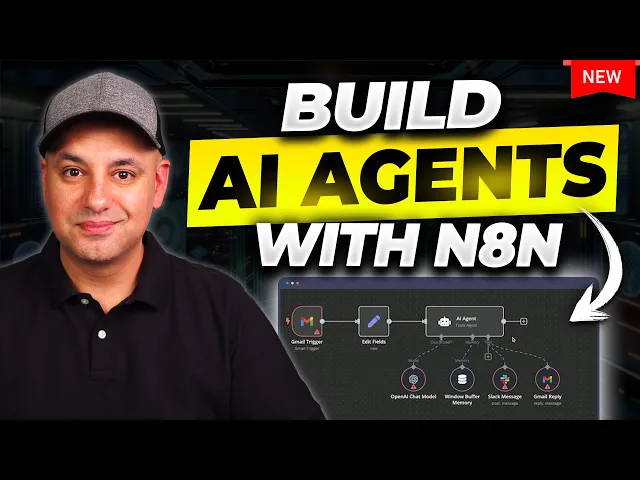
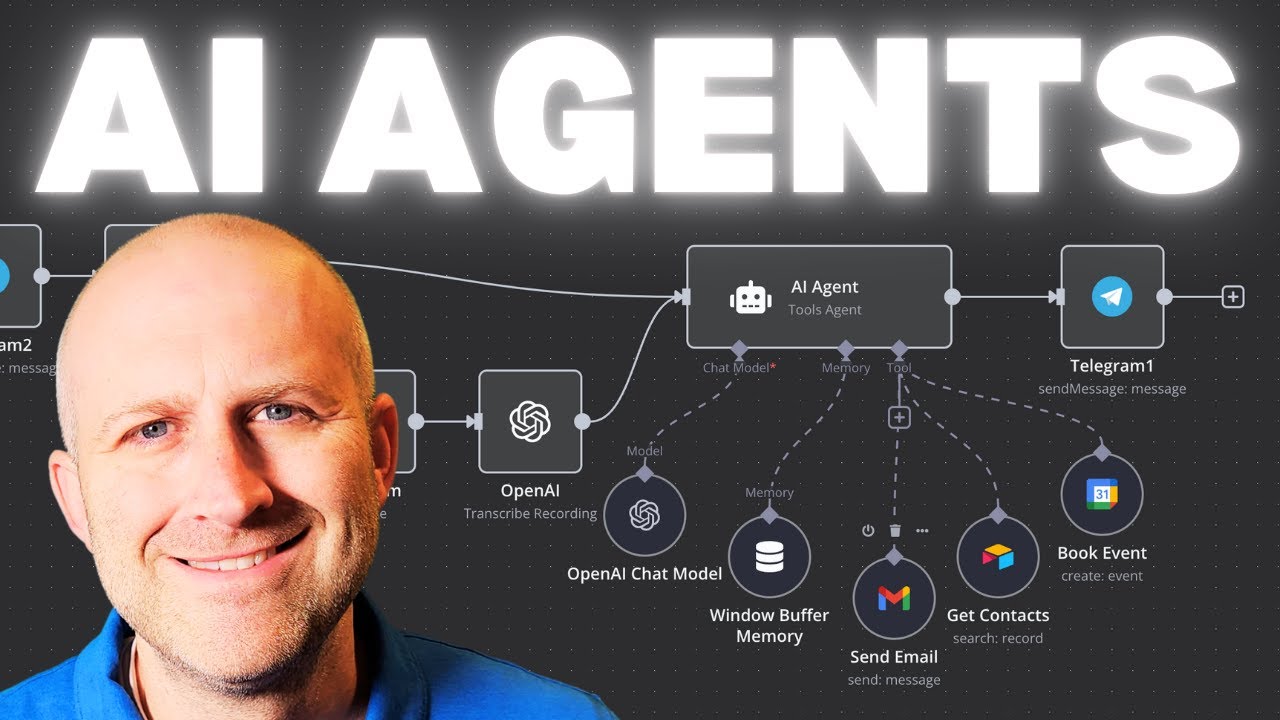
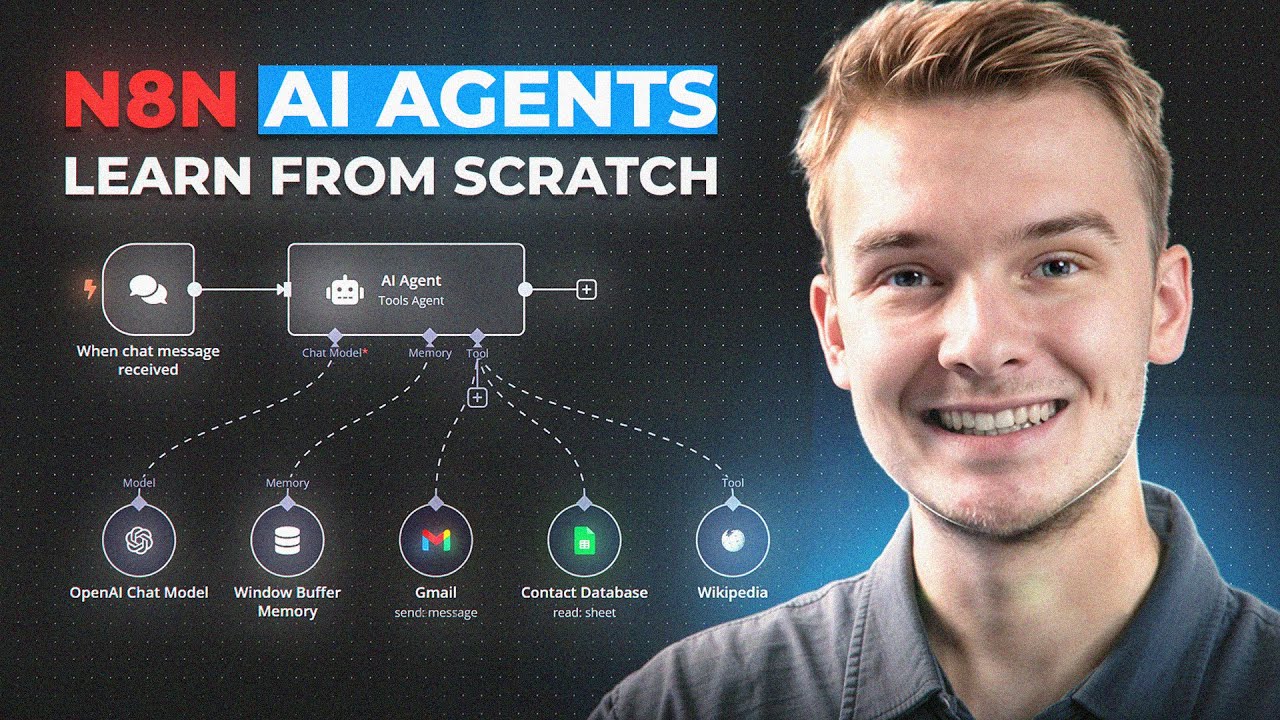
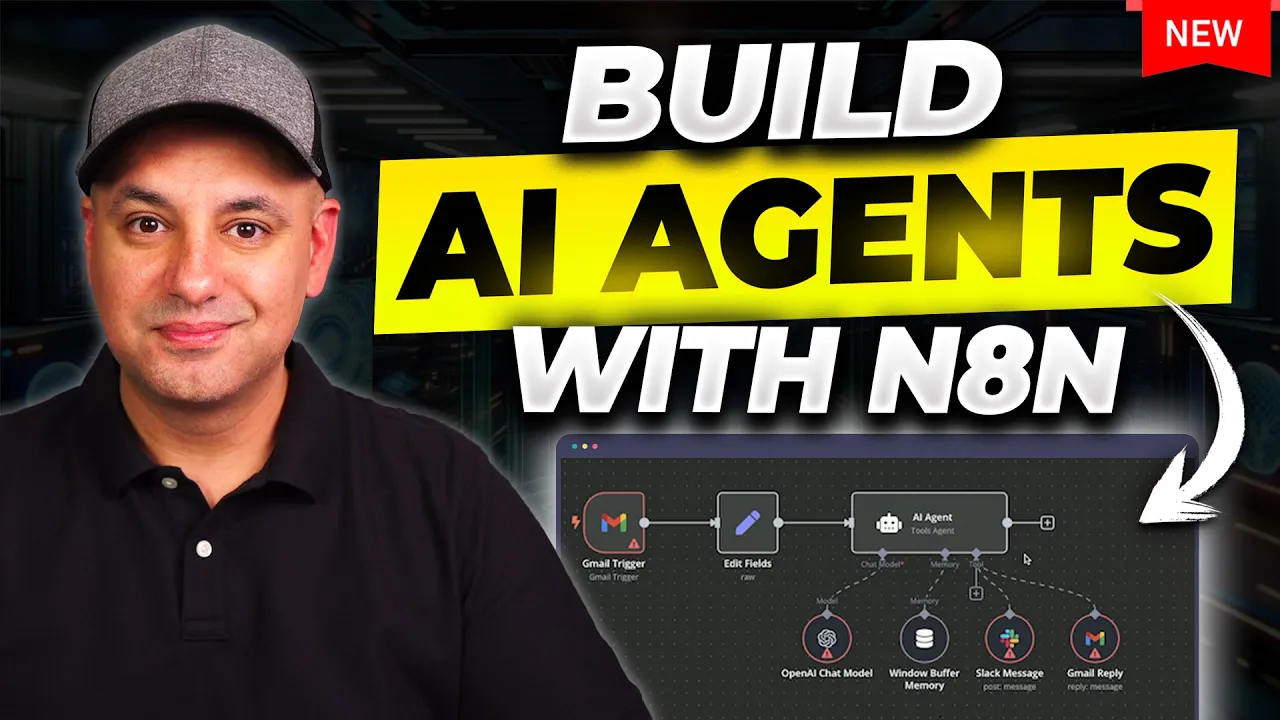
in this video I want to show you exactly how to create AI agents that could automate tasks for you we're going to use a platform called n8n this is going completely viral right now because it's going to give you some options you've never had before with other platforms and I'm going to go very step by step there's no coding skill required to follow along with me and by the end of the video you'll have a real clear idea how to build AI agents to automate your tasks okay so the platform is called n8n and one of the big reasons why it's going viral and is so popular is because it's open source you could actually download it and run it privately on your computer and this is a AI native workflow automation tool so you may have used other competitors to this there's zapier there's make. com but this one actually takes it to a whole new level it's really designed to be AI native first and just to give you some idea of what kind of workflows you could automate with this platform they have this page that I'll show you once we set up our account here this is going to give you ton of different examples over a thousand different work workflows that the community makes here and they make it available a lot of them are free some of them are paid here but for example if you wanted to automate things in sales you could click here and then you could see all kinds of different Automation and exactly what each one does so when you click on each one you'll see if it's free to use and you'll be able to add it to your account and you will have all these different steps already laid out for you and there's ton of different options like things in marketing with support with design finance a lot of ways that people are using AI but now you could create these agents to actually take care of tasks automatically for you okay so what we're going to build in this video is an AI agent that's going to do exactly this task right here it's going to fetch emails from Gmail we could have a dedicated Gmail email address for support for example then it's going to kicking the AI agent and the AI agent is going to send that message to open AI so this is going to use version of chat GPT here and that is going to have its own custom instructions to know how to deal with different messages then it's going to actually be able to reply to that message and create a draft for us so we'll have a draft sitting in Gmail rather than just automatically sending it out this will be much safer because you could then tweak it or just verify before you press send and then it's going to analyze the message and if the message requires an instant urgent answer it's going to ping someone in our slack Channel and the slack message will say hey reply to this because it's urgent the ones that this automat atically replies to will sit in draft you can automatically send it too so I prefer to have it sit on draft mode and manually do it right now just to make sure this automation is working exactly like I want now you have three different options for using n8n so let me just walk you through those and then we'll go ahead and build our agent here but the first one is just the n8n website I'll put all these links in the description below too so this is going to be an option that is hosted by this platform and and this this is not a local install so you have to pay for this monthly and the pricing starts at $20 a month this is very similar to zapier and make. com and it kind of has a similar monthly pricing too but they do charge you a little bit differently on the workflow and how they count workflows the second option is you could self-host it and I'll link this document below This is highly technical though so because this is open source you could technically download it and use it on your own computer using your own hardware and if you're more technical this is one way to go about it as well self-hosting on your computer now the third way you could do this is by using a VPS or virtual private server now this has the benefit of a local install but it's a whole lot less technical but you still get the privacy because it's again private and you get the security of a local install too now I specifically partner with hostinger for this video because they have the easiest way and a native way to install n8n in these virtual private server in just a few clicks so I'll show you that in a second and once you end up setting this up this way this is what my hostinger hosted version of it looks like and this is what the n8n website looks like so you could see it's pretty much the exact same thing one of them you're hosting yourself privately and the other benefit is actually based on price because that hosting your option starts around $6 a month instead of paying $20 a month so you're saving 70% on doing that now if you use a PPS or if you install locally the only difference is the authentication when you're tying into other apps so if you tie into Gmail it's going to give you a step-by-step guide on how to do that it's a little bit different than the one and8 and hosts on their website so I'll link this page in the description below this video this is the hosting plan that I actually chose here the second one and if you're doing this long term they do have a two-year option or you could choose one month or onee option over here obviously the longer the duration the better savings you're going to get here just check out through this process and hosting here also gave me an additional coupon code so it will add to this discount that you get over here so if you type in skill right here and press apply you'll get an additional 10% discount I'll go ahead and Link hostinger in the description below this video as well as this discount code right here that you could apply during the check out process so you could host n8n on a virtual private server and once you log into your hosting air accounts VPS this is right here I'm going to just go ahead and create a new one I have one running right now you're going to click this first one right on top now it's going to choose a server location near you here and then right over here we're going to choose application and they have ton of different applications but we're going to look for n8n which is this one right here so we're going to select that now we need to create a root password because we need to log into this once we set it up on our private server now once you set it up you'll see all the resources you have access to over here and then if you press manage app it will take you to this page it'll probably show you the login screen here where you do have to type in your username and password to log in but then you get started here in the very first page of n8n and you could go ahead and start from scratch and then you'll press the plus sign here to build your first AI agent which I'll show you step by step and the link to the hosting air VPS option is in the description below if you want to take this route if you want to do this manually and install it locally there is a link to that document as well now for the rest of the video I'll just use the regular n8n webs side here okay this is the workflow we're going to create here from scratch and I also want to just show you another type of a workflow this is a little bit more complex so I'm not going to cover it in this video this is going to require much more in-depth knowledge about using n8n but this one uses these things called AI agents that could access other tools so this AI agent has for example access to open AI has access to this memory has access to slack and Gmail I'm going to for this video make it more linear once so let me go back to this one this is the one we're going to go ahead and create that kind of goes through it in a linear stepbystep order kind of achieves the same thing but the AI agents I'll probably cover in upcoming videos that fit inside of a workflow this is just an AI agent here that will do these things those other type of AI agents fit inside of an AI agent workflow so you got have multiple agents in the same workflow okay so to start a workflow all you have to do is press the plus sign up here and choose workflow and you could choose different projects you could create different projects for yourself and in this case I'm just going to put this inside of my personal project here okay here we're going to go ahead and build one from scratch so typically that's the very first step is you just create your workflow from here and put it inside of a project if you press these three dots over here you could also download a project and share that file with someone else and then they could import that file here so if you click this and you have a project someone else gives to you you could import it that way I'll end up sharing this too in the description below this video once I build it out but it's important to understand how you gets created kind of from scratch that's why I want to do this step by step so we're going to press right here in the plus sign and it's going to give you an option to start your workflow they're always called triggers in these type of automation tools something has to trigger the sequence of events here now I'm going to go ahead and search here in the search bar for Gmail because receiving an email into an inbox is going to be the reason why this agent starts going to work so I'm going to go ahead and choose Gmail here and right here the trigger says on message received but there's ton of other things with all these apps that you could do so for example every time you get a message every time a message deleted every time a message is Mark as red you could create labels you could create drafts pretty much anything you could do inside of the Gmail app with the Gmail website you could do with these type of automations in this case my first trigger and you already knew that right out top message is received that's going to start my automation here now this page is going to require you to connect to whatever app that is starting your automation so in this case Gmail is starting my automation so I have to press this pencil icon here to make that connection to my Google accounts so if you're using the version on the n8n website you could use this signing with Google and sign in that way if you're self-hosting it you will have to follow along they usually give you a set of instructions on how to do it if you're using a self-hosted version to authenticate because if you're self-hosting the authentication process takes a few more steps that you'll see here on the right side okay so I connected my account here just off screen I give it the permission here that I needed to so it's all set I could close this right here so on this page really that's all you have to do is make sure it's connected to whatever email you want to pull in and it works pretty much with any email provider if you're making this kind of an agent everything else I'm going to leave the same I'm going to say fetch this step okay and here's the email I just sent myself a test email here so I could show you all the information so this step is working so I could actually click on top right here this empty area and you could see I got a check mark over here if there's any kind of connection issues kind of get a error message or error icon over here that you'll have to fix and they do always have this ask and assistant option down here so if you do get stuck this is actually kind of helpful it will try to find the problem and solve it for you or tell you how to solve it so that is an option you have here on their website now we're going to actually have to use some AI here because we're going to need to read that message here with our agent so I'm going to press the plus sign here and we're going to look for open Ai and this is the open AI one we want just says open AI right on top and there's ton of different options with open AI you could do a whole lot of different types of automations like as you get used to it this is just my initial introduction to these so I'll keep it kind of simple but all we want to for this one is message a model so that's what I'm going to choose but you could also message an assistant you could build out an assistant right here create an assistant ton of different options generate audio this has access to things like dolly for generating images analyzing images I'm going to message a model over here and then we're going to get this box over here the first thing we need to do is press the plus sign and we need to give it API access to open AI API that is going to charge you that portion regardless of how you set this up even if this is privately installed because we need to pay open AI to use a version of chat GPT here for us to get some results I also got a popup here that gave me some free open aai credits here so if you get that popup right here if you're using their website gives you a little bit just to get started but I highly recommend you actually click over here and create a new credential and type in your API key over here okay to get an API key the open AI API key you go to platform.
open. com click on dashboard right over here and over here you'll see API key on the left side and this is going to show you any API key you've set up and you want to create a secret key from here this is 100% independent from the chat GPT website so if you're paying for chat GPT that is not going to get you an API key you have to set that up on the platform website I'm going to go ahead and create a new key from here give it a name over here and create a key now you're only going to see this one time so copy it and store it somewhere safe and I'll just just go and paste it over here and save okay I got the check mark here if you have any issues you do have to tie in a credit card under the billing section in open AI in order to be able to use that API here then you have models it says from a list of models over here and depending on your account you may have ton of different models available or you may just have a couple to choose from it depends on how often you use that and which of these has been unlocked so chat GPT you have 4. 5 let's see if I have access to 4.
5 so I have access to 4.