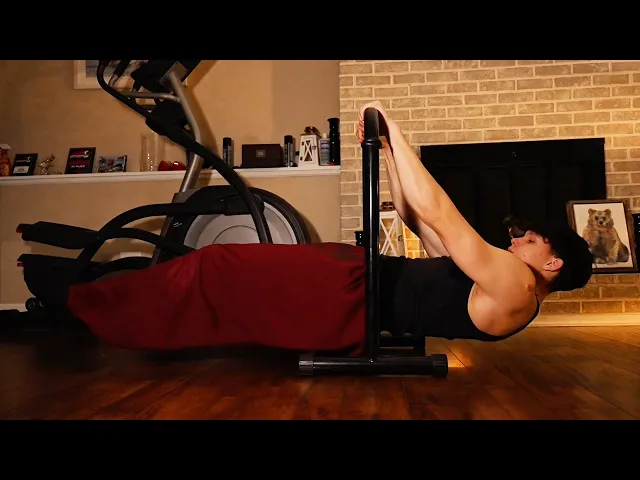
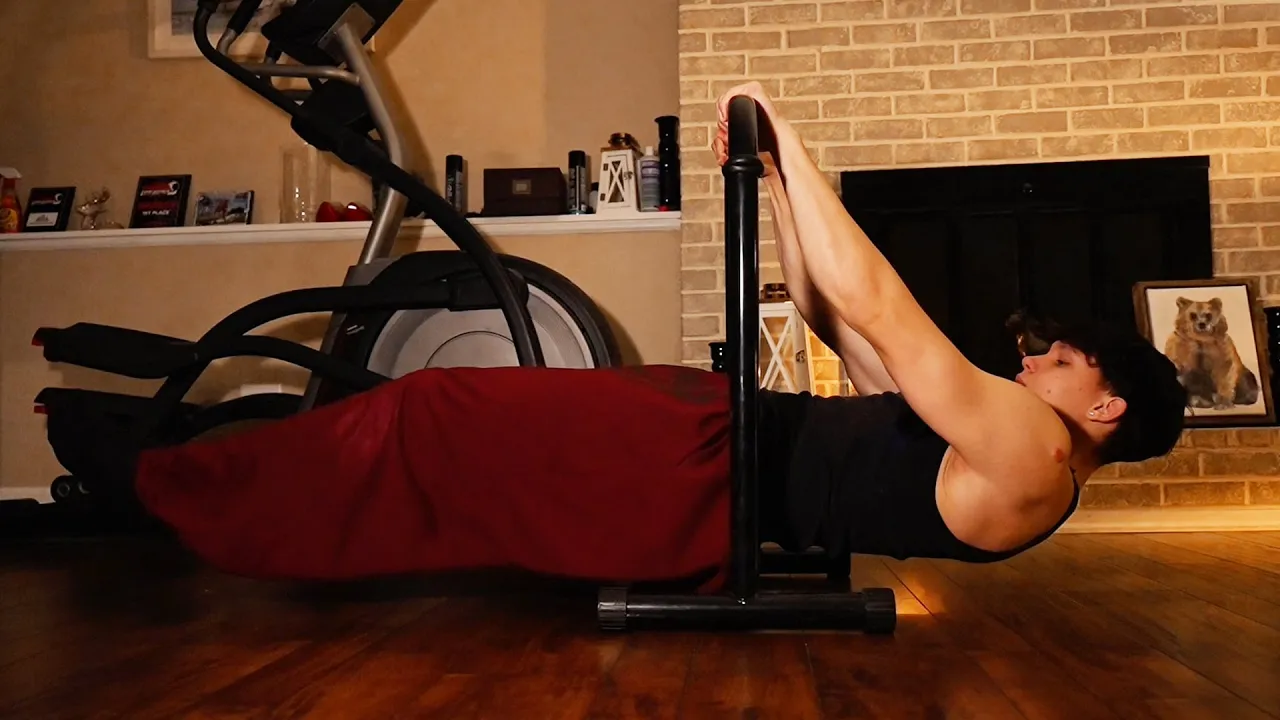
The front lever is another staple movement in calisthenics, showcasing pulling strength in an unconventional position. It is the gateway to many even more advanced skills like the front lever row, touch, one- arm front lever, and many others. In this video, we're going to cover everything that you'll ever need to know to unlock and master the front lever.
Before you ever even think of starting to learn the front lever, it is highly recommended that you have a prerequisite of 15 clean, strict body weight pull-ups. The front lever is purely a pulling strength skill. So, it's important that you have a strong base when it comes to your pull-ups.
Some very common misconceptions I see with this skill is this obsession with core. The front lever is purely a demonstration of pulling strength. The core is never the reason as to why you can't hold this skill.
Okay? If you cannot hold the front lever, it means that you are weak at pulling. So, just to further emphasize how important pulling strength is in the front lever, if you take someone who can pull 80% of their body weight, additionally in a weighted pull-up of a one rep max, they can most likely front lever their first try ever.
Sure, the form might be a little bit sloppy, but they'll be holding it. And with a few weeks of hyperspecific training, they will have a super clean front lever hold for 10 seconds or more. This goes to show how important having a strong foundation of pull-ups is before you even think of starting the skill.
Another misconception I see with this skill is the hyperfixation when it comes to retraction. When we're fully retracted, our lats are disengaged. When we're fully protracted, our lats are super engaged.
If you protract really hard and you put your hand on your lat, you'll actually feel it, right? You'll feel it activate if you're in a fully protracted position. So, you're probably wondering, well, in the front lever, if it's a pulling based skill, we know that our lats are the largest muscle of our back.
And so, the lats are going to be the primary movers in this skill. So, why is there a hyperfixation on being in a fully retracted position when in a protracted position, our lats are fully engaged? So, our goal with the front lever is to maintain a neutral shoulder position as well as a depressed shoulder position.
Okay? We don't want to overexaggerate retraction and we also don't want to overexaggerate protraction. A front lever is defined as a straight arm pulling skill.
Right? This is all a front lever is is your your scapula is in a neutral depressed position. Your arms are locked and you're exerting a force downward on the bar or whatever you're holding.
Right? That's what a front lever is. So if you're bending your arms when you're doing this skill, you are not doing a front lever.
Okay? Your arms must be locked whenever you're performing this skill. I also want to talk about the pelvis position in this skill.
When you're holding the front lever, it's important to note that your pelvis is in a posterior pelvic tilt position. We want to avoid anterior pelvic tilt because this is going to not only lead to more pressure being put on the lower back, but it's also going to make your front lever look really, really ugly. I often see this cue being thrown around of trying to bend the bar.
But this is wrong, okay? because this is going to put your shoulder in a more externally rotated position. When naturally the shoulder is going to internally rotate to hold the position longer.
When you do your front lever sets, don't think of trying to bend the bar. Just think of trying to rip the bar out of the ceiling or wherever it's anchored into the ground. Okay?
So, for example, I have my bar here. So, whenever I'm holding my front lever, I'm thinking of trying to take this bar and slamming it to the ground. Okay?
We're trying to take this bar, rip it out, and slam it into the ground. That's a really good mental cue for you guys to engage your lats. A little tip for you guys before you do your front lever sets, you can do a isometric hold where you take a bar or some object, right?
You can put your hands on a table and just exert a force downward like this and you'll feel your lats really engage. And you can just hold this for 10 seconds before you do your sets to get the engagement down and get the mental cues in place before you actually do your real training sets. I want to reiterate that the front lever is not a core strength exercise, okay?
It is purely a pulling strength skill. Often times you'll see people say, "Bro, you have such a strong core. " Whenever you whenever people see like full PLCHes or full front levers, in reality, what they should be saying is strong scapula, bro.
Okay? Because the hardest part of these skills is maintaining the proper shoulder position. And the primary movers in this case being the lats is going to be in charge of that.
Okay? It's very important in the front lever, too, to keep your glutes engaged. So, think of trying to squeeze your butt cheeks together and push your butt up.
Also, toes pointed is important. Engage the calves. Just make sure you're maintaining tension throughout your whole body when performing this skill.
So, I'm going to show you guys an example of really bad front lever form. And if your front lever looks like this, please stop doing this immediately. Okay?
So, with bad form, you often see the arms bent and you often see the hips sagging. So, it looks something like this. That's horrible.
And you're probably wondering, well, my hips are sagging, so you know, my core is weak. No. What your body is trying to do is it's trying to reduce the length of itself so that you have enough strength to hold it.
The more piked your body is, the shorter your lever is and so the less force your lats need to exert to hold the skill. So the issue is not your core, it's just that you're weak in pulling. So to fix this, simply regress to a progression that you can hold with good form.
After you build up enough volume with a previous progression, you can then retest the progression that you were originally struggling with. And so with proper front lever form, you'll notice that everything is in line and that the shoulders are not sinking. They're staying in a neutral and depressed position.
So good form would look something like this. So with the good form, we see that the arms were locked and everything was in line from the feet to the head. Everything was in a straight line.
There was no piking at the hip. And there's no magic to this. This was simply a strength issue.
However, if you can hold the front lever straight and your arms are bent, that means you've developed a bad habit. And to fix this bad habit, you have to force your body to lock the arms. And so if you go to try to lock your arms and you can't hold the full front lever anymore, that means that you don't have the sufficient strength in the straight arm position to actually hold the skill.
So what you should do then is regress to something like straddle or halflay and really work on building that habit of having locked out arms. Also, it's important that you record your front lever sets from the side so you can really see what you're doing right and what you're doing wrong. This is going to be the most important part of the video.
So, make sure you guys are paying attention. Often times when I see people training for skills like the front lever or PLCH, there's a common mistake and it's focusing too much on the static portions of the skill. When it comes to the front lever, it's very, very important that you are implementing presses or raises as well as negatives into your training.
And you're probably wondering, well, how about rows or front lever pull-ups? Well, they're not necessarily needed to learn the full front lever. But if your goal is to do something like the front lever touch or full front lever rows, then I highly recommend starting to do advanced tuck front lever rows the moment you're starting to get your first real front lever holds.
But if you're still trying to learn the front lever and you don't have your clean holds yet, then presses and negatives are going to be your best friend. Using presses and negatives, we can build strength in a larger range of motion. Also, we can put our foot in the door to the next progression that we're trying to unlock.
So, for example, if I'm stuck on the straddle front lever and I can hold it clean for, let's say, 5 seconds, but anytime I go to do the full front lever, I instantly fall. Negatives in the full front lever would be a great way to bridge the gap and expose our body to the full front lever. When you do your negatives and you're fully inverted, you want to make sure that you're focusing on lowering yourself as slowly as possible, maintain the same speed throughout the whole negative.
Presses are also a great tool we can use to build strength in a larger range of motion. Something I want to say about presses. If you're doing presses from a, let's say you're hanging from a pull-up bar and you're doing a press up to the middle and you're going back down and you're not holding that middle position, that static position, it's a waste.
Do not do presses where you're only working on the bottom half range of motion. Our goal is to either do presses throughout the full range of motion or do a press from the dead hang position and stop in the middle for a 1 second before going back down. Because if you're doing presses where you just are hanging from the bar and you momentum yourself up and you're not focused on trying to pause yourself, it's useless.
So to summarize, using dynamic movements will allow us to build strength, add variety to our training and allow us to get our foot in the door to the next progression. In terms of progressions for the front lever, I recommend that everyone start at tuck, but try to progress to advanced tuck as fast as possible. Advanced tuck is going to be the most crucial progression, okay?
Do not rush past it. Make sure your advanced tuck is really, really clean. Make sure your shoulders aren't sagging.
Make sure your hips aren't sagging. Really nail this progression down and you'll have a very easy time moving on to the next progression. After advanced tuck, I often see people go to the one leg progression.
Avoid this entirely. One leg is horrible, especially if you do it like this. A proper one leg is an advanced tuck, but one leg is fully extended out.
This is allowed. But if your one leg is a tuck front lever with one leg out, this is the same difficulty as a tuck front lever. Many people do this progression and they think they're making so much progress or they're so close to the front lever when in reality it's just giving them a false sense of progression.
The next best progression after advanced tuck in my opinion is going to be the straddle front lever. So to bridge the gap between advanced tuck and the straddle front lever, we can do one of two things. We can either focus on building a large amount of volume in advanced tuck, pairing that with some sort of dynamic movement like straddle front lever negatives, or we can use bands to actually work on the straddle front lever.
So for bands, you can actually scale the difficulty really well. So, with proper band placement, it's going to be around your lower back area, right below where your hands are. And that's usually going to be around the lower back, right around where your underwear band would be.
And you can scale the difficulty or you can scale the resistance of how much the resistance band is helping you by how over you throw the band. Right? So, if I throw the band over really hard and I grab it, this is going to provide a lot of resistance versus if I just put the band just on the top of the bar and hold it, this would provide me the least amount of resistance.
But I don't recommend throwing it far over because it's going to give you a lot of resistance. So, for proper band usage, put the band around your hand like this. Grab the bar with your hands and then enter the front lever or whatever progression you're working on.
[snorts] It's important to note with bands that this is the only setup you should be using. They should not be around the lower half of your butt. The band should be strictly positioned under where your hands are.
Wherever your hands are holding on to the bar is where your center of mass is going to be. And that's where we want the bands to help us at. If we put the bands at our feet, it's going to give us too much help and it's going to change the strength profile of the skill entirely.
Also important to note that you should not be using a false grip if you're trying to learn the front lever. The false grip is going to shorten your arm. And if your arm is shorter, it means that you're in a more disadvantageous position when it comes to holding the front lever, making it harder.
The false grip should only be used if you're training things like the front lever touch or the front lever rows. Then it makes sense. But if you're only working on static holds and presses or negatives, you should not be using a false grip because it's going to make it harder.
After you can comfortably do the straddle front lever, you can move on to the halfway front lever. This is the last progression before the full front lever. And you can use the exact same concepts we've talked about to bridge the gap between straddle front lever to halfway front lever, just like you did with advanced tuck front lever to straddle front lever.
You're probably asking yourself, "Well, how do I know if I'm ready for the next progression? " The truth is, even if you have a 10-second clean hold with something like the advanced tuck, you're not going to be able to hold the straddle front lever if you're not exposing yourself to it to some degree. So, whenever you already can hold the progression you're at for around 6 to 8 seconds clean form, you can start working on the next progression.
Whether that be banded work, attempts, dynamics, you can start exposing yourself to the next progression while continuing to build more volume at the progression that you're currently at. Bad form is important. Don't always try to have clean form.
Now, there's a key distinction between bad form with intent and bad form because you don't understand what you're doing. If you have the intention of bad form, it means you're pushing the intensity really high, right? you're trying to go to the next progression.
You're trying to overload your body and make it adapt. This is where bad form is okay. Whenever you're doing your attempts of the next progression, you can expect form to break down.
But if you're holding a progression for 8 seconds and your form is bad, that means that you're just choosing to do the skill incorrectly. So, make sure to utilize bad form, especially when it comes to your highintensity attempts. You should think of it this way.
Whenever you're doing something that's really really hard, expect form to break down. That's okay. You should not stop the set prematurely just because you lost shoulder positioning a little bit.
But when you then regress to the progression that you're currently comfortable with, that's when you can reinforce good habits, good form. So volume versus intensity, right? They have an inverse relationship.
So you cannot have high amounts of volume and high amounts of intensity. Okay? You're going to be overtraining yourself.
you're not going to make progress. At the same time, you can have low amounts of volume and low amounts of intensity consistently because you're going to be undertraining. So, if you're doing super high intensity work, you better have low volume.
For example, and this is where you can use your intuition and autoregulate session to session. So, let's say you're starting your front lever trainings with attempts of the next progression. For this example, let's assume that I can currently hold an advanced tuck for 8 seconds and I'm trying to bridge the gap to the straddle front lever.
I'll start my trainings with maybe, let's say, sets of straddle front lever attempts and I will do those attempts until I start to feel as if the quality of the sets is getting really, really bad. Then I'll regress to advanced tuck front lever and focus on good form, building more volume because this is a progression that isn't as intense for me, which means I can do more of it. The goal with static skills is to do as much work as possible without burning yourself out.
Everyone has different capacities, and there's not one approach that's going to fit everybody. If you're training the skill seven times a week, well, your intraession training is going to look much different compared to someone who's training the skill only two to three times a week. And I just want to recap this tutorial by saying that all of you can achieve the front lever.
If you're putting the front lever on a pedestal, whether you think it's too hard or you're you're too tall, you're too heavy, I want you guys to remove that way of thinking from your mind completely. Okay? The front lever can be achieved by anyone.
In fact, any skill in calisthenics can be achieved by anyone. You just have to be willing to put in the work, stay consistent, take it on the chin when you do have bad training days, and just keep going. All of the information that you'll ever need to learn the skill we have just covered.
So, reference this video whenever you need, rewatch it, and make sure that you're not trying to rush the process because strength skills like the front lever take time. Don't look for the shortest route. Don't look for any shortcuts because from my experience, the more you look for a shortcut, the longer that path tends to be.
I hope this front lever tutorial was helpful for you guys. And if you have any detailed questions, then I highly recommend joining my Discord server. I'm super active in there.
There's a lot of other highlevel calisnic athletes in there who will be more than willing to help you guys out. If you guys want to join, the link is going to be in the description below.