welcome back and welcome to Lesson Four aduino Fast Track lessons this one is the control over ethernet using the wisnet um and or the ENC 26 uh j60 modules both of these modules can be used in an Arduino Uno the wiset is typically one that is on a shield the ENC 26 j60 is typically one that is uh smaller and connected with flying wires either with the ribbon cable or just a bunch of loose wires connecting to it um the libraries for both of these now is um pretty much 100% compatible with each other so
that aside from changing the library name your code should not have to change the initial video that we're about to do will only focus on the wiset um and the general functionality of the code the uh ENC module I will follow up um with a separate video just to show how you can introduce that library and not have to do uh any more than basic changes to the library that you include into the sketch um I want to focus mostly on describing the code in this particular video and we'll be using the wizet for the
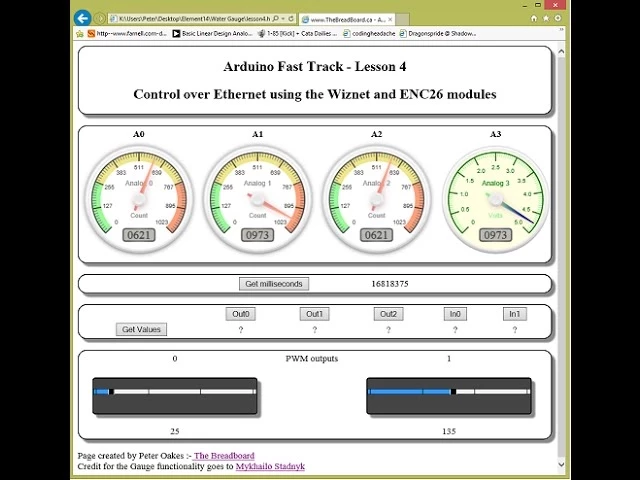
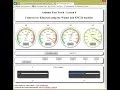
connectivity for all of this as well so if you haven't already watched the previous lessons please go and do so because if you don't I'm assuming that you're already knowledgeable about certain things and I do not want to have to go back over on this one and I'm not going to uh and I don't want to lose you off so if you haven't watched it please go and watch them and then come back to this one um this what you're seeing on the screen right now is the web test console that I put together to
help with this tutorial um you can download the HTM page directly from the blog entry and you can edit it change it whatever you like after the video has you know and after you've done the tutorial but please don't do it unless you're sure of what you're doing um before you finish with the tutorial because it's been set up right now to work with uh the way that the code is going to be put together and we'll be coming back to this screen because there is a small configuration thing that you have to do with
it which you can just do with notepad or something and I'll show you how to do that in a little while so the code um Lesson Four right um let me just start from the very beginning and we'll work down and I'll highlight the changes that have been done uh we have an additional Define use ethernet this allows us to turn on and off the ethernet as required um I'm not sure if I've call everything so far but we've already discussed about using the debug um where you can turn on and off sections of code
and use ethernet um once we're done will allow us to turn off um the ethernet functionality completely as well to recover space um we've added two more libraries now from what we had before the spi. and the E.H spy umh is the one that talks to the physical um spy bus needed to communicate with the ethernet wisnet card that's going to be plugged in and ethernet is the specific library for talking to the U wisnet card it relies on spy being there what we've also added in now is another Define for the buffer for the
ethernet serial Communications uh we've got the serial buffer size which we've already used in the previous video so you'll know what that's for because we now have a different Channel coming in and we don't want to have the issue of them both writing to the same one uh because it depends on how quickly things come in um we've set up another buffer of 50 bytes for the ethernet you can normally have way way more than this but the way that we're going to work uh this this lesson is um to actually use a technique where
we don't send in big messages all right um and we don't return big messages either um we limit the amount of data going to and fro to make the whole system more responsive um other parameters we've already seen I've added two more uh I've rearranged the delimiter slightly here because um some of them you can't actually send over ethernet they get escaped into different things like a space for instance um won't actually delimit properly through the ethernet also um one of the common delimit is for ethernet um when you use a g query on HTTP
is the Ampersand and the question mark so I've added those in to help uh as you can see I've changed up the um defines for the pins to make them more sensible for what we're using uh you know as we go through and we get more and more advanced on these videos we'll put more and more uh sensible things into these that are getting away from um beginner terminology so we have the first three out puts and they're on pin 2 three and five um the inputs correspond to n0o and in1 they're actually on pin
seven and eight um the Spy pins you've re reiterated them here I already talked about those i2c pins um there are two of them and SDA these are you're talking to's Liquid Crystal displays add d2a converters and other things um for this particular lesson not using them but I've already excluded them just so I don't have to worry about it later this basically reduces us down to only having two pulsewidth modulation channels one is on pin six and one is on pin nine um the next section that's been added is a standard um block of
definitions that the ethernet cards will use uh we Define a MAC address which is the media Access Control layer address this is used by the local Network only it doesn't go over the Internet specifically for communications and it has to be unique on your network otherwise uh other devices will get confused as to where they need to send traffic to um the tcpi port is resolved down to a MAC address um once the communications is running the next thing is the IP address um this needs to obviously be unique on your network um the one
I've got here is just unique on my internal Network at the moment uh you will have to probably change this to something else um typically 192.168.0 do something or1 do something um depending on the router and the DCP you have set up at home I'm not going to try and tell you how these all need to be set up if you don't understand what these settings are then talk to somebody either in your household if you're a um youngster uh and your dad looks after the um Network for you then ask him what you need
to set these to or whoever it may be that looks after it for you the typical Port that um a web server works on because we're going to be setting up a kind of web server in this case is Port 80 so this here is starting off the or initializing the server class for the ethernet server and it's telling it to use port 80 here we're also initializing a client this is often done inside the functional code further down but because I want to be able to share this client with other parts of the code
I've moved the actual variable into the global area for now to keep things simpler as we did with the serial Port we're also defining a character buffer set to the ethernet buffer size which if you remember just above was set to 50 bytes uh this is the serial buffer stuff that you had seen before and we also now have a new um int for the uh ethernet index all right so the serial index you already know we count through we keep track of where we are with the buffer the ethernet index is the same thing
but for the ethernet buffer uh enums and all this stuff we've already talked about in lesson three um we have changed things up a little bit um not in the messages they're exactly the same as they were but in the um commands and things that we had before so I've removed some of the digital um command indexes I've removed the pwm and some of the analog ones and I've added um get Ms if you remember when we talked about the web page we have the ability to get the milliseconds from the Arduino um digital all
JS n what this is is a command that says to the uino give me all the Dig Port which is the D out zero out1 out2 and in zero and in1 um even though a port is set as up as an output you can actually still read its state um JSO N is a format it's um you'll see a little bit later on um what it looks like but it's a very very uh compact way of sending data back to a client when asked for if you use something like XM M it is very verbose
and takes a long lot longer to transmit it um so Jason is a great thing for small devices and mobile devices to use for communicating um so coming down here we've most of these we've already covered off again reduced the um and deleted the ones that are no longer applicable um we've added the new ones like analog old Json we also have a digital old Json for um which we were talking about just a moment ago and the get millisecs these are the actual strings that have to come over the internet to work um now
one of the other weird ones you see here right now is this one here which is get um when you use the serial Port we were doing uh and in lesson three we were doing things like web five analog 2 digital zero and things um when you use a browser to communicate with um a server over the Internet what happens is is it it uses a query string typically that's what we're using you don't have to but we're using query strings and in the beginning of every query string which gets sent to the port on
the server um is the word get all right so this is seen as the first parameter so we have it in here so that we understand we're getting a get command from the internet and we can um take appropriate action so if you sent something for the analoges it would actually be get and then analog all Json if you would try trying to adjust a pwm it will be get pwm1 and then the value after it that you were sending so we'll do a little bit of a tweak with the um debug messages later so
that you can see what happens when uh these commands come in and see what they look like but for now um just take my word for it that that's what it does um coming down here now um the all the command table obviously adjusted the the same as the rest and we've covered how we do this in lesson three as well um same old same old we've already covered this so in find command we already know how that works in setup we've added the um initialization for the ethernet port you see they're wrapped around with
these um compiler directives so if we turn it off we just have to change one statement and all the ethernet will disappear slight modification to the ini ization of the um inputs and outputs to reflect the changes in our pin assignments uh no changes to this and in the loop statement you'll see that the U the basic one here for serial is still there um and there's an extra command been added to the do command and when you're using this from the main loop it's hardcoded to just send an empty string in um you'll see
see later on why this is done um there may be a better way of doing it but I'm trying to keep it simple right now um and I the additional piece of code in the main Loop um is the check for the ethernet you can see we got a check serial method which we've already talked about we have another method now which is almost identical for checking the ethernet and if this returns true then we will call do command this is exactly the same do command it doesn't matter whether it's the Ethernet or whether it
is the serial Port that got the data um the only difference is which buffer you're passing in okay and then the client. stop is um stopping the listener of the ethernet port once we processed any commands so we don't waste time uh normally this is inside but because we're doing things in other functions it's been moved into this main Loop and that's the only change in the main Loop here at all that we've done so that's pretty good that we keep this simple this nothing in this code so far that is blocking at all there's
no delays or anything like that um in the do command uh what we've done here now you see this extra parameter that we've added in so you've already seen this one with command buffer the character point of Pam is a second parameter that um will handle the situation where if we've got something from the ethernet remember I said it has the get command um at the very first parameter well that really is irrelevant to us we want the second um parameter and the third parameter which is the actual value parameter if any um to be
used so what I'm using with this now is a technique called recursion where the do command function which is still basically the same as it was before um we'll actually call itself with the uh modified command as they come through so I'll describe that as we go through but let's just go down the first part of the code here so we had do command uh the command parameter and the parameter as as described in the lesson three I've added another one called parameter 2 so that we can capture the additional variable that's going to come
in from a web Channel um I've also changed the initialization of analog value from0 to minus one it just made things simple a little bit later on um mainly for T toggling digital values because if you send in the digital command with nothing this was defaulting to zero before and therefore was turning the output off with a minus one if you just send a digital zero command it will actually toggle the output and I'm just making use of that on the web page to keep things simple as well um command Strat talk is the same
as it was before with the parameter Strat talk is the same as it was before um we've added an additional one here parameter 2 the way this works is still exactly the same as the previous ones and we talked about that in lesson three um we're just picking up the third parameter using the delimiters and we're assigning that to a third variable now what I'm doing here is this next piece where it says if the character at address of parameter so this is address of and then the first space is equal to to a empty
string character which is the zero to say it's a Terminator um that means we didn't get anything in the parameter variable all right so that's either because we didn't pass one in or it's because we're doing some kind of recursion and we've come back again um where there is none in the command like the main line because it's already been passed out because it's gone through these three once already and now it's going back in on its self um the second part of this check is if there's no parameter and the Pam which is the
one we passed in here okay um right now it's always we've all we've seen is it being hardcoded to sl0 so we're saying if the parameter the main parameter is zero but we've passed in a secondary parameter in on the main function call because it's saying it's not zero then whatever we passed in make it the main parameter that's all this really does is just saying if a parameter came in on the main function call and we didn't pull one out of the main uh buffer then just assign it okay uh I moved the debug
statements up here a little bit just for convenience so that we were printing them out before we process them because of the way recursion works and we're calling the ourselves a little bit further down this code um if this was at the bottom you would actually see the printing in the reverse order that things were happening so moving it up here it means it prints before you call itself which means that your output is in the correct order um this is exactly the same uh the find command is exactly the same and you can see
these things here are identical as well as far as they how they are functionally working it's still a case statement it behaves exactly the same as it did in lesson three um we've added the get statement and this is the only place right now where the recursion is occurring so what happens is is if it sees the get statement as a command you see here we're calling it self again only this time around we're taking the parameter which was actually the second um variable that was on on the command buffer and we're making it now
the first variable and we're taking parameter 2 which is the one that came in which we derived earlier and we're actually making that the second variable passed into the function call so if you go back up to the top this do command parameter parameter 2 ends up being um the command buffer which now only has parameter and parameter is actually being assigned to parameter 2 which was the one that was p pulled out in this statement here this allows us to recall ourselves and effectively we're shifting all the parameters across one um so then the
second time through say we said um get analog old Json the second time through here we're going to have analog Json as the command this time and then it's going to call the function get analog Json and then it's going to pass in client um now if you remember up above client is actually the ethernet client that we initialized earlier so now we're passing in a pointer to it the reason for this is um we need to be able to Output these strings back to the client and I don't want to have massive big buffers
to build up any content so by passing a pointer into this function um we can have the function itself do the writing back out to the caller which is in this case the web page um later on we'll probably expand this to take the client and flag to say whether we're talking to the serial port or whether we're talking to the ethernet and have a bit more decision logic right now we're keeping it simple um so we're just passing in the ethernet client so that we can talk back to the browser um the get milliseconds
is the same thing we're passing in the client um analoges is the same as before um get all digital get all Json sorry digital all Json is is one of the other functions where it is called through the recursive nature so the first time through it's going to get the get um that's going to recall itself and now it's going to pick up on get all Json and it's going to call this function that will send out the Ser the ethernet port the um digital IO of the Arduino digital 01234 works exactly the same as
before for uh they don't actually return anything to the ethernet port they will print out diagnostic information to the serial Port though because that code is still in there from before um but when you send things out the ethernet you don't have to have responses so if you're just saying turn a light on you don't have to say come back and say that it's done it uh and in the case of our uh console right now the digital port indicators uh are not automatically updated they can be easily updated by adding a single line to
the browser code uh and you can see that when we look at it later on um but for now uh for the sake of the tutorial we've left it where you have to hit the uh get values button pwm 0 and one are also instances where with the uh ethernet it's going to hit the g first it's going to do the command again and then the second time through it's going to hit these in fact anything that comes from the ethernet that tries to talk to all of the these it's going to do the recursion
which is the basically calling itself um so you can see we've added these extra commands but structurally and functionally it behaves exactly the same as it did in lesson three so check serial U none of this has changed it's exactly the same as it was before now what you're going to find here that is going to be really really interesting is that this code here is check ethernet and if you look at this you'll see that aside from the few commands at the very very beginning which is basically um seeing if there's a connection so
so has a browser connected to the ethernet port um do we have a client set up uh is the client connected and is there any data available on the ethernet port and if there is so while the client is connected and while there's data available um we're going to start doing this middle Loop and if you look at this um this bit of code from here to here I literally um cut and pasted from sorry copied and pasted from the serial buffer code and just pasted it in here and the only changes I made to
it was changing the name of the buffer to reflect the ethernet buffer instead of the serial Port buffer but that's it it actually behaves in exactly the same way so you know it is possible that I could actually abstract this code and put it into a separate function and Shrink this one and the serial Port one down even further for now I'm not going to do that though because um I don't want to make things too complicated in too quicker steps um and that's the end of the ethernet so really that's all there is for
talking to the ethernet pole is the initializations you've already seen up above and then this one function called check ethernet outside of that everything else is working just as regular set of functions the do command is completely it doesn't you know it's it's agnostic to whether the data came from the ethernet port the serial Port um by that I mean it doesn't care all right it doesn't care where it came from so going down here uh we've got some small functions just to help offload the complexities of the main Loops so we have the get
all digital Json which is designed to return um an HTML response to the caller which is you know obviously our web page we have the analog version and the the main difference here is that the function code 200 um just outputs the basic Header information required for an HTTP response and then the uh Json digital response outputs the bit that is specifically Json formatted um code where it's going to read the digital ports format it into the right string and and return it to the caller the analog does exactly the same thing and the code
200 is the same for both which is why I separated it out to a function um this is the get milliseconds uh function and as you can see um it too just says send the Header information and here because it's so simple I've just wrapped it up um in here it's not worth creating a sub function for doing the main Loop where the um ethernet client that should be CL sorry minor mistake there C it actually will be exactly the same because the client is the global variable where I'm keeping uh references to it but
um it's actually CL here so to keep the code correct it should be using CL um so it's sending out a squiggly brace and then a quote value close quote colon and then quote and then the millisecond which is the actual you know the binary Val uh sorry the numerical value of how many milliseconds the board's been up and running for and it closes the quote closes the squiggly bracket the SL end sends the new line character which is the OA back to the um caller as well you could do a print Ln as well
and it would append this on the end but I prefer to keep this simple and actually have control of this um visibly so that you know what you're sending in and out and you don't you know it's easy to forget that the print line is there and it can mess you up sometimes so is numeric is the same as it was before so I'm not going to bother talking about that uh free Ram exactly the same as it was before so now we have the Set pwm uh we were using this in the serial sorry
in lesson three and this has not changed one little bit it still does exactly the same as it did before um get analog does exactly the same as it did before get set digital um it does exactly the same as it does as as it used to do and if you remember I said the I had changed the uh value initialization up the top to a minus one and what happens here now is when it comes in because it wasn't an analog sorry because you didn't pass in a zero or a one uh or or
any parameter into the um digital call um it'll be initialized to a minus one and here we'll just use that and we're automatically seeing the minus one and we're just inverting whatever the pin is if it was high it make it low if it's low makes it high now this also handles the digital input ports not just the output ports and what happens is when you write a high to a port that's been initialized as an input it actually turns on the uh pull-up resistors that are built into the microcontroller when you set it low
it will actually turn them back off again so if you're reading switches you don't have to have an external pull-up resistor for those switches um you just connect this the switch between the input pin and ground and you just turn on the pullup resistor and that's enough so you can actually keep your bilding materials down a little bit um as you can see this doesn't send any data to the client I'm not passing in the client here so it's not talking back to send any kind of acknowledgement at the moment um it still does though
send out the serial port to say what it's done all right so that's the same as it was doing with lesson three process web command is exactly the same as it was for um this is a new one now that we've added which is the Json digital response so this is reading all of the digital ports and formatting a response now this is exactly the same as what we had um for the get milliseconds except that it's been extended to Encompass more than one parameter so we still got the starting squiggly brace and then uh
Json formatting is basically name value pairs so it's digital zero as text and then um the actual value that it read from the digital port digital one the out output the value read Digital two the value digital three four um Etc right and then it closes off the same way and puts a um new line character at the end of the response string so it know it's all it's all done um the analog response is exactly the same as the digital response where it starts with a squilly brace it reads the um puts the name
reads the analog port and adds the the value to the end of that one repeats it for analog one analog 2 and analog three now I haven't put these into program memory space yet um I I will do that again as we go through future lessons um because you know we got plenty of ram space right now so I'm not worrying about it for the moment and and I wanted you to be able to see what we're actually outputting easily without trying to run around all the different bits of code so most of these ones
that are outputting to the ethernet port they all start off by writing code 200 um 200 HTTP 200 response code is the accepted Response Code that indicates that everything behaved correctly so um if you actually look at the data go going back to the browser you'll see it literally will have this these strings at the beginning of it HTTP 1.1 200 okay content type text XML uh sorry HTML and then connection closed connection close actually tells the browser in this case that once it's got all the data close the connection to the um server that
you're talking to and this is a mandatory requirement that it would do this and the reason we're doing this is because um the wizet can only handle four connections so if you want to have two browsers talking to this or something else like that or the ability for other things if you've got the browser sitting there or the connections being held nothing else is going to be able to connect to it easily and the current level of the ethernet code even though the chip is capable of handling up to four connections the code itself from
what I understand can't so the time you spend holding the connection open the better all right the 404 is when you get an error message um right now this is not being output to anything um it's here just for completeness and we will be using it when we start using the SD card and things in the later tutorial um so that's really it for this code as you can see we haven't added a huge amount and what we have added I've kept contained within individual functions so this you know it's it's just formatting a string
um formatting a string which is for the digital and sending it out um processing web you're not calling from the browser so there's not even though this seems to now be a very long program um it's still broken up into small manageable chunks that you can look within its own right like even the cze ethernet which is the biggest addition to this particular lesson has not got massive amounts of um code in here and 90% of it works exactly the same as the serial port code did so if we compile this now um let's just
run it on the compile here you see how much how bigger it is um it's now uh 17.5k now the minute you bring in the ethernet library that brings in a lot of code that has to deal with using tcpip Stacks UDP DHCP a whole bunch of functionality that comes in that we're not necessarily using right now so you know if I quickly open lesson um 3 B um which is our let's just save that yes so if you open lesson 3B and compile this all right you'll see that this is going to be what
7.9 so 8K okay now we open lesson full and we compiled this one and we're sitting at I think it was 17K so we've gone from 8K to 17 1 12K so we've added almost 10,000 lines of code and as I said most of this is Library so if I upload this to the um Uno board now and yes I do have this running on an UNO um some of the community uh actually had some problems with a uh piece of code where they were reading from an ultrasonic transducer and things like that and um
they were running out of ram but they hadn't done any of the optimization techniques that I've been describing in these videos and so the only easy way to get it up and running at the time and to validate the code was to put it onto an 18 Mega 2560 which has uh 256k of Ram uh sorry of flash space and about 8K of ram so there was no way it was going to fail for that so we were to get the code running but right now even with this we actually have more code here uh
and a lot more functionality and yet we have way less um Ram being you know flash Ram being used and way less U actual Ram being used so if this is now running it's uploaded to the board so if I actually open the serial monitor now and have a look um you'll see there it is it's going to introduce its little hello thing and now what it's doing is remember we had the debugging the web page I've still got up and loaded um off to the side screen here so what you're seeing is the debug
print that's happening if I just stop this for a second so this is the initial command that comes in it's broken out into its individual parameters um I'll show you before the end of the video what it looks like um in its raw state but there's the get command I put pipes in the uh printing just so we can Del limit between the different commands it's got the get command as the first parameter analog all Json as the second parameter um the no cach equals is something that um the web page is actually sending in
to prevent the web page from caching the old pages so it's you know it's a technique that you can use for more advanced work where you know a browser sorry a server might be caching pages and giving you stale data by making the query string you unque every single time it prevents it from doing that anyway this is the first one where it comes in and as you can see it's got 989 bytes of ram still so we're just below 1K now we can improve that a little bit by moving some of those strings into
the flash Ram but remember we've added a whole ethernet buffer uh ethernet Library we've added um an extra 50 by buffer um so we're still not doing bad you know that's 989 bytes of ram free for this um so this is the first call through remember I said we did recursion so this is recalling get uh sorry do command and remember I said that the the parameters get shifted slightly so here's the analog Json all right so the first time through it gets the get which has got that call to itself again to do command
this is the second time through now where the um analog all JSO n is now the first parameter and then no cach has moved across along with with it no cach is irrelevant and there's nothing that's going to respond to that but I'm just showing you what's happening here with this and it's doing the analog reads and it's just every second it's doing another read you can see the ram is not being chewed up all right if I put it back on auto scroll again a second it's not using more and more and more RAM
so everything is behaving very very nicely now what I'm going to do is I'm going to hit the get milliseconds button on the browser if I bring this into view a second um right here so you can see it going to hit this and see it's updated because I just uploaded so I reseted the counters I can hit it again you see it's changing value every time and if I hit the get values button all right if I turn on a couple of these lights all right see now it's reflected the changes I just sent
out now if we quickly bring this out of the way and stop this if I go back to where this was all going on all right here's the first digital all where I click sorry where's the get millisecond one there here here's the initial one that asked for the millisecond so there's the get and there's the second parameter of the get milliseconds all right now it did the recursion and recalled itself so now the get milliseconds becomes the actual command and now it can do what it needed to do all right and now a little
bit later down here we did the same thing but we hit the get the digital button and we here's the get and then with the recursion it did the digital old JSO n and did its bit of work there right um and the parameters just shifted across with it as well um and then I hit that a few times so there's another instance of it here this is the one where I actually sent the command uh remember what I said if you get a minus one on the digital it's just going to flip-flop the bit
um so here we're saying get digital zero um that's going to hit the get statement it's going to recall do command and then moving the parameters across to the left so there it is becoming now the main command in this case we're still writing status so it's saying digital 2 was Zero okay um here's the one for digital three um this is the PIN number by the way that's on these ones anyway there's digital one and there's digital 2 which is actually pin five and it's saying there were zero in that now they're not going
to be zero of course um and now it just B went back and started resuming doing all of the analog read which again is happening every second so that's scrolling all the way down there all right so let me just um stop this running for a moment let me just close this uh serial Port we go down to the um check ethernet all right right in here there's a um every character that gets in right here's the character by for client. read if I actually put in here a serial. read uh sorry do write and
the character buffer what this will do is every time a character is read from the ethernet port it's just going to Echo it out of the serial Port now hopefully it'll do this all together without other things getting in the way um but we'll see let's just upload this to the um the board that's busy compiling and uploading okay I just turned off the um printing at the top of the do command section just because it was cluttering the screen up and it was difficult to see what was happening so if I just PA pause
this now what you can actually see here this is the actual it's just one line of it this is exactly what is being sent out from the code on the web page um to the Arduino so it's sending the Gap remember we talked about that and then it's a space and then a slash analog Json uh analog old Json and then an append no cach equals blah blah blah finishing with an http/1.1 this is the complete minimal amount that you would have to send um from a page to be able to get any data from
it properly formatting everything else so you can see this is the first command which is a get the command we're really really interested in is this one here all right so that's why we have the m the m to and the slash as the limiters because the first talk is going to split on this the next one's going to split on this and therefore we've got this one if I actually um allow this to continue and I hit a command like um changing a pwm value all right let's just stop that a second okay so
here you can see that I've done a get and then it's got the/ pwm 0 and then a comma 135 so here's the we don't want this parameter but it's the first one here's the main command that we're already interested in um which you've seen in in the recursion and then the next one that we're interested in is the 135 so there's a comma in there and then we got the 135 um the comma may not be the correct parameter I probably should have a question mark in there or something like that to be correct
and I could change that on the browser and it wouldn't make any difference it would just continue to work because the question mark is also one of the um parameters that's allowed or I could even just put another slash in there it would still work okay okay um anyway you can see here though that you know now that we've added an extra command with a slider you can see the different values 120 125 1335 as I slid it from the left to the right um they're being sent out and talking to the Arduino um to
get the data all right um because I was sliding it quickly some of this was showing up quicker than the serial pole could deal with it and then it went back to the standard analog reads again right now if I run this and I actually do the same call um like analog old Json but do it from an actual BR like as a main browser uh so it's um 192.168.1.2 4 7 right I just did that without any parameters there and you can see it sent the get and it sent the HTTP but it didn't
have any parameters in there this is what would typically be sent from a uh page if you didn't say anything um now what we want to do is to add to this is the analog old Json which is the actual command so I'll add that to the browser query and run that now if we just quickly all right so here's what happened when the browser did it versus the code that's running as a script on the browser it did the get here which is get analog Json HTTP 1.1 but it also did this this is
one of those weird things where there's nothing I've got in there that does this but the browser is asking for fave icon which is really it puts it into the URL line in the top left hand corner if it finds it it'll just show the nice little icon which of course it's not one of my commands so it it doesn't know what to do with it so it just prints this debug message saying it doesn't understand it and then the the other page goes on and continues printing now what I will show you is what
you know I just basically executed the command from the browser if I come here and show you this is the actual string that resulted from the from the command see there's the command that we sent and here's the string that came back so you actually don't need to use this nice pretty page that I built um you know this this one here that's still sitting there ticking away um when each every time these things it every time this Texs and asks for a page um sorry asks for a data from the analog pole it's what
it's actually getting back is just this with a little bit of the Header information which was on the HTTP 200 but what it cares about is this bit here and that's what it's taking and then it's stripping it apart into its individual name value Pairs and putting them onto the gauges to adjust their values all right and the gauges are doing this bit of work here so let's take that off um so yeah that that easily now shows you what actually happens when this thing's running um the only difference is the scripting of the web
page is doing it in the background anyway that's the end of this lesson um it's feels like it went pretty quickly but I'm sure once I check to see how long this video is it probably wasn't um the next lesson is going to be building upon this one we're going to start using the SD card um right now for this lesson the uh this web page as you can see is coming straight off one of my hard drives on the local computer um in the lesson five when we start using the SD card um this
web page is actually going to be delivered by the Arduino as well we're going to put these pages and we're going to put a nice pretty 404 page and a few other things actually on the SD card with Graphics uh and everything and then it'll be completely self- serving so you just go to the page you ask for you know and it can it will return this to you in the browser and then it'll start working away reading all the analoges and everything else I mean everything else will be working the same way we're not
going to change what the page does or how it behaves we're just going to change where it gets served from so a lot of people have been asking how to use SD cards and how we can use them for doing a web server and a lot of people have struggled with it um so what I intend to do is now I've shown you how you can communicate with the board using uh tcpi using the ethernet adapter and everything else lesson five is going to say okay we got all this nice stuff working but now let's
pile a bunch of pages onto the Arduino board uh on the SD card and let it have a lot more things okay different pages could be connecting to different arduinos as well you can put them on all of them and you know if you got a few of them within ethernet port on uh they can have different address you just have a primary one that has all the pages and then it communicat case with the other ones just to start doing the functionality just like this one anyway I hope you like this um please provide
comments feedback etc etc to The Forum and um what I'll be doing is um I'm not going to go through all the code again on the next video but just one more video for this lesson before it's complete will be to use the ENC card right the ENC 26 j60 modules um this one through the whole of this used the wizet and what I want want to show to you with the next video is that uh now the code is good enough in the ENC it'll take up more RAM because it doesn't have the same
level of Hardware abstraction of the TCP and um stuff like that kind of functionality that's in the wisnet chip um but you can get the ENC boards up and running quite easily um the difference is what is you'll be able if you're using a wiznet board you'll be able to get a lot more functionality coded into it uh into the Arduino because of the fact that um some of the functionalities offloaded to the card for dealing with the networking ENC is um it's a ethernet level device it's not doing anything on board for tcpip or
um UDP or any of those other things all is getting done in software which means the library ends up being a lot bigger but you'll see that in the next video all right anyway I hope you enjoyed it I hope you can make use of this I hope you can understand it um and uh stay tuned for the next one