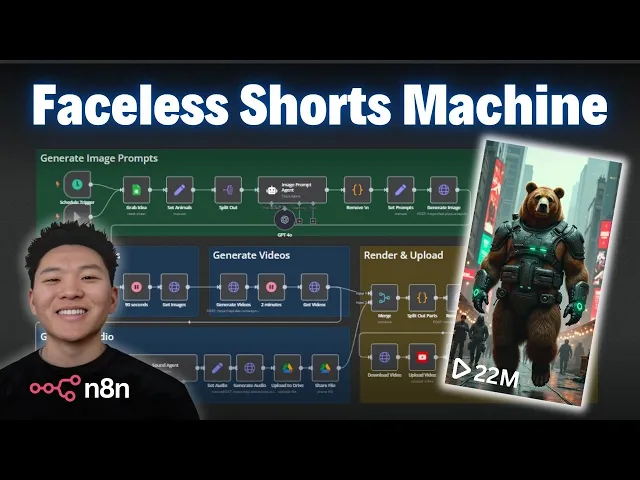
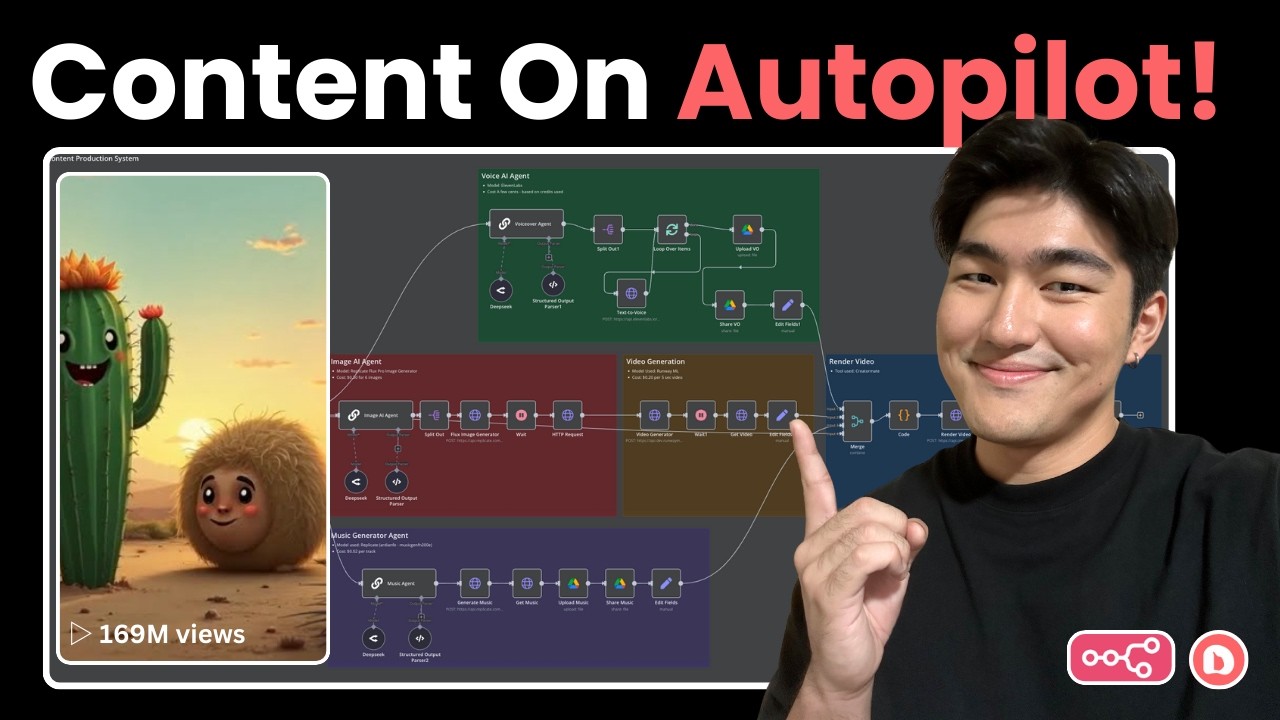
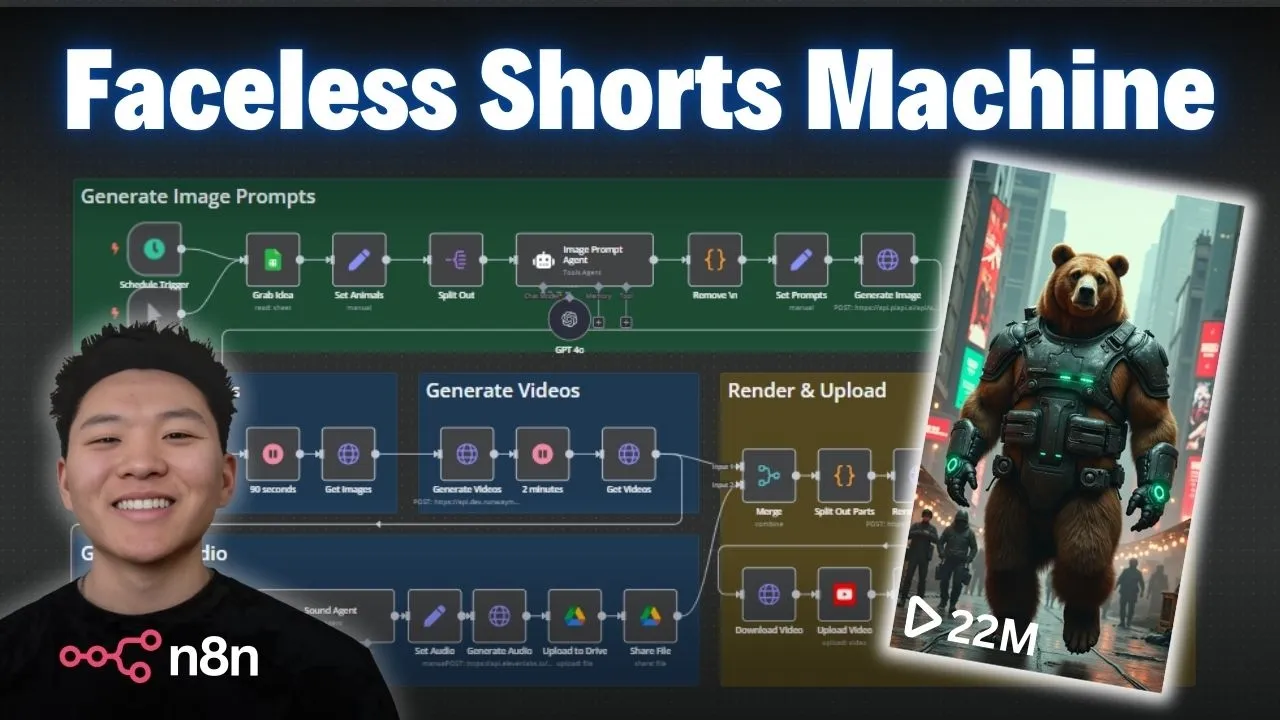
today I'm really excited to share this end workflow that I built with you guys that's going to help you generate and publish faceless AI shorts on autopilot once you have this thing up and running you can generate as many shorts as you want per day so you're basically going to be able to grow a YouTube channel while you sleep and the best part about it is I'm giving all of the resources that you need to get this thing set up away for free so all you have to do is join my free school community and
all the resources will be in there so let's not waste any time hop straight into a demo and then we'll break down each node and see what's going on cool so this is what the workf looks like um and before we actually hit test workflow let's look at this Google sheet real quick that has all of our ideas that triggers the workflow so I'm going to hop into it this is what it looks like as you can see we've already created four different videos that we'll we'll look at in a sec and you can see
that the video status on them are created the published status is processed and the video link is the final video link is right here as well and in order for you to plug in this workflow and hit run you need to have your sheet set up just like this so you'll also be able to grab this template and then everything will be mapped correctly for you but anyways when we go back into ended end and we hit run we're going to be pulling in this row right here which is going to be futuristic cyber Punk
Rebels and it's going to be tiger bear rhino pig it's going to know to grab this row because we have the video status set to to do now that we're back in Ed end let's hit test workflow it should be pulling in that last row we just looked at and it's feeding in those four animals and the style into this image prompt agent the only reason I'm using an agent here is because I wanted to be able to plug in different chat models and test out different image prompt generation and so right now we're going
with 40 but now it's clean cleaning up th those prompts getting rid of any new lines and punctuation just because we want to make sure that they're able to feed into our API call here where we're doing a text to image API and then we have to wait about a minute 90 seconds in order for the images to be generated then we're going to grab them and then we're going to feed those images into a image to video generator and then we're going to wait for 2 minutes and then we're going to grab those videos
and I'll explain the rest of the process okay so those images just finished up as you can see we pull them back into Ed end and then we feed them into this next node that converts the images to videos not really converts but makes videos out of them so now we're going to wait for those to finish up and while we're waiting I thought it would be a great opportunity to hop back into here and take a look at some of these finished products so this one is Viking conquer animals cool so now let's also
look at Cowboy Wild [Music] West all right so that's you you get a feel for it right um if you noticed each video has a different audio so we have this sound agent down here kind of looking at the style and then creating a sound prompt that we're going to send over to 11 labs to generate that audio so I wanted to switch back into the workflow because I had a feeling that we're approaching that 2-minute Mark and I wanted to to just show you guys live the process of getting videos and then sending it
down and we'll see how the merge works and everything over here okay so that just finished up and now we're downloading the videos back in Ed end and we're sending it off this way to create that audio as you can see right now 11 Labs is what we're using to create that you know sound effect audio whatever you want to call it and then what we're going to do is upload that to drive we're going to share it within our Google Drive and then we're going to merge back and actually do the full render and
upload so it's being uploaded now it's going to get shared and then we're going to come over here we're going to split it out to Parts we're going to make our request to a service called creat a mate to actually render that template and then we're going to wait for 25 seconds it doesn't usually take that long but always just want to make sure and then we'll pass it over download the video upload the video to YouTube and the rest is history there we go just finished up download upload and then we're going to upload
update our sheet and then we're going to get an email notification so let's go ahead and pop over to the Google sheet right here we can see it just got updated to created processed and a final video link so let's click into this [Applause] I think that one's my favorite that one's that one's kind of crazy we didn't look at the Egyptian warriors so we can click into this one real quick too okay so that one had some weird sound effects but first thing I want to point out is these first three we used an
image to video generator called cling and for these second two we're using one called Runway so you've got a little bit of flexibility here as you can see right now we're using Runway but I also included the API calls down here and you would basically just plug and play these three instead of these three and then you would use this code node right here if you use cling instead of this current code node so you've got some flexibility here you can try out some different things the only only reason I switched away from clling is
because we were accessing clling through an API and we were just running into issues with rate limiting because their service was receiving so many requests and cing takes like 6 minutes to download or render and Runway is much much quicker so I went with this one but if you notice the difference in the video quality there that's why and here we are in email you can see that we got a new short process futuristic cyberpunk and then I can click on this link right here it's going to pull up my YouTube unlisted and we can
see all these shorts that we have um we could also click in here to validate that it is a short so that's exactly what we just saw and we have the caption filled out as well as the title so let's hop back into the actual workflow here and break it down so I know this seems like kind of a complicated workflow it may look like there's a ton going on but it's not too bad um but if you're looking for more Hands-On step-by-step approach then you should definitely check out my paid Community the link for
that's down in the description as you can see I already uploaded this as a step-by-step tutorial and then I also did another version of this template sort of a V1 where I did straight text to video generation rather than using using images first and in my paid Community I also did a step-by-step of this tutorial as well but like I said you can still access all this content for free if you join my free school Community click on YouTube resources click on the post associated with this video and then you'll have the Json file right
here to download and import into your own nadn all right but let's get into the actual breakdown of this build so right now we have two triggers we have a manual one because I was able to just hit test workflow or we have a schedule trigger and you could set this to go off at you know three times every day at these three times or whatever you want we can use a schedule trigger so it can really grow this channel while we're sleeping so the first thing that we're doing of course is we're hitting our
Google sheet with our content ideas and we're grabbing back one row and so we do this by saying okay we're going to look at we're going to filter through the column video status and the value has to equal to do so back in our template we have the column called video status and if it equals to do then we pull in this row but right now since none of them equal to do if we hit run nothing would come back and we also want to make sure that we're only returning the first matching row because
ideally you'll have like 20 or 30 ideas ready to go but you only want to do one at a time so that's going to make sure we only pull out one and then we're going to get the row information like the title the animals and then the style all that kind of stuff from there what we're doing is we're just going to turn that those four animals into a list and so we do this by setting a field called Animals we change the data type over here from string to an array and then in here
we're basically just dragging in animal 1 animal 2 animal 3 we're putting that Within in square brackets and we're putting quotation marks around each animal and on the right you can see it comes through as a tiger a bear a rhino and a pig and this way no matter what four animals you have in your sheet they're always going to be populated into this array and then the last thing I did was set the style which is just dragging in the style from the sheet over to the middle that way the output is very clean
we have the four animals that we want image prompts created on as well as the style for all four then what we wanted to do is split out the list that we just created of our animals so we could have four separate items because then we can feed in four items into the agent and the agent will split out four different prompts so that's the idea here and all we have to do is say hey which array do we want to split out which list are you're trying to split out and we just Dragged In
animals and now you can see it's always going to be looking for a field called animals and then it's going to create basically four items from that list so now we have our four animals all separated and they're ready to go into the image prompt agent within this agent once again the only reason I'm using one is to be able to play around with different chat models rather than having to do different requests so that's the only reason I'm using agent obviously there's no tool calls going on here but we have our user message and
our system message so the user message just think of this like an actual you know your chat bar with chat gbt something you type something different every time but the system prompt is behind the hood you know open AI has prompted chbt in a certain way so that's the difference here but the user message is going to be different for each run so there's four items coming in there's four items coming out if we click into here we can see that we're giving the agent the animal as well as the style and on the right
we can see the four different runs so the first time it's getting a tiger second time it's getting a bear third time it's getting a rhino and fourth time it's getting a pig cool so now if we go into our system message we can see that we're basically telling the agent how to act so we give it an overview which is that you are a master prompt generator specialized in crafting detailed highquality prompts for advanced image models like flux which is actually the one that we're going to use your task is to generate Vivid well
structured prompts that accurately depict an animal dressed in a specific Style with a matching background that complements the theme so we're going to get a really really solid image prompt here we gave it some instructions like clearly describe the animal's appearance specify the output and accessories that reflect the given style include details about the background that reinforce the style use Rich descriptive language avoid generic terms and never output quotation marks or new lines because as I said earlier that would break our Json body request then we gave it an example input and output so we
said an animal Fox style cyberpunk and then a good image prompt and then finally this is something very important that I had to figure out when I was testing all prompts must be familyfriendly no sensitive words should be used no references to weapons even toy guns no references of showdowns or violent offense so if you remember we saw an example of a wild west one of the prompts was a dog that was holding a gun and um the video prompt generator didn't like that or sorry the video generator didn't like that so that's why I
put that in there a great example of reactive prompting I wouldn't have done that beforehand so now we're getting four items in and we're getting four high quality prompts back so we have a majestic tiger an imposing brown bear a robust Rhino and a muscular pig I love that so we have our four prompts right now you can see there's no quotation marks or new lines but what we have here is a code check just to make sure that there's no new lines I actually didn't work in the quotation mark thing getting rid of quotation
marks here as you can see I'm only replacing new lines but so far so good um that would be an easy fix using something like Claude 3.7 but as you can see we didn't get any new lines but um if we did we have to clean those up and when I was playing around with Gemini flash 2.0 I was getting new lines so that's why I put that in there and then finally I'm just setting prompts in a field called prompts just so if we want to reference them later we know exactly where they're coming
from and just to clean things up so right now with 40 I don't think that these two steps are necessary but sometimes just good to have some extra um you know guard rails in there and I like to set Fields frequently I also like to save items frequently so if you're building this out step by step save your workflow after every node because you'll learn the hard way anyways we're ready now to move into this blue section down here which is going to be our generating images and so as I touched on earlier for some
of them I used our cling API which you can find down here we're actually hitting cling which is a model for video generation through a service called Pi API which I'll show off in a sec because we use Pi API to hit the Lux model as well but I have a code note here that if you do decide to test out with cling you will put the code node there instead of this one and same thing for these three nodes you'll just swap out these three nodes so if you want to experiment go ahead but
anyways when it comes to generating images let me click into this node what we're doing here is we're accessing an API called Pi API in order to hit the flux image generation model so this is pi API leverage our AI apis for your AI application developments it's kind of like a router the same way open router lets you connect to different chat models this lets you connect to different image generation and different models as you can see right here mid Journey all this kind of stuff so once you get in here you'll make an account
and you'll be able to get your API key from down here in the bottom you'll create your key and then what we're going to be looking at is first of all image models so we have mid Journey or flux and in flux what we do is if we click on run API we can see here is the information of how to actually get this configured okay so what we see first of all is we have an endpoint and honestly all the endpoints for pi API are the same where you specify the model and the action
is going to be down here so down here you can see in our body request the model is going to be required and we'll fill in that with flux and then for task type we'll put in text image so anyways we have our endpoint so that's going to be a post to this endpoint so copy that in and we have that figure filled out the next thing that we see is we have a required field which is our API key so this is going to go in the header and I'm going to show you guys
a really cool trick that you can do when you have stuff like header parameters or query parameters that are authentication so what I did in here is rather than sending it over as a header right here where I would type like x- api-key and then i' put my key right here rather than doing that I want to make sure that I can save my credential every single time so that's why I have this Pi API header here you're going to go to authorization generic credential type you're going to go to header off and then you
you can see I have a ton of other ones set up but when you create new credential all you have to do is type in the x- API key right here and then put your actual API key right here and then you can save this and name it whatever you want so that later if you ever building another workflow and you want to you know use Pi API you already have this Sav so like you know I have Twitter tavali Runway perplexity 11 labs and now I have all of these always saved and then if
we go back to the documentation we have to send over different body parameters so the first thing you want to think about is which ones are required so we need a model we need a task type and then we need an input um and that's all that's required so I basically just copied this example from over here and I pasted that down here and then we can configure it so the only thing I really changed was the width and the height cuz we want the aspect ratio to be you know the vertical 9 by6 for
YouTube shorts and then I drug in the actual prompt so I was just able to grab this from the previous node because we had just set our prompts and they're all cleaned up at this point and once again this is going to run four different times so the first run is for the tiger second run is for the bear Third Run is for the Rhino and the fourth run is for the muscular pig cool so what happens after we send this request to Pi it basically comes back with four items so one for each of
the prompts and says okay here here's the prompt and here's the status of your picture so right now they're all pending because they're pending and we know that if we came into P API we're in the flux playground and we're looking at our task history we can see that each run is taking about 30 seconds and we can also see that each run is costing about two cents a little less so it's going to be what about six total cents for you to run this every time just for the image generation we'll get into the
other cost later but about 6 cents here for each run for your text to image generation and um we can see these will be like processing for 30 seconds or so and so that's why over here what we did was wait for 90 seconds just to be safe after we wait for a minute and a half we will do another request and it's going to be to the exact same endpoint so you can just copy the endpoint from the previous node put it over here and then instead of a post we're going to be doing
a get and we're referencing the IDS that are coming from the left hand side so we're just dragging in task ID and putting it at the end of the endpoint as long as we put a slash after the task and there's no space between the Slash and the ID and so the reason this works is because you can see here every single image has a task ID associated with so this one was the tiger and if we open up the image URL we can see it was the picture of the tiger this next one is
a different task ID and this one was the brown bear so we can open this one up as well if I can copy this correctly and we can see that this is a different unique image so that's just how we were able to track what image is what and also on you know flux's side they can have every single task asso with a new image so now that we have our four Images right here downloaded pretty much into nen not really but we have the URL we're able to feed that URL into this next node
which is hitting Runway to create videos from a prompt and also an image combined so I'm going to open up the runway API documentation right here where at the API reference and this one is even easier because we have a curl Command right here so we'll copy this curl command we'll come back into nadn and all we have to do is click on import curl and then paste it right in here and then when we hit import it's going to fill in everything we need except for like a few blanks like your API key will
have to pop in and then you have to configure some of this own stuff but I'll walk through what's going on here but it'll by default throw an API key section right here in the headers and we don't want to do that we want to set up our header so we can store it and use it later it's just best practice so that's how I got my header here once again we also need to set up the x- runway Das version which we can see right here it's required um x- Runway - version and it
needs to always be exactly this value so we're just going to copy and paste that right into here and then finally we're setting up the actual body request so back in the documentation the first thing that's required is a prompt image so all I did is I put in prompt image and I'm dynamically dragging in the image from the left to the right so on the left hand side this is where the image URLs are so I just drag this in right here then we have um to set up our model so the only model
right here is Gen 3A turbo so we basically just fill that in right there we have the option to fill in a ratio down here and there's only two accepted values so we grabbed this one because that's basically the equivalent of a 9x6 aspect ratio we were also able to configure the duration as an integer we could only do five or 10 so we filled in five right here and then finally we have the option to fill in a prompt text and once again we filled in the prompt text right here notice with the prompt
text it has to be less than or equal to 512 characters so maybe within your um image prompt generator agent you might want to say make sure it's not longer than 512 characters if you're using um Runway if you're using flux they can be maybe up to like 2500 or something so you have a little more wiggle room there so that's all we did we run this and then we're getting back four IDs so similar concept is what happened earlier where each of these IDs is associated with a video but they're not ready yet so
waiting 2 minutes is good I think a minute-ish is probably the average but I just want to be safe and then after we wait we're able to do the exact same thing as before where we're just going to be getting rather than post and we're going to use the same endpoint except for after tasks we're going to do slash the ID so we're able to see that because right here this is the get task details and then we basically will just copy this curl we can paste it in here import the curl and then we'll
fill it out again you still need to have the header of X Runway version and you still need to have your credential and then all you need to put in is the four different um t task IDs from the Le hand side and now we can see we have these different ones and if we open up this um URL this should be a video and this one is the Rhino so now we have the images turned into videos this one turned out really nice with him walking so I love that but we have the videos
so now we're kind of branching off two different ways the first thing is that we're putting it over here for later because we we're done with them for now but don't think about that yet we are going to be going down this path now to generate the audio so the first thing that we're doing is we're going to limit it to one item and this is really because as you can see from here we had four and then there was four items going down this entire process which was fine because we wanted four images to
be generated and four videos to be generated but we don't want four audios to be generated we're just going to generate one 20 second long audio and also just a quick reminder in Runway when you create your um you know looking in my Dev portal I put in 10 bucks for it was 1,000 credits each 5-second video is going to be um 25 credits so each video that you do is going to be about a dollar so a dollar for each video um it's very similar for flux it's about a dollar per video as well
and then um we're at what do we say like 6 cents for the images and so there'll be some other costs that we have to think about like generating audio and you know calling this agent or whatever also create a mate but right now we're at about a dollar so anyways we limit it to one because we don't want to send four updates to Google Sheets we we don't want four sounds we don't want four audios so we limit it to one and it's okay because we're going to merge everything back again later so after
we limit it to one which all I did in here was just literally said keep one first item then we're going to update the video status in our sheet so we're selecting our document we're selecting our sheet and we're saying what column do we want to match on and we chose row number and so in order to get row number I just drag this all the way down to the node that started this process which was our Google sheet and I just dragged in the row number right here so this is saying okay whenever the
row number equals six which should only be once we're going to change the video status column to created and that's how it was able to change it from Todo to created and it would update like that cool so as you can see that was successful that's all that happens here and then we go to a sound agent where we're feeding in the style so once again I dragged all the way down to the original style we could also look later like right here we set the style so I grabbed it from the sheet but there's
multiple places you could grab the style that's the user message because every run is it's going to have a different style but in the system message we kept this one pretty short I said overview you are a master sound prompt generator given a style generate a vivid 1 to two sentence prompt that describes the Ambiance tone and key sound elements to create an immersive audio scene use evocative language to capture the essence of the style and then we gave it one quick example with the haunted ghost hunters Eerie Whispers there was Echoes floorboards creaking all
this kind of stuff I think that this can definitely be optimized because some of those sounds were pretty bizarre but in general I wanted to just create like a a sound out of our style with the minimal things that we were given which was just a style so in this case our prompt was neon signs flicker amidst a downpour in a grimy alley um augmented voices shout rebellious slogan so that's a little bit weird I should probably dim it down a little bit but as you can see this one outputed a new line at the
end so we used flash 2.0 if you used flash 2.0 up here you're probably going to get new lines so that's good that you have that there but that's exactly what I was talking about this would break the request so what I did here is in order to get rid of that new line I just at the end I dragged in here I'll actually just show that real quick so I dragged in the json. output and the new line doesn't show up right here in the expression but you can still see it over here so
what I did was I at the end of output I typed type I typed inrim end and then it basically just trims off that new line and you can see it's gone over here so now we have a clean audio prompt ready to feed into 11 Labs so now we're making a request to 11 Labs once again we're going to go to 11 labs and we will first of all what you want to do is get your API key so you'll go to API Keys you'll create one um I think you probably want to be
on the $5 starter plan in order to do this but $5 starter plan is going to get you a ton of credits I've been doing a ton of testing here um and I've never run over but anyways then you're going to go to your API documentation we're going to click up here on API reference we're going to look at the different endpoints so we can do text to speech speech to text we want to do sound effects and we want to create a sound effect and then once again we have a curl command so we'll
copy this come into NN import curl paste that and then when we hit import it's going to populate these fields except for once again this is going to put your API key in the header so it's going to throw it right here as an actual header field we don't want to do that we want to save it our own as a header off that we can use later then from there we're just setting up two things in our Json body which is the actual text to make a sound effect wi and then the duration in
seconds which we know is going to be 20 because we're generating four five second long Clips so we want a 20 second audio and then once that comes back it's going to be a binary file you can hit view anyways that's going to be the 22nd file um and then what we have to do with that file is we have to upload it to the Google Drive and we have to share it somewhere to make sure it's publicly accessible so anyways we're uploading our binary data which is right here on the left to a specific
folder and right here we can see input data field name is data which is this field right here so that's going to be automatically grabbed in then we have to set the file name so what I did was I went to schema I went all the way back down to the first Google sheet and I grabbed the title or actually no I think I grabbed the style I grabbed the style and then I put at the end of style MP3 and so that's how it's going to come through then you can see I chose the
parent folder which is called audio files so right here is my audio files in my drive and you can see we have Cowboy Wild West showdown futuristic cyberpunk Rebels Viking conquerors and they all have this little people thing next to it because it's publicly accessible and shared if it wasn't then there'd be no little two people so anyways what we get back is the ID of that file um we have like information about anyways what we get back is the ID of the file which is what we need for this next node to actually share
it so we're doing a share file operation we're doing the file by ID so we just drag in the ID from the previous node right here and then we just have to add a permission that says reader anyone and then we allow file Discovery so what we're looking for is right here when we have this in the drive we're looking for this um web content link and so if you pasted this into your browser before you shared it it would be an error 403 because you don't have permission but now that we've shared it and
it says Drive permission anyone anyone reader now if you copied and pasted that into your browser you'd be able to access it okay so we generated images videos and audio now it's time to actually like how do we get that all together in one format so we're going to merge everything back together what we did here is we just combined by all possible combin because if you combine by matching Fields that's like saying okay I have two tables and whenever name equals Nate I want to match all those rows together and so that's not what
we're doing here you could also do it by position which would just say okay four items on the right four items on the left we're going to match that together and um that would only keep one item really and if we're just doing by all possible combinations it's just going to throw everything together honestly this isn't super super crucial just because we're not we're kind of splitting it out later anyways but you might as well just throw it together like this we just want to get all the data brought back together in one space so
from there we're splitting out the parts because what we have over here is our um video files right here in a field called output but because these are four items we would basically be making four separate runs like we've been doing in the past with creating four separate images or four separate prompts or and that kind of stuff we don't want to create four separate videos anymore we want everything together in one item so we can create one holistic video so I had Claude write this code of course and all it's doing is it's splitting
up these four items into one and so now we have one item here with all four video URLs that we need as you can see this is actual um video URL this one is probably going to be the pig yep there we go that's the Cyber Punk Pig and so now we have everything right there which is great because we can easily drag it into this next node which is making an API call to Creo mate so here is my Creo mate and here is my animal video template so what we have here is a
20 second long video template an audio track that's all 20 seconds and then we have text and video that's going to be dynamic and we have them each you know four of them total that are in increments of 5 Seconds so if you want this template in order to plug it into your automation basically you open the source editor and this code right here will be able to I'll have it in the classroom so once again you can get all this for free um and you can just copy and paste this code into the template
and then you're able to actually access this template for your nadn HTTP request so how you do that is you click on use template you click on API integration and what you're going to do is once again copy this curl command this is great because it's already going to have your API key in there when you fill it in so copy this you'll make a new HTTP request import curl paste that in there and then when you hit import um it's going to automate automatically populate all this stuff and by the way the reason I
haven't been actually importing the curl is two reasons I don't want to mess up the flow and also with the newest update of nadn it's been buggy so if you're unable to click the import button then maybe try to go down one version of NN and that should fix your problems but anyways it fills in your method which is post because we're sending over data and so here's an example of I didn't save this authentication I have it just sitting here in my header parameters so maybe I should save that up there but this is
what it would look like typically if you don't save it now when you have this header authorization schema where it's authorization you have to make sure there's a space between Bearer and your API key if there's not that space it's going to fail so make sure you have that space there and then finally our Json body so what this looks like is we have our four video sources we have our audio track source and then our four text sources and this is why we had to split everything up because now we can just drag everything
in from the left into the middle so um here was URL one I dragged that in there here was URL 2 I dragged that in there same for three and four so now we have our four videos for audio track I went down to the node where we shared the um where we uploaded the file to our Google Drive and right here um the web content link that's the one we're looking for because we shared it it's accessible now for Creo mate so we draged that in right here and then um for the actual text
Fields what we did was we got this all the way from the beginning because all I did here you know super creative of me all I did was just put in the animal so I animal one drag that in there animal two drag that in there three and four and so that's how we have tiger bear rhino pig we have all these different files and basically it knows to use this template and make a video for us which is cool so the video obviously takes a little bit to render so it takes like about 10
seconds from my experimentation I set it to 25 just to be safe you can come into your Crea a mate and click on API log and you can see all the templates that we've done so this was the most recent one the cyberpunk one with the tiger and then all you have to do once again is we're just going to be making a get request we don't need any authorizations so it's literally just a get request where we feed in the URL that comes from Creo mate so if I go back to the render video
we get a response with the URL right here and this is the final video so all we're doing is we're dragging in that URL from the node render video or you could just do it from the wait node because it passes everything over and we dragged in the final video URL right here and then we're able to view it and we got the sorry that is awful sound really should rework that prompt but now we have that final video right here in NN as binary data for us to pass through to the YouTube API so
that's the next step right here we have the upload video operation to YouTube you will fill out this credential the same way that you did with your Google Drive where you have to get your client ID and your client secret but if you've already made that you're good to go and then once you're good there all you have to do is basically fill out a few things so the first one is a title for title I went to schema I went all the way back down and I dragged in the title for description which is
a field that you have to add there's tons of options down here I add an option for description and that's the caption and I dragged in the caption and then you just fill in like you know your region code your category name or ID which I did film in animation there's one down here for shorts and I tried that and it errored and um because we're sending over an aspect ratio of 9 X6 YouTube automatically makes it a short as you saw earlier when I clicked into my shorts these are all already here at shorts
but um yeah so you can play around with the different categories um we're dragging in once again the input binary field is data so we have data right here which is our video as you remember sorry about that um and so then the final thing you want to do is privacy status unlisted I accidentally made one public from my um my real Nate herk a automation YouTube channel so if any of you guys got that notification or saw a short that was about um a creepy basement door that's why that was an accident but anyways
this is successful so it's been uploaded unlisted and now the last two things we're doing is just sending a notification and updating the sheet so when it comes to updating the sheet we are grabbing that exact same um document the same sheet we're matching on row number once again like we did earlier so I grabs row number six and then we're setting the publish status to processed because in here we can either be processed or not processed so we set that to processed and then for the actual video link we're dragging in the final video
which we got from um this URL right here so that's all we do and then as you can see it populates all these final links over here um and then from there the last thing is really just sending ourselves an email notification just in case you have this running at like 6:00 a.m. every day and you can wake up you'll see an email that it was unlisted then you can go in there and check and make sure you like it but anyways I pretty much just filled this stuff I filled in the email I made
it fixed because I'm always going to be sending this to me we have um the title where I put new short process and I dragged in the title of the short from the Google sheet change the email type to text and then I made a quick body which just says hey Nate a new short has been created and is awaiting your approval it is called blank um and then I dragged in my just URL from my YouTube Studio where it shows my shorts and that way I can just click right into it from the email
and then I said cheers so the last thing we did is we added an option called append naden attribution and I turn that off just so at the end of the email you know if you don't turn it off there'll be a message right here that says this message was sent by NN so just turn that off to clean it up and that is the end of the process okay so just to recap now a couple things so the first one is this template is a really good starting point but you have so much stuff
that you can do to expand on top of it for example you can optimize these prompts you can then make it send over eight videos and eight images rather than just four so you can increase the template length rather than making it just 20 seconds obviously you can improve the sound agent you can make the prompts better you could also do narration instead of just sound effects all this kind of stuff you can play around with cling um you can play around with different image models as well um you can you can customize the schedule
on this so you can obviously Say Hey I want this to run four times a day or 10 times a day whatever it is and then the next piece would be making the idea generation within the actual Google sheet making that more automated because right now I was just talking to chat gbt and I generated these five stories but what you could do is set up a very similar workflow where you have um an agent that is trained on like what you're doing and it can access this database and it will just every day pump
out like five more and then once those are pumped out this workflow will pretty much grab them and create those shorts so just a couple more things to keep in mind it's going to be roughly a dollar maybe a little bit over a dollar per run on this current you know four images and four videos we're generating um 11 Labs you'll have probably want to get on the $5 a month starter plan depending on the different models you're using in here it could either be free or it could be a little more expensive and then
with creat mate right now I'm on the free version and as you can see I've only use 36% of my credits and in my AP I log I've done quite a few requests so definitely just get in there and play around with it for now and then you can look at if you actually do want to create this you know just a YouTube channel that runs on autopilot then you'll probably want to obviously upgrade that account so I know that might have been a lot but I would really recommend for you to go to the
school community and grab this template import it into your workflow and then you know have it pulled up but build out this whole workflow on your own and then you can customize each step you know as exactly as you want it and exactly the type of shorts that you want to create once again you'll be able to have all the resources the source code for the creat a mate template the actual template right here for your faceless shorts um that you want to feed through because once again everything right now is mapped to my template
so you need the exact same column names and values if you want this thing to just be able to import and hit test workflow so just something to keep in mind but anyways that's going to be it for this one really appreciate you guys making it to the end of this video as always if you enjoyed it or if you learned something new please give it a like it definitely helps me out a ton and I will see you guys all in the next video thanks