hi and welcome to create Studio 3 in this video we're going to give an overview of the editor itself talk about some of its main features and give you some really helpful quick tips on how to get started all right so real quickly one thing I do want to point out is that along with our support and our tutorial section here inside of the homepage we do have a YouTube channel as well as a Facebook group that has an abundance of resources from tutorials to Quick links from uh just a Community Helping themselves out inside
of the Facebook group itself so be sure to check those out as well all right so when you open up your cre Studio 3 the first thing you're going to notice is you have the options to create a new project you can use a lightning Builder um you can open a pre-existing project or you can use templates right and you do have the same options here on the left-hand side it's just broken out a little differently all right so if you want to start a new project from scratch right you want to create this custom
yourself you would click on new project right so I'll select that opens up my new session and then I can go over here to the top right go to resolution and I can choose what resolution I want my project to be right so whether want to be standard um 1920 x 1080 do want to be vertical Square portrait so depending on what format you're looking to create that's where you can set your resolution right all right so one other thing I want to point out real fast is that up here we have some new layouts
right so if I click on this button here you'll see that right now I'm in the left and right panels so left and right means that I've got my interface on the left here and I've got my settings and resolutions uh stuff that I can have on the right side now if I click here and go up to left bar it moves everything to the left side here and then everything is now on the left side of the screen right so all my settings are right here for my settings and resolution along with all of
my other categories that I can choose from within cat studio 3 right all right so now if I go back up one more time to our interface layout I can click on minimal and minimal will then move everything to the top and then I still have access to my settings and all of my features there at the top all right all right so from there you can go ahead and you have access to all of the content from all the menus on the Le hand side here you can drag them into your canvas and then
work on the proess projects you have right so I'm going go ahead and exit back out here to our menu so you can see the next way to build a project which is the lightning Builder all right so I'll select the lightning Builder and the cool thing about the lightning Builder is it allows you to quickly build projects and assets um to use for for quick purpose to get things out really fast and you don't have to sit there and custom make stuff you can do this really easily right again you have options for square
standard 16x9 or vertical 9 x16 so let's just go ahead and choose standard for now and so now I'm at the choose the St of your video page right so I can scroll through here and depending on what my project needs are I can choose the style of video that is set for me right so I'm going to go ahead and choose the meet Jack uh scenes here right so up at the top is where you will see all the scenes that you add you'll see them appear there at the top and here in the
subcategory section the all shows you all the scenes that are available to you to choose from um but the cool thing is is if you start with the opener it's like a story right your opener you start with your content your problem Your solution and your benefit right so it works out for you really fast right so let's go ahead and click on opener and let's just say I'm going to start with the meet Jack scene here and then what I can do is you can see is it added it up at the top now
I can go to content and and say okay so where do what kind of uh scene do I want to use to add my content right it's like maybe I want to add this this tablet scene right so I can swipe across and so some show some cool imagery that's coming on screen here so I can hit add scene and then now I can go to problem and you can see I can add this scene here which lets you know on un fortunately um he had that I can list out the different types of problems
that I've got going on and then I can come up with the solution that my company wants to present right so now I can say let's use this guy so you can see they're adding them up at the top so I'm already building out my story really fast now I can go to benefits and I can say all right so here's where all of my benefits are going to go that I want to showcase for my business so I can add scene and now I'm good to go right I've quickly laid out a fast um
scene here already pre-built and I can go in there and just customize it really quick and I'll show you to do that here in a second um you can see these little transition icons in between each of the scenes if I click on it you can see that it opens up the transition page now I can hover over each one of these and it will show you what that transition looks like so maybe I want each scene to drop down as it goes so I can select that and then it added that transition for um
that scene in between there right now if I want to add the same transition to all of them all I have to do is click back on any one of these guys and with that drop down selected there click on apply to all scenes and so now it applies that transition to all of my scenes at one time all right so now I can go here and click on go to editor and it opens up a choose a music style section for me so I can go through any of these awesome themes here um and
then you can have Crea Studio 3 choose this for you right or you can skip it if you got your own music and add your own music right but let's go and choose Funk and then it's going to build the project for us and here we go it has built out all the scenes that we chose inside of cre Studio 3 so now if I scrub through this you can see here are all the scenes that we added right so what I can do if I want to adjust these is if I can select on
this scene here and then if I scroll through you can see here is where it says meet Jack and on the right under settings is where I can make some some adjustments right so I can say instead of Meet Jack maybe I wanted to say will right and then I can come over here to this next one and here's where I can make adjustments for um the pictures that are going across the uh tablet here um I could change the text right I can change different colors of the text box right so you can get
in there and really customize this and make it fit your project needs right same thing with these other ones you can click on them and you can you can add your problems right that whatever um the solution is that you're trying to solve right and then same thing over here go in here on the right hand side under settings you can adjust all these settings all right now you can go in here and you can uh double click on these groups here in these scenes and you can go in there and get a little more
customization if you want to go in there and really tweak some of these things even more you can go in there customize them to fit exactly what you're trying to do right so I'll go back to the main time on here so again really powerful features um inside the lightning Builder that are available to you in cre Studio 3 all right so the next way you can start a project is by using templates so lightning Builder allows you to build a scene as you go right so maybe you're trying to build a scene for a
product and you want to build it out piece by piece that's a great way to get started right now templates on the other hand if I click on templates here it opens up all of our pre-built templates that all you have to do is just plug andplay media to help get you started and get you going right so what I can do is right here as we click on all it shows all of the awesome templates that we have to offer right so you can scroll through here navigate down and find templates that fit your
needs right of course we also have uh character explainers promotional spots right so it's very themed based right so you go business local business you can got stuff for YouTube on here right um logo stings if you have something you're trying to spruce up your logos you can do that we've got a lot of cool stuff templates for uh for scroll Stoppers really interactive stuff and then we have other types of templates that that fall in this category as well right so really awesome stuff that helps you start your templates and get started from scratch
and if you go to the top here you can search templates you also can choose whether you want to see standard videos do you want to see vertical do you want to see squares so it kind of sorts them out so depending on what project you're trying to do to work on you can then um kind of narrow them down into that search right then of course you could search popular new uh by name that kind of thing right so another way to just kind of quickly search up some of the templates that you might
be looking for all right so let's go ahead and select one of these templates and let's drag it into our session here so you can see how it works and what that looks like all right so if I select this it opens up a dialog box that allows me to preview what that looks like I could choose landscape this one offers a square option as well I'll choose landscape and then I'll hit start editing all right it quickly downloads that if it hasn't already been downloaded to your system and then it'll open up create studio
and then insert the session uh project files together all right all right so now that we have our scene in here what we can do is we can then scrub through it and you can see this is everything that we just previewed a second ago and then now if I select these scenes you can then go in and custom customize them to the way you want them change the text change the images change the videos and again same thing with scene two do the same thing so you have the flexibility to quickly adjust these templates
to make them your own to fit whatever it is that you would like them to be right so super cool and super powerful things that you can do inside of crazy Studio 3 all right right so next up let's talk about the interface itself once we're inside of czy studio all right so if we navigate to the top left corner of our screen here there is a folder called media so if I select on media you've got three options here in the top you've got project which we're in right now you've got Global and then
you've got stock so project is since I brought this template into create Studio here is all of the the project files associated with these scenes right so if I open these up you'll see here's the imagery involved the video clips the different assets that make up these scenes right now if you want to go in and start replacing these assets um with something that you that you have you can import them in here at the bottom so you want to import them from your hard drive um you can bring those into create Studio into this
project folder you can create new folder so if you add a new folder come in here I could rename it import straight to here I could delete this folder if I want so everything you can do is you can build everything inside your project save it into your project now the global global is something that you want if you have assets that you use for uh multiple projects and you you have the same logo that you use all the time in multiple projects maybe the same background that you use um all the time you want
access to it every time you open up a session right so for example let's say I come in here and go to our stomp scene 8 here maybe this is something I want to use for the next six projects I'm working on I could right click this copy to Global so now if I go to Global you'll see there it is so anytime I open up a session create a new project if I come to the global folder all of these images or video clips will be saved here for me to access and use for
my project so super cool all right so if I go over to the stock here is where you can search up anything inside of the built-in stock libraries inside of cre Studio 3 so if you want to search up video clips or images or gifs or stickers or svgs it's all accessible right here inside of creat Studio 3.0 and then anything that you save um into your if you import in a picture for example it goes into your project folder here and then I could take that drag it into my project and then use it
how I need to right all right so let's go ahead and select our studio section here and inside the studio section is where you'll find all of the assets you need to build really cool projects within create Studio 3 all right whether that be finding scroll Stoppers social media assets um looking for backgrounds right which is really cool right there's so many backgrounds different things that you can use to enhance your projects or looking for characters right so say you want one of these assets all you have to do is click on the little download
icon and then once it's downloaded then you can then drag them into your timeline and start creating some really cool content so now underneath studio is your scenes right so these are pre-built scenes that you can then add to your already existing timeline if you want so say for example if I come here on my timeline and I want to add a scene after scene six right it's like you know what I need instead of it ending on this have fun sequence here I want to come in here to my scenes and I want to
search up something else and I want to add maybe um a different look a different feel I could drag it maybe I want this this YouTube closer right so I could take this YouTube scene and then it gives me a whole bunch of different profiles that I could hover over and play if you haven't already downloaded something you can then click on the download icon select it and then drag it onto your timeline here and then now I have this scene so it'll go from here to my closeout YouTube channel scene right so super cool
way to just add additional scenes um or even start from scratch or if you just want to start from scenes right so that is what the scene section does in create Studio 3 all right so now if I navigate to the music section you have access to download our music tracks right so under music you can choose the different um categories that you want right if you want Indie you want happy you want Funk then you can scroll through preview these tracks and then download them and then drag them into your timeline right we also
have effects that work the same way so if you're looking for sound effects that you want to enhance your projects it's another way to search up your effects download download them as well and then drag them into your projects now the newest really cool feature inside of cre stud3 is our text to speech feature and that is the AI text to speech right so this is a great way to really enhance your projects maybe you got a script that you want um you can use that AI dialogue scroll through and sample some of the awesome
AI dialogue tracks that we have and then you can then generate that speech and drag it into your uh session right now these are the languages we do support at the current moment so once you type in your language it will um automatically recognize what language that is as long as as is from this list list and there will be future languages added as we work along all right so one thing I do want to point out is that our text to speech AI feature is available to All Access users all access users get 3,000
credits a month um your credits do not acre if you do not use them every month so every first of the month you'll get a new Fresh 3,000 credits you can always buy more and then again if you're not an all access user you can get access to the Texas speech AI feature by just buying some more credits using the link here in Crea Studio 3 now we do have Google text to speech as well which is is unlimited to every user um and you have a list of different language options as well here and
you have a list of 10 female voices and 10 mail voices um but again the Google version is unlimited so you have access to that as well all right so if I go over to the record section here um this is where you can record your own dialogue right so maybe you want to record your own voice or record somebody else because you want them to be the voice of your project you can choose the interface that you have right so whether you have your own external audio interface or you have your own built a
computer microphone it works just as well you can choose whether you want to record in Stereo or mono and then hit start recording and it will record your voice which you can then drag into your timeline and make a part of your projects right so a lot of cool and super powerful features inside the music section of C Studio 3 all right so now let's go to effects and components and effects there's two sides right so under effects there's different things right so you have Glitch scen screen filters Jitter there's color removal there's wave there's
Twirls there's a lot of different really cool effects that you can then um drag into your session and tap into and really enhance the project that you're working on the component section um is a little more different right so you can add these to your scenes right so maybe want to add some camera movement to your scene um you want there's a subscribe button there's the carousel um there's the typewriter effect right there's a lot of different cool components that you can add to your project and this is where you will find them all right
now if I come down to Transitions if you hover over each one of these it it will play a transition right so again if you want to use one of these and you want to scroll through one maybe you like that one or maybe you like this guy what you can do is you can download it and then select it now if you drag it across on your timeline you'll see that it highlights everything in your timeline right now if you hover it over certain scenes here it changes the color of those scenes right so
let's drop it onto this um scene right here so now what it does is if you go over to your effect side you'll see that it added the reveal conceal transition for you right and here it's previewing what we just added right so if I look on my scene here on the timeline you'll see that it added the transition effect right here in the middle and I'll zoom in there so yall can see that so what that does is is it added it right here and if I want to adjust the parameters of that I
can go to the effect side and right now it's turned on right so if it wasn't on you didn't see it just um check on the box there and it's blue now it's it's on so you have two options here you could reveal and conceal right so right now it's um starting at the beginning for the reveal if I take that away nothing's going to be there if I do it on the conceal it'll add the transition to the end of it right so let's go ahead and put it on the beginning so on the
reveal so now if I come over here you'll see that if I scrub through I've got this really cool transition that scrubs through right so really cool um features and all the transitions are in here and again if you want to hover over them you can then see what they look like and then drag them into your scenes and then work with them and enhance your projects that way right so super cool all right so now let's go ahead and go to our 3D Creator section and here's where we have access to our customizable characters
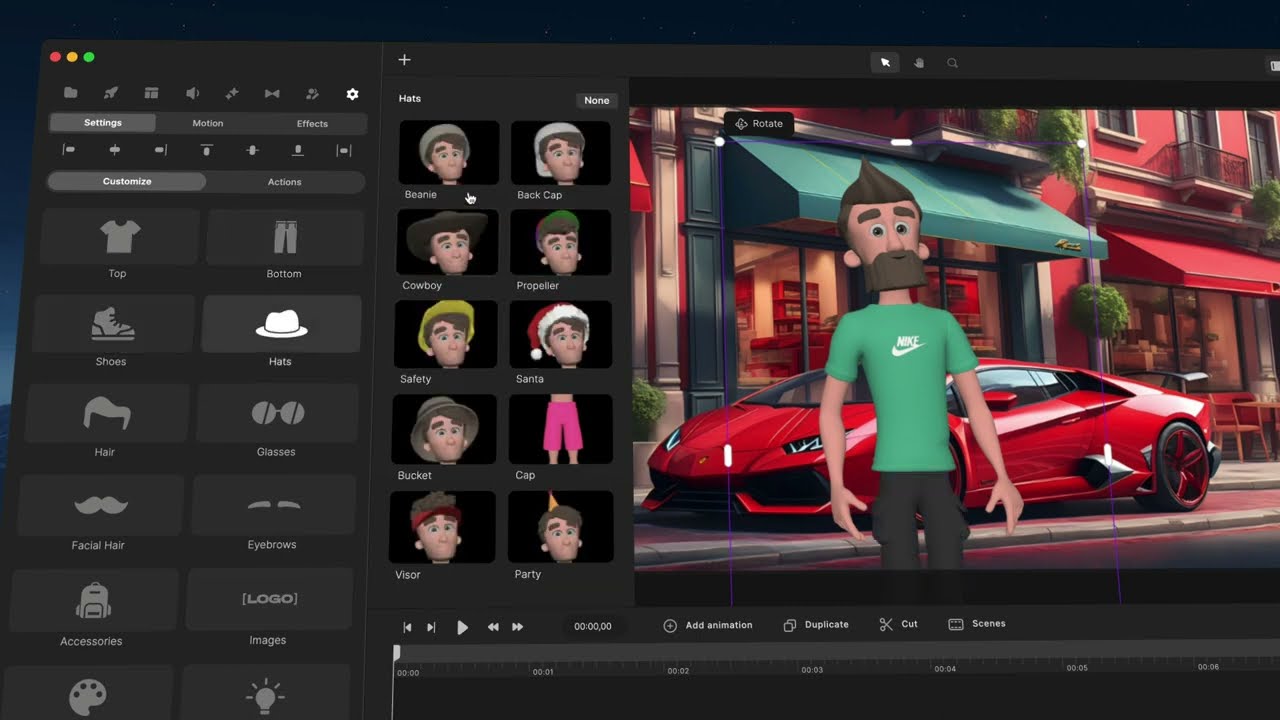
all right so right now we have Linka and Tom we will be adding more customizable characters um soon so look out for that for future updates um let's go ahe and drag in Tom so you can kind of see what this looks like so if I drag Tom in um you'll see that the cool thing about it is aside from animating him in in the standard Way by adjusting his animations and his actions right which is down right here what we can do is we can go to customize and we can change and and change
the complete look of Tom right so right now I can change his top give him some sleeves I could change his pants you know let's give him some bead shorts maybe we want to give him some tenis shoes and we going to give him a nice little hat you know maybe a little visor hat maybe he's going to go to the beach right so there's a lot of different things that you can do you can change the hair you can add glasses uh there's just so many things you can do to really enhance your projects
um to meet the needs that you may have um accessories the colors right so you can change skin tones hair eyes um change the color of the shirt the bottoms the shoes the hats the glasses so depending on what it is that you're adding to them you can change the colors of that right all right so now I want to focus on some of the features inside the main editor here that will be more practical for you to use as you're working inside of cre Studio 3 all right so if I look inside here at
the top of my interface here I've got a plus icon right now if I click on that you'll see I this is how I can easily add text can use the pen tool I can add rectangles and shapes um and arcs and now if I move over to the top part of our interface here right now on the selection tool right so once I have this selected this allows me to select anything in my timelines here in my scene right so that's a really awesome feature that we can have right um so that is what
the selection tool does the hand tool allows you to move around in your canvas you can click and drag and it allows you to maybe just want to look in this corner here and you can punch in a little bit um that way um you can also if maybe you're on the selector tool and you don't want to have to click that you could hold the space bar down and then you can click and drag around your canvas as you need to to kind of look around different parts of your scene and then you can
uh the minute you let go of space bar it goes back to your selection tool right so just a kind of a quick shortcut there um we do have our uh you can zoom in on the canvas with the magnifying glass so you can do some some Auto settings here right you can go 25% 50% and you go to 100 and 200 or you can just drag the slider and zoom in as you need to um you can fit to screen or you can Center it up so just depending on what you're looking to do
here's where you have those options now here's where you have your save icon right so if you want to save your project save it here um and then if you're ready to publish um you can publish your um your stuff so right so you do before you can publish and Export your video you need to make sure that you have saved it then you can hit publish and then you have the options there to save this video uh do you want to save just an image out of this is it just Audio Only um you
have different formats to save all of these things right for audio and video um Quality levels size um where you want to start and end with um you know if you want to apply audio normalization and then choose your out put file and then it exports out for you right so that's all where that's located and then here under the create Studio logo on the right hand side you can start new project you can save as you can if you need some help with some tutorials you can click this button here you've got support access
and you can exit back out of your session and it'll take you back to the main menu for cre Studio 3 all right and then if I get into the settings here under this section here here is where the properties for whatever scene you select is whether it could be a character or it could be a scene um so let's say I select on stomp scene six here here are the settings for that right so I could change out at a high level all the text for that file change out video clips um I can
go to motion I could add some um some animated effects to the intros or the outros of this scene um I could go to properties and I could scale up I could change the opacity the position um anchors just different things within the properties that you can do and then of course if you add effects like we added that transition this is where they'll be stored and you can adjust those and turn them on and off from here all right so now let's work our way to the top of the timeline here and for the
properties that you have to utilize right there so if I click on this left button here this will take us to the beginning of the session if I I select the right hand side there it takes me to the end obviously the play button does the play and then the this is kind of moves you frame by frame right so if I tap forward you can see I'm inching frame by frame or I can go back and go back frame by frame all right so right here is where it shows the amount of time that
you have for your session so right now we're looking at you know 20 seconds it'll tell you just how many minutes it is or how many seconds that your project is total right and right here is where you can add some animations some key frames so if I select this scene here and let's zoom in a little bit so you can see and I select add animation here's where I can add some key frame properties right so I can change the uh or I can add some position and scale um you can do rotation border
Shadows a distortion just depending on what it is U that you're working on you can add key frames to that animation right so then you can also adjust the easing so you can change the easing for the in and outs together right you can go from linear to smooth slowmo elastic or you can change um individually right you can set the easing for the in and then set a different easing for the out right so once you got those in there you'll see that it added our two key frames our inpoint key frame and our
out so depending on what properties you selected you could select that first key frame um go over here to settings and then go to properties here and I could adjust the uh the position properties right set a start point and then I could go to the second key frame and then set an outp point for the position right so I can animate different objects and items inside of C3 which is really cool all right so now let's work our way down and of course you can duplicate so let's say I wanted to duplicate uh this
scene six here I could select it and then hit duplicate and then you can see that it made a nice duplicate for me so that has a really cool feature and then if I go down I can go to my cut section here right so let's say I go into this scene and I want to cut these um these little particles right so I could say you know what I want to cut this right about here and then if I select cut it makes a cut there and then I can either delete that or I
can um use that as a sync point for something else right so it's just a cool feature to have that's your cut tool um let's go back to the main timeline here and then now what I got is I have my scenes here so if I click on scenes here's where you can get scenes so if I click get scenes again you can then add more templated scenes out that um that maybe you want to add to your already existing project maybe you're like you you know what this needs a uh a certain outro a
certain intro and you don't want to have to build it from scratch you can go here go back to categories and maybe you find a specific type of intro outro that you're looking for right so super cool features and a great way to just quickly add to your scenes right all right and if I keep working my way down I click this here are my grids right so you can do action safe lines and everything um available with grids um you can go here and then you have your guidelines that you can add as well
as our shortcuts that are available right here um so if you want to get really efficient with keyboard shortcuts here is a great way to start learning those um and get in there really efficiently and you've got your uh redo uh redo and undo tools right here um and so that is a great way to get familiarized with the uh timeline inside of czy Studio 3 all right if I work my way down on the timeline though we have access to the slider bar which Scrolls me through across the timeline right and then this guy
will then zoom in for me as well another quick tip is if you hover over the uh your time here and it turns into a double-sided Arrow you can left click and drag left or right and it will then zoom in and out for you so a quick fast and efficient way you can also adjust your timeline so I could fit the timeline um for me there I could also uh make the the timeline full width so if I click that you can see it basically hides the elements over here and it allows you to
have a full wider view of your timeline which is actually really cool and efficient um and then you can always um adjust your track size right so you can right now it's large you can go medium you can go small if you want to it's just depending on how large your project is you can then um change the degree of your track size depending on what's your preference right all right so that was an overview of create Studio 3 hopefully you got some really cool quick tips out of this remember the best way to go
about this is to just dig in there and try it out right experiment maybe you may not get it right away but the more you do it the better you'll learn can't wait to see what y'all create and I'll catch you on the next video


![Notion Tutorial - Full Course for Beginners [2024]](https://img.youtube.com/vi/kOf3QSBV29Y/maxresdefault.jpg)