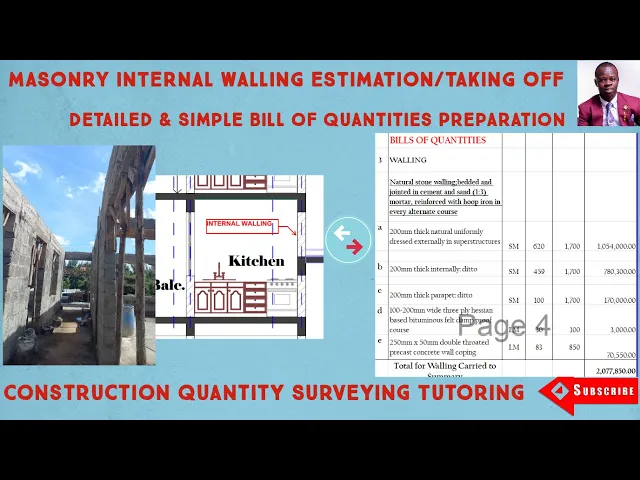
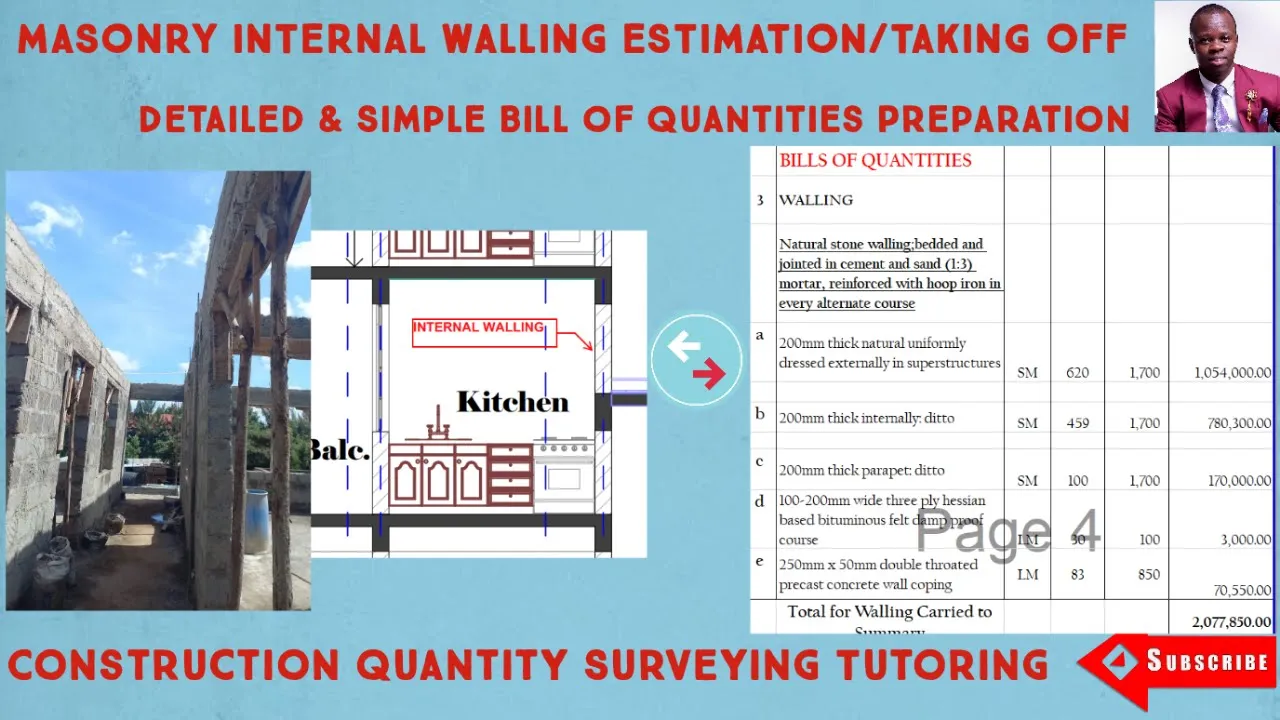
Hi D bstone is here I would like to welcome you to my channel and I would like us to continue with the estimation over the past few sessions we've got the privilege to learn quite a number of items related to preparation of bills of quantities and so far so good we've learned up to Walling in the last session we did external walls estimation and in this session I would like us to do internal worlds estimation for for the new viewers welcome to this channel for you to get the catchup videos I will attach a playlist of all the work that we've done in the description part of this very video for my returning viewers words can't express how grateful I am if you need any consultation with good surveying if you need any construction and measurement materials kindly reach out to the number that is going to be attached to this very video as well also personal tutoring is welcomed and at a very convenient time and a very very friendly charges or cost so to say welcome if you haven't subscribed kindly do so before we continue a moment for you is very much in order and that is fine thank you very much for Hing to my call so today I would like us to do uh the internal walls estimation and as usual we get to learn various ways or U easier ways of doing uh the measurements from this very channel so when you want to measure the internal walls they are now easier ways to do that and that is why we are here and that is one of the items that I would like us to learn if you need to do the internal walls of course these ones are also done in square meters and I just want us to learn how to do that in an easier way Well normally when you're dealing with the wall or when you're dealing with a structure with various walls then it's just important that you find a way to tackle them in a procedural manner so that you don't miss out on some or you don't actually omit them totally so what you'll do is this in most cases you'll find that your drawings have been provided with what you call the grids looking at straight into your screen you'll notice that I'm presenting um I'm presenting what we call the the plan this is a plan of first floor of course first to fourth floor because we are dealing with a house with numerous and numerous flows so what you have here shows that we have uh various grids running from grid one okay when you check vertically on your longitudinally on your screen you'll notice there is grid one to Grid 10 okay then when you check along the along the horizontal planes you'll notice their grids running from grid A1 uh B1 and so on up to H1 so it's always important that you take your walls in a procedural manner so for instance in this case I would like us to start with along the longitudinal longitudinal grides that is from grid one two and so on and of course we are destimated in our previous session we had done the estimation of the external walls separately okay so that we don't mix them up with the internal walls so in this one we are just focusing only on the internal walls and I would like us to start straight from uh the grids on the longitudinal axis and we going to start from uh grid 1 2 3 4 and so on okay so what we'll do is this uh along grid one grid one is falling on the external walls so external wall is not going to be part of the estimation that we are doing for the internal internal walls so Gade one is out we go to grade two we check grid two along the grid two you just follow it uh quite keenly so that if at all there is any wall which you need to take into consideration it's well captured in terms of the length and of course we'll get to the section get the height and then get the areas and so on grid two is also out then we move move to grid um grid three along grid three there is an internal wall where I would like us to start so uh first of all after you've identified that wall just zoom it in properly so that you are able to see it well so uh what I've zoomed in uh it's nice that you can see along grid three just follow that uh the the dot that is indicating the grid and then you can see it's starting from uh this is C1 and then down to E1 you notice that always in my recommendation these walls you can always take them uh you can always take them in a manner that uh allows you in identification for the wall so this is uh 200 200 mm thick Walling internally all right so once you've identified that uh the thickness of that wall and then of course the unit you state here the unit is uh square m and then uh the next part is now we've decided to take uh start from the this is a long grid three moving all the way from E1 to C1 so we can always decide that the vertical ones or along the one that are along the the grids one 2 3 and four and so on will be taken within within the Walls Within the the ones that are on the horizontal horizontal grids so that we pick on one direction to be taken full and then on another direction to be taken in within okay so that we we take note of the double measurement especially at the intersections of the walls so that said once you've also take a note of that then we proceed so along the grid three it's going to be from E1 to C1 and that distance is um 1. 6 M okay in what I've just zoomed in you able to read the 1. 6 M so what we'll do we'll consider length at long u just on the side as usual where we do all our our calculations so the very first length that we're going to deal with here is 1.
6 then we indicate plus okay once we've done that we proceed so that we find another internal length then the other internal wall is along grid four and it goes all the way along rate four it starts from h actually H1 to fub1 is part of external wall which we had taken into consideration in our in the estimation for the external walls so we won't take note we won't worry about that for now so we leave it out from that point but then we'll start it from F1 moving all the way to moving all the way to D1 somebody will be wondering how would you identify an internal wall and external wall well if you have for instance this now a high multi- story building of course you have these are balconies so balconies they are always identified by an internal wall and external wall okay so you can always check where you have your doors and the windows and so on forance what I've just zoomed in if you check kly where my casa is playing around you have an external door for access to the B bony so to me these an external space balconies are external spaces okay the same applies to that space that is adjacent to the one that I'm referring to so that means all the three walls are external walls starting from the one that the door is and then the other two walls that are are showing or demarcating that space okay so all the three one two and three are external walls which you won't be much concerned ConEd about or rather you will consider them at the external walls part okay so that means at grid four our wall is starting from F1 the internal wall all the way to D1 so that is what we are going to uh talk about or we going to the length that we going to measure and uh looking at this it starts the length you can see the length has been indicated coming from this point where my casa is then moving all the way up up and this is 2. 5 M okay so we also indicate this to be uh 2. 5 M and then we move on to the next bit of it and uh the next part along grid five yeah along grid five there's another internal wall moving all the way from grid D1 can see that grid D1 then it goes up to the grid between grid B1 and A1 okay and let's see what we have here this is um let's calculate what we have well I can see it here it this is 3.
8 okay we've realized that it starts from grid D1 moving upwards to a grid uh the grid between uh yeah you can call it B1 prime or something yeah the grid between A1 and B1 okay so I'll take the 3. 8 8 and then of course I'll add what I have here this is a 0. 8 yes this is 0.
8 okay yes so I will take the 3. 8 uh plus 3. 8 and then plus 0 0.
8 so that is taken care of the next one is along grid six along grid six the internal wall is starting from F1 moving upwards to D1 fub1 to D1 so let's uh consider that as well it's 2. 5 okay look at where my casa is and that wall is 2. 5 M so I will add the 2.
5 all right then the next part is uh grid seven grid seven that wall is similar to the one we've done at grid five okay so on grid five we got it to be 3. 8 and then plus 0. 8 well so we proceed after the 0.
8 we have another internal wall that is along grid eight as well and that is also similar to the one we've done at grid six so looking at it kly so this is a 2. 5 so we'll add We'll add to that another 2. 5 then plus uh moving on then the next is at grid n uh where we have that smaller wall and the length is 1.
6 yes just look at my Cura where it's uh moving around now we have 1. 6 so we add the length for 1. 6 and then we add another one that is the last one uh there is the last of the walls along the uh grids 1 2 3 4 up to 10 okay then straight away we switch now the grids and at this time we look at along the grids uh H1 F1 and so on so IID like us to start from the bottom where we have H1 H1 is along the external wall so we are not going to include that in our measurements now for the internal walls we check on G1 G1 followed closely there is none as an internal wall F1 as well okay then we move to E1 E1 there is an internal wall that will start from all right so at that point we have a wall coming from yes E1 follow the E1 so so it's starting from uh this is grade two and then it moves up to grid four and we agreed that at this point we are now going to take it all through to the external faces of the walls okay all right so um E1 from grade two to grade four it's showing us that we have um let's see let's see let's see yeah the 2.
1 + 1. 1 okay of course these are at the centers so we are going to add to the external parts we are going to add to the external parts of those walls so that we have it up to the external faces the reason being on the ones to the the on that we took along the longitudinal grids we didn't go all the way uh we didn't go all the way to the external faces okay so there is that portion that we did to consider the intersections so uh We've uh talked about the and what we take into consideration now is uh the 2 uh 2. 1 + 1.
1 okay so 2. 1 sorry plus the 1. 1 and then of course we are now going to add uh the wall half of it is 0 0.
1 * 2 okay for to cover for the either faces and then we move on the next one is uh yeah what you have here is identical to what we have on the other side that is now from grid eight uh to grd 10 so we can just take what we've done we've done again so that is um all right we can have it into bracket right from the 2. 1 and then we multiply that time two and then we add another Point all right so GD E1 is complete we move to grid D1 so from grid D1 it's going all the way from um that is now four 4 to8 4 to8 so 4 to8 let's see what we have 4 to8 we have 1200 * 1 2 3 4 okay that is 1. 2 * 4 all right so we'll add we'll add the 1.
2 * 4 and then also 0. 1 * 2 to cover for uh to cover for the other bits all right uh when I say the other bit I mean uh let me see This 1. 2 * 4 + 0.
2 0. 1 * 2 I mean the external faces of the external halves of that particular wall so we've added that and the next part that is left that we're covering next is grid C1 on grid C1 it's going all the way all right so we have we have uh two two moving up to this is five yeah two to 5 all right so 2 to 5 that length is supposed to be uh 2. 1 + 1.
1 + 1. 2 right so we'll add that okay let's see what that comes to uh 2 yeah 2. 1 2.
1 + 1. 1 plus another 1. 2 and then we add the 0.
1 * 2 for the reason that I've just explained and this one is identical to the other portion to the to the last end Okay so we've taken the uh 2. 1 + 1. 1 so I'll have a bracket over there + 1.
1 2. 1 + 1. 1 + 1.
2 yes so that is okay then I'll multiply this by two then add another part yes so the part between 2 uh Grid 2 to grid five is ident equal to the one that is from grid seven to Grid 10 all right so that is also taken into consideration and that actually gives us the last part of the internal wall that we needed to take care of so we just do away with that plus and have the equal sign so that gives us a total length for the internal walls of 40. 9 okay so 40. 9 is now the total internal wall length so once we have that then what we have next is now to get the area all right so when you have your total length the area is now the easier one because from the length you just need to get uh the height the ceiling height that is now from the finished flow level going all the way to the uh suit okay to the suit of the beam to the top so we just need to get our section right we get our section from which drawing it is read that particular height and then you'll get your area when talking about the height you consider it from the finished floor level okay all the way to below the bring the The Beam on the on that particular on that particular particular section so this one gives us a height of 2 point uh 2.
55 okay this is where it starts and it goes all the way up to this point yeah do not consider the beam because the beam is going to be taken care of and actually has been taken care of under concrete works so this is a height of 2 uh 2. 55 all right so the area we just do the area on the side here and uh this gives us 40. 9 * 2.
55 so this is supposed to be the total area of the internal walls this is now the gross area okay but then when you refer to our standard methods of measurement you need to realize that we are supposed to do that area as a net net in the sense that we need to deduct the openings okay and for the internal walls the openings that you have are normally the doors okay so you have to ask yourself where do you get the sizes for the doors and how do you uh do the uh the deductions so it's simple so once you have the gross area the next point that you need to consider is from the plan that you've used okay from that plan that you've used in your in your measurements do you have the dimensions indicated that is option okay that should be option two option one is to have what you call the door schedule okay so just on the side you've indicated that the door that you have for instance let me illustrate here for instance uh the doors you can just indicate here doors for instance so as you are taking off on every every grid you just indicate that now or you you can do it down in the second phase once you complete you can start the way you started from a grid for instance grid three okay grid three there is a door so when you have a door schedule indicated somewhere then you'll indicate that you know when you have a door schedule in most probably you'll be having those identified as D1 D2 D3 and D4 and so on okay so you just indicate here that is D1 okay so just indicates the the identifications of those particular doors okay then you go to D2 so in this case it's not indicated because there is no there there is no door schedule provided but if at all it's provided just indicate do one do2 do three and so on so that once you complete once you have done taking the measurements you just go to the door schedule and look at that list okay so you just cross check do D1 what is the size do D2 what is the size okay so that uh at the end of the day you just get the length the width and the height of those doors okay and then you are done you get by getting the areas but now that for the one we are using it's not indicated so what we'll do just follow grid by grid take the sizes so in this case we have at grid three we are starting with this door and this door is 0. 85 on the width okay so uh it's uh uh the so what we'll do these are doors okay now that they have not been identified in terms of uh numbers as D1 and D2 and so on it's going to be uh we are going to follow our procedure of one by one grid by grid so that we don't miss out on any so we'll start from where we started while we are taking our our measurements for the length of the walls and in this case the first one here is 0 uh 0. 85 okay so when you don't have the door schedule you can always get the width of those do do on the plan so that is the first tip so you get the the wids of the doors on the plan but then now for your Heights for your Heights you can always check the section if at all you can have idea of the heights of those walls of those doors all right uh let's check if at all there is any if section doesn't give you any anything then you can always go to what we call the elevation so looking at the elevation here you notice that also you can't get the height of the walls or the windows okay so what is your next remedy what you can do of course you can get the width right from the plan okay it's indicated but then now on height you can always do what you call using the standard height okay so the standard height would mean normally of course now internal internal walls you just have the internal doors to worry about in most cases the doors that you have they always go up to the suet of the beams okay so you can always check what is that height from the finished floor up to the beam level so that you get the overall sizes of the doors and of course it always safer to be on an upper side than on the lower side so even if the doors will now be lower than shorter than what you have provided as um the maximum height from the finished floor level up to the sofit of the beams then you'll still be safe okay so you can always take that full height all the way okay but then in in in my region doors are always made some of them are standard of course in terms of height so a height of about 2.
4 of course the height that was provided in the section uh was showing I was showing the 2. 55 but then those most of them are at around of height of 2. 4 M okay so uh this is a two uh 2.
4 M that is the first door that we have dealt with so the other door uh let's see if there is another so we move to grid four grid four there is no other door to be toen uh to be taken off or to be measured grid six there is none oh sorry we move to grid five grid five there is another door here and this is uh 0 this is 0. 8 yeah so there's another part there's another door that is 0. 8 in width so that is uh 0.
8 we'll stick to the same height in this this case and then move to the other grid uh grid uh seven is the next with the door and it's the same height so in that point we have got two doors okay of course can indicate numbers here by Roman numbers so that one we once we done you will tally them up then uh grid eight at grid eight is there another door to talk about there is none all right then the other one is grid nine grid n there is a door of 0. 85 this one here all right so that is grid nine and there is none along the straight of the vertical grids so 0. 85 is another door so we have it there then we go to along the longitudinal grids I mean horizontal grids check the first grid is here F1 there is none we go to E1 along grid E1 there is a door this door is 1.
1 the another one here is 0 0. 9 okay so I'm talking about this as the first one 1. 1 and then this other one is 0.
9 so those are two doors of different sizes so we have uh 1. 1 of course we stick to the same height and then another one is 0. 9 and then the same height of 2.
4 of course these ones are so far we've seen one okay not two and then another one here okay so we move next uh the next is grid D1 along grid D1 there's another door 0. 85 the other one is also 0. 85 okay so on the 0.
85 list we'll add other two doors so one two all right we move on to the next uh the next is talking about is um uh C1 C1 there's no door those are just openings they are not doors they're just openings and then uh yes that is it so that bring us to the end of U those doors that we wanted to talk about so here is four these are two this is one this is also one so the areas here is equals to width then you multiply by the height then times the number of doors okay and then we copy that formula then we get a sum here okay need to update on that I need to update on that so that the formula works all through this then equal sign we do a sum sum of the areas of the doors that we've calculated that gives us 16 16. 1 so the 16. 1 is supposed to be deducted from the gross area Okay so the net area therefore net area here therefore is equals to the total area gross area that we've calculated and then we subtract from it we subtract now what we've got as the area for the walls okay there is a small problem there I need to correct so this is the total area and then we subtract the area for the doors perfect so our net area for the internal walls is supposed to be 87.