[Music] foreign do you need to maintain a consistent security posture across your internet-facing applications but also want the flexibility to tweak specific requirements for certain applications welcome back to our go deep with Cloud Armor Series where we do demonstrations on capabilities and features so you learn what's available how to use it and how you can leverage it in your environment in our previous video we covered the basics about Cloud armor and the architecture we'll be basing our demonstrations on if you're thinking what previous video check out the link in the description and go watch that
first because it has helpful context that you'll need Cloud Armor's flexible and efficient policy configuration capabilities allow you to have a uniform strategy across applications while maintaining the flexibility to create custom rule sets with your specific requirements and modify policies when needed in this video we'll be going over how to configure Cloud armor rules and policies to secure your applications we'll cover how to create a new rule from scratch how to clone an existing out-of-the-box Rule and modify it to create a new rule how to copy a rule or policy and apply it to multiple
backends we'll also highlight our rate limiting feature here and how to use a rule in preview mode and test a new rule before enabling it and we'll cover how to use the threat intelligence feature here check out the description for the timing of each of these so you can go to whichever one you want at any point to configure Cloud armor your ID requires the compute Network admin and compute security admin roles you'll want to ensure those are in place before you start working with rules we'll be doing all of these demonstrations in the cloud
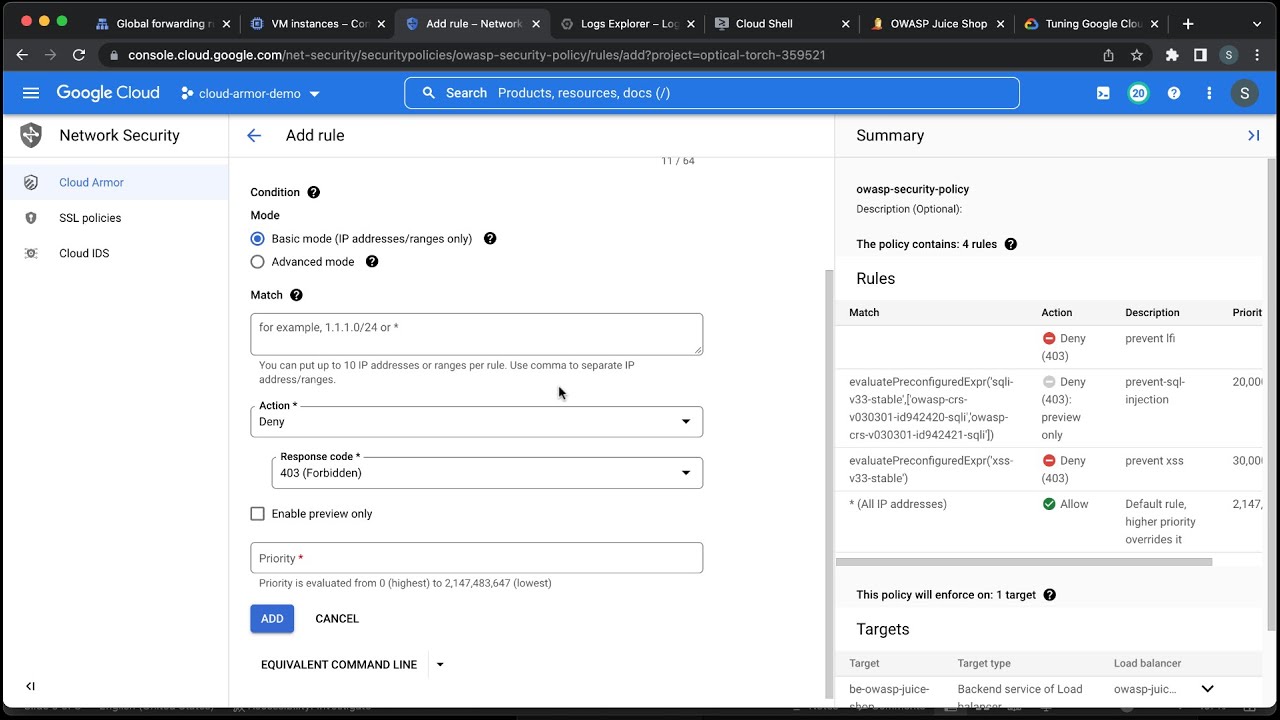
console and Google Cloud command line interface for our first demonstration we'll be showing how to create a rule from scratch before we start let's take a look at the page we're trying to block you can see that the page can be opened because we have not yet deployed any of the rules we're about to configure now back in our console we'll start by clicking into the test policy that we're going to execute on and click the add rule button in the description box I'll write the rule itself in this case we're going to block U.S
users that are using a specific header then I can click into advanced mode we're using common expression language to write our match condition common expression language or cell is used in many places in Google Cloud in this particular case we're using a compound rule our action is denied and I'm going to assign a priority level of 12 000. the way rules are evaluated within Cloud armor is from lowest to highest the first rule that matches wins the action specified in that rule is taken and no further rules are examined so rule priority matters I add
this rule into our setup and it'll take a moment to show up on the screen we can see here that the new rule has been deployed now in my browser I'll make a request to my application but before making the request I'll use the browser plugin called mod headers to insert a header before the browser makes a request to my application the plugin will add the header user agent hacker to the requests made by the browser you can see that the request was denied with an HTTP 403 response and that's it for our very first
rule configuration very simple and easy to complete the next configuration we'll cover is how to use an existing out of the box Rule and modify it to create a new rule we start by clicking the add rule button and for this scenario we're using cell rules again we'll use the O wasp mod security rule for PHP and modify it slightly again in advanced mode paste in our cell expression to block requests with a PHP vulnerability here we're using the PHP rule set but we're also incorporating a compound rule where we target a user agent the
action is denied and the priority is eleven thousand click add to deploy the rule and you can see that the rule has populated into our rule set and is ready to go now in my Chrome browser I'll stimulate a request that matches the condition for the PHP owasp rule set my mod header browser plugin already has the header user agent hacker which will be added to the request made by the browser then I regenerate the request and you can see it fails as expected because in the PHP oasp rule we were explicitly looking to block
the user agent field contained the value hacker next we can go into Cloud logging and review the cloud armor Lots here are the log lines that show the action taken by Cloud armor you can see under Json payload and enforce security policy the rule that was applied and details like the priority of the rule using Cloud logging you have real-time insights into how Cloud armor is operating you have the ability to analyze if when and why a specific request was allowed or denied the extra level of details gives you confidence and also helps in identifying
any false positives during rule tuning next we'll demonstrate how simple it is to copy a rule or policy and apply it to multiple backends we can use the export function to create a yaml file containing the entire configuration for a policy for this I'll open Google Cloud shell and execute the export command to create the yaml file we can now use the yaml file to create an exact copy of the policy to create the new policy we execute this command if I refresh my page I can now see that my new policy has been created
and if I click into it I see that it's an exact clone of what we previously had with our app one policy but this is for app2 now that we've copied the policy we'll show how to apply it to multiple backends go to the policy and switch to the Target tab click on ADD policy to new Target and select the new backend note that a policy can be applied to multiple backends but a backend can only be attached to a single policy let's add to this example the use of the rate limiting capability rate base
rules help you protect your applications from a large volume of requests that flood your instances and block access for legitimate users rate limiting can be used to achieve two main objectives one prevent any particular client from exhausting application resources and two protect your application instances from erratic and unpredictable spikes in the rate of client requests Google Cloud armor has two types of raid-based rules first throttle you can enforce a maximum request limit per client or across all clients by throttling individual clients to a user-configured threshold second rate based ban you can rate limit requests that
match a rule on a per client basis and then temporarily ban those clients for a configured period of time if they exceed a user configured threshold we identify individual clients for rate limiting by using the following key types for aggregating requests and enforcing rate limits all a single key for all clients IP a unique key for each client Source IP address HTTP header a unique key for each unique HTTP header value xffip a unique key for each original Source IP address of the client that is the first IP address in the list of ips specified
in the x-forwarded for HTTP header and HTTP cookie a unique key for each HTTP cookie value so now let's configure a rate based ban I'll be using the Google Cloud shell again and I'll paste my command to create this rule in this rate limit rule you can see that the action is rate based ban we're setting the limit on the request to 10 and the time interval to 60 seconds so if we receive more than 10 requests in a minute from the same IP the user will be banned for 300 seconds you can always go
into the policy and confirm that the rule has been created I have a separate setup running in the background to generate a large number of requests let's look into the logs to validate that the rules taking effect and exercising a rate based ban as you can see from this log line the rules preventing a user behind a single IP from exhausting my application resources finally we'll show how to use a rule in preview mode this allows us to test a new rule before enabling it and make sure there are no false positives which is when
a rule blocks requests it's not supposed to the action here is neither block nor allow it's preview you still put the action in the rule but because it's in preview it will tell you if it would have matched the rule but ultimately ignore the behavior and continue on to the next rule this allows you to evaluate the potential impact of a capability with preview mode before actually blocking traffic for this demonstration we'll incorporate the use of our threat intelligence feature Google Cloud armor threat intelligence lets you secure your traffic by allowing or blocking traffic to
your external https and TCP and SSL proxy load balancers based on several categories of threat intelligence data threat intelligence data is obtained from both primary and trusted third-party sources Google creates and automatically updates these lists of IP addresses as regularly so all you need to do is to call the list as an object in a rule and you'll always be getting the latest threat intelligence and force in that rule there are different types of threat Intel objects that you can use in a rule some you'll likely want to block like tour exit nodes and known
malicious IP addresses and some you might like to allow like search engine crawlers public Cloud providers and Upstream providers like CDN providers now we'll create a rule using a threat intelligence list object this rule will deny requests from the IP addresses of Tor exit nodes which points at which traffic exits the Tor Network again in advance mode paste in our cell expression check out the link in the description for information on creating these custom language rules we'll set the priority to ten thousand action to deny and enable preview mode you can see that the rule
has been created now I'll make a request from the Tor Browser which is connected to the torn Network you can see that my request wasn't denied because the rule is in preview mode now I'm going to go back to the rule and turn preview mode off then set the rule to deny and retry the same request we can see that the request was denied let's get into Cloud logging and validate both these scenarios we're locked you can see that when in preview mode we let the request through but logged this action when we denied the
request you can see that being logged as well Cloud logging is a great way for security teams to verify Cloud armor is working as they expect it to and that's it that is how simple configuring rules and policies in Google Cloud armor is when it comes to web application security it's important to have a consistent strategy across applications to maintain a certain level of security with Cloud armor you have this consistent security without having to compromise on application specific details now you can take these principles and apply them to secure your application to get started
with Cloud armor you can go to the console and find it in the menu bar under network security or you can type in Cloud armor in the search bar make sure to check out the links in the description for helpful information and if you found the demonstrations in this video helpful make sure to subscribe so you don't miss the upcoming videos in the go deep with Google Cloud Armor Series [Music] thank you