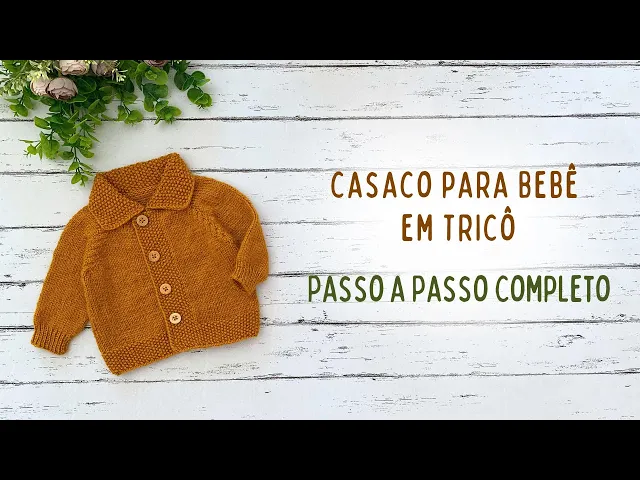
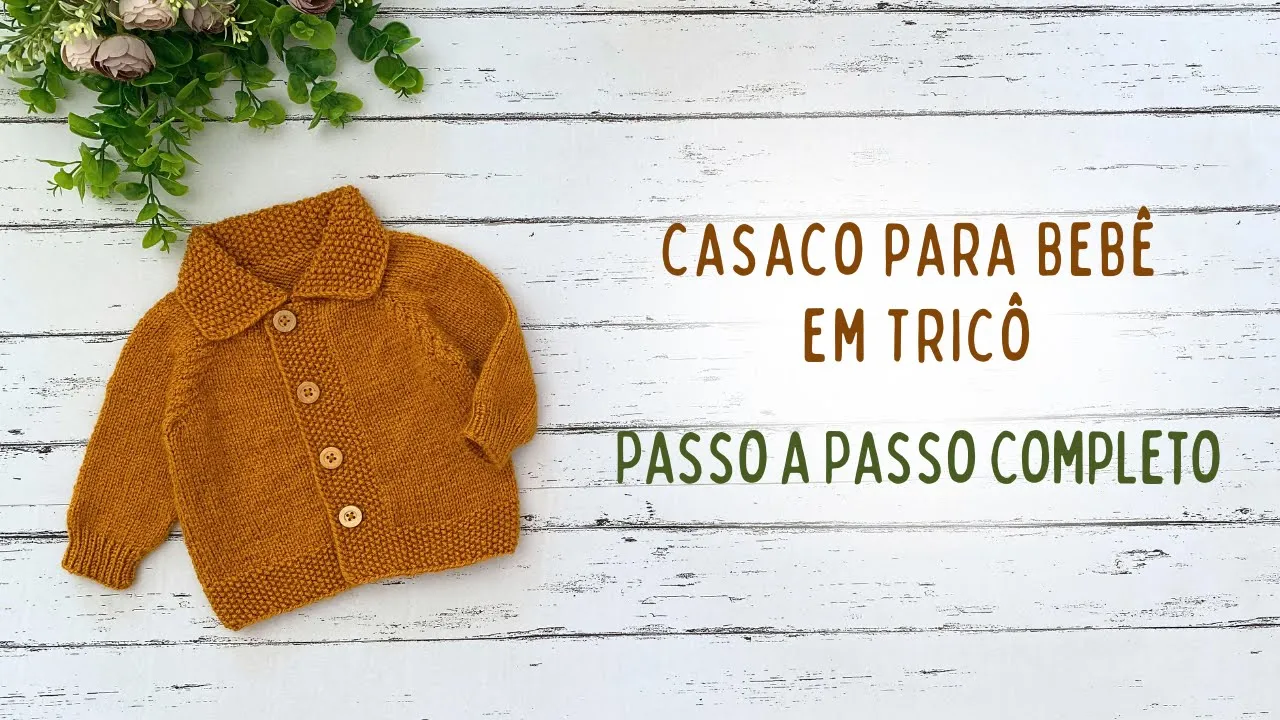
Hi guys, how are you? In today's video lesson I'm going to teach you how to make this beautiful little jacket with a collar for a baby. I knitted it for a baby aged 0 to 3 months, but if you want to knit it in other sizes, I'll be leaving the written recipe here in the description of the video which contains all the information for you to knit in sizes from zero to 12 months.
And there I'll also be leaving the materials I used to make this piece. This little jacket is part of a complete set of pants. shoes and hat all matching And I'll leave here in the description of the video the link to the other pieces, ok This piece I knitted in stocking stitch Here on the collar I knitted in rice stitch Both the collar and the buttonhole and also on the hem On the cuffs I knitted in bar stitch one by one And here on the yoke on the raglan line I made a simple braid ok And if you liked this piece, don't forget to like it, also comment below what you think and also share so that other people also know my work and subscribe here to the channel and activate the bell button so you don't miss any news And also follow me on Instagram @tbabytricô which is where I post lots of inspiration and knitting tips for babies And after all this let's go step by step To start this work I put 60 stitches on my needle This number of stitches is for size RN If you are weaving in another size I suggest taking a look at the written recipe as this number of stitches changes for each size I I knit for 6.
5 cm in rice stitch or 6. 5 cm And the rice stitch you start knitting a stocking stitch then a knitting stitch and repeat a knitting stitch a knitting stitch And in the second row where there is a stocking stitch you do a knitting stitch And where there is a knitting stitch you do the stocking stitch And repeat these two rows until you reach the desired length So after having knitted the collar for 6. 5 cm I will cast on six stitches in mine needle ó Just turn the thread like this and put it on the needle One ó Two 3 4 5 and 6 After having cast on the six stitches I'm going to knit these six stitches in rice stitch Ó as the last stitch here was in knitting stitch so here will be a right stockinette A knit one knit one knit one knit one knit one knit one sock one knitting and here I continue Where there is a knitting stitch I will knit and where there is a stocking stitch I will knit stitch I will continue knitting in rice stitch until I reach the end of the row I have reached the end of the row and here I will cast on six stitches again 1 2 3 4 5 and 6 I turn my work And before I start knitting these stitches I will divide the flap so that you can better understand So to divide the flap I will place the front part with these stitches cast on.
13 points Then 2 4 12 and 13 I place the stitch marker Then I will place four stitches for the braid guide stitch I place another stitch marker The sleeve seven stitches 2 4 6 and 7 four stitches for the braid 16 stitches for the back 2 4 6 8 10 12 14 16 Place the stitch marker Four stitches for the braid Seven stitches for the sleeve 2 4 6 and 7 four stitches for the guide point of the braid and on the other part of the front 13 points 2 4 6 8 10 12 and 13 So it was like this for the front part here the fronts 13 points the sleeves seven points and the back part 16 points And there were four sets 1 2 3 and 4 of four stitches which is for the braid okay Which is the raglan line o 1 2 3 and four which are where we make the increases We make the increases before and after Before after before and after before and after before and after always OK So here I'm going to put the stitches onto the needle I'm going to knit I'm going to knit 10 stitches in rice stitch So here as the last stitch is a knitting stitch so here it's going to be a knitting stitch, right? knitting A sock one knitting one sock one knitting one stocking stitch and one knit So here were 3 6 7 8 9 and 10 10 stitches in rice stitch which is the edge stitches And I'm going to knit three stitches in stocking stitch 1 2 and 3 Here I'm going to make my increase I'm going to put this little thread that is in the middle of the two stitches And taking it from the front I'm going to make an increase inclined to the right I make the stitch marker I make four stitches in knit which is the braid I make the stitch marker I take the loop which is in the middle of the two stitches I place it on the needle like this and taking it from the back I will make the increase inclined to the left First we made the loop by taking it from the front and then taking from the back the little thread that is in the middle of two stitches that will be the increases So here I will continue knitting in stocking stitch until I reach the next stitch marker I knitted the seven stitches of the sleeve I arrived at the stitch marker I take the little thread that is in the middle of the two stitches and put it on the needle from the front E from the front I'm going to knit a stitch in stocking This way the stitch marker I'm going to knit the four stitches of the braid I make the stitch marker and again another increase But only with this increase I put the loop in the back like this And from the back I do a stocking stitch which is an increase inclined to the left I continue knitting in stocking stitch until I get to the next stitch marker I know you're going to ask me why I pick up the stocking stitch from the back and another stocking stitch from the front because from the position of how the stitch is Look, you can see that this stitch is turned one way and this one is turned another way. If I knit this stitch from the front, the stocking stitch, it will be twisted.
So, due to how the stitch is, I have to pick it up from the back, you can see that it is open. And this one from the front. we don't want it to be like this So the difference is that it stays open here it is I knitted all the stitches in stocking stitch I reached the stitch marker Again a slanted increase to the right You take the little thread that is in the middle of the two stitches and put it on the needle from the front From the front you do a stocking stitch I pass the stitch marker four stitches into knit I make the stitch marker take the little thread that is in the middle of the two stitches and put it on the back First it's from the front like this and the second one from the back OK change the position And from the back you will do a stocking stitch I will continue knitting until I reach the next stitch marker Oh I reached the stitch marker Again an increase inclined to the right I make the marker four stitches in knit I make the marker and an increase inclined to the left And now I will knit three stitches in stocking 1 2 3 If you want you can place the stitch marker here just to identify the edge stitches which are in rice stitch So here as a knit stitch so I will do a knit So 1 2 3 4 5 6 7 8 9 and 10 I turn my work The first stitch, as it is a knitting stitch, I pass it to the needle without knitting in a knitting stitch to form the edge stitch so that the edges look like this, you see With this very neat finish So the first stitch I will always pass to the needle without knitting, okay So here I went to the needle without knitting in a knitting stitch The next stitch, as it is the stockinette stitch, so I knit and continue knitting 10 stitches in rice stitch 1 2 3 4 5 6 7 8 9 and 10 10 edge stitches And the rest of the stitches I will knit in knitting stitch I will not make any increases The increases are done only on the right side of the work And reaching the end of the row 10 edge stitches in rice stitch ok I will continue knitting here in the center in knitting stitch and edge stitch 10 stitches in rice stitch I knitted the back of the work and Now on the right side of work I will make 10 stitches in rice stitch.
Remember that the first stitch we pass to the needle without knitting. So 10 stitches in rice stitch. edge I'm going to knit four stitches in stocking 1 2 3 and four I arrived at the stitch marker I take the little thread that is in the middle of the two stitches I put it on the needle from the front like this and I make a stocking stitch which is an increase inclined to the right I pass the stitch marker Here I'm going to cross the braid I'm going to take the auxiliary needle and go through the stitches I'm going to leave it reserved behind the work This thread I put in the front part of the auxiliary needle like this And I'm going to knit the next two stitches in stocking 1 and two I remove what is on the auxiliary needle and place it on the left needle on the main needle And I'm going to knit these two stitches I pass the stitch marker I'm going to make an increase inclined to the left Then the thread is like this The little thread that is in the middle of two stitches from the back And from the back I make a stitch in stocking I'm going to knit the stocking stitch until I get to the next stitch marker I reached the next stitch marker I take the little thread that is in the middle of the two stitches from the front to make an increase inclined to the right This form the stitch marker I reached the four stitches of the braid I pass two stitches to the auxiliary needle and leave it reserved at the back of the work I place the thread forward here from the auxiliary needle and I will knit two stitches I remove what is on the auxiliary needle I place it on the left needle and I will knit two stitches So this is how you cross the braid ok I make the stitch marker I will make an increase inclined to the left with the thread to the back From the back I make a stocking stitch I continue knitting in stocking stitch until I reach the next stitch marker Whenever we reach the next stitch marker we make an increase first and then until we reach Paula's indicated length Oh I reached the marker again I'm going to make an increase inclined to the right I pass the marker I'm going to cross the braid again If you don't want to do it with an auxiliary needle you remove the four stitches These first two stitches you place on the left needle and these two that remain turn and place on the left needle That's another way to do it is to cross the braid but if you think it's better and easier you can do it with the auxiliary needle, ok.
here you knit the four stitches in stocking stitch ó I pass the stitch marker I'm going to make a slanted increase to the left I continue knitting in stocking stitch until I reach the next stitch marker I reached the marker an slanted increase to the right The right The loop is on the front You make a stocking stitch pass the stitch marker to cross the braid ó I'll teach you again Take the four stitches out The first two from here I insert into the needle If you want to do it like this, ok And these two that are left I take them and put them on the needle Then I do the four stitches in stocking stitch I make the marker I'm going to make an increase inclined to the left and I'm going to knit four stitches in stocking stitch 1 2 3 and 4 And here 10 stitches in rice stitch edge And now I'm going to knit the back of the work according to the pattern The 10 edge stitches both at the beginning and at the end of the row And here in the center all the stitches in knitting stitch without making any increases, okay The increases are only on the right side of the work Here we just follow the pattern of the stitch I'm on the fifth row and now at the beginning I'm going to do the buttonholes The first buttonhole is at 1 cm 1 cm And the next ones are every 5 cm So after I do this one every 5 cm I'm going to do the buttonholes again So here I'm going to do three stitches in rice stitch 1, 2 and 3 I'm going to make a yarn over and I'm going to knit two stitches together Oh the last stitch was in stocking stitch so this one is like knitting So I'm going to knit two stitches together in stockinette We do these two stitches together as the pattern of the stitch The last stitch was in stocking stitch Here it would be a knit So here it would be stockinette Then continue knitting A knit stitch a purl a knit stitch and a knit stitch So here was 10 stitches in rice stitch I will continue knitting in stocking stitch until I reach the next stitch marker When I get to the stitch marker I will make an increase inclined to the right I pass the stitch marker Four stitches in stocking stitch I make the stitch marker an increase inclined to the left I continue knitting in stocking stitch until I reach the next stitch marker where I will again do the increases before and after the stitch markers Before an increase inclined to the right and then an increase inclined to the left through all the stitch markers in the seventh row And in this row I will cross the braid again and I will continue making the increases ok So here a stitch without knitting for the needle I will make 10 stitches in rice stitch 2 3 4 5 6 7 8 9 and 10 I'm going to knit six stitches 1 2 3 4 5 and 6 And arriving at the stitch marker, as always, make an increase, an inclined increase to the right. Pass the stitch marker And here I'm going to cross the braid . one front one back and in the next one the crossing of the braid So I'm going to pass two stitches here to the auxiliary needle I leave it reserved behind the work o I put the thread in front of the auxiliary needle like this Then knit the next two stitches in stocking put the thread to the front and return the two stitches that are on the auxiliary needle Put the thread to the back and knit these two stitches in stocking stitch And here I made another crossing of the braid o It looks like this I make the stitch marker and again an increase inclined to the left I will continue knitting in stitch knit until I get to the next stitch marker Oh, I've reached the next stitch marker I'm going to make a slanted increase to the right with the thread forward I'm going to make a knitting stitch, I'm going to pass the stitch marker and I'm going to cross the braid again Then if you want to do it without the auxiliary needle, then remove the four stitches, pass the first two stitches to the left needle and then take these two with the right needle and place them on the left needle to knit them And knit these four stitches It's another option if you don't want to knit with the auxiliary needle OK, you can do it like this, I make the stitch marker and here an increase tilted to the left And so I'm going to continue knitting, making my increases before after the stitch markers and crossing the braid every four rows.
So as I told you, after this crossing you're going to knit the back, you 're going to knit one more row on the right side , then you're going to knit the back, which is already the third right . all the stitch markers are All all I continued knitting, making the increases before and after everyone's stitch markers as I told you previously until I reached 50 stitches only on the back, OK So for my size on the back without counting these four guide stitches, OK Not that here So from one marker to the other marker here there are 50 stitches So on the back there are 50 stitches On the sleeve part there are 41 on the front there are 30 stitches on both one side and the other And between the stitch markers have the four guide stitches okay So the number of stitches for the back, sleeve and front is separated Then there are the guide stitches I don't count the guide stitches okay So only on the back with the increases there are 50 stitches From now on I'm going to continue knitting the body and I'm going to leave the sleeve part reserved So here I'm going to start knitting the front part So I knit according to the pattern I'm going to knit until I get to the stitch marker Remembering that this number of stitches that I said before is for the size RN Each size has a different number of stitches OK I reached the stitch marker I can now remove the marker And these four stitches from the guide stitch I will knit the stitches together twice So one and two OK I knit them two stitches together twice OK To have just two stitches I remove the stitch marker And now I will pass these stitches from the sleeve which in my case has 41 stitches to an extra thread If you want you can take a tapestry needle and pass all the stitches to an extra thread or get those hook needles like this and pass all the stitches I'm going to take an extra thread and a crochet hook which I think is better and more comfortable to knit So here I take an extra double thread, I don't make any knots Then I insert my crochet hook in the first stitch I pull the thread and with the thread that is connected to the ball I pull a little loop into the little hole as if I were going to make a chain Then I insert it Then I insert my crochet hook in the next stitch I pull the loop inside the stitch and also inside the hole And so I continue passing all the stitches into an extra thread So that way the 41 stitches are finished I finished passing the sleeve stitches into an extra thread Then when I get here I cut and pull it there to undo it, this part where we started, it stays down, and this one, which is the end, it stays up Then, all you have to do is pull it here Then you pull it, it starts to come undone, then you put it on the stitches on the needle So here I'm going to remove the next stitch marker But first I'm going to cast on two stitches on the needle and on the right needle I cast on two stitches one and two When I get to the four stitches in the guide stitches I'm going to knit two stitches together One and two like this I remove the stitch marker and I'm going to knit the stitches on the back until I get to the next stitch marker I've finished knitting the back part Then I get to the stitch marker I take it off I'm going to knit two stitches together twice which is the four stitches of the line of the raglan I take out the next stitch marker And here I'm going to transfer the sleeve stitches to an extra thread again, okay So I'm going to pass them here and come back to continue the work I've finished passing the sleeve stitches to an extra thread Then now on the right needle I'm going to cast on two stitches one and two I remove the stitch marker Then I've reached the four stitches of the raglan line I'm going to knit two stitches together in stockinette One and two Like this I remove the next stitch marker and I'm going to continue knitting according to the pattern until I reach the end of the row I reached the end of the row I turn my work and from now on I will knit the body of the cardigan So on the front here I will knit everything in stocking and edge stitch I will continue knitting in rice stitch the 10 stitches both at the beginning of the row and at the end until I reach the indicated length of my piece Remembering to make the buttonhole every 5 cm ok So here I have already done one more So I will continue knitting until I reach the indicated length of the my piece Knit in stocking stitch on the right side of the work And here on the back you knit in a knit stitch And in these two cast-on stitches you knit in a knit stitch on the back of the work and on the right side in stocking stitch okay I continued knitting in stocking stitch here in the center and from the edge in rice stitch until I reached 20 cm measured from after the collar So from here to here it was 20 cm Then after the collar up to here it was 20 cm And after I knitted until I reached 20 cm I knitted for 14 rows in rice stitch and then I finished the stitches at 20 cm, the body 14 rows in rice stitch and finished the stitches And the body of the cardigan is ready Here I already made one sleeve o It looks like this And I'm going to show you how to do the other one since the two sleeves are made in the same way So here and I'm going to pass the stitches to my needle If you did it the same way as me, when the thread is down it's because You can't take it off on this side, OK, you can see that it's down and on this other side, the thread is kind of upturned, you see, that's the side you have to take it off, Oh, pull it here, pull it here, then you'll have a stitch left, then you can put it on the needle like this. Then just pull it, and you'll put the stitches on the needle, OK, just pull it and slowly put it in .
I've finished passing all the stitches onto the needle. sew the side seam With a straight needle I think the stitches are very tight but if you want to do it you can feel free So here I'm going to attach my thread here in the middle of the armhole where the two stitches were set up here in the middle I'm going to give a nozinho Fiozinho Then I hide it So here I'm going to pick up two stitches So I'm going to pick up this edge stitch here, lift one and here right on the side o Skip this part here that is in the middle of the two knitting stitches and skip to the next knitting stitch and lift one more stitch like this And now I'm going to knit in stocking stitch until I get to the end of the row I've reached the end of the row and here I'm also going to pick up two stitches So I'm going to pick up a stitch here on the edge o one stitch o When the stitch is a bit loose then you pick up where it's tightest, okay? So it was here, in this stocking stitch One And here closer to the next one, which is in this next stocking stitch, two two stitches And now I'm going to knit for another seven rows in stocking stitch In the eighth I'll come back to teach you how to do the decrease So here I'm going to knit in a circular pattern, you're going to continue knitting the other side in stocking stitch If you want, you can put the stitch marker here To identify the beginning and the end As my needle is big , so I can't get lost OK, so I'm not adding it, but if you want, you can do it.
So here I'm going to knit in stocking stitch for seven rows. In the eighth, I'll come back to teach the decrease . another way, you can see that this one, the strap is facing the front, this one is facing backwards So I'm going to knit by inserting my needle from left to right and knitting two stitches together in stocking stitch so that there is a decrease tilted to the right Then I'm going to continue knitting in stocking stitch until I reach the end of the row with three stitches remaining I reached the end of the row with only three stitches left to finish I'm going to make a decrease tilted to the left I'm going to pass one stitch without knitting to the needle The next stitch I do the stocking stitch I take the stitch that I didn't knit and throw it over the stitch and stocking It's a simple matte, okay We can also call it a decrease inclined to the left And finally a stitch in stocking And now I 'm going to continue knitting in stocking stitch for another seven rows And in the eighth I'm going to do this decrease again So it will look like this Oh here I knitted the seven rows here is a decrease Then seven more rows in stockinette without making a decrease Then in the eighth a decrease Seven rows in knit In the eighth a decrease So I continue until I reached the indicated length of my sleeve I continued knitting and making decreases every eight rows So here you have a decrease Then you count after the decrease 1 2 3 4 5 6 and 7 Then in the eighth you make the decrease Then after again 1 2 3 4 5 6 and 7 Then in the eighth again a decrease both at the beginning of the row and at the end of the row Then now I will make the cuff I continued knitting until I reached 10 cm measured from the armhole here 10 cm And now I'm going to make the cuff To make the cuff I'm going to knit the cuff with needle number three If you don't have needle number three you can do it with needle size 3.
5 So I'm going to start by knitting a stocking stitch a knitting stitch a knit stitch until I get to the end of the row I 'm going to knit for 10 rows in slash stitch one by one I reached the end of the row with the slash stitch one by one So look, here there are two stitches to finish the row Then here is a knitting stitch and a knitting stitch like I started with a knitting stitch, there will be two knitting stitches here at the edge. So to avoid getting the bar stitch wrong one by one, I'm going to knit two stitches together in knitting, okay? Because then it will be knitted.
Then come back here in stocking stitch to get it right, the bar stitch one by one So if in yours it's like that too, then you do that, okay, Knit two stitches together to get it right, the bar stitch one by one And now I'm going to continue knitting the slash stitch one by one for 10 rows. I finished knitting the 10 rows in slash stitch one by one and then I finished off the stitches. Then here, to close, here I will teach you how do you do it I cut the thread, put it on the tapestry needle Then here, taking the first stitch in stockinette stitch from the back, you go past the stockinette stitch on the two legs, pull it here in the front and here where there is the binding, you put the needle back and press here, oh Then it's very tight Then turn it back here, make a little knot and hide the little thread That's it And the sleeve looks like this oh And this is the result of the jacket I placed the buttons right on the edge of the stockinette stitch ok Okay I placed it well around the edges and hid the remaining threads and this is the result of the cardigan.
I hope you enjoyed it. A big kiss and see you next time.