[Music] hi guys and welcome to the course clean architecture in net MVC if you are new to the channel make sure to hit that subscribe button that way you are always notified of the new content that I release in the net world this course is all about net core MVC starting from Ground Zero using clean architect we will start with the fundamentals of An MVC application and then enhance the application with more features as we follow clean architecture design pattern now when I say fundamentals we will start from Ground Zero when it comes to a
net core MVC project and we will understand what MVC stands for how files and folders are organized in an MVC application and then build further on the fundamentals I have been a net developer for more than 10 years and my main focus For this course is to remove the hardship that I faced when I was learning MVC along with clean architecture if you have worked with an antier architecture getting familiar with clean architecture might seem a little odd at beginning but at the end of the course you will see how everything comes together now when
we are programming bugs and errors are very common and because of that I intentionally introduce bugs While programming to show you the commonly encountered error messages and how to solve them net team has been great with adding new versions every year with major release planned at end of the year but when there are new versions one thing that I have seen is updated Cod course and following an outdated course has its own headache because of that if there are any breaking changes with the version update I will always keep the Course updated that way you
do not have to worry about being stuck with an outdated course but before we start I have a small advice for you whenever you are learning something new it is common to be overwhelmed with the new terminologies and Technology sometimes you might even feel things are not making sense I would recommend you to watch the same video again if that happens and if it still does not make complete sense continue on with the next Video because I can assure you by the end of the section that you are on everything will start making sense I
have carefully drafted the course in a way that if something is confusing I iterate through the same flow again again that way it will make sense but you might have to watch next three or four videos for everything to make sense so make sure to trust the course and do not give up if you are completely new to MVC or other Concepts it might take a While but if you follow along I guarantee you that by end of the course you will be proud of what you have accomplished when you see the final application that
you will build and another very important thing is to not overdo yourself if you feel exhausted after a few hours take a break and come back next day you will learn more if you complete the course with a fresh mindset even if it takes you 2 weeks to complete the course rather than If you would try to complete the course in 2 days by overloading your brain and rushing through the course with that piece of advice I I hope you are excited to see what we will build in the course and let me show that
in the next video in the next video I will walk you through demo of the complete application that will be built but for the introduction here we will not be building complete application I have link of that complete course in the Description but for the clean architecture fundamentals here we will see and understand what is clean architecture and how files and folders are organized in a clean architecture we will modify the files and folders in a new project to follow clean architecture and once we do that we will perform crud operation on Villa and Villa
number we will see notifications we will have alerts we will interact with database using Repository pattern and then whatever we perform crowd operations on we will display all of those Villa in homepage and Details page with that you will have a great understanding of fundamentals of clean architecture and then you can continue on in the Advan course where we will build and add many more features in the application now the course was recorded with net 8 but if you have net 9 then the good news is that it is 100% Compatible with do net 9
everything that you follow along in the course will match 100% when you are using net 9 in your application let me walk you through the application that we will build it is a resort website where on the homepage you can see we have a navigation and we have login and register if you click on manage bookings here for a user it will redirect you to the login page because you must be Logged in if you want to see your bookings before I log in here let me click register as a new user and I want
to display the registration page we have few details here and we have validations on top of that we have a drop- down where you can select role of the user we have two types of role in our project admin and customer now of course when we publish the application this drop down will be hidden and the default role will Be customer rule but right now we are testing that's why I have a drop down that way you can easily create customer and admin user I do not want to spend time on creating let me log
in I already have registered customer user let me log in here and perfect we are back on the homepage we see the user ID of the logged in user and the log out button that looks good if I scroll down here we have check-in date and number of nights If you click on all the Villa here it will display all the Villa details on top of that you can download a PowerPoint presentation of the Villa let me open that here and perfect that looks good now this PowerPoint will be dynamic PowerPoint based on the Villa
that you select it will automat automatically add the image and all the details we will see how to build that on the Fly based on the selected Villa now in order to make a booking here we have to enter a check-in date and number of nights that we want now each Villa that we have like premium pool Villa there might be three premium pool Villas available but if during the time that user is checking in and checking out based on number of nights if any one of the night all the rooms are booked then it
will display sold out so we will have Dynamic availability based on that let me hit The check availability and I know for 15 all of the premium pool Villas are already booked so you can see it displays sold out here if I select some other date here when the Villas are available perfect you can see that works so the availability will be dynamic and that is great if I hit the book button here it takes me to The Villa details where we can modify few details we have checkin and checkout date and if Everything looks
good we can press checkout button when we press checkout it will redirect me to stripe for checkout it displays the order total and right now we are in the test mode for stripe I already have been using this email and we have a dummy credit card that is automatically saved in if you want to create as a guest checkout it will log out but I do not want to do that right now let me hit the pay button with the Default test credit card that I have once it is successful it will redirect me to
the booking confirmation and perfect our vacation is confirmed we have the order ID here if I go to manage booking perfect in manage booking I can see all the approved bookings by default if I modify that we have other status here but I will not go into all the details right now we have completed as well checked in and cancelled right now we want to work on The order 1019 if I click the details button here you will see all the order details perfect that looks good now let me log out here and let's take
a look at what the UI will be if a admin logs in let me log in as an admin here and you will notice the UI is different now we do not have the top navigation for manage booking we have a site navigation right here that means we have different Navigation based on if a admin logs in or if a customer user logs in on top of that you can see we have a nice dashboard with multiple charts where we can exactly see new bookings new members that were added and other details but you can
see in content management we have the Villa there where we will be able to create new Villa or we can edit any of the existing Villa if we want to change image price or anything we can always update all of That so we are performing crud operations on Villa we have a villa number here where for each Villa we will associate the room number or Villa number so you can see premium pool Villa has three Villa number that basically means that there are three rooms available of the type premium pool Villa and based on that
we will toggle if a villa is available on the selected date we will see how many bookings we have for that date and Number of villa available for that same Villa type then we have amenity here where we will display the amenties for individual Villa finally the most important one is managing all the bookings you can see we have quite a few approved bookings let me pick the one that we created 1019 and if we go to the details here admin will have more options than a customer you can see the next status Here is
to check in that user and When an Admin checks in the user they will select the Villa number The Villa number here will only be available for those Villas that are not checked in they will select the number here and they can check in that user when they hit check in here the status is updated to checked in and next button that gets highlighted is check out a user when we select that it will complete the Booking on top of that we can also generate invoice in word and PDF let me do that and it
will also be dynamic based on the template it will automatically populate that and perfect it also displays the Villa number total and and other details Let Me Close That download the PDF open that and create so you can see we have PDF PowerPoint and word downloads all of them are Dynamic based on the Template as you can see there is a lot to cover in the course let me get started with all of that from the next video let me walk you guys through the journey of net core in this video net core is probably
the biggest change net programming language has encountered in 2002 Microsoft introduced web forms and that was a revolution at that time but web forms had its own drawbacks and there was a need to overcome all of them because of that the Net team came up with a new architecture which was net MVC now even though I love MVC and I have built many applications using MVC it had its own flaws like it was created on top of the components of web forms because of that it was tightly tied to IIs and ultimately Windows operating system
but with evolution of development Microsoft had to keep up with the changing technology as a result of that in June of 2016 Microsoft released asp.net core and it was the first version of dotnet that was built on top of this new net core framework this net core platform has been completely Rewritten and it is a crossplatform version because of that it is not tied to Windows operating system now since net core was Rewritten it was written with Cloud architecture in mind and because of that it is extremely robust then in August of 2018 Microsoft Released
the next version of net core which is net core 2.0 and after that the team has been very active in releasing new versions of net core lately they have finalized that in November each year they will release the new version with new features so in November 2022 net core 7 was released and net core 8 will be released in November of 2023 now even though the final version of net 8 will be released in 2023 we can use the preview version of Net 8 using visual studio preview so the preview version is out there and
that is what we will be using in this course that is a small overview of The NET Framework and its Evolution now that being said why should you even learn net core and what are the advantages that net core brings to the table when you compare the classic net language the list is quite extensive first one is that net core is fast and open source if you compare that With traditional net applications there have been quite a few Benchmark and net code is very fast when you compare that to web forms or even net MVC
then net core is crossplatform the classic net was tied to IIs and windows but since net core is Rewritten it has removed that dependency with net core and with net core we have a built-in dependency injection dependency injection is super great when you will move along with the Course and and by the time you finish the course if you work with net core you cannot imagine yourself going back to the code where there is no dependency injection it saves a lot of time and it is extremely efficient in managing all the dependencies with any programming
language it is critical that new updates or new versions that are released they should be easily upgradeable and that is one of the great features with net core The updates have typ Ally been very smooth and because of that you can always keep up with the new version doet core is also Cloud friendly as we move along with the development more and more companies are leaning heavily towards Cloud development and net core has been built with Cloud architecture in mind so that is why it is very flexible when we have to integrate net core with
the cloud Technologies lastly when when it comes To Performance net core exceeds all the previous version and even the new versions that are released in net core they supersede the previous version Microsoft has invested a lot in net core that gives us a clear idea that Microsoft has long-term plan with this technology so with that brief overview let me continue from the next video before you take the course there are some prerequisites that you should be familiar with and the first one is basic Knowledge of c and net web development now even if you have
worked with the old technology and not net core or even webforms that is okay but you should be familiar with basic concepts of HTML CSS JavaScript and C development I would say about 6 months of experience is good enough but that is required on top of that you should have basic understanding of Ms SQL server and how to write stored procedures or how to write select Statements now even though we will not be writing any of them in the course but you should have a basic understanding on how select statement works or how do you
join the tables and that is all the basic Foundation that you will need everything else will be from Ground Zero let me walk you through on what are all the tools that you will require for the course first thing that you will require Is net 8 the IDE that we will be using will be Visual Studio 2022 right now net 8 is in preview so you will have to download visual studio 2022 preview and make sure that you installnet 8 as well but once stop night 8 is released in November of 2023 you can work
with that directly in Visual Studio 2022 without the preview version when you download visual studio make sure to download the community Version that is the free version that is available finally for database we will require SQL server and SQL Server management Studio make sure to install both SQL server and SQL Server management Studio on your local machine that way we will be able to interact with the database so make sure to install all of them before you continue to the next video if you are ever stuck with some issue in the course I am always
here to Help you but let me walk you through on how to get help whenever you are programming your bound to run into error messages and to solve them the first thing that you should do is Google the error copy the error message that you have encountered paste that on Google and the chances are very high that you will find your solution now the reason I am asking you to Google is many times when you will be programming in real world I will not be There to help you at that point you need to explore
how to Google the error and go through the suggestions to find a solution but if that does not help then I will recommend you to search through question and answers on UD me do not try to go through question and answers before you Google the reason I have that in the next step is if Google disappoints you then go through question and answer and see if other students have faced that issue and what was the Solution but if none of them helped then raise a new question and I will be responding back within 2 to
3 days based on my availability but when you raise a question make sure to follow the next three steps or else it is difficult for anyone to help you with a solution first you must clearly identify or Define what is the issue that you are facing after that that you must include the steps that we should take to Reproduce the same issue that you are facing and finally most important thing is a GitHub link to your project if you do not provide a GitHub link chances are very high that looking at the issue I will
not be able to tell what exactly is wrong because many times the issue is not on the same page it throws an exception it is related to some other files in your pro project so until and unless these three critical points are present in your question it gets really Difficult to answer or provide a solution so make sure to follow that in your journey throughout the course when you are working with the course there will be times when you will require GitHub link or project resources that are used in the course to get all of
them you have to navigate to net mastery.com and go to your course we will navigate to the details there and we have the first link for GitHub code if I open that here you will notice The complete code that is used in the project if you examine I have each an individual commit based on the section and lecture name if you open that here you will see exactly what was modified that way you can track on what exactly is not working in your application like right here you can see these two lines were modified in
section 17 lecture as no tracking in EF core I would highly recommend to put your code in Source control as well that Way it will be easy to compare and if you face any issue you can directly send a link to your GitHub code if I go back here I have content resource make sure to download that because if I open that there will be code Snippets that are used throughout the course so you will require them on the videos and all the images that are used in the course are also provided in Project resource
so make sure again to download The project resource before you continue to the next video it's time for the main question what is clean architecture clean architecture is one of the most commonly used architectural pattern it is a design pattern that promotes separation of concern by splitting one large application into multiple layers in a circular design each layer here will have its own responsibility and their dependencies Fundamental behind clean architecture is to create a layer design where central core of the application is independent of any external dependency when we have multiple circular layer the dependencies
will always Point inward so a layer in clean architecture cannot have outward dependency it must always be an inward dependency now let me show you how the layers are organized in a clean architecture the innermost layer is the Domain layer in clean architecture this layer contains the core entities and their specification as an example we will have models for all of our database tables in this layer and they are also known as domain entities so our core database entities or models will reside in the domain layer next layer that wraps around the domain layer will
be the application layer Now application layer is the place To host all of your business logic it is the layer where we will keep all the interface separate from implementation to support separation of concern now when I say we will keep interfaces here it is not always the interface and we will of course explore that as we dive in the course the next layer that wraps application layer is infrastructure layer now infrastructure layer handles external concerns like database if you Have email service and other services that you use in the application we will host our
database migrations and DP context in this layer along with repositories if you implement them with Entity framework finally the last layer will be presentation layer and this is the outermost layer responsible for handling user interaction and user input the presentation layer must be designed in a way that it is easily Replaceable in a net core application it contains the web application itself with controllers and Views but controllers will ultimately depend on inner layer for the business logic retrieval of the data and returning back to the user user interface now again this is a 10,000 ft
overview and if everything is confusing right now do not worry by the end of the course everything will start making sense on why clean architecture is one of the most commonly used design pattern But like I said there will always be an inward dependency now presentation layer and infrastructure layer will have a dependency but but when you think about the innermost layer both presentation layer and infrastructure layer will include application layer because that is the business logic an application layer will include domain layer that is exactly how dependencies will flow between all the layers as
displayed in The picture if possible draw this diagram on a piece of paper and always keep that handy when we are programming because right now everything will be new so it will take a while on where the dependencies are going but we will always refer to the image right here when we are configuring clean architecture we need to create a project in Visual Studio 2022 right now I am in the preview version but if you have Visual Studio 2022 steps will be the same if you are using net 8 before it is up available for
public release then you will have to use the preview version now in Visual Studio 2022 we will select a new project there it will display all the available templates and we need to select the one that we want to work with the template that we want to use is an MVC template so if you search for that you will see asp.net core web app With model views and controller we will select that and hit the next button then we have something called as project name and solution name I will give it a project name of
bulky web and the solution name I will keep that as bulky no solution you can think of that as a folder and project name as a file in that folder in one solution we can have multiple project if you want you can keep both of them same but we will keep solution name as bulky And then bulky web is basically the web project in our solution you can change the location to where you want to save your code and we will hit the next button we need to select the framework here if you do not
see to net 8 that means it is not installed on your system so make sure to install tot net 8 before you proceed next we have authentication type now authentication type you can see There is individual account none Microsoft identity platform and windows we can select individual user account here and then it will automatically configure everything in our project but I do not want to go that route I want to start from ground zero so we will select none here and later we will work on how to add authentication in an existing project we will
have the check boox here for configure for https and we do not want to use Docker We will leave that unchecked here and this is something old it might go away in future where it says to not use top level statements with that our application looks good here let me hit the create button and great that creates application and we have files and folder that we can examine in the solution Explorer right here but with that we have created our first project now this is not our final Project this is only to understand the files
and folder structures and some basic overview but we will delete this project and we will start fresh in the section two with our final project our project is created here let me walk you through all the files that we see right here one by one but before I even do anything with that let me run the application by clicking the https here and that will build the project and open that in the Browser Perfect by default we have a simple application let me zoom in here and we have two things in the header here homepage
where we see welcome here and we have a privacy page where it displays a different page so one thing you can see right out of the box we have a header here we have a footer we have a body here and we have navigation that is already configured by the default do net project that is great news but before we take a look at any other files the main File that I want to show you is the project file itself to examine the project file you have to right click on the project now here there
are two things one is a project which is bulky web and then one is a solution which is bulky a solution can have multiple project in net right now we only have one project which is bulky web when we examine the project file it belongs to a project so we will rightclick on bulky web which is our project and there we Have something called as edit project file perfect when I open that you can see it is pretty simple right now in the older versions of net core this was more complicated but they are simplifying
this with the newer version inside Property Group we have something called as Target framework which says that we are using net 8.0 which is the net 8 framework then we have something called as n label and that is enabled now what I exactly this nullable will do I will cover that in the later videos because it is too early to go into those details and next we have implicit using statements if you are coming from any front-end library or any other Frameworks you should be familiar with some import statements that you write to import other
libraries now because implicit using is enabled here the default using or import statements from the net libraries we Will not have to write all of that it will automatically be included with our project if you disable that then basically you will have to explicitly add import statements nothing more complicated but it is a convenience to have implicit using enabled and that is the setting we will keep as well project file basically has all the project properties which are set by net right here and on top of that when you add some of the new get
packages or npm Packages then you have to add them in the project file now when we add new get package I will show you how the project file here gets updated in the upcoming videos but right now when we have the project file we have the net Target framework that is really important and we have nulli which has been introduced from net6 I will explain that in later videos as well and we have implicit using nothing that fancy right now but when we Add more things to our project I will show you how the project
file gets updated with that brief overview let me continue from the next video after the project file we have something called as connected services but that is empty we will ignore that next we have the dependencies when we build a net application we always or most likely we'll be having more packages that will be added for more Functionalities like if we have to access database if we want some payment integration we will be adding more packages right now in our dependencies we do not have any package now when we have multiple project we might also
add project as dependency so when we do that this dependencies will automatically reflect that and we will do that in future videos so do not worry dependencies basically mean that this project is Dependent on some packages or some other project but we do not have any dependencies on new get package or any other project right now then we have a properties folder and there we have launch settings. Json now this launch settings. Json basically defines a file which will say that when we are running or debugging the application right here when we click on https
what should be some settings that should be Used you can see here there is IIs settings and there it is saying that you should use the URL which is http1 with the port number but if it is an https this will be the port number then if we scroll down we have something called as profiles these profiles resemble everything that you see here you can see we have an HTTP profile https profile and IIs Express in profile we are saying that when we use HTTP profile we want to run the application On this URL and
we are setting some environment variables environment variables will basically be like a Global variable that is defined and we can use that in application as an example let's say if you are setting as net core environment to development then inside the code you can check this variable if that is development you might use a different development database if it is production you might be using a production Database same applies for let's say if you have a payment integration if it is development you want to use your development keys that way you do not have to
use a real credit card but if it is production then you want to use the production key that way real credit card payments can be processed so we can Define all of those envirment variables and profiles in launch settings. Json if you scroll down we have an https profile and that is what we are using Right here you can toggle between the profiles by selecting which profile you want to run the application with we are using https here and here we have the application URL let me hide that and that is 7169 I can update
that to be 701 and let me run this perfect when we execute that you can see the application is now running on Port 70001 that that way you can toggle some Of the properties we also have IIs Express here and you can modify them as per your requirement now typically you do not modify the profiles that much but I wanted to give you a quick 5 minutes overview on launch settings. Json perfect whoops let me stop the application here next file that I want to show you is in the controllers well in in the launch
settings let me revert back the change so here I can undo my git change and that Will bring back the original board now of course you can use whatever you want but I'm not going to change that with that we have covered launch settings and the project file next folder that we have is www root folder and this is an important folder in the application this folder will basically host all of the static content of your net core or your project now what is static content Static content basically means any CSS any JavaScript any newg
get packages or third party libraries or if you have any images files PDFs PowerPoint and so on anything that is static which does not have an HTML code goes into the www root folder so you can see right here we have a global site.css which is already being used in the application so if you want to add some styling here you can always add that next we have the JS file which is site. JS but that is empty we just Have a basic template there inside the lip folder we can see bootstrap G jQuery jQuery
validations all of them are included by default when you create an MVC application in future when we have to add images or anything else which is static we will always add them in one place which is www root folder always remember that after that we have controllers models and Views that I will cover in the upcoming videos but after That we have something called as app settings. Json and then if you expand that you can see we have app settings. development. Json app settings will be the place where you will host all of your connection
string now when I mean connection string it is not just connection string but basically any secret key that you have for your application an example of that will be for your email you might be using send Grid or you might have a secret key for email you will add that in app settings when you have database connection you will add those secret keys there if you are using Azure blob storage or Azure storage account you will be storing all of those Connection in one place that way when you have to change a connection you always
know that you have to go to app settings. Json and not go through all the code Cod trying to find out where is that connection all of your Connection or secret Keys should always go inside app settings. Json now here you see there is app settings. Json and app settings. development. Json if you remember inside laun settings. Json we have the aset core environment now based on this environment it will be configuring to use a different connection ring like let's say in production you will have an environment variable with the name of production then inside
app settings. Json well in the project here let me add and show you that new file we will be adding a new item and we will search for Json file we have the app settings file I will call that app settings. production. Json we save that here and what will happen with net core is it will dynamically use that connection whoops I have a spelling mistake there fix that so perfect now in production if your asut core environment name this is Production then it will be using the connection string and all the settings from this
app settings production. Json so it is pretty smart on what connection it will use but we will uncover that in the upcoming videos right now we do not want to go into that complexity only thing you should remember is all of your secrets or connection string will go in app settings. Json file let me remove the production file that I added right now We are not going to use that but in the final section where we will be deploying the code I will modify that and show you how things work so perfect with that in
the next video Let's examine program.cs which is a critical file now I want to cover a main file which is program.cs in the older versions of net core we used to have two files we had program.cs and we had startup.cs but with the newer version The net team has combined both of those file in one file which is the program.cs file now here let me zoom out and when we have to configure a net application there are two things that you should remember first we have to add some services to our container and next we
have to configure the request pipeline in the program.cs those are the two things that are being handled first you can see there is Builder. web application that creates a builder on that Builder here we are adding some Services right now we are using MVC for our architecture and that is why on Builder doservices it has added something called as ADD controllers with views that way it knows that okay our application will be using controllers and those are already defined in the net project so I know how to handle that service in future we will be
adding many More services inside program.cs file like if we have to inject something using dependency injection which is a very critical aspect in net core we will inject all of them inside the services right here and the next thing that we have is we have to configure the request pipeline pipeline basically means that when a request comes to an application how do you want to process that now one thing that you see on 9 here is we have App. environment. is development this is the same environment variable that we saw in launch settings. Json it
development is a buil-in Helper and you can see we also have his production is staging but if you have some custom environment name you can use his environment and pass it there as well that's too technical for now but I just wanted to give you some over overview on how the environment variables are being used here we are Saying that if the environment is not development then we want to use an exception Handler and we want to redirect to home error page but if it is development then we want to see that exception that is
why we have this if condition after that in our pipeline we have added https redirect and app.use static files when we add the UST static files it will configure the www root path and all the static files in there will be accessible in our Application after that we are adding routing to the request Pipeline and we have authorization now ignore this authorization right now we will cover that when we have authentication and authorization in our project but by default in the request pipeline just have that authorization is added if you even forget that that's okay
next we have something that is important now when we have an application we are Telling it how the routing should work and for that we have app. map controller route it basically has a default pattern that if nothing is defined in the route you should go to something called as a home controller inside that you should go to index action and I ID here can be defined or not a question mark in net basically means that ID can be defined or it can be null so we are defining the default route that it should follow
and finally we have app. run that Will basically run the project now it might be confusing on what is going on here why do I need program.cs file what is all this middleware pipeline very strange words do not worry when we progress with the course everything will start making much sense the reason I spent 5 minutes on this file right now is you have a rough idea that there is one file where if I have to add a service to The Container or I have to configure the middleware I Have to go to program.cs file
that is all that I want you to digest from this 5 minutes and have a rough idea of what I talked about if nothing here makes sense that's okay you should only remember that when you have to configure something in the pipeline program.cs is the place you have to go with that understanding let me continue from the next video if I go to solution Explorer and open the program.cs file you can see in The routing we have something called as controller and and action remember these keywords for now if you open the solution Explorer again
you will notice we have a folder with the name of controllers we have models and we have views that basically defines the MVC keyword MVC stands for models views and controllers but how do all three of them come together let me show you a brief overview about that in the MVC architecture as I said first Letter stands for model model represents the shape of the data so if you have any tables or if you have any classes model will have all of that and what I mean by class is let's say you are building an
e-commerce application where you have products you will have orders you will have order details shopping cart and much more models will basically have all of those class files next we have something called as view which stands for the user Interface so whatever you see on the screen that is the view part of the MVC application so model represents the data and what you see on the screen is the user interface like if you have a form or if you have a fancy chart that you see on the browser all of that is represented by the
view view will control the HTML element of your web project now you have the view where you have the fancy HTML that you see on the screen but when you have the data you Will have to process or even fetch that data because data might be inside database so you need something to fetch that data and display that in a table on your HTML view that you have that missing piece or heart of the MVC application is the controller which is the last piece of the missing block here controller will basically handle the user request
and it will act as an interface between model and view what happens is when a user clicks on one of The button or opens the website the request will first go to the controller controller will then determine what model it has to fetch it will retrieve all the data that is needed using the models and then it will pass all the data that is required to be displayed to the view component what view will do is it will add all the data in its HTML formatting and pass that data back to the controller and then
controller will send That response p and the data or website will be displayed on your screen so one thing that you should always remember is in an MVC architecture controller is heart of your application and it might sound like I'm repeating this over and over again but MVC architecture can be tricky to understand if you are getting started so let's walk through that again when a user opens a website it goes to a controller controller will then fetch Data from the models or wherever it has to do process that data like there might be some
conversion or anything that it has to do and once the data is in good shape it will pass that data to The View on that static HTML it will add the data that controller has passed like in view we might have defined that there is a table but what data that table needs we will pass that from controller to the view then view will add that data in the HTML and final content it will return Back to the controller which will ultimately be passed on to the user screen and user can see the complete website
this my friends is the basic architecture of an MVC application now a controller can have many action method action method basically Define the end points in a controller and we will uncover that in the next video but there is something called as action methods there as well if I go back to the website here you can See where we have the default route we are saying that if nothing is defined you should go to the home controller and there you have index action and something called as ID Let's ignore that right now you know the
basic MVC architecture and let's cover this routing in the next video now we want to understand routing in an MVC application routing basically defines that in the URL when you type something Where it should send that request to we have configured a default route here but when it comes to an MVC application we have a certain pattern and before I show you that in the application let me walk you through a presentation here to give you a rough idea you can see the URL pattern for routing is considered after the domain name Local Host and
port number is the domain name this Local Host can be google.com Can be nm.com or whatever you want when we have to consider routing we remove that piece and anything after that is considered the routing pattern in an MVC application the typical route that we have is a controller and then action those are the two words that you should always always remember and write it down there is a controller and inside controller there are action methods let me show you that with an Example here in this first URL you see we have the domain name
which is Local Host and then we have something called as for/ category slash index and then a number three so the first thing that you see after the domain is the controller name and next thing with a forward slash will be an action name after that if there is anything there that will be the id id is an optional field that we already saw right Here you can see that is question mark So if we go back what is the first thing after the domain name that is the category after that we have have index
and then if there is anything present that will be populated in the ID that is the default pattern that has been defined in the net project now of course we can modify some things here and we will do that in the later videos but this is the default pattern we have controllers and inside there we have Action based on that I have an example here and I want you to find out that based on the URL what will be the category and what will be the action and if there is an ID or not the
first example here category is the controller and index is the action we do not have any ID so ID will be null after that we only have something called as category if there is no action defined then by default the action will be index action we do not have any Action defined in the second example so controller will be category action will be index and ID will be null in the third example here we have controller name as category action name as edit and then we have some ID with the value of three and the
final example here we have a controller with the name of product we have an action with the name of details and I D with a value of three now you might be wondering what is the Importance of this assignment well it is really important from now onwards if you look at a URL that is using MVC architecture you can tell what is the controller name and what is the action name now if I go back here we are saying that the default controller is home and action is index that basically means that if nothing is
defined after the domain name it is telling the application that you should go to home controller and index action Method that is the default route that net team has configured in program.cs if you want you can change that default route but that is the default route and you know how that will be converted to a URL if you want now enough talking let me show you routing in action in the next video now you have a rough idea of what is a controller and what is an action based on the URL so basically if you
have a URL from that you can tell me What is the controller what is the action and what is ID with that rough idea let me go back to the project here and I will open solution Explorer you can see there are three folders here that we have not covered yet there is a view folder there is a model folder and there is a controller folder in controller you can see we have something called as home controller when we are naming any Controller one thing that is important is the controller keyword so if you have
a home controller you should have the name followed by the controller keyword and that must be placed inside the controller folder if you place it somewhere else it will not work these are the rules that are defined for the MVC architecture so in controllers we have home controller in models we just have one model which is error view model it Is a basic class file and it has two properties nothing fancy and we don't want to go into those detail right now another thing that I want to point out is when a request comes to
controller it is not always required that a model is needed sometimes it can render a view which can be a static View and no model is needed in that case but I want you to keep that in mind that model is not always needed perfect so now we have a home controller here and All the views related to that controller will be placed inside the views folder with the exact same name as controller and this will be home and not home controller controller is a keyword here so actual name of the controller is home and
that will be the name of folder inside views folder that is the architecture for MVC we have controllers and all the views that corresponds to that controller must be placed inside the views folder with a Subfolder of the exact name as the controller name so perfect we can see in home controller we have an index View and we have a privacy view if I run the application here and right there you can see we have a homepage and a privacy page right now we only have one controller in our application so both of the view
belongs to the same controller when we load the page you can see the U L we do not have any Controller name or action name we just have this welcome text let's see where the text is inside home view we have the index view if I open that that is the exact text that we see right here we have the welcome we have learned about and we have an anchor tag with building web apps with asp.net core so what we see on the home page page here basically is displayed from this index view inside the
home folder when we click on privacy here we Have the privacy policy and if I open the privacy. cshtml file that is the data that is being displayed right here ignore this view data for now but you can see the paragraph tag is exactly what we have now something interesting thing that you should notice here is when we are going to the Privacy page the URL here is something that we have seen before with routing based on this URL can you tell Me what is the controller name and what is the action name the controller
name is home controller and action name is privacy now how does that come together I will show you that but before that let me change this to be index so home controller index action press enter and perfect we get back to the homepage how did that happen when we click on homepage it does not define anything in the route and that is because the Default route that we have here we are saying that if nothing is defined go to home controller and index action so that means that even if you define home control and index
action it will take you to basically the same page so I hope you can see how things are coming together but the main question how does it know where it has to load this particular view that we see let me show that we have home controller and index action for that let me go to the home Controller here and we have few things right here you can see there is some something here but ignore that what I want to show you is in home controller what we have down here these are called the action method
on line 11 we basically have a Constructor for our class and I will explain you that in later videos but other than that we have three action methods here and they are returning something called as I action result I was telling you before that There are two things controller and action what we have defined in the URL we are telling go to the home controller and get the index action so at that point it will go to the home controller and it will execute this index action in index action we do not have any code
we are only saying return view what does this mean well it basically says that we have to return some view inside the views folder but what view does it have to return and That is where the naming that we have given to folder comes into picture if we have not defined a name inside this round bracket it will use the same name as the action name so it will return an index view but where will it get that view from it will get that view from the home controller so it will go to the home
folder inside views and there it will will get the index. CSH HTML and if we type home/ privacy it will execute the Privacy action method And the view that it will return will be the Privacy view because that is the name of the action method now ignore the error action method that we have here but you can see how index and privacy are executed now with Visual Studio we have great debugging functionality for that what you have to do is right here when you hover you can see a circle dot if you click there that
means you have added a Debugger let me add that in both the lines here and if I go back here and if I execute home index and press enter you can see the breako is being hit here that means that this statement is being executed right now so that proves that it is going to the index action method we will have to hit continue here and then it will navigate or continue execution and bring back the website when we click on privacy it will Go to the Privacy action method and we continue here and perfect
so with that I hope you have a rough idea of how routing works but let me show you something before I end the video when we are returning back to the view actually let me go to program here and rather than home controller index action let me set the default to home and privacy and let me run that now when the application loads we do not have any URL defined so on the homepage it will Invoke the Privacy action method and that view will be returned perfect let me roll back that change and I will
go back here to controller there when I am returning the view as I said before if nothing is defined here it will look for the same view with the name of the action method in the folder of that controller name now rather than that I am saying that when the index is being called I want you to return a view with the name Of privacy in that case it will go to the home folder and look for a view with the name of privacy and Views have an extension of Cs HTML let me run this
Now the default page it again loads the Privacy page but to prove you that if I go to home and index privacy view is being loaded so you can always overwrite what view will be returned but this is the default that we have if nothing is Present I will also roll back that change to keep things simple for now but I hope with that you have a rough idea of how routing works and again in controller we will have action methods that will Define what view needs to be returned back now MVC is is tricky
to understand as I've said before so I do not expect you to understand 100% of the things that I'm explaining right now but even if you are understanding 50 to 70% so far that is a great progress and When you actually start implementing this in the upcoming section everything will start making much more sense and you will understand why this pattern is so powerful with that overview let me continue from the next video now that we have seen routing we know how the views are being displayed based on the URL but if I run the
application again that is not the only thing that is being Displayed on the page because if I open the index. cshtml you can see there is a welcome text and a learn about that we see right here but what about this header that we have on the top and we also have a footer how is that getting loaded and for that we have to go to solution in views folder we have seen what is there in the home view but we have something called as shared and we have something called as underscore view Imports and
underscore view start if you have worked with older net application you might remember something called as a master page and a child page underscore layout is the master page of your complete application if I open underscore layout here you can see we have do type HTML we have a head here with some styling we have a body and there we have the header in header you can see we have the home and privacy links here and we scroll Down we have something called as render body this render body is a built-in helper in the MVC
and that will display anything that we want in the body now what that body will be that will be determined by what is returned from the controller if we return the index view it will display that view right here after the render party we have a footer here where we are displaying the bulky web if we go back back to the Application that is what we have right here so underscore layout will be the master page of your application or the main page of your application always remember that and inor layout we will add all
the JavaScript all the CSS that we want to use globally in the application with that we have something in the anchor tags like ASP controller as B action these are called tag helpers but ignore them when the time is right I will explain you why we need them right Now undor layout is the master page of your application and whatever view we return from the controller that will be displayed in the render body content ofor layout after that let's go back and we have something called as validation scripts parti there we have basically included to
JavaScript now when we progress with the course we want to add client side validation and for that we will be using This JavaScript because of that on all pages validations are not needed so what the net team has done is it has added some of the basic JavaScript here and then on the pages where validations are needed it has separated that out in a different file and we can use them in our file only if needed we will see that in action down the road but here we have something called as validation script Partial now
one thing that you notice here is in validation scripts partial we have an underscore this underscore is not required in layout or validation scripts partial but typically if that is a page or component that is used throughout the application then we typically like to add an underscore that way when we look at the name we can know that okay this view will be used throughout the application and there is also a special Name for that which is partial view partial view basically means that they cannot be displayed on the Page by itself they will be
incorporated as a part of some main view but that is a little too technical or little too early for now but just keep that terminology in mind that there is something called as View and there are partial views by the name partial views are basically the views that you do not use by themselves they will be consumed inside the main View then next we have a view for error. cshtml this is the view where we display the error message if anything is encountered and we can ignore that for now now one main question that I
had when I was learning MVC was how does the application know that this underscore layout is the master page of the application that is simple we Define that inside the file which is view. cshtml there we are telling that the Layout of the application isore layout if I change this to be layout here let me stop that and run it things will not work we have an exception here the layout cannot be located and you can see where it is actually looking for the layout to fix that what we can do is I can rename
this to be layout and then it will start working again perfect so you can see that is how The application is configured to know what is the default layout or Master page of your application let me revert back the change here I will keep it uncore layout that is the name you should be familiar with and not layout perfect let me run the application and it should work the same great so view start will Define what is the master page or what is layout of your web application then we we also have Something called as
view Imports here we have defined bulky web and bulky web. models we have added using statements here if you are working with net you know the using statements are used rather than typing that every time if not do not worry when the time comes I will show you why using statements are needed but on top of that it has added something called as tag helpers that that also we will cover in upcoming videos but view import you can Think about that as a global import file rather than importing or writing the using statement in all
file you can add that here and that will automatically be available in all the views now again the view UT are the using statements that we have added here will only be available in the views and not in controllers or models when the time is right in the future videos I will show you the importance of VI Imports and we will also be adding More inputs in the file let me close all the tabs here and with that I believe we have covered all the files in the views we have a model controller and perfect
now with the overview that we have covered with all the files and folder it is the perfect time to get our hands done dirty from the next video I want to spend some time on an important topic and that is I action result if I go back to the application in the home controller you will notice That the action or the end points that we have here they return something called as an i action result as the name implies here I action result is a base abstraction of action result but action result is ultimately used
as the base of all the other derived return types for an action method right now you can see it is returning a view if rather than action result we have something called as view Result if I return that back it works you can see view is a type of view result so we can write that as the return type for privacy action and if I run the application everything will work exactly the same let me open privacy page and perfect you can see that is working rather than returning to a view we also have something
called as return redirect to action and we can redirect to index action from the Privacy action so let's say there was something that we Have to process here once that is done we want to redirect to index action the return type here is a view result so rather than that we have to change that to redirect to action result and that will work let me run the application and see that when we click on privacy here you can see it is redirecting us back to the homepage that is another return type that we have we
can return back Json Here and if we do that the return type will be Json result here so there are multiple return types that we can configure but the main point here is what if you had an action method that was returning two things like we have a condition here let's say we have a variable temp is equal to0 and if temp is equal equal to0 we want to return redirect to action we want to go to index action and in the else part here we want To return back to the view let me write
that we will go to the Privacy view if we had index in there then even though we are on the Privacy action it will redirect to index view we do not want that we want the default privacy view but with that you can see we have an error because the return type we are saying redirect to action result but sometimes we will return back to the view you rather than that if we had I action Result everything will work because that is a wrapper around all the return types if you want to be explicit like
view result you can do that but I action result is the default way and that is the approach that you should be using let me show you one more thing here where we have redirect to action result if I press F12 you can see it has the action result here and if I press f121 action result that implements the I action Result because of that where we have the return type here if we say I action result then we can return anything that inherits the action result in simple words you can think of I action
result is basically like using a VAR that you have here you do not have to explicitly Define if this is an integer based on the value that is assigned it will automatically use that I action result is somewhat like that but not Exactly it does not matter if your action is returning redirect to action or returning back to the view as long as you have the I action result you can return any of the classes that have implemented action result like Chon result view result partial view result and much more now if this is too
much much right now do not worry I only wanted to give you a brief idea of how everything is working and what exactly is this I action result as we proceed With the course you will see how we will redirect to action written view add parameters and much more what is dependency injection it is a common interview question and explaining that with a real world example will show that you really understand the concept my name is Bain and welcome to net Mastery if you enjoy free content related to net programming make sure to subscribe to
the channel that way you will be notified when new Content is uploaded now back to the main question what exactly is dependency injection dependency injection is a design pattern in which a class or object has its dependent classes injected rather than directly creating them this is done so that we do not have to create manage and dispose the object and it improves the loose coupling between classes now that is too much technical Do not worry let me simplify that with a real world example that almost everyone can relate to in this example we have pop
here who wants to go on hiking now it is a long hike and for that he will require many supplies like Maps flashlight protein bars and much more so he places all of them in his backpack and next day when he goes on the hiking he takes the backpack with him the back that he has acts as a container so during the hike When he needs anything he can take it out of the container and use them this is the simple concept you put the items that you need in a container and when you need
them they are already present in the container so you can directly fetch them from the container now that is a little too easy to understand but how does it relate to programming world to show that let me elaborate a situation without dependency injection in our application we have Three pages and we have some common functionality that we want to use across all the three pages like we want to send emails and we want to access our database in all the three pages that we have so first let's say we have to access database in order
to do that what we typically do is create object of our class which is used to access the database let me call that DB for this example then we might call some method Inside that object and retrieve data once we are done we will be disposing that object that was created this object creation logic we will have to write in all the three pages and same thing we will have to do with email as well by doing that we are actually solving the issue of having email and database access in our page but as you
can see we have a lot of duplicate code that is written here and when we design we try to build the Perfect solution but sadly most of the time we do not know the complete future of a project it could very well happen that in future because of some reason you might have to create a new class for sending email or maybe a new data access class what happens in that case well it is simple for now in all the Pages where we had the old object we will replace that with the new class like
in this case we have tpor new class and we have email New and when we think about that it does not seem like a big issue that is because we only have three pages right now but what if your application had 30 pages or 300 Pages you will have to modify that in all the pages and on top of that you will be dealing with creating the object managing and disposing them that is a time consuming effort when we have to do that in all the pages so what is the solution to avoid All of
this and get an optimal architecture the answer to that is dependency injection let me show you how the same situation would look like with dependency injection again we would have have the three pages and we would have email and database functionality these are common things that we had before as well but right now we would have something special which is A dependency injection container and in that container we will register both email and database service so there we will have an interface for our email and idb and we will have the implementation inside email and
DB class when any page would access these functionalities they would ask for an implementation of ITB or I email the pages do not know what implementation will be given to them dependency injection container is Responsible for all of that so what the framework will do is when a page request implementation of email interface it will look in the container to find out that email interface is implemented inside the email class so it will automatically create the object and pass it onto the page that way we do not have to deal with creating object disposing or
managing that in our page pages will look very clean because they will just have the interface and Implementation is provided by the dependency injection container the best thing is in future if you have to change or replace the implementation you do not have to do in all the places because you only registered the implementation in the container so only in that file you will have to go and replace with the new implementation so our DB and email we just need to replace them with DB new and email new and all the pages will Automatically get
the new implementation so with that you can see email and database are now Loosely coupled with the other classes and that is the beauty of dependency injection now dependency injection is built in if you are using NET Framework so you just have to register the service and Net Framework will take care of everything else I hope with that short video you have a better understanding of dependency injection if You enjoyed the video make sure to like the video video and leave a comment if you have any other question or topics that I should cover next
you can check out more free videos on netm way.com until then Happy coding now there is one teeny tiny thing that I want to tell you right now when we go to controller we have a controller and we have an action method there it is returning something called as a view if you are coming here from traditional. Net or some other programming language you will be smacking your head what is this view what is this action result why is this return type typically we have a return type of let's say an object or maybe a
string or something like a list or I inumerable I action result is one of the custom classes or rather interface that is implemented in the net framew work and that basically implements all of the possible result type for an action Method so even if things are looking like it's magic right now it is not and when you progress with the course you will see how everything comes together so right now do not and I'm saying that do not try to smack your head or be too hard on yourself on trying to understand every small piece
that you see on the screen by the end of this course I will cover all of them to make sure that no stone is left unturned but when I say that just assume This is the syntax right now just assume that for now because I know when I will be moving forward with the course you will understand all the basic Foundation nothing is Magic everything is programming and you will learn all of that by the end of this course so right now don't be too hard on yourself and let me continue from the next video
I hope with the overview that we had so far you have a basic Understanding of all the files and folder that are created with the default application now what I want to do is get started on our final project for that we will be creating a new project so whatever you have right now now you can delete that project it was to get you up and running with the basic fundamentals and let me start fresh from the next video we need to create our project in Visual Studio 2022 we will select new Project right here
we have to select the type of project our project will be an MVC application so let me select that we have asp.net Cod web app with model view and controller I will modify the location to where I want to save that and the solution name here let me call that white Lagoon next we have the project and this project will be the MVC application so Let me call that white lagoon. web project with that configured let me hit the next button we will be using net eight that looks good let me create the project now
I do not want to select any authentication type because rather than configuring our project with everything I want to show how we can add and configure that later on perfect our project has been created here we are ready to start learning Clean architecture with net core but when we are programming it is good to have our code in a source control and we will be using GitHub for that you can see in Visual Studio I have the button here add to Source control I will select kit there and I have already logged into my GitHub
account so that looks good right now I am publishing that as a private repository but by the time you take the course this will be a public Repository and you can access all the Commits with that let me select create and push here and we will have the initial commit let me push that as well and perfect with that our solution is configured in Source control and to validate that if I open my GitHub account repository perfect you can see we have the white Lagoon repository right here when we will be adding all the commits
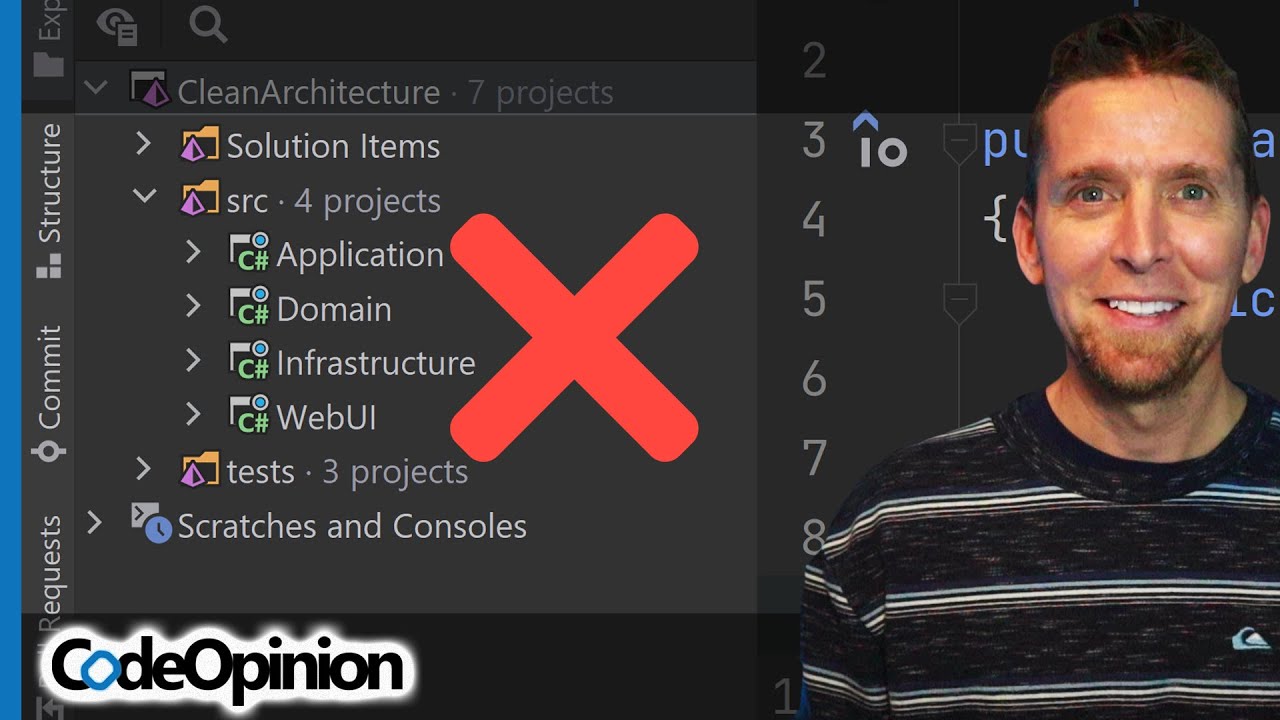
here you will be able to take a look at all of them and see exactly what was Modified in that lecture in the last video we saw what different layers are responsible for so let me create them right here in this solution let me create a new project and it will be class Library if you do not have them in the recent project you can always search them right here make sure to select the C that's the language that we are using and I will call that white lagoon. Domain let me copy that name and
create that perfect that looks good let me right click again add a new project next one that we want will be white Lagoon do application let me create that with net 8 looks good add a new one and the final one that we will have will be white lagoon. infra structure perfect let me create that as well and great now we have different projects in our Solution let me delete the class one that is the default one from all the layers and perfect that looks good with that we have different layers that are needed for
clean architecture configured in our solution now that we have created multiple projects in our solution it's time to configure database and Entity framework code in our web project but right now you can see models and everything is clustered in the web Project we do not want that we want everything to be separated out in a clean architecture because of that we have a question where will we place all the data models or entity models which will correspond to the tables that we will have in our database that will always go to The Domain layer which
is the innermost layer of clean architecture in domain here we will Create a new f folder for that and I will call that as entities because that will be all the entities or tables in our database in the entities folder let me create a new class and we will create our first model and that will be Villa model our project will be a resort project and there will be multiple Villas in our project we will make that a public class and there we need to create View Property ke first will be Primary key of the
table and let me call that as ID next we will have the name property and I can make that a required property because when we create a villa name will always be required next property will be description here but I can make that nullable let me add a question mark here to make that nullable after that we need few more properties for the Villa like what will be price of The Villa what will be square ft and what will be occupancy all of them that we are creating here are basically properties of the Villa class
now on top of all the properties that we already have let me create three more properties I will have an image URL where we will give the URL of an image and that will be displayed for that Willa later on we will modify this to upload an image and handle all the Scenarios but right now we will keep things super simple then I have some date here to track on when that Villa was created or when that was updated it is purely for logging purposes but that looks good for the Villa model now the model
that we have created here we have to create a SQL database is and a table inside there when we are working with Entity framework core code First methodology that means we only write the code and then we write some commands it will automatically convert this code and create that database and Below table but before we go into those complexities we have to configure our application to use SQL Server we need to configure Entity framework core in our project we have the Villa entity that we added here but in the web project we need to add
some new kit Packages because we will be adding and configuring connection string to our SQL database I already opened the new get package manager but basically you will right click on the project and select manage new kit packages make sure to select the include pre-release here here because we are using net 8 and we want to use the preview version now you can see by default intellisense is displaying we have to Install microsoft. Entity framework core. SQL Server we have to install that package so let me do that here and perfect that looks good now
we can also install the microsoft. entityframework code. design package I believe that will be needed as a dependency later on and great when you install any preview version you can see right now I am using preview 6 if during the recording the version gets updated To preview 7 I will update that in all the project make sure to install the same preview version if you do preview six for one and preview five for other things might not work so if you do update make sure to keep that consistent but I believe that looks good for
the web project now the reason I did not install Entity framework core here is in SQL Server when you look at the dependencies we have relational here and there we have microsoft. Entity Framework core so that way when we install SQL Server Entity framework code is already configured good in the project but all of the implementation of repository will be done inside the infrastructure project so let me manage that new get package and we will go to the browse tab here we will have to install quite a few new kit packages first let me install
the SQL Server after that we will manage Migration and for that we will use microsoft. the framework core. tools now the commands do not worry about them right now when the time is right I will walk you through them as well finally let me implement the microsoft. Entity framework code. design we are using the same version that looks good and perfect with that we have configured the infrastructure project and web project with all the new kit packages that are Needed for Entity framework core we want to configure Entity framework core in our project the DB
context for that will be inside the infrastructure project so right there let me create a new folder with the name of data and inside there I will create a new class call that application DP context now this will be the DP context for Entity framework core to make this class A DP context we have to extend the DP Context class that is inside microsoft. Entity framework core when we configure Entity framework core there are few things that we have to configure right out of the box and one of them is to have the Constructor right
here what we are doing is whatever we get in the parameters of this application DB context we are passing that on to the base class now the options here we will configure when we Create an object or when we inject application DB context or rather register that to something called as a dependency injection do not worry about that complexity right now you can assume that this line you have to write by default when you want to configure Entity Framework but with that we have created RTP context in the infrastructure project now you might be wondering
that We have written some magical code but how will this code actually help us with Entity framework let me show that we will now work on the web project here and we have something called as app settings. Json file if I open that file we have some logging right here but app settings will be one place in your complete solution where you will have connection strings and secrets for your project what I mean by that is you will have your database Connection string if you have some secret for stripe payment or you have some SSL
secret you will store them here or if you have connection to some other API endpoints all of them you will write them in app settings. Jason now of course in production you can move that to a secret world but right now let's keep everything simple any secret or connection that you have for your project will go inside app settings. Json File if you expand that you will also see we have app settings. development we can add app settings. production that way we can manage the connection for different environment but if we add some thing in
app settings that will be applied globally so let me use that rather than adding the individual ones but later on we will see that in action as well but now the question is how do we add a connection string you can see if I add a Comma here there is already a predefined block with the name of connection strings you can of course create a new custom block but we can even use the existing one and and sometimes you might see intelligence like this automatically populated for me that might not be the case for you
I have license of GitHub co-pilot because of that it is automatically detecting few changes and displaying that if I press tab here you can see it Creates a connection string but for the database name I want something more meaningful like white Lagoon so perfect right you can see in default connection I have added a connection string and there I have a server name now one thing that I will point out is right here we have a format in connection string we have a key with the value of default connection and then we have connection string
you can call this anything that you want but right Now make sure and make sure to name it exactly same as default connection that way when we are accessing the connection string in the upcoming videos your name will match what I have here and then you must match the connection string based on your local setup I have the server of Ms SQL local DB if I copy that and go back to SQL Server if I paste that name here and if I remove one of the backwards slash hit the connect button you can see I
I am Able to connect to that SQL Server so whatever server you are able to connect here copy that name and paste that for the server name right here next we have the database name I will call that white Lagoon and I have trusted uncore connection to be true and multiple active result sets to be true for the local development I have seen that if you do not have the trust server certificate to be true SQL Server Connection sometimes does not work so Make sure to add that trust server certificate and that looks good now
right now I will intentionally add a bug here and rather than having trusted uncore connection I will write trusted connection because I want to show you one common error message but with that we have added connection string in our app settings now right now things are very isolated in infrastructure project we have something called AS application DB Context where we have defined the DB context in the web project we have defined a connection string but we have not configured our web project to use this DP context and apply the connection string for database we have
added the DB Connection in the in infrastructure project and in app settings we have the connection string but one thing that is missing is how does both of this come together in the web project we need to configure Application DP context and Entity framework core where we have to tell that you need to use the connection string defined in app settings. Json because we are working with net core all the configuration of the web project will be done in the main file that is program.cs this will be the root file for all the configuration right
here you can see where we have to add services to The Container we want to register TB context there and then later on when we have to add something to the request pipeline we will do that right here but right now we want to add dependency but right now we want to add a service to our container and that is DB context service now previously if you remember one thing that we have to do is our DB context is an infrastructure project so in the web project we need to add Project reference and we need
to reference our infrastructure project let me select that perfect that way our web project can now access application DP context if you remember remember the old net days typically what we had to do is we say application DB context is equal to new and then we pass something in the parameter now right now you can ignore what was there in the parameter but basically that is what we used to do in The controller or any endpoint we need DB context we create a new implementation with net core that is not needed what we we rather
have to do is on Builder doservices we can register an existing service right now we have a default implementation of add DB context and there we have to Define what class is implementing the DB context that is application DB context because of that you can see the using statement got added at the top Here and that looks good in the parameter here we have to define the option now that option will basically be the DB context option that we already defined in the application DB context so here we will say option goes to and then
we can say option. use SQL Server along with builder. configuration doget connection string default connection I have written something here but before I explain that for use SQL Server we will need microsoft. Entity framework core using statement now when we are saying that we want to use SQL server for our DP context we have to pass the connection string right here connection string if you remember we added that in app settings. Json we can access app settings. Json directly in program.cs by calling builder. configuration and then we have something Called as do get connection string
we can use the built-in method get connection string because that basically gets a section with the name of connection strings if you remember that is the exact name that we have right here if it was something else here like get connection strings one then we will not be able to use this method and we will have to use something called as get value But because we are using the default one we are able to use the helper method get connection string and then we have to write the name that name must match what we have
right here if you write default connection one then you have to match it like that I will revert that back and we will keep that simple but that way it will retrieve the connection string and it will pass that As a parameter to the use SQL Server method and with that configuration our DB context has been configured to use SQL server for our web project what we did so far might seem a little magical but do not worry what we have done is the basic setup that is needed for any net core application to use
Entity framework core so these are the basic steps that you will always do in any new project where you are using Entity framework core and It is pretty straightforward we added connection string in app settings we created a DB context that implements the default EP context from Entity framework core and then we binded them together in program. CS and added that service to our container right now if things are not making sense think about that as the default setup that you have to do but when we progress with the course everything will start making more
Sense now we have the connection in program.cs that binds the DB context to our connection string but how can we create database how can we create a model inside there and everything that we want with Entity Framework core for that we have to go to tools new get package manager and in package manager console we have to write some commands in the web project if you remember we installed the new get package well not the web project in the Infrastructure project where we have the dependency where we have DB context here in the packages we
added microsoft. Entity framework code. tools if I open the document for this new get package you can see there are few commands when you have to work with Entity framework core add migration is needed to add a new migration right now we have not added any code to add a new Migration we will walk through majority of them but right now I want to run the command update database and you can see it says updates the database to a specified Migra right now we do not even have any migration but even without migration if we
run the command update database we will see an error message first and perfect you can see keyword not supported trusted connection if you remember I Intentionally introduced that error message so let me fix that if the connection string is not valid that will not not work there must be an underscore there once I modify that and run the command update database you can notice here no migrations were applied the database is already up to date that is because we did not have anything called as a migration right now but you can see in database I
do not have any white Lagoon If I refresh here you will notice an empty database with the name of white Lagoon has been created with one table EF migrations history now what is this table how do we add migration we will cover all of that in the upcoming video we have achieved one big thing with the connection it automatically created a database in our server but now we want one more task we have a villa entity and we want to Create a villa table in the database with these columns we can do that very quickly
with the help of Entity framework all we have to do is go to our application DB context and we have to tell Entity framework core that this Villa is basically a table and we have to tell Entity framework core that the Villa class that we have here Will will be a table for that we have to create a Property we can use the snipet prop here and the type of property will be DB set DB set and we have to define the class that is Villa we cannot access that we have to add reference to
wh lagoon. domain once you do that we have that here and we have to give it a meaningful name now one thing that you should remember here is table name will be whatever property name you give right here if you want to call that tlore vaa you can do that I typically prefer using Vas with a plural here and that is what I want to be the table name but as long as you add a DB set in application DB context Entity framework core will automatically create that table well not completely automatically but it will
write all the script that is needed as long as you run the correct command in package manager console if you remember in the documents here there was something called as ADD migration in Entity framework core. Tools we have to add a migration when we add a migration Entity framework core goes through the DB context and it automatically finds what are the the new things that have been added we did not have any past migration so it will treat it as an empty database and then it will think okay you want to create a Velo table
so I will create a script for that let me show that in action right here we will type the command add migration with a hyphen in Between and then we have to give our migration a meaningful name I will say add Villa to TP as the name and press enter you will notice an error message right now let me expand this to show you what the error message is and perfect it says your target project white lagoon. web does not match your migrations assembly wh lagoon. infrastructure Visual Studio knows here that the DP context is
inside Infrastructure project and because of that the default project we have to modify that to be infrastructure if you keep that as a web project there is a miscommunication and it displays that error message so wherever you have the DB context you have to set that to be the default project and then we need to rerun the command add migration perfect something just happened it created a new file with some Random things things here and if you examine in the infrastructure project it created a new folder with the name of migration if you examine the
file here you can see there is some code written in a unique language but if you read that it is creating a table with the name of vas and it has few columns constrain it automatically added ID as the primary key of that table that is in up method in down method it is basically dropping that Table it is treating that as a transaction if something goes wrong then we roll back but basically Entity framework code created this migration based on the model that we have and that is great we did not have to write
any script but right now this migration is only on my local if I go back to the database and refresh the table here that table is not created to create that we need to run the command update Database and when you run the command update database it will push the pending migrations to database and with that if you refresh here examine the tables perfect we have created a willage table with few lines of code and we did not even have to write any script in SQL server and that is the power of Entity framework core
now before I work on the MVC application I want to spend some time on Explaining you how this Entity framework core works with the application if you examine there is a table migrations history where it tracks which migration have already been applied to the database if we go back here there is also a model snapshot that way when we add a new migration the code will compare what is the snapshot that is there in database based on that it will create a new Migration that way if you add a new class to the DB context
the new migration will only create that new table and it will not recreate the velas table but one thing that is common is let's say you have a Velo table and then you realized you made a mistake in column name you want that to be created underscore date and updated uncore date if you ever have to change something in the migration what do you do should you delete the migration Folder here should you drop the database what should be your approach one thing that I will tell you up front is never ever change the migrations
folder always keep it as it is and and do not try to change anything in that folder if you made a mistake simply modify the code on what you wanted to be and then add a new migration I will call that modify names in Villa table and we will create a new migration based on the model snapshot Code was able to determine what exactly had to be updated and you can see it is only renaming those columns pretty smart with that if I update the database here you will notice the column names will be updated
once it completes here perfect if I go back and in the EF migration history it will create a new entry because now it has applied the new migration as well if I examine the vas table perfect you can see column names have been updated To give you a recap here never go to the migrations folder and update any files here if you have to modify something on the tables always add a new migration even if you do not need this columns and you have to remove them you can remove them save the changes and create
a new migration update the database and Entity framework core will take care of applying that to the database but what we have here looks good let me Save all of that we have created our table but table does not have any record if I want to add a record I can do that from the database but rather than doing that we can seed some initial record from the application DB context as well and we want to see our vage table we can do that by over writing let me do that the on model creating and
inside there I have added one line base. on model Creating now this line is not needed right now so I will uncomment that but in future when we add identity we will require this line when the time is right I will walk you through on why we need that but let me ignore that for now in the on model create we can see our vas table to do that we will say model builder. entity of villa and there we will say hash data now because I have Co-pilot you can see it automatically displays me a
dummy record that could be created but let me remove that we need the hash data there we have to create a new V record and that will automatically be moved with our migration now rather than having you type all of that in Project resource I have provided code snippet section two I have seed Willer let me copy what we have here and make sure to paste that in the round Bracket once we do that we might have to align things a little let me do that here and perfect that looks good so here we have
one Willa inside there if we scroll down we are creating Villa ID 2 and Villa ID 3 now for the image URL I am using a dummy URL right now if you open that URL you will see a placehold image and that is okay but we are creating three Villas Right here now how can we create the villa that we added in the Villa entity here to our database answer to that again is by using migration let me add a migration here and I will call that seed Willa to DB perfect let me do that
here and if you examine the migration you can see it is inserting data and there we have all the records that will be inserted in the Database all we have to do is run the command update database and that will push three records to our Villa table once that is done let me switch back here and perfect it automatically created the three records for our vas table with that you can see how easy it is to seed some initial records using application DP context we have model builder. entity and we have the method has Data
we have seen quite a few things with Entity framework core and I do like to get into little bit of detail with Entity framework core because it is a big part of The NET Framework and when you use that to retrieve data your life is much more easier than writing all the SQL yourself but now it's time to switch back to the MPC aspect of the appli application for that we will be working in the web Project right here we have the controllers and we have home controller if I run the application we can see
the default page here with home and privacy we want to perform crud operations or basically manage the Villa that we added in our table we want to create a new Villa update delete and view details of an existing Willa to perform all the crud operation Rather than working on the home controller it makes sense to create a separate controller for Villa in the controller here we will create a new item and that will be controller in the template here we have multiple option we will select the empty controller because we want to start from fresh
we need to give controller a name and if I want to call that Vore Co or V Co that will not work when you create a Controller it must have the word controller at the end if that is not present then the net code will not be able to read that as a controller it is a naming convention that controller name must end with the word controller with that name let me select the add button perfect we have created our Villa controller now one thing that we have to do in Villa controller is we need
to Retrieve all the Villa from database when we were working with old.net application what we used to do is we had application DP context let me add the using statement we used to create a new application DB context and then we were using that in the application but with net core things are different we registered in program.cs a service that hey a DB context is already registered so when we want an implementation we can directly ask our Program.cs that hey can you provide me an implementation of application DB context it will automatically configure the connection
string open the connection and give you an implementation inside the Constructor so to access that I will say private read only create application DP context name that as context here and then in the Constructor I can create one with the snippet C and press tab after that we get the Constructor here Dependency injection will inject the object for application DP context that is preconfigured so we can say underscore context is equal to context and that way this underscore context that we have will have the object of application DB context here now how can we use
this underscore context to actually retrieve all the Villa if you want for naming Simplicity you can call thator TB as well let me Modify that and perfect now here in the index action we want to retrieve all the Villas you can see intelligence is already displaying me how that could be done it might be the co-pilot but that is exactly the code that we have to write in order to retrieve from Entity framework code we do not have to write the query select star or select columns if we write uncore tb. Villas convert That to
a list it will automatically have that list in this vas variable let me add a debugging Point here and show that now we need to invoke the velas controller index action doing that is super simple we will write Villa here press enter index is by default so that will automatically invoc our endpoint and perfect if I scroll on Villas here you can see it has three vas and that is exactly what we have in the Database so you can see how easy it was to retrieve all the Villas and we are using the magic of
Entity framework we have the index action for Villa controller let me run the application right now if I go to the Villa Endo that we have we will retrieve all the villa and then we return back to the view what will happen when I continue here when we continue it will throw an exception let me show that reason behind That is we have a controller but we have not created a view for that action when we say return back to the view it is getting confused on where is The View view it tries to find
the index view but it cannot find that in the Villa folder or in the shared folder so what we have to do is we need to create that view now one way to do that is right click here we will select add view we want the empty view here and the name is Index that is exactly true if it was something else you will have to rename that but but that looks good when I hit the add button you will notice in the views folder it creates a new folder and that name exactly matches the
controller name if here it was Willa one for the folder name then things will not work again the name of the folder must match the controller name and that is how everything is binded together here in the H1 let me display Vaa list here and let me run the application perfect what will happen is when we hit the end point let me trigger that Willa or we can write Willa index it is the same thing here we return back to the view and we will display Willa list here that is great so now our view
is getting loaded based on the end point but then we need to display all the Villa list here in order to display that we will have to pass the Villas that we Retrieve to our view that way what will happen is when we are loading the view we are passing all the Villas but in our view we are not accepting that list right now so we need to accept that list of villa iterate through that and displayed right here but before we do that right here in the navigation I want to add a villa navigation
where we will load the Villa page now pause the application and try To think on where we will have this navigation if you said underscore layout you are 100% correct it will be inside views shared folder uncore layout there we have two new Ali element for home and privacy I will copy and paste that one more time we are not using areas so if you want you can remove that as well the controller name is the Villa controller and action is index action we will be loading or rather managing Villa in that Link let me
stop and restart the application I had hot reload there and I will remove move the debugging Point here perfect now if I click on Villa here it will navigate to Villa controller index action and great it loads the same view and that is exactly what we wanted we want to display the list of villa in the view that we are passing from the index action right here we are passing a list Of all the Villa but where we we have the view we need to explicitly say that hey a list of villa will be passed
right here for that we can Define that by using add symbol and then we have to write model again model has to be all lowercase and here what we will be getting will be a list so I can say I inumerable and that will be Willa model now Willa model we do not have that in the same project object because of that we need to reference the complete path Here we will have to say white Lagoon do domain do entities. Villa perfect that looks good with that our view is now ready to accept an incoming
model that will be of the type I inumerable of villa what I can do here is I can create a table add some bootstrap classes of table table bordered and table striped these are the default bootstrap classes inside table I can create a th create a table row and I can Define the Table header let me display few things in the header here I have one th another th will be for Price next th I can display the square fet and finally let me display one for occupancy now that is the table header but next
we will have a t body and inside the T body we will require a for each Loop because we will have more than one Villa we need to iterate and display all of them with net core we have Something called as a razor syntax and that is a game changer using razor syntax we can write a c code that was typically in back end like for each Loop within the CSH HTML or the view itself whenever we have to write C code we will start with the add symbol and then if we need a for
each Loop we have that right here we will say variable obj in model because we want to iterate through the model that we have right here on line One one thing that you will notice different here is the model on line one is all lowercase but whenever we will access that model in any code in the view it will be a capital M for the model so with that configured let me create table row and in TD tag here now we want to access this obj for the individual properties like I said before when we
have to use the C code we will use the add sign obj Dot and great you can see All the properties first we want to display the name let me copy and paste that three more times next we have price here then we have the square fet and finally we have occupancy with that configured if I save the changes here and if I go back hot reload automatically kicks in now if that did not refresh the page automatically you can restart the application but I have hot reload that is enabled on file save Because of
that whenever I save a change here most of the time it will automatically reload the UI changes and I do not have to restart the application but you can see in the view here we have a villa list and we can view details of all the Villa that we have in our database and that is great news but the most important thing that we have learned in this video is how to accept a model at the top here on top of that whenever we need c code in the view we Can do that using the
razor syntax by using the add symbol and this is very powerful with net core and you will see how easy it is to work with views and controller as compared to the traditional net application but with that configured pat yourself and take a break you have successfully created the willage table populated some entries in that table retrieved that using Entity framework and you displayed that on the screen Before you continue forward try to take a small break if that is needed and then let's continue on our journey before I continue here let me make our
page little more pretty where we have the H1 formula list here let me add that in a div give it a class of withth 100 card border zero and padding four I will close that within the div here let me paste few lines where we are displaying a title with our list but I Have added some bootstrap classes to make it little pretty with that configured let me go back and take a look at the UI that looks much better so our heading here looks good let me create one more div here give it a
class of card body give it border and padding for let me cut the table here and I will paste it in the card body here save that and that looks great let me add a Button to create new Villa let me create a div with a class of row and padding bottom of three now rows and column s are typical bootstrap classes I will not go into details about bootstrap here because that can be a course by itself my main focus is to work on MVC so we will quickly write some styling and not that
fancy styling as well let me make it column six offset that by six here and let me add text End perfect we will have the anchor tag here then we need the controller when we have to redirect to some controller action method we have tag helpers if you remember let me open the underscore layout here where we added the anchor tag we were using tag helper ASP controller and ASP action this anchor tag we will say we want to redirect to controller of villa and then we need an action now we have not created that
action yet So let me keep that as empty I will give it some bootstrap classes for the color BTN secondary and inside there I will say create new Villa save that and go back here and perfect we have a button to create new Villa but when I select nothing happens because I have not defined the action it will basically take you to the same page you can see that is working because without any action the default is index action but with that our UI is looking Much better when we are working with any project icons
are very common previously I was a big fan of font awesome but since bootstrap has introduced their own icons and they are open source I typically like to use them because they are easier to integrate and you do not need any license even if you use them in the production project if you go to icons. bootstrap.css Add the CSS in our project if you said underscore layout you are spot on all the CSS and JavaScript will be added in the master page that is undor layout we will paste it there and with that our application
is configured to use the bootstrap icons simple as that in order to search for an icon let me go back and let me write Plus here we have the plus Circle let me copy this particular line Here and we will paste that before create new Villa if I save that part reload will kick in and perfect it automatically adds an icon and you can see how easy it was to integrate the bootstrap icons in our project we have added bootstrap icons in our project but you can see with bootstrap we have light and dark theme
I like the dark theme here so let me see on how I can add Dark theme to my project it has Been introduced with bootstrap 5.3 and for that we will require the latest version if I search for CD and bootstrap 5 we need the latest one let me see CDN JS let me go there and it has 5.0 we want 5.3.1 here and perfect we have the JS here let me copy the script tag go back to underscore lay out because the default one that is here it is not 5.3.1 as of this recording
so I will update that looks good let me get the CSS here copy the script and paste it right here perfect with that we will have to rebuild and apply the changes and let me take a look at that by default it will not give us the Dark theme but we will have to modify some things let me see if the edn is working now of course in production you Will not use the CD njs you will rather be downloading that file and you will be adding that locally that is good so you will basically
download the file here add that in www root folder in CSS and JavaScript and reference there but right now we will keep things simple and we can use the CDN but now how do we get the dark version in order to enable that where we have the HT ml in underscore layout we need to add data BS theme of Dark with that if I save the changes let me see if that works and great it automatically converted to dark background we need to modify some things in the navigation here let me see we have the
BG white that is not needed scroll down here we do not need the text dark and anymore and let me save that great our complete background has been modified to the Dark theme and that is looking much Better in our unders layout we have the navigation where we are displaying list of all the vas here but now we want to work on the create functionality when we are working with create function ality the first thing that we should think about is the controller end point we had an action to display all the vaa here there
we need to create another action that will be called when we want to create a vaa I have intelligence here but let me Try to create that that will be public ey action result create and we return back to the view now right now if we run the application here we do not have the create view we need to add that but if I go back to the index view where we have the action to create a new vaa you can see we were going to ASP controller of vaa and the action name was empty
we added a new action name with the name of create so that is what will Be invoked when we call that button we need to create the view as well you can right click on create add view here it will be an empty view but you can see the default name is index one make sure to rename that to be create and the name of the view must exactly match the action name with that configured here let me say H1 tag here we will say create Villa and let me run the application perfect we go
to our Villa here we Should have a button there great when I click there it redirects me to the create View and that is exactly what we want we need to work on the create Villa here and we have to add all the fields where we will populate some details let me go back to the code here and where we have the index let me copy the first div here that will be a uniform design and I will close that as well we will say create Willa if I save that and go back heart reload
should kick in and perfect that looks good but now when we are working with create Willa if you remember in the index Willa we had something called as a model what what will be that model when we are working with create vaa you can see the model was an i innumerable of vaa but when we are working with create we will only work with one single Villa we need to Define that model here And that will be entities. Villa now you might be saying one thing when we are returning back to the view we are
not passing a new Villa here how will that work because so far what we have learned is whatever we pass from The View that will be the model here and that is indeed correct if you want you can pass a new Villa entity here and that will work but when we are working with create here if we Define a model here that will create a new model and it Will be empty that is perfect because when we are creating we do not want to populate any values now of course if there were some default values
that had to be populated and displayed when the Villa was being created in that case we will have to create an object here and pass it down to the view but if you do not pass anything here it will basically create a new object right here with the default properties of that model that is something that you should Always remember whenever you work with controllers and action always try to see what was return returned here that will be the model type and if nothing is return returned like in this example then you will analyze on
what model you will require for this view you can Define that here and that will create a new object so after the card header here I will create another div give it a class of card body border and padding For within that div we need to create a form tag because we will have a submit button here where we will create a vaa so form method will be post here class let me give it a class of row and within there we will create a div give it a bootstrap class of padding three if I
click on the vaa entity and press F12 we need to add all of these properties well not created date and updated date we need the six input fields in the View let me create the first one here div give it a class of form floating padding y of two and column 12 within that Dev we will add an input tag and there we will use the tag helper now in traditional net we did not have tag helpers but with net core because we have a model here we can easily bind all the properties to the
corresponding input Flags right here we have a tag Helper asp4 and when you are using asp4 you can Access the model using at sign dot we have the name we can add bootstrap classes here for form control to give it a full width here give it a border and Shadow perfect when you are using asp4 it automatically binds that property in the Villa entity to this input field and when you hit the submit button it will also post that property automatically in the Villa object tag helper will automatically Handle The Binding in this example but
asp4 tag helper is a little bit special asp4 tag already knows that you are working on the Villa entity because of that even if do not write the at model it will still work it will automatically work on the properties of the model if it was something else you will have to access that using at model but with asp4 you can directly access properties in your model entity after that let me create a label Here as well and there also we have the tag helper ASP for name class is equal to let me get give
it some margin if I save that and go back right now it is cutting off the Border here if you want you can make that padding y1 and perfect that is looking great now one thing that I will point out right now is we have asp4 for the label if I open the Villa model here it by default displays the name but there Is something thing called as data annotations with which we can overwrite the default name we will cover them in the upcoming videos but right now you can see we have asp4 tag helper
that automatically binds the model to a property we are displaying name inside the view but we need to display all the other properties let me copy this div here and paste that about five more times here next thing that we have here is Description let me copy that for both asp4 input and label then we have price let me modify that here after price we have the square fet then we have the image URL and I believe that is all let me double check here we have occupancy let me add that before the image perfect
if I save that hot reload will kick in and great we have all the entities right here for the input Field lastly let me add the button here to submit and let me also add a button to go back to the Villa index I will do that in a div here give it a class of row padding top of two here div give it a class of column six in medium screen let's say I will only do column md3 there I want a button GitHub co-pilot is already displaying the button and the type will be
submit that is something that you should Remember then I have bootstrap icon here and that looks good I will add another div here give it a class of column 6 again column md3 in there I want to create a link to go back to the index page you can see Co pilot is already displaying that let me add and align that we will create an anchor tag ASP controller will be Villa controller action name will be index action we have some bootstrap class process and a button to cancel that Looks good let me save this
and go back here and perfect if I click cancel it takes me back here and that is functional but if you click on create here nothing happens because we do not have a post end point on what will happen when we submit a button in our form tag another thing that I will point out here is writing the controller name is not required if I do not write that save It and go back well I will have to rebuild and apply let me do that when a controller name is missing it will look for the
action in the same controller create is also inside the Villa controller so when we cancel it will invoke the index action of the same controller now even though it is less code I will not recommend this approach I always want you guys to be explicit and write the controller name and then Action name that way it is more explicit because right now you might think that that's okay but when your application grows you have multiple controllers you have multiple views having a tag here to Define what controller it is makes it a little easier to
read the code and I always give more importantance to clean and readable code AS compared to writing less code if you have to write a few more words to make your code more readable because that Will ultimately lead to a good code base for other developers but with that configured we have a form to create our Villa and now we need to work on what should happen when we post the form here by clicking on the submit button now we have one more requirement if I go back to the view here and when I hit
create new Villa rather than having image URL as one word what if I want a space between them also rather than Price here let's say I want to display price per night if we go back to our code we are using as4 tag helper for the label based on that it automat atically gets what we have as the property name and display that as the label one solution you might say that rather than using asp4 in the label itself here why don't we display image URL save that and that works but net team has provided
with Something called as data annotation using them we can use the built-in asp4 and that way we can modify what this this property should be called when we are displaying that in a label for that we have a data annotation with the name of display here and you can see we have to add the using statement system. component model. data annotations there we can say display name is equal to and we can say image URL for the price here we can modify That to be price per night if I save that and go back great
you can see it automatically triggers the refresh here and displays what we have in the display data annotation if you go to the do net documentation and you examine the data annotation name space here there are quite a few data annotations right here one that we used was the display attribute but there are many more values here Data annotations are very helpful when you have to do some validations as well but before we add validation to our form we need to add the post Endo to create a villa we want to work on the create
functionality here let me switch back to the code we go to the Villa controller we have the create endpoint the endpoints that we have created so far are get get end points what do I mean by get end points Is basically you can navigate to these action methods or endpoints from a URL but there are post endpoints which are triggered when you submit a button or you submit a form for that we can create an endpoint let me call it create but here when we will be posting we will be getting a villa object now
autopilot is Auto automatically typing everything for me but let me do that manually here we will get a villa object here I will add that Add the using statement call that as obj now why we will get a villa object here because when we are on the create we are posting a form here and we have the model of vaa net code will automatically provide this model when the form is submitted because of that we can retrieve that and we can extract the values but like I was talking before we have get end points and
we have post end points to tell explicitly that this is a Post end point we will say HTTP post here you can see in the intelligence it identifies an action that supports the post method so form will be posted here and what should we do when we retrieve all the ENT entities and what should we do when we retrieve the Villa object we need to create that in the database we do not have to write the insert query for that Entity framework core will do everything we have to write small Commands we have our underscore
DB and that is what we will use to deal with all the database operation now on DP we want to work on the vas entity their Entity framework code Pro provides many helper method if you just write _ db. willas you can see it will retrieve the list right here but on there we have a method called add and there in the parameter it expects a villa [Music] Entity we have that in the obj here so if we provide that that will be responsible to create that object in the database but with Entity framework core
when you WR the add statement it does not directly go and adds that to the database that time it will track that okay whenever I go to the database I have to add this entity and the actual execution or the query execution happens when you invoke _ db. saave changes on line 32 when we say save Changes it will go to the database and create that Villa once the villa is created in the post endpoint should we stay on the same page or should we redirect to some other page Technically when the create is complete
we should redirect to the Villa index page where we are displaying all the Villa so let me do return here and when we have to redirect to some other action method we have something called as Redirect to action and there in the double quotes we will write the action name right now we are redirecting to an action in the same controller because of that we do not have to write the controller name but if you want to be explicit here you can even say that this will be inside the Villa controller we will have the
action name followed by the controller name again the controller name is optional but if You want to add that explicitly you can always add that this is a basic implementation of the to create endpoint with that configured let me restart the application because we added a new endpoint here let me see what happens now do not go ahead and try to create a villa watch me what happens and then we will move forward I will add a debugging Point here go to Villa create a new Villa There and right now what I will do is
because I will enter one for all the values do not keep anything empty or do not try anything else we will only do one for all the values here hit the create button perfect it hits the debuging point here if you examine the obj you will notice everything is populated ID will be zero because we are creating a villa it does not have an ID yet created date and updated date are null but Everything else is populated with that if I press F10 here when we execute the do add if I go back to SQL
Server here we have white Lagoon and if I open the Villas table there it will not create that Villa after we execute the save changes here at that point it will create a new Villa here and perfect now you might be wondering that why did it create 101 and not the next Willa ID when we work with Entity Framework core the way identity column works is it increments by thousand when the application restarts and there are some other kvarts with that so if it jumps by 1,000 don't be surprised but with that you can see
we have created a villa and that is looking great but again if I at this point you tried to create and things did not work do not worry I will show you why exactly it will not work and what will fail in the next Video we are able to create a villa with all one here but if we hit the create new Villa again and hit the create button without writing anything you will get an exception perfect you can see we have an exception here that cannot insert null value in the column name if you
examine the model here name is a required column because of that you get that exception now that is great but throwing an exception not so much so what is the Solution when we have model validations like here we have the required field we can check all of that validation directly in controller the net team has provided with some something called as model state DOT is valid that will check if the model in picture is valid or not if it is valid only then we will redirect to index and create the model in the else part
let me align this in the else part we will Return back to the view and we will have to pass the object back here let me show you what happens if we do not pass that we go to Villa try to create a villa with empty and if I press F10 examine the is valid that is false in model State you can always debug to find out the result View and see which property is invalid you can see occupancy price square fet and name are invalid if you go back here they are integer values and
You need to have a value greater than zero if we go back and if we continue here it will not redirect but it will bring us back to the create page and that seems valid here but what if we want to display the error message how can we display them on the UI here displaying all the model State validations are very simple inet we will have to go back to the Create view here and where we have the label we can add something called as span and there we have a different tag helper for validation
that is ASP validation 4 we want to display the validation for name here and we want to give that a red color so text danger with that if I save it and if I try to create again we hit our break point and great now we see the name field is Required let me remove the debug Point here and once I populate that hit the create button now we do not see the other validation because we need to add the pan tag for the other fields let me do that copy this and paste it for
all of them I will replace the model for all of them and perfect that looks good if I save that perfect you can see value is invalid with that we have server side Validation now the way you can tell if it is a server or client side validation is by two ways if I add a debugging Point here let me reload the page and if I hit the create button you can see it hits the controller endpoint and then it displays the error message another way to tell that is if I load the page again
you will notice a page refresh here when we hit the create button that means it is going back to the server and refreshing the Page what we have right now are server side validations with net core we have seen simple validation but when we are using data annotations like we did for display we also have more validations like range attribute what is the max length required attribute and much more we can easily apply all of them in the model class here like let's say where we have the price here we can give it a range
we can set minimum to be $10 And maximum to be 10,000 next we have occupancy we can set a range for occupancy and let me Define that as 1 to 10 for the name here we can have max length and let's say maximum length could be 50 characters all of the data annotation that we wrote here will automatically be applied let me go back and try them for name if you try to type a name that is longer than 50 character It will not work you can see I am typing but it's not working if
I press F12 here and if I examine that here you will see max length is automatically set to be 50 so the validations are working if I type test here and price per night let me make that 20,000 great we see our custom validation and that is working at as expected data annotations are really great with basic Validation you can go through them in the documentation provided by the net team and explore more options there another one that I typically like is email address attribute using that it will automatically validate an email address but with
that you can see server side validation using data annotation we have validation that are there on the model but many time when you are working you will have requirements of custom validation let's say for example we have A requirement that name and description cannot be the same to add that custom validation we can always alter the model State and add more error messages to the model State like here we can say if objn name is equal equal to obj do description then on the model State here we can add a model error when we are
adding that we need to provide a key and a value we can leave the key as empty here And for the value we can say description cannot exactly match the name with that configured if I save that and if I go back to the page if I enter the same name and description option and hit the create button I do not see that error if I add a debugging Point here you will notice that it is indeed adding that to the model state but why do we not see that on the UI reason is simple
when we are adding that the key is empty so even though it Is adding that it does not know where to display because where we have the individual validation you can see we have provided the name description that way the model errors will be binded to these properties but if there is any other custom that is not displayed if you want to display that right here at the top we can add a custom div here where we will display ASP validation summary as model Only if you save that it automatically hits the end point here
and now if you go back on top here it is displaying all the model errors the individual errors are being displayed here but any other error is being displayed right here that way you can add custom validation and display them using model only as the parameter for ASP validation summary that is a different tag helper then ASP validation for that we have Been using so far right now the error message that you see with description we are displaying at the top here because it is not bed to any model properties what if you want to
add a custom error message to a certain property here like name in this example it is simple where we have the controller here and we are adding the model error we can directly add the property name to the key of that error Message now this is not case sensitive so with that if I save it here it will automatically reload the page and perfect now you can see the error message is associated with the name property there is one more thing that I want to display in the create here where we have the validation summary
we also have something called as all if we set that to be all it will display all the error message at the top and perfect that looks good sometimes You want a summary where you display all the error message rather than displaying on the individual inputs so that is also an option the last option that we have here does not really make sense to me and that is none that will not display any error message in the summary and I do not know why they added that option rather than keeping that as none I would
technically or ideally remove this particular T but for learning purpose I will leave that in the comment here that way you can see that varation summary is also an option now the validations that we have here are server side validation you can notice the page is refreshing every time we hit the pattern but there are validations that we can do on client side as well with net code it is way easier than you expect the model validations that we have here could be done on client Side By including a Javascript file that we have and
that let me show that in the shared folder we have validation scripts partial there we have the jQuery for validation and all we have to do here is in a section for scripts we can include a Javascript file so right here I want to include a partial tag with the name of underscore validation scripts partial now you might be wondering what is this funky code That I just added while validation scripts partial is a partial view we need to include that view in our code and in the scripts tag because of that there is a
tag helper with the name of partial and that is used to include any any partial view in another view we will be creating more partial views and I will explain you what exactly they are responsible for or how they help to break down code and reuse them but if you have to include any Partial view we will be using the partial tag helper in the name we need to provide the name of the view and that must exactly match you do not have to write the extension. CSH HTML but if you make a spelling mistake
here things will not work with that if I save the application and go back and now you will notice if I hit the create button the page is not refreshing another thing that you notice here is the server side validation that We had for name and description is not available because that will only be tested if the request goes to our controller and there we are adding that error message if you add a debugging Point here and hit the create button the request never goes to the controller unless the client side validations are complete so
if you complete them and hit the create button now you can see the server side validation with description and price range that is also server side Validation you can see in the example here how easy it is with net to add the client side validation all you have to do is include the partial view that is validation scripts partial we have all the validation here and with that if you try to create a villa it should work successfully let me see that here and great that is functional what I want to work on now is
how to update a villa I want to add two buttons here on the index page for updating a villa and deleting a villa let me go back we will have to open the index view here and perfect in the heading here let me add one more Mt in the TD here we can add two buttons let me create a div here add some bootstrap classes and a roll of group and within there I will add a anchor tag we want to redirect here to ASP action let me call that as update we Have not created
that action but I will do that very soon I can also Define ASP controller here to Bea controller but because the action method is in the same controller that ASP controller is optional on top of that when we click the update Villa on any of the Villas here we we need to know what is the ID of the Villa that user wants to update and that ID we need to pass to our action as well that we will create if we Want to pass any parameters in the action tag here typically when we were working
with HF attribute we need to say something like Willa update and then we used to add the ID right here when we are working with tag helpers we have something called as ASP route and using that we can pass the route parameters with the URL you can see it will add additional parameters for the route we need to give parameters a name I can call that ID or I can call that as Villa ID that Villa ID we have to pass that using razor syntax in the obj that we have here we have it in
the ID parameter with that let me give some bootstrap classes here for BTN BTN success and margin X of2 I can also add the bootswatch icon here and let me call that as edit or you can leave that as update perfect the anchor tag here looks good let me copy and paste that once Again and I will call the next action to be delete here when we will delete we will again can pass the ID let me give it a class of BTN danger and rather than pencil I remember we have trash hyphen fill that
is also an icon with bootstrap let me call that delete save that and perfect that looks good if you are not sure about the icons here you can always go to bootstrap.css [Music] but our edit and delete is functional And you can see in the parameters it is passing the ID as expected so our UI for the edit and delete buttons is working as expected we have buttons for edit and delete but we need to create endpoint in the Villa controller the action name will be update let me create that here now think about will
we need a get endpoint or a post endpoint for update well we will need both the Endpoints because when we are updating if we hit the button it will display all the details of that Villa and then user can edit anything there and after that when they hit update button then we will update the Villa details and redirect back to the index page first endpoint that we want is the update endpoint and I will manually type that we will call that update here and with that what exactly will be the parameter you notice here we
are passing Willa ID we will retrieve that here and it will be an integer based on the Villa ID here we need to retrieve that Villa detail in the Villa object I will make that as nullable here we will use Entity framework core there if we do do Vas it will retrieve all the Villas we do not want all the Villa we only want one Villa based on the ID for that we have something called as first or Default using that we can use Link expression to filter down the records we want the first. default
where we can say U goes to u. ID is equal equal to the Villa ID what we have used here is called a link expression and there we are filtering on the Villas and we are saying give me the first or default where the ID matches what we receive in the parameter if this particular condition Returns more than one Villa then first or default will retrieve the first record now of course because we have the ID as unique property it will never retrieve more than one Villa after after that we can check if obj is
null then we will return not found now later on what we will do is we will create a view for not found and return that back that way we will have one page that will be displayed when something goes wrong but right now let Me just return not found but if the obj is not null we will return back to the view and we will pass our obj to our view this particular object will have all the Villa details populated from our database and with that the get endpoint for update is looking great the get
end point for update is looking perfect let me create a view for that as well I will stop the application here right click add view empty View and I will call that as update let me add that view and now when you think about that update will look exactly same as create but what will happen is initially in create the model was empty now the model will be populated and we are passing that from the controller right here so I will copy the create. CSH HTML and paste that for update rather than create Willer I
will call that update Willer let me scroll down here where Where we have the create button I will call that update and with that let me run the application we go to our Villa here let me click edit here perfect we see all the details we have the Villa ID 13 let me change the image URL to be tou one and what do you think will happen let me open this in a new tab that way you can see the old records here and now let me hit the update button well when we hit the
update Button nothing will happen we do not have a post endpoint for update so nothing will be updated but right now if we hit cancel you can see update Willa is functional as expected so our view is looking good our validation will also be in place if we hit update we have the client side validation let me work on the post Endo for update in the next video before I work on the post endpoint For update let me switch back and walk you through on multiple ways we can retrieve data using Entity framework core when
we have to retrieve only one record we can use first or default but let's say we need a list here let me call that Willa list is equal to undor db. Villas let's say we want to retrieve all the Villas using some filters like aware condition we want to add a Weare condition where price is greater than 50 to do that we have do wear we can use Our link expression and we can say U goes to u. price is greater than 50 if you want more condition you can say u. occupancy is greater than
zero and so on you can get pretty fancy with the wear condition let's say after the wear condition you want only one record you can even use first or default on top of the wear condition but if you have first or default I would ideally use that in place of the wear block here on top of that where we have to Retrieve the first or default if you are working on primary key like Willa ID we also have something called as find find will work based on the primary key you can directly pass the integer
Villa ID here and that will also work we will be retrieving records many times in the application so all of this will get much more familiar on how easy it is to retrieve data from database using Entity framework we do not have to write any SQL Syntax but I want wanted to give you some rough idea on multiple ways that would work that way you can always keep them in back of your mind that there are many ways to retrieve records using Entity framework but what we have here is looking good and let me continue
from the next video we need to work on the post end point for update but if the opj is null here we are returning back not found let Me see that with an example type some vaa ID that is invalid and it returns a not found page rather than displaying page not found why don't we display a page that is dedicated for something that goes wrong in the website if we open our home controller here you will notice we have something called as an error page where we are displaying a view model rather than return
an error view model we can return back to the view and Perfect let me open this view here we already have that let me remove everything right here I want to add an image that will be displayed on the page here can you tell me where in the application should I add all the image that will be inside www root folder let me create a new folder here with the name of images and in order to get all the image You can go to Project resource there I have provided all the image for our website
let me copy everything and paste them right here the image that we want to work on is not found what we will do is right here in a div of class container we will go to the images folder we have not found Jank that is great where we have the controller let me go back to Villa controller rather than going to not Found we can say return redirect to action we want to call what action is that it is the error action let me write that and what is the controller name that is in home
controller and this time we have to explicitly write the controller because it is in a different controller with that configured let me run the application and see if that works we want to edit here type some dummy ID and great we see something went Wrong and that is exactly what we want date get endpoint is looking good great we can finally work on the post Endo that will somewhat be similar to what we have in create so let me copy that endpoint and paste it here we will rename that to be same action method as
update that looks good we will be getting a villa object here I will remove the custom validation I only added that to display how we can add custom validation but that is not needed We will check if the model state is valid now this time we do not want to add we want to update so rather than add here we have an update endpoint and we can pass the obj based on that Entity framework we'll do all the calculation and run the update query to update that particular record with that in place here let me
restart the application and see what happens you will notice some something strange but let me walk you through that Let me open this in a new tab that way we can see the old record here and let me update that to be google.com and hit the update button to your surprise if you notice the old and new records here it actually created a new record rather than updating the old record with the different URL I want you guys to pause the video and try to see if you can figure out why it is creating a
new record when we are Updating now I know it is a little bit tricky but the first thing that I would do is add a debugging point and examine what is the record let me add it here to google.com 1 hit the update button and if you examine the obj here you will notice everything is valid but it is missing one critical information and that is the ID if you do not have an ID there how will Entity framework code know which record to update if the ID is zero even If you call update Entity
framework core will create a new record thinking that if there is no ID that means a new record has to be created what we can do here is we can add a check here and obj doid is greater than zero but on top of that the main thing that you should do is ID should never be zero in update the reason it is zero is if I go back to the view here you can see in the input I have all the other properties But I do not have ID if I do not have ID
in an input field it will not be available when the form is posted for that what we have to do is within the form tag we have have to add an input field with asp4 ID and Mark that as hidden that way it will not be visible but when the form is submitted ID will also be submitted one thing that I have seen in many code is people will place random hidden properties throughout the code That is a horrible approach to follow I always try to keep them uniform right after the form tag if there
are any hidden Fields I will place them immediately after the form tag that way in one place you have to look for all the hidden properties and you can even notice if anything is missing right there rather than following along the code and trying to find out where the hidden fields are you should always try to keep them in one place I like them Immediately after the form tag with that if we run the application Now update will be functional let me try that again we will update that to google.com 111 we have the ID
that is perfect let me continue here and it did not create a new record perfect with that in place our update is working as expected let me try to update that whoops cannot exceed 10,000 and great that is Working last functionality here is the delete button if you hover here we are going to delete action and we have Villa ID we need to create the get endpoint and the post endpoint let me copy the get and post endpoint for update paste that once again I will call that to be delete here let me comment out
the post endpoint for now perfect the get endpoint looks good and let me create the view it is pretty straightforward we Will call that delete and the view will be similar to what we have in create well not create but in update because we need the hidden property copy everything paste it here and we will say delete will one more thing that I will do is input Fields let me disable all of them it will be read only so let me disable them and we do not need any validation I will remove all of them
because they Will not be able to update anything and rather than update we will have delete here I believe the bi is trash fill let me see if that works with that let me restart the application and let me go to Villa delete perfect rather than green here let me make it danger save that and great lastly what we have to do is in Willa controller we need the post Endpoint for delete let me call that delete here we will get the Villa object but on the DB context here do Villas we have something called
as remove now in remove we can pass the object here but everything was disabled so what I typically do is I will retrieve an object that we have to delete obj from DB is equal toore db. willas do first do default we can retrieve that U goes to u. ID is equal Equal to obj do ID we retrieve that object and we will check if that is not know so obj from DB is not null if that is true then we will pass obj from DB remove that and save the changes one more thing that
I would like like out is where we are checking null here I typically like to use the is operator rather than checking equal equal to with the null operation that is because double equal to can be overloaded which is not common To see in a code but it is always good to use the is operator or is not when working with no with that configured let me run the application we go to Villa here let me see if delete is functional and great you can see Villa was deleted when we create update or delete anything
we want to display a notification on the screen that the operation was Successful net team has developed something specifically for that and that is called temp data let me go back to the code here and let me close everything other than Villa controller I had too many tabs open let me open the underscore layout here and where we have the div container here inside the main before render body let me add some razor code we can use the add symbol here and we can add an if condition we can say if temp data and That
can be access accessed using a key let me give it a key of error if there is any error so we'll say if that is not null then we want to display in a div give it a class of text danger H3 and we will display the value inside that temp data now that is for error let me copy and paste that again for Success here and with that what we are saying is if temp data of Success is Not null then we Display that in a div but how will this temp data be populated
we can populate that in our controller right here when the delete is successful before we redirect to index here we can set temp data of success is equal to Willa has been deleted successfully now make sure that you do not make any spelling mistake with the key name because if you do things will not work let me add the temp data for the other Requirement as well like if the opj is not now we can say temp data of error the Willa could not be deleted let me add the success notification for update as well
temp data of success we has been updated we have create here perfect that is looking great you can add more condition for error but with that let me run the application and see If that works let me go to Villa try to delete one and great we can see the Villa has been deleted successfully the great thing about temp data is it only stays there for one request if you refresh the page here it goes away and the reason behind that is when you display notification they will only stay there for one call and even
if you refresh that it will go away and because of that main reason for temp Data is for notification for notification what we have is a simple H3 and I think we can do a little bit better let me Google something called as toaster notification and there we have toaster by code 7 if you examine the demo here show toast that looks way better we can do error here that is great we can do warnings and perfect that is great for Our notification but how do we incorporate that in our project doing that is simple
as well let me go back we have the GitHub link here and we have the usage if we scroll down simple as that but for that we need to add the CDN for JavaScript and CSS rather than getting the link here I can directly go to cdnjs and I can look for CDN toaster perfect fact we can get the link Here let me copy the complete script tag here go back to underscore layout and rather than pasting that right here where we have the temp data let me add that here perfect we have the JS
here let me paste it here and we need the CSS let me copy the script tag paste it here [Music] great so far so good now when we are working with Toaster here we need the jQuery let me paste that before toaster ignore the warnings here and finally where we have the div we need to add a script tag here let me add the closing tag as well copy that paste it here well I should add the type here Text slash JavaScript now copy that and I will add the closing tag right Here perfect let's
go back here to the documentation and to the usage we have success copy that paste it here value is inside temp data. error paste that in the single quote here and I believe that should work let me copy that and paste it again for Success perfect with that configured let me restart the application let me go to Villa here try to delete One and great Willa has been deleted successfully you can see those notifications are way better than the simple H1 tag than the simple heading that we had before we have the toaster notification but
right now we have clustered everything in underscore layout what if we want to move this code to a partial view partial views in net core are special views which rank renders a portion of the view content it is like User controls that were there in traditional webform application main advantage of partial view is that it helps us to reduce the code duplication now for this particular scenario we will not be duplicating it but we are using that to understand how to create poral View and its importance all the partial views will be created in in
the shared folder and we will right click there stop the Application of course right click the shared folder add View and it will be an empty view now nothing is special when it comes to a partial view but we will call them with an underscore that way it is easier to tell when you look at the view name here you can say with underscore that is a partial View now one thing with partial view is that partial view cannot directly be accessed by calling an action Method partial views are typically consumed in other views here
what we want to do is the code that we have for temp data let me cut that and let me paste it right here so we have moved the complete code to a partial View and then right here we can directly call that partial view with the tag as partial I cannot type there name is equal to now you cannot make a spelling mistake so let me copy the name here and I will paste it right here perfect that way the code that we had in the unders layout we moved that to a partial view
with the name of underscore notification and we are calling that right here everything will work exactly the same but because of that our underscore layout is not getting too complicated let me try to create a villa here and perfect our notifications are working what I want to do is in the Header here I want to add a logo and modify the footer all of that will inside the underscore layout if you examine the images here I added an image for resort. PNG and that will be the logo right here we have the anchor tag here
rather than wh lagoon. web I want to add an image tag SRC will be images we have resort. PNG along with that let me give it a style of 35 Pixels perfect that looks good let me go back and double check that great let me scroll down to the footer here let me give it BG dark make it text Center and rather than the default text let me say made with love by net Mastery perfect that is looking great one thing that I would also like to point out right now is when you examine the
underscore layout you will notice there is an arrow icon right there if you open that you will notice it has its Own CSS file it is a new feature that has been introduced with net 6 and that is CSS isolation that basically means creating a CSS file like CSH html. CSS for the individual CS HTML or View files in this isolation process the styles that are defined in underscore layout. CSH html. CSS are limited tocor layout. cssh HTML so basically the Styles here are scoped only to underscore layout you can Create scoped CSS for the
other views as well if you like but I typically prefer to have a global CSS but for some reason if you need scoped CSS you can also do that The NET Framework during runtime will bundle all the isolated CSS files in a single file and the name of that file will be the application name which is wh lagoon. web. styles.css and if you go to underscore layout here you can view that right here so if you notice something in the style File here while debugging and you're surprised you do not file that and you are
surprised you do not find that in the code that is because that will be inside any of the scoped CSS files that is something that I wanted to share for information purpose but with that let me continue from the next video one thing that I want to modify is in create here you can see we have to reference white lagoon. domain do entities and then Villa I do not want to write this particular line every time if you do not want to add that in a using statement or a model here every time you can
always do that in view import right here we can Define the global using statement so that is white lagoon. domain. entities and once we add it here and create if we remove that you can see that is working we can now clean up our code in all the views that we Have and perfect you should always remember that if you want to add Global using statements you can do that in view Imports now the using statement here will only apply to the Views that is in the views folder for some reason if you had some
views in a different folder like if you added the identity razor Library you will have to add the using statement in that view Imports as well we will not go into that Complexity right now but it was something that I wanted to point out with that our application is looking great and the cred functionalities on Villa is working as expected we have worked on the Villa model here and we are able to perform crud operations with MVC now I want to create one more model where we will be performing crud operations but this time it
will have a foreign key relation with the Villa Table in a resort let's say we have Villa and for each Villa type that we have we will be having multiple Villa numbers Villa number will basically be like room numbers for the type of villa in the vas table we will be creating our entities in the domain model so in entities create a new class that will be Villa number it will be a public class here and there will be an integer that will be Willa uncore Number now this integer that we have if we use
the key data annotation then it will make it a primary key but if you examine the Villa table here we did not add that and even without that it made ID the primary key that is because if the name is ID it will automatically make that primary key or if it is model name followed by the ID then also Entity framework core will automatically make that a primary key of the Table but in our case we do not have that we have a different name Willa uncore number because of that it will not automatically make
that a primary key you have to explicitly Define that with the data annotation next we need a foreign key relation to the Villa table right here we will create a navigation property for Villa and we will also have an integer Willa ID you can Define here that this is a Foreign Key by using data annotation and we have to Define what is the navigation property that is the V property right here on top of these two properties let's say we have one more property special details but that could be empty now if we create a
model like this Willa number will automatically be created we will not have any control on what the Villa number is but we do not want that we know the Villa number of our Resort we will know the Villa number Of our Resort and based on the Villa number we want to automatically create that and based on the Villa number that we want we want to assign Villa that number to get that there are multiple ways to do things what we can do here is we can create a unique ID here make that a primary key
and then have an integer value for the Willa number that is the easier approach but that does not make sense because Willa number will also be unique and ID will also be Unique so why do we want two primary key for the table when we can make Willa number the primary key but if we do that we cannot make this an identity column we can disable that right here we can set database generated and we can say database generated option do none by default it is the identity but when you make it none that means
database will not automatically generate that as an identity column with that the responsibility will Be on you to make sure that this column will always have a unique value we will take on that responsibility but this model looks good for Villa number with that we have learned two things in this video One how to add a foreign key relation and how to have a primary key without the default identity column now we need to create this table for that we need to go to the infrastructure here and we need to add a DB set it
will be on Villa number let me call that Willa numbers when we are creating the Villa number here let me seed some record as well so I will say model builder. entity that will be Villa number do has data we will create new Willa number Willa number let me give it 101 for the Willa ID e of one copy that paste It few more times here we will have 102 103 104 paste that again fora id2 we will have 2011 202 and 203 paste it few more times formula ID 3 this was two we have
301 and 302 perfect that looks good with that we need to add a migration I have package manager here if Not you can open that here default project will be infrastructure we need to add a migration add Willa number perfect let me see the migration here it is adding max length to the name that's okay creating the table Villa number here inserting the values there and perfect it has the index here that looks good if you notice here the primary key is the Villa number and that Is not the identity column let me update the
database here and let me switch back to database if I refresh white Lagoon here we will have the new table with our numbers and perfect everything is working as expected now that we have created The Villa number here we want to work on performing crud operations on Villa number majority of the things will be similar to what we did with v model but It will be a good practice to get into the MVC flow I will be using the code that we already wrote for the Villa model but you can write that from scratch to
get some practice first let me work on the index that is the Villa list before anything we need to create the controller what I can do is copy the V controller paste that one more time and rename that to be Willa number controller when you rename the file here Copy that and make sure to update the Villa number controller for the Constructor and the class name first we want to work on the index action there we want to get the vaa numbers and we will call that variable Willa numbers perfect we will work on one
method at a time index here is looking great let me add the view here it will be empty view index is perfect and I will copy The View that we have for Villa here copy that paste it here and what will be the model that will be Willa number let me modif few things here it will be Villa number list create new Villa number and what will be all the properties we will have the Villa name here we will have Villa [Music] number and we have special details perfect we will remove the extra Th there
and the model we have Villa ID right now let me use that we have Villa number special details when we are updating here we will have the Villa number ID and let me pass that here now I will not have the update here but let me add that for now when we come back to that I will modify things perfect Willa number ID and controller will be Von number fix that I believe everything Else here is looking great it will be Von number perfect lastly inside the underscore layout let me open that in the shared
folder we need to add one more navigation problem property that will be Willa number perfect let me run the application and see if that works we go to Villa number here and perfect we can see all the Villa number Here Willa number list is looking great here let me work on the create functionality I have the vaa number controller here the create View looks good but when we post here we will be getting a Willa number object we do not want any validation there and if model state is valid we will be adding a new
Willa number let me modify the temp data here and perfect that looks good for create I need to add that view let me do That here stop the application add View and we will write the name create let me copy The Villa view for create paste that and I need to modify model will be V number we will have create Villa number here and we need the Villa ID let me fix that here ideally we should see vaa name and not the ID but we will work on that later On here we will have the
Villa number copy that and we can add special details that's all that we have here let me remove everything else here and perfect controller will be V our number that looks good with that in place let me run the application and take a look at the view we will go to create and perfect that looks good where we have the Villa Number let me modify that the model here add a display property name is equal to Willa number perfect that looks good with that in place the view is looking good let me continue from the
next video we have the view for create Villa number if I go back we already have the end points for get and post for creating a villa number let me try to do that I will enter a valid Villa ID for now and Let me enter a dummy Villa number special details will be empty now what do you think will happen when we hit the create button Willa will not be created we are hitting create here but it is reloading the page and not creating the number let me add a debugging Point here and show
that we press F10 and perfect you can see model state is not valid so try to debug and see what exactly is not valid If you navigate to model State here result view you will notice that it is trying to validate Villa we do not want to validate that that is a navigation property so basically we need some way to tell the code here that you should not validate The Villa entity that we have right here that is purely a navigation property how can we ignore that well there are multiple ways first what you can
do is if in a model State there Is something that you do not want to validate you can explicitly remove that right here you can say model state. remove and you can pass the key name that is Villa that will explicitly remove that validation and let me show that we go to Villa number number try to create a one formula ID 1 and let me keep it 111 create if you examine the model state DOT is valid that is true if I remove And continue here perfect Willa number has been created that is one way
to remove the validation another way to do that in the Villa number here we can add an attribute here that is validate never if you type that it does not exist by default you can see it is asking to install microsoft. aspet cor. mvc.org and examine that new get package when you examine that you will notice That it is being depreciated so we should not be using that the reason it is being appreciated is because the core functionalities have been added in the default net core app framework package what we should do is add that
in the domain project to add that right click edit the project file now how do we add that outside of the property group we will create something called as an item group And within there we will have to add framework reference of mic microsoft. aspnetcore doapp that is the root package of net core with that configured if we go back and now if I press control dot here we only have to add the using statement and with that it will not validate The Villa Property with model State validation let's run the application and confirm that
we go to Villa number here create a New Villa number or Villa ID 3 perfect in this video you can see when we are posting something and we do not want any property to be validated we can either use validate never that should be the default approach or if you want something custom you can remove that from the model State validation using model state. remove we have we are able to create the villan number but if you try to create the same villan number again then it Will throw an exception we will handle that later
on do not worry but right now try not to use the same Villa number that being said right now what I want to do is when we create a new Villa number rather than having to enter a villa ID what if in the drop down we display all the Villa name that will be more meaningful because chances are high that you will not remember the ID of the Villa now the question is how do we get That list we can easily get list of all the Villas using our undor DB and then we can pass
it down to the view in the create get endpoint let me get list of all the Villa number in the create here we basically need to get all the select list item and then we have to pass it down to the view what we want to get here is a list of Select list item let me call that list is equal to we have to get that from the Database db. Villas convert that to a list right here now that is great we are converting that to a list but what we want is a select
list item with Entity framework code we have something called as projection we will get an i in numerable here and on that we can use something called as projection where we will be using the select and we can explicitly say that hey of all the list here I want you to convert that to a list of Select List item it is pretty fancy we can say you goes to New select list item and there we can Define text that is equal to u. name next we have the value that is u. .2 string it will
be an I inumerable here let me fix that and perfect we have a drop- down list right here with the Villa ID and Villa name how do we pass that to The View we can pass the list here directly but then it will not work Because from the code here we are saying that it will expect an i inumerable of Select list item but in the create here we have model as Villa number let me show that if you go back on the Villa number create it throws the exception because the types are not matching
so that will not work we basically need to pass the collection here but we cannot pass that in the view once you revert that back things are working Again let me add a debugging Point here refresh and if you examine the list here perfect we have all the pool vas and the ID that is looking great but now the question is how do we pass this list to our view to display that in a drop down we have to move the collection here and pass it down to the view but for that we cannot pass
it in the return statement one thing that we have seen so far is temp data but that will only Remain for one request and when you refresh that goes away net team has provided other functionalities for such requirements and one of them is view data view data transfers data from controller to the view and that is exactly what we want view data will store value as a dictionary so it contains key value pair where key will be a string to see that an example here we Will have a few data and we need to give
it a key name let me call that Villa list and assign anything to the view data once you have assigned that if you go to the view you can directly access that view data as I said before view data is responsible to move data from controller to the view in the view here where we have the input let me replace that with a select statement and we need ASP for tag Helper whatever V will be selected ultimately the value if we go here that is the ID so what we can do is whatever we select
asp4 we'll have the final ID value and that we can store in the Villa ID we need list of all the items that will be inside ASP items tag helper it is a special tag helper available with the select tag here we want to access view data with view data we need the key name Let me go back and copy that to avoid any spelling mistake paste it here and with view data we have to convert that so explicitly we will say that this will be an i enumerable of Select list item with that configured
we will add some bootstrap classes here of form select and border and Shadow we can also add a default option to select the Villa let me run the application and see What happens we go to Villa number here we hit the create let me continue and great you can see the drop down is working as expected and we are using view data to pass some record from our controller to the view similar to view data we also have something called as view bag and view Pags are also used to transfer temporary data from controller to
the View view data is of type dictionary but view back is a dynamic type property because of that we do not have a key value pair what we have is a Time damic type we will say view bag Dot and then the name will our list that's it next where we have to consume that in the create here we do not need to convert that back here all we have to say is View bag. Villa list simple as That now even though it is a dynamic property here internally the data is stored in a dictionary
with the key name as V list because of that you will not be able to use the same name for view data and view bag but with that if you run the application everything will work exactly the same let me go to Villa number here create new Villa number and perfect we have the drop Down things are working great and we have our drop down but we are using view bag and view data now even though they can be handy and they have a great purpose I am not a big fan of using view bag
and view data reason behind that is when you are using view bag or view data you have a model that you have binded to the view but when you are in the view that data that you retrieve here is somehow magically coming up and because of that the model is not tightly find it To the view I always like to find models directly to the view that way whatever I am accessing in the view here is available in the model itself that is a much cleaner approach and that is what I always recommend hands down
now the question is we do not want to modify our root entity because if I add more properties to the root entity this is corresponding to the dat Database table that we have we need to create a different model that will be binded to the Villa number view we will do that in the web project here right click add a new folder call that as view models in that view model let me create one more class I will call that Willa number weem for view model first property that I want there is of type Willa
number let me add that and I will call that Willa Number I will make that a nullable property here and next will be an i enumerable of Select list item I will call that as Willa list perfect that looks good but now now the Villa list if you submit that it might try to validate so the solution is to use validate never with that the Villa number view model looks good now we can bind our create using that Villa number view model if I update this to the Villa Model it is not able to detect
that let me close and open that again because we created that right now it is not able to detect let me restart Visual Studio sometimes intelligence does not work let me restart let me go with white lagoon. web. viw models. Willa number view model now of course we can add that to our Imports right Here perfect that works where we have the model I will add V number dot let me do that fact that looks good where we have the ASP item we no longer require the view bag here I will say model Dot Willa
list perfect that looks good last thing that we have to do here is we need to pass that view model right here I will create a Von number view Model let me add the using statement is equal to new and where we have the vaa list we can populate that right here comma we did not need the Villa number I can remove that and that looks good let me save that and run the application we will go to Villa number here create and we get an exception let me see why that's odd it says whoops
we forgot To pass that to the view that was the reason with that configured let me try again and perfect we have the drop down and that looks good what we learned in this video is rather than using view pag and view data a cleaner approach is to use a view model and tightly bind our view to that view model with the create Villa number everything is looking great But what we can do is when we go back here we want to display Villa name and not the Villa number if I go back to the
code here in index we are retrieving all the Villa number when we go to Villa number model here you can see we have a navigation property of villa for each Willa number if this navigation property was populated then from there we can easily get name of the Villa now because we have defined that To be a navigation property using foreign key relation we can easily load that with Entity framework where we have the Villa numbers here we have to write do include and add a using statement using statement will be Entity framework core once you
add that we can load navigation property we want to load Villa navigation property and when you write. include it will automatically join the Villa table Retrieve that and make it available in the Villa number let me add a debugging point and restart the application to show that we go to Villa number here and perfect if we go and examine the Villa number you will notice Villa will be populated with all the values now when you run the application it also runs a console window if you open that console window you can see that it is
inner joining Both the table Willa number and Villas and it is retrieving all the record that is how using do include you can load the navigation properties and then displaying that is super simple if I if I remove this debugging Point go to the view here where we have Villa ID we will go to the navigation property and display v. name with that if we continue here great now we are displaying The Villa name Here but what we learned in this video is very important we learned how to load navigation property using do include in
Entity framework now if there was another navigation property inside Villa Entity framework core also has then include which you can use to include a navigation property inside another navigation property but if you had more than one navigation property you can add more do include and load all of the Navigation properties one thing that I want you guys to do is if you try to create a villa number and that Villa number already exist I want you to display a toaster notification so pause the video and try to see if you can complete that small assignment
I hope you were able to complete the assignment what we need to do is when we are creating a villa we need to find out if that that number is unique or Not so I will have a Boolean here is number unique is equal toore dp. Willa numbers we can use something called as any with Entity framework that will return return true or false if there are any records with the same billon number another way to accomplish that is you can use the bear condition retrieve that if the count is equal equal to Z then
the number is unique but a more efficient answer will be to use do any rather than using where Or first. default now any here will return true if that Villa number already exist I will change the name to be more meaningful room number or Villa number already exist if model state is valid and if room number does not exist only then we create that room number else we will check here if the room number already exist then we will add that to our temp data for notification let me edit that did I Forget something no
semi go in there rebuild and apply the change let me go back here one second we are in the create post yep that looks good let me run the application and try that we will say 101 that already exist and when we hit the create button you will see an exception I want you to try and figure out what's wrong here the answer is simple right here we Have Willa number but when we post we will be getting a villa number view model so in obj we will have Villa number do Vore number and when
we are adding here that will be obj Villa number let me run the application again let me try to create one with 101 and this time you will see a different exception perfect you can see we have an exception with model. Villa list object reference not set to instance of an object Can you try to debug and tell me why you are getting this exception if you debug you can easily identify the issue I hope you were able to debug and find that what happens is it will go outside of this F condition and it
will go with the temp data and then return back to the view in the view it is trying to access model. Villa list but when you are returning back are you passing that view model we are not because of that we get the error Message what we need to do is we need to pass the view model with the dropdown if I paste that here let me run the application and see what happens let me do 101 here and perfect we get the notification Villa number already exist but if you notice here the Villa list
drop down is empty because we are passing the view model here again that way it will not throw exception of object reference not set to instance but the object does not Have the drop down we basically will have to populate the dropdown again similar to what we did right here copy that and before we return back we will say opj Villa list is equal to and paste that that is something that you have to be careful if the model state is not valid whatever you are populating here has to be repopulated before you go back
to the view with that configured let me restart the application and now it will work We try to create a new Von number here 101 and great drop- down is populated but the notification here is a success notification we have error I think we made a mistake in the notification where we have the error it will be error and that should fix it perfect looks much better create functionality is working great with Villa number let me work on update now when we update I want to add a special business requirement that once You create a
villa number here you cannot update that if you made a mistake you can always delete that and create something new but you cannot update a villa number but before that let me see if drop downs are working here let me create a Royal Villa Willa number 777 and perfect that is working now let me work on the update here we have the Villa number controller let me close everything Else we have the update cat endpoint we need to load the dropdown so let me copy this scroll down paste that here here and along with Villa
list we need to populate Villa number undor db. Villa numbers. first. default U goes to u. Villa number is equal equal to vad number this will be a Von number let me go back to the index and see what name I have used we will go to Villa number index scroll down we have the Villa number ID let me use that if it is something else here things will not work if the Villa number view model do Villa number if that is null we will return back to the error page else when we return to
the view we will pass vaa number that looks good let me SA that and we need to create the view I will copy the view for create copy that paste it Here let me remove the comment here we will have update Willa number and scroll down this will be update perfect I believe that looks good let me me run the application and see if that works let me click the edit here and perfect the update is looking great I want to point out something if for some reason you do not see the view and you
see an eror message like this Something got corrupted while adding The View what I typically do at that point is delete that view and create that again of course I will copy all the data in a notepad that way just drop that view create a new view and paste that again but that is one tip that I want to give if in case you are trying to access a view and you see view not found but that view is in the same location try to delete that and create that again we need to work on
the post end Point for update let me go back here and copy what we did in create here scroll down where we have the update let me paste that we will be getting the Villa number view model here let me fix that and when we are updating I need to disable the Villa number that cannot be updated well not here in the input field disable that but but we need that in the post endpoint let me add the input asp4 well if it is disabled I think we Will be able to access that in the
post Endo we do not access that if the field is read only so we are good there we get the Villa number we do not have to check the room exist because that cannot be modified here if you want to add that then you need to add some extra validation rather than add here it will be update and that will be inside Willa number view model. Willa number Willa number has been updated Successfully redirect back to the action and if something is not valid we need to populate the Villa list again and send that perfect
looks great let me go back and test that again 102 is disabled let me add a debugging Point here change that well not one or two I have Tri 7 rather than Royal Villa make it a luxury pool Villa we get the error here multiple matched end points let me restart the application Sometimes hot reload might act funky let me edit that to be premium pool Villa great we hit the end point let me [Music] examine and we did not get the Villa number I was under the impression that we get Villa number even if
it is disabled but we need that so asp4 Willa number dot Willa Number I will make that as an hidden field and that should work I will have to double check I think read only might be working let me edit here premium pool Villa examine the Villa number and perfect that is working let me continue well our number has been updated and we have the premium pool Villa so great our edit functionality is Also working as expected finally we want to work on delete and when we are deleting we are passing Villa number ID so
let me copy what we have for update here it will exactly be the the same rename that to be delete here and that should work well along with that let me add the view stop the application add view for delete and I can copy everything in Update paste that here I will disable the select dropdown and I will disable the special details this will be delete and BTN danger that looks good let me run the application the post end point we need to modify that but let me see if I am able to view all
the details yep that looks good now let me go back and fix the post end point which we will be retrieving Villa number here and we will get Villa Number view model I need to check the Villa number here is equal equal to Villa number view model Willa number doore number I have too many lines here let me split that out it will be of the type willan number if the obj is not null we will remove that Willa number from the database and Villa number has been deleted Successfully The Villa number could not be
deleted let me rebuild and apply the change and that should work go to Villa number here try to delete one with special details and perfect that worked with that the CED functionalities for V number are working as expected before I continue let me point out one small thing when we are redirecting to index here we are using Magic string if you make a spelling mistake there it will not display any error message rather than using magic string you can use something called as name off and that will find name of all the action method here
and that way if you make a spelling mistake here it will directly display you an error message this is a great alternative rather than using magic string so let me fix that in the other Place here for index where we have that perfect looks good that name off will not work when you have a different controller but when you are working in the same controller it makes sense to use name off let me modify that in the Villa controller as well rather than index name of index perfect and great now these are very small Things
but when you are writing code if you gather all of the Small Things ultimately you will have a very clean code and that is the best practice our application is looking great we can perform the crud operation on Villa and Villa number but now let's take a step back and analyze on the code that we have let me close everything here close all the TS here and then if you examine in the home controller and the Villa number Controller we are directly accessing the DP context now that is okay if the application is small you
can have all the logic in one place but if we are working with a large application typically we need to break it down in multiple projects and we are using clean architecture for that one of the best thing that we have with net core is dependency injection we should utilize that and Create a generic repository that way we can move all the database related operation in the repository let me show you how we can get that done now first when we work with dependency injection there are interfaces and we will have implementation of those interface
so the question is where will we have interface for our DP context interface will typically go in the application layer so in the Application project here we will add a new folder and let me call that as common inside that common folder I will create one more folder for interfaces we will work on the Villa model and then we will work on Villa number in the interface here let me create our first interface and I will call that IA repository perfect it will be a public interface and inside there we will have all the methods
to perform crud Operation on Villa let me do that one at a time if I go to V controller here you examine we have something called asore pb. v.2 list to retrieve a complete list of vaa but when we go to update here we also have first. default where we have a condition and we are retrieving one Villa in the repository here we can add a generic implementation to retrieve all the Villa here and I will call that get all let me add the reference here to The Domain project we need that perfect now when
we go to controller here we have a method where we are passing link operation what if we want something similar in the get all here that way we will be able to add filtering to do that we will be getting an expression here and that will be function f andc on the Villa model and we will have Boolean as the result right here let me call that filter is Equal to null and the expression here will be nullable because if we go back to controller we will need that expression in first or default but when
we have to retrieve the complete list that will be empty along with that if I open the Villa number controller you can see we were including few properties to eager load the related properties to to handle the scenario in our repository here let me add a comma and I will get all the Include properties as a string let me do that include properties now how we will implement this do not worry in the next video we will go into extensive detail when we do the implementation of our interface but the G all here is looking
great next what if we want to get one individual Villa if we want to get one individual Villa then also we will need some condition to filter that and when we are Getting one the condition here will always be required so let me copy the get all paste it one more time rename that to be get and if we are getting only one record the expression will be a required field let me remove that null here and we will have include properties if we want to load the navigation property that looks great let me go
back to the controller here in create we will have ADD where we will get the entity Here in update also we will get the entity let me create those two method return type will be wide you can add Boolean if you want I am keeping things simple we have ADD we will have update let me fix that and we will have remove as well and finally there is one more thing here we need to save the changes so right here let me add a void call that as save and perfect that looks good with that
I believe we have all the End points that are needed in the Villa controller to perform all the crud operation we have the interface of a repository and we need to implement that now typically when you are working with an Anor architecture you have the implementation in the same project but with clean architecture you need to remember responsibility of the individual layer we will Define the contract in the application layer but The implementation of all the database migration database context object will be in the infrastructure layer so where we have the application DP context there
we will Implement our repository now I know it might seem a little odd that we are keeping the interface and implementation in separate places but ultimately it will be a clean architecture and by the end of the video you will see the complete advantages in the infrastructure here Let me create create a new folder and I will call this repository in repository we will be creating a new class and that will be implementation of the I Villa repository we will call that Villa repository it will be a public class here and it will implement the
Ia repository we need to add the dependency between the project so the infr structure layer will have a dependency on the application Layer let me add that here and let me press control dot here to implement that interface perfect that looks good but one thing that you should always remember is V repository will be the implementation of IA repository in our main web project we need to add that to our dependency right here I will say Builder doservices do add we want to add a scoped dependency that whenever someone request an implementation of IA repository
the Container should be able to give them the implementation in the v repository class that looks good but we still need to implement all the methods in V repository let me do that in the next video before I implement the V repository we should be clear with our clean architecture the web project should have dependency of the infrastructure project and that looks good the infrastructure project will have a dependency on the Application project if I expand it here you can see we also have a dependency on the domain project that is not needed because when
I open the application project and examine the dependencies it has a dependency on the domain project so if infrastructure project wants to access domain that could also be done because application is already included in the infrastructure but with that the dependencies that we have are looking Good when you work with multiple layers you should be careful when you add project reference you do not want circular dependencies or if there is already a dependency you do not want to duplicate that as well so make sure to keep that in back of your mind and I will
explicitly point out some of the pitfalls as we proceed with the course we have to implement the Val repository let me hide that here and Close everything else we only want the V proos itry when we were working with application DP context let me keep a controller open here for V number we were injecting the application DP context when we work with repository it will work exactly the same if I copy this and if I paste it here I will have to change the Constructor name to be V repository and that way we will get
the implementation Of RTP context now we need to implement the add method here for that onore DB we had add and there we were adding The Entity one thing you might be seeing is when we were adding here let me scroll down in the create post we were adding that on V numbers. add but even if you were using _ db. add Entity framework core knows what object it is and based on that it will add in the corresponding table right here we are using directly Undor db. add now get and get all are a
little bit complex let me cover that in the next video where we have remove we will saycore dp. remove and remove the entity in order to save the changes we will say underscore DB do save changes scroll down for the update here we hadcore db. update on the entity now we already know that Villa repository will be working on the Villa Here so if we want to do something like this that is completely okay because we know that our entity will be V entity for this repository we can add the Villas after the context object
I will keep both the things here we have one without that we have one with the Villa because as we move forward we will be improving our repository but now the two things that are remaining is get and get all now we need to work on get and get All let me first do the get all here and we will be working on an i quable and that will be off the type Wella or the repository now typically we used to work onore db. Villa something like that that is directly working with the DB set
but on the DB we can also use set here and then the class that way it will work exactly the same likeor db. vow we are setting our I variable here and we are telling that it will beore dp. veloc Here next we need to add filter there we can check if filter is not null in that case we will work on query here and we will add our filter adding that is super simple we can directly add a wear condition next property that we have here is include properties now this we will extract as
a string property but if you exam in the Villa number controller we are basically having that as an expression as well but if we want to Include more than one properties we can have a comma separated list and then accomplish that so what I can do is where we have the include properties I can check here if not string do is null or empty include properties if that has a value I will have to split that by a comma because again it will be a comma separated values we will have a for each here variable
include prop in include properties for each of the include Properties we need to split that so right here on the separate line here we will split that and I will split that by a new character value that is comma and I will set the strings split options do remove empty entities we do not care about any empty entities and that looks good now for each of the include property on query we can say query do include and we want to include the include Prop that way we will be able to include all the properties that
are separated by a comma but here you have to be very careful what whatever you add here that must be case sensitive like if we go back you can see it is Villa here if it is a lower case include will not work so that must be the exact name that we have for the navigation property let me close that here and I will add a comment here it will be Something like vaa comma vaa number and again it will be case sensitive with that we have our query that is working finally we will return
back query. to list that looks good for the get all implementation let me copy and paste that and there we will be getting everything right here but when we are returning back here we will return first our default the return type will be only Villa let me go to the interface here I Think I made a mistake there whoops F12 when we get it will be an individual Villa and not an i innumerable perfect our get and get all are looking good and the other methods are also implemented in the repository we have implemented the
Ia repository but we need to consume that in the Villa control roller right here we no longer want to directly use the application DB context we want to use the Ia Repository let me call that V repo dependency injection will get us the implementation I Villa repository call that as V repo and underscore Villa repo is equal to V repo now here do not make it a villa Repository it must be the interface because dependency injection if we go to program.cs when you ask for an implementation of IA repository we have registered that it should
create an Object and give you the implementation of V repository so in the controller here it will dynamically do everything and give you the implementation that you can directly use in your application right here here we will be working on Villa repo we do not have vas but we have the get all. get all perfect that looks good where we have to add anything we will say Underscore V repo do add and we pass the object to save the changes we will say underscore V report. save and perfect when we have to get the first
our default on the V repo we have the individual c here and there we can pass the expression exactly same like we do in first. default that is perfect when we have to update uncore V report. update and we pass our opj finally we will have V repo Dove That looks good where we have the first. default will repo doget and that looks good let me modify here as well where we have to remove anything on the V repo we have remove method and we need to save the changes perfect with that I believe we
have modified everything and now in the v controller we are no longer using the application DP context directly let me run the application and see if we are able to perform the cred Operation we will go to Villa here let me try to create a new Villa name cannot match perfect that looks good let me try to update that worked as well and perfect all the cred operation are function but now we are using our repository the version for our repository is looking good but think about this thing right now we have a v repository
then we will have a villa Number repository and for all the entities we will have their individual repository that is also okay but when we examine the repository here the add method maybe the get get all all of these methods will be exactly same when we are working with Villa or Villa number now there might be some cases when we need some changes and that we can override but typically the retrieval process and creating and updating is pretty standard with Entity Framework so rather than having the same code in all the repository it makes sense
to move all of the base code in a generic repository and then implement ment that in the v repository that will be the next version for our repository first let me implement the interface for that and interface will be in the application layer right here let me stop the application first and I will create a Class that will be repository now this will be an interface here so let me make it public interface and not the class I repository modify the name here to be I repository the repository here will be a generic interface and
we will be using generics in C we do not know what class it will be it can be a villa class or it can be a villa number so we can say when we Implement that it will be on type T Where T will be a class but we will not know what that class will be right now that is how generics work then let me go to the interface here for the Ia repository copy everything here and paste that and paste that in the vaa repository we knew the class was vaa but here we
do not know that so I will replace that with the generic class that we have defined as T here now when we are working with generic Repository we can implement the save and update here as well but I will not do that update I typically do not like in the generic repository because many times you do not want to update all the fields maybe you only want some fields and that can be different based on the individual model right now let me only add these four methods in the generic Repository Next Step will be to
implement this generic repository and that will be done In the infrastructure layer where we have the repository let me add a new class there call that repository it will be a public class and it will implement the interface I repository but we are working on generic make sure to add that here that way we know that repository is also generic where T is a class with that if you press control dot here we will have the helper to Implement all interface we have a generic I repository and implementation will be inside the repository. Cs now
it's time to move the code from Bel repository to our generic repository here you you can see we were getting application DP context we will do the same in repository and get that with dependency injection Constructor name we will modify that to be repository here and on Top of that I will also create internal DP set DP set is what we ultimately work with when we are working with Entity framework let me do control Dot and add the using statement and that we also saw in the v repository right here when we work on the
set here that is basically creates a DP set of the type entity when we had to work with Villa we were using _ db. set and we were setting that to be Villa in generic we don't Know what class it will be but that will be defined in t so what we can do is in Constructor I can say DB set here is equal toore DB do set and type will not be B it will be the generic class here next thing we will not be working onore DB but we can work on the DB
set for add so DB set dot we have the ADD and we can add the entity similarly let me get the get here because it is a little complex Copy that in our generic repository and the query here we can change that to be our DB set one thing that we need to modify is we do not work with vaa it will be generic and perfect the errors went away copy that and paste it again for the get all we will modify first or default to be to list and that looks good final thing that
we have here is for remove that will be DB set. remove and we will pass the Entity perfect now our repository has the majority of the implementation that was there in V repository that being said we should clean up the V repository and the interface here methods that we have added in the generic repository let me remove them and we will keep update and save we can see that this IA repository implements the I repository and there we can Define what class we will pass in The I repository it was generic but when we are
implementing we are seeing right here it will be on the class Villa that looks good but now we need to go to V repository and we can remove the get here get on all remove we will keep save and update and that's about it perfect that looks much better but now where we have the Ia repository our V repository basically also needs here the repository let me change the spelling Here and repository we need to define the class that will be Villa that way the Villa repository will get all the method me of the repository
and it is implementing the Ia repository but you will notice one error in the Constructor here and there it says no argument given that corresponds to the required parameter DP of the repository pill and that is because if we go to repository it requires the DB Context we already have that let me go back we have it here so we can pass that down to the base class with one single command base and we can pass DP simple as that with that it will give the implementation to the repository and everything will work exactly the
same with that in place if I run the application now everything will still work exactly the same but now we have moved our generic code to a generic repository from The Villa Repository we are able to retrieve everything let me try to create that works if I try to edit that it is working so all the crud operation are working as expected but we have moved our bulky code to a generic repository implementation and this repository we can reuse a across all the new repository like if we create a villa number repository in the future
we will create Booking repository and much more that way we do not have to rewrite all the code in all the repositories now I know we have covered a lot in the past few videos with repositories so I want you guys to pause the video and make sure that you understand everything that we have done now you should be able to bind everything together on how repository is helping V repository how the interfaces are working and how everything is coming Together to load all the data in the web project so make sure to take a
pause right here and analyze everything that we have done before we enhance our repository a little more in the upcoming video what we have for our repository is great and this is fully functional but there is also one more thing that could be enhanced right now if we go to our Villa controller you will notice we have a Villa repository let's say down the road in a controller if we require to use three repository we will have to inject all of them individually how about we create a wrapper on top of V repository something like
if we have that wrapper call that as maybe unit of work Dot and then we can add the name Villa there and then we will be working directly on the V repository similar to what we have with Entity framework when you use _ db. Villa and then the operation now that would be great but how do we do that for that in our repository here interface let me create a new interface I will call that unit of work so this will be an interface i unit of work it will be a public interface and there
we basically need an IA repository call that as a villa and we will only require a getter let me go to solution Here and where we have implementation in infrastructure let me Implement that in a new class called as unit of work it will be a public class that will implement the i unit of work Implement that interface in the Ia repository here let me create a get and a private Setter I will give that a name of villa as well and that looks good let me also create a private read only application DP context
here and set that in a Constructor so application DP context here and we will say underscore DP is equal to DP now we need to create a new Villa instance so Willa will be equal to new Willa repository and we have to pass the application DP context as a Constructor that way we will get the dependency of application DP context pass that down to the vaa repository vaa repository will be getting that and passing that down to the base repository now if you think that is too Much it is getting the DP context and passing
it down to the base class but with that our unit of work is all done that's it that we had to do it might seem a small task but with that we have created a wrapper around our repositories how do we use that when we go to the web project here in program.cs now we no longer have to register individual repositories all we need to register is unit of work and its implementation is Inside unit of work with that configured our unit of work is already set up to be used in our project our unit
of work is already configured in the project and we do not have the individual V repository so in the v controller when we inject things will not work let me show that because it will not know what implementation to give when we ask for I Villa repository in the Villa controller you can see it throws an Exception we need to modify that to use i unit of work now let me call that score unit of work and we will have unit of work here and we will get that with dependency injection underscore unit of work
is equal to unit of work where we have underscore V repository we need to replace that with unit of work and then What entity we are working on that is the Villa entity Copy that and let me fix everything that we have here perfect that looks good with that if I run the application ation now all the gud functionalities will be working but with unit of work let me show that we are using Villa number here let me fix that and great we are able to create we are able to update and we are able
to Delete with that you can see how easy and clean it is with unit of work we can tell What entity we are working on and then the operation now there is one small modification that I want where we have unit of work and we are saving the changes we are basically calling uncore tb. saave changes it does not really make sense to have the entity when you are saving the changes because if you are adding two Entities here and you save the changes it will ultimately save both the entities right now we have the
Villa model but if we have Villa number then it will save both of them so rather than that unit of work should have the implementation of save and not the individual repository so what we have to do to fix that is inside unit of work well first in the i unit of work we need to add a method vo save and in the implementation Let me implement that I control Dot and we will saycore DP Dove changes with that in place if I go to the Ia repository we do not need the save method there
and implementation let me open that perfect that is not needed in the Villa controller on unit of work directly we will have the save and that looks much cleaner perfect let me run the application and make sure that nothing Is broken we go to Villa here let me try to delete this one and perfect now our repository is in a great shape everything has been configured with unit of work and the save method is implemented in one Global location rather than individual repositories now that we have V repository in our unit of work it is
time for an assignment what I want you guys to do is what we have done with the V repository I want you guys to do the same with Villa number repository ultimately in the Villa number controller we do not want application DP context it should be a unit of work and everything should be functional make sure to pause the video and do that assignment that way you will understand the complete flow of what we need to do we need to create I repositories we need to add that to unit of work then we need To
modify the controller and finally everything will be functional so pause the video and make sure that you implement the Villa number controller using unit of work we have to implement few things to get our task done let me close all the tabs here and first in the interface in the application layer copy and paste V our repository here and I will stop the application rename that to be I Villa number Repository copy that name and we will modify the interface name here that will be on Villa number and not V entity make sure to correct
that and perfect the I Villa number repository looks good next we move to the infrastructure layer well while we are there in the unit of work we can create an entity for I Villa number repository that looks good then in the repository here we need To copy V reposit paste that one more time and rename the new file to be Willa number repository copy the name here open that file modify the class name and it will Implement repository with entity of Villa number and interface will be I Villa number repository in the update here that
will be on V number and this will be Willa numbers. update perfect pretty simple final step That we need is in unit of work we need to create public I Villa number repository right here we will say Villa number is equal to New Villa number repository that's all that we had to do with unit of work and the Villa number repository final change that is needed is in the controller Willa number controller let me open the other controller and copy the unit of work here paste that here make sure to correct the Constructor name and
perfect now we need to modify when we retrieve the Villa number we need the include properties on unit of work we will be working on Villa number. getet and there we need include properties so we will say include properties and what will be the value it is case sensitive so make sure to cut this value and paste that with that it will retrieve everything and it will be get all Because we will get all the Villa number where we have the drop down here we need to go to Villa here if this was not unit
of work you would have to inject Villa repository and Villa number repository but because we have unit of work there we have Pilla and we can call get all let me copy this scroll down I believe we are doing that again here let me paste that that looks good then we need to check if the room number exist So underscore unit of work do Willa number and right now we do not have a repository Endo for any but if you want you can easily add that end point let me do that right now we will
add that in the generic repository here where we will have a Boolean return value we will have any and there we will get an expression when we are using any filter will not be an optional let me fix that and we need to modify our Repository let me Implement that interface right there we can return the DB set. any and apply the filter simple as that you can see how easy it was to add few things to our repository and great that is functional next we want to add here so we will say underscore unit
of work willan number. add and unit of work Dove let me copy that and scroll down where we need to get the list here we will say underscore unit of work. Villa. getet all we need to get the Willa number here unit of work. villa number. getet and we will pass the expression that looks good let me paste save changes here in order to update again unit of work Willa number do update and we need to get the drop down here that will be unit of work. Willa do get all and perfect looks good we
have the Drop down again let me paste that here scroll down to see we do not have any more dropdowns first. default unit of work do Willa number doget that looks good let me copy that and we have that again paste that here looks good finally we have unit of work. villa number. remove and unit of work do save changes great with that I do not see any error message here let me run the Application and see if everything is functional we go to Villa number here let me try to create a new one for
luxury pool Villa random Villa number and some special details perfect let me try to edit that to be a Royal Villa that works and delete is also functional perfect with that our application is fully functional for Villa and Villa number using unit of Work now what I want to do is when we are working with Villa you notice we have an image URL but in a typical application they typically upload an image and that is saved on the server and we are using to display that and that is exactly what we want to accomplish rather
than a string here we want to upload an image to get that handled let me close all the tabs here and let me open our Model in entity domain we have the Villa model right here we have image URL but let me add one more property that will be of the type I form file that way we can upload file when we are adding the V call that as image and let me make that not mapped not mapped is another data annotation that can be used on entities when you add not mapped we are Telling
Entity framework core that the columns that we are adding here you do not have to add that to the database that way it will not try to add the image column to the database and that is exactly what we want with that configured our Villa model is looking good now we need to modify our controller to handle upload of an image but when the image will be uploaded where should we save that all the static files are in one Location and that is www root folder images there we will create a new folder let me
create a new folder with the name of vaa let me follow the same convention and make it a capital V here and that looks good finally what we need to modify is the Villa controller and there when we have the upload here or create an update along with the Villa object we will be Receiving a file here but we need to modify the view as well right here on on the form we need to handle image upload when we scroll down where we have the image URL we can keep the image URL here as a
hidden property we do not want to use that but what we rather want is the new property that is image and that will not be hidden with that change if I run the application we will be able to see a File upload when we are on the create view for our Willa let me go to Villa here and hit the create button and perfect we have a choose file button here that way we will be able to select an image to upload but let me close that right now even if we upload things will not
work because when we are handling file in a form right here in the form tag we must add the ENC type and that will be multi-art form data if you do not add That then when you hit the upload button file will not be posted so make sure to add this ENC type on the create form with that configured when you upload the image here we will be able to receive that in the Villa object itself we have the form file so that will be available in the Villa object now we need to retrieve that
image here and save that inside the Villa folder in www root Folder how do we access the root folder of the application we can do that by using something called as I webhost environment and that is available in theet framework itself so we will inject the I web host environment using dependency injection here let me inject that it will be I web host environment make sure you do not make spelling mistake There perfect we are injecting that in the controller and in the post endpoint we need to upload that image after the model state is
valid here we can check if opj do image if that is not null that means an image was uploaded in the else part here image was not uploaded at that time what we can do is we can set a default image let me add a default image of placehold do go and if you open it's a Dummy image that looks good if an image is not provided we will use a default image here next what do we do if we have an image here let me continue in the next video if an image is provided
we need to handle that first let me retrieve the file name here because we want to reame that to be a random GD when we get an image here we do not want to use the default name let me Generate a new name using GID do new quid do2 string but when we have the file we need to keep the same extension so using path. getet extension helper m method we can retrieve the extension of the image that was uploaded by obj do image. file name right here you can add a validation if you want
that if the extension is PNG or jpeg then you accept else you reject that but I'm going to assume that the image is valid here next we need the Path so let me call that image path is equal to path. combine and the default path is inside uncore webhost environment. Webroot path that basically will give you path of this www root folder and after that you have to navigate in images and then vaa with that we will have to add images forward slva and that looks good for the final path where we have to save
that image in order to add that image we will Create a new variable file stream is equal to and we will have to combine the path which is the final path which is the final path of image path along with the file name enter into a file mode of create and then we will use copy to to copy that image in our folder Villa right here rather than Villa let me re name that to be Villa image that makes more sense perfect Villa image here let me pin that and this will be Villa Image rather
than having a bracket around using statement we can simplify that and perfect looks good after we do everything we need to upload the new image URL and that will be inside images vaa image we have file name now the smart intelligence that you saw on my screen that might not be available for you and you'll have to type that because I am using GitHub co-pilot because of that I am getting those suggestions so if you do not have a License for that or if you do not have co-pilot you will have to type that and
make sure to not make any spelling mistake when you are typing the magic string but that looks good for uploading the image in if that is present else we are setting that to be a default place hold. goco and then we are adding unit of work with all of that configured here let me run the application and test that I will add a debugging Point Here will go to Villa not Villa number create a new Villa here and let me select an image let me open an image here and hit the create button perfect we
hit the end point image is not n that is good we get the file name with the extension we get the path where we have to save it and now it copied so if I go there perfect we have that image in the Villa image folder if I open that great let me do F10 Here and and it will add to the database save changes let me continue perfect if I go back to the folder the image has been uploaded so perfect when we create a villa image is working let me try that once again
with something dummy where I do not enter anything and hit create button it will go in the else block create that and let me go back to the edit here perfect we have Place hold for the other one we have the URL inside the Www root folder so changes have been saved successfully in the database now let me work on displaying that image on the edit page now I want to display that image on the update page here let me go back to the code and we will have to navigate to the update view go
to that view where we have padding three let me create a div give it a class of column 10 and let me create one more div give it a class of column 2 let me cut the padding three here and paste that in column 10 if I save that well I will have to rebuild let me do that and let me go to Villa and then update perfect we moved everything to the left and we can display image on the right here I will add IMG tag SRC will be model. image URL width will be
100% let me add some custom styling for the Border here save that and perfect we we can see the image here where we have placehold we can see that URL and that is looking great next we need to make sure that when we are on the update here we need an upload button on this page as well let me go back where I have the image URL I will add an input tag for image and the image URL we will require that in a hidden property because what we Want to do is when we have
create an image here we want to delete the old image that will be present in the image URL so we will delete the old image and we need to upload new image that has been uploaded but if we do not upload any image here then we need to make sure old image does not get deleted we want to work on image in the update V let me go back here to the Villa Controller and let me copy the code that we have in create paste that when we are updating and if the model state is
valid there will be one thing that will be different this time is if there is an old image we need to delete that so we will say not string. is n or empty obj do image URL in that case there is an image URL we will say variable old image path is equal to we will have to do path. combine where we need to add the web Host environment. Webroot path along with that we will add obj do image URL if I go to the database here and if I open vas you will notice that
we are adding a forward slash before image so what I will do is right here I will say trim start and I want to remove that forward slash I will have to escape that so we will add two backward slash again it will be backward slash not forward slash then we will check if System.io file. exist then we delete that image that way if it is an https then it will not delete that image but if it is a local file we will remove that image after that we will upload the new image and everything
will work exactly the same this time what we will do is if obj do image is not null then we basically do not want to replace the image URL so we will remove the else condition that way the image URL will Stay as it is because we have that in the hidden property so it will remain as it it is and when we call update that will not be updated looks good here let me add a debugging point and we have to test that H reload will kick in here let me try to upload a
new image here if you notice here the obj do image is null can you try to find out on why that is null we have fixed something in the Create but we missed that when we are working with update one thing that we have missed when we are working with update is if we go to the top in the form here we forgot the ENC type if we do not upload that image will not be posted with that change we will have to restart the application here and now the image will be uploaded let me
give that a try again we will upload a new image Here press F10 perfect we get the new name it finds the old image here it will remove this one let me see perfect that got deleted and it will upload a new image we have that here we get the new file name as well and we will update perfect if I do edit here we have the new image and that looks good if we update any records here without updating the image then also the image will stay intact and That is exactly what is happening
with that create an update Villa are working as expected finally we have to work on delete here and in delete also let me display play the image let me go back to the code here where we have update let me copy the column two here and I will open the delete view for [Music] Villa the padding three here let me add That in a div give that a class of column 10 and let me paste it here closing div I will add that after the padding three that looks good I believe we do not need
to make any other change let me go back to the UI heart reload did not kick in for some reason let me restart let me go to Villa here try to delete this one and perfect we want to delete image if we delete the Villa let me go back to the code in the Villa controller we have the delete logic in update let me copy that paste it right here rather than obj here let me get that from the database obj from DB if that exist then we delete that file and we continue perfect let
me save that and I will try this out Willa is deleted we should not have any image and that did not work for some reason let me restart the application here and let me try to Create a new Villa well I have an existing Villa let me upload an image perfect if I try to delete here let me see what happens image URL is populated the image exist here let me go back and perfect it deleted this time maybe the hot reload did not kick in because of that delete was not functional but as you
can see the image was deleted and let me clean this up I do not want a dummy image lying Around perfect looks good if I add a new image here remove the debugging point if I exam in the Villa we have that here let me try to delete that go back and perfect that is gone with that we are handling image successfully with create update and delete of our Willa in the assignment here you will practice everything that we have done so far what I mean by that is first we need To create a new
model that will be Amity model and we will have to create that table in the database with four columns it will have an ID column name column that will be required description will be optional and there will be a foreign key relation with the Villa ID it will be similar to what we have in our Villa number table now the model that we have to create we will do that together in the next video and after that you will start On the assignment so next video try to follow along with me and then you will
pause and start the assignment what you will have to do for the assignment is once we create the model you will have to add a migration to push that to the database and then you have to create amenity repository and configure unit of work with amenity repository after that you need to perform the crow operations on on Amin and there will be a drop down for Villa Similar to what we had in Villa number make sure to follow along with me in the next video and then pause the video and complete the assignment before you
start on the assignment let me create The Amity model that way we will be on the same page we will be going to our entities here add a new class file and that will be Amity docs it will be a public plus here and what will be all the Properties we need ID name description and Villa ID let me copy what we have in vaa number and I can quickly modify that we need an ID here let me add that integer ID and that will be the primary key that looks good we do not have
a name here let me add that perfect name will be required here so let me add that and then we need the navigation property but rather than special details we have description that Will be nullable perfect that looks good finally we want to se that in our database we will add that in application DP context that will be in infrastructure data create a DB set here on amenity the table name will be amenities with that we want to seed our database we have on model creating here let me minimize that a little bit and we
Will be adding more on model creating for our Amity now rather than typing that I have provided that in snippet if you go there in section 9 I have seed amenity here copy that and paste it right here with that configured our basic requirements are complete for the assignment in the next video you need to create the amenity table and then you have to add amenity repository configure that to unit of work and perform crud Operations on amenity these will be amenities on individual Villa based on the Villa ID so there should be a drop
down to select an individual Villa I hope you were able to complete the assignment what we have to do is add amenity to repository and unit of work but before that we have to create our table in order to do do that we will open the package manager console and we Will point to the infrastructure project we will add a migration call that add amenity to DB the migration here we are adding the amenity table and we are seeding data perfect everything is done here and one thing you should remember is there is Villa ID
1 2 and 3 so make sure that when we are seeding that there is also Villas that we are seeding with Villa ID 1 2 and 3 make sure that that is present in your Database if you deleted that by accident this is what you should do go to the solution Explorer and open app settings. Json we have the white Lagoon what you can do is go to SQL server and delete that table close the existing connection delete that perfect that is gone now with that deleted if this database does not exist it will create
a new database and apply all the pending Migration so if you run the command update database it will work let me do that here and go back refresh the database again we will have white Lagoon and there if you examine the vage table it will have entries amenities perfect everything is looking great but with that we have seeded our data and amenities table has also been created next thing that we have to do is create Repository let me copy The Villa number repository paste that once again and I will rename that to be amenity Repository
copy that name open the file here modify the class name model will be Amity here it will be I Amin repository update will be on Amin as well perfect looks good we need to create the interface here for that we will go to application layer we have the I Villa number reposit Copy and paste that here rename that to be I Amity repository copy that name for the interface modify the interface here and perfect looks good let me modify unit of work here add the IM Amity repository great finally we need to modify unit of
work here and we will be adding I Amity repository and Amin is equal to new Amity Repository with that we have configured Amity repository and added that to unit of work we have configured the repository for Amity now we need to create a controller let me copy The Villa number controller and paste that once again I will rename that to be amenity controller copy the name here and modify the class here perfect now what we need to do is in all the places where we have V number we will have to replace that with Amity
let me do control shift F here replace in file make sure to modif y this to be current document if you do that in multiple document it will not be pretty we will find Willa number replace that with amenity replace all perfect looks good then I want lowercase so where we have V numbers I will replace that with amenities we will match the case and Replace all both perfect and where we have vaa number now I will replace that with amenity make sure to replace the plural first and then the individual let me replace here
perfect if you notice in the git changes here only one file was updated and that is exactly what I want let me take a look at what happened we need to create an Amity view model for the drop down in view models here copy the V number view model I will Rename that to be amenity view model and it will be amenity let me fix that perfect looks good the class will be Amity view model great let me close it here perfect let me examine the code here we do not have the number exist re
requirement for create let me remove that perfect looks good date here we have Amity ID that will be ID itself Perfect looks good primary key is the ID and we have the ID is equal to Amity do ID perfect now where I have F number let me replace that as well with amenity in current document double check that replace [Music] all and perfect that looks good let me scroll up here let me manually update that scroll up Here remove the end perfect let me try to build here and see if that completes great our amenity
controller is looking good finally we need to work on the views and let me do that in the next video now we need to work on the views before I do that let me go to Shared unor layout with we will have to add a link for that controller will be Amin and we will display Amity as well perfect first let me work with the Index view add view here it will be index and let me copy the view from Villa number copy everything close that perfect the I inumerable will be Amin let me modify
that it will be amenity list here let me copy that create new amenity controller will be amenity we have amenity ID let me add that next we have name and we can display Willa name as Well the order here Willa name will be at the end so Willa do name we have the ID and we have name in amenity perfect that looks good the controller name will be Amin modify that here and what will be the route parameter of course that will be the amenity ID here let me fix that but on top of that
we need the route name here and the parameter name let me scroll Down that is amenity ID for create and delete both so it will be ASP route Amity ID and that will work perfect let me run the application and see if that page is functional we will click on amenity here and cre everything is looking perfect for our Amity list here we need to work on create Amity now let me go back to the Amin controller Stop the application copy The View name here add view that will be create let me also add the
view for update here add view update and the delete one add view for delete let me copy all three of them from Villa number we have the create copy that paste it here make sure that you leave open The Amity one and not the Villa Number we do not want to modify V number accidentally delete let me copy and close that paste it here final one is the update copy and paste that here close the other one double check this one yep it is the amenity you can see from the route right there perfect let's
work on create that will be Amity view model let me copy the name amenity here it will be create amenity rather than Villa number we will Say amenity do Villa ID here looks good Amity ID paste that perfect after that we have amenity do name let me add that here and we have description next we have the description that me remove that copy and paste that again and we have description perfect we have the create button it will be Amity controller index action and great looks good for update and delete I believe it will be
better If I copy that and paste it right here everything will be same it will be update here and we need the amenity ID as the hidden property rather than create we will display update and that looks good let me copy the update paste that for delete where we have the select here let me disable that scroll down mark it as read only we will go further down down here It will be delete and BTN danger I believe that looks good but we will have to run the application to double check if everything is working
we go to Amin here let me try to create for premium pool Villa all four that works edit that change that to be all five here perfect change the pool to be luxury pool Villa that is functional let me Delete and great all the cred operation on amenity are working I know what we have done with amenity is exactly same as Willa number but the main reason behind this is to give you some practice on how everything comes together I really hope you spend time and complete the assignment before quickly browsing through the video but
with that I hope you had good practice and you are having fun working with Amin now we want to change the navigation let me go to the documentation of bootstrap here and search for nav bar press enter here and we get to nav bar scroll down I want to add a drop down like this let me scroll down and copy the Ali element that we have for the drop down copy that go back to our code underscore layout right here let me add or rather Paste that the anchor tag will have a class of drop
down item let me fix that for all the three that we have here perfect let me cut this one paste it right here whoops I'll have to do some formatting here let me copy the next one add that [Music] here scroll down the last one here cut that and I will paste that after a Divider perfect let me delete all three here save that and let's go back part reload did not kick in let me restart the application we have a drop down but that is not working let me inspect the elements here we have
console error with create popper I thought I included that here and well we had the cdnjs for bootstrap so we did not add that let me Go back here I will go to CD and bootstrap here let's go back and we have the bundle let me get that and paste it right here and restart the application when we have the bundle here it should include everything and perfect that is working now right here you can see there is a blue color for the active tag can you figure out where it is getting that color From
I hope you were able to figure that out it is because of the scoped CSS that we have here and let me remove that I do not want want that as soon as you remove that perfect looks much better now rather than drop down let me call that content management perfect if I go back here or drop down well the hot reload for some reason it's not Working let me restart here and make sure we have that on yep we have that on it should work now great our drop down is working let me remove
the Privacy we do not want that anymore save that here hot reload well it's funky hot reload sometimes works sometimes does not I will restart my laptop before the next video and hopefully the hot reload will work again but this looks good for the navigation let me continue from the next Video you might be wondering that you have skipped few videos but you have not right now I am displaying you the completed application but what I want you to focus on is the homepage right here on the homepage you can see we are displaying all
the Villas we have a check-in date we have number of nights here a button for check availability and based on that I want you to figure out what will be the model of the homepage basically I want you to focus On what will be all the properties that we will require to display everything on the homepage that you see right now pause the video and try to see if you can figure out what will be the model of the homepage let me walk you through that we first have to display all the Villas here so
we will require a list of villa or an i innumerable to hold all the Villa detail next we need a date only field for checkin date integer value for Number of nights here and based on that we might also add a checkout date in our model I believe that will be all the properties that we will require so let me switch back to the application and create that let me close all the tabs here and where will we create our view model we have that in the web project view models add a new class call
that as home view model first property that we want is an i inumerable of villa to display all the Vas it will be Villa here let me add the using statement call that as Willa list next will be a date only field and that will be checkin date now date only is a new type that is available with net 8 if you are using older versions ofet you can use date time and that should work for the requirement but with net 8 we have date only and time time only so let me use them for
checkin date and checkout Date another parameter that we require is an integer number of nights let me call that as nights here and that looks good for our home view model we have created the home view model let me open the home controller here and where we have the index we can populate that I have I logger here but that is not being used let me replace that and we need to inject unit of work once we do that we need to create a new home view model Here and there we are getting all the
Villas using unit of work the nights here let me default that to be one night and next we have the checkin date let me convert that to be datetime do now and from there we will convert it to date only because it is a date only field we will have to convert that from date time and to do that we will say date only do fromom date time and in the parameters we will give datetime do now when we return back to the view let me pass home View model with that when I run the
application here on the homepage now I will have a list of all The Villas in the home view model let me examine the view model here and perfect we have three vas so that is looking good and we have our model in the index section in the home controller we are loading all the items in the home controller here but where we Have the Villa list here if I go to the Villa model in the domain class we have Villa and then if I examine Villa amenity we have a relation one Villa can have multiple
Villa amenities based on the foreign key relation so that way when we retrieve the Villa can we retrieve all the related amenities of course we can with Entity framework code even if we have one to many relation we can load that but we need a navig ation property in Villa then we can pass that to our include statement and Entity framework code will automatically retrieve that so right here we need an i inumerable because it will be more than one amenity and the type will be amenity I will call that Willa Amity make sure that
you add validate never here or else when it will try to create a villa it will try to validate The Villa amenity in model State validation now how do you populate Villa Amenity in the home controller where we have the get all we will say include properties and what name we will use should we use amenity here if you go back and try that it will not work it will throw an exception because the name here must be the name of the property or the navigation property and that is Villa amenity if you copy and
paste that here add a debugging point and run the application now amenity list will be Populated for the individual Villa let me examine here Villa list expand that we have Villa amenity four amenities and last one has three amenities perfect with that you can see how easy it is to load navigation property but you have to add that navigation property in the model in our home controller we have the action method where we are passing the home view Model let me right click here go to the view and we want to modify this view let
me go back to the Snippets here in code snippet section 10 we have the homepage UI where I have provided HTML and CSS using bootstrap that way you do not have to waste time in writing some basic HTML and CSS and we can keep our focus on learning the MVC architecture let me paste that here and run the project before you run that if you examine the code there is no Dot n Related code or tag helpers it is purely HTML and CSS and it is using some of the image in the images folder that
image we already added that from code Snippets if you go back we have the images when we added the slide one and slide two in www root folder images we have already added that with that let me run the application and show you the transformed UI for the homepage perfect we have an image and There is a slider as well but I wanted to take the full width so let me go back and I will have to modify the underscore layout here scroll down scroll down let me scroll down and where we have the container
remove that let let me also remove the padding bottom three and I believe that looks good let me scroll up here we do not want any margin in the nav save that here and great heart reload is working Again and that looks good for the homepage of the application we have the homepage here but we are not binding that to our model let me go back to the index here and first thing that we have to Define here is the model that will be home view model that is what we are passing from the index
Action Now using home view model if I go back to the UI here I can populate checkin date and number of nights Here let me scroll down we have the form tag here and we have the input let me use the as4 tag Helper and we will have checkin date [Music] here that looks good let me save that and go back here and perfect we get the default date here if you want to be explicit you can say type is equal to date and because of that you will get a date picker by default perfect
looks good next we have The form tag here and basically I want to display a drop down from 1 to 10 we can use razor Syntax for that at the rate 4 and we can have a for Loop here I is equal to 1 I is less than 11 I ++ for each one of them we can add an option tag here with the value of at theate I and we will display the I as well well if I save that the drop down should be populated and that looks much better on the homepage here
we will have Our check-in date and number of nights but we need to display all the Villa if I go back to the code here in the controller we are populating that in the home view model we can use that and display a list and display a collection inside our index view now to design that again I have provided a snippet here if we go to code snippet section 10 we have the home list on homepage UI here let me copy everything there we will scroll down and Within the form tag here let me paste
that right here now again it is purely HTML and CSS here but you can see there is quite a few things going on so rather than spending our time on HTML and CSS it is better to provide that in snippet I have provided a model here where I have a dynamic ID based on that it will automatically display a model let me go back and we have one sample here if you click on detail it Displays a model and that is what we have right here we need to display all the Villa details so first
let me work on adding a for Loop and generating all the Villas that we have in our database right here for that we need to add this particular Block in a for each Loop let me go back where do we have that well inside the row here we have the padding four and in the for each Loop we will also have to Loop in the model Because there will be individual model for all the individual Villa right here we will have a for each loop I will say variable Villa in we have model. Villa list
I will close that after the model here and I believe that looks good if I save it here we will basically see that repeated three times but we need to make it more Dynamic let me go back to the top well It's right here we need to make some changes SRC that is inside villa. image URL next we have the Villa name here so villa. name let me scroll down we have the description and here let me do html. ra that that way if we have a dynamic HTML it will convert that and display that
here perfect right now it is only a string but later on we will convert the description to be a rich text editor Because of that I am changing it to be html. ra we need to display the price here that is inside villa. price and we will convert that to string currency format if I save that here perfect looks good and I believe that is all let me double check here well we have the V size and occupancy right here we need villa. occupancy and Willa do Square Fet perfect everything is dynamic here and that
looks good but there is one more thing that needs to be modified and that is the details model right here we want to work on the details model here right here let me display the Villa name if I go back here we have that model and where we have the Villa details let me add a hyphen here and we will display Villa do name now if I save that here let's go back and see something odd right here You see Royal Villa but when I click on the details of Premium pool you will still see
only Royal Villa it does not matter what you are clicking you always see the Royal Villa and you can see it is automatically selected it feels like it is always loading the same model even if you close that that and open that again model should be different for individual Villa and the reason behind that is simple if you examine the ID That we are giving here it is example model hyphen and then a value of 11 when you go up to the details here we should see that as well on the details you can see
we are setting the data PS Target with that ID this this ID needs to be dynamic rather than 11 here we can modify that to use the villa. ID that way for individual Villa it will have a different Target and that Target will map exactly to the ID Here if I make that villa. ID then for each individual Villa it will have a different model ID and that will be triggered with that right now we see royal Villa but now if I click on premium pool Villa it is working as expected and perfect that looks
good so make sure that you have Dynamic ID here based on that it will have a different model for the different vas final thing that we want on the homepage here is the V2 now rather than again typing the HTML I have provided the UI for V detail as well you can copy that it is not that long go back here and where we have the V details let me paste that if I save it and go back and examine the details perfect you can see it looks much better but we have to make it
Dynamic and also where we have Villa amenities we will have to iterate in a for each Loop and display all the V The Amity let me go back to the code here and let me work on that now where I am displaying the name let me remove that it is not needed where we have the image here we will say V do image URL perfect name will be inside Willa do name description we can use html. Raw and Willa do description next we have the amenity here we can check here if Villa do amenity is
not null and we will say Villa do amenity do count is greater than zero if that is valid only then we will display Villa amenity perfect looks good here we need a for each Loop so for the UL we can have for each Loop Amity in our Villa and perfect we will display amenity do name let me correct that and perfect looks good let Me save that if I examine the details great that is coming along finally we need these details to be dynamic let me fix that occupancy is inside villa. occupancy we have the
square feet here Willa do Square ft and finally we have the price here that is inside Villa do price convert that to a string in the currency format perfect let me go back here and perfect I believe everything is Dynamic here image you can see it is 401 here 402 and that looks good what we can do is modify the image for all of the Villa here let me upload a new image update that next one update that and perfect if I go to the homepage here great now we have a different image and everything
is looking much better now I have a small assignment for you the Villa details here we might be Able to reuse that in the upcoming videos I want you guys to move this particular logic in Villa details to a partial View so if I go back what I want you guys to move to a partial view is the row that I have highlighted where we are displaying everything in the moral body so pause the video and try to complete the assignment by moving the selected code to a partial View and make sure to name that
view as uncore V Detail I hope you were able to to complete the assignment we will create our partial view in the Shar folder here stop the application of course and in the shared folder I will add view empty View and I will call that underscore V detail perfect that is done let me go back to the index view here I will cut the complete row paste it right here we need to define the model here model will be lowercase not a capital m and that will be the Villa model it will not Be view
model it will directly be the villa and it will be model do image URL let me replace everything with model [Music] here perfect looks good we need to invoke the partial view in index here we will say partial name is equal to and do not make any spelling mistake it will be V detail now when you pass only partial things will not work let me show that there are errors here let me see What it is it will be model fix start and run the application the the reason it will not work here is partial
view is expecting a villa model but we have not passed that right here you can see it is expecting a model in index we are not passing that we have to be expess it here and model will basically be Villa that we have here with that if I go back perfect if I click on details here everything is coming up and and great to Recap again we have moved our Villa detail logic into a partial View and that can be consumed in any views in the future because it is isolated all it requires is a
villa model I hope you guys have enjoyed the free video if you want to explore and unlock more content and continue on with the course you can go to net Mastery and there you have the full course for clean architecture in net core along with many other courses in the complete course we Will take the application that we have built and we will add identity to the application add a section to make a booking and manage bookings for admin we will also have a different layout for the admin and we will see how to integrate
charts in.net core along with exports in.net we will see different services in a clean architecture deploy the application and we will also do some restructuring of clean architecture Along with email service [Music]