[Music] call chromatography the purification of chemicals is one of the most important jobs of a research chemist perhaps the most common purification technique in an organic laboratory is colum chromatography this technique takes advantage of the different polarities of different compounds to separate mixtures frequently on the gram scale technically column chromatography can be challenging but with a little practice you will be able to separate mixtures of compounds consistently and successfully as the name suggests a column of absorbent either silica or alumina is packed into a glass tube with a stopcock at the bottom the sample is
applied to the top of the absorbent and solvent is run through the column until the compound is flushed out of the bottom in most cases flash column chromatography is used meaning that pressure is applied to the top of the column resulting in faster running times and better separation before you can run a column you need to decide on the appropriate conditions it is vital that you pick a solvent system that will provide good separation in general you will use a mixture of two missable solvents one polar and one non-polar luckily TLC is an effective tool
for deciding on the optimal solvent system for your sample make a TLC sample by dissolving a small amount of your material in approximately 1 ml of solvent use this sample to spot several TLC plates and develop each plate in a different solvent system make sure that the absorbent on your TLC plates is the same as the absorbent you will use in the column either silica or alumina most commonly you will use a solvent system composed of a mixture of ethylacetate and hexane but when you are purifying a volatile compound it is a good idea to
use a lower boiling solvent system such as a mixture of ether and pentane mixtures of methanol and D chloromethane are frequently used to purify highly polar compounds when you are removing small amounts of impurities from a sample Focus on the major constituent once you have found a solvent system that separates the components of your sample adjust the polarity so that the major and hopefully the desired constituent has an RF of approximately 0.3 if the RF is too low then the solvent system is too non-polar and it will take a very long time for the material
to come off of the column Al alternatively if the RF is too high then the solvent system is too polar and the material will come off of the column very quickly with poor separation when you are separating a mixture of two or more compounds adjust the solvent polarity such that the midpoint between the spots is at an RF of approximately 0.3 when you are separating two or more compounds with very different polarity it will save you time to increase the polarity of the solvent as the column proceeds begin the column with a solvent system that
puts the least polar compound at an RF of approximately 0.3 once that compound has completely come off of the column slowly increase the polarity of the solvent to a mixture that puts the next spot at an RF of 0.3 continue this until all desired spots have come off of the column once you have picked an appropriate solvent system you need to decide how much absorbent to use this video will illustrate the use of a silica gel column but the same procedure can be followed using alumina caution silica and alumina are highly toxic when inhaled handle
absorbance in the hood in cases with good separation a 20:1 mass ratio of silica gel to compound is usually adequate this means that for one gram of compound you would use 20 G of silica it is good to use as little absorbent as possible but when the separation is more difficult ratios of 50 or 100:1 may be necessary choosing the appropriate amount of absorbent takes practice until you have developed your own intuition it is a good idea to ask a more experienced chemist for advice weigh the silica into an Erland Meer flask in the hood
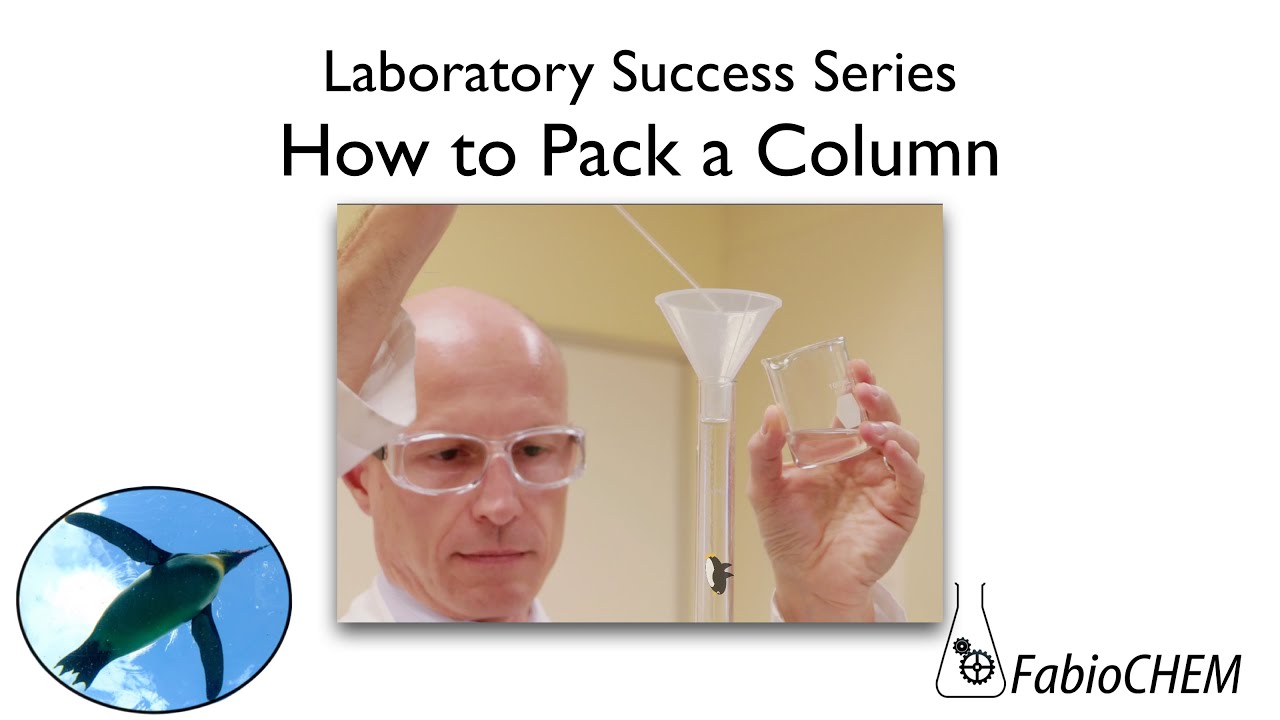
use a flask large enough that you don't fill it more than 1/3 full the last major decision to make is what diameter of column to use different people have very different opinions about this but in general it is a good idea to choose a column that will fill 6 to 7 in with the chosen amount of silica in a taller column the different bands of compounds will disperse and overlap but a shorter column will not have enough surface area to give good separation packing a column with absorbent can be fairly tricky and it takes practice
to be able to do it well every time the first step involves plugging the bottom of the column with a small piece of of cotton to prevent loss of silica gel roll a small piece of cotton between your fingers and drop it into the column tilt and tap the column until the cotton settles into the center depression using a long stick gently pack the cotton into the hole don't pack the cotton too tightly or it will be difficult to force solvent through the plug to continue packing the column you will need an empty Beaker a
pipe pet a supply of your chosen solvent mixture a funnel your pre-weighed silica gel some sand and a flash pressure apparatus with the cotton in place clamp the column in a straight vertical position and use a funnel to pour in a small layer of sand approximately 1 to 2 mm now fill the column with approximately 5 in of solvent mixture make sure that the sand layer is flat and no sand is stuck to the sides pour enough of the solvent mixture into the silica gel to form a mobile slurry swirl the silica and carefully pour
it into the column making sure that you do not disturb the sand layer use additional solvent to add the remaining silica once you have added all of the silica rinse the funnel and sides of the column with a small amount of solvent apply pressure to the top of the column and open the stop coock tapping the sides of the column gently to make sure that the silic layer is flat drain the solvent until 2 or 3 in remain above the silica layer then close the stopcock and remove the pressure caution make sure there are no
bubbles before you add sand Bubbles and inconsistencies in your column will cause serious problems later to avoid bubbles use a very wet slurry of silica gel gently tap the sides of the column while packing the silica and apply pressure before opening the stop coock when you have achieved a uniform layer of absorbent use a pipet to rinse any excess silica down from the sides of the column using the funnel carefully add a small layer of sand careful not to disturb the top of the silica gel use a small amount of solvent to wash the excess
sand from the sides of the column apply pressure open the stopcock and drain the solvent to just above the silica gel [Music] caution never let the solvent layer drop below the top of the column now you're ready to load your sample onto the column there are a couple of ways to do this if your sample is soluble in the chosen solvent system then it is easiest to load your sample as a solution dissolve your sample Le in the smallest possible volume of the chosen solvent mixture if you have trouble getting it to dissolve try adding
a few drops of methylene chloride it is vital that your sample is completely dissolved before you add it to the column slowly drip the solution of sample around the edges of the column being careful not to disturb the sand layer lower the solvent level to just above the silica rinse the flask with a small amount of solvent and add the rinse in the same fashion lower the solvent level again and repeat the rinse one or two times it is a good idea to rinse any residual sample from the sides of the column lowering the solvent
level in between each rinse now you're ready to fill the column with solvent start by slowly adding solvent with a pipet once you have added a nice cushion slowly pour the remaining solvent into the column being careful not to disturb the sand or the silic done correctly you should end up with a thin band of sample just below the sand when your sample is largely insoluble in the chosen solvent mixture it is more effective to pre- absorb the sample onto a small quantity of silica and add it as a dry mixture to do this you
will need some methylene chloride a round bottom flask and some silica gel start by dissolving your sample in methylene chloride and transferring it to the round bottom flask make sure you complete the transfer with a few rinses then add a small amount of silica gel to the flask and swirl to mix before you can remove the solvent on the rotovap stuff a few Kim wipes into the bump trap to prevent contamination of the rotovap with the very fine silica powder attach your flask to the bump trap and concentrate it on the rotap until you obtain
a fine free flowing powder if the mix mixture remains clumpy or sticky you may need to redissolve the sample and add more silica gel don't add it to your column until it is a free flowing powder to dry load your sample pack the column as before but leave a small layer of solvent above the sand pour the pre-absorbed silica onto the top of the sand use a small amount of the solvent mixture to rinse the flask and wash the silica down from the sides of the column drain the solvent to the top of the silica
and add a small layer of sand carefully fill the column with solvent as before one alternative to dry loading is loading your sample as a solution in a solvent that is more polar than the solvent system you're using for your column you will end up with a thick band of compound and poor separation once your sample is loaded on the column you must begin running it immediately and it's a good idea not to take any breaks until it's through before you start make sure you have an adequate supply of your your chosen solvent mixture and
a nice big rack of test tubes begin running the column by placing a test tube at the bottom of the column applying pressure to the top and opening the stop coock if the pressure is right you should have a fairly rapid flow of solvent out of the bottom of the column you may have to adjust the pressure so that the flow rate isn't a slow drip or an Out of Control stream but something right in the middle don't forget to continually collect the eluent in test tubes you have to pay attention so that the solvent
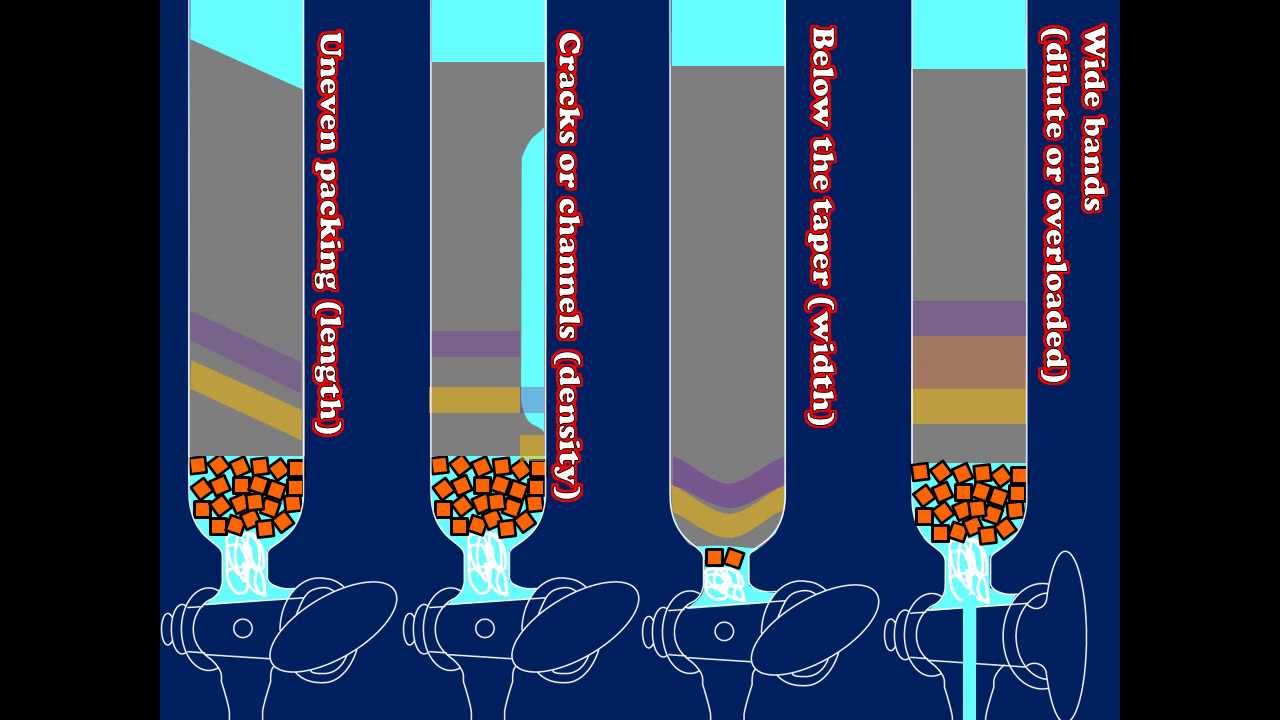
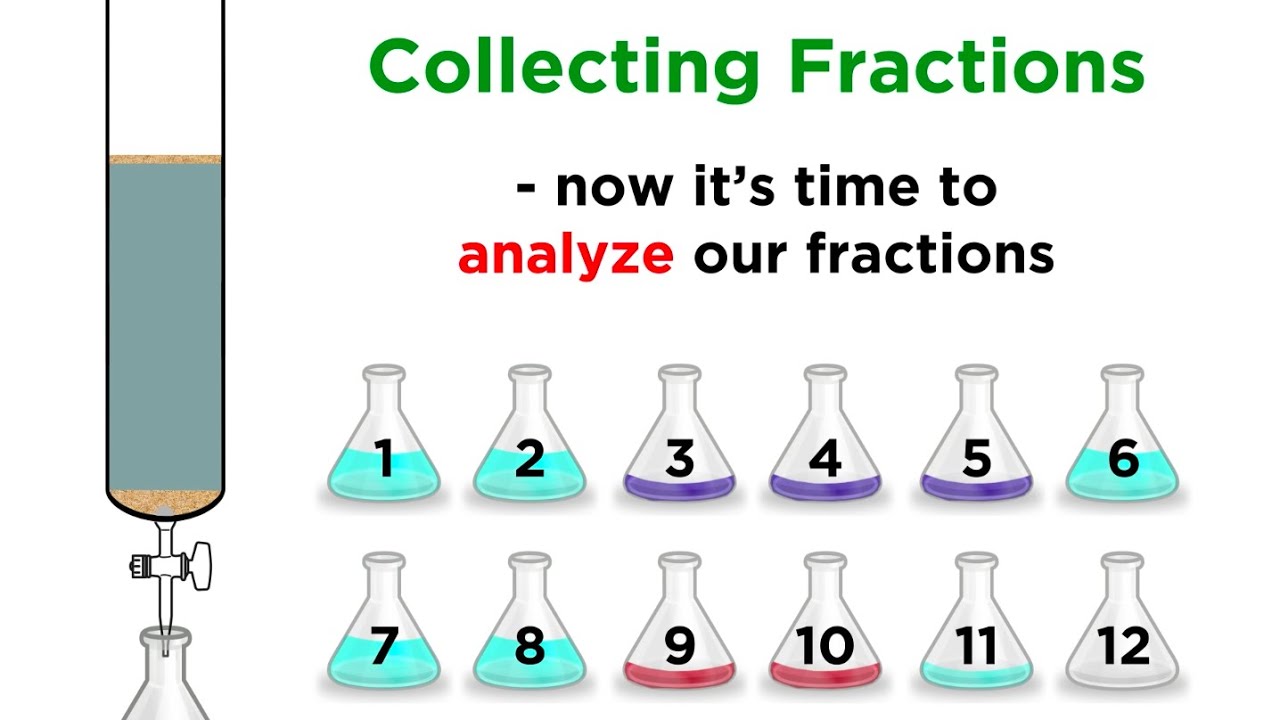
doesn't overflow caution pay close attention to the solvent level and refill frequently now your hard work is over and it's time to see if it paid off when your compound is colored it can be easy to find it in the fractions but a more reliable method for monitoring your column is with TLC you can easily spot five or six fractions per TLC plate make sure you rinse your spotter in between fractions develop the plates with a solvent mixture that spreads the spots out on on the plate it does not have to be the same solvent
system you use for the column if it goes well you will end up with a maximum of one compound per fraction with a few clean fractions in between the compounds you're trying to separate unfortunately it doesn't always work out so well overlapping fractions containing more than one compound are the sign of a failed separation so what went wrong if all of the material elutes in just a few fractions then the column may have been too small or the developing solvent too polar on the other hand if the compounds are spread out over many fractions then
the column may have been too tall or you used Too Much solvent to load your sample once the last compound has come off of the column and you have analyzed your TLC plates it is time to combine the desired fractions combine all of the fractions containing the same pure compound in a round bottom flask fractions containing more than one compound should be set aside for further purification it is a good idea to rinse the test tubes two or three times with a little bit of clean solvent and add those rinses to the flask as well
don't fill the flask more than half full remember you need to concentrate it on the rotovap removing solvent from your compound is the last step in a chromatographic purification caution never discard any fractions until you recover the desired material it is a good idea to clean up the silica before you discard it in the appropriate waste container when you are sure that there is no more desired material on the column fill the column with ethanol place a flask underneath and push air through the column until the silica is dry and free flowing at this point
it will be easy to discard the silica by pouring it into the proper waste container when you need to purify a small amount of compound it is sometimes easier to run a micro column in a pipet on small scale the packing and Sample loading steps are greatly simplified it is easiest to pack a microc column completely dry without any solvent plug the end of the pipet with a small piece of cotton then add a couple of inches of absorbent and a thin layer of sand next add your sample pre-absorbed onto a small amount of absorbent
top it off with a thin layer of sand and you're ready to go to run the column place a collection flask or a test tube underneath the pipet and use another pipet to add solvent to the top of the column keep adding solvent until your compound has come off of the column make sure you don't let the column run dry this video has outlined the basic steps that you will use to perform a purification using column chromatography now it's time to get in the lab and try it for yourself remember this video is intended to
help you prepare for lab by providing a demonstration of the proper experimental technique it is not intended as a replacement for reading your lab manual or the supplementary material in order to become a great experimentalist it is important that you understand both Theory and technique now it's your turn good luck [Music] [Music]