hey gang and welcome back to our Kauai bathroom remodel in our last video you saw us rip out that old deck tub all the tile and the framing around it all the old plumbing and it's looking fantastic today we're out here at shipwrecks beach in fact that clip over there Jordan and his brothers jumped off of it just a little while ago awesome job bud yeah I didn't think y'all could do it so we like to hang out at the beach a little bit in the morning kind of get our Vibes going for the day
and then head back to work so our tools are waiting the bathroom's waiting let's head back over there and keep on keeping on all right team we're back here at the job site and our next steps are to set this pan from Schluter put our backer board on our floor and our walls put up our drywall start waterproofing everything to get ready for tile but this is a remodel so this pan has kind of an odd shape coming out of the door we got this little recess or this lip right here we want to accommodate
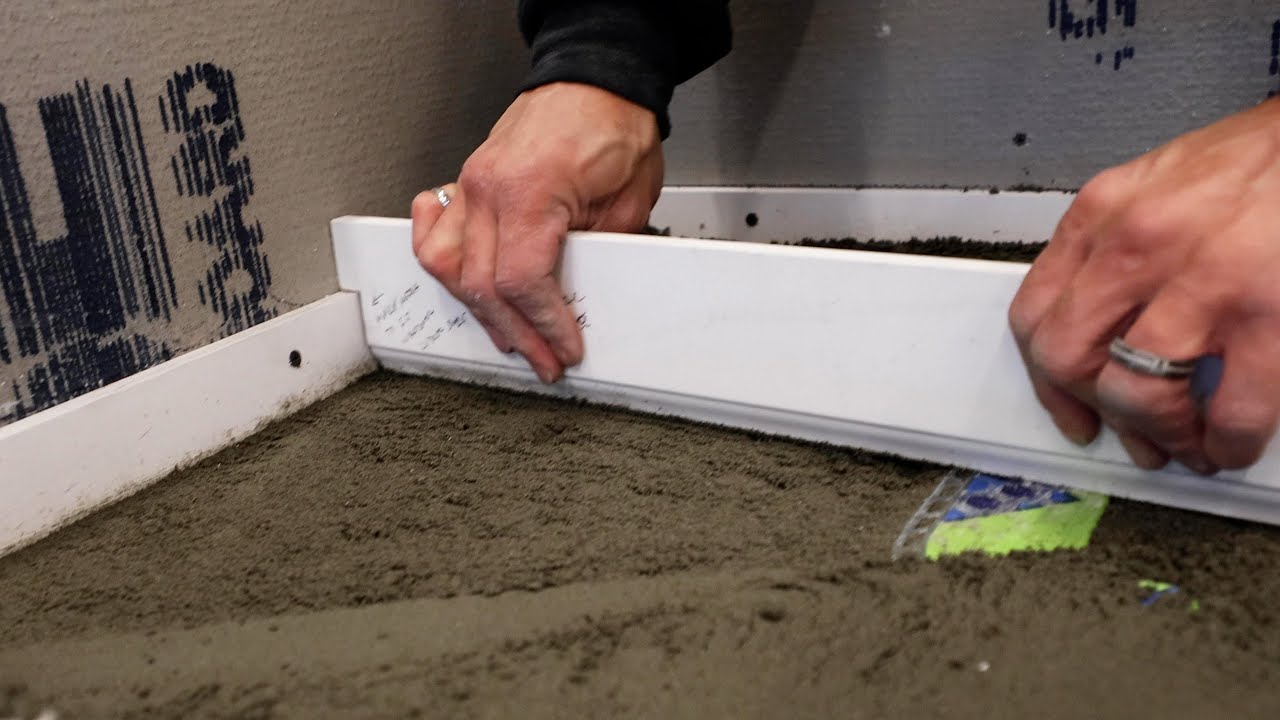
so we're going to modify that foam pan let's grab a utility knife and our multi-tool modify that pan get to work okay team we're all ready to go to cut our pre-manufactured sloped pan all my references were from the center of the Drain You see I've got it all marked up here's my entrance right here I'm just going to cut it with the utility knife foreign [Music] we had to create a little rabbit in our Schluter pan to go over that plywood lip you'll see more how that works when we put it in we got
one more to do on the other side for the entrance to the shower where we're transitioning to that sloped deck and as you can see I even got it marked at a slope let me spin this over cut that one we'll give this a test it all right here's the bottom of our pan ready for our test fit you can see how nice this rabbet came out and this one so what we're going to do those rabbits cover this area right here where the plywood's taller and also right here at the entrance to the shower
now yes the foam is thinner there look at this we're going to put thinset here to strengthen that joint but also by the time we put backer board and tile here it's going to be fine because you're never going to be putting any weight right here on probably the weakest part of the pan so let me grab it we're going to do a test fit I measured 40 times cut once hopefully we're good to go lower it in place I'm liking it I'm liking it oh nice check that out gang we are almost ready for
a shower now we're going to use an unmodified thinset to put this down and we're actually ready for that step but what I think we should do Jordan we should cut our backer board for the floor mix up enough thinset to put this down and our entire floor system do it all in one Fell Swoop you ready yeah all right let's go downstairs cut the back of board mix some thinset thank you [Music] who's the measurer huh who's the measurer good job you're the measure run all right all three pieces of our backing board are
cut and as you can see we got a seam in the plywood right here I didn't want my seam in the backer board over that one so we overlapped it just like that get this guy down there we go now you'll also notice we used half inch backer board typically I would use quarter inch backer board on the floors save the half inch for the walls but under this tile is half inch backer board so we did the same thing here so our tile floor in the bathroom would flush out with the towel in the
existing part of the house so Rad's going downstairs we've got some unmodified thinset we're going to mix up we're going to put the pan down we're going to put it under the backer board screw all the backer board down and then we're almost ready for tile on the floors let's head downstairs see what Rad's doing all right guys we're ready to mix up our unmodified thinset now we're working with some Schluter products they have their all set that they use but really the specification is unmodified it meets ANSI schedule a118.1 so we picked this up
locally can't get the saluder all set here and it's key that you use this particular type of mortar we've actually gotten emails from people that used modified thinset behind the Kerdi and it never dried properly they come back the next day and they can rip it off like wallpaper so important to use the right product I think we're ready with our paddle and our water let's start adding some thinset and getting this done so it's important to note that we don't have a measuring cup we don't so we're kind of eyeballing the mixture here but
you know what I would consider us pros at this point so I think we're going to get it to a nice consistency yeah on the last tile job we had our little Beaker and our scale right but you guys by the end you're a pro so I'm going to let you do it let's do it [Applause] [Music] [Applause] [Music] this is cool but I did not think the next bathroom I was going to be thin setting would be in Kauai that was going to be your garage back in Houston man yeah it's cool though we
can't complain not at all how's that consistency that eyeball consistency it's okay no I'm kidding it's perfect loving it using a quarter by three eighths Notch trowel so it's recommended for that pan [Music] you got it it's all you [Music] ready Bud let's do it man oh tongue up on a screw there's always one screw letter see it nice very solid loving it all right let's screw this down and I think we are done for the day all right gang next day here at the bathroom job site we got all the backer board down on
the floor as we did yesterday and today we're going to start doing the walls because that's had time to dry so now I can walk on this the first thing that we want to do today we got this glass block there's a ton of mortar grout whatever they used in between this joint right here and that's good that they did that but we need it out of our way because when we slide our new backer up against it we need to have a good seal we've got some lexel or the Kawaii version of lexel we're
going to put a big nice bead on the edge of this glass block and then slide our backer into it create a nice seal that's waterproof and flexible because this is open to the elements outside but we need to get all this mortar out of the way I just got like a beater chisel and a hammer and this glass block is uh pretty strong so I'm not worried about breaking it and we're just going to go ahead and chisel this stuff away in the meantime dad's going to be cutting blocking for grab bars and stuff
like that cutting the backer so when we're done with this we can just install it so let's get this done foreign that's what we're looking for right there just a nice cleaner Edge for our leg sail nice what's going on in here y'all working yeah what you got here's your blocking platter sir oh right on use all the scraps of plywood and two by and put blocking here and here for our grab bar just like this one we have a vertical grab bar here horizontal one here but look I'm still on my board shorts from
the beach this morning should I go change or can I just work on this oh those are the Vibes man you're good yeah that's improved let's go [Music] oh [Music] my team all our blocking is done this one right here is for a vertical grab bar as you enter and exit the shower so that's going to be great had to put a little one here to pick up the edge of this piece of backer board down here at the bottom kind of forgot this one there's always one more right so we had one here in
the corner to pick up this sheet so we're good here we're good here working our way back to the other corner put a block in here again pick up the edge of that sheet got one here doing the same thing and these two guys that's for a horizontal grab bar right here didn't have any wide two by material so we just doubled up some plywood it's going to work great of course took a picture of that so we know where to put the grab bar we also took a picture of this one with the tape
measure coming off of the block so we can locate it once it's all tiled now let's go on down here to our pan our thin set from yesterday's all dried and this is nice and solid but we have this little area here and a smaller one over on the other side and typically we would fill that in with deck mud dry pack something like that and then waterproof over it we can't get that material here on the island best I could come up with is just stack two pieces of half inch backer board this is
one and an eighth inch thick so I think by the time you add the thin set it's going to flush out right here we're going to go heavy on this side to get a little bit of a slope and then I actually brought a big piece of Kerdi with me well rad brought it on the airplane we're gonna wrap it and waterproof this come up the wall here and there so our pan is completely waterproof got our thinset ready to go so I'm gonna let Jordan rad cycle this one these two little pieces are for
over here I got everything pre-cut here's my two pieces for this side I'm gonna let them get in here install those and so while Jordan and rad are working on the backer board try to finish this shower pan I'm gonna be right around the corner doing something pretty crazy that I don't think we've ever tried before we've got the vanity that goes here it's the only place it can go in the bathroom and remember it's 18 and a half inches deep it sticks out into this doorway and we can't have that because we don't want
people banging their leg on it as they come in and out of the door we want to push it as far that way into the wall as possible and we got all this in the way we got hot cold we got a drain and a vent and all this Framing and there's the refrigerator we're gonna have to patch that too so while they're working in the shower I'm going to remove this piece of sheetrock see what I'm up against and see if it's even possible to push the vanity back as far as we want make
sure you hang on for that let's grab our tools and get to work [Music] all right gang the drywall is removed and look at this we got everything in our way we got Plumbing in the way both the water supply and the drain and the vent got electrical in our way and all the framing in our way here's what I would like to do this space right here is just a little bit wider than the top of the vanity the top is the widest part I want to slide the top back into this wall which
means I have to cut the back of the vanity the back of the cabinet out the vanity actually comes with a space in the back four and a half inches for plumbing for example if it comes up from the floor so they design the vanity to have room for the plumbing in the back which is going to help us out so my plan is to remove this blocking we got the half inch copper water hammers here I'm going to cut those off and lower them as much as I can on this side I bought an
air and mittens file I'm going to show you what that's all about not my favorite but it's the only solution we have here to take care of this event on the top of the vent this goes through the roof we'll cut that off put a cap so rain water doesn't come in there and we'll get on the roof later and cap that that leaves me with the electrical and the framing so I got to move the electrical but look at all the wire I got so that's a good thing so we're going to come over
here remove this drywall it looks like my cables come out of the bottom of the box I'm going to remove the drywall and come out of the top of the box which is going to give me more wire come through this corner stud and Route all my wires up here so by the time I do that the plumbing both the water supplies and the drain and the vent should be taken care of and now we got the electrical taken care of my next step is just chop off this framing this is not a load-bearing wall
you can look through here real quick see how this place is built we've already scoped out where all the posts are and this is just a partition wall so I feel very good about removing these studs we'll have a sill plate here one at the top we're basically creating a big Niche right here right Jordan yeah and this the top of our vanity is going to slide into that Niche and our cabinet base we're gonna have to modify it's going to go back and everything should flush out about right here it's going to look epic
this light is not in the center so we're going to take advantage of what we're doing now Center that light we may even flip it over put it on top of this block so it's a little higher and uh this is remodeling at its finest I got my work cut out for me I'm going to start on this Rad's already bringing up the back of board from downstairs and Jordan rad are going to start putting backer board in the in the shower let me hop in there real quick this came out great got a nice
flush flushed out here nice slope to it I can feel that and again brought some Kerdi with us we're going to go over that and up the wall it's going to work out great now come over here to this corner remember this pocket that's built into the kitchen for the refrigerator greater door handle so the refrigerator door opens all the way we're going to keep that but there's nowhere to put screws for our backer board so we're going to use adhesive I'm going to put this sheet up first screw it where we can and this
sheet is going to die into it and help hold it it's going to work out just fine all right bud I'm tired of talking yeah ready to start working nice little three and a half minute segment yep let's uh let's grab my tools and I'll start working on this y'all do backer board and let's come back in an hour see where we are all right [Music] [Applause] [Music] foreign [Music] I'm standing in our shower it is Monday and we demo this thing last Thursday epic progress for the stud pack team let me walk you through
what we've done so far in the shower it is almost ready for waterproofing got a three foot piece of backer board here the seam worked out perfectly for our ledge don't know how that happened but sometimes it happens right second full sheet here still deciding what we're gonna do here drywall or backer board and what we did at this class block we pushed the backer board as tight as we could we got some Lexile and embedded it so it's nice and waterproof there even though the shower heads over there that'll never see any water we
wanted to seal it up the best we could so just a couple more pieces of backer board here on the end here on the top we thought it would be cool if we could angle the tile in the corner just like this is angled but we really don't have the tools for that but who knows and maybe we'll figure something out now let me come out here and I'll update you on the impossible vanity install so this is what it looks like now we pull down the drywall I cut out the section of vent I
looked up this pipe to see if I could see Skye the beautiful Hawaii sky but I didn't so we just put a cap on it but I think this one and a half probably does it goes up turns left and ties into the two inch main vent over there for the shower because that's the only vent on the roof I can't really see it up here because it's full of blocking so I'm happy with the way that came out remember we're going to put an air admittance valve right here let me grab that and just
show you what that is right now this is an air admittance valve it comes with this ABS fitting you can glue it onto two inch or the inner diameter inch and a half something like that but let me show you how it works pretty cool so I'll be able to suck air in but I can't blow air out watch see that and that's how the sewer gases are going to work it can pull air in if it needs it when it's draining just like when you put your finger on a straw over a glass pull
your finger water drain same thing here but sewer gases cannot come out and stink up your house so we're going to mount this here as high as we can going to wait for the vanity to arrive tomorrow before we do that so the vent is basically out of our way then I started on the electrical now let me walk you through the electrical side first thing I did I removed the drywall from here to here so I can access this stud Bay then I pulled the existing switch leg switch leg feeds the light vanity light
over the sink right here that box actually was on the bottom I flipped it on top to make the light a little higher over the sink and then I put it in the center because it wasn't in the center before that kind of stuff drives me crazy once I had this one free the switch leg I had this cable to deal with that's 120 volts to the box so I simply rerouted both of them way up high drilled new holes in the stud here and here over here in the corner this is like a four
stud corner I couldn't drill through it I couldn't even get a drill in here and here so I just hogged it out with a big paddle bit or spade bit and to cover that up just put a nail plate there and there it'll be fine now come over here Jordan and let me and let me show everybody this remember we talked about how these are just partition walls look at this we just have a single two by four as a header for this door and that confirms to me that this is just a partition wall
because if it was a load bearing wall this would actually be a header right we all know what a header is it'd be a four by four four by six something like that so feeling really good about what we did to the framing to modify it to get that vanity in this wall so one of our goals in a remodel is always to be better and stronger than it was when we got here and this is a good example right here we have a four inch square plastic junction box and these devices won't mount here
so they were mounted to a mud ring and I've never seen one like this before of course I broke it because it's Bake Light plastic look at that look how brittle that is so that's trash now but no problem we picked up a new two gang metal mud ring at the hardware store and we got a new ground fault and a new single pole switch and a new cover plate so it's all going to look awesome now this circuit's been off for a while I'm not sure what else is on it the refrigerator is on
at least we got cold food and cold water but I feel like I want to finish the electrical get the power back on so I'm going to work on that and then we're going to start waterproofing this shower let's do it what okay say something no okay all right got all the electrical done came out great we replaced the mud ring right here and I went ahead and put electrical tape around there because the ground fault was on a separate circuit than this I knew that but it did kind of uh give me a little
bit of a reminder that it was still on so now it's nice and safe all right in the shower it is ready for waterproofing our last step before we finally tile this thing couldn't be any simpler you've seen us do it a bunch before we're going to put mesh tape here then set all the seams the outside corners all the inside Corners we're going to come down here and put kerdi-band between the pan and the walls a larger piece of Kerdi between here in the wall where you had to fill in then we're going to
set our drain let's head downstairs get the thin set get our tools get the waterproofing done [Music] [Applause] [Music] [Applause] all right guys we're working on our inside Corners these are critical right this is where all the water gets in under your tile seeps through causes all the problems in the future so we've got a piece of Kerdi right here up the wall two inches out over our patch remember the patch we did just like this one we have a piece of Kerdi band right here now I've got the pre-made corner I am ready to
put this one in just like that really liking the way this is turning out love these corners smooth it all out and this one's laying down nice Jordan yeah got to be careful the direction you're pulling your knife because you'll pull that mesh tape out but finally got this one a little more thinset in the corner but it's kind of a balance right Jordan you don't want to put too much thinset in your Corners because what's going to happen if you put too much thinset in your Corners you're just adding a build up that you're
going to have to tile over eventually we've experienced that in a lot of tile jobs where we just went heavy with the thinset heavy with the waterproofing because we thought we were doing a good job which we were but then you go to tile it and your bottom is kicking out so far and when you've got a perfect tile job and you get to that bottom piece and it kicks and it kicks out and messes it all up it destroys your like yeah exactly but I'm liking the way that looks that looks really good let
me do this other side I'll do the wall behind me with the band then I think I'll do the drain and I'll work my way out of here perfect [Music] [Applause] [Music] all right gang we are waterproofing our way out of the shower so my next step is going to be the drain and then I'll do the threshold right here so I got to cut this pipe off I'm going to do it with the multi-tool I got a blade on here obviously I'm going to cut it as low as I can and I got a
special tool because we have to cut it even lower let's cut this pipe off [Applause] I got a rag in this inch and a half pipe I feel like I'm stuffing an Old Musket rifle we go pretty deep and the reason we put the rag in there because sometimes don't ask me how I know this Chuck will loosen this drops in your pipe and now you're fishing for your special tool now check this out this is a two inch fitting and we got an inch and a half drain it was existing we could have increased
the size of this pipe but we're already tight already if I would have increased it to two inch I don't think we would have ever gotten this in there so I've got a two by inch and a half bushing already glued in there and that's going to slip right over the pipe but you can see we're way too high I got to cut this down and that's what this internal pipe cutters for I'm going to get inside turn the drill on rotate and it's going to cut with this little blade from the inside out now
how do I know how much to cut off from the bottom of the flange to the bottom of the bushing is four inches this pipe is going to go inside the bushing three quarters of an inch four minus three quarter is three and one quarter and that's the distance I have from the edge of my Chuck to the blade so all I got to do all I got to do is kind of eyeball the bottom of the Chuck with the top of the foam and work my way around really don't know any other way to
do it we've done a bunch of these and it's always worked in the past let me get down in there we'll cut this pipe and set our drain finish the waterproofing all right there we go it's a little rough but it's going to be fine because remember we have three quarters of an inch of material to glue with I'm gonna get this rag out of here how many suppliers guys yeah I got it and there she goes clean this off I'm gonna give it a little test fit line it up man it's off so I
put some thinset here on top of the white foam it's going to bond this plastic flange down ooze up through here and we'll smooth it all out so I've got the thinset down there already now I've got my abs cement glue everything up and this is always the part that stresses me out because we have no access from the bottom well I guess we do right it's a bedroom we can put a hole in your bedroom ceiling right totally and we even have a special tool to get the drain in here check this out a
little more a little more there we go nice nice nice all right all right gonna remove the special tool all right let's put that collar on there and then all we got left is it's a little corner uh Paul I think all right uh that can become the garage broom and we'll buy it we'll buy your dad a new one all right I'm putting a notch on this uh thinset got to use a special size Notch for the Curtis it's not really that special but the trowel I got at the Saluda workshop and it's simply
a 1 8 by 1 8 square Notch trowel yeah this is like one of those Japanese Zen Gardens right with all the the circles in the uh the sand and the stone yeah I like that yeah put her down sweet putting in the drain is like the most anxious part in putting this in is like my favorite part so you need to clean this part out right here because the drain sits in there you don't want any thinset hindering you when you push that drain down you want to go down even with the tile you
don't want anything in your way or the drain is going to be higher than the tile all right I'm really liking that I can smell supper let me move my station over here we'll do this corner we're out of here it is the next day on our bathroom remodel here on the beautiful island of Kauai and as you can see we've already been well kind of hard at work this morning putting up bread guard is really just as simple as painting right but we like to put it over backer board as a belt and suspenders
approach to keeping water out of our structure and from leaking downstairs we could tile directly over the backer board but like I said it's cheap insurance and we like doing it and it goes really fast so our next step believe it or not is to start tiling we actually counted all our tile if we go six courses high I would need 47. we have 70. so this is going to look really cool we're going to go all the way here we're going to do this whole wall with tile and this whole wall with tile up
to about here it's going to look killer I think can't wait to see how that's going to look the red and summer just got back from wearing the tile saw we're going to set it up outside on the balcony how cool is that going to be Jordan cutting tile outside in Hawaii can't wait and we're going to mix up some thinset and get this thing tiled [Applause] [Music] all right gang a little change of plans as soon as we got the tile saw set up on the balcony the vanity showed up and I wanted to
get a jump start on the vanity because over here I need the drywall up so this tile could come over and hide this seam between the backer board and the drywall so we've already put the air as maintenance valve in and we've already lowered the hot air chamber this is my cut line that I need to cut this framing right here so the vanity top can slide back into the wall here's my cut line at the top already got those established so as soon as I solder this cap on we can cut this framing out
of the way frame in kind of a big Niche and then we'll put the van in here again for a test fit let's get going to use my reciprocating saw cut through this 2x4 here cut through the 2x4 there remove this one rinse and repeat three times and we're ready to put this thing back together this is remodeling baby sometimes you gotta take a few steps backwards to move forward now I'm standing in the kitchen here's the niche for the handle on the refrigerator door and here's our Niche for the refrigerator all separated by half
an inch of drywall pretty tight [Music] so I've done this before trying to take out a portion of a stud on a three Corner stud and it's a pain it's really A four corner stud right we've got one two one on the other side plus this one right here and they're all nailed at an angle but I think we got it oh a million nails there we go so you'll see what I'm eating there's one two three studs so I'm perfectly fine taking this piece out it's not going anywhere and that completes all our framing
to put this vanity in the bathroom because remember we had to get this vanity pushed back so it wasn't sticking out past the doorway and now we can push the countertop back into this wall because we removed all the plumbing we lowered it and we removed all the electrical and the framing that was in our way countertop is going to slide right back here and the vanity is going to slide back a little closer also and make sure you stay tuned to see how we cut three inches off the back of our brand new vanity
to get it into this wall and since we're out here on the island of Kauai we can't just go down the street and get a brand new one if we screw it up so I think the next thing I want to do is start to drywall right here make it look better we're going to put a piece right here in the back we'll glue it to this piece paper to paper put some pieces around the side to hold it in place and then I really need to get this piece up next to the backer board
because we need to tile this wall of the shower first and we're going to tell you why in just a minute but I would love to start hanging some drywall and get in this place looking like a bathroom ready to cut some drywall yeah all right first piece of drywall let's go nice nice Cut yep all right I'll cut these for around the perimeter that's going to help hold it in place in place while the glue dries half coming up look at my life all right putting the piece of drywall over the vanity where the
light is I don't have a drywall a drywall router here so here's what we did check it out you put some white paint on the face of the box I'm going to position the sheet where it goes press against the Box the paint should transfer and then we can cut it out with swamp it that'll work this is all I got just a blade I'm going to treat it like a drywall saw maybe this is what they call a kawaiian drywall blade Jordan I don't know if I just get it through here I'll be good
to go but I'm glad we don't have a lot of these there we go come on come on come on there's the wheelers away huh my first one in a way there you go yeah pretty good fit nice all right getting the drywall is basically done I got a piece at the bottom some patches on the other side of the kitchen but we got what we needed so I can start tiling because we got to return that saw in a couple days and we have a million videos on tile and showers so we're gonna fly
on this one because we want to go enjoy the beach and the surf on this back wall we're going to run them horizontal put our little shelf and our gold tonight is to get this back wall done and then we can do the side walls start on this floor tomorrow let's get going guys do it I'm gonna do this and you guys are going to be my cut guys water guys all that yep all right here we go I'm excited it's gonna look awesome all right team it is the next morning and check it out
this is how much tile we were able to put up last night it's coming out awesome and we're going to walk you through the pattern why we chose to do what we did a little later I'm going to put Jordan and rat on tiling so they can work together in there and while they're doing that I'm going to hit this drywall because we got to start thinking about paint I got to drywall all the seams inside corners and make this thing look great and I also have a couple patches to do in the kitchen where
you can see the refrigerator right down here so what do we do for drywall tools ran to the local Home Depot just bought a cheap plastic mud pan it's been a little extra dollars on the stainless steel knife well worth the investment that'll last forever we got the smallest bucket of all-purpose mud we could find and the biggest roll of tape they had this thing will reach from here all the way to the beach also picked up a piece of corner bead this is a mud on bead got that at the local hardware store I
didn't want to use metal because it's going to rust here but I like the mud on bead for something like this it's going to work great so it looks like we have a full day's work ahead of us so I say it's time to get back to work [Music] foreign [Music] making great progress this wall is done this one's almost done we just have about four full tile to put up here at the ceiling so we want to tackle that one next and get this wall all done and the very first one we're going to
tackle is the one around the beam so we have to slope the top and Notch it for the beam so obviously we need to know what that angle is and as you can tell we've already figured it out because we've done these two how do we do that we just put our foam in level mode put it on the ceiling and we're 23 degrees now let's show you how we transfer that measurement to our tile using a simple speed square because it's all we got here's the piece of tile we're going to notch around that
beam so we've got the length already right here that's our height of our tile I'm going to use a speed square here's the pivot point right here in fact it says pivot on there and you'll notice on the hypotenuse it goes from zero to 90 degrees so I'm just going to start angling it at my Pivot Point until 23 degrees lines up at this Edge which is flush with the edge of the tile there's 20. and 23 right there now you can come over here and see we've already made the line perfect right there that's
our cut line so we can use that method to do any angle we want with just your smartphone and a plastic speed square all right now let's bring it out to the saw make that cut and then we can mark it for the notch for our beam [Music] all right I'm holding this in place against my spacers it's gonna make a line up here and I'm just gonna eyeball it man yep all right I like that now let's take it down we'll get our depth we'll draw everything including the bull nose right here and take
that whole piece out with the saw the grinder and whatever else we could find all right we're just using this hole saw as a circle guide to account for our bull nose looks pretty good yeah I like that let's hog that out boom this is a piece of tile we're not hogging we're cutting gracefully removing [Music] so as you see I made one cut here and another cut here that allowed me to remove all this tile between our radius and I'm going to use this little guy sneak up on the radius and get this part
out of there and we'll clean all this up give her a test fit don't worry about the ink it comes right off oh yeah oh yeah Jordan rad are doing the last wall in the shower so I thought what the heck we got one more body in here I'm gonna finish mudding this because my daughter's after me because she wants to paint right foreign [Music] all right all the wall tiles are done they look fantastic can't wait to see it with grout in it the white grout is going to make it pop even more but
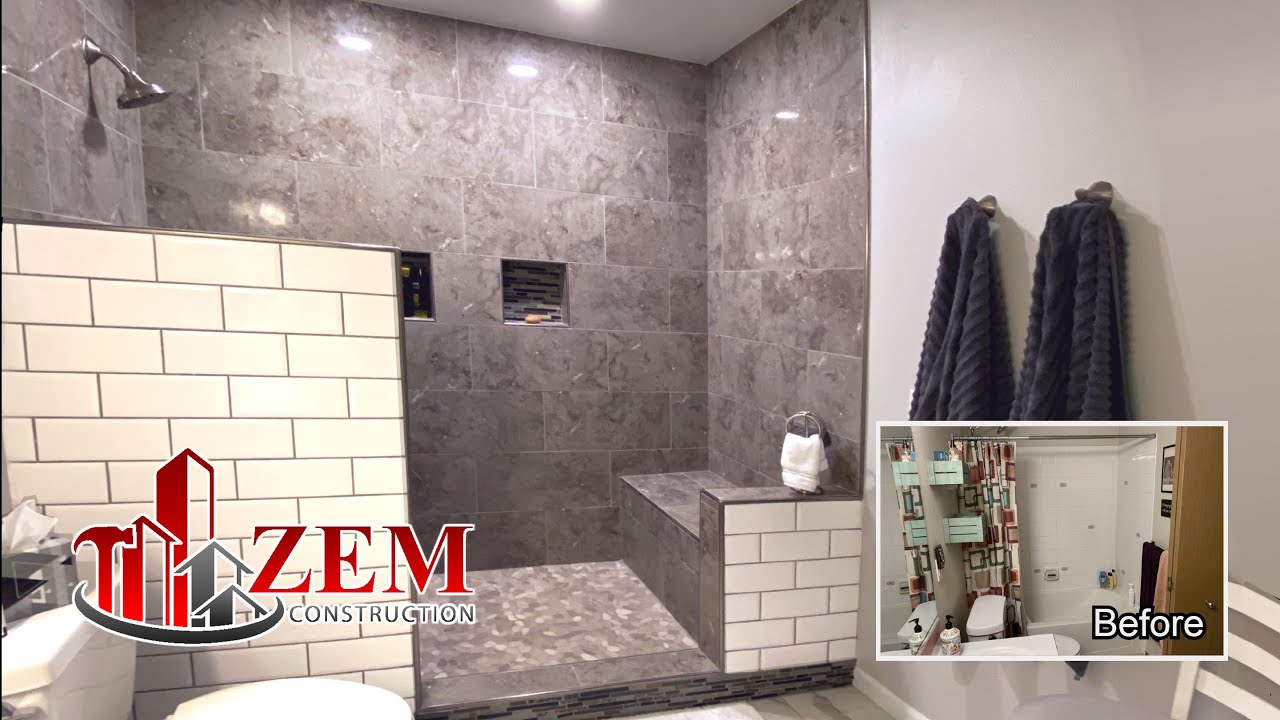
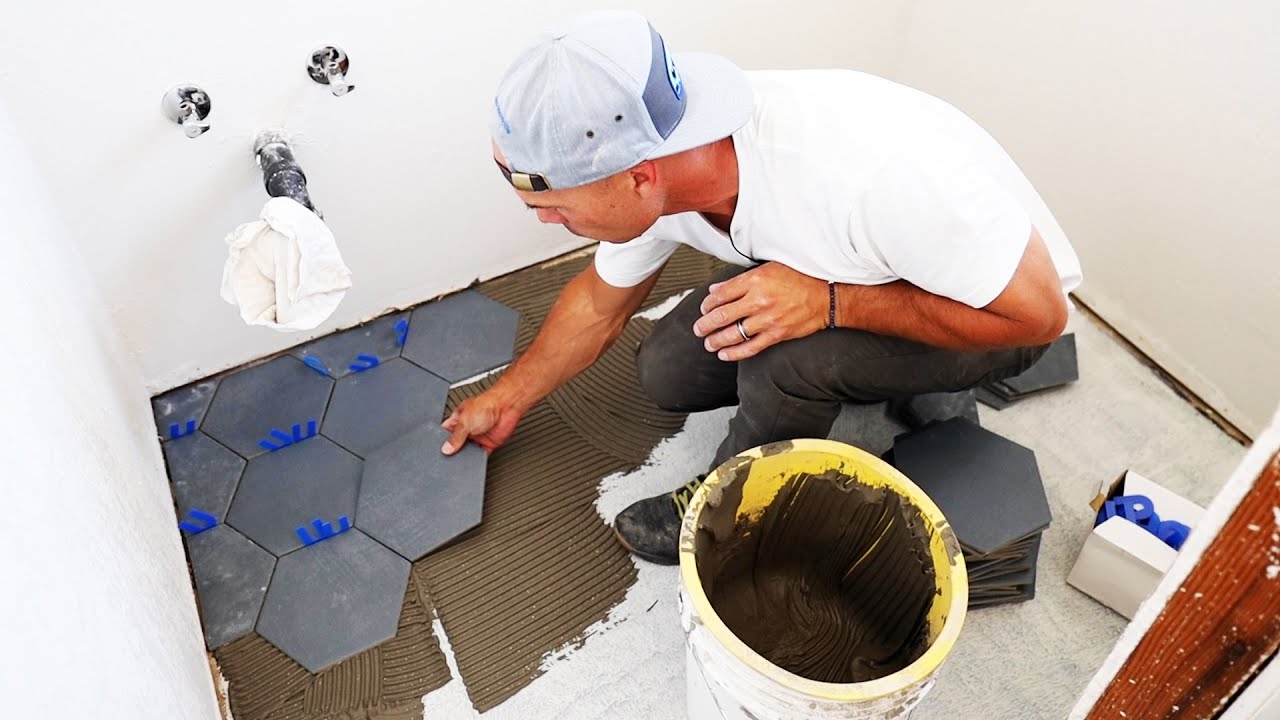
big whoop right it's wall tile super easy but what we don't see a lot of is integrated shower floor tiles and what do I mean by integrated where the tile in the shower just flows naturally right out into the floor tile of the main bathroom and we have a break right here this tile the sloped to the drain this guy soaked a little bit back to account for the high spot here and then all that perfectly flat and we see this all the time in high dollar Custom Homes right Jordan but we don't see it
kind of everywhere else because there are a lot of tips and tricks a lot of details you got to get absolutely right but we love the way the shower floor flows into the main bathroom it looks killer and we're going to show you how to DIY it yourself now we're on the island of Kauai we ordered everything what like two months ago Jordan right all the tile the Schluter system the valve the toilet it was all put at the Home Depot we picked it up and that's what we had to work with now those Schluter
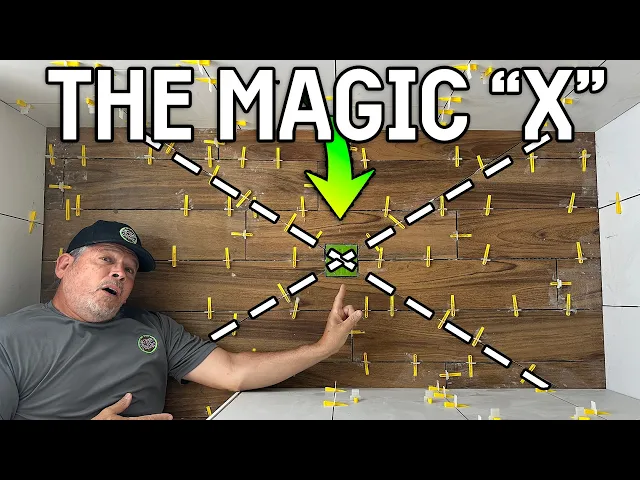
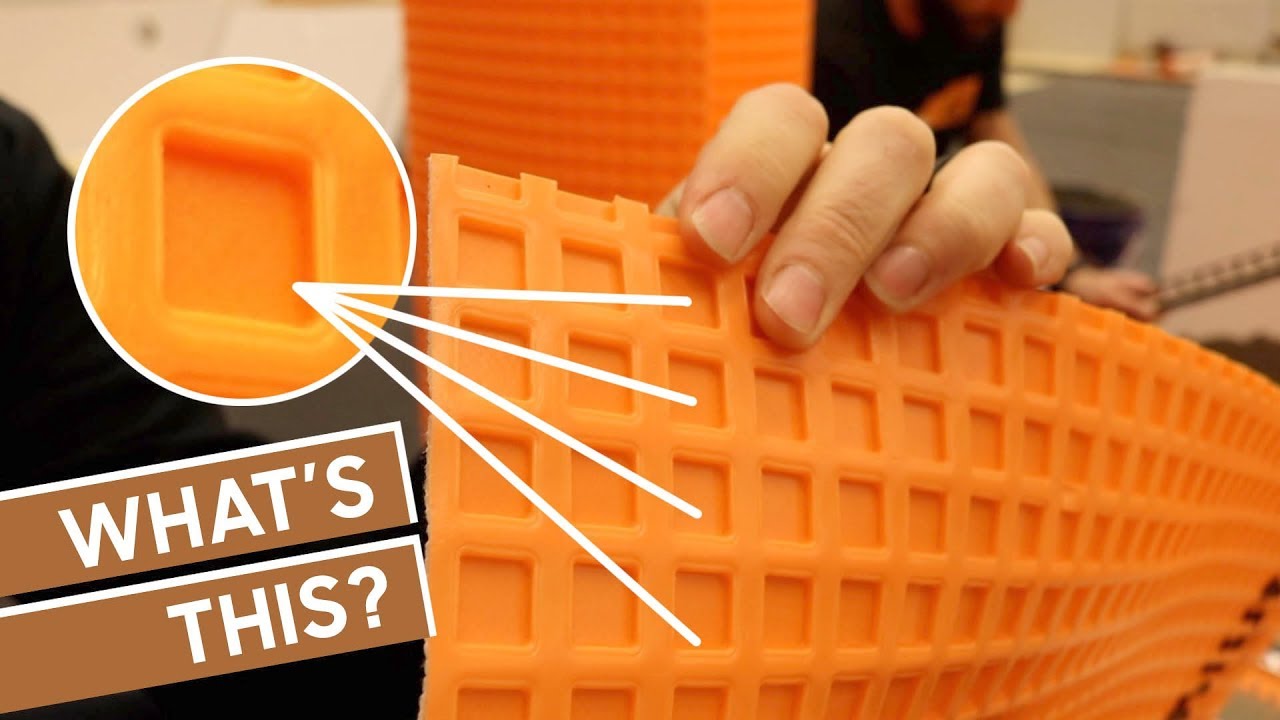
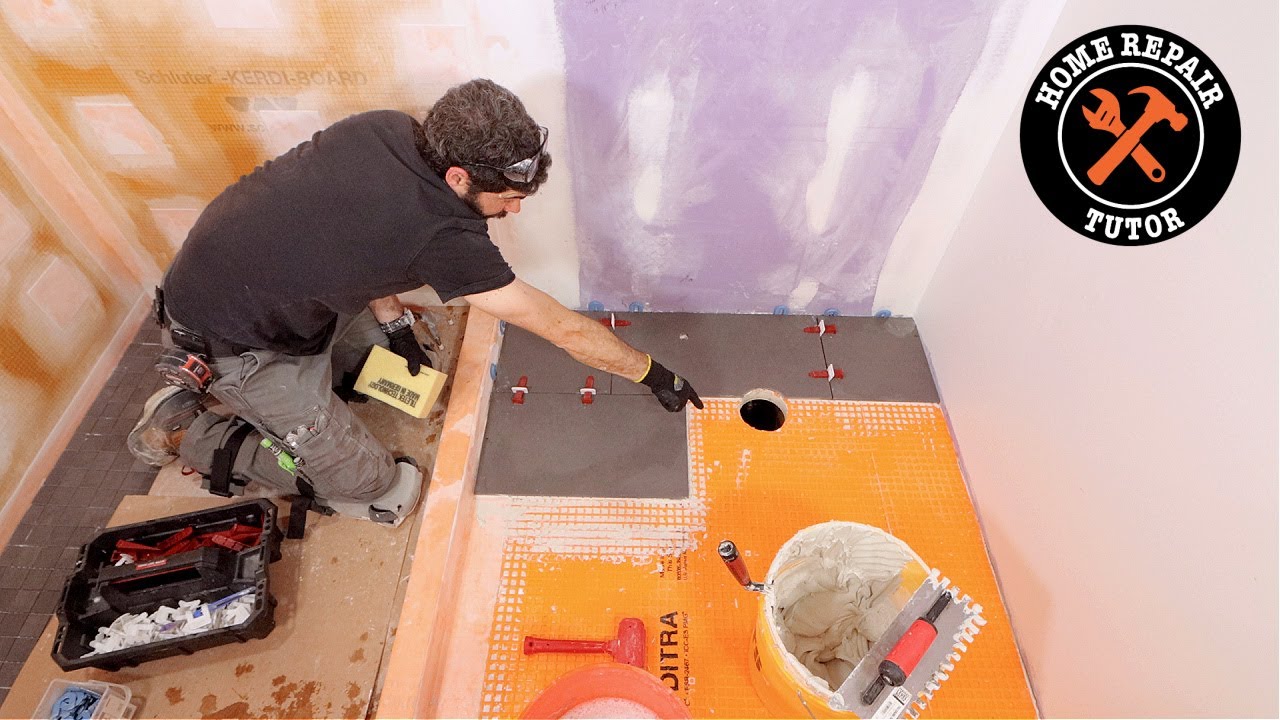
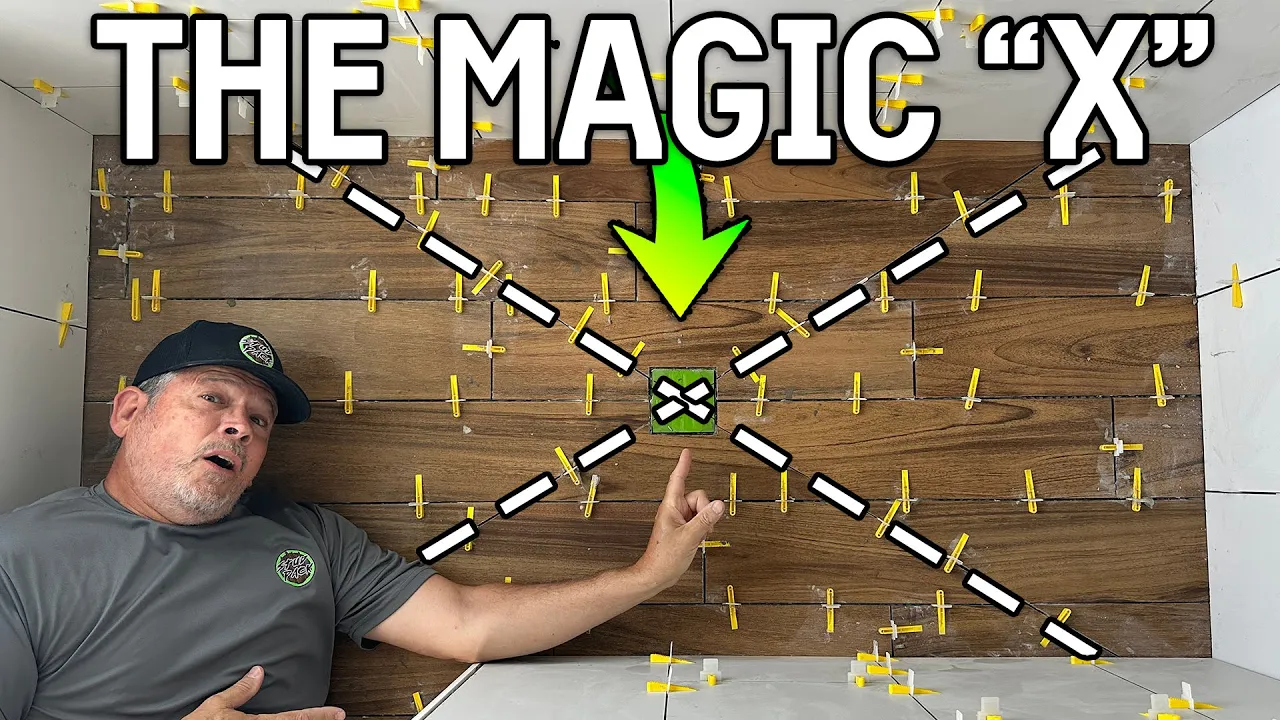
pans are pre 4 formed at the factory to slope towards the drain so you get good drainage from your shower and we love them because it saves us a huge step in the dry pack and the waterproofing it already comes waterproof we just have to set the drain and we're ready to go so once we were ready to start laying floor tile I did my layout I started my layout by using a black marker and making a big X on the pan with the intersection at the drain and these lines of the X and those
black marker lines on our orange Kerdi on that pan or where the valleys are in the pan the valley separated into four quadrants and each one is flat they're not rounded like a typical funnel that you would think of so once I had those black lines it was just an easy matter of setting my floor tile on there using a level on top connecting the line and then I had my cut I started right here in this quadrant I did all eight pieces pre-cut them fit them make sure it was perfect then we got our
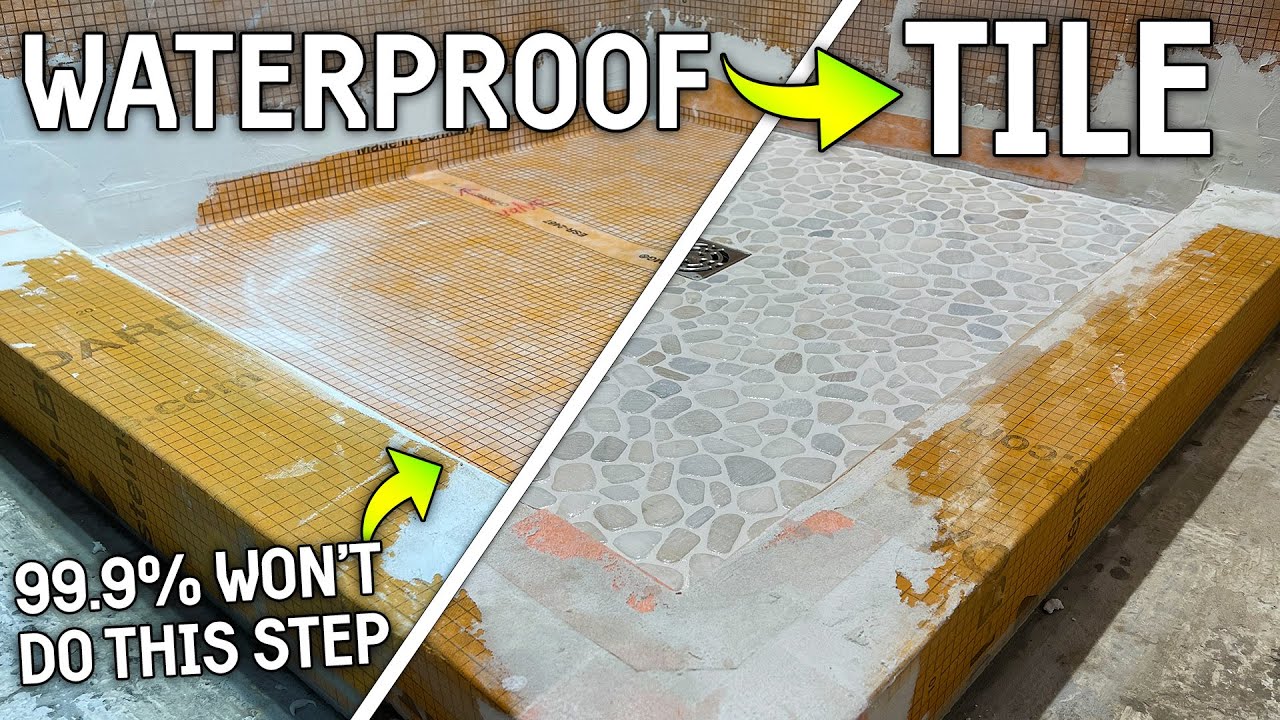
fin set out brought the thinset right up to our line and laid that quadrant now if you're using mosaic tile you may not have to do an envelope cut because they're going to form to the shape of the pan but because we're using this big tile that we used in the floor check out what would happen if we just laid it in place I'm going to set it on the pan but look it's sitting here and here and this rocket pretty good you're going to have a lot of lippage if you don't make this envelope
cut and you could probably break that tile because it's not going to be very well supported right here in the middle and I can just imagine you can have little puddles of water everywhere because the whole time you're going to fight that lippage you have to make an envelope cut when you use a large tile on a pan like this tiling is full of compromise and the main compromise we had to make on the tile floor was that we don't have Unity between this piece and this piece in other words the wood grain in here
doesn't flow into this tile we could do it that way but what you're going to get is small triangles no matter how you lay this out if I were to put this here and cut this off then this little triangle piece of tile is up over here and it's really difficult to get that little tile perfectly flush with the rest because it's so small so what we did on this one we tried to use full tiles as much as possible and we didn't worry about the wood grain and you know what it still looks pretty
dang awesome it's a good time to Pivot back to that vanity remember it was sticking out past this door by about four inches and we have to sneak it back into that wall now Jordan's going to show you some of the work we've already done you can see the niche we built and that Niche is going to allow the countertop to go back into the wall so the faucet can be behind the vessel sink and now that all that framing is done and the niche is built we still have two major challenges ahead of us
to get this vanity into that wall space this thing is about four inches too deep so we're actually going to cut the back off but we got drawer Glides down here we got the drain and the plumbing to accommodate we got the doors up here so we're not sure how we're going to do that yet make sure you stay tuned and we're going to figure that out together but what we can do right now is to cut the vanity top I'm going to put it up here for you so you can see this is the
front of it this is the drain for the vessel sink and this hole is for the faucet so if I cut on this black line I can push this back just a little bit more and the faucet won't interfere with that back wall and neither their will to handle so we're going to take advantage of our saw while we still got it for a few more minutes literally yeah literally we're going to put this on here and cut that let's grab some help because this takes two men and get this thing cut and return that
tile saw which has been awesome I'll say nice that wasn't too bad at all maybe we can uh maybe we can use that like a mini backsplash what do you think all right let's put this inside where it's safe get this saw cleaned up return to the store and then we're going to figure out how we're going to modify that vanity think of it like trying to put 20 pounds of whatever into a 10-pound sack that's what we got to do now let's give this thing a test fit we were really anxious about how we're
going to get this vanity in here so it sits on the ledge like that all the way back you can see I got some more demo to do got a drywall screw right in the way that's where our faucet is so I'm going to drill a hole there I'm actually going to put a big Notch there and then I'm also going to have to notch come on down here Jordan in the backer board because the faucet is going to be in that wall and the hoses are going to come out and tie in here and
here but we got it back as far as we could and I'd say we're sticking out past this stop what an inch yeah that's the best we can do huh absolutely but I'm happy with that it was way out here so all that worked for three inches let me get rid of this so George is going to start putting in a white grout in the shower how do you feel about uh grouting a shower on an island in the middle of the Pacific Ocean it's about 10 feet tall you ready so while he's doing that
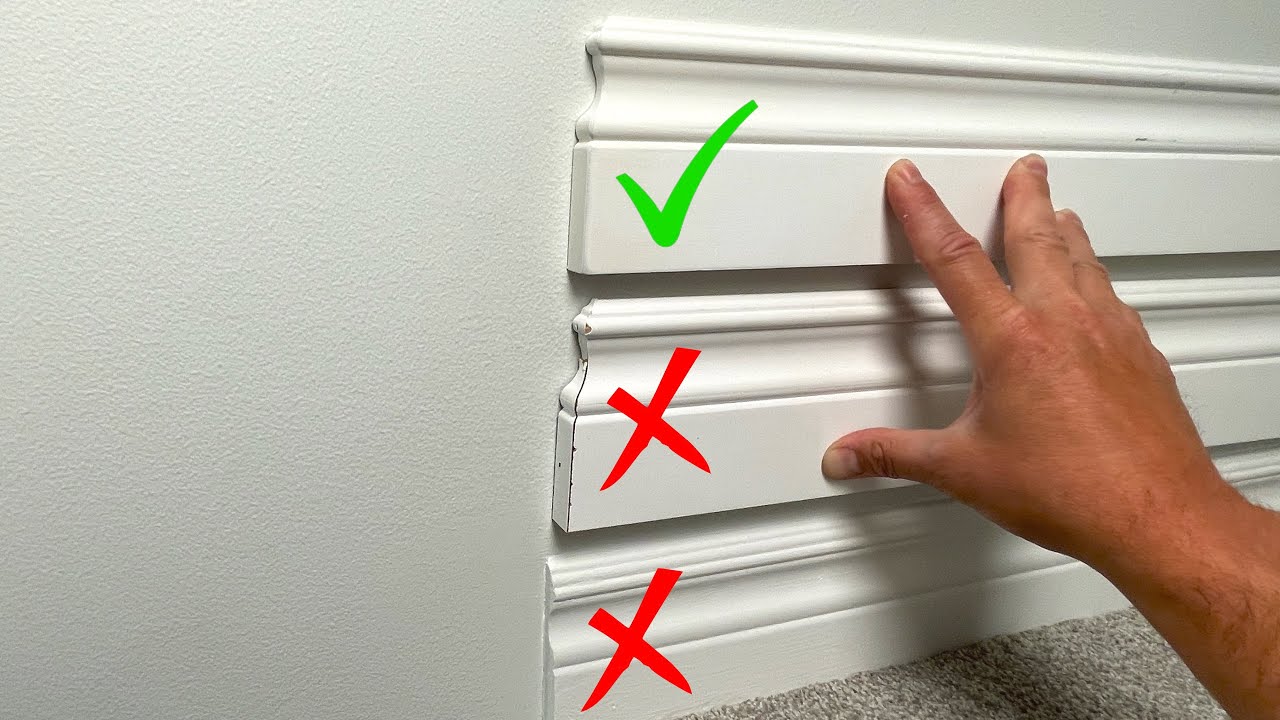
I'm going to put another coat of mud on all my joints and then down here we had tile baseboard and you can see there's still some thinset here and our new baseboard is a PVC base because that's what we like to use in your shower so it won't ever rot but it's not tall enough to cover that thinset so I'm actually going to Flat tape that so the paint looks great just like that flat tape right here between the drywall and the metal trim all right again we're grouting this bathroom the grouting is so hard
because the grout doesn't wait for anybody the grout doesn't care how fast you are it doesn't care how slow you are it doesn't matter if it's your first shower or your 100th shower doesn't matter if you're in Texas or Kauai it's just the best way to grout is to just chug and chug an energy drink or some coffee and just get an energy power up and go as fast as you can and I like you see I'm using the two hand method so I usually spread it and then I come across at 45s like that
and the thing about this grout even though it's pre-mixed and it's super fun to work with like I said it just doesn't wait for you so I can already tell by the way that it's spreading that it's time to it's time to wipe okay right here got this it's got the sponges all all set up and so you start with the sponge where you started I like to get all the big thinset off the tile in the middle first because found that if you try and wipe your joints too soon doesn't matter what kind of
sponge you're using you're going to end up digging out your grout so I always just get the bulk off the middle of the tiles first like you see me doing now and then I go around and and hit my joints just even that even that minute of letting that grout sit there in the joints makes a difference should uh drowning is a game of minutes yep golf is a game of millimeters grouting is a game of minutes nice boy yep I'm gonna get you some clean water to drink her to use [Music] all right getting
all the grounding is done and the tile came out phenomenal we love the white on the walls and the wood grain tile on the floor and it's the same pile obviously from out here into the shower makes it look epic couple details we did we ran the tile all the way up here almost 10 feet on this tall wall followed the angle of the roof here on this wall and we even wrap that beam love the way that looks and there are a lot of important details that we have to do to finish in this
bathroom and if we don't do them right it's going to make like all the work we did or not we have fixtures to put up the electrical the plumbing the toilet and the most important probably is this vanity remember I got to cut the back out of it I have a table saw a resip saw and a multi-tool we have to remove like four inches from the back of this and stick it in that wall so it doesn't stick out in the doorway and give somebody an injury on their hip so make sure you stay
tuned for that next video where we do a magic trick on this vanity give a big old envelope cut to your like button smash it ask the question drop a comment Please Subscribe check studpack.com for Merch and we'll see you on the very next stud Pack video right here from Kauai foreign