[Music] hey guys welcome to simply learns youtube channel today we'll be discussing the advanced java full course before we begin let me tell you guys that we have daily updates on multiple technologies so if you're a tech gig in a continuous hunt for latest technological trends then consider getting subscribed to our youtube channel and don't forget to hit that Bell icon so that you can never miss an update from simply learn so we'll start off with understanding what exactly is enumeration in java then we'll continue with annotations in java followed by that we have serialization
in java then we'll dive into multithreading in java next we have synchronization in java and autoboxing in java later we will discuss about input and output streams in java advancing ahead we have few more topics That are java database connections that is jdbc next we have generics in java string handling in java and the libraries which are java lang and java util followed by that we will discuss the networking in java next we have images in java and concurrency utilities for the next we have a few more topics which are regular expressions in java non-blocking
input output or n i o in java next we have java beans followed by that we will enter into spring framework Next we have the spring model view controller followed by that we have spring and rest apis and finally we will conclude this wonderful session with a springboard project for a better learning experience i hope i made myself clear with the agenda now we'll dive into the first topic over to our training experts hello guys this is vikesh and let's get started with enums or enumerations or enumerated types in java so before we go Into
enums let's understand why we need it when you are building when you will be building the java applications you will face scenarios where you will have to define some variables which will remain constant forever for example months of the year they are not going to change they are always going to be 12 months in an year similarly let's say name of flowers they're not going to change a lotus will be a lotus forever similarly the name of The seasons will always remain same the season of summer or winter will always be called summer or winter
they will not be changed the meaning of those variables will never be overwritten or will never be changed so you can think of them as constants but they are not the constants which your programs may mutate or your programs may interpret differently they will be interpreted by multiple applications multiple components multiple consumers in exactly The same way similarly if you take the example of time zones they are fixed they work with the gmt with respect to the gmt time zone and they will always remain like that so if you have if you whenever you have
a situation where you have to define such constructs or such constants always think of enum types or numerated types enum is basically a language construct and you can use this language construct to define type safe variables When we say type safe variables what we mean is that these variables are not integer or string they are of enum types that's the reason java created a completely new data type which is called the enum type they are by default constant so you cannot change them that's their property and the way you define enums is like this you
say public enum so instead of the keyword class you use the keyword enum And then you define the name of the enum the name of the enum type and then you define the possible values just simply separating them by a comma so for example days of the week is again a constant thing there will always be seven days of the week irrespective of what you do on this planet so that's why you can declare an enum for the day and you can define those as as the values you also notice that the values are caps
By default and yes that is how you define the enums let's have a look at a more interesting example of the enums in the ide now so if i switch to the ide i have created a class called color not a class but an enum type called color and this enum type color is basically holding all the different color types their values basically like all the vibger colors for example so i've defined three colors here which Are red green and blue so you see i've defined them as caps they automatically become bold you don't have
to bold them but you see an interesting thing a difference here that there is another value in the brackets here this was not there when we looked at this example of day there is no value inside each of the enum types but i have defined the value of the enum types and that is optional there will be use cases where you want To define some enum constants where the name of the enum type is a constant which is a placeholder but it will have an internal value which may be more practical for your application so
this is what your consumers see and this is what is used whenever you call red inside your application is just for simplicity there would be there might be use cases where you use some abbreviations and their full forms for example if you want To use here an abbreviation of let's say wh o and inside this you can define the value as world health organization so this is just a toy example i'm giving you where you will have use cases where you want to define a constant but you want to define an internal value of it
which is to be read by your application elsewhere but Everybody who wants to consume this enum can just use this particular keyword and if they want to get the value they can get the value as well so this is the use case where you might need to define values of your enum types as well but whenever you have to do that if you want to fetch the value of an enum type you have to write some extra code which is written here if you were not defining the value of your enum types your enum can
be as simple as this You don't need to define anything else apart from just defining the constant of the enum types i'm giving a more complex use case so that it covers both of the things of using just the constants and also using the values so if you just want to read the constant you can just say color.red or color.green or color.blue in different classes and you will be able to refer to the enum types or use the enum types But if you want to refer to the value of the enum type then probably you
need to call this method called getvalue so whenever you define a value what you would do is you will define a private member variable inside the enum which is defined here you can name it anything if you want you define a constructor where you set this particular value and then you define a getter so whenever some consumer application wants to refer to the value of your enum type they can Call this get value method to get that so this is the enum now let's see how we can use this enum for using this enum i
have this main class where i have a public static void main method and you can simply fetch the enum types by writing the code like this just write the enum type holder and then type the enum type so let me show you how this is done if you just put a dot here you will get all the enum type options so i've defined three enum types red green and Blue and i get all the options so whatever option i want to choose i can just select here and i can store this inside an enum variable
so if you want to just refer to the name of the enum so this c1 is holding color dot red or red so if you want to refer to this just this red then you can call the dot name method on the c1 variable so if you say c1 dot name it is going to put or print the red in caps and if you want to fetch the value inside the red Remember the value is read in in small caps so if you want to refer to the or if you want to fetch the value
of the red then you call the get value method which we have defined here so that's what we are doing here in this first two sysouts where we are printing the red enum name and then printing the redinum value now you can also iterate over all the enum types and for that you need to call the dot Values method on the enum so you can just say color dot values which is going to iterate over all the enum types and you are just storing each of the enum type in this color placeholder then you can
either call getvalue to get the actual value of that enum type or you can call the name to just print the name of the enum as well both of the options are available so let's just put it back to get value and let's run this code so if i run this application i get some Output here which looks like this first sis out says red enum name is red in caps because we are calling the name method second says red enum value which prints red in small because we are calling the getvalue method and then
we are iterating over all the enums so i had three enum variables here red green and blue and i'm going to iterate over all of them one by one here printing their value and not the enum constants So that's why you see the red green and blue here in small but if you just want to print the enum constants themselves and not their values then you change this to dot name and then all the enum constants will be printed here so this is how you can create enums and use enums for the constants which are
never going to change in your application let's get started with annotations in java now annotations is a bit advanced concept so let's understand why we need It there would be some cases in your pro in your application where you need to provide some metadata information to the java compiler now this sounds a bit complicated but it's much simpler than that because you might not want to code everything with lot of lines of code rather you want to give some smart instructions to the java compiler so that they understand what to do we have already seen
some of the annotations but the basic idea of annotations is to Provide some shorthand metadata information about the program to the java compiler generally annotations will not have any direct effect on the operation of the code they annotate but they provide additional logic to the code that's the idea with annotation remember they are shorthand metadata the main use is providing information to the compiler or providing some compile time or deployment time processing or also providing some instructions for runtime Processing we have already seen some of the annotations if you remember when we were dealing with
inheritance we had this add the rate override over the methods right this add the rate override is an annotation this annotation if you if i if i show you what i'm talking about if i take you back to one of the inheritance example or the method overriding examples and if i open the mountain bike class here mountain bike extends bicycle you will see this Override annotation this is an annotation an annotation always starts with at the rate in java and the annotation name is overwrite now this override is just a shorthand to tell the compiler
that hey i am overriding this method from the base class that's what this annotation does if you remove the annotation in some cases the java compiler might not understand what to do and the java compiler has to do some extra processing to figure out that this Method is actually being overridden but if you put this at override here then the java compiler pre-hand will know that this is coming from the base class so you save some of the compiler processing time as well by using the annotation it's a shorthand providing instructions to the compiler you
see exactly what i'm talking about so this is one of the annotations which we have used but we will look at some of the other more generic annotations and we Will also see how we can build our own custom annotation in java you might have also seen some other annotations like for example you can put aggregate suppress warning annotation which is a very popular annotation to suppress any kind of yellow warnings in your code generally we do not recommend doing that but if you have a use case then you can use at direct suppress annotation
as well there are some other annotations as well like admirate author if you want to Put your name as the author of a particular piece of code then you can add this metadata so that whenever somebody looks at even the documentation of your code your name will be shown there as the author so that's the idea with annotations so let's see how you can build your own custom annotation whenever you have to do that there are multiple ways to doing that and the first type of annotation we are going to have a look at is
called marker Annotation a marker annotation is just an empty annotation without having any metadata logic at all you can see it is i have defined an annotation here i will talk about what is all this means but inside the block there is no code here and this is how you define a marker annotation marker annotation is just to provide very high level instructions to the compiler and the way you will write your custom annotation is you will put an access modifier keyword like public Then you will write at the rate interface this is the keyword
which you have to use whenever you are trying to create your custom annotation marker or no marker doesn't matter whenever you define your annotation you have to use ad grade interface once you do that then you provide a name for your annotation which can be anything but still not complete you need to also provide more instructions to the compiler or the runtime processor to tell them when to Execute this annotation and what the annotation type is going to be applied upon so at first you specify when this annotation is going to be active or executed
or evaluated so here you can say add the retention which is another annotation so you say add direct retention and then you say retention policy dot whatever you want to write as you can write it as runtime or you can write it as source if you write it as source then it is going to be applied at Compile time and if you select it as runtime then the annotation is going to be processed at runtime so this is the first thing which you need to provide the second thing which you need to provide is where
this annotation is going to be applied whether you want this annotation to be applied to a class or to a method or to a member variable or to any other type and that's what you define in the add the rate target annotation you specify the target Audience for this particular annotation and here inside the element type you will get multiple options you can apply this annotation to a constructor to a field local variable method module package record component type etc so here i'm going to use type which means it can be applied to a class
or a generic element type which generally means class type and that's all you can define your marker annotation like this but generally these marker annotations Does not have any logic so you will not get much value out of it until you have very special cases but if you have a case where you want to also run some business logic or provide some metadata logic to the compiler while defining the annotation then you can define your annotation like this so i've created one more annotation here which called which is called my custom annotation again the target
audience for this is method so this annotation can Only and only be applied to methods if you try to apply this annotation to a class you will get an error the retention policy is runtime it means it is going to be processed at runtime and have declared a method here which is called int value so this is how you will declare your annotation now let's see how do you how do you use this annotation so i have a class called as my class here and if you look at this structure of the my class we
create the Class and then i create a method which is named as say hello and i am applying this annotation on this particular method remember the target audience of this particular annotation was method so it only be applied a method if i try to put this on the class type here then i get an error here it says the annotation my custom annotation is disallowed at this location because the type specified is of type method so the compiler will not allow you to use this at an illegal Place so you write any method and you
apply your annotation but you provide a value to the method the int value method is going to consume this value and inside the method you can write any other logic so let's see how this pans out i create a public static void method and i create an object of my class so my class h equal to new my class and after that i'm saying h dot get class dot get method i'm basically calling the method by using reflection api you can also Call the method directly if you want but this is how you need to
call it if you want to use the annotation property value if you want to fetch the value of the annotation so this is just an example of me showing you how you fetch the annotation so we created an object and then we say get class which is going to return my class type and then get method is going to return the method type which has the name say hello so this is a way to fetch a method name or A method type from a class using java's reflection api which is an advanced api you might
you might not need to use it but for the sake of demo i'm using this so we fetch the class and we fetch the method it is going to search the class for a method name say hello if it finds the method it is going to return the method in this variable and then you can call method val which was this variable dot get annotation give me any annotation which is applied on this Particular method and you supply the annotation class type as well once you do that you get a my custom annotation reference type
and then if you call the value method on this you will get this value as 10. so this is a way where you can apply an annotation and you can actually see the effect of the annotation you might not always want to do this because like i said these are metadata instructions to the compiler but if you have a need to actually see What your annotation is doing you can use the getclass.get method to first fetch the method store it into a method type and then call get annotation supplying the exact annotation class type and
then you can call the exact method which is defined in your annotation here i've defined it as value so i'm just calling the value method so if i run this particular example i get the value as 10. so i'm able to see or fetch the exact value which my Annotation metadata is holding at the runtime and this is the power of annotation there are very powerful concept and there a very advanced concept they would be very rare scenarios in your application where you need to create your custom annotations generally you will be better off will
with your with your predefined annotations which are provided in java like at the rate override and variate author at the rate Suppress warning etc let's get started with serialization in java now before we go further let's understand why we need the concept of serialization when you will be building the enterprise grid applications in in different organizations you will often have a use case or a need to send an object from one application to other application which is deployed on some other machine so if you have a network of computers or if you have a lot
of different uh Complex setup where you need you have a producer application and you have a consumer application producer application produces the object and then this object gets traveled over the network lines over the network wires and reaches at the consumer application and how does the consumer application receive the object and how does the producer application sense the object because when the data travels over the network lines it will be all bytes so How do you convert a java object into bytes send it over network and then the consumer application has to again convert that
bytes back to an object representation and then store that or use that inside its application so you need to do this whole conversion right so the process of converting an object to a byte so that it can be sent over a network is called serialization and the process of converting back the byte from the byte from the network to a java Object is called deserialization so generally you you may have a use case where you serialize an object create a binary representation of it send it over the network and that's where the java serialization concept
kicks in whenever whenever you have to do this in java you will be using the serializable interface so you need to extend your objects from this serializable interface so that those objects themselves becomes serializable you need to tell java that This object is able to serialize itself and deserialize itself and the way you will tell java is by letting that object implementing the serializable interface let's have a look at an example for of this serialization and deserialization to understand this concept better so here again i've used the same student class where it has the name
age and address so you can see i have created a student class but the student class implements serializable this is Something which you have to add to your class second thing the moment you do that all the modern day ides like eclipse or intellij will ask you to add a serial version universal id to this particular class this is added so that java can uniquely identify your object once it is serialized and deserialized and it will also keep a versioning track of it right because when you serialize the object what happens if somebody hops over
the Network line and change the representation of your object and the consumer application will get a completely different object copy now so this is java's way to make sure that the same version which the producer application is producing is received by the consumer application so it's also sort of a security feature it basically whenever you do an update on to the object it is going to increment this serial version uid by one so when you Create the object first time and you serialize it for for the very first time the value is going to be
set as default 1 and as you mutate the object again and again before deserializing it the count will just keep on increasing so that's how you keep a track of the state of the object which is being serialized by adding this long serial version uid you can also specify your own value if you want to by default java initializes a value of 1 and this is a long type Variable so that is the only new thing which is happening the moment you do implement serializable after that i have the same fields here i have the
constructor and the setters and the getters and i also have a tostring method just to print the object nicely where i print the name the age and the address so let's look at a main class and where we use the student object we serialize This object and then we deserialize this object so what is happening here is i create a class i create the main method and i create a student object this is something which we have already seen then i want to store the state of this object when when you serialize this object this
object has to be either sent to a network but since i'm running this demo on the same machine what i will do that i will serialize this object onto my local file system it's the same thing Right you can put it somewhere and then fetch it from there so either you can send it over the network or you can put it on a file system so i create the object and then i need to store this into a file so far i have not covered the file handling operations so we will not go deeper into
the file handling classes here but i will just explain you the reasoning for it and when we'll do the file handling session there i will go in detail about the file handling Classes so i specify your file name we are the serialized representation of my student object is going to be stored and this is the location where i'm supposed to store this then i create two different classes which is for writing to the file and then creating an object for it so that's what i'm doing here we can ignore this particular part where i'm just
supplying the file name and we can focus on this part this line where i'm saying write The object the student object to this particular file that's what i'm doing here in this particular in this three lines of code that i'm writing the student object to the file so when java has to write this object to the file it is automatically going to serialize it that's the only way java can write an object to the file so you serialize the object and then you print that message that the object has been serialized again you can ignore
this part as well Like i said we will not focus on this but what we technically did is we just wrote we just wrote the object to a file by serializing it then i try to deserialize it so i load the file load this same file into the java jvm and then i read the object and the way i read the object is by using this object input stream class i supply the file that read this particular file and then i call the read object method which is going to return an object a general Object
when you call the read object method the read object method does not know that it is a student type object so you so you need to explicitly cast this to the student type so that you can store this as a student object if you do not cast this you will get an error because like i said read object does not know anything about the student class so what does what does this mean is that when you serialize an object the class type information is lost you cannot Store the class type information when you serialize an
object because the moment you call this write object method from the object output stream class so you created this object output stream class you supply the file output location and you call the right object the moment you call the right object it's just any java object for the this java program the signature of the student class is lost it does not know that it's a student class anymore once It has been once it is being serialized similarly when you deserialize it the serialization api has no idea about what student class is and what student object
is so you need to tell the read object method explicitly that hey you are reading an object of the student type and that's how this line works once you explicitly provide the casting operation once you have casted it we try to print the same deserialized object to see if all the state which we stored in the Object is still persisted there or not when we deserialize it so our major focus in this particular class is this object output stream classes and the right object method these are the two most important statements which you need to
take care of the file output stream is basically a file location what is an output stream we will talk about that later but whenever you need to serialize you need to use this particular class called Object output stream so that's all i'm doing here i'm serializing the object with this these values and then i will deserialize and i will again print the object to see if these values are still there or not so let's run this application so when i run this application let's start from here first this says out gets called which says object
has been serialized so you see object has been serialized and what i serialized was the student object which Had the value of name as john age as 25 and the address as 23 east california and that's what gets printed here then this whole block gets completed this whole try block gets completed it's a standard try catch block you see i have also added the i o exception you need to do that because these file operations will force you to catch or throw the i o exception which is a checked exception that's why it will force
you to do that then we move to the deserialization Block where we create an object of the object input stream class and then we call the read object we cast it to the student type and then we print the object so when i print this object this line gets printed object has been deserialized and then i can see that the exact same state is still there the name which is set in the object is still there after being after being deserialized the age and the address is exactly intact so this is how we you can
Serialize an object send it anywhere you want and then the consumer application need to read the object and cast it back to the student type and they will be able to see the exact same state which you saved in the object just before serializing it what if you have a use case where you do you have a property in up in a student class or in your object but you do not want that to be serialized that's also a use case where you may have 50 different properties Inside the student class and one of the
properties something which you do not want to serialize because you do not want the consumer application to see that value if you ever had that scenario use the transient variable so transient is again a keyword and the moment you put this keyword in front of a member variable that variable becomes transient the use case of transient variable is that if you do not want this x to be serialized and deserialized then you put The transient keyword in front of it the normal member variables will automatically get serialized and deserialized when the object is serialized and
deserialized but if you have a use case where you do not want a particular member variable to be serialized or deserialized put transient in front of it and then have the getters and setters for this x variable and let's use this and see if this actually gets serialized or not so i created the Student object and let me call student dot set x and let's put a value to x let's say 10 so i have set the value of x is 10 and x is a transient variable and then i am serializing the whole object
here and then i'm deserializing the object and let's see if i'm able to fetch the value of x after deserializing the student object so i'm calling the system.out.println and The serialized value of x is object dot get x let's see if i'm able to see the value of x or not so let's run this application again so this is exactly the same as before this is also exactly the same as before but i see the value of x is 0. remember i set The value as 10 before serializing it but i don't see the value
10 anymore when i deserialize the object because it was transient if you remove transient from it then you will be able to transfer or travel this value of 10 between serialization and d serialization so if i just remove this here don't change anything at all and i just rerun the application this time when i deserialize the object the value of x as 10 is still present there even After deserialization so this is how you can use the transient variables if you want to not have that object serialized or deserialized when you're doing the serialization let's
get started with concurrency and threads the reason i want to talk about concurrency because once we understand about the concurrency it will become much more simpler to talk about threats and the idea behind concurrency is very simple and plain and That idea is that as a developer when you write a program you would expect the machine or the computer to run multiple tasks in parallel for example right now i'm recording this video on on a particular laptop which is regarding my voice which is also recording the screen which is also running the eclipse ide and
also running a chrome browser it is also have it also have opened multiple background applications so there are a lot of tasks running in parallel at the Same time and that's the idea about concurrency now how do we work with concurrency in java is with the help of processes and threads so these are the two basic units of execution when we talk about concurrent programming in java and when we talk about processes you can think of a process as basically an execution environment or i should call it as a standalone execution environment think of a
logical box which is completely cut out from everything And it has its own environment for example again the recording software is running it's in its own execution environment and when we talk about process process generally has an everything or a private set of all the runtime resources it needs and the memory space it needs now this another concept or another construct which is very important is threads so threads are also sometimes called lightweight processes and Basically when we talk about threads it's a thread also has an execution environment but creating a new thread requires lot
less resources than creating a new process and you can also think of threads as a mini version of a process because a process can have multiple threads remember that statement that a process can have multiple threads threads always exist within a process and whenever you start a process there will be at least one thread attached to It and each thread is basically a task for example the voice recording can be a process and inside that the mic recording expression or the mic recording or task can be run by a particular thread let's take another example
that when you play games let's say you are playing a racing game so when you play the racing game there are multiple things happening at once you see the current speed of your car or bike on the screen you also see Your leaderboard position what ranking you have in the race currently you also see some other kind of features like players health or the car's health or the fuel consumption available and lots of other stuff the graphics the motorcycle the other comp other competitors bikes and their speeds and their distance to you as well so
if you see all of these are running are different threads there's a different thread to show your current Speed there's a different thread to show the current leaderboard position there's a different thread to show the fuel indicator etc everything is running in a different thread so all of these threads need to run at the same time in your program for a complete immersive user experience and that's what we mean when we say multi-threading that we want multiple threads to run at the same time to create a better experience in the application so that's the basically
the Theoretical part of it please do read about more about how threads work and how processes work and there's a lot more documentation available in the java docs as well when we talk about threads but i will keep the theoretical part to this particular point and now we will move to an eclipse example to see how we can create threads so with that let's move to the eclipse ide and here i have a demo prepared basically so what i have here is a threading demo class which has A public static void main method and it
has a simple for loop and inside the for loop i see this strange code here where i am initializing two threads and starting them so that's all i'm doing here but let's see how this thread one and thread two class have been written and why do i see two different ways of initializing them let's go deeper into this now so let's see how thread one can be created so first of all you can create a thread by just creating a Simple class but make sure that you extend it with the pre-built thread class this thread
class is from coming from java so from the jdk basically so the moment you extend your normal class from the thread class then you will have to override the run method so if i show you the thread class here this is the thread class implementation available inside the jdk and this is the class which is getting called when you are extending this from The thread class and this thread class will ask you to override a run method here the override annotation is missing so let me just add this for better understanding so you need to
overwrite the run method and this is something which you need to do so that you can specify what happens when you run the thread so this run method will be called whenever the thread is running at this particular point i would also like to tell you that there are Different states in the thread so there is a thread which says thread is ready then there is a state which is which say thread is running there is also a state where the thread is waiting for an i o input from the user from the console or
the command line there can also be a state which says dead where the thread has completed its task and it's not working there can also be a state which is called sleep state where the thread is paused so there are different states Of the thread and in this example we are going to focus primarily on three states which is the ready state and the running state and the completed state so when you call the run method the thread state is going to change to running and whatever code you write inside this particular run method will
be the logic which this particular thread is supposed to execute here i'm just putting a dummy logic where i'm just printing a cis out but definitely if you try to create your Threads this will contain your actual business logic for example that fuel indicator code or for the leaderboard position code will go inside this run method and then i'm catching an exception if there's an exception but obviously there will not be an exception coming in because i have nothing here literally so that's what we are we are doing when we are creating this thread one
class and let's come back to the threading demo now so to initialize a Thread or initialize might not be right word to run a thread the first thing which you need to do is to initialize the class containing the run method so i would avoid calling this class as thread because technically this is just a class so you initial so you basically create an object of the thread just like you create the object of any other class there is nothing new here right so we just say new thread one and then we call t one
dot start now if you observe Carefully there is no start method here we just had a run method but this code is still compiling fine and i'm calling the start method here because the start method is the internal method of the thread class which in turn is going to call the run method so you are never going to invoke the run method directly you just need to start the thread which is going to change the state of the thread from ready to running so this start method has the responsibility of Changing the state to running
and the way the start method is going to do that is by calling the run method internally inside the jdk itself from developer perspective you just need to call the start method and that's it the thread will start running and whatever is present in the run method will get executed so that's the way to start the thread second thing i have one more thread created here which is the thread 2 class so In this case when i create a thread 2 class i am not extending it from the thread class rather i am implementing the
runnable interface here so this is a different interface available which is a functional interface which means it will have just one method which is the run method but the interesting thing is that here when i created thread one i said extend thread but here when i'm creating the second thread i'm not using extends thread but i'm using implements runnable Let's understand why do we do that first of all the reason java provides two different ways of creating threads is because there might be a use case that you need to extend your thread to class from
some of your custom java class remember java does not support multiple inheritance so at a time you can only extend this class from one class so what if there was no runnable interface and you need to extend this thread to from student class let's say so you need to Do class thread to extends student for example the student is not present here but let's assume it is so you do this and then you also have to extend it from thread now java doesn't support multiple inheritance and this will not work so what would you do
if you have to also create it as a thread but also extend it from some of your parent class you will not be able to do that and that's the reason java provides the implements runnable because then you Can extend it from any of your super class of your interest and at the same time also implant implement it with runnable interface so that you can treat this class as a thread so that's the reason java provides two different ways of creating threads remember that it's a very important concept and once you implement runnable again it
will ask you to override the run method so i will just put overwrite annotation here so once you override the run method again You can write whatever logic you want this particular thread to execute inside the run block coming back to the main class so when you are extending from thread the initialize initialization is very simple where you create the object and you call the start method on the object but if you are creating a thread by implementing the runnable interface the initialization of the thread is a bit different and it's different in this Particular
part on the left hand side you still say thread t2 remember you are saying thread and not thread 2. this is a this is the java thread class this is the jdk thread class not your own thread class so you say thread t2 then you say new thread and inside the new thread you provide your own class type thread 2 was your own class type so you specify your own custom thread class here inside the new thread constructor this thread class is the jdk class if you click on this You will see this is from
the jdk class so that's the difference extending thread simple initialization implementing runnable interface do the initialization like this and after that you call the similarly the start method which is in turn going to call the run method so that was how you create threads differently and now let's run this program to understand how the output looks like when we run these threads in loops remember i'm Initializing 10 instances of each of these threads so in total there would be 20 output lines so if i go to run as java application i see this output here
so let's observe this output for once so thread 1 thread 2 is running in sequence in the first time but then you see thread 1 is running twice and then thread 2 is running twice then again you see a good sequence but again thread two has run twice here again thread one has run Twice if i go further down thread one runs once then again thread two runs twice thread one runs once thread two runs once so there is no particular order here though based on the code which we have written we should expect thread
one is running from here and then thread two is running output from here in a sequential fashion but we don't see the sequential fashion here and this is the power of concurrency this is because threads never run in sequence they run In parallel and which thread will execute first you can't really predict that so it's so be very careful when you whenever you're writing multi-threading code because you cannot predict the sequence of execution because threads are going to run whenever they find the idle cpu so the key is the idle cpu whenever a thread finds
an idle cpu it is going to occupy that cpu and going to run its own execution and the moment its execution finishes the other thread will Jump in and take up and take a piece of the cpu so whichever thread gets the idle piece of the cpu is going to execute and that is the reason you see this randomized output the next time you're going to run you will see a different random order so so this time you see thread one ran four times you you did not see this in the previous execution if you
run it again you will see again a different output this time the thread one run price so every time You will run this you will see a different sequence there is no guarantee of order because the threads are running in parallel and they are running whenever they get the idle cpu that's the bottom line so this is how we are going to create threads and remember you cannot guarantee the sequence of the execution so write your code accordingly and use the threads for independently running parallel threads which do not depend upon each other let's get
started With thread synchronization in java so in the previous example we saw that when we execute threads then we can't guarantee the sequence but it's actually technically not a problem in the example which we had look at before but it can become a bigger problem when two threads are trying to access the same object remember object has properties and state so what if the first thread modified the object state and the second thread is reading the state of the object the Second thread is expecting the original state but while it was trying to read it
the other thread modified its state so you can see this become a this can become a big problem for example if you are working with a banking system and if there are two persons accessing the same account at the same time one is depositing the money and one is withdrawing the money from the account and if the total balance is thousand and if both of them deposit 500 and withdraw 500 at the same time then who sees what and if these are two if these are handled by two different threads then we can't guarantee if
somebody sees a 1500 as the total sum or somebody sees a 500 as a total sum or there can be a scenario where somebody sees zero as the total sum so it there so the application can turn into really weird scenarios if two threads are trying to change the state of a particular object at the same time and java provides a solution of it With the concept of intrinsic locks and synchronizations so the idea is that when a thread tries to work on a particular object it basically takes a lock on that particular object we
also call this as an intrinsic lock or monitor lock so it takes a lock on the object and it means that that particular object becomes completely inaccessible to other threads in the system at that particular time so the moment you put synchronization or you put lock on a Particular object only the thread which has taken the lock will be able to access the object and other threads will be forbidden from accessing the object so that's the idea behind intrinsic locks and synchronization so that was about the brief theory of it now let's have a look
at a practical example so i have prepared another example for it so here i have again created two threads but these two threads it's the pretty much the same threads which we covered In the previous session named as thread one and thread two one is extending thread class and other is implementing runnable but that's the that's same but the interesting part is this both of them have a reference to a class called mathutils if you see thread 1 also has the reference and thread 2 also has the reference and what the math utils is doing
here is basically you supply a number and it prints the multiples of it Till 5. so for example if you supply 2 you will get the output 2 4 6 8 10. if you supply 3 you will get the multiple of 3 up to 3 times 5 so 3 6 9 12 15. if you supply 4 you will get the outputs of the in the multiples of 4 till 20. so whatever number you will supply you will get the next five multiples of that particular number that's what this class is doing and another thing which
interesting thing which i've done here is this thread.sleep which means that When you run this loop where you are printing the multiples still five of that number every time you do the first multiplication then you sleep for 400 millisecond and when i say sleep it basically means the current thread is going to pause its execution for 400 millisecond and it is going to leave the cpu idle and if there is another thread running currently in the system that thread will get the share of the cpu for that 400 millisecond and once the 400 Milliseconds is
finished the thread is going to wake up and it is again going to hunt for the idle cpu to pick up and start doing its execution so that thread dot sleep happens for 400 milliseconds at every step of this iteration in this for loop so thread one is going to use this particular method of this particular class and it is going to ask the class to print the multiples of 2 and thread 2 is also going to access the reference of the class and access the Get multiples method but this thread asks to print the
multiple of three so thread one asks for printing the multiples of two up to two times five and thread two wants to print the output to multiples of three up to three times five so that's the basic scenario two threads accessing the same object supplying different values and expecting the output so if i run this demo as is without any change here i'm just initializing the math utils class Initializing two threads and then calling the start only once so if i run this particular program i see get i see this strange output that even when
i said p1 dot start first so t1 was holding the multiple of 2 remember but i still get 3 first then 2 then four six so multiples of two gets executed here but then the other thread takes the cpu and it starts running its own multiples outputs and you see nine printing first and then six gets printed then twelve Then 8 then 15 and then 10 at very last so the output looks very random it would have been nicer if i could have seen 2 4 6 at 10 once and then 3 6 9 12
15 once if i see them in different sections in different sequences that would have been so nice because then i know which thread is running when and when that particular thread is working on the object so i'm just trying to replicate the same scenario where two threads are accessing the same object at the same time but They are executing the object randomly they are changing the state of the object randomly here so how do we fix this to fix this we can put so we have this get multiples method which is the bone of contention
here this is the method which is being randomly accessed so what i can do here that i can put synchronized keyword in front of the method so once you put the synchronized keyword in front of the method which is being accessed by multiple threads at The same time this method this whole method gets synchronized now what this means that one thread will be execute this method at once there will never be a scenario where two threads are simultaneously executing this get multiples method or even getting a hold of this get multiples method at the same
time there would be only one thread at a time executing this method so if i put the synchronized here and if i rerun this example you see i get a more Streamlined output if you notice everything is one running like clockwork where first the thread one gets executed so i get two four six eight ten really well printed and then the second thread starts which says three six nine twelve fifteen the reason i get this output is because when i did t one dot start it immediately went to execute the get multiples method but it
saw synchronized there so it took a lock on the method and even when the T2.start might have got executed maybe milliseconds after that or no seconds after that it still could not get hold of the get multiples method because thread1 occupied this particular method it took a lock on this particular method due to the synchronized keyword so that's the power of synchronized keyword that you can take a lock on a particular method if you put it in front of the method now there can be scenarios that you do not want to lock the whole method
You still want two different threads to access the method but there can be very few lines of code inside the method which is the which is thread sensitive code now how do you spot that sensitive code there is no magic bullet there is no silver bullet for it and it comes with experience so you need to have that experience to know which is the thread sensitive code which can create problems if two threads run that code at the same time so the moment you have spotted that Code and if you don't want to lock the
whole method you can lock the exact lines of code by putting the synchronized block so if i remove this and i enable this particular part so what i am doing that i know that this is the code which is exactly causing the problem which is creating this random output so what i can do that i can put the synchronized keyword right before the block of the code starts which is thread sensitive and the way you do that Is you write synchronized and you supply this which means whoever has the current who whoever has the object
of the math appeals that whole object gets logged for this particular block of code so whoever has the math utils object takes the lock on the object for this particular block of code if there were some other code which was written in the get multiples method before the synchronized block or after the synchronized block that block can be Accessed by multiple threads at the same time but this code will only be accessible to one thread at a time there will never be there will never be a concurrent access to the synchronized block that's the power
of synchronized block and it will work the exact same way so to show you if i run this particular program i still get the output in the same streamline way where first the multiples of two get printed and then the multiples of three get Printed so that's how you can actually use synchronized methods or synchronized block to make sure that one thread is accessing a sensitive object at a time and there will never be a scenario that two threads are mutating the same object at the same time again like i said be very very cautious
of when you use synchronized blocks and when you use threads because threads have unpredictable execution cycle execution sequence basically and synchronized Blocks also have problems if you have if you have thousands and thousands of threads running in your application and if you put synchronized on a particular method your application may face severe performance issues because all of the threads will be executing that method in a sequence imagine you put this onto a huge application or a huge ecommerce application or a news website it is it is going to create serious performance issues so be very
cautious of how and When you use synchronized method and the key to that is to have that developer dna to spot the code which is causing this problem which might be thread sensitive and maybe you might need to change the code itself you might not need to go into the multi-threading scenario and you might you might be able to fix it without using the threading or synchronized concept it completely depends but always have a good trade-off when to use the synchronized methods and Synchronized blocks let's get started with auto boxing and unboxing in java so
if you remember in the very first sessions i talked about the primitive data types and then later on we talked about the objects for example we had the int data type but there later we also saw an integer data type which is which can also pretty much do the exact same work which int data type was doing and we saw the similar kind of uh experience for the float data type and the float Class double data type and the double class care data type and the character class and so on so forth so java provides
an easy way to convert a int data type variable into an integer data type variable and also back from integer data type variable to an int primitive data type variable now you might be wondering why we need that there would be scenarios for example if you had an int array as in primitive int array and if you want to store that into a Collection now collection can only be of type of objects it cannot be a type of primitive data type so you might need to convert this int primitive data type array into an integer
object collection so you need to do this conversion of into data type to integer data type and there would be cases where you invited you might need to do vice versa so that's the basic idea about auto boxing and unboxing so when we talk about the definition you can see auto boxing is The automatic conversion that the java compiler makes between the primitive and their corresponding object wrapper classes so whenever you are converting a primitive data type to an object class this is called auto boxing and when you do the reverse it is called auto
unboxing or simply unboxing so let's understand this with the help of an example now so i'm just going to open an example about auto boxing and unboxing so that we can have a look at it and Here it is i've created a class which is called auto boxing demo it has a public static void main method and inside the method i'm first simply declaring an int data type variable i with the value 10 then if i need to auto box this if i need to convert this primitive value into an integer object wrapper class or
an integer class type then i need to write the code like this which says integer dot value of and then you can supply the primitive data type value and The output of it will be of type integer class so you get an integer object and then you can print the object to check if it is successfully doing the autoboxing or not similarly doing the other way round once i have converted this into an integer object let's convert this back to a primitive data type so from integer object i'm converting this back into the primitive data
type and you see here it's a simple assignment i just have to assign the Object to the primitive data type and that's it i can do the same for a character object and a cad data type so first i create a character object obj and then if i have to unbox it i can simply assign this cad obj to a care primitive data type ch and that would be it so you can do the similar drill for any other primitive to object wrapper conversion let's say you want to convert a float data type to a
float class or You want to convert a double data type to a double class then whichever primitive data type has an object wrapper class you can do the auto boxing and auto unboxing like this remember whenever you have to do auto box it means you're going from primitive to object and for that you need to call the value of method for example if you are converting a double primitive to a double object class double object type basically then you are going to call Double dot value of and similarly the same kind of behavior will be
seen for other object wrapper classes as well so for auto boxing you call the value of and for auto unboxing you literally just assign this to a primitive and the object wrapper class value will automatically be assigned to the primitive data type so let's run this now and observe the output so i had the int i equal to 10 then i wanted to convert this primitive into the object Wrapper and the way i can do that is by calling the value of method and supplying the primitive data types value so that's why i'm doing it
that's what i'm doing here and this i obj should get the 10 value now which i can see if i print the cis out and if i just print the integer object all together i get the value 10 so this concludes that i've successfully am able to auto box the primitive into an integer object now looking at auto unbox like i Said you simply can assign the object wrapper to the primitive data type variable and that should work as is and that's why at line 15 we get this output which says value of i1 is
10. similarly when we try to auto box the character object so i have created a character object here and then i want to unbox this back into a simple care data type ch so when i print ch i get the same value and when i print the care obj i again get the same value remember the Reason i've put this as auto box is because this by default is being stored into a car data type i can also write it like this for example i can say care x equal to a and then i can
refer here as character dot value of x this will pretty much have the same impact or the same effect which i had just now it is going to print the exact same output if i rerun this program i'm going to get the exact same output so this this basically Concludes our understanding that you can use the auto boxing and auto unboxing pretty easily whenever you have a scenario where you want to convert the primitive data types to the object wrapper classes or you want to convert the object wrapper classes back to the primitive data types
let's get started with io in java or io streams in java so when we say io it basically means input output and the basic idea is that your program takes an input and gives you an Output so whenever you have to do some i o handling generally the i o handling involves taking input from some external source it can be the command line it can be from a file it can be from another consumer application it can be from a hard disk but the basic idea is that whenever you have to do that input output
handoff or input output operation we call that as io generally whenever you will hear the term io we refer to the input output operations with respect To the file system or the hard disks or the external disks basically now when we talk about streams what is an io stream so the basic idea is that you have an input source you have an output destination now the way the input source sends the data to the destination is via streams so basically it converts the data into one and zero and that one and zero travels as a
stream for example you can see this pretty good image here where you have a Data source and you have a program and your program is trying to read the data from this data source which is basically sitting on the file system and this data gets converted into zeros and once and then this is streamed to the program bit by bit or piece by piece similarly when the program wants to send the data back to the data source it again goes in the form of stream so when we talk about stream we also use the terms
as input stream or output stream so a program Uses an input stream to read data from a source remember whenever we are reading we will call it as input stream and whenever we are writing something we will call that as output stream remember that because i will be using this for these particular terms again and again in the demo so that's the basic idea about streams that you convert this into one and zero and input stream means reading something and output stream means writing something so now that we Have built that understanding let's have a
look at what kind of classes support java provides to do this io streaming operations so this is the java io hierarchy where you have the object super class and then you have different types of streams stream classes so you have input stream you have output stream you have reader and you have writer so if you talk about this particular section in the input stream you have a file input stream in The output stream you have a file output stream this is basically showing an inheritance relationship so you have the input streams for reading something you
have the output stream for writing something and you have java provides the classes to write to read from a file or to write to a file using the file input stream and the file output stream class respectively there are more classes under it but only a few are few of them are shown for simplicity similarly if i Go to the right side i also have a reader class and a writer class which also have an input stream reader and output stream reader and again these have multiple other sub classes like file reader buffer reader and
file writer so i will also try to showcase the understanding of why we need this and why we need these i mean ultimately you have to write a stream right so by creating two different types of classes i will come back to that in a while with That understanding let's go into looking at an example and let's build an understanding of how do we work with streams and this is also the session where i will talk about the file handling operations in detail so to understand that i have created two different examples one for byte
stream and one for character stream so let's take that concept first why do you need two different types of streams and the Reason is pretty simple whenever you are reading data from some some data source or writing data to the data source so the data can either be simple character strings like english characters or the unicode characters or it can be some tabular data sitting in a table in a database it can be an xml file it can be an html file it can be literally anything it can be a mathematical expression file it can
be an image you don't know that so that's the reason Java created two different types of classes that if you want to work on a particular file which is holding characters then you can use character stream and if you are dealing if you don't know what kind of data the file is going to contain then just use byte streams character streams also internally will be using the byte stream only but it is much more simpler and much more faster to use character Streams if you just have character files also it is worth noting that when
you are using character stream the file will be read character by character and when you are using byte stream the file will be read bite by byte so one byte at a time and one character at a time so let's look at the byte stream example first i've created a class called byte stream example it has a public static void bin method and then i'm using the file input stream and file output stream Classes basically what i'm trying to do in this example is i'm trying to read a file and write to a file and
like i said the uh when we look at the theory whenever we are using the input stream term we are primarily doing a read operation and whenever we are using the output stream term we are writing something to the file so for these kind of operations java provides for file handling java provides these two classes which are called file input and file Output stream so i create null references and then i enter a try block and inside the try block i basically provide a location to read the file from so i've created a source.txt in
the java tutorials location and if i show you what this source file is containing so if i go to this location java tutorials and if i open the source file it just has a simple text which says this is a sample text file let me delete this dest.txt For now so i just have a source.txt here which is containing a sample text this is a sample text file so i am reading the source.txt using the file input stream and storing the output into this in stream which is a byte stream and i'm also creating another
output stream where i will be writing the destination file so i'm saying this particular location write the file with the name test.txt but these are still just containers i haven't done much here so You are going to initialize the reading stream and the writing stream and then you are going to read one byte at a time till the time you reach the end of the file the way to denote the end of the file or the way java tells you that you have reached the end of the file is when the read operation returns -1
so you keep reading the file till the read operation returns the value as -1 whenever it returns the value as -1 it means that you have reached the end of The file so i'm going to read this source.txt byte by byte one byte at a time till my re until i reach the end of the file so i call in stream dot read i store the output of in stream dot read into a variable called content and at the same time i also run this condition that till the time this output is not equal to
-1 keep writing right where right to the outstream so i want to write to this particular stream so i i call the write method and remember this Is a byte stream but here i the output of in stream dot read was an integer output so you need to convert this int output to a byte by doing the explicit casting here so we do the explicit casting here so that the int con content gets converted into a byte type and then out streamed alt right writes that byte inside the stream onto this particular file so that's
what is happening here that you load the in stream you read the file byte by byte and you start writing The output file byte by byte that's what you do in this while loop once you have reached the end of the file you will be broken out of the while loop because the whole file has been read and whatever was written in that file has been written to the outstream to this particular file location and then in the finally block you close both of the streams remember it's very important to close these resources otherwise these
Resources will be present till the time java runs a garbage collection so it's very important to make sure that you close all the resources which you open in terms of file handling these are costly connections and they take up lot of memory so make sure that you close them in the finally block and that's why if you see i don't have a catch block here but i've put the finally blocked so that i can say i can seamlessly close them so that is what i'm doing here and Now if i run this i don't get
any output because i'm not printing anything but if i go to this particular location and see if i have a dest.txt so yes our desk.txt has just appeared which was not there earlier and if i double click on this it has the exact same text as i had in my source.txt so the source.txt and the desktop.txt have the same content because i've just written the source.txt to the best.c.txt So this is how you can use bytestream operations to do file handling now let's have a look at the character stream example it is doing exactly the
same thing it's just that you have to use different classes so instead of file input stream and file output stream we are going to use file reader and file writer so i create the file leader and filehead references let's call it as reader for simplicity and let's call this as Writer so i initialize file reader and file writer again pointing to the same location let me delete the desktop txt again so that we can observe the output so i create the object for file writer and file reader and i again do the same thing i
call the read operation the read operation is going to return an integer value output and i i'm going to continue reading the file character by character this time the byte is not red but the actual character of the file is being Read so i'm going to read this file character by character till i reach the end of the file which is denoted by this condition and as the output is int i need to convert this into care so i cast the int output to a care output and then write it to the writer then i
close the reader and writer both and that's it so if i run this now and if i go back here i will see desk.txt and i see the output here exactly as same so in terms of output there was no difference but since This was a purely character file the character stream demo is a better use case or like file reader and file later classes are a better use case but like i said there would be cases where you have to read it as bytes because for example if you're dealing with databases or if you're
dealing with another type of files for example image files etc that will be traveling as bytes so using a byte stream might be a better example in that case and that's that holds true for Any other different type of data source as well let's get started with using jdbc in java to connect to the databases in this example i'm using the open source community edition postgresql but you can use any database vendor provider if you want to if you want to use oracle or mysql feel free to do that but in this demo i'm going
to use postgres so you can download the postgres windows installer since i'm using a windows machine here you can download the Installer from the official postgresql.org website and you can also download the jdbc driver for post resql going to this particular official website which is jdbc.postgresql.org similarly you will be able to find the jdbc driver for all other database vendor providers as well once you download this this is going to download a jar for you and you can store the jar anywhere like i put this jar into this particular location you can see this Latest
jdbc driver jar for post sql so for every database vendor there would be a different jdbc jar which you need to download so that's that you install the postgresql you set up its database and when you install the post sql you also get a nice sql client to talk to the database because database has a server and database has a client right so to deal with that you install the server and all these database vendors like postgres oracle microsoft sql etc they Also provide a nice thin client with it postgres also provides a client when
you install the postgres server it will also ask you or it will actually automatically install the sql client for it as well which is called pg admin so this is how the pg admin client looks like the current edition of it is pg admin 4 so you will get that installed automatically and once your postgres server has been successfully installed if you just go to Search and type pg admin you will get this option once you click on this option a new browser window will be opened and you will see this client here you will
not see this particular window let me let me close this one but you will see something like this you will see a server here so you can go inside it you will see a postgresql edition here and if you go inside it you will see a database here if you open the database you will see the postgres Database by default created so you can just right click on this and create a database here you can name it as whatever you want you can leave everything as is for now and hit save another thing which you
need to do when you do the installation is it will ask you to set a database user and password so choose whatever database username and password you are comfortable with and you will be using that user username and password in your program as well so Create your database here and just leave the database at this particular point and now we will try to connect to this particular database in the in the example which i prepared i'm going to connect to this test database so let's go to the jdbc demo and see what is happening there
so for this purpose i've created a class called jdbc demo it has a public static void main method and there's a lot going on here so let's take it step by step and i will be keep Shuffling between the database sql client and this particular class to build a nice narrative so if you think carefully what you need to have if you want to connect to a database the obvious answer is the address of the database where is the database you need to know the location of the database to connect to it so that is
called the connection url every database vendor will provide its own connection url and you can find that Connection url from the official documentation there are tons of examples available for it as well but always refer to the official documentation for that particular database provider the general syntax is jdbc colon your database vendor's name colon double slash the host name this can be any ip address or your local host generally we also put a port here something like this 5432 is the port on which the post resql server runs but again you can put the Post
the port here on which your database server is running every database vendor has their own default port the postgres sql server has the default port as 5432 so you provide the hostname you provide the port and then you provide the database name you provide the database name to connect to so if you remember i told you that i have written the program to connect to this particular database called test so whatever that be you provide that name Here and this is going to form the connection url i can remove this for now but this is
how the connection string is going to look like and it is going to it's follow it follow the same format for any database vendor that you say jdbc column you write the database vendor name and then you say column double slash you provide the host port and then you provide the database name so that is your connection url after that to connect to uh connect your java Program to a database you need to use the java.sql.connection class this is very critical class and very important and probably the single most important class which you need to
have in your program if you want to connect to a database so you say connection con equal to null i'm just getting a null reference to it and before we go any further let me also tell you why we need this jdbc and what is actually this jdbc so Java is a programming language it does not comes with its own database but there are multiple other vendors like postgresql mysql microsoft sql oracle etc so java wanted to provide a uniform way to connect to all of these databases because imagine all of these databases building their
own api contract it would have been a nightmare for the developers to connect to different databases or shift from one database to other database and that's the reason java Created this nice interface called jdbc and it said whoever wants to connect to java should follow this jdbc specification and provide their implementation similar to the the interface and concrete class thing it's not exactly that but you can think of it in that manner that jdbc provides an interface with the method declarations and then oracle postgresql mysql all these database vendors are supposed to implement that interface
and provide Their own implementation but jdbc apis will always remain the same whoever wants to connect to java has to create a driver and that driver contains that implementation and that's the reason we downloaded that jdbc driver and i will come to how how do we include that but that's the background of jdbc and that's why you need jdbc to build that uniform contract and your vendor will provide their own jar which will have the implementation of the jdbc interface and In this program what i'm trying to do is basically i'm trying to insert a
record into a table so what is a table and how do you create that so let's go back here so in this test database you will see a schema by default you will see a public schema and you can create a new schema if you want to or you can just use the public schema so inside the public schema you will go under and you will see a an entry for tables so you just right click and you say create table you Can also write in complete sql statement but i'm just showing you how to
do that in pg admin and you can give the table name you can give the column information and that's how you create the table so i have created a table here which is called student and the student table has three columns roll number name and age if i show you the exact query or the the whole create tdl for it it looks like this so i created the student table in the public schema which Has a roll number field or roll number column which is of type numeric it has a name column which is a
varchar or a character varying and it has a age column which is again a numeric so roll number name and age these are the three different columns which i created inside the student table so i have a student table with these three columns so that's that now let's go back to the program so i have the student table and now i want to insert some records in the student Table so let me just change the values here so that we can see a different entry so i have just hard coded some values generally you will
be getting these values from somewhere in the program but for simplicity let's say you have got those values once you've got those values the next thing you need to do is to build the sql statement the exact sql statement which the postgresql which is going to be run on the postgresql server so you write that Statement in this case i'm showing you in a creation example so it is going to be an insert query so i say insert into table name which is student and then i provide all the column names it is always a
better practice to provide the column names in these brackets even if you are inserting the values to all the columns still provide the column names so i say insert into table column values and then you provide the actual values as the roll number variable which i Created here the name variable and the age variable values so i just supply the values here remember the when you are inserting the values roll number and age are integer so you don't need to put any single commas single inverted commas for it but name is a string variable so
i put this single inverted commas it's a simple string concatenation nothing fancy here so i'm just writing and a plain sql statement here and storing that into a string once i've done that The next piece which i need to do is to get a connection to the database and the way you are going to get a connection is by this uniform method no matter which database provider you are using you are always going to use the drivermanager.getconnection method to get a connection to the database and how do you get the connection you supply the connection
url you supply the username to connect to the database and you supply the password in this case i've Just set the username and password as postgres and postgres so postgres is the username and postgres is the password pretty lame i accept but this is just for demonstration purpose so it's fine but generally you will be getting these values from some application property file so these are the three parameters which you need to supply to this get connection method and then you will get a live connection to the database this is this this is the line
which is going To make it all happen to connect to your database server so if this line gets executed successfully you have a live connection once you have a live connection the next thing which you are going to do is to create a statement object on the connection statement is it can be anything it can be an insert statement or a select statement or update statement or a delete statement everything is a statement there right so that's why you need to create a Statement object so you create a statement object and then you execute the
sql this insert sql which you prepared you're going to execute the sql here saying st dot execute update execute update is the method which is used for any insertion or deletion operations so that's the method you're going to use and supplying the sql query which you built with the actual values of roll number name and age the execute update method returns the number of rows Affected once this statement got run on the database server or the sql query got run on the database server it might impact one rows if it's just if it's an insertion
it might impact multiple rows if it was an update query right so it is going to return the number of rows affected and that is what we are going to use to check if my insertion successfully went or my insertion failed so if this execute update is going to return 1 which means that my row got Inserted successfully in the database so i'm just printing us this out here and if any if this particular m returned zero which means none of the rows were affected by my sql query which means my insertion operation failed so
i'm just printing assist out here and then i'm just putting this in a catch block here to print any error and finally closing the connection this is again very very important database correction is one of the costliest connections you will be Creating when you will be writing your java applications always and always make sure to close these database connections otherwise your application is going to face serious database bottlenecks so we close the connection so that's all we are doing here we prepare the url we prepare we uh just create a placeholder for connection object we
prepare our scale query with all the relevant values we get a connection to the database we get a create statement we get a Statement object from the create statement method and then we execute the statement and then we can validate the statement execution if there is a way to validate it once you've done all of that you close the connection so let's run this program and see if we can see this new record inside the student table and before we do that let's also validate what is present in the student table as of now so
if i go here and i say view all rows this is just going to run a Select star on the student table so currently student table has one record with roll number one name as john and age as 20 and now i am trying to insert another row with roll number two name as jane and age as 22 so if i right click and run as java application i get this entry which says inserted successfully which is coming from here insert it successfully and it also prints the exact sql so that you can see what
sql actually got executed on the database Server this is the same string sql which i built so this is the sql which got run on the server which said insert into student values and the roll number the roll number was 2 and the name was jane with single inverted commas because this was a string and then age was 22 this was the exact sql which got executed so my sql has been executed my connection has been closed if i go back to the pg admin client and if i try to rerun this query now i
get two records so if you Remember this record was already there but now i get the second entry which is the new entry it just got inserted because i did i ran the program and you see the roll number two the name as jane and the age as 22. so this was a very simple example to show you how you can do the jdbc correction but one of the things which i still haven't covered is the usage of the jdbc driver the jar which i talked about so the way you are going to add the
jar is you go to the Project you right click on the project you go to the build path go to the configure build path and there you will see different tabs source projects libraries so go to the libraries tab and select the class path here and you can choose the add external jars option click on this load your sql jdbc jar for your particular database vendor for my case it was post resql let me just quickly remove this jar and show you right from how it's done so this is how It will look like for
you you select the class path you click on add external jars you go to the location where you have downloaded your jdbc driver jar for your particular database select that click open it will come here hit apply and close that's how the jar is going to be there if you don't provide the jar your program is going to fail miserably it is not going to work so make sure that you have the jar and then only it is going to be able to create a Successful connection and be able to successfully execute the query remember
jdbc provides the specifications and then the particular database vendor like postgresql provides the jdbc driver which has the implementation for that jdbc api and that the java has this uniform jdbc avi api and every database vendor is expected to honor and implement that api only so that java developers can work on the jdbc contract and everything should work as is let's Get started with generics in java so before we go about generics let's understand why do we need generics and what what was the requirement that led to the creation of generics so as we know
that when we work in an any object-oriented programming language we created classes we create objects we create variables and everything has a type everything has a type and that type is static the type cannot be changed that's why we call java as a strong type Checking language at compile time it checks the types of the variables of the classes at the compile time and if the classes are mismatching or their types are mismatching then you basically get a compilation error but what we see as we as we moved along we saw that we were creating
the similar kind of functionality again and again in different classes for example if there is a login functionality which should allow a person to log in and we should Also allow an application to log in then these are the two different use cases but the functionality still remains the same so how would the login functionality allow both of the types of entities be it user or application to get into the application or login into the consumer application how do you do that and that's what led to the creation of generics that you can reuse the
same code with different types of inputs remember the stress here is on the types And that's what it is mentioned here that we will like to reuse the same code with different inputs we will just keep changing the type parameters and we'll keep using the same same code again and again it has some benefits over the non-generic code like we mentioned like i mentioned earlier that when we work with the non-generic code we have the statically assigned types to the variables and objects and if we use generics then we don't have to do that And
at the same time you don't even have to explicitly cast them we touched upon this concept of generics in different bits and pieces in different sessions throughout this tutorial series where we saw that whenever i was creating a list i was supplying this type into these brackets right and i told that this that this is the generic type but now we'll go deeper into this concept and we'll see how we can create our own generic types if java Does not provide it so with that let's move to an example and see how we can implement
our own generic types to create generic code where we can supply the types dynamically so i've prepared an example for this i've actually prepared two examples for this and we'll go through both of them one by one so here what i'm doing that i'm creating any class you can think of it as any class holding any functionality which is applicable to Multiple entity types think of it as the same login class which i just talked about so if your class has a functionality which should be reused by many different types then one of the way
to not repeat the code or repeat the class or repeat the functionality again and again is to make that class use a generic signature and how you do that you write the class name and then you put these brackets and you just type t you can write any variable abc or Whatever you feel like but t is sort of the default standard the java developers have been using since generics was launched so you put this t here now whoever calls this class or whoever whoever initializes this class will have to supply the type of the
class on which this particular functionality is going to get executed now remember the collection examples i took i took in the past series what if this was a list Class because we have used the exact same syntax right we use list we put brackets and then we wrote string and we said okay now this list is a list of strings if we said list of integer then we just write integer in these brackets and that list became a list of integers so you see the same list was being reused for different data types and the
exact same concept is applied here for your custom classes and your on your own custom functionality so i write t here Then i can do whatever with this t i want so i just uh put a reference of it inside the class i create a constructor constructor is also assigning the t type i do a get object and that's all it's a very simple toy example but just to get the point across you can write as complex logic as you want inside the class depending upon your use case but this is just a straightforward example
that you can use generics in the classes as well once you do that then how do you Initialize this class so let's have a look at that as well so i've just created a public static void bin method inside the same class obviously you can create this method outside the outside this class as well there's no stopping that logic but but for the sake of simplicity i've just put the main class here so it's a simple public static void main method there i am initializing the single generic holder class the same class and here the
t type is of integer This t type can be of anything else as well for example your own student class can also be supplied here and then the single generic holder will become of student type in this case i'm just using a pre-built java class so this single generic holder becomes of integer type i give a reference i create an object and i provide a value to the object because you see the constructor is this whatever t you supply so if the t is the integer this t becomes integer and this Obj is going to
hold the value 10 because that's the constructor being called here and after that you can do whatever you want in terms of the logic here i'm just i just have i just have a get object method so i'm just calling that method and printing the object that's all similarly you can also initialize the same class with the string type so you see i'm reusing the same class in the same functionality again and again for different class Types so this time i'm using the string type instead of integer and i'm supplying a string parameter this time
and this this constructor still will work because this is generic when you created with integer this constructor this t became of integer type and when you initialized it with the string type this constructor started accepting the string objects so just supply a string called simply code and then i call get object So let's run this method so when we run the main method from the first invocation at line 16 and 17 when you call the get object the value of the object gets printed which is 10 for the integer and then at line 20 the
value of the string gets printed which is simply code so that's how you can use generics inside a class or for a class now there might be use cases where you have to create a class which can accept multiple types of generic types let's take an Example if you remember when we talked about hashmap we had the exact same situation so you had the key and you had the value now key can be of any type any data type it can be string integer whatever and then value can also be of any data type it
can also be your custom data types for example the key becomes a roll numbers and the value becomes student object so map is a situation where you have two generic types so i'm just trying to replicate that similar Kind of behavior that if you have to create a class with two three as many generic types as you want you can still do that by just providing a comma here you can go on doing as many generics as you want in this example i'm using two generics and then it again goes to the same drill that
i created references for both d and u i have initialized both t and u in the constructor and then i have a display method which is going to call the and display the obj1 and obj2's Values or their two string methods basically because when you when you try to call the object inside the system.out.println method the by default the tostring method of the object will automatically get called so that's all i have in this particular class so i it's a simple class accepting two different types of generics and then calling the display method and here
is the public static void main method for the same here i am initializing the dual generic Class and here the t is string and u is integer so these t and u are assigned these class types and then i create the class i again write the same types and i provide the value so for the string one i provide simply code for the integer one i provide 10 this constructor gets called obj1 gets the value simply code and obj2 gets the value 10 and then i call display method there i am printing obj1 and obj2
so let's run this method okay i'm getting Simply code in 10 because when i call the display method at line 13 obj 1 gets printed obj one is holding simply code value and at line 14 obj2 gets printed or the two string method of the obj 2 gets printed which is holding the value 10. so this was a quick tour to tell you how can you use generics you can obviously use generics in the variable types as well you can use generics in the method argument types as well wherever you want the simple idea is
That one you would like to reuse the functionality again and again and second you would like to you would not like to have a strong strict type checking and like i said try to relate these generic concepts with the collection framework we listen because collection framework is completely built upon the concept of generics whenever we initialize a list or a map or a hash set or a linked list or error list or anything we always supply the type and that type is coming From these if you look at the implementation of error list class you
will see that let me see if i can open that for you to show you how that looks like if i go to an example of collections and if i try to just open the class you will be able to see that yep so if i click on this list class you see list of e type so here e is the type which you are going to supply so in this particular case when You say list of integer this integer gets typed into e so whatever so this this whole list class whatever operations you are
doing inside the list class will be applied for the integer type so similarly you can look at other collection classes and you will always see these generics everywhere in the collection classes let's get started with string handling in java so we have been dealing with string types Throughout different sessions in this whole series but in this session we are going to look at lot of different utility methods which the string class provides string class is very versatile in java and it provides lot of handy functions which can help you manipulate strings in multiple ways for
example if you want to trim a string or if you want to append a string to another string or if you want to find a particular character at a particular index or if You have an index and you want to see what character is present at that particular index or if you want to do any other kind of pattern matching in the string so string is very versatile in that in that context and today we will have a look at some of those methods so i've just opened the java docs api for string and you
can see in the method summary you will find a long list of methods we will go through some of these methods for example if i just Show you a snapshot of what i'm talking about it has a careat method so you provide a index and integer index and this particular method will tell you which character is present at that particular index in the string remember string is basically a zero based character array zero index based character array similarly you can also call code point at which is going to return the character in the unicode code
point at a specified index similarly Compared to method can be used to compare two strings with each other compared to ignore cases also there which can compare two strings ignoring whether they are in uppercase or lowercase you can use concat method to join two strings together you can use the contains method to find if a particular character or a particular sequence of character exists in a particular string or not you can do a content Matching you can do copy you can also see if a particular string ends with a particular character or a sequence of
characters so there are tons of different methods available here and please do check out the api because like i said this is going to come very handy when you start writing real time projects or the real life projects so with that knowledge let's go to uh our ide and let's have a look at some of these examples in action so here also You can obviously have a look at the string class uh uh from the ide itself just write string and hit control and you will see an underline and hyperlink so just click on this
and you in the string class will be opened and you can actually read on about the documentation of the whole string class but we are not going to do that we are going to have a look at some real life examples of how we can use different methods of the string class so Here i've created two strings str1 and str2 str1 is holding a string which says john is studying and str2 is holding a string which says in college now the first utility function which i'm going to talk about is the length method so if
you want to find out what is the length of this particular string then you can just call the length method on the string and that is going to return the length of the current string let's see that in action let me comment the rest Of the code and let's see this one in action so if i run this program i get the value 16. so if you count this 1 2 3 4 space is also counted 5 6 7 8 9 10 11 12 13 14 15 16. so you get the exact length of the
string when you call the length method similarly another method is concat method and concat method is used to concatenate two strings together concatenation basically means joining two strings together so if you want to join the string one and string two then Just call str1 dot concat with the string you want to append or you want to concat so the concat method on the left heights left hand side of the string is going to get concatenated with the argument which you pass in the concat method so let's see that in action now and let's see the
result as well because i'm storing the result of concatenation into a new variable and printing that variable so i get this whole text here and you see the studying in just got Merged there was no space in between because there is no space here if you just put it like this and if you rerun this you will see the proper space as well while concatenation one of the things which i also want to call out is strings are immutable in nature when i say immutable it means that once you have created this str1 holding this
value then st and then this particular object's value pointing to str1 cannot be changed you cannot mutate the strings If you try changing str's value java is going to create a new object and point str1 to that object but the object which was created initially is not going to be overwritten so remember that concept that whenever you are doing manipulations on the string the previous string object still remains there it doesn't get overwritten or it doesn't get modified whenever you modify a string you get a new object that's the property of string so we saw
the Concatenation let's move ahead uh this also format method format method is used to dynamically populate some parts of the string for example if you have a long list of students and if you want to print the name of students then what you can do here is that you can change you can assign those names to certain variables and you can point or refer those variables in the string with the percentage syntax percentage s syntax basically so the string.format method is Used to supply dynamic values inside a static string so in this case this part
of the string is static where i'm saying the name of the student is then in the next string remember plus also can concatenate it it is also doing the exact same thing as the concat method you can it's just a shorthand so i'm creating first string then i'm creating second string but here i'm writing percentage s i will come to that and then i've created one more string where I'm using percentage b so what happens that java format method supports certain special type of references for example if you want to dynamically place a string you
can use percentage s if you want to dynamically place an integer value you can write percentage d in the format method similarly you can also write other percentage f for for a float value and there are more other similar placeholders which are available in the format method so do check out the format Method documentation if you want to know what all percentage types or variable types can be dynamically placed inside the format method here i'm just using percentage s and percentage d and then once you have created the first part of the format method which
is string with with dynamic placeholders till this particular point then you put a comma and you start providing the values remember the sequence of the values have to be exactly the same way in which you Have used them here so if percentage s is coming first then you have to supply a string value if percentage d is coming after that after the string value you have to provide an integer value if there was another percentage s after percentage d in the same string then after 21 you had to provide another string value so that's the
contract which format method needs to honor and if i run this particular program and if i say if i try to see the Output let's try to see the output as well and for the output i need to store this uh whole string dot formats output into a variable so let's say i say string r and then i can print r and see what comes out so that's it let's run the program now and now you will see this line the name of the student is john comma and the age is variable is 21. i
think it's coming because i've just wrote variable is here but if you if you Remove this and if you say the age is percentage d then you'll get a nice human readable output without any extra formatting so the name of the student is john and the age is 21 and that there was a comma that's why you still see the comma but this is the basic idea with using the format method now another method which i want to talk about is a cad at method let me comment the previous output so that we can follow
along so i'm just going to comment all Of this which we have covered already and let's focus on the care at method so caret method can be used to find the character present at a particular index in a string so whatever index you specify in the caret method the character present at that particular index will be returned so when i say str1 dot care at 5 remember strings are 0 based indexed character arrays so 0 1 2 3 4 5 at 5 i is present so this car at method should return i so if i
Run this particular program yes i see the output as i now let's move ahead uh with next example or the next api call the next api call is the usage of equals method where i can see if the two strings are equal or not so here i'm saying str1 dot equals str2 if both strings are same it is going to return true otherwise it is going to return false so if i run this i get the output as both strings are different it goes in the else block because str1 and str2 are Different they are
holding different values so here the exact content of the string is going to be matched the next one is the index of method so index of method can be used just for the reverse functionality of care add in carrot we were supplying the index and getting the character here we can supply the character and get the index of it so what what is going to happen that you write the string dot index off and then you supply the character which for which You want to find the index of so i supply y here and if
i run this particular program for this line the output is 12. let's see if the output is correct so here if you try to find what is sitting at the index number 12 in this string so again 0 1 2 3 4 5 6 7 8 9 10 11 12. so yes y is present at the 12th index and that's the output i get what if you provide a character which is not present in this particular string that says z which is not there And see what the output is in that case you will get
the output as -1 so if the character is not present in the string you will get the output as minus 1 another thing what if the character is present more than once in the string for example i is present more than one time in the string so if i write i here whether i get the index of this i or this i let's see so i'm going to run this program again and i get the value 5 So 5 is basically this i because this is definitely not 5 it's far far further index so the
first match of the index is going to be returned in terms of the index of method okay so that was about the index of let's look at the next one which is the replace in replace it's as the name suggests you can replace a character or a sequence of characters in a string by calling the replace method on the string on which you want to do the manipulation and Remember you are doing the manipulation here so the previous object is not going to get overwritten but a new object is going to get created so what
i want to replace is with r so in this particular string i see an occurrence of s here so this s should be replaced with r if the replace functionality works as i just explained so let's run this program and yes i can say instead of s i see r being replaced there and that's the usage of the replace method next one is the split Method where if you want to split the string into multiple elements so you just call the split method and you provide the separator here i am separating the string whenever there
is a space i'm basically breaking up the string into multiple sub strings that's what i'm doing here or multiple strings i would just call it as so whatever separator you provide whenever the string is going to encounter that separator it is going to split one part Of it so in on providing the separator space it means in this particular case i'm going to get three items the first breakup is going to go going to happen here so the john part of it will go out and this will go out in a separate string then again
between is and studying i have another space so there will be another break here so i should get three elements if i call the split method one element will be holding the value john the second element will be Holding the value is and the third element will be holding the value as studying and then i'm printing all the elements of the of the array remember that split method returns a string array so that's what i'm using here to store the output of the split method and then i'm just using the streams api to iterate over
this string array outputting or printing the each element of the array so let's run this program okay so i can see three different Outputs through this system.out.println first john then is then starting like i said split method is going to create a three element size array of strings because i'm separating it based on the space the last utility function which i want to talk about so this is the last one but i'm skipping some of some more due to the interest of the time but like i said do check out the documentation to read or
understand more about other string utility methods Which i am not covering here in this session so the last one i'm going to talk about is the substring method and substring is basically going to take a mini string out of the long string so what if you want to trim the string what if you have a long string and you only want to get a part of the string so you can specify the starting point we can specifying the you can specify the end point and whatever string characters are present between the starting index and The
end index will be taken out from the string and you can store that output into a new string and print that so here i'm calling the substring method providing the starting index as 1 and the ending index is 5. let's run this program and interpret the output so i'm getting the output as o h n so what is happening here let's go back to the str1 so i said start with one remember string is a zero based index so it starts with zero one it starts with o because o is Present at the first index
and then i'm going up till five so one gets printed whatever character is present at one index get printed second index get printed third index gets printed fourth index gets printed which is just a space and then the fifth index is i which is not printed here so it means that when you call the string substring method then the end index position will not be printed it starts from the beginning index and it will go till index mine end Index minus 1 position in terms of printing because if you select this you'll see an extra
bar here because the space is also getting printed so it is printing everything before the fifth index it will not include the fifth index character remember that when you use the substring functionality that the end index is not included in the substring if you want to include that you need to increase the index by one so for example if you want to print i as Well then you have to write it as index s6 and if you run this then you will also see i now yep so that is how this substring functionality works let's
get started with java.lang package so java.lang package is one of the most core and fundamental packages in java which is provided out of the box to the developer you never explicitly import this package in your java program because you don't need to java provides this automatically the moment you create A file with java extension or and you have you are running that particular program inside or on a jdk you get the java.lang package automatically for example when we were when we were running the string handling demo i was using the string class but i never
imported the string class you can see there is no import for string because string class is also part of the java.lang package it's automatically imported for you you never need to Explicitly import the package or any classes of that package so this is going to be more of a theoretical lecture where we will just have a look at or a quick overview of all the java.lang package classes and other utilities you don't need to remember all the classes and utilities but this is just to give you a sense of what all it contains so in
terms of the interfaces it has the appendable interface autoclave auto closable care sequence clonable Comparable if you remember we also used comparable when we were writing the comparable implementation to compare different objects in a collection so this also comes automatically as part of the java.lang package iterable runnable again we use this in the in the threading example so this also comes automatically to you you never need to import the enable class from the java.lang package when we move to the Classes all the data type classes which you can think of in terms of boolean byte
character class class loader compiler enums even float integer long math so all the classes which we were using the the data type classes which we were using in different examples are also part of the java.lang package okay so this is a long list long list it also has a thread class so whenever you are creating thread you again never imported thread class but it still just worked Fine because there was this was also coming as part of the java.lang package there are also bunch of enumerations which it provides in terms of unicode thread state etc
it also provides exception classes like arithmetic exception or or that the different runtime exceptions which we dealt with like array index out of bound array store class cast class not supported the root exception class so a lot of exception classes also come as Part of the java.lang package it also provides some error classes if you remember when we talked about the exception framework you have the error types and you have the exception types so it also provides some error classes if you want to use that you don't you never need to import any of these
classes and you will automatically get them from the java.lang package similarly it also provides some annotations as well like functional Interfaces or you remember we use this annotation a lot the add the rate override annotation but we never imported the override class or the override annotation because it's part of the java.lang package so this basically tells us that there are a lot of different classes utilities enums errors exceptions data types which are provided out of the box from the java.lang package which makes our life so much easier whenever we want to work with Java because
we don't need to import the very basic classes which which we use very frequently and another very important package is the java.util package we have been using the java.util package in all of the collections examples and tutorials we walked through in this whole tutorial series so let me just open the java.util package for you so if i go here to java.util and I will be able to see the java.util packages different classes etc yes so here is here it is the java.util package and remember java.util package is not imported automatically you have to explicitly import
the java.util package to use the classes of it so it so that's the difference between java.lang package and java.util package that you cannot you can use the classes coming from the java.lang package without explicitly importing Those classes or importing the java.lang package but java.util package is something which you have to explicitly import in your java program to make it work or even make it compile so what java.util provides first of all the collections framework the whole collections framework comes from the java.util package so for example all the interfaces which we use while we work with
the collections framework classes interfaces like collection list set map You can see the map interface you can see the list interface with the generics so all the interfaces which we use from in the collections framework are present in the java.util package similarly when we talk about the classes all the concrete classes implementation of the collections framework in terms of error list linked list hash map hash set preset tree map you will see all of those classes here here we are covering all the this is showing all the classes Summaries so you see some abstract classes
and you will also see some concrete classes as you move further down in this particular list so you see hash map you see hash set hash table linked hash map linked asset linked list we used all of these classes while we were going through the collections framework tutorials so it provides all of these and lot of other classes like the scanner class which we covered in the java project for taking the inputs From the command line from the user stack class again from the collection some time classes and it also provides bunch of enumerations like
the local basically setting the language categories for a particular program it also provides some exceptions which we used while we were working with the collections framework so most of these exceptions are or some of these exceptions are related to the collection classes for example the concurrent Modification exception gets thrown uh whenever you your the whole execution detects concurrent modification of an object when such modification is not allowed you will see other different types of exceptions like illegal format etc in this particular exception section of this particular package then it also provides just one error class
as well so this is what the java.util package contains and just to refresh your memory whenever we ran any collection demo we Always imported the java.util classes you can see this is all coming from java.util so this is something which you have to import without which your program will not even compile so that's also one of the difference between the java.lang package and the java.util package and that's pretty much all i want to cover in this particular session so we basically did a quick tour of the java.lang package and the java.util Package and like i
said it's impossible to cover all of that for all of the classes and enums and interfaces and errors and exceptions with all the examples so i would suggest you to just keep this in mind about the java.lang package and java.util package i told you the basic concept that java.lang contains all the types the class and the variable types or the data types we dealt with and java.util majorly contains all the collection Classes that's that's that's the basic uh thing which you need to remember whenever you work with java and your java.lang package never needs to
be imported but java.util package needs to be imported always whenever you use the util classes let's get started with networking in java so when we talk about the networking in java java has a whole dedicated package called java.net package which has all the different Classes which you need to have to write a networking program in java so we'll you will see bunch of classes with two classes most important ones which are i net 4 address and inet 6 address so as you can see you can understand that inet 4 address is the class which can
be used to represent the ipv4 addresses and inet 6 address class can be used to represent ipv6 addresses and then you can learn about sockets it also has socket classes it has a lot of interfaces the with the Prominent one being the networking interface there are some high level apis for example the uri class is there which can be used to represent a universal resource identifier as specified in the rfc and this is just an identifier this doesn't provide the means to access the resource if you want to access the resource then you need to
use url which is the class representing the universal resource locator which is a slightly older concept than uri but with url you Can hold the address as well as access the address url connection is also one of the class which is created from the url class to set up a communication link with the url and similarly http url is for an http connection and you have protocol handlers there are a lot of interesting classes which you can explore if you want to learn more about what all networking support java provides but when we talk about
the basic ones like ipv4 address the url uri Classes these are the ones which generally most developers interact with if you want to write a socket programming uh socket program that's used you can still do that with the classes and interfaces support provided by java so you can see bunch of interfaces here key policy socket option then in terms of classes you can see again content handler cookie manager http cookie i need four and i need six address with the classes which I talk about it also has a generic class but i would always recommend
to use one of these if you know what address you are dealing with uh the url connection the jar url connection class proxy class some bunch of socket classes uri url classes and some enums and exceptions as well which are related to networking connections for example malformed url if the url itself is is not correct then you get a malformed url exception socket exception if there's a socket timeout Exception then also you have a dedicated exception for that so there are a bunch of different exceptions uh classes enums and interfaces available which you can have
a look at if you want to dig deeper into it so i've also prepared a demo where we will be using some of these functionalities of these of this particular package so let's jump to the ide and see what i've built so here i have created a class called networking demo and what we are trying to do that We will provide the simply launch url and we will try to get bunch of information about how this website is hosted so you just create a simple string variable and you can type any string you can write
any favorite website of your choice here and then we create the inet address class and like i said you always use the concrete implementation of the inet address class which is in this case inet 4 address so i use the get by name and We supply the url to get an inet address object and what does inet address contains it contains all the information in terms of the internet address on which that particular website is hosted so you will see lot of different functionality in this class let's explore some of the functionality and methods which
are provided by the inet address class so once you do this you will get an inet address address object if the url is correct if the url is Incorrect you will get a malformed url exception anyways if you want to just see the address of the ip address where this particular website is hosted you can call the get address method and if you want to see the host address method then you can call the get host address now you might be wondering what is the difference between get address and get host address so let's get
first that out let me comment the rest of the code and let's first focus on this particular Part so let me comment the local address part as well we will come to that in a while and i can just remove this comment so we are printing the get address and the get host address and let's see what values do we get and how do we see if it's a different value so this explains right when we call init address dot get address we just get all the values as we know that when we deal with
ipv4 address the address has four values something dot something dot something dot Something if you want to verify it just go to your own laptop and you you will be able to see some address like 192.168.something or something so that uh so for ivv4 address has four sections and all the four sections will have some values so if you use the get address method and you try to convert this into a string it basically will return an array the get address method will return an array which will look like this but if you want to
see it exactly in the Format in which the real world networking protocols understand it then use the get host address which is going to show it exactly in the way in which we write the ip address where we write some integer dot some integer dot some integer dot sum integer so that's the difference between get address method and get host address method same value different representation the next function which i'm going to talk about is about local address and the local Address or the method name is is any local address so this method is going
to tell me if there is a wildcard address which is associated with this particular host you can also see what this method is doing from the documentation so if you go to the documentation and if you search for this particular method in the inet 4 address class you will see it says utility routine to check if the inet address is a wild card address the result will be a boolean which will Indicate if it has a wildcard address or not so let's run this program and understand if it has a wildcard address no there is
no wildcard address associated for this particular website similarly there is another method which we can explore which is is link local address so let's search for the documentation of it first so this is the class if you search it it will just show you the exact class which is present with the method and this method Provides basically a check to see if the inet address is a link to a local address within the domain of the website so the result again will be a boolean if it says true it means there is a link to
the local address and if it returns false it means the address is not a link local unicast address so let's see the output of this in with respect to the simply learned website so if i run this program now i again get false so there is no wildcard address attached or Associated with the website and it does not point to a local unicast address either is there a loopback mechanism now these all are networking concepts and uh since this is not a networking session so i will not go deeper into what what a loopback address
means in detail but to get to give you an understanding of where it present and how you can use this in java is what we are going to focus on so if you want you can always read about what is a loopback Address but if you want to know if the url which you are pointing to is uh the address which is returned by that website has a loopback address or not then you can use the is loopback address method and this again returns true or false based on whether it has a loopback address or
it does not have a loopback address so if i run this particular program we get the output false again so no it the simplylink website does not even also have a loopback address the Last one or the second last one which i want to explore is the site local address method so let's see what does this method do let me just remove this extra commented lines so let's look at the documentation of this method so this is a utility routine to check if the init address is a site local address the result is a boolean
indicating if the init address is a site local address or false if the address is not a cyclical site local unicast Address again this concept is again a networking special concept for similar to the loopback address so this is just basically showing if the site also has a uh basically a local unicast address associated with it or not so if you want to see the site local address output i have enabled that code and if you run this particular program we get false for that as well yes that means that the the simple website is
built with pretty good Practices there is no loopback address there is no site local address which we don't need for for this particular website in this case the last one is just a simple thing just to see the hash code it's not much of relevance mostly the programs but just to tell you that this is also available so you can also see the hash code which is contained by the inet address object so we covered bunch of functionality in this particular example we had a look at The java.net package it has an inet 4 address
class and i net 6 address class lot of networking exceptions and interfaces support as well and the simple way to use it is to you point it to a website call the get by name call the get host address and you will get the ip address in the exact format in which the networking world deals with it similarly you can call the get address to just get an array of it just as we saw here and then there are a lot of Utility functions available in the inet address class like is any local is link
local is loop back his site local and there are actually more if you look at this class you will find more methods here uh in terms of what like for example it also has a is multicast address this is basically to check if the init address is an ip multicast address so there are a lot of different methods here there are some mc methods as well which will check which are Specially created for the multicast address scenarios so a utility routine to check if the multicast address has a global scope if it has a local
scope or sorry it has a node scope basically or it has a link scope or it has a site scope so there are a lot of different methods available for the multicast as well which you can have a look at and we already covered the get address the get host address and the hash code address classes there are some url classes as Well like i mentioned url ui classes are also very important classes which you might need to use whenever you are you are building a connection with a particular application based on their url if
you are doing socket programming there are socket classes available which you can also use while using the networking concepts in java so you can build a pretty decent and robust application uh using the networking classes and the networking support Provided by java to build a networking application let's get started with image handling in java so we deal with images on a daily basis and you will often be required to deal with image handling in java programs as well where you might need to re read an image or write an image or load an image into
memory and do other kind of manipulations on the images so java does provide support for image handling as well and You can pretty much load up any type of image be it a gif image a beta png or be it a jpeg image basically it converts into a java 2d image to render it and it basically creates a byte representation of the image to serve and save the contents so in this section we are going to talk about the image handling aspects of java and to do that there are broadly two classes which java provides
as you can see in this official documentation the first one is Java.awt.imageclass and the second one is java.awt.image.bufferedimageclass which extends the image class so this is basically the superclass as you can see here which you can use to represent any kind of graphical image as a 2d array of pixels and buffered image is a concrete implementation of the image class which you can use to construct instances of the class and buffered images is sort of the i would say the defacto standard or The go to class whenever you are dealing with any kind of image
rendering tasks in a java program and we will also have a look at how we can use the buffered image class to basically read and a sample image and also write a sample image to a file system so you can read more about this in the documentation and these are there are also bunch of documentations available in terms of how you can read it how you can load it into The program how you can draw an image how you can create and save the image etc and like i mentioned we will be covering some aspects
of it in today's demo as well so this was a very brief theoretical introduction about image handling and like i always mentioned if you want to know more about this do check out the official documentation of of java where you can learn more about the image handling classes and utilities so with that let's move to the Demonstration part so i have prepared a demo here which talks about image handling so i have created a class called image handling demo which has a public static void main method and i'm just giving some some sample uh dimensions
for the image in terms of width and height here and then as i mentioned that we will be using the buffered image class so i'm creating an a reference for the buffered image it's currently assigned to null so basically There's nothing and then i am calling the method read from file so like i mentioned you can you mostly will be dealing with reading from an image or writing to an image so here we will look at both of the aspects as to how you can load an image from your file system into a java program
and then write it back to the file system from your java program so let's first look at the read from file method which will tell us how we can read a java file so i provide some Sample dimensions these dimensions will vary based on your use case and i supply the buffered image object inside that i have created a try block and in the try block the first thing you need to do for image handling is to basically create a file object because image is also technically just a file right so you provide the file
image path here at this particular location so let's go to the sample image part this is the destination path and let me open the Sample image path as well which is somewhere in the c drive so this is the image which we are loading this is the path which i have mentioned which is c sample dot jpg so let's first have a look at the image as well as to what this image contains so this image is basically from a from a click clinical trial and showing some blood sample or some vaccine bottles which is
probably the very uh popular image nowadays because We are living in this pandemic world so this is the sample image which i have chosen to read and then i will load this into the java program and then we'll try to write it back to the file system to a destination location so this is where my image is present in the c drive named with sample.jpg and this is what i've supplied here so you just need to supply it in double quotes remember when you're dealing with windows file system you always have to use double forward
Slashes which is different if you're working with a on a mac machine or you're working on a linux system where only this will work fine so that's a bit awkward thing which which windows has and you have to respect the operating systems uh restrictions or way of doing things so once you have loaded the file or created the sample.jpg file object then the next thing we are going to do is we are going To create an object of the buffered image remember we just created a reference we did not create an object yet of the
buffered image class and now is the time to do that so we supply the width we supply the height and then we supply the type of the image let's go to the constructor of this image to see what this image type means so this image type can be basically the type of the created image which comes from the color space so whether it's an rgb image or a Rgb image or bgr image or a bite gray image there are multiple different types of images in the media space and whatever type of image you have you
need to basically supply that image type in this particular argument so in my case it was an argb image so i supplied that particular if you click on this you will see that currently it's inside java an 8-bit rgba image basically has a static constant which is denoted by two you can read more about this inside the buffered Image class documentation is as well so once i've supplied that my buffered image object is ready which has all the details dimensions and the types of the image now the next thing is that you need to fill
this image object with the file so you basically need to read the file and store the output of this read operation into the buffered image object then what will happen that along with this information whatever is present here will also be added to the same Buffered image object so to read a image or simple a file java provides an i o utility which is called image i o and there is a read method available which is a static method on this particular class as you can see i'm calling the class dot method name here and
then you supply the sample file name once you have done that then it will basically be reading the whole image into a 2d byte array and copying that over into this buffered image object Once that is done if this particular line is successfully executed then you will get this message which will say reading complete and it will try to print some hash code of the image object and after that if there's any exception in this block for example this particular line may raise an exception or this particular line may raise an exception if the file
does not exist then you need to have the io exception caught remember io is a checked Exception so if you are using these operations file new file and imageio.read you need to catch the i o exception because it's a checked exception so either you need to catch it or you need to rethrow it these are the only two options you have with the checked exception so once we have done all of that if everything goes fine if everything is happy till line 35 then we just return the image object and our read from file operation
will be done Going back to the main method once the read operation is done the next thing i'm going to do is writing this image object to a new destination file so let's see what is happening in this write to file method because this is the method which is responsible for writing this image to a new destination location so i've created a public static void void method inside the same class where the public static void main method is present as you know that static methods Can only call other static methods that's why this has this
had to be static and i'm supplying the same image object which was returned from the read operation that goes in as the argument of this particular method and again i'm using a file object and this time i'm providing a destination location where i would like to write this image so this is the destination location i've chosen which is f drive java tutorials folder and the image should be stored with the Name out dot jpg so this is the location there's already already an out.jpg here so let me just remove it so that we can observe
the output so we create the file object after that we again use the image i o utility uh we call our static method static utility method called write we supply the whole image object we supply the image type extension and we supply the output location again if i take you to the signature of this you take the rendered image you take the format name Which is jpg and the output location so these are the three things which you need to supply once you call the right method on the image io utility class image io is
a very handy class and do remember this class whenever you are dealing with the image handling operations it will provide lot of static convenience methods so we write this file uh write this image object to a file to a destination location and if everything Goes fine in these two lines we will get this message which will say writing complete if anything goes wrong we again catch the i exception and the exception will be printed here that's all is happening in this particular program where we are reading from file and we are writing to the file
reading it from here and writing it on this particular location so let's run this program and see if we are able to read from file successfully and also write it to the Specified location so run as java application it's a slightly memory heavy operation so it takes a bit of time because the whole image needs to be loaded into memory be very careful about that it might eat up your a large portion of your ram if the image is too heavy so here it says reading complete and then it prints the hash code details of
this particular object and then it also executed the write to file method and it said writing complete so just to Show you the reference back again this is what we read sample.jpg and c drive and if i go to the f drive java tutorials where i provided the output location i do see an outdoor jpg here which which was not there earlier and if i double click on this it's exactly the same image so java was able to read the image and render the exact same image by converting the 2d byte array representation back to
an image exactly the same for there's no change in this Image so this was a very short enlightening tutorial for you to show you how you can use image handling classes for example the image io class and the buffered image class to do basic image handling operations obviously you can do more complex operations with it as well but for the demonstration purpose i've just kept it simple let's get started with concurrency utilities in java now concurrency is a huge topic and it's not possible to cover this into A 10 or 15 minutes tutorials so treat
this particular session as an introductory session where i will talk about some of the most relevant classes which you need to know when you talk about concurrency we have been talking about this whole concept of concurrency programming throughout the thread tutorials as well and the basic idea is that you would like to do multiple things at the same time that's the basic idea now in that context java does Provide lot of utilities and packages especially the java.util.concurrent package is one of the most popular package which you need to use whenever you are dealing with concurrency
programming paradigms in java so with that let's have a look at what does this java.util.concurrent package contains so broadly it contains lot of utility classes which can be very useful for you when you are writing the concurrent Programming code apart from that it will also provide some basic ideas around the locking functionality and the atomic packages as well when we talk about locks again we discussed about locks when we talked about the whole sync thread synchronization concept as well and it basically marries very well with the whole concept of locks and atomic packages as well
atomic is again a different topic which is used for thread safe types basically but whenever you Will hear about concurrency utilities be it in your discussions or be it in your interviews you will be seeing a discussion happening around executors you will hear these terms like executors executor service future completable future callable all of these you will hear the name of all of these classes quite frequently so we these classes were first introduced in java 8 and have been there since then to support the concurrency programming paradigm so i Will talk about these three classes
broadly in today's session and we'll have a look at a demonstration of these three classes as well uh let's first talk about executor technically it's an it's an interface it's not a class though i said that it's a class but it's basically an interface an executor is basically a very simple interface which will help you define the sub systems which you want to which you would like to create with the help of threads may Be including thread pools or if you want to do a disk reading and writing operation in an insynchronous way or you
want to create some sequence of task frameworks as well so executor will provide you a very lightweight framework to do all of that especially around thread pooling and asynchronous io is is where it shines most because in your computer you have limited resources and you would like to dedicate a certain pool of threads for a Particular task or for a particular executor object so with that and the second class which we would like to know about is executor service an executor service will provide a more asynchronous task execution framework and this is probably the class
which you will be using whenever you're dealing with asynchronous programming in java asynchronous programming basically means that you submitted a particular task but you did not wait for it to be completed You did not hang your process or your thread for that particular task to be completed it's very simple it's very uh easy to relate this to a real life for example if you are you know there are times when you do two things at the same time for example uh let's take a very very simple example if you're just boiling milk on on your
gas stove so you put the milk on the gas stove and then you move out for a couple of minutes to do some something else for Example maybe checking your mobile for new emails or or doing some other work doing maybe just doing some laundry so uh you are doing the you you submitted the milk boiling task then you moved away from that task because you know that this particular task is going to take some time and you utilize your time somewhere else that's what we mean by asynchronous programming and executor service will provide you
with constructs to create a similar behavior in your Java program as well so remember about executor and executor service we will look at the implementations later where we can talk about that another interesting class which i would like which i would like to talk about is future if we have it here yeah so future is another class which we will be looking at and future is basically uh to fetch the result of the submitted task again taking the same knife example of the milk milk boiling example so It would be great right if if there
is some mechanism or some alarm which just sets off the moment the milk is is is boiling and it's about to be spilled out it would be great to know that in that in advance via some alarm or something so future provides that kind of a carrier or that kind of a holder where you submitted a particular task you moved your threads to something else you did something else and then you can check with the future object and Future object will tell the status of their submitted task whether it is completed or whether it's still
in progress once it is complete then you can fetch the result of that submitted task based on with the future object so that's the concept of future so remember executor service and future they will work quite hand in hand because executor service will be used to submit the task and future will be able to fetch the result of that particular task Asynchronously so that was about a quick theory you can read more about it in the documentation you can see an executor service uh future class what does what does this basically in this class do
uh but to have a look at or get a greater sense of this let's have a look at our demonstration of it to understand these classes better so let's move to the eclipse ide to look at an example let me close all the classes and just open a relevant one so yeah so let's first deal With the executor interface itself so if i just minimize this one here i've created a main class and i've created a public static void main method and you see two static methods here executor invoke and executed service invoke i'm basically
showing you how you can use executor and executor service so if you're just using executor then how you would do that is basically you are going to create a reference of the executor and then the executor needs a basically An executor object because it's an executor reference so you need to supply an executor object so either you can supply an inner class right here or you can call you can create a executor type of class which i've created here which is called caller class so i've created a class called caller which implements the executor type
and execu the moment you write implements executed it will force you to override the execute method and inside the execute method you are going To run your own thread so this is how the current thread or the executor's own thread will be running so once you have done the initialization then you can call the execute method on the executor class remember you got this object so you can call the executor execute method on the executor object here and inside this you can provide this particular lambda function implementation which is going to ask you what exactly
you want to do when i run this particular thread So when i run this thread when java runs this particular thread what do you want java to do that's something which you will provide here so this is how you can use it's a very simple example like i said this if i build a more complex example it will take a lot of time and lot of other concepts to cover so treat this as an introductory session and you can basically try to run a very simple example of this writing whatever complex Logic you want to
write while the thread is running and put that into this execute similarly if you if you want to use executor service for doing the asynchronous operations then it will follow the same way but there are some differences along the way as well so this is the method which is showing the executor service implementation or the way of using executor service so again i create a reference of executor service and then here you see i'm saying Executors dot new fixed thread pool with a size of 10. so that's the power of executor service it is going
to create a pool of threads dedicated to itself to do the tasks whichever are written inside here so whatever you write here these thread pool will be utilized to execute that particular task you can assign the size of the thread pool based on how many threads you need there are multiple static utility methods like there is one new fixed thread pool which I've used but if you just do control enter you will see cached thread pool a single thread execution a new work stealing pool so like i mentioned there are a lot of classes interesting
classes here which you can use for simplicity i've just used a fixed thread pool here once you get the executor service object then here you called execute but here you will be calling the submit method and then the drill goes exactly the same way that you write the lambda function Implementation inside here basically the functional interface implementation and you provide your own implementation code which you would like to run whenever you call the run method whenever this executor service calls the run method on that particular thread you can actually go to the submit method and
you will see it accepts a runnable it basically accepts a thread object so whatever you write inside this particular code will be the public void run implementation of That particular thread class if you don't if you don't remember how threnable works please go back to my threading tutorial and watch that where i explained the runnable interface and the run method in detail so that's what we are doing here so this is for executor and this is for executor service so let's run this program and yes i mean nothing because i'm not doing anything much apart
from just doing sis outs here And that's what you see here the executor's example and the executor service exam so this was about executor and executor service now let's deal with another interesting uh class of of called future which i said that i will also talk about so for that i have created a separate demo because it deserves a separate demo it's a very interesting class so let me just make it full screen yeah so i've created a class called future demo which has a public Static void main method and again i'm doing the executor
service initialization but this time i'm using a new single thread executor now what does this does this this will basically create an executor which will use a single worker thread operating from an unbounded queue remember even if this single thread terminates due to let's say a failure during the execution before the before the graceful shutdown a new one will Automatically be spawned and will take its place if the execution is still pending so that's the power of single worker thread from an unbounded queue that's what i've used here based on your use case you can
use other ones as well like i mentioned earlier then uh i have the executor service object with me and similar to the previous example i'm going to call the submit method and inside the submit method i need to provide the runnable class runable Interfaces implementation and that implementation will basically be of the public void run method and this is what i want to do in my run method where i'm sleeping the thread for 10 seconds thread.sleep method takes milliseconds values as the parameter so this is 10 000 which means 10 seconds so i'm sleeping this
thread or pausing this thread for 10 seconds and then returning a string called completed this is what i am doing in the executor service dot Submit implementation the result of it is going to be a future object remember the result of the submit task is going to be a future object so i store that future reference here and then at line 20 i'm using the same feature or future object to ask java to check if this task is done and the way you do that is just by calling is done so till the time there
is a negation condition till the time the task is still in progress because this main future is not done Because i've put a negation then just print this out there where you say the task is still in progress it's still not complete and you pause this particular thread remember this was a different thread if you you pause this particular thread for 500 millisecond or basically half a second and you again check this condition if it's still not done you print this again pause for half a second again check this till the time feature dot is
done becomes true when future dot Is done becomes true that means that this particular task is completed now you see i mean generally when we execute the programs the execution happens sequently sequentially that after line 17 the control will automatically flow to line 20 and before the control can reach line 20 everything above line 17 has to be completed that's that's basically synchronous programming for you but when you talk about asynchronous programming using the power of executor Service and future objects we can do something here which will go into a separate thread and then you
can continue your execution here so this can be in a different method altogether where you submit something and this is basically checking the status of this task understand this very well this is very important concept that it's not as it's though it's a sequential execution after line 17 line 20 is getting executed but line 20 is not waiting for Everything above line 17 to be finished it will continue that's the power of asynchronous programming so here we are checking this and once the feature the future dot is done says true then we say task completed
we and then you probably would like to fetch the result of this particular task right and for that future provides a method called future dot get this is going to pick the future object state and whatever you are returning from here will be returned Here and then i'm printing the result so if everything went fine this result should say completed because that's what i'm returning from this future object and always remember to shut down your executor service to release the thread pool which you created here i've also put a catch block here because i'm using
the thread.sleep method which will ask you to handle an interrupted exception and then there is an executor service exception which is execution and a Timeout exception as well there are other interesting methods as well on the future class future object sorry which is like future.cancel where you can cancel explicitly a future task which is currently in progress you can check the status of it by calling is done which i've used here you can also call is cancelled to check if the user or some other process explicitly canceled the execution of the submission of the executor
service task so hope this is You are able to understand the flow of it that these block and these block will program will execute them but they will run in different threads so let's see what happens now i'm going to run this particular program and if i bring this here you see the task still in progress keeps getting called so we submitted the task here and now this block is getting executed this block uh kept getting executed so this task did not finish right the thread dot sleep was this this Thread this whole thread was
sleeping for 10 second but line 20 did not wait for 10 seconds it continued execution and it kept checking the future object 10 times at least or till the whole 10 second sleep was taken away and one once that once this thread woke up it returned completed feature dot is done became true and it came out and it said task completed so that's what we get here and at the end in the result you get completed which is which is what you Returned from here so this is the power of asynchronous programming please like i
mentioned please do read about more about these classes and how they work and what is the paradigm of asynchronous programming it does make debugging a bit hard at times but it's a very interesting concept to be used in concurrent applications let's get started with regular expressions or regex in java you may hear people calling it as as regex or regex doesn't Matter you can call it anything as as you want till the time you have the concept understood in the right way i'll just call it as regex so when we talk about regex let's understand
why do we need them and what are how java actually provides support for that so the basic idea behind regular expressions is is to find a pattern in a in a text corpus if you have lot of strings available if you have any kind of text any kind of string and if you would like to find a Particular pattern saying okay does this whole text paragraph contains any character or contains any number or contains any special characters or contains characters after numbers or numbers after characters so if you would like to find those kind of
patterns in in your text corpus then you can then that concept is called regular expression finding and java provides the support for that particular regular expression finding through a package Called java dot util dot regex package so this is the package which you would need to use when you want to do any kind of regular expression finding in that text now you may want you may be thinking that why do i need to use this i already have the string handling methods right you can do substring you can find a particular character in the string
etc but that is limited because it only and only provides string methods ways to manipulate and find and replace Strings but regex is generic you can literally find any kind of character in your string it can be a special character it can be a square bracket it can be a multiply sign it can be a divide sign it can be like i said integer uh capital letters small case letters so any kind of pattern you would like to find java.util.x can be used to find that kind of pattern now this package is very interesting and
it provides lots of Classes and again this is a very very very big topic and very complex topic so we will just scratch the surface of it and like i always say whenever you would like to read more about it go back and read the documentation currently the documentation i've opened is for version 8 but when you are reading it you can go for the latest java edition uh documentation so with that let's talk about some of the interesting classes which we will be dealing with and we Must know when we talk about regex in
java so i already explained what are regular expressions let's go to the interesting classes the first class which we need to know about is the pattern class so pattern class or an object of the pattern class will basically be representing a compiled regular expression so you write your regular expression in a certain way regular expression has its own language i would say to write the pattern for Example if you would like to write a pattern saying that find uh check if this particular text paragraph has the characters first then the integers then the characters then
this particular special character so that is your pattern you write that pattern then you need to compile that pattern to compile that pattern you can use the pattern class this this class generally does not provide any kind of public constructors to you so you cannot Initialize the pattern object explicitly but to create a pattern you first you need to basically call the static methods a static method named as compile so compile is the method which you need to use to compile your regular expression which will then return the pattern object once you have compiled your
written your pattern and you compile your pattern the next class which you need to know about is the matcher class matcher class will provide That particular engine framework which will understand and interpret the pattern and then will try to find that pattern on the text paragraph which you are supplying and it will result in true or false if it finds that pattern it will say true if it's not finding the pattern it will say false so that's the basic idea so you need to you need to know about the pattern class and you need to
know about the matcher class so it also does not the matcher class also Does not provide any kind of public constructors and you obtain a matcher object by calling the matcher method on the pattern option so once you created a pattern object just call the matcher on that particular object and that will get you a matcher object and it then you can use that object to find the patterns in that particular text corpus there is also a dedicated exception which is called pattern syntax exception which will be Thrown whenever you have written the regular expression
syntax incorrectly like i said it has it has its own language so you need to write the expression in a way regular expressions are supposed to be written and supposed to be understood i will touch upon that in a while but that's that's the basic idea about the three classes now when when you would like to find a pattern it can be a string pattern it can be some characters it can be some predefined Characters some quantifiers you can also create sub groups within the regular expression so there is a like i said there is
a tons of functionality which is available in this particular concept and we will just cover some of the relevant ones or just just run through some of these concepts and then i will switch to a demonstration for example if you talk about the string literals then you can do the string matching for example if you want to find this Particular word or this pattern this is just a text pattern right so if you would like to find this particular text pattern in the text string then you can write this particular text pattern as a string
pattern inside the pattern object so that's that's about the string literals now let's move to some interesting ones like uh like meta characters and the meta characters are very interesting because they have a special meaning for example if you write Your regular expression like this where you say cat and then you say dot then when you are applying this particular regular expression to find the match into a string it is only going to find the match for c a t it is not going to find the match for c a t dot because dot is
a meta character in regular expression it has a special meaning it does not mean dot but it has a special meaning and that special meaning basically means that even though the dot Is not present it will basically mean that after cat it can be any character so the meta character dot means any character which is why you see this snatch succeeds because it will search for this pattern which it matches and after that it can be any character it doesn't care so even if it's s or d or whatever it will say true because c
a t was found a match so dot means any character after the pattern you have specified similarly there are lot of Other characters special characters or meta characters like the ones which have been listed here question mark star plus dot on and all of these have their own dedicated special meaning they are not your your normal uh arithmetic operators or other operators they have their special meaning when you are dealing with meta characters so do read about them in detail and i will be using a bit of meta characters in the example as well then
the character classes are also Very interesting uh similar to the example which i told you before if you want to find a particular string or a particular integer into a into a text corpus then you can use the character class patterns for example you just put a square brackets and you write abc this means that it will try to find exactly a b c in the string if you put a cap in front of abc then it will try to match any character or find any character except a b or c so it's a negation
Similarly if you specify small a to z and capital a to z it means any character can be there between small case a to z and capital case a to z a to z inclusive similarly you can provide specific ranges like a through d or m through p so only the characters which will match the union of this condition will be returning true and rest of the if that if this particular pattern is violated then you will get false so similarly there are you can build lot of Complex combinations and permutations with these special meta
characters and character classes do read about these in detail if you are curious to know about it and there is tons of materials available on this on internet which you can read about to learn more about similarly there are predefined character classes as well dot is something which i already explained which means any character then you can use slash d to find a digit in a Particular string or a particular text corpus slash capital d is for non-digit or you can use the classic negation condition as well slash s is for a white space character
slash capital s is for a non-white space character word non-word so there are a lot of different examples so i think by now you would have built a decent understanding of what i'm trying to tell you is that you can specify these patterns compile them and then use the matcher so let's move to a very Simple demonstration it's not a complex example but very simple example just to get the point across so i'm creating a regex string here and this is the pattern i've specified i'm saying any character star means any number of characters so
it can be anything here then the string the the pattern expects an alphabetical uh string or alphabetical section after that the alphabetical section should be followed by a numerical section and after the Numerical section again it can be any character so this is my pattern i create a simple string with this regex pattern and like i mentioned in the documentation you call pattern.compile to compile the regular expression so i compile the regular expression i get the pattern object and after again as per the documentation it said that you can call the matcher method on the
pattern object to get a matcher object so i say pattern dot matcher and i provide my String on which i want to test it so i've just put a random string where there are some integers then there is some alphabets and then again there are some integers once you have got the matcher object just call matcher.find this will return a boolean where you can test whether the the matcher found a hit in the text corpus or not if it found a match the match found will be true and if it didn't found find the match
you will get a false value in this Result so with that understanding let's run this program so i get the output match found why did i get that because i said that start with anything so it started with anything i don't care what it is it's an integer or any special character i don't care after that there should be some alphabets so there are some alphabets and right after alphabets there should be some numbers so again there are some numbers and after that there can be any character 0 or more Characters so there is nothing
here that's why you see a match found let's do an interesting test here let me do this i put a to z again here so now i'm saying start with anything have alphabets have numbers and again after numbers you should have some alphabet which is not the case here because you start with something you have alphabets you have numbers and after numbers the string ends there is nothing after that so let's see what happens now you get a Match not found because this particular pattern when got compiled and got applied on this particular string did
not find the string following the right x pattern which you have specified so this is a very simple example to show you how you can build patterns you can use groups concepts as well to group the patterns it can get very very complex and very very nasty so use them very wisely very carefully and do read about the documentation and Other examples which i talked about to get more understanding and more comfortable with regex let's get started with nio packages in java now let's first understand why why do we need this package and where will
be using this package let's talk about the wear first you can use the nio package to read from a file or write to a file now let's talk about the why because the obvious question will be that we already have the i o package in java right where you Can where you can use the classes from that particular package to read from a file or write to a file then why do we need an another package doing exactly the same thing as nio so the basic reason for launching the java.nio package was providing the multi-threading
capabilities to the io library and we could not do this in the existing io library because we had to probably rewrite and change the functionality of It that's why java created a new library called new package called java.nio package and this package is basically uh i mean if you if you understand what nio means here generally as per the popular perception it means non blocking io that you don't want to block your threads while you're reading to a file or writing to a file classically niu meant networking i o but as per the popular perception
people know is know it as non-blocking i o so the basic idea is Because whenever you are read reading a file or writing to a file the thread gets blocked until the whole file is written or until the whole file is read so the nio package provides an improvement over that it provides an improvement in a way that you can read the file into a different thread but at the same time move on to another thread and writes to a file so you get this multi-threading capabilities and non-blocking capabilities out of the box From the
classes provided by java.nio package so that's the brief about this package now some of the popular classes which you will be dealing with and some of the concepts which you need to know about niu package are buffers and channels these this is probably the core concept of the whole nio package of how channels and buffers work so let's say you are trying to read something then the read operation will be happening from the channel into the buffer and Similarly the write operation will be happening in the reverse way which means to the channel from the
buffer so that's how the buffer and channel work together that whenever you are trying to write something you have to first open a channel create a buffer and then you can read from the channel into the buffer and similarly when you're writing to the buffer you again have to go via the channel route so channel is that route basically buffer is basically just a Plain container for the data and channel is basically representing the connection to the entities which are capable of performing the io operation so think of channels as as a pipe a channel
literally basically if you if you understand the english meaning of channel that's exactly what we mean by here that it provides just a means to an end it provides sort of a wire to the buffer and then you also have selectors and selection keys classes which Together with selection channels work to provide the non-blocking i o functionality there are some other apis interesting apis as well like cassette and some more but i will not go into the detail of that because if you know about buffers and channels and selectors then we will be able to
figure out what exactly we would like to do with this i would also like to talk a bit more about the buffer class so if you go to the buffer classes operations the popular Operations you will see there will be the read operation which is for reading the files basically or reading the content of the file this works on the byte stream concept first of all so it to read the bytes from the file you will call the read method there's also a very interesting method called flip which i will be using which makes a
buffer ready for the new sequence of operations so once you have done something and you want to let's say you read a particular File and you have come to the end of the file now you would like to reset the buffer and go back to the beginning of the file then you can use the flip method for that particular piece to the uh to bring the current position back to the position to the zero index or to the starting of the file so that's about read and flip and we will have a look at some
of the other methods and there are lot of interesting classes in this nio package do read Read about the documentation and check out the other methods as well to learn more about this package but the basics are like i said channels buffers some methods of the buffers and there's also a path class which is used to basically provide a particular path to a directory which i will not be covering in this example but something good to know so with that understanding let's move to an example and understand how we can work around with this an
io package so for That i have prepared an example where i will be writing a reading from a file and then writing to a file so i have a main method here the first section here basically is about reading from a file and the second section is about writing to a file so let's go through all of both of these sections one by one to understand what is happening so in the read section i use the file input stream class from the i o package i'm still not using the paths class here just to show
You that both two on both of them still can work together if you want to use the old constructs so i use the same file input construct to read a file called source.txt which is present at this particular location in my directory and this source.txt has has just a one line of text nothing more so i i basically create the file input stream object and then i create a channel because we are dealing with files so you create a file channel if you're dealing with network Socket then you might have a socket channel so that's
also something which you need to know about that this nio package is is generic it can be used for any kind of communication of reading and writing not specifically to file handling so we create a file channel object here by calling file input stream dot get channel it's that simple once you call that you will get a reference or the object basically of the file channel then the next thing is to create The buffer like i mentioned that channels and the buffer are the two main tools through which you work within an io library so
we create a byte buffer and we allocate some starting size to it just some some threshold size so you can put it any number which you think is practical for your file and your for the use case here i've put just one zero two four bytes or one megabyte because my file is pretty small so i just put that and initialize that read buffer and then I call read channel dot read operation so the file channel object you created you just call the read method on this particular channel and supply the buffer and then it
is going to read the file wire the channel into the buffer and this read method is going to return a result to denote if the file was written successfully or not i'm just pointing printing assist out here just a bear once this out nothing new here so this section will be used to read a file so Let's see if i can read the file successfully and then we'll move to the right section so i go to run as java application yeah it says file read successfully and it read 27 bytes it means that there were
total of 27 bytes in my in my file which had a single line of text so it read all of that and it it completed the execution now let's move to the right section and i can comment the read section because we have covered that so here i'm again creating a file Output stream object because i need to write something so again using the same construct of the i o package i have covered previously in the previous sessions once you have the file output stream object created the next thing is to create a channel so
i again create a file channel but this time it's the right channel i again create a buffer which is the right buffer allocate some size to it then this is the string which i want to write to this particular file So my file my destination file will be called dest.txt will be present in this particular location and this file should have this string written if this whole operation goes successfully that's my end goal so to do that i say right buffer dot put and whatever string you have created just call get bytes on it and
you get a bytes representation of the whole string so that's what i've done here because this put method expects byte because if you go inside This it expects a byte array so that's what i'm supplying here i'm providing the uh the byte array by on the string by calling message.getbyte or any string object.getbytes will get your byte array once you've done that then i'm calling the flip method remember i talked about this flip method to basically reset the index that's something which you need to do in this particular case so that the index goes back
to the initial position and the buffer can be written Successfully to a file uh to a channel basically so once the buffer is comp has completed its operation then i can write the buffer to the channel and once that is done then if those if these operations went successfully then i will see a file called dest.txt in this particular directory currently there is no desk.txt in this directory you can see there are just three files but there is no test.txt so let's run this program so it says file written successfully Which was the last sis
out at line 28 but let's also see what is happening in the directory so now i see a desk.txt popping up here it's a 1 kb file and if i double click on this i see the same string which is which say this is a test string which is the same string which i supplied here so you can see you can use the nio packages to do the file read and write and much much more than just read and write using the nio package but this is just to get get the point across that This
can be done using the nio or the non blocking io package as well so that you get maximum performance on your machine while you deal with file io operations let's get started with java beans so we have been creating java classes and creating objects of those java classes to work and manipulate transfer data call methods create properties etc and java beans just use that as the groundwork to create a specification first of all let's Understand that java beans is just a standard it is just a specification which has been provided by by java to be
followed while you are implementing production grade or enterprise grade applications so it's just a pure specification set of standards if you want to read more about this please go to this particular link which is written here i mean if you just google java bean spec oracle then you will be able to find this particular link you will see a Download option here if you go here you will get these two specification documents option so you can just accept the license agreement and click on this particular beans 0 1 1 0 1 pdf and you can
read about the whole java bean specification i have already downloaded this particular pdf which is opened in this tab and if you go to the toc here it's an official sun microsystem white paper basically and if you read about this this is going to explain the whole Java beans api specifications it's going to specify the core components of the java beans component architecture so it's a specification let's understand that very well if you go to the table of contents let's go to the interesting one which says what is exactly a bean or a java bean
so a java bean is basically a reusable software component that can be manipulated in any visual ide like eclipse or intellij or netbeans etc so technically a java bean is just a java Class but that java class should follow three main properties the first property is that that java class should have getters and setters to access the properties second property is that that java class should have a public no argument constructor so that anybody can create an object of it and third is that the java class should implement serializable the reason in java being specified
these three conditions which i said so let's talk about the third one Where we are talking we are saying that it should be implementing serializable interface why is that it's because our java bean would be required to be exported between applications may be required to be written to a database or to a file system or to be converted into an xml or a json document sent over the network again being deserialized so this will be moving across a lot because that's what we mean by reusable multiple different software components and Applications might be reusing that
bean again and again and that beat needs to travel across and to enable that that bean has to be serializable because if you can't serialize it you just cannot transport that object to another application it's just not possible this is how java has been so that's why you need to implement serializable you need to have a public no argument constructor and you need to have getters and setters to access your properties you can Actually read more about this if you scroll down it will also talk about the difference between beans and class libraries remember not
class but class libraries and here it explains what i just said that a java bean can have properties it can have events and it can have methods so properties are nothing but the normal attributes which you create inside a java class nothing fancy the same attributes are named as properties for example you may have a Foreground property and then you can have a method which is just a normal java method which can be called from other applications or from an environment and by default all of the bean's public methods will be exported by exported i
meant when you export this when you serialize and export this object all the beans public methods will be exported by default but then a bean can choose to export only a subset of its methods if it wants to a bean can Also have events and events basically provide a way for one object to notify other objects that something has happened so something similar to the uh to the producer consumer example or the producer consumer pattern where you can notify other objects threads also have this particular pattern where a thread can notify other threads that it
has completed its task and other threads can start so ah so this is so that's the property behind event where something Has occurred and then the object can tell other objects that's that that something has occurred so that they can react to that particular event so these are the three main uh traits which are properties events and methods you can read more about this particular white paper i will not go into the details because it's a long white paper but it's a very well written white paper which will give you a very good Understanding of
how java bean specification was written what was the thought process behind it so coming back to the code if you want to just write it it can be very simple to write just write any class and say implements serializable so it will ask you to provide a cl version uid so you can write this here then you can create your attributes as normal private attributes you can create public methods to access and manipulate these attributes in the Forms of getters and setters so these are the public methods to to access and manipulate these attributes here
we have a parameterized constructor which will not be required or which should not be there when you're creating a java bean it should just be like this because when we talk about the public know args constructor as we discussed in the very first lectures that you do not need to provide the default constructor java will automatically Provide a default constructor for every class so you don't need to write something like this it's just not needed because you can write it but it has no value attached it has no meaning because this is something exact this
kind of code is already generated by java compiler when it compiles this particular class so a public default no argument constructor implementing serializable private properties and public methods and you can have Additional event methods as well which i talked about just when we were going through the white paper and that's all pretty much what a java bean is so you can see it's it's just a java class but some additional uh specifications which a java class has to follow to be called as ajava bean let's get started with spring framework so spring framework is the
most popular web application framework available out there today and all of the big companies From netflix to whatnot use spring framework to build the modern day java applications so before we go any further let's understand why do we need a framework so let's understand this with the help of a diagram so let me just open a blank paint page and let me show you what i mean by a framework and why do we need this so we built simple applications so far but if you have to build a enterprise grid web application you will have
a Front end probably where you will have what you see in the browser so you will have the html the javascript or or any other java enterprise edition classes like gsp servlet etc then you will have a backend where your java classes are present which contains the business logic so the business logic and then you have a database where you have the you store the basic basically the whole data so you have these three different layers we Also call this a three tier architecture so you cannot build all of this by just using the core
java classes which we talked about you need to do more integrations you need to use more different programming languages and concepts to build a complete enterprise grid application and if you try to build all of this by yourself then it's going to take a lot of time and lot of effort that's why we have frameworks which basically create provide the structure To create these three layers so that's why we have this frameworks and in the frameworks spring is the most popular framework it provides the structure to write all these these three layers one of the
reasons i did not talk about the the java enterprise edition technologies like servlets and gsps because nobody works on them today even if you learn about servlet it's good to know the conceptual overview of servlets but nobody today builds applications on jsps And servlets that's the reason i did not talk about it because today we have sophisticated front end frameworks like angularjs or react.js or amberjs and whatnot and it is hydrating at a very faster speed so there is literally practically no need for a java developer today to learn about gsp because i can bet
you on that you can take it in written for me nobody is going to build the gsp app based applications in 2021. everybody is going to use some sort of Front-end framework to build that and then you have a back end in the back end you have the exact core java classes like i just explained so you will be using the java beans and you will be basically using the pure java concepts of collections and and etc to write the backend logic using the java classes and then you will need a jdbc connection to write
to a database as well so you would need a database as well and spring provides connectors and Specifications to support all of these three layers that's the reason so generally when you talk about a web application let's talk about web application because java primarily is used in web applications so in a web application you basically see a browser window where you load a particular page but what happens behind the scene this browser has some html and some js maybe and this code is basically calling some end point this end point is present in The backend
layer so this endpoint is present in the backend layer that end endpoint transfers the control to the business layer where you have your core business logic written and then the business layer transfers the control to the data layer or some people also call it dow layer this dow layer then talks to the database that's how a web application works and that's what that's the architecture you will mostly be Following whenever you are building any enterprise grid application in any organization so spring provides support for all of these parts this obviously is written by angular and
react and other frameworks but this is this whole section is basically presented or supported by spring so with that let's understand a bit more about spring framework so if you go to the spring official website it talks about some of the value uh propositions spring is used Heavily like i said it's used everywhere it's very flexible framework there are a couple of concepts which spring provides which is around inversion of control and dependency injection and i will talk about these concepts in a while uh when we'll talk more about the springs components it makes uh
it's quite productive and quite fast as well so it's very fast to build application on on spring it has a whole dedicated security module as well so it's quite Secure by design and the spring community is huge so you can find lot of support on internet let's learn bit more about the springs core components or core technologies so if you talk about the springs core components these are the strings core components so you have a testing module you have you have a core module first of all inside the techno in the core components you have
a core module which has ioc containers resources events i'll talk a bit about That it has a it has its own testing component so it provides very good support for testing applications it has a data access component the data access component is used to provide connections utilities to the database because like i mentioned your application will be talking to the database and spring provides a a completely dedicated component to be used whenever you are dealing whenever you are talking to the database it also provides a web servlet Component to provide support for spring mvc which
i will be covering in the next session websockets and stomp and messaging frameworks etc it also supports reactive or asynchronous programming if you want to do that it provides a lot of integration capabilities in the integration modules if you want to do jms or jmx or email or task scheduling etc and it also provides language support to support international internationalization of The applications so it it has a lot of different components but we will focus on this core component which is of the interest here so let's talk about that the first thing which you need
to know about string is its support for inversion of control and it provides that support by creating an inversion of control container what do we mean by inversion of control the basic idea is let me take any random example and i will be able to Communicate the idea behind this so let's go to any simple example which i have already covered let's go to method calling for example so we had a student class we created a student class simple student class three properties constructor and public getters and setters and then i created a main class
and i initialized the student object so to the responsibility of creating the student object lies with the student class itself student class have to be Explicitly initialized to be having an object of the student so this creates a problem because when you're dealing with enterprise grade frameworks you might need to create a lot of objects on the fly whenever the end point is talking to the business layer if i take the reference of this architecture if the endpoint is talking to the business layer classes business layer classes are talking to the data Access layer classes
so when the business layer classes needs to talk to the data access layer classes the data access layer classes needs to have an object because that communication happens between objects only so who creates those objects if every time the data access object has been uh has been called and if we provide if we pass that responsibility to the dow class to create the object or every time the end point talks to the business Class we ask the business layer to create the objects it becomes a lot of painful process because every time you will be
doing this new student everywhere you need a student object which is very painful process so what spring says it says okay involved the control of creating the object so let's not give the responsibility of creating the object to the class let's give that responsibility to the framework so the framework will be responsible for Creating the objects of a class and it's not the class who will be responsible for creating its own objects so generally outside the framework a class is responsible for getting its object but with spring spring inverts this responsibility that's why we call
it inversion of control the control is inverted it's reversed and now it's the frameworks responsibility to create the objects you will also hear about a concept called dependency injection a Lot in context of ioc and dependency injection is an implementation of the ioc concept so using springs dependency injection mechanism you can inject the object of any class into any class once you do that spring dependency is going to use the inversion of control concept and create the object that's about ioc and di or dependency injection then the other modules like resources will provide a way
to refer different files and properties if you want to then you Have a validation module as well which will provide different validation constructs because once you receive the data you might need to run a lot of validation right and writing the validation by yourself can be very painful so it provides a validation framework as well by providing the validator interface you can use this particular framework to write the validation rules checking the name not empty etc similarly it also supports an Expression language if you want to use that so the expression language support is wide
very wide in fact you can create an expression parser and you can do the expression language evaluation using the a spring expression language similarly it also provides support for aspect-oriented programming now again all these concepts of validation and spring expression language and resource support the you probably would need hours of reading to learn about these Concepts and i'm just running through them just to tell you about these concepts and do read about why do you need resources why do you want to do validation why do you need an expression language what is aspect oriented programming
read about all of those concepts because they are not related to java they are generic concepts which will be applicable to any programming language so any enterprise application you build in any programming language You would need to do the validation you would need to do the resource reference management you would need to have an expression language you would need to have aspect oriented programming support so this is just to tell you that that java does provide an aop or aspect oriented programming support as well and it has a lot of apis available for that along
with that it also provides very good logging capabilities because you definitely need To log all the actions which the framework or your objects are taking so this was a very quick lightning overview about spring i understand it's not possible to cover all the concept of a framework as sophisticated and as smart as spring in in 10 to 15 minutes lecture so treat this as an introduction session and like i said read more about all of these components i just explained the core because this is this is sort of the main building block of spring framework
And then you have other supporting uh components as well so be do check out the documentation there are tons of examples available in fact in the springs official website itself if you go to the spring guide section if you go to the learn and you go to the guide section there are awesome getting started and topical guides and tutorials available so for example how to build a restful web service how to schedule tasks how to Consume a restful web service how to build a simple java project with maven how to upload files with string how
to do messaging with redis which is a basically a caching framework how to do messaging using spring to rabbit mq rabbit mq is a messaging framework so there are tons of examples available here very good documentation and very robust documentation do check out the examples to learn more about this let's get started with mvc and the Implementation of mvc using spring so before we go any further let's first understand what do we mean by an mvc application so in the previous lectures i discussed about the three tier application where you had a presentation layer you
had a business layer and then you had a database layer which is talking to the database and that's how we built a three-tier application which can also evolve into an n-tier application but when when the web Development started the most popular concept which came out was m v c m stands for model v stands for view and c stands for controller so the idea was that these three components together can render a web application and how they render the web application is basically that the controller is going to receive the request which is coming from
the web browser then the controller will have the knowledge of where the business logic for that Particular request will be residing so the controller is going to invoke the model the corresponding model which is required to execute the business logic of the request and the controller will also have the knowledge of what response page to be sent back to the user so we are talking about the response page here not response remember that because it's a web application so the model view controller architecture basically was designed uh to keep in mind that you Have a
web application where a request is coming from and you need to process some business logic and then you need to return back with a page response which is going to be displayed on the web browser of the client machine so that's why we had these three components as model view and controller controller taking up the request then finding the right model for it which can execute the business logic and then also finding the right view for it which can Render the business logic processed by the model so that's a quick overview about model view controller
or mvc architecture do read about it in detail to understand how this works but like i mentioned that mvc the most popular mvc implementation is provided by spring spring is the most popular mvc framework and the way spring implements it is something which i have drawn already here so let's understand how this works so first the request Comes from the web browser and spring has uh the a very first welcome servlet which is called dispatcher servlet any request which is coming to the spring enabled web application will first hit dispatcher servlet and once the request
comes to the dispatcher servlet the dispatcher servlet has all the knowledge of all the controllers of all the view resolvers which i will talk about in a while and of all the views as well it also has knowledge about handler Mappings which again i will just discuss now so the basic premise is that dispatcher servlet is the component which has knowledge about literally everything happening in your application and that's why dispatcher servlet is the first servlet or the first component which receives your web request so once the request comes here first of all it looks
at the path and finds out the right handler for it the right controller for it and the way it does That by using the handler mapping component or handler mapping logic which is provided out of the box by spring framework so the handler mapping logic will tell the dispatcher servlet which particular controller is going to process the request which is coming because every request will have a different controller return so whatever the type of request is whatever the path of the request is based on that the dispatcher servlet is going to find a Particular controller
once the controller is found like i mentioned earlier the controller will have knowledge about the right model to invoke for that particular request model is nothing but basically a java class holding the business logic for this particular request so it will invoke that java class and get all the business logic processed and then it is going to return a model and view object view is here Simply pointing to the ui response which you are going to send back to the user it can be a jsp page it can be an html page it can be
any other view technology so anything which is which is used to render a web application on a web page is view and controller is going to send both the model and view information back to the dispatcher servlet the dispatcher servlet will take the view part of it and go to another component which is Again provided by spring which is called view resolver the view resolver will have the knowledge to see which particular actual jsp or template to invoke for the view value coming from the controller so based on the value which is returned by the
controller a view resolver is going to return the right page mapping and once the dispatcher servlet knows the page mapping it is just going to invoke that page by calling the view component so Dispatcher servlet handler mapping controller view resolver and view these five components together help render a web mvc application in the spring framework so that was about the theory of how spring works now let's move on to uh example to understand how this works in action so here i have already built a spring mvc application and if you're wondering how to build that
there's an easy way to do that using spring initializer and that's also the Recommended way actually if you go to the documentation of spring you will see that it recommends creating a new project from scratch using the spring initializer utility which is provided by spring out of the box so just go to web a web browser and tar and type start dot spring dot io you will get this page where you can specify what type of project you want to create so it is going to create the basic skeleton for Any spring application automatically for
you it's probably like i said it's probably the fastest way to get started with spring so we will choose a maven project maven is again a dependency management tool which is used to download any kind of jars for your application so we are going to use a maven project and we want to create a skeleton for a java application we are going to use the latest released version of spring or spring boot which is 2.4.2 It says spring boot here but don't get confused with it we are going to use just the mvc classes and
not the spring boot specific logic yet then you provide your group artifact id and the name for your jar you provide a description you can provide a welcome package name whatever suits you and then how you would like to run your application whether you would like to package your application as a jar file which is a java archive or you would like to run it As a web archive which is a var file so you can choose either packaging mode and it is going to add appropriate dependencies inside the project to support the packaging of
jar or the packaging of var then you can also choose the java version so you can see there are three java versions listed here which are 8 11 and 15 so whichever java version you are working on you can choose that particular version and once you have set all with everything just Hit generate once you do that it is going to create a project here and then you can import this project just as a normal project inside the eclipse ide and that's exactly what i've done for this initial project which is showing a very basic
hello world sort of example for how spring mvc will work so this whole structure will automatically be created for you and like i said it was a maven project and in every maven project you will have a palm.xml if i double Click on this it is going to open this xml and it will list down all the dependencies which my project needs to have let's understand the dependencies as well so this project is currently using the properties of 1.8 but that's and that's fine you can obviously definitely change this value i just kept it as
1.8 for now because i'm not using any new functionality yet in the dependencies section you will see all the dependencies or all the jars which Are required by the spring application to run successfully the first dependency we see here is about daimy leaf and daimy leaf basically is a view technology similar to jsp or similar to servlets technically where you can supply use this dye my leaf templates which are basically just htmls with some dynamic values and you can use this dimei leaf templates to render web pages for your spring mvc application if you want
to Use some other view technology you need to include the dependency of that view technology here instead of dye my life so that's about that then you need to include the spring boot starter web the spring boot starter web is going to enable your application to become a web application then this is this is a this is basically a good to have dependency which you can have in your project which will help you deploy the project at runtime automatically without restarting The server because the web application will be running on a server on a web
server basically or an application server technically because it needs to run somewhere so that it so that clients can access it that's how a web client architecture work or the server client architecture works so this dependency will allow you to deploy changes dynamically at runtime without restarting the server then this dependency is for tests if you're Writing any unit tests and then you have a plugin which will allow to run this particular project with a single command which we will see in a while so that's about the dependency tour now let's look at what is
in the src main java in the src main java i just have two classes one is the main class which will have a public static void main method and this is the entry point of this spring application and then i have a controller class i already talked about what Controller is but i will come back to that in a while let's understand the rest of the files as well the next one is src main resources where you will have your view technology data available like i mentioned it is using dye my leaf templates currently and
basically like i said they are technically htmls with some dynamic data so i've created a templates folder under src main resources which will automatically be generated by spring initializer and then Under templates i have placed an html file it's a pure html file with the only difference is this value so this is what the dynamic value means which which is supported by dimer leaf templates otherwise this is pure html it's just a paragraph with a header and this is the dynamic value which i'm populating it also has application.properties which has nothing but you can use
this particular file to supply environment specific properties for the development Environment or the testing environment or the real production environment if you have any unit tests those will go here under src test java and this is the system library already provided supported by eclipse itself and i already talked about the palm.xml you also see couple of more files created by springboot if you want to use that you can use that to run the run the program from the command line as a utility otherwise you can just use ambient Spring boot command which i will show
you in a while there's also a gradle folder which you can ignore probably we don't need this because we are just using maven and we are not using gradle gradle is another dependency management tool very very similar to maven so you can ignore this folder right now so that's the structure and now let's come back to the controllers remember i told you that controllers are the ones which receive the request so from the Dispatcher servlet which i talked about here after the dispatcher servlet the request comes to the controller so once you hit a particular
url then you need to create a controller for that url mapping remember that you need to create a controller for almost every url mapping you are having in your application there should be some mapping to some controller somewhere so i've created a greeting controller and the way you specify or you make a simple Class as a controller is by putting the add the red controller annotation this is the annotation which is supported by spring and you can put this annotation on top of any class and that class will be treated as controller by spring and
the moment the moment you put this this class will also be registered with the dispatcher servlet and like i mentioned the controller's main purpose is to receive the requests the web requests which are coming from the client and the Way you can receive the requests to a controller by providing the exact url mapping so if somebody runs this web application and says slash greeting then this particular method should get invoked and how you define that is with the get mapping annotation use the get mapping annotation to provide the url path whenever somebody invokes this url
path this method would be getting called and when this method is getting called at That same time this url can also accept some query parameters we call that as the request parameters in in the spring language so you can use the request parameters as an annotation to provide a placeholder for the variable for which the value will be supplied in the url so slash greeting if if you call this url something like this then it will work because you have a variable called name which is which is being parsed as a query string because You
have used the request paramentation so we'll see an example of that when once we run this application and how we can supply the query string but you use the request param annotation to supply the query string parameters to the url you can mention if the parameter is mandatory or non-mandatory if the required equal to true was there then this parameter would be mandatory you can also supply a default value if somebody is if the client is not Providing this query parameter at all would you like to set any default value if yes you can supply
that default value here and then you just give a placeholder name like i said then the second argument which your your methods which are intercepting the request should have is the model argument and remember i told you that the controller will have what should have the knowledge about the model and from here that knowledge comes you this particular Method will expect you to provide a model argument as well so if somebody calls this application and provides the urls with slash greeting this particular method will get invoked and then the code inside this method will be
getting executed so it's a very simple code right now but this is where your whole logic will go remember that but here i'm just saying model dot add attribute name with the value which is coming from the query string parameter that's all i'm Doing here and remember i told you that the model will hold the business logic so here this is the business logic where whatever query string parameter which is coming from the request param i'm capturing that and i'm adding that value with the variable name in the attributes of the model so my model
is set and after that i need to return the view so that this particular file name will be intercepted by the view resolver here if you remember we Talked about the view resolver so when we return greetings as a string that string goes here and then dispatcher servlet looks out asks the view resolver to find a particular html matching with this particular text so view resolver is going to look at under src main resources slash templates to see if there is a file with the name greeting available or not since we have that file available
the spring is going to render This particular file supplying the model attribute value name now remember the greeting.html had the exact same variable name so this variable name should exactly match with this variable name here if you do if you make a mistake here this is not going to work because the model is holding the business logic and i'm printing that business logic inside the view using the dye my lift template syntax which is dollar curly braces so whenever you have To print any variable or a model attribute or any runtime value inside a dhammalife
template then you need to use the dollar curly braces syntax to do that so that was about a quick overview of how this application is is written right now and that's all the code is here now it's time to run this application so one of the simplest way to run this application would be to provide a spring at the run configuration here for the spring Application or you can choose another way which is to first have a look at the spring web content application which is the entry point so once your application boots up this
is the first line of code which is going to get executed and to make sure that this code works make sure that you have the add the red spring boot application annotation on top of the entry point class so this is this is sort of the mandate which spring will force you to put in front of the or on Top of the entry point class to to treat this class as the first entry point when you run the project so to run the project what we will do that we will just go to the command
line and we will say mvn spring boot run so let's do that and let me open the terminal for that so i have opened a get bash prompt here you can also open the classic windows terminal but this is something which git installs by default if you install git on your system it's pretty much exactly The same it's just more unix-like but it's also just a simple terminal shell utility to access your file system so i have gone to the project which we were working with in the eclipse ide and this is the path of
the project so once you reach to the path what you would like to run is just say mvn spring hyphen boot colon run that's it and you hit enter once you write mvn sprinkle hyphen boot call and run you will see lot of code lot of logs here Where it is going to run all the compile all the java classes run any tests if there are any and then it is going to start the web content application you can see and once the application is started you will get this message that everything is run one
of the interesting thing which you can see here is that it is also spinning up an application server automatically for you and that application server here which is being used by spring is apache tomcat Technically apache tomcat is a servlet container and it's not a full-fledged application server but just to get the point across you can use apache tomcat as an application server which is being used here out of the box by spring if you don't want to use apache tomcat and you want to use something else you can do that as well so now
everything is ready and we can now execute the application to observe the output so for that let me Open a fresh browser window so that we don't get any cached response and now i can just type localhost 8080 and if i hit entry enter i i get a white level error page because there is no home page for tomcat defined but there is a home page for my application defined in fact let's try to access the url which we wrote in the greeting controller the url was slash greeting so let's copy this and let's put
this here so localhost8080 Greeting and if i hit enter i get the message hello world let me just zoom this in a bit so that you can see so you will see this hello world message here by putting this url why do we see hello world let's go back to the controller so when you call this url this greeting controller got invoked since we did not provide any query string parameter the default value which was world was picked up and this world value was stored in the name variable and the name variable Was added as
an attribute to the model and then we were using the greeting.html and we were printing the name variable since the name variable was holding the value world so the message came as hello world with an exclamation and that's the output which we see here now let's try to supply the queries query string parameter the way you do that is provide a question mark provide the key of the query string parameter and the value you Want to put here so let's put simply code as a value and hit enter so now the message got changed and
now it says hello simply code so what happened here is that whatever con query string parameter we supplied that got passed here at par as part of the request param and the value of simply code got stored in this name key and in turn in this name variable and then i added the same value into another name attribute and added that attribute to the model so now This name here is storing the value simply code and then the all the things work exactly is the same as i just described it goes to greeting.html and it
prints whatever is stored in the name attribute coming from the model let's get started with spring boot and how we can build a simple application using spring boot before we go further let's understand why we need spring boot and the basic idea of spring boot is to build restful web services if you want To know more about what are restful services please you can read about the restful concept as a concept what does rest stand for but the basic idea is that if you are accessing anything over http then that particular component can be built
as a restful component and spring boot is the most popular choice for building restful web services today and even in fact microservices which you might have heard about so you can build microservices which also run on https Using spring boot so what i'm showing you right now is the official guide of spring which you can use to build an application with spring boot it will list down all the requisites which you need in terms of the jdk installations maven on and how to complete this guide etc etc you can again use the same springs initializer
which i talked about in the previous session you can use this to generate a spring boot project for you specifically So all those options are available here so i've already done that and i'm not going to repeat what i just did in the previous session and will directly jump to an ide where i have created a sample spring boot application and the structure here you can see the structure would look very similar with one change that in the previous example when we were dealing with mbc we had an src main resources folder and that src
main resources folder was having all the web Components or the htmls but since in restful web services you do not render the html but you just send back the response the response can be the response body can be pure xml or it can be pure json but you do not send back and view and that's the main difference between spring mvc and spring boot that in spring mvc it will you are required to return a view technology like in the in the previous session we sent a dye my life template which is basically in html
You can also written a gsp but with spring boot you do not deal with the view technology and that's the world we are living in today when you write spring boot you do not have to worry about how this is going to be rendered on the web page whether it is going to be rendered using html or whatnot what you need to take care of using spring boot is to return the right response body the exact text of the response and that's it so with that in mind the Spring boot was born and the structure
apart from that the structure would look very similar this palm.xml here which will provide all the list of jars and dependencies which are required for this particular project so you can see all the dependencies here pretty much the similar ones we have a starter web we have a starters test and we have a spring boot maven plugin and we have an application file which is the entry point again having a public static void Main method so you need to put the at the red spring boot application at the top of the class to make it
an entry point if you don't do this spring boot will not run this class and spring boot will even not run your application so what we are doing as part of this example that we are just printing all the beans which are provided by spring that's all we are doing like i said it's a very lightweight and the introductory session So we will keep the logics to minimum and i'm just getting all the bean definitions sorting the bean definitions and just printing them one by one how do you get the bean definition you get that
with this application context class which is returned when you run the application and how you run the application is basically using this line where you say string application dot run and you supply application dot class with any command line arguments which You might want to use once you do this it is going to return an application context object to you and the application context object can be used to get all the bean definitions by calling this method which says get bean definition names so that's the basic logic which is being run in the main class
now we also have a controller but this time it's not a web controller but it's a rest controller so you see in the previous example we just had written Something like this it was just a pure controller but here we have become more specific we are saying that hey this is not a simple mvc controller but this is a spring boot controller or technically a rest controller so spring provides a separate annotation for that which is at the rate rest controller so you write that particular annotation or that on the top of the controller class
which you are creating and then you provide a request mapping similar to what we did In spring mvc but while you return it you do not return a view technology you just return the raw response here i'm just returning a string but you can return a json object you can return an xml object or whatever you want to but not a view technology that's what i'm doing like like you can see there's literally nothing i'm doing in this it's just a simple string return statement which i have printed here and that's all the code i
Have right now here i just have these two classes okay so that was all about what i have written in the project and now it's time to run the project so i have just reached to the location on inside my terminal where the project bom.xml was present and if i just do an ls you will see that there is a palm.xml available here and all the code directly is also available here so now i will just run this application and to run this application i'm just going to type Mvn spring hyphen boot colon run and
hit enter once i do that the spring application is going to spring boot application is going to get started and let's go back to the controller and actually the main app main end point and see what we were doing there i did a cis out here which said let's inspect the beans provided by spring boot and then i was printing all the bean names and if i go back to the output i will see the same line being Written here which was around let's inspect the beans so you can see that message which says let's
inspect the beans provided by spring boot and then all the beans which are available in the application context are printed here so that's that's the basic idea which i want to give you that you can actually build a spring boot application and you can write your rest controllers return a string body from it and once this is run then you can also run your application For from the web browser as well so let's try to hit that particular url which i wrote here so the url of hello so for that let me just open a
new cognito window and our application is already running so if i just say http localhost 8080 slash i get this message here which says greetings from spring boot and this is the message which we were sending from the rest controller so this validates our understanding that we can invoke a rest controller which is a Spring boot rest controller via the same method but this time we are not getting an html but we are just returning this particular string now you can use the string in any ways you want so it depends upon the consumer so
that's all i want to cover as part of the spring boot now spring boot is a huge huge topic and we can spend hours and hours talking about spring boot but since this is more of an introductory session so i just wanted the concept to get Introduced and remember the value proposition of why you would need spring boot the basic idea is to build restful web services or build restful micro services that's the basic idea behind using spring boot in your applications and also remember the difference between web mvc spring mvc application and spring boot
application spring mvc is for building web application spring boot is for building restful applications which might not have a web interface Integrated with them at that moment so that's all i want to cover for this particular session and in the next session we are going to have a look at an advanced java project using some of the concepts which we might have learned during this whole journey and that would be the last session of this particular tutorial series let's get started with our demo of a project which is using spring boot to build a restful
web service so a restful web service is Nothing but any end point which you can access or you can consume the data from via an http layer or via a simply a web layer because most of the web traffic which we deal with is built on http so to take an example if you go to any website where you sometimes see on the top right corner you see today's weather so how is that today's weather coming in it's coming in via a rest web service the website which you are accessing is basically hitting an http
endpoint Which is where the where the weather application is sitting and it asks for the weather data and the dressed web application just returns the data and that's how the website is able to show you the current weather so restful web services are everywhere and they are the most popular way to build applications today where you just build your restful web service and you expose an http url and then the consumers need to just access that http Url to consume the data from your application and you see this makes it very easy because there is
no data type restrictions there is no tight coupling here it's just an http endpoint so that's the basic idea and we will look at a project where we will be using spring boot to build a restful web service and then we will try to run that web service to save some data and also to return some data so here on the on the package explorer you see i have Created a project called rest service and let's just walk through the structure of it and then we'll go into the details of it so we have an
src main java where i have a package and i have bunch of classes here and before we go to the classes let's first also access the dependency file because every project needs some dependencies some jars to execute it for example spring itself is basically a jar so you need to include the spring jar in your project So that your project can become a spring project and there are generally two dependency tools one is maven and one is gradle in this particular project i am using maven uh dependency tool for downloading and managing the dependencies which
are needed to run this project successfully and the way you will find if it's a maven project or if it's a gradle project for a maven project you will see a file called pom.xml pom.xml and if it's a gradle Project you will see a dot griddle file that's how you can spot whether the project is using maven for dependency management or it is using gradle for dependency management so let's open the palm.xml since it's an xml file it will be a bit verbose but if you just read it piece by piece it will become easier
to understand first of all since this is a spring project i need to include the parent dependency which brings lot of good defaults Sensible defaults from spring boot automatically and this is the jar name this is the artifact id which is spring boot starter parent so any spring boot project you are starting do include this parent this parent is basically bringing all the dependencies from some other jar and you can make your project as a as a child of this particular parent so all the spring board projects have this as a parent as a standard
practice after that you Provide your own details in terms of what is the package name how do you want to see the jar name on what is the jar actual name what is the jar version etc etc you also set the minimum required java version to run this application and then you in the dependency sections you provide all the jars which you need to run your project successfully both compile and run your project successfully so we added the spring boot starter web on dependency which Basically brings all the dependencies around making a controller or making
a repository context component scan all the interesting features which spring provides get wrapped up inside the spring boot starter jar and you can actually go to the mvn repository and and have a look at what all classes it provides it's a lot of classes so i'm just telling you in a brief that it provides all the restful functionality Then you have the next dependency as spring boot starter data jpa which is going to enable this project to also have a database and if it has a database then you need java to talk to the database
and the way spring suggests to talk to the database is why are using the spring boot data jpa library we will see this how this library can be used but basically this provides ways to represent your java object in the database and then you need to also add The actual dependency of the database and in this case we are using an in memory h2 database so i'm not using an external database like mysql or oracle or pos sql because that will just make more configurations more complicated i just wanted to keep it simple and generally
you in this h2 database you can easily access by adding this dependency and it will be an in-memory database created for you then i've also added a spring boot starter test here Which will be used whenever you are writing unit tests and you must write unit test for your project and then we need to add the plugin so that springboot can run this project that's all i have in the palm.xml now let's move to the interesting part the java section part let's start from the main class so this is how the main class looks like
where you have you just create uh any any name with the class and then you add A public static void main method inside the public static void main method you call spring application dot run and this run method is basically going to run your application and you just provide the same class name which you just wrote here so just say dot class and if you're supplying any command line arguments it can interpret that command line arguments as well if you want so you'd always need an entry point in an application and this is the entry
point Which spring boot supports and this is if you see this code this is just normal code to make spring be aware about this class being treated as an entry point you need to add add the red spring boot application annotation on top of the class this is one of the annotation which is coming directly from the spring boot library you can see this import so once you add this then only spring will be able to treat this class as an entry point otherwise spring doesn't know Where to start from so when you run spring
it will fi it will try to find a class with an annotation spring boot application and then inside the class it will try to find a public start a static void main method and once it has found both of them then it will just run the application so it's very simple nothing fancy here and what we are dealing with here is a student object so we will try to insert a student object and we will try to retrieve the student object so If you ignore these annotations which have added it's just a pure pojo it's
just a plain old java object you create a student class let's ignore this field as well for now i'll just come back to this annotation in this field but this is just a student class it has three fields as name age and address an empty constructor and a parameterized constructor and some getters intentionally i have removed the setters because generally whenever you are Building any enterprise grade application you would like to keep your objects immutable means once they have been created you would not like somebody to allow to change the values of the object this
just makes programming much much more easy if you treat all the objects in your application as immutable that's why i have not added setters here it's just considered a good practice so apart from the standard things which we have Already seen there are two things here which i want to talk about let's first talk about this one so accurate entity is the annotation which is coming from java x persistent entity persistence entity and this makes springboot save this particular object into the database this is the annotation which you need to put on your class so
that springboot knows that this class represents a table in the database so you need to add this to make sure that This represents a table second thing a table will have a id it will have sort of a primary key so i've created a new column called id which is basically representing the student's role number or something or maybe a registration number and here i'm using couple of more annotations if you see these annotations are also coming from java x persistence library and these annotations will basically allow the a new id to be created every
time you create a student Object so you don't have to specify the value of this id variable springboot will automatically generate a new id value every time you create a new student object and how does it generate you you can provide the generation type as well so currently i've just said that set it as automatic but you can set it as identity sequence or rate or controlled by table you can also see the explanation of each of these here but i've just kept it as auto which Basically uh let the persistence provider pick any appropriate
strategy for the particular database in our case the database is h2 so that's about the entity class let's call this as entity class now let's move to the repository so you need a repository class like i explained in dots in that three tier architecture you always need a dow layer or a repository layer to store your student object into the database so we have enabled the student object to be Saved but we need a handler which can save this particular file this particular object into the database and the repository classes are the classes which will
allow you to do that so you create a very simple interface you what you name whatever you want to name your interface as and then you say extends jpa repository the type of the object and the unique identifier of the object so the type of the object is student here and the unique identifier of the Student object is the id which is of type long so you need to just supply the types type of the object type of the primary key or the type of the unique identifier and this annotation is coming from spring boot
you can see specifically spring boot data library which we added so you just need to create an interface extend it from jp repository and make sure that you add this annotation as well spring heavily uses the concept of annotations and this Will help spring understand that this is a repository layer class and it will apply some more metadata to this class while this class is running in the jvm so what happens here you just created an interface you did not provide any method to create or any method to delete or any method to get a
student object because all of that is automatically provided by springboard via the jpi repository class if we go inside this class and if you scroll down you'll see the find all Method find all find all by id save all flush save and flush delete etc and if you go further up this also extends the paging and sorting repository which provides pagination and sorting facilities but the interesting one is that pagings and sorting repository again extends a crud repository and if you go to the crud repository you will find all the basic methods to save an
entity save multiple entities find an entity by the id that's why it needed That long type to make sure this that it can execute this method you can check the existence of an object find all the entries find all by id count them delete them so all the basic crud functionality so we call them as crud because the reason it is called crud because create read update delete that's the basically the generic acronym so because uh this cred repository provides all the methods and their implementations automatically we Do not need to write any code at
all so that's why spring boot is so awesome and that's why springboard is very popular because it's zero code in the repository and you still get all the crud functionality so that's about repository now we have covered the entity class we have covered the repository class we have covered the entry point class now the only thing which is remaining is the is the end point the http endpoint which i Talked about and that you can create by creating any class generally try to suffix it with the controller so that your core developers can easily find
this class and make sure that you put add the red rest controller annotation on top of it this annotation will allow spring to treat this particular class as an endpoint class then you can auto wire the student repository so if you remember i talked about the whole dependency injection and inversion of Control so here dependency injection is in action so here you are just telling student controller to auto wire the student repository and now what will happen that at run time student controller or actually spring will automatically create an object of the student repository and
supply that object of student repository to student controller so you as developer do not have to create an object of student repository explicitly that's the benefit And that's how the dependency injection is working because you inverted the dependencies now the dependency is just injected into the class and as a developer you don't have to take control of creating the objects it's the spring which will automatically read the autobot annotation and will automatically supply an object whenever it is required then i have two methods here since we are talking about http endpoints so i have represented
a post Method here and a get method here the way you will write a post method is via at the rate post mapping annotation and then you can provide the url path on which somebody should call your endpoint to save something so for example somebody can call it http localhost 8080 student slash create whenever they hit that url the control or that request will directly hit this particular method why because you have provided the url mapping here in the post mapping Annotation so since it's a post method there would be request body what is the
actual request body which the client is sending and you can represent its uh request body with the add direct request body annotation and you can provide the type of the request body and here i'm saying that hey if you want to access this particular url yes all good but you need to supply me with a text representation of the student object or a json representation of the Student object and then i inside the method i'm calling student repository dot save which is going to save the student object which is coming in so you see there's
a lot going on here i will i will show you how the student is represented in the request body as well and then i will come back to how it got converted from json to java but this is how you can store this particular student object you can hit this api as many times as you want and keep Inserting a new student object every time then if you want to fetch a particular student then you can do that by supplying the slash student and then in the curly braces there's an id written here so basically
you can supply the value of the id of the student so generally there would be another method here which would be find all to see all the students uh and with their id and then you can pick a particular student's id supply that student id value here Dynamically that's why at the curly braces curly braces supports dynamic value so here it can insert one two three or whatever the student id you want to fetch the value for you provide that value in the student slash id and all good then some if somebody is hitting the
url with saying localhost 8080 slash student slash one then student with the id one will be returned from the request and you need to put add direct get mapping to make sure that This method is treated as an http get method and you can provide the type you can say get student and here this dynamic value is captured with the add the rate path variable because you need to know the id right whatever id somebody has supplied in the url you need to capture that ide and then use that ide for calling the repository so
that's you can do that by using the add variate path variable so here i'm just saying whatever id is coming in i will Store that value inside this ide once i've done that then i can again call student repository dot find by id which is again a built-in method provided to me by the crud repository i can supply the id and this actually is going to return an optional object which is uh which is an object which may or may not contain a value so it said just a types of defensive programming style so this
will return an optional and you can call a get method to return the actual Student object this will return an optional of student so option of student means that this optional object may have a student or may not have a student why did string do that because the id somebody is supplying that id can be invalid also right so optional object takes care of that that if there is no student found then you will not get a null pointer exception and if there's a student found you can return that so it's just a defensive programming
style Which spring has adopted by returning an optional of the student object rather than directly the student object but if you're confident that this particular option of student object does contain a student object then just call optional.get which i've called here which will return the actual student object sitting inside the optional object you can read more about the optional object and its usage uh from the official java docs and there are Tons of examples available on it on internet so this is about the controller uh we have covered all the classes now it's time to
run the application so you go to the command prompt you go to the particular file folder location and there you just say mvn spring hyphen boot colon run so i just hit enter and this is going to run the application it's going to split some logs here and if everything is fine You will not get an error and you will just be getting a message saying that application got started and it's running on tomcat localhost 8080 with no context url so this is not a web application this is a rest full web service right this
is a restful service this is not a web application so there is no web interface so how do you access this you just have an http url so you can use any of the rest client available on the internet there are probably hundreds of Different clients available on the internet you can choose any one of them i am using advanced rest client which you can also install as an extension from the chrome browser itself so if you just if i just open the chrome browser and i just say rest client if you just write this
and hit enter you will get many different options and the first option you get is from google play stores app store so you can go to the app store that basically the chrome web Store not the play store but the chrome web store and you can just install this since this is already installed you can click on launch app and it will open this interface for you so this is pretty uh this is not a tutorial for advanced rest client so i'll just be quick here you can choose the method type which you want to
hit so let's say you want to do a post and then you can provide the url here so remember the url which we put here in the controller method this has To exactly match so http localhost slash student slash create should be the url so let me just copy paste this one here okay so the url is good here it's a post type of method which i want to do and i want to hit this particular url now i need to supply the content type and the body so in the content type you can choose
application json because i'm going to supply a json object and in the body this is how the json object looks like advanced risk client also provides A nice visual interface to basically uh create this json if you are thinking that json creation is very tough it's not actually tough it's just curly braces and then you put key and value key value comma let me just put an enter here so that it's more readable so you just put curly braces starting an end and then you just put key value you put a key which is the
variable name and the variables value variable name variable value and these keys have to exactly Match the students properties so the student.java had this name age and address right so it has to exactly match otherwise this will request will fail so this is all good now i can send this particular request when you click send it is going to hit my spring boot application which is running on localhost 8080 it is going to call the student slash create method it is also going to convert this json into a java object because here i am supplying
a Java object so it will convert the json which i'm sending from here to java object automatically and it is going to automatically save it here because i've called the repository.save method so let's hit send here once i hit send i get a 200 okay it means everything went fine and in the response header i get the object back because i have returned the object here you see this save method is going to return the same student object which you created uh so Everything is good here my object has been stored here and now it's
time to fetch the object so it has already been saved into the h2 in memory database and you can obviously go and connect to the in-memory h2 database and have a look at it but for simplicity i'm just going to do this here and let's say the first object is generally added as the id 1 by default by the h2 database so let's hit this particular url when i hit this url it is going to Hit the student controller here and in the student controller it is going to hit the get student method which is
having a student id url and it is going to find the database with that id and if it finds a student object with that id it is going to return that so let's confirm that now let's hit this particular send button and it's going to hit a get request with this particular url springboard is going to find if a student with the id 1 exists in its Database so once i hit send i get a 200 okay and you see in the response headers i get the same student object back which i added let's try
with 2 now let's see what happens i see 2 and i get 500 internal server error because there is no object stored in the h2 database of the spring application with the id 2 yet because we only inserted one object that's why only one student object is there and the first id which h2 database Created for it automatically was one so when you hit for get request with a student id one you get the object when you put an invalid value and you hit this you get a 500 internal server error you can also make
it look nice by not sending the 500 internal server error and sending a nice exception from the back end so from here you can also send a nice exception that if this object is not found you can say something like that or else throw which is again an Optional object and here you can supply a particular type of exception which you want to supply instead of just throwing 500 internal server error but that's just additional thing additional defensive programming you can do you can add more and more validations and constraints into this project as you
build this project in a more complex paradigm so this is basically what i wanted to show you that and that we have created a spring up boot application we Have connected it to a database we haven't created also an http endpoint with student controller we ran that application we used any random rest client in my case i used advanced stress client and we first did a post request we provided the exact url the url has to exactly match with the controller url and then the body the request body also has to exactly match with the
student objects property especially the case of the names have to exactly match so if This all this matches then you will get a response back that the object has been created if you want to fetch the value of the object you're going to use the http get method and you again provide a url which has to exactly match to some method in some controller in the spring boot application which is running on localhost and if you provide the right id you are going to return get a valid result if you provide an invalid id you
are going to get a 500 internal server Error and from here on you can make this controller as robust and as mature as you want you can add find all method you can add update student method you can add a delete student method you can have all different kinds of filters like for example return to me all the students starting with the name a or return all the first students with the role number one and hundred are between one 100 so you can write as many endpoints as you want and Build this application in as
with as much maturity and as much complexity as you want and that's all i want to cover in this particular lecture thank you and we'll meet again in another session thanks to our training experts it was really a wonderful session i hope this session was informative and interesting if you have any queries regarding the topics covered in this particular tutorial then please feel free to ask in the comment section Below our support team will be happy to help you out with all your queries until next time thank you stay safe and keep learning [Music] hi
there if you like this video subscribe to the simply learn youtube channel and click here to watch similar videos to nerd up and get certified click here


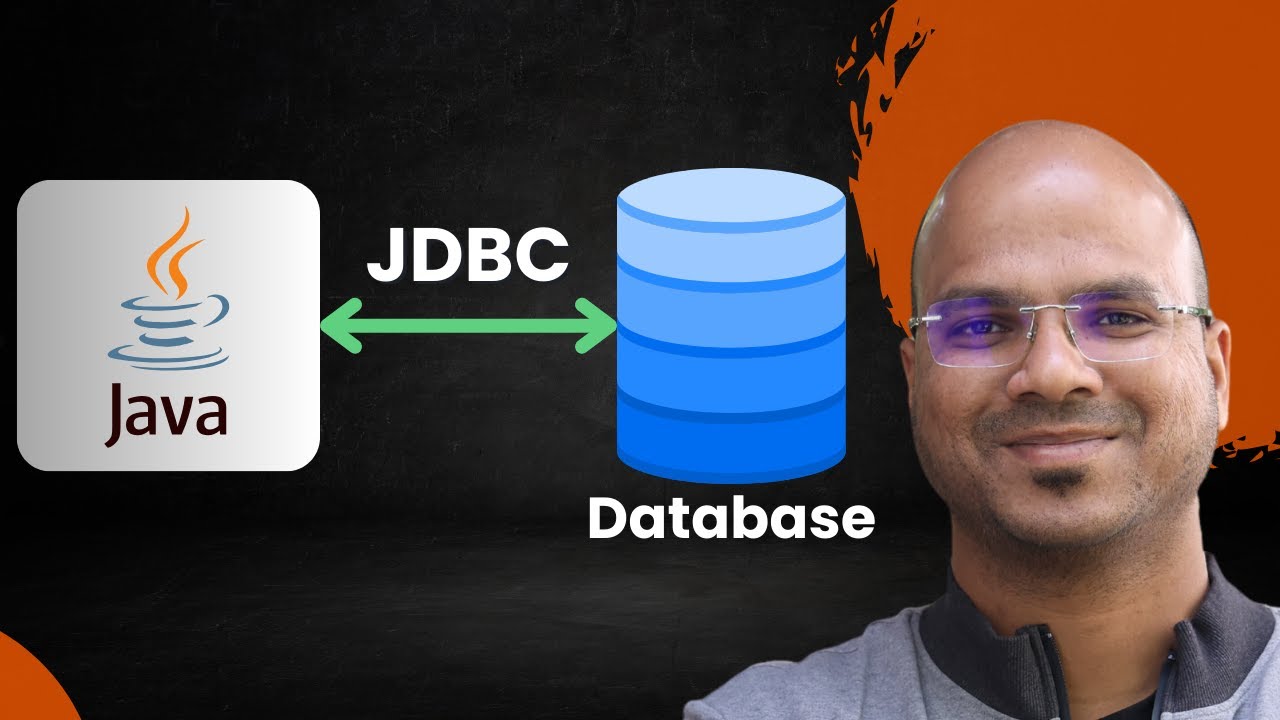


![Java Full Course [NEW]](https://img.youtube.com/vi/Qgl81fPcLc8/maxresdefault.jpg)