If you've been trying to build websites with top tier AI tools like Claude Code or anti-gravity, chances are they're still coming out looking like this. Templated, clearly AI, and lacking any sort of premium unique feel. And no matter what prompt or skill you invoke, you still get stuck in this AI slop trap.
But here's the thing, the prompt isn't the problem. The real problem is we aren't giving it context in the right manner. So to solve that problem, I'm going to give you my four-step framework for creating high-end premium quality websites using tools like Claude Code every single time.
This requires zero design skill, zero technical experience, and we're going to knock it out in under 30 minutes. So let's strap in and get started. So, what is the secret for creating these premium animated web pages using AI?
How do we get these super cool motion graphics? How do we do the glass morphism? How do we ultimately create something that looks like it was actually generated by a web developer instead of Claude?
Well, the secret isn't a prompt. The secret is simply a four-step process. And that four-step process is really simple.
Step one is inspiration. We need to go out there and we need to find web pages we actually like. and essentially copy them.
Step two is going to be build, right? We're going to take our inspiration, we're going to bring it to Claude Code and we're going to have it actually start generating some assets for us. Step three is refine.
That's where we're going to take the template we've built and we're going to give it our voice, our brand, our messaging, and we're going to get detailed in terms of how it actually looks with all the little bells and whistles. That's where we're going to use things like 21st. dev to actually customize the components that we're going to use.
And step four is deployment. How do we actually get this thing out on the internet so people can use it? And that's the framework we're going to cover.
Inspiration, build, refine, deploy. And by following these four steps, you can essentially create any website you like. So step number one is inspiration.
This is where we're going to go out into the wild and find a premium website whose style, whose vibe we essentially want to emulate. And we're going to do two things once we do that. One, we're going to take a bunch of screenshots.
and two, we're going to grab his HTML code and we're going to take all that and we're going to bring it to our agent coder of choice. Now, you may already know what website you kind of want to copy, but if you don't, here's three great resources to find things. The first one is Drbble, and that's where we're at right now.
It essentially just has a whole bunch of web design stuff that you can search through up top. Right now, we're looking at landing page SAS. So, if I find one I like, I can click on it.
I can kind of see all the assets, right? It's great. Another one is godly.
ebsite. And again, I'll have links to all these inside of the school, the free one, links in the comment, and it's just an infinite scrolling page where again we can look at websites. I can just click on it.
I can visit the website, right? Easy enough. Number three is awards.
com with three W's. Again, another cool place to kind of see what people on sort of the bleeding edge of web design are doing. Now, for today's video, I essentially want to create something that looks like this, which is openands.
dev. I think their website's really cool. They got an interesting color palette.
The background's really neat with like the scrolling code almost that reacts to your mouse. Overall, I like the design. And we're essentially going to be creating a web page for our SAS product, right?
So, what do we need to do? Like I said, two things. One, I'm going to take a bunch of screenshots of the landing page.
And then two, I'm going to grab all the HTML code. Now, how do we do that? Super easy.
Either hit F12 or rightclick and hit inspect. And then we have all this scary stuff over here on the right side. What you want to go to is elements up top.
We want to go to styles right here. And then I'm just going to copy this entire thing. And I'm ready to go.
That's pretty much it for step one in terms of inspiration. This is our idea, our version of grabbing context. So when we show up to Claude Code or anti-gravity or whatever, I'm not just saying, "Oh, I want a cool website that's sleek and modern and minimal.
" and try to articulate it with words. No, we're using words plus picture plus code, which turns out is way easier for the AI to actually act upon. So now it's time for step two, which is the build phase.
And I'm inside a cloud code. And again, it doesn't have to be cloud code. It can be any agent coding agent.
And the prompt I gave it is pretty simple. I said, I want to create a React/vite project and copy this web page. The following are screenshots of the page as well as the HTML code.
I want a pixel perfect replication. Here's the URL. Gave it the URL, gave it the screenshots, and then pasted the HTML code.
Now, we're just going to let it go to work. So, as this is building, let's talk about the next steps. Because while I'm creating a clone right now, obviously, I don't want to be open hands.
The idea is we are going to get a template that we've built that is as close to this as humanly possible. And once we have something that is essentially a 99% solution, then we're going to add our own messaging, assets, colors, whatever. The idea is we just want to get that base as close as possible first because it's much easier to have something that looks good like this and then tweak it than to start with nothing and try to prompt our way into this, right?
How do you actually articulate all these things? It's actually kind of difficult. But again, with all this context that we fed it, the screenshots, the code, and the website itself, it's going to be able to do a pretty good job.
So, Cloud Code just finished creating the copy of the web page, if it doesn't give you a local host to look at. Tell it to create a dev server so you can take a look. It's going to give you a link.
Just follow that and it will open up your browser. So, on the left, we have the version Claude came up with. And on the right, we have the original.
So, right away, the colors look pretty similar, but we notice there's a few things that are off. like we don't have this really cool background that we got from the original open hands that we can see on the right. You know, you can obviously it has motion to it and it changes based on our cursor position.
Also stuff that are different are kind of the buttons for the trusted by engineers. Ours is ours is scrolling. Theirs is just static but other than that it's essentially I would say as we go through this essentially like an 80% solution.
We can also see that some of the assets are different. Like we used more generic ones on this portion and they had probably their own custom assets over here on the right. But overall, right, pretty close.
Like I would honestly be okay with this because from here I can start making changes I want to make to the background for example because I don't want to copy their background exact exactly. I'm going to want to put my own flare to it. Same thing with the buttons I'm going to want to adjust.
I just wanted it in terms of the general form and the colors and the templated style, right? This is good enough for me to work off of. And again, how long would it have taken to essentially recreate this if we were just doing prompt after prompt after prompt?
We basically oneshot this, which is great. Now, if there are significant differences that you want changed right away, go ahead and do that. Alls you would do is you would take screenshots of the main page or you can just prompt it using words and say, "Hey, can we change the buttons?
Hey, can we mess with the background right now? " Right? It's that simple.
Just get it to a place through prompting until you're ready to start adding your own messaging to it. And so now we can move on to step three, which is the refining stage. And this is where we're going to spend most of our time.
Now, the first thing I like to do really is to start adding my own messaging. So, what I'm going to do is I just open up voice on cloud and I'm just going to give it a stream of conscious explaining essentially what my SAS product is, what the general theme is, the general messaging, and then I'm going to tell it apply this to the web page we just created, right? Change their verbiage into mine, but keep the template the same.
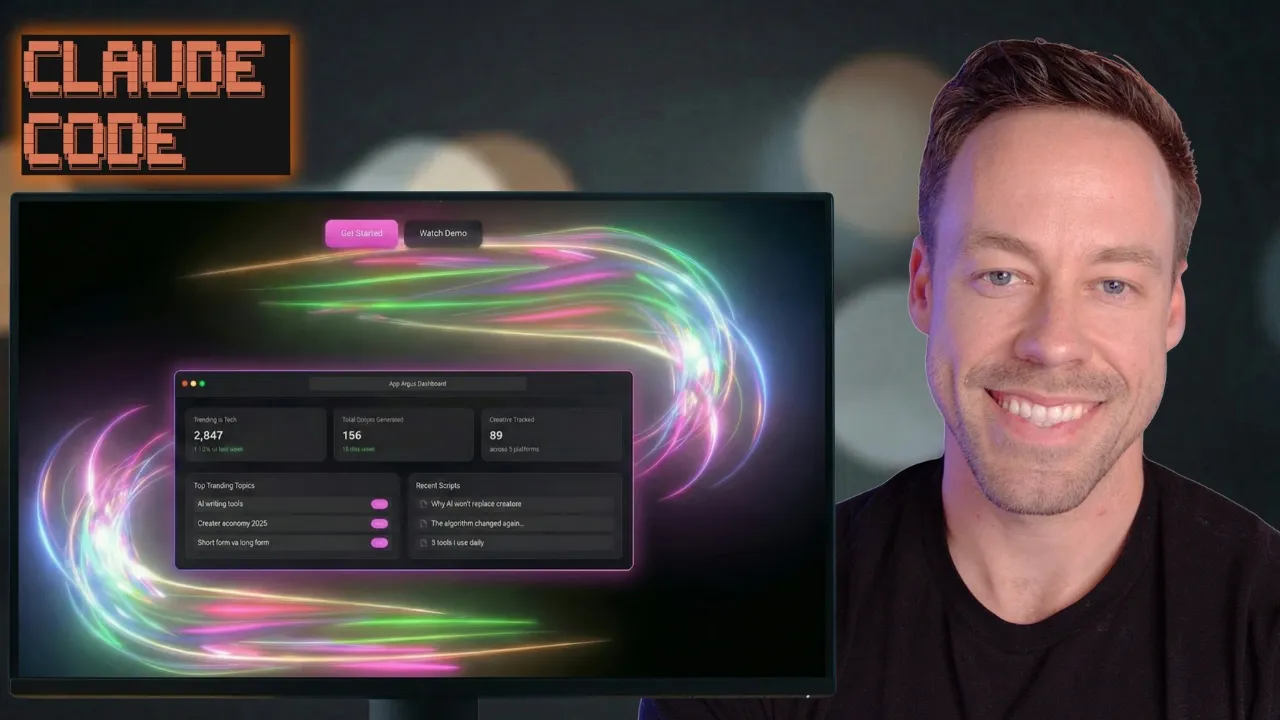
And so, that's exactly what you see right here in this wallet text. Essentially what I said was for our product that we want to create the landing page for. It's for a SAS product that we're going to call Argus and it's a essentially intelligence agent for content creators.
What it does is it scrapes the web, scrapes Twitter, YouTube, Instagram to find trending topics in their niche and then come up with scripts in their voice based on that trending information. Right? So it's a tool for content creators.
It's a SAS product. And so that's all I said to it. I was like, "Hey, I want to replace the messaging.
" And then I said, "What questions do you have for me to be able to input this? " And we'll see what it comes back with. And what I expect is it should have some questions, for example, when it comes to right this, right?
This is a code output thing over here on the left. And we'll just full screen this, right? Probably doesn't fit for our particular SAS product, right?
Obviously, it's going to need to change some of these things like why people choose Argus instead of open hands. Same thing with this, right? We're now tailoring it to our product, right?
So, first it's asking about colors. We will stick with the current one for now and we'll change that later. What is our target audience?
We're going to do all content creators. What's the primary call to action? We want them to start a free trial.
Brand tone, we're going to go for bold and energetic. And then we're going to submit that. So, Claude told us it changed the messaging.
And if we look at our page now, you can see it's totally different, right? It says Argus instead of open hands. It changed the hero text.
Right? Now, it says start free trial. We don't have companies.
Now we have platforms and everything's related to our content creation tool. Yet at the same time we've maintained the same design template which is what we want. And so now moving forward our job is to continue to iterate and refine this till we get it to a place that we're happy and we can go as deep with this as we want to.
And so this is where I now want to show you how to use these websites like 21st. dev dev to actually start adding really cool stuff that otherwise would be kind of difficult to prompt your way into. And to start, let's do something about this really boring background.
And this is where we can start using really cool tools like 21st. dev or code pen. These are essentially repositories with a bunch of different components for web design.
So, for example, we talked about backgrounds. I can go to the section over here on the left on 21st. and see a bunch of different cool backgrounds that we can easily implement into our project.
For example, these background paths. These should look familiar to you from earlier, right? I can essentially just click this button where it says copy prompt, bring that prompt to claude code, and it's going to implement this for me.
And it's also really customizable once it's inside there because it's just code, right? I can change how fast these move. I can change the opacity, the color, anything I want.
And that doesn't apply to just backgrounds. That applies to all sorts of UI components. So things like buttons, right?
Things like carousels, right? Or things like cards. So anything that you can mess around inside of your web page, there's probably something on 21st.
Or CodePen, which works in a similar fashion that you can take a look at. And if you're not someone, if you're someone who doesn't come from a web design background like me, this is huge because you kind of just don't know what you don't know, but once you see it, you know it, right? Right?
And this makes it really easy to implement instead of being like, uh, Claude, do something where like these things look like this and there's highlights, right? That's going to be a tough cell for Claude code to actually get you an output you want. So, let's go back to backgrounds because that's what we talked about.
So, like we saw in the intro, let's check out the background paths one. Now, obviously, this is in sort of like a dark mode, but let's try to implement this for our current web page with sort of that current color scheme we got. So, I'm just going to copy prompt.
And I just said, can we implement this as our background with a color scheme that makes sense? And I pasted it in there. And again, what am I pasting in there?
What came from that copy prompt? Well, it's just a bunch of code, right? That's all it is.
So, we can see here it added that component from 21st. dev pretty easily. And now I can just continue to adjust it as I like.
As we can see, it's only in the hero. But let's say I wanted that going across the entire background, no matter how far I scrolled. Let's say I also wanted to kind of give these cards like a glass morphism effect so I could see the lines going through the back.
Well, let's try that out. So, I gave it a prompt to do exactly that and it knocked it out of the park, right? We see that animation in the background going through the entire page.
Now, right away, I'm starting to realize I hate this section. I hate how it looks. I want to change this.
And also, I don't like how these cards look either. I feel like we could definitely give it some more pop, whatever that means. And this essentially becomes your workflow, right?
Make a change, see how it works. go back into 21st. dev, see if there's anything that speaks to you, bring it to the AI, repeat, repeat, repeat, iterate, iterate, iterate.
That's pretty much it. And what you get to the end of that iteration cycle is this, right? You can see sort of the bones of that openands.
dev webpage we originally cloned, but you can also see a bunch of different 21st. Components that we added to the mix, right? There's our lines in the background, but we kind of toned down the opacity we first saw, and we added a little bit of color.
We changed what the cards looked like and we got rid of sort of the double feature we had before. Right? We added some weight to the buttons and even has a little bit of a pop and sort of that shine.
Right? This is the process by which you create highquality web pages with AI which then brings us onto our fourth and final step which is deployment. How do I actually get this thing out there on the web?
And deployment is a two-step process. First, we're going to create a GitHub repo which is where we're going to push our code. Don't worry, AI can do that for you.
And secondly, we're going to create a Verscell account. Verscell will be connected to GitHub. We'll sign up with our GitHub account.
And from there, we connect our GitHub project and it will automatically push it to the internet. It's going to give us a URL and everything so people can actually visit it. So, to use GitHub, very simple and very free.
We're just going to go to github. com and create a new repository. Go ahead and give it a name.
Doesn't really matter. And then you're going to go to create repository. You're then just going to copy the URL of your repository.
Should be something like github. com/your username/the project name. You're then going to hop back into cloud code and just say, "Hey, push this code to this repo and paste the URL.
" Now, if you've never connected your GitHub credentials to Cloud Code before or your whatever Genta coder you're using, that's okay. It will walk you through the process of how to do that. It takes like 30 seconds.
As that's happening, I want you to go to versell. com, create an account, and sign up using your GitHub credentials. Then going to head to the project section.
Go to add new project and then you should have the git repository populate right here. Right, you see YouTube demo. I'm just going to hit import and it's going to import the project for me.
You'll get to this page and you're just going to hit deploy and then the deployment will begin. If you run into any errors for whatever reason, just copy paste the errors it gives you back into AI and it will fix it for you. No problem.
Once it's successful, you'll see a page like this and it will give you a domain. If you have your own custom domain, you can add that very simply as well. You just follow the domain and it will take you to your web page.
That's how easy deployment is. So, that's where I'm going to leave you guys for today. Hopefully, this video was able to illuminate the four-step process for creating premium looking websites with AI.
And remember, first step, inspiration. Go out there, find a web page you like, and take screenshots and grab the code. Step two, we head to our coder of choice and tell it to essentially replicate that web page we found.
And then we move on to really the meat and potatoes, which is step three, where we refine, refine, refine, we add our messaging, we add our custom components, and we get it looking exactly how we want it to. And lastly, we head to GitHub and Verscell to deploy this thing. So, as always, let me know what you thought in the comments.
Make sure to check out the school communities down there in the pinned comment. The free one has tons of free resources. The paid one is for those of you who are a little more serious and are looking to essentially make money with AI, whatever that looks like for you.