Today I'm going to show you guys the quickest and easiest way to set up any end with WhatsApp so that when someone messages our business account, we can have an AI agent on the back end responding to them, booking in a meeting, whatever we want them to do. So right now you can see I have a WhatsApp trigger and if I click into this, you can see that we need to create a credential. So if I click on that, it prompts us for a client ID and a secret.
So we have to head over to business. fas. com in order to set this up.
So this is what the page should look like. I'm going to go ahead and log in with my Facebook account. And once you log in, it's going to look like this.
if you've already set up like a business portfolio. If you haven't, on this lefth hand side, you're going to expand this open and then down here, create business portfolio. And yes, this is Hercules Detailing, which used to be my car detailing company.
Anyways, you're going to go down here to the bottom left and click on settings. And then right here under accounts, you can see apps. So, you're going to click on that.
And then you're going to add an app right here. And you're going to click on create a new app ID. Now, right here, it says your account must be confirmed before you can create new app.
So, please confirm your account by adding a mobile number or credit card. So, if you haven't done that, you're going to go ahead and confirm your account real quick. All right.
So, now that I went ahead and confirmed my account, I can actually create an app ID. So, I'm going to click on that. And what we're going to do is go ahead and create this app.
All right. So, I just threw in Nitend test as my name. I'm going to hit next.
Now, we have use cases. I'm just going to scroll to the bottom and hit other and continue on. Now, we have to select an app type, and it cannot be changed after you create the app.
So, for this case, I'm going to go ahead and use business. So, we can use WhatsApp. And then, we're pretty much just confirming the details and selecting the right business portfolio for this to go under.
And now, I'm going to click on create app. All right. All right.
Now that we've got to this screen, what we want to do is set up the WhatsApp. So, I'm going to click on the setup button right here. And we're going to go over to the lefth hand side under app settings and click on basic.
And now, here's the screen that we were looking for where we can right here get our app ID and our secret. So, I'm first of all just going to copy this app ID. We're going to paste that right into here as the client ID.
And then I'm going to go back into this screen, copy the app secret, and paste it into Nitin. There we go. Everything's been set up.
I'm going to hit save. And we should get a green message right here that says connection tested successfully. Okay.
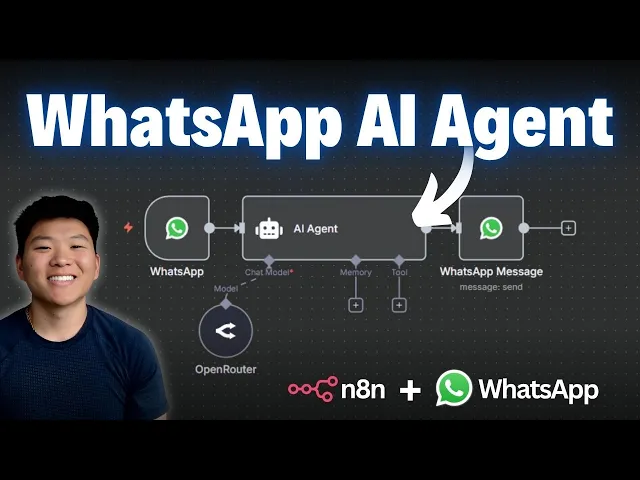
Okay, so now we have the trigger set up, but we need to make sure we set up like a number that it's going to text from and that we can respond back to it. And unfortunately, it's not super simple because there's like two different types of credentials. One for the trigger and one for the node that's going to send a message back to that same number.
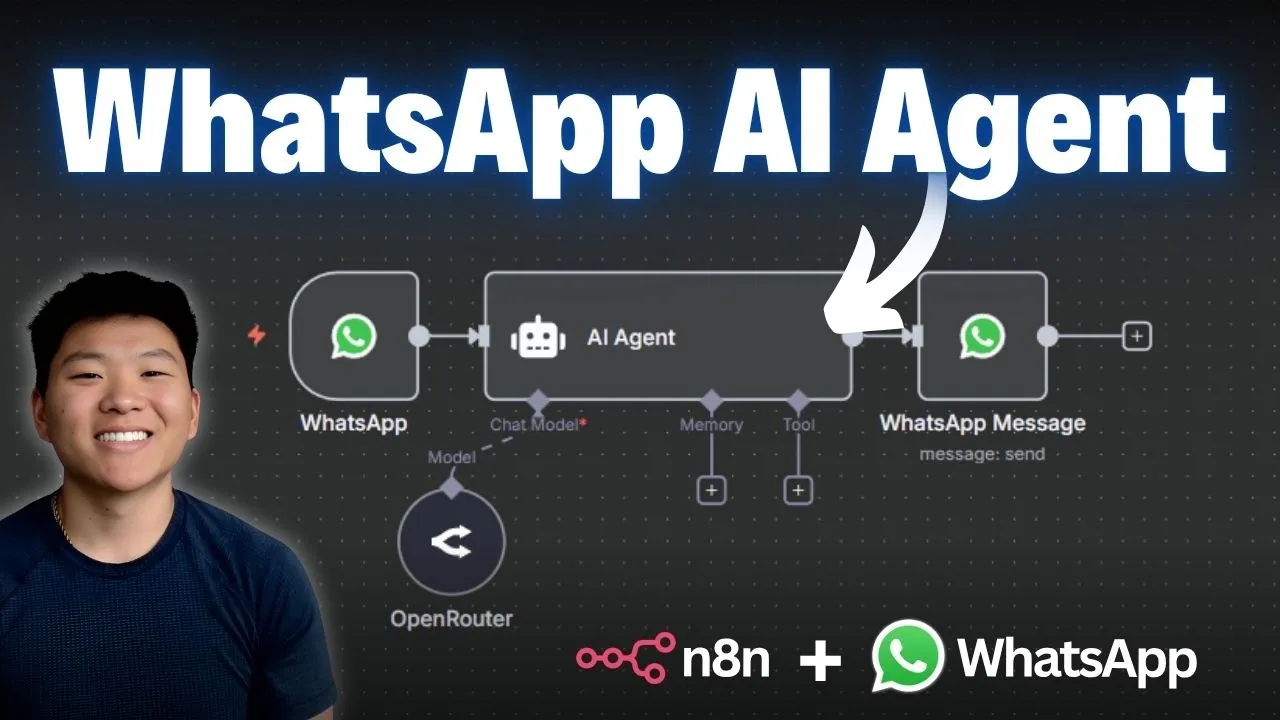
So, let's set that up real quick. So, I'm going to click on the plus right after the WhatsApp trigger. And I am just going to add an AI agent just so I can show you guys how it'll look when you have an agent getting your messages and responding to you in WhatsApp.
And now, we just need to connect an AI chat model to give the agent a brain. So, I'm just going to hook up Open Router real quick. And then what we want to do is add another node after this agent to send a message back to WhatsApp.
So, we'll click on WhatsApp BusinessCloud and we will choose send message. And now, here's the issue. You can see we don't have a credential set up because this is a different type of WhatsApp node.
So, we're going to have to create a new credential, but this is different than a ID and a secret. This is an access token and a business account ID. So, let's head back over to our Meta Suite and set this up.
All right. So, we're going to switch back over here. And what we need to do now is on this lefth hand side under WhatsApp, we're going to click on API setup.
So this is what your screen should look like right here. You can see we have a test number, which is one that Facebook is just going to provide. You can go ahead and connect like a business phone number if you want, but right now we're just going to stick with that test number.
And then we also need to input a recipient phone number. So I'm going to throw that in there real quick. Now that we've set that up, we can go ahead up here and click generate access token.
So I'm going to click on this button. It's going to ask us if we're good to continue on this Facebook account. So NAND test will receive your name and profile picture.
I'm going to continue. You can opt in for just this WhatsApp account or you can just opt into all current and future. So, I'm going to do that.
And then we're basically just reviewing what this app can do. So, manage your WhatsApp accounts and manage and access conversations in WhatsApp. So, if you're good with that, you'll hit save.
And now that we're connected, what we have is our access token right up here and our business account right here. So, I'm going to copy the access token. And I just pasted that in right here.
Switch back over. We're going to grab our WhatsApp business account ID and then we're going to paste that in right here. All right.
There we go. We're going to hit save and hopefully we get green once again. Connection tested successfully.
And now we can go ahead and test out the whole flow. So I'm going to connect the sender phone number which is the test one that Facebook gave us. I'm going to add in my WhatsApp number with the country code and everything so we can test out if it works.
And then for the text body I'm just going to put test to make sure that this actually goes through. All right. So let's close out of here and hit save.
And so right now just because our workflow is inactive, we're going to have to hit execute workflow every time to make sure that our WhatsApp trigger is listening. Once your app is in production, you won't have to do this. All right.
So, what I did over here is my WhatsApp and this is the test number. So, I'm going to hit execute workflow. This trigger is now listening for us.
So, I'm just going to right here say hi. And we'll see if our edit in workflow grabs it, which it did. But now, we just have to actually configure this agent real quick to accept the message.
So, I'm going to click into the agent. For the user message, I'm going to choose define below. And all I have to do is drag in the actual field that has the variable, which is our text message.
So that would be right here at the bottom. You can see the message I sent was hi. So we're going to grab that body field.
And now the agent's going to see whatever we send to it in WhatsApp. Okay. So that's set up.
I'm just going to hit save. We're going to hit execute workflow once again. And now it should be listening to us.
I don't know why visually it's doing that. Just a little bug. But I'm going to say hello.
The WhatsApp trigger is going to get that message. The agent's going to think about it and respond to us. And we get the message that we set up, which was test.
So from here, you're basically done. All you want to do is configure the agent's response to be the thing that's sent back to us in WhatsApp. So the way we do that is we click into this node right here.
Instead of sending over test, we're going to send over the variable, which is whatever the agent responds to us with. So I'm just going to grab the output, put that right here. And now when we do our final test, this should work and we can have a conversation with this AI agent.
So once again, I'm going to hit execute workflow. I'm going to come into WhatsApp and just say, tell me a joke. And it's going to get that message.
The agent's going to actually write us a joke. and we get it back to us in WhatsApp. It says, "Sure, here's one for you.
Why don't scientists trust Adams? " Because they make up everything. And from here, you can obviously like connect memory.
You can connect some tools. You can connect your different CRM or whatever you need to do. And now people can access this phone number.
Once again, you can switch out for your business phone number. And you should be able to have this WhatsApp NAND automation built and running for you. And another thing just to keep in mind as well is that if people are able to just constantly text this number right here, if you're using an open router or like an open AAI or Enthropic or any closed source AI model where you pay for credits, it will be eating up your credits every time someone messages it.
So someone spams it with like a million messages, that cost will fall on you. So just wanted to throw that out there real quick. But hopefully now you are set up with WhatsApp and you are good to go and start building some automations.
And if you're looking for some support when you're setting up this type of automation on the back end with NAND, definitely check out my paid community. The link for that will be down in the description. And it's a really cool space of almost 2,000 members who are always building every day with NADN.
Besides the community aspect, we have a classroom with two full courses, agent zero, which is the foundations of AI automation, and then 10 hours to 10 seconds where you learn how to identify, design, and build time-saving automations. I'd love to see you guys in this community. But that's going to do it for the video.
If you learned something new or this was helpful, please give it a like. It helps me out a ton. And I'll see you guys in the next one.