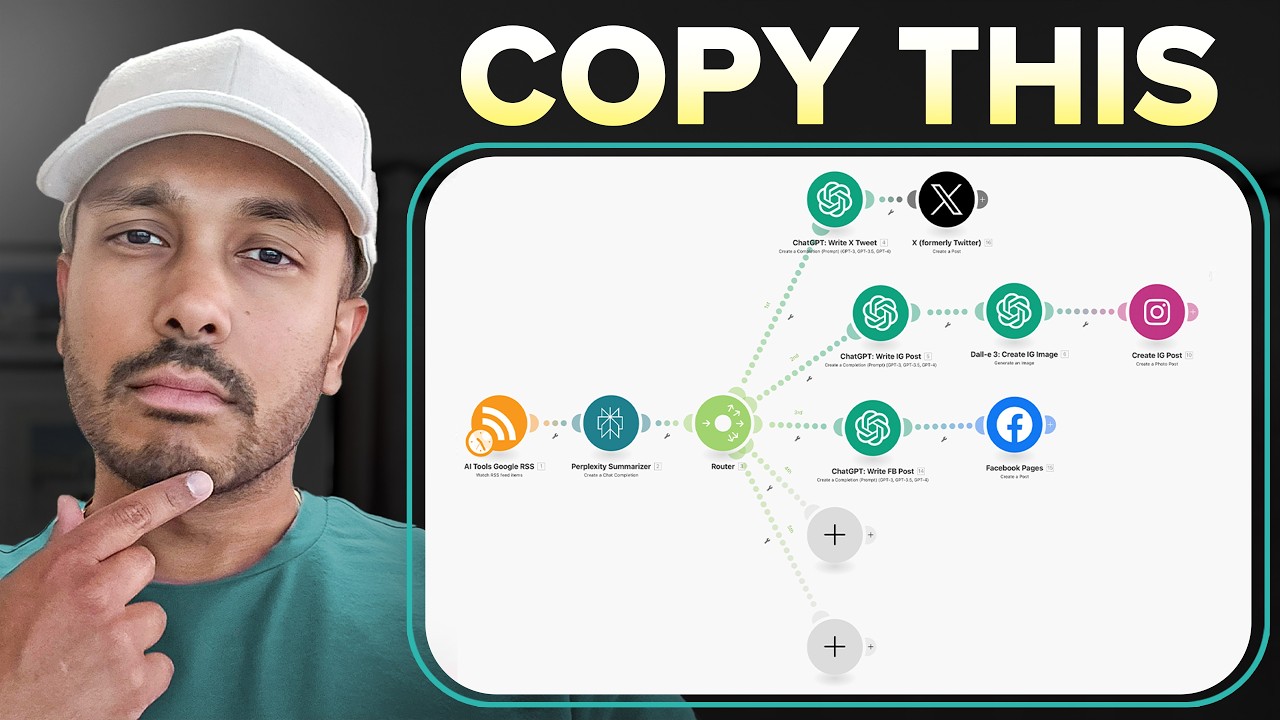
what is going on guys it's johon O and today we're going to be talking about how you can generate social media posts automatically but not just a couple but like you can generate to 10 or 20 or 50 or 100 however many social media posts that you want and the best part is is that it's completely 100% automated You Don't Have To Source the material you don't have to write the material you don't have to generate the images if that sounds like something that you're interested in let's dive in immediately all right so in front of me I have a make scenario here right and this is actually part one of two when it comes to this whole workflow and how to automate your social media posts let's break into what's happening at a high level overview so the first thing is is that anytime a new spreadsheet row is being added in this particular spread sheeet it's going to take a particular URL right this is a blog post this is an article online we're taking that and we're going to summarize that article using perplex di we're going to generate images we're going to generate a title we're going to generate descriptions and then post that particular summarized article onto medium onto Facebook onto Instagram LinkedIn um onto Tumblr onto X or forly Twitter onto Pinterest right and just to kind of give you guys an overview of what that actually looks like here's a particular LinkedIn article that we're writing here's a particular uh Facebook article that we're writing here's a particular medium article that we're writing right so all of this is happening on automatically now if you're thinking well man I don't want to spend the time to actually generate these particular links that is where the second workflow comes in because in the second workflow what we're going to do is we're going to automatically find articles or blogs online right and how we do that is we have RSS feeds that we're going through right so think about big news sites maybe like CNN or whatever right for example we're going through their RSS feed and then we're finding particular blog posts or articles and then we're pushing those articles into this particular spreadsheet and once they're added then it's going to trigger the second workflow so that we can automatically summarize that and post that summarized version of the article on all these seven different platforms and we're doing this at a daily interval so that we're only publishing once a day you can change this to whatever interval frequency you want maybe you want to publish once every 4 hours or so on and so forth but the option is yours now before we proceed onwards guys just take a look at this section down here where it says more you can actually import this exact workflow for free in the description below both part one and part two are going to be in the description and you can grab these 100% for free down below and you can start using this in a matter of minutes so what I'm going to do today is I'm going to actually be walking through how these these two uh scenarios work in make. com so that when you implement them into make. com and start using them yourself you know exactly what's going on and how to use them so let's dive into it so what we have here is we have a Google sheet right and it's a very it's probably the simplest Google sheet you'll ever see in your entire life but here it is is it's just one column essentially and it's just a list of different URLs right so we're just grabbing these URLs and then we're going to generate social media posts out of this so we're going to talk about how we generate the post first and then we're going to talk about how we can automatically grab these URLs from websites that you actually want to generate content off of so coming back in here we have this list and we're going to watch for a new row so any time there's a new row added so anytime there's a URL that's added to the sheet what we're going to do is we are going to use perplexity Ai and we're going to summarize the article so what perplexity is going to do here is it's going to take URL and it's actually going to go into the particular website it's going to scan the website and then it's going to summarize it for us now typically what I you know what most people might want to do is stick to chat gbt that's typically the most popular uh AI out there but the reason why we're using perplexity in this particular module is because uh chat gbt cannot actually go to a website and read that website and summarize it it doesn't have access to the web as of the as of the date of this recording but you can use perplexity to actually summarize an article on the web and then once we summarize that article what we're going to want to do is we want to generate an image and maybe you want to generate a carousel of images because maybe you want to publish multiple images on certain social media platform so you can go ahead and do that and if you do want to do that you just create multiple different modules here in this module it is using chat gbt and we're using specifically Dolly 3 to generate an image for us so if we kind of look at what this looks like if we come into Data here go into one and we go into this URL I'm just actually going to pull this up this is what the image is that it generated for us right so pretty cool to see that this image actually was created by artificial intelligence now let's take a look at the prompt here um it's pretty simple just generate a blog post based on the content of the summarization that we got from perplexity in the module before but we're just saying make sure the image is clear captures the Reger attention and is realis please do not include words numbers and any digits in the image so you can see here it kind of violated that rule by having Google AI um and the reason why we try and avoid that or you probably want to avoid that at least at the date of this recording is because you can see that it misspells the word so it's trying to create a word but it for whatever reason it just can't put the words together yet the model isn't good enough to be able to really semantically understand the words that it should be using in the particular image so as of right now you want to avoid words or numbers or anything like that in your particular images and then what we're doing as a step two is we're just generating a title here right so we want to make sure that we grab um well we from the uh summarization in perplexity once again we're pulling all the information from perplexity by the way but we just want to make sure that we generate a title for that particular blog post so in this case it says AI search Showdown Google overviews vers search GPT right so that's pretty cool so so far we've summarized the article we've generated an image we've also generated a title for it and this is where the real magic happens we have a router module and we have seven different paths that we're going to go down now it's up to your discretion guys you can have all seven paths if you want to post to all different social media platforms you can just have a couple really the choice is yours but I put all of them in here so that you guys can pick and choose what you want to do the first thing that we're going to do is we're going to generate an article on medium.
com so I'm just actually going to take a look at what that looks like here so the AI search engine Revolution Google vers open aai so you can see the picture here and then it actually gives us a beautiful article that's already pre-written so that's pretty cool and how it's being pre-written is by this uh prompt here so we're actually generating the whole article based on this one Chad GPT prompt here and you'll notice that these prompts if I just kind of come down here there's a common theme between these prompts uh at every single stage they're going to be quite similar but the prompts are going to be narrowing in on the particular social media platform that you're using so that you can get the best return back so in this case for medium we're just saying you're you're a content creator and you're writing a medium blog post and then it just gives specific parameters that it should focus on to make sure the blog post gives the best content possible and we're just adding a couple more assistants in here right and the first assist is is we need this blog post to be HTML and we want to make sure that it's taking that image that we generated in the previous step and we're including that in the blog post itself so you can see that it's coming up right here so that's pretty cool right so it's actually dynamically taking that image and it's inserting it into uh an HTML image tag so that it can be rendered on the screen here and there there's nothing that I had to do to actually get that other than just tell chat GPT to add that into the HTML and then one last assistant here and this is going to be uh very similar between all of the different chat gbt modules here but it's just making sure that not to include any information or text outside of the post because a lot of the times what will happen is it'll be like you know right before it actually generates the blog post it'll be like sure here's an excellent blog post for medium and you're like please do not include that I don't want that to be included in my blog post because when somebody reads it obviously they're going to be like what the hell is going on here said sure here's an excellent medium blog post and then you just look absolutely foolish so um you just want to make sure that it doesn't add additional context before after like a conclusion or an intro it also you also want to make sure it doesn't add any custom parameters like your name for example or for example link goes here it might say like insert your link here and then it's and but it doesn't provide the actual link it just tells you to insert the link so you want to avoid all of that confusion because obviously that's not going to reflect good on you right and um just make sure everything's polished and it's it's it's ready to be published right and as soon as we do that we generate the medium blog post so we're just adding in the content format HTML the title the content and then also the publish status statuses set to public now there is one magical component here which um is amazing and we have this set variable here so what's going on is that traditionally in make. com when you're going down all these different paths when you you can't access information from any of the previous paths so what happens is we start at the top we go down path one then path two then path three then path four and so on and so forth right but if you're going down path two here and creating that Facebook post you can't access anything in path one but with the set variable what this allows us to do is it sets the particular URL from this so that we can use that URL for this make post so we're just copying this URL here and it allows us to fetch that in all of the preceding paths that we can use that URL and dynamically insert it into all of the other social media posts so that when we direct people to an external URL we're directing them to a blog post that we created right so that's pretty cool now you can have this blog post in medium you can have this blog post on your website wherever you want it to be um but we're just using Medium as an example here and then the next step is Facebook so we're generating a Facebook post very similarly we're just giving it some simple prompts making sure there's no HTML markdown language or anything else and we're just making sure that it creates a post that's going to be um really engaging right so that we can maximize our likes and our comments and our sharing and all that kind of stuff and then we're just going to at the bottom here provide it with some examples of you know um hashtags and then make sure to include that post URL so it links back to medium and then of course we have a brief summary of the article you'll need to turn into this Facebook post and sorry about that I actually just uh edited this so that should be Facebook not Twitter Okay cool so there we go um there we have it and this is what the actual post looks like and you can actually see the medium link down here which brings us back to the particular post that we just created in medium so that's pretty cool awesome same kind of assistant here just making sure there's no custom variables and all that kind of stuff okay sweet same thing with Instagram as well so we have um the chat GPT option here and we're just creating a nice social media post and we're also including any relevant hashtags down below as well and then we're connecting that straight into Instagram and we're just providing the photo URL right so that we can have an image that we're uploading straight into Instagram and then the caption as well which is dynamically generated using artificial intelligence so that's freaking cool as well right imag is generated by Ai and the caption is generated by AI as well the next thing is we're generating a LinkedIn post we can take a look at what that LinkedIn post looks like here so we have a nice little description and then we also have the image down below so that's pretty cool and how we're doing this is we're first getting the post URL from medium right so that we have a link over to our medium article up here straight in that LinkedIn post and then we're generating a um a or a post using chat gbt right so we're writing a LinkedIn post summarizing the key points of the article and we're highlighing the important details and providing context as to why this top IC matters and then we're just briefly once again summarizing the the article that we found online and then we're just making sure that there's no um markup or HTML or any of that kind of stuff um in the particular post and then what we're doing here is we're actually generating a new image and the reason why we're generating a new image here for LinkedIn is because we cannot insert in a link our URL link here we have to insert a file right and when you generate these images using dolly3 you actually have to make the decision between whether or not you want to have that file format be a URL or an image file and in this case every other platform can accept a URL except for LinkedIn which can only accept a file upload so we had to regenerate the image here and attach it in this file upload here and then we're essentially good to go we have the the title we have the content all of that kind of stuff from um the previous AI prompts we did so we have the results here for the LinkedIn post and then we generated that title on this module right here and we're sticking that into the Linkin post so that is the LinkedIn uh portion completed and then we're going to Tumblr same thing we're just grabbing that post URL from um from medium so that in our particular tumblr post as well we can make sure to link back to our medium article we'll take a look at what that looks like in Tumblr so we have our post here and then we also have our article here so we'll just copy and paste this in links back very nicely once again to a particular site that you want to direct traffic towards which is super cool and um yeah we're just generating the actual description for the tumblr post here very similarly to what we did in the past as well and then same thing with X or formerly Twitter we're generating a um a tweet from open or open AI chat GPT and we're just making sure that it sticks within the 280 um character limit so that the Tweet doesn't get cut off right so that's really important is just sticking within the parameters of the particular social media platform and then lastly we have Pinterest here where we generated a pin board where we once again link back to medium and we have a uh pin that we generated automatically using artificial intelligence and we're just entering in once again another um we're creating another description using artificial intelligence directed specifically at Pinterest to maximize the likes comments all that kind of stuff on Pinterest okay sweet so that is part one of this course on how you can automatically generate social media posts however many you want in a particular day now let's dive into how we can actually generate these posts on auto pilot right so effectively we have a spreadsheet right now right in this spreadsheet we we could go into particular blog posts and we could copy them and paste them but that's just going to take a long time right and if you want to get something a bit faster maybe you don't want to have to think creatively on you know where you want to find all these blog posts there's actually an easier way to do this and we can automate this process of actually collecting all of the links and that is the second part of this um scenario here right so in this scenario what we need to do is it's a five-step sequence we start off with Json right and in this Json it's a very simple um data type if I just come in and show you what this looks like there's an array and what an array is is it's just a list right and we're giving it multiple RSS feeds so that we can go through each RSS feed one after another and find different articles that we can then push into that particular spreadsheet right so we're going to go through this RS feed here and I'm just going to pull this up here and this looks like this may look like jbr to you if you're not familiar with code but it's going to go through and find particular articles right that we can essentially use so we have this particular link here let's just pull this up right so it's going to take this particular article here right or whatever it's going to find in that RSS feed and we're going to go through each one of these RSS feeds one at a time and then post all the articles that we find into this particular spreadsheet which then can automatically post those um different social media posts onto all the different platforms so that's pretty cool so you can add as many RSS feeds as you want here it's really up to your taste and up to your limit uh but you know the more RS feeds you have here the the more content that you're going to be able to utilize right so that's pretty cool and what we're going to do with those different feeds is we're going to parse that information so if we take a look we're generating Json here and this doesn't this isn't super user friendly with make. com right so what we need to do is parse it to make it readable for make.