Welcome to this Cuda programming course where you will learn to leverage gpus for high performance Computing the course starts with an overview of the deep learning ecosystem and guides you through setting up Cuda and reviewing essential C and C++ Concepts you'll explore GPU architecture and write your first Cuda kernels Advanced topics include optimizing matrix multiplication and extending pie torch with practical Applications like implementing a multi-layer perception for the mest data set Elliot Alid created this course so what is Cuda or compute unified device architecture by Nvidia uh my name is Elliot and I'm an instructor
on free code Camp as well as a student studying for my computer science degree so in this course I bring to you Cuda for deep learning but don't let that repel you if you're not in deep learning because there's still a lot that we're going to Be able to cover uh many other fields of parallel programming so this is more oriented for deep learning but not specifically aimed at it um there's going to be a lot covered here so uh I'll show what the final prodject what the final project is first um so that you
can get a feel forward and see kind of what we're going to end up building by the end um and then we'll just kind of go from there so before we get started with anything crazy I should Include a disclaimer um this course may not be fully up to date by the time you're watching this if you're watching this 10 years years down the line from when I've released it it might not all be the same there might be things that are updated the new uh compute capabilities might be you know way better there might
be a bunch of different stuff happening so I'm not too sure where the ecosystem will be at in 10 years but as of 2024 this is pretty Much the best you're going to get so just trying to include that and I thought I'd try to make everything uh not entirely centered around time so you can go back into this version uh or or certain Cuda versions and reproduce all the same stuff it just might be a little bit different down the line if you're watching this later on so why did I create this course exactly
well a lot of these performance and kernel engineering jobs require a lot of knowledge they Require a lot of experience in the industry uh and it's just really hard to get up to that point where you're able to compete with the top and the best of the best performance Engineers so these are the people that are writing the training runs for like gbt 4 gbt 5 all of this um you need a lot of skill to optimize a massive neural network training run and inference on a larg data center or compute cluster so this aims
to prevent some of that manual Weaving on your part still encouraging you to do so U on your own but prevent some of that hardcore labor of going through and really figuring things out on your own from scratch uh that's one of the reasons why I created this another one is like generally speaking the point of writing GPU kernels or playing with code at all on the GPU is to run something faster so if you have a nested Loop um you know it's like 4 I in range 4J in range four 4K in range Whatever
however many you want to put uh essentially what parallel programming and Cuda allow us to do is unroll those so if you take like for example four ion range you could take each little thing in that and run that instruction on a different CA cor so if you have 10,000 cacor and you have 10,000 different iterations in your Loop then you can affect L do each iteration in a single instruction or a single thread on on the GPU so this is some of the things that Allows us to do you're going to use your job
of uh you're going to use your your knowledge of GPU architecture kernel launch configurations and a bunch of other cool stuff we end up learning in this course to make that code run as fast as possible uh and then the last one is really there's so much data nowadays they say we have way too much data but very little cleaned data I've taken everything from all the other video courses everything on the internet And YouTube uh and I put them in a single course so I filtered out a bunch of the nonsense a lot of
you know the old stuff a lot of the new stuff that maybe isn't covered as well and kind of just projected into this one Masterpiece so this includes topics covered by paid courses as well I haven't actually paid for them but I kind of just looked at you know what are the chapters that they cover and then include some of those important Concepts in this course um I Do have links for YouTube videos and all of these resources which I've gone through only the high quality ones but I've gone through a lot of these videos
and resources and these are all going to be uh put in links inside of the um GitHub Link in the description so everything you need is going to be there um and I put a lot of all of those links in that um in that link so what are some use cases for Cuda parallel GPU programming what are some of the use Cases for this well you have graphics and rate tracing so the computer Graphics that you're seeing in video games um you know user interfaces all of this you have fluid simulation for like physics
um and modeling you know engine Dynamics you have video editing so the video that I'm editing for this right now is using uh parallel Computing to render uh crypto mining which a lot of you might be doing already that's going to be using uh you know your GPU Hardware and some of the advantages of that to like mine through the the crypto mining problems and then you have 3D modeling and software like blender so when you have a bunch of different points going on and you have to render things it's essentially the same as video
editing but just um 3D instead of 2D so the last one which you probably guessed it already is deep learning so the number one use case for Cuda right now is primarily what I'll be covering In this course which is deep learning so we're not going to go as as deep into like say convolutions but uh to kind of understand how to optimize an algorithm like matrix multiplication uh we're going to go quite in depth with that so now you might ask Elliot what are the requirements or the prerequisites for this course so there are
some that are more intellectual and academic and there are some that aren't so this is strictly for NVIDIA gpus in case you didn't catch On to that earlier um if you don't have one you can always consider renting uh the cheapest ones in the cloud um I advise you to look into the pricing before giving a definite no on the pricing for some of these Cloud gpus um at first I was actually surprised how low the cost was for some cloud instances um especially the non-comp compute demanding ones so if you have like only a
CPU or like a ram intensive machine it might actually cost Significantly less than one with gpus on it um the gpus one are still very cheap you can use things like vast AI which I'll cover a little bit more um you can use this for actually getting really cheap uh consumer grade Hardware that you can SSH into in the cloud um and then just do all of your experiments and go through the course on that you can continue uh you can continue running with any you know NVIDIA GTX RTX or data center level gpus so
all of the Nvidia cards are pretty much supported for this uh maybe like the lower ones that are like 15 years old those might not work um but generally if you have like a GTX like 1660 or something like that it's like it's going to be fine um as for course prequisites Python Programming will help in understanding while we're implementing in lower languages so um just understanding the whole programming uh Concepts is really what's Going to be needed here again all these different languages is just like a change in syntax right so um you know
we're going to use basic differentiation and Vector calculus uh that'll make learning easier if you know it already um it's really only required for intuition behind back propagation and some of the stuff we're going to use to build neural networks from scratch um linear algebra will definitely make your life easier by not having to learn Fundamental algorithms from scratch so like if you're not really intuitively um you know into matrix multiplication yet if you haven't really uh you know gone into that extensively it might be a little hard for you to catch up uh but
matrix multiplication is very easy it's quite trivial in retrospect it's very it's very easy to understand um but just the intuition there and optimizing it might be a little hard if you haven't worked with it a lot already Um then if you really care I would recommend just reviewing you know Matrix uh transpose matrix multiplication chain rule from calculus and then difference between gradients and derivatives um there's maybe a few more that I missed but those are like the general ideas that you're going to need for going into this um and then just a heads
up uh if you are in a Windows machine this might be a little harder for you so I do have a little setup guide on Windows Hardware Um but I I do everything here on on Ubuntu Linux so this is what I'm running uh just on my local machine here and this is what we're going to go through the course with um you can always use uh WSL on Windows to simulate a a Linux system or you can use uh Docker so Docker is an awesome tool that'll allow you to essentially fire up uh a
little simulated Linux machine uh just in your terminal on Windows and you can just do everything through that uh I think it Supports Nvidia gpus directly through Windows I'm not entirely sure yet I haven't tested that but um if you're on a Windows machine machine I would recommend uh WSL or Docker if you do run into errors or issues throughout this uh I do suggest you you check GitHub stack Overflow Nvidia developer forums pytorch docks uh if your issu is related to any of this course material so you know you have a lot of resources
at your disposal if you Need to resolve an error that doesn't come up in the course material uh you also have really powerful language models to use there's a lot of language models that have been released recently that are really really good at solving and addressing coding problem s so I do suggest you try those out um if all if all goes wrong right um all the all the code and notes for this are kept in the GitHub repo in the description the ecosystem is going to change all the Time so in case this video
isn't up to date uh the GitHub repo will be because I'm able to push that and actually make changes so if something is a little off in here you might want to go check in the repo and see like what it actually looks like so that you can actually write it properly and maybe there's a more optimized version thing things will change but you get the point uh I do suggest following uh the repo for maintaining a structured learning Approach I include excal draw diagrams so this is going to help illustrate like high level ideas
how we're going to approach things uh as well as how to do things on the level of Kernel optimization so all the way top down all of it excal draw is awesome for illustrating things and it's completely free so all the diagrams there will be included in the in the GitHub repo uh and in the course too um you know you can always uh reach out To me through my Discord server which will also be in the GitHub repo um and you can reach out to me through there and talk with the community there's going
to be a lot of other students learning there's going to be a dedicated set of channels for this so in case you get stuck or wanted to discuss something or just have a cool chat in the server uh you can totally join that I do want to note early on that this course isn't on Cuda only so there's a few things That I cover outside of it including pytorch referencing uh going into like Triton and c and C++ with like externally not including Cuda just to you know help illustrate things on how how that the
naive version of an algorithm works but uh so there's there's the code side and then there's also um I'm going to provide some prerequisites or not even prerequisites but rather just uh a good understanding about the whole deep learning ecosystem So this is actually what one of the next chapters is going to be about is how does the whole ecosystem work and where can I apply Cuda it would be a little silly of me to say here's how you optimize a kernel and make it run really really fast on your Hardware but not actually give
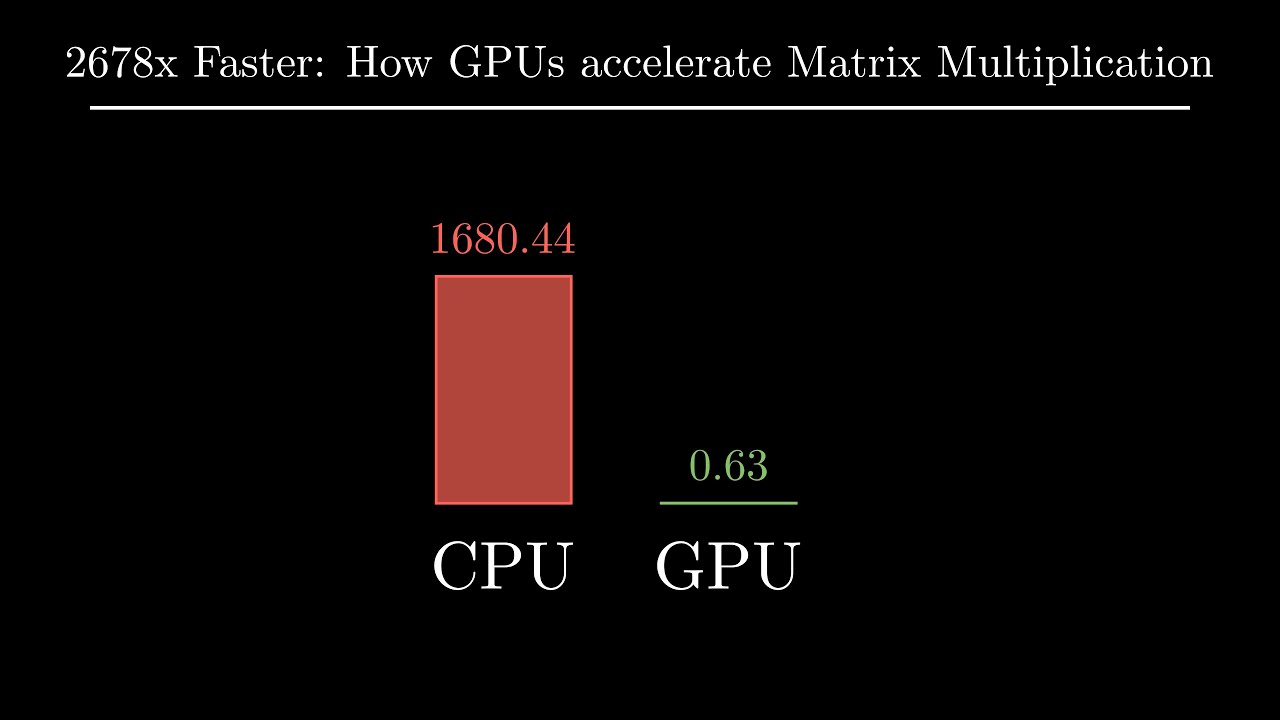
you some solid use cases for that so you might already know what the use case is but in case you're just trying to learn Cuda and you might look at some ways that you can apply it I Provide that Resource as well so spoiler alert but some takeaways you might get from this course is that through experiment experimentation and research you'll learn that the main GPU performance bottleneck is memory bandwidth so in deep learning we have these giant inscrutable matrices that cannot fit into the onchip memory at once so think about if you have like
a giant cluster of gpus and each of them have really really fast tensor cores These are like super optimized for doing you know tensor operations in deep learning um but if you're doing these across many gpus you really have to exchange and and and mix and manage information between them so you end up sending electrons uh you know from this node to this node to this node to right and there's a lot of this communication that's going on so you really get a ton of speed from the compute inside of the chips but when it
comes to communicating There's actually a a pretty big bottleneck there and that's you know one thing that you might take away from this um there's also on chip constraints too so you have like GPU vram which is going to be uh you know comparatively slow to what the on chip stuff is so vram is like off the actual you know cores and all this and then it has to communicate with the cores and all the the the shared memory on chip and all the registers and that ends up being a ball Neck too so it's
not just the the massive um the massive matrices communicating across a lot of gpus it's actually a lot of the onchip communication too so there's multiple bottleneck that that's arise or that that arise um but these are just things that you'll end up coming across and and being able to address later on through optimizations another key takeaway is would be to take an existing implementation and make it faster so a Lot of the times you'll see a new research paper come out and you'll see a really cool algorithm but you might not know exactly how
it works and so or or you maybe know maybe you know how it works and you just want to make it fast and you want to integrate it into Pi torch for example so this is something we're actually going to do in this course is we're going to uh we're going to build up uh an algorithm and we're going to optimize it and then we're GNA Actually Port it into a pytorch extension so that you can call it in Python which is super cool um but just learning how to integrate your own research into things
to make them faster to have it operate at production scale um these are some really important things that you'll have to do when you start working you know very deeply with Cuda um another thing is karpathy LL M.C a lot of you have probably heard of this um if you go search up LL M.C Uh LL M.C on uh on you not not on YouTube on Google um you'll come across guy named Andre kpoy and he pretty much built up a giant gbt2 training run in C from scratch so it uses C and Cuda and
all of it there's a ton of stuff in it and I really felt like it's hard to understand that at first um you know as someone who's not like super super enriched uh and have having done Cuda for like 20 years um it's kind of hard to understand that at First so having a really nice basis like this where you can actually understand how to use Cuda and where the where the real uh benefits are from it and how to use it that will allow you to read and approach kpoe lm. see a little better
so that was one of the reasons why I actually made this is to make it easier for people to go into llm Doc and understand what's going on so in the GitHub link and the notion document inside of my GitHub repo uh you will see This in the intro section so just a bunch of cool videos on how uh Cuda Works how Transformers work a bunch of just really cool fun videos to you know really get you motivated and upbeat on uh all of this so got some technical stuff we got some fun videos by
fireship um but generally speaking these are just some cool resources you can check out uh Cuda programming kudam mode is a really good server actually I highly recommend you join this it's just a Discord Community of a bunch of people who are really into Cuda so I believe Andre gpoy is in here A bunch of really cool uh you know coders a bunch of Engineers are in here just to discussing how to uh how to get certain kernels working and and generally just Cuda stuff um hence why it's called cuda mode right so uh really
cool server I highly recommend you join that as well as my server which is also in the GitHub repo but that's that so now we're going to go into a Little bit about the Deep learning ecosystem right now so obviously this going this is not going to be up to date in five years so just you know take this with a grain of salt this is not uh this is not everything this is just what I found interesting to look at and focus on and and to be aware of in the ecosystem and how you
can sort of interconnect things and understand what's going on so this doesn't actually go over anything highly technical with Cuda but I thought it's better to show you the ecosystem rather than just entering technical details blindly like if we just dump straight into Cuda kernels um you won't know how to connect the dots later on so when we uh when we're actually building out good algorithms it's like okay now you have the skills to do this where do you apply that so this is this is what that aims to give you just a bit of
background um understanding the ecosystem will help You map out everything properly and it provides that initial motivation to learn so some parts are going to get really hard and when you have that higher level motivation to see like okay this is what I can actually build once I learn how to do this instead of just let's learn Cuda blindly that that seems a little naive um so going into it with like understanding what to do later on or what you can do I think is really important um again don't feel free uh Don't don't feel
binded to just watch uh watch me talk about a subject for 20 hours um you may limit your learning if you just force yourself to sit down and and just just watch and listen to what I'm saying um I do encourage you to go down rabbit holes so if you find something that interests you in this section or other ones just totally just go down there that that's where you learn a ton right um but anyways I've I've organized this into several Sections so research production um low level inference for Edge Computing ease of use
compilers and miscellaneous so we start up at the top here was the easy ones we have pytorch we have pflow we have Jacks and fireship has videos on all these These are very well documented um I'll let you you know you can kind of just like read through these I'm not going to go over every Single bullet point cuz it's already here um but yeah you have you have mlx developed by Apple for Apple silicon open source uh for Apple devices P torch lightning is like P torch but reduces boiler plate code so there's a
Reddit post here which was interesting um when you do like when you set like your tf32 Precision to do tensor core computations in in pytorch um like that's boiler plate code so pie torch lightning is actually going to Reduce that and it's going to remove that boiler plate so you don't have to worry about like including all those little optimizations and and and uh and hacks so when it comes to production this is there's typically two things that fall in here so you have training and inference and some of these will support two of them
together some of them will just support one or the other um so in here we have VM which is quite interesting um Search a BLM on GitHub actually go down and we can see um where did it go yeah LM impr and serving and then where did it go performance yeah so performance Benchmark againsts tensor rtln which is the next one that I'll actually talk about here um but they they Implement a bunch of like very like essentially Hardware GPU optimizations that we may talk about later on um but BLM is great um tensor RT
is pretty Much tensor runtime by Nvidia and they have a tensor RT LM so it's for like inferencing language models with all of these you know all these different optimizations um specifically for llm inference now Triton is Triton is something we're actually going to cover a bit more Tron was developed by opening eye we go here you can see this uh it tells you about like what the heck Triton is like what the motivation Was where it came from um but if we look at this paper from Harvard this is actually where Triton originated from
so try an Intermediate Language and compiler for child neural net computations child neural net computations is the key here this is where a lot of the performance comes from and you'll see this later on when we build fast algorithms tiling is where you have like a giant problem where you're you have to do linear algebra Operations like on tensors and you have to do them fast on parallel uh parallel processors like gpus and so what you can do is you can tile The Matrix into a bunch of little like squares like subsquares and you can
you can multiply them together so this way you don't have to do like an entire thing at once and then reserve it and and worry about all that stuff you can literally just select blocks and the parallel processors in Cuda are extremely good at processing Those blocks because of the Cuda architecture which we will talk about later um but but try is interesting this is a whole paper which I'm not going to dig into in this course but a lot of interesting uh both compiler and um you know speed ups that you get from approaching
things with a with a tiled um philosophy now toor just some other optimizations we'll get in performance is torch do Compile so you do torch do compile and then Open Bracket model close bracket and this will literally just increase performance 30% out of the box it'll take that Dynamic graph that P torch builds and it'll statically it'll snap it into a static representation for production because we're using it for production uh and it'll just apply optimizations all all around um which we will dig more into this course like an example would be like kernel Fusion
Where instead of you know doing a separate function for each for each step you're like combining two or three operations into one single function uh and that like reduces some overhead comp computation that you have to do there so uh just a bunch of these little optimizations that torch talk compile does uh extremely recommend for production uh torch script is a little older but there's an article here on Torch script So torch script um I haven't actually used but there are some more discussions here that you can follow um I know it's a little older
so I typically just resort to Tor shock comp pile for most things um but it's it's here in case you want that and then Onyx runtime is also interesting I should probably should have put Onyx before Onyx runtime but it is what it is um Onyx runtime is pretty much on top of Onyx so you have this This thing called Onyx which exports a model from either pytorch or tensor floor whatever you want down to this Onyx format that's intercompatibility uh it's like a Onyx file extension that you use for storing neural net uh weights
and tensors so uh Onyx runtime essentially takes that and allows you to just run it faster so that was built by Microsoft uh and then a cool little project I came across and that chat jbt recommended I put into this course was Detectron 2 so it's uh it's interesting you might find it useful but um developed by Facebook and it's essentially a computer vision library that uses uh image detection and segmentation algorithms so just a bunch of like really cool computer vision stuff that it has bunch of different neural net architectures and hats that it
employs and it's just one of those fun things that you might want to mess around with um then we go To low level which is what this course is based on in case you haven't read the the the title it's on Cuda uh Cuda is compute unified device architect Ure uh programming language uh programming platform rather for NVIDIA gpus um and there's a bunch of stuff which we'll dig into later um rock M qu equivalent for AMD gpus and then you have opencl so this is more General um built for CPUs gpus uh dsps other
types of Hardware so just like a General purpose Computing language open open source um and then we have Edge Computing and embed systems so what the heck does Edge Computing mean l what is Edge Computing um think of the Tesla Fleet that Tesla has so there's a bunch of cars that are maybe running into accidents occasionally and so they want to report this back to the Tesla data center to train on and improve the models so you'll have a bunch of these this essentially this Fleet and the Purpose of edge Computing is to have them
own doing their each of them doing their own local computation and then whenever you're do an update you're just going to send that back and you're able to have like the centralized entity that I guess the centralized data center is our entity here and it's just going to do some training on all those on all that new data and uh that that's pretty much what it is it's just like a decentralized Computing if you will um so you know you have um you have like tensorflow light which is like a a light version a lightweight
version of tensorflow and then pytorch mobile is same thing um what I mean there's always optimizations you can do in Cuda and like just plain pie torch that'll just make stuff run fast either way but there is py mobile for that um then you have corl which is for Apple products so like the Mac OS watch TV all this Um then you have ease of use which isn't like entirely Cuda related but I thought I'd still mention this because some of these are really awesome so you have uh you have fast AI which I'm not
going to talk about a lot but you can you can look you can look into this maybe separately um so they have their own they have their own thing here but um yeah I'm not going to I'm not going to go over fast AI but they uh they have some interesting Stuff Onyx which we talked about before stands for open neural network exchange so the x is capital and that's where the X comes from um literally you just do torsa onyx. export model um and then dummy input and then just whatever the the file name
is so you can look more into the torch docks and Onyx as to how to do this on both P torch and tensorflow and whatever else you want but this is how you would export an onyx format Um and then this is the tensor FL equivalent so this is essentially this like nice little image that I got where like it kind of binds with everything so P toor Tor flow carass um C Cafe which was which was initially what P torch was using um Cafe was one of Cafe was one of those uh original parts
in the pytorch ecosystem um from a while back um so that that just kind of shows how they can interconnect together so you like export in one of these and then you can Import back into any one of these uh plus Onyx runtime which runs faster and then you have weights and biases so I got a little snippet from the internet as to like what this looks like but pretty much allows you to track your training runs and a bunch of different charts and statistics about how your models are are performing so uh when I'm
doing like when I want to train like a clo a clothing uh recognition model I can literally have all of these Different ones so accuracy on sandals shirts trousers pullovers boots right boots is like kind of chaotic and pullovers just kind of worked fast um and then this one too so you can kind of just track a bunch of things and understand what how your models are performing and then show that to like maybe your maybe your uh employer whatever or whoever is maybe your manager and just kind of get things done that way and
document things easily Without having to use same matap plot lib um it's all just kind of tracked and imported and taken care of for you um and then Cloud providers these are actually quite important to know not necessarily on the lowlevel part of like Cuda but these are still good to know because they play a major role in the ecosystem um you have AWS so AWS is a major one I personally use aws's products and prefer them I'm not endorsing like not sponsoring them but Um not sponsored by them but I do use ad us
products and uh the two main things here for ML stuff is ec2 instances so these are like used universally you just fire up a like a remote machine you can SSH into it and then do whatever you want and you can use all the specs like it's literally uh command line access and you could do whatever you want um and then you have Sage maker so it's a little bit easier and more ml focused but you can run jupyter notebooks on a Cluster so instead of worrying about a command line and having having to fire
things up in like um in vs code like VSS code SSH you just uh run a jupyter notebook literally like in the browser or you can uh just SSH into uh The sagemaker Notebook I believe um and then you have the uh the data labeling part which is very big in the world today so where does all the data come from that we're training models on well this is exactly Where it is um if you go AWS sagemaker and then you find like the the labeling part or mechanic Turk I believe is believe is what
it's called that's where all of the labeling on AWS takes place so uh you know big stuff there uh typically costs like a decent amount of money for people to label your stuff but that's that's where you find it um and then model training and deployment you that's that's also supported by Sage maker so you want to like deploy your Own llama 3 variant it's like go there you go Sage maker um then Google Cloud I don't use as much they have vertex Ai and their VM machines which are like 2 equivalent then you have
Microsoft Azure which I haven't actually used that much so um it's just like another top three like these are the top three players in the ecosystem and then you kind of break down to open AI fast Ai and Lambda Labs so open AI provides their own like fine-tuning services and you can you Know everyone knows open AI you can literally go on the website and just navigate around there and figure out what you want to do with models um fast AI so I haven't entirely gotten a picture here yet but if I go to bass
at AI um I go to the console hopefully it doesn't expose anything bad um but like yeah I can select any of these it's just like a bunch of rigs That I can rent for an hourly right get all the specs on them everything um and it's great so you know I set RTX 370s which is like my graphics card and mine costs about you know 1 cent per hour which is which is embarrassingly cheap but uh yeah this one oh this one is more expensive but yeah so so vastia is awesome you can use
these like any GPU you can pretty much select it and just use it on the Fly and it's like hosted by someone else in the world that you SSH into and do stuff from um then you have Lambda Labs which I sech set up actually find Lambda here Lambda Cloud y so uh data center dgx systems like literally you have the Blackwell gpus you have the h100s um yeah just pretty much GPU infrastructure specifically um and it's like I believe a bit cheaper than the big three providers like AWS Google and Microsoft so uh Lambda
Labs is commonly used but typically you would rent things in a cluster so you're paying like multiple hundreds or thousands or tens of thousands of dollars per hour for these so if you're in a company and you're trying to get like cheap cheap gpus that are data center quality you might want to look at Lambda um and then compilers so I'm not like a compiler expert but mainly you're going to have things like xlaa so this is what Is powering Jacks um you're going to have lvm which I'm not an expert I hav't build compiler
so um I'll let you look into that there's a ton of resources on lvm um it is it stands for low-level virtual machine I believe um go to lvm project um a toolkit for the construction of Highly optimized compilers optimizers and runtime environments Um multiple components um component compiles C C++ Objective C and objective C++ code into lvm bit code um and then into object files so it's essentially used for developing stuff in cc++ and compilers and general then you have ml ml which is what is ml look at this again multi-level intermediate representation so
this was uh ML and lvm were mainly developed by Chris flater which um I also have a course um on on The on the programming language that his company built called modular the programming language is called Mojo you can search that up on free code camp and go learn Mojo too U but it's like a pretty much just an AI programming language for doing like Fast tensor operations um so this was moved um it's part of the lvm project and uh there's some interesting stuff there it's it's somewhat newer so there's you Know interesting interesting
changes it's not it's not like super ancient um but uh the main ones that I'll be able to talk about are like nvcc so that's like the Auda compiler Nvidia Cuda compiler um and you know there's an architecture here which I haven't like fully memorized yet but uh the Nvidia Cuda compiler is what we're what we're going to be using to essentially compile our Cuda scripts and kernels and have them You know into binary so that we can run them fast so uh you know these are interesting interesting compiler infrastructure I'll probably add to this
with some better descriptions on like what these are but uh this is like the general overview and then for miscellaneous I had I could not leave out hugging face so last but not least it's like hugging face right um You probably already know what it is but I'll look at it up just in case so On hugging face you have a bunch of things um you have models data sets uh and then spaces and that's like pretty much all you need to know so if you go to models you can oh maybe it'll take a
second to load um here we have multimodal computer vision MLP audio tabular reinforcement learning and then graph machine learning so there's a bunch of cool stuff you can do here but most of it is language models Right now um I know like recently released some of their I believe it's like image Maybe video Generation stuff I can't remember specifically but this is where you'll see all like the new open source models uh that you can just pretty much download and run run in P torch like that uh you just need enough Hardware you just need
good enough Hardware to run these and it'll just it'll just work um and then you have the actual data Sets for these models that that you train them on so um you know you can go like 3D data sets which is interesting um a lot of it is just going to be text so um if I remove that yeah Vision data awesome Auto math text so just all these all these data sets are here that the models are trained on um and then you have spaces which is where you can actually use models um this
is where people will like host things or get sponsors with custom Hardware setups uh and they'll be able to just essentially host these models and you can try them out and use them so hogging face is awesome it's a major player in the whole ecosystem and I could not leave it out but uh yeah that's that's pretty much it for the Deep learning ecosystem I'll see you in the next part so doing the setup on Windows we just need to open up our terminal and run as administrator I'm starting with Windows uh we just enable
permissions ensure that it's the system 32 directory going to navigate get over to the turn Windows features on and off um we're going to scroll up and look for hyperv um ensure that box is checked off and then we're going to look for virtual machine platform ensure that is checked off and then or checked on rather and then you have a Windows subsystem for Linux make sure that's also checked on um in order to get this working you will Need uh to enable virtualization on your machine so uh you know once the windows subsystem is
on you can do wl. exe and you'll see you know a bunch of options so install distribution and we see an example there WSL install distribution Yu we can go ahead and enter enable and we'll just wait for that to complete I've sped this up a little bit because it takes some time uh realistically it takes more than you know a few seconds To do this so I'll speed some of these things up um you has been installed awesome changes will not be effective until system is rebooted um yeah so we run it again um
we have this command that it's asking us to run so WSL exe install no distribution that installs correctly um and we get the same thing again so we just do a system restart now after we've restarted you might be greeted with this Terminal uh your BTU and then uh the other command prompt so when you're greeted with that if you're just greeted with the command prompt you do WSL uh and you can get into here and just enter a username and a password that you're going to use now you should be logged into your uh
little simulated uh Linux environment so once we're in here there's a few commands we need to run so we're going to update and we're going to upgrade everything so just type In the commands as you see them there's some that we're going to be able to copy and paste in so just end that password you set earlier I've time-elapsed this not time-lapsed but I've sped this one up again so that was just a bunch of things uh updating um if we go and install some other packages that we'll need later like WG curl and git
we'll see that those are also installed as a part of the update and upgrade commands um and then we just install Python 3 pip uh this is just going to be python essentially for our machine and uh that also runs too so that does not come by default apparently um so we just need to install that manually but that's okay we navigate over to Chrome and we search Up Cuda toolkit this is what we're looking for Cuda toolkit download so you just navigate to the latest one it might be 12.5 it might be 12.6 whatever
it is for you go to Linux pick your architecture and use WSL you to Remember we're using uh WSL and then just do the run file it's the easiest one least amount of instructions you have to do um so so going to do the first one so w get uh you can just right click in the terminal if normal pasting doesn't work um let's maybe highlight the whole thing awesome so that's going to take some time to upgrade and uh I'll see you guys on the other side okay so now we're in the little accept
part so just only Check off the to Cuda toolkit there and then you should be good to install now we've done the runsh file which was the second part of the command and it tells us in the summary that we need to add some things to our path so I've just pulled up this here um but this wasn't really working too much so I went off and generated some other uh you know more upto-date commands with chat GPT uh and figured out uh the act the the proper ones So you'll see those in a second
here once I pulled them up but this is just the this is just a reference so this is one of the things we have to do so we could just Vim into our bash RC file um and then I'll just just pretty much type along with me here and then we'll we'll save this file so feel free to use Nano or Vim whatever whatever you feel comfortable with I'm using Vim here but uh you know Nano isn't too hard either so going to set a Cuda home um user Local Cuda and then we're going to
export another one uh called path and as a part of that path um we're just essentially going to include Cuda home and then the binary for that and then last but not least um we're just going to export the LD Library like it also said in the summary and then lip 64 to end it off awesome so now we can just contrl C contrl W and contrl Q or col w q we exit that um and then we Can oh I noticed we missed something so Cuda 12.5 instead of just Cuda um so we can
go ahead and go back into this and then just find that part and add um and just right click and paste that back in and then just delete the last Cuda part awesome C 12.5 sweet now we can just exit that again and Source then we just do nvcc uh-- version which is the Nvidia Cuda compiler so that's working and then Nvidia s SMI so We can actually track our GPU stats as long as these are both working um we've done the job correctly so if you're not get if you're getting errors with nvcc or
nvmi uh that's that's not good you need to figure that out uh I don't of course cover all the errors but um that aside we're going to go ahead and set up a little Cuda test just to make sure that everything's working properly and that we can execute a docu Or Cuda script so I just made a directory called cuda setup test and we're going to just Vim into um that that directory and we're going to edit and we're going to make a new main. cuu file and inside of here I'm just going to go
ahead and paste uh some functions so uh we include the Cuda runtime header we include the io stream which is a part of C++ that allows us to use things like C out we declare the namespace STD for for standard and then we see out hello World in our in main function so if we do nvcc um out main binary and then main. cuu we should uh be able to run this binary and get Hello World awesome so if this works first try for you that's awesome if it didn't that's not so awesome but but
you should be able to figure it out just by navigating uh forums so like GitHub the stuff I recommended before just navigate around and figure out how to install the Cuda toolkit for Windows um it pretty much Applies the same to yuntu I'm going to go over some brief instructions here but I'm going to switch over to Ubuntu because that's what my whole thing is based on that's where I do all of my stuff and where everything is set up and optimized for so I'll see you on the other side if we can go ahead
and open a Chrome tab here and just type in Cuda toolkit downlo mod so we go to this one on your BTU same thing we go Linux x64 is mine might Be different for you um YouTu this one run file local um you can do this you can also do Network or local so for me I did network but that was a little while back and having to uninstall it and then reinstall it again just gives me a bunch of weird Graphics uh errors so I'm not going to do that and mess with my operating
system too much but you should be able to just plug this directly into terminal so you should be Able to just pop into here and uh plug these in W get the uh the Debian file um and then just the rest of this and install the Cuda toolkit and then just get the the Legacy Cuda drivers I just did this this Legacy Cuda drivers if that doesn't work do this one um and then you would of course want to just do do um nbcc version and then Nvidia SMI and you should see uh some useful
stuff pop up here so uh if that if these don't work for you right away um you know you Might want to just restart your computer that's usually the best option and then try something again um if you do already have these installed you don't even have to worry about it so I would probably check these first probably should said that first but uh yeah Ure uh the Auda compiler works and then Nvidia SMI so now we can finally get into some coding um in order to really understand how to use Cuda you need to
First cover C and C++ so this course isn't actually About C and C++ so I'm just going to provide some resources for you guys to learn this stuff and then I'll jump into more some more advanced topics uh just to watch over and and review the subjects so for those of you who are new to this stuff for those of you who are new to lowlevel C C++ Cuda programming um I have some resources for you some good articles some good uh things to manage through and if you are already experience uh just pretty much
skip this Part or even even still look at it to maybe touch up on the basics and I'll cover some more advanced topics right after this so learning C and C++ is hard and so you really have to Define what the best resources are and how to actually learn things properly what is the best use of your time right this is a common dilemma that we have so I came across a Reddit article on best resources to learn C++ and it it pretty much said learn C+ plus.com plus a bunch Of other links that you
might like so learn C+ plus.com is good I've never used this before so I don't know how comparatively good it is um so that that's an option of course and then there's best way to learn C so looking through this I pretty much found that Everyone likes the um the modern C this one C programming a modern approach so it's a it's a newer book um but that's how people found best way to learn to C um if you are just trying to learn this For free and try to you know just go through the
syntax and understand it as quickly as possible um there are some resources I would recommend and have looked through a little bit so freed code camp has some good stuff on this um C programming just a bunch of uh blogs essentially on how to just pretty much just learning the language and then you have C++ uh just you know maybe some more advanced things um you know Libraries a bunch of modern C++ stuff um so free code Camp is a great resource and then the one that I've personally stuck with for a long time and
continue to use is W3 schools so it's pretty much like a nice easy to read easy on the eyes documentation on or just an intro rather on how to use C and C++ so I have both here um I'd recommend if you're new to this just look over each of these and do do a bunch of practice questions on every single one of these um all these Are super important there there's some of them you might not actually use explicitly in the course but it's still good to know it regardless just for you know having
that uh you know lowlevel uh brain so that you can dissect problems with uh on Cuda applications that we may not cover in this course so I'd recommend just like looking through all of these go down all the way to like these examples um like everything and then same with C++ as Well so all all your Basics your functions your classes um and then down to examples as well so uh that's that's pretty much all I have for the basics of CN C++ now we're going to go ahead and touch on pointers we're going to
start off with pointers if you go to github.com inosi Cuda course um and then pop over to well you're not going to pop over to Dev this is going to be all pushed up and ready once you once you're seeing This but uh essentially you're just going to get C this into a directory of your choice uh and then we can go and get started with the c and C++ review so I have this all in my vs code here and it's all zoomed in and nice for you to see but um we we'll start
off with a symbol pointer example so uh we initialize an integer integer X to 10 this a data this is the data part of X um and then we initialize a pointer type so this asteris uh that means we're Doing a pointer to an integer uh and we're setting that we're setting the name equal to pointer and then this uh Ampersand is saying we're going to get the memory address of X so we have X here which is 10 and the ENT says uh we're going to get the memory address of of X which is
um which is going to be the pointer to 10 um and then we can we can just print this out so if I go GCC and we do Z 01 and then run that you'll see that We get an address so I have the pointer I have the pointer type here there's there's an index where you can find these um if I pull up a tab here and go uh Point uh print f uh like in for example so you have all these different things here on C+ plus.com that you can use um and these
are just like the formats and stuff so we have uh we have a pointer it's this value that we're Returning uh we get a memory address to the value 10 and to get 10 we're passing in pointer and then we do the asteris to dreference it so dfference means uh we we have this essentially we have this data thing which is 10 we have the memory address to 10 which is the level above and E reference is just going to go downwards just going to go back to back to that so we have this memory
address just dreference and go back to 10 um the next example here is a little Bit tricky um but it's fine it's it's relatively intuitive so I don't expect it to be that hard but essentially what we're doing is we initialize a value to 42 and then we make a uh a pointer an integer pointer type called pointer one and we set that equal to the memory address of value so it's ersan memory address of value um so it's going to be like 42 and then we create pointer 1 which is a memory address or
a pointer 2 42 and then we do the same thing so we Make a pointer to a pointer which is what the double asteris is for uh and then we do again Amber sand of pointer one so memory address of this pointer so then you have 10 you have 42 and then you have memory address which is the the you have the pointer to uh 42 then you have another one above that which is pointer to a pointer to to a value and then we just do that another time so it's pointer to a pointer
to a pointer to a value um and uh this logic checks Out and when we print this out we're going to return the integer type so D um and then we're just going to Triple D reference it so we have these multiple different layers so we're going up a pointer like level one pointer level two pointer level three and D referencing is just like going down a level so we go down one two three levels and back to back to that value of 42 which is an integer and we can safely return that so if
I just go GCC and then compile 02 we go and run that and we get a safe output value 42 awesome so now I pop over to number three which is where things start to get a little bit weird uh and initially this was kind of a funky topic for me as well but this is this is void pointers so void pointers are a little funny and they actually allow us to do a lot of tricks that uh allow for things like polymorphism and stuff um but we're not going to go over that a ton
that's that's like other uh That's not covered in this review uh so we initialize an integer called num to 10 we initialize a float called f num equal to 3.14 um and then we have this this void pointer so what this means is like if you had an integer and then an asteris that would mean it's a pointer to an integer but void is no type so it's like a pointer to no type and that means we can actually change which type it is pointed to which is a cool little Feature that you can do
in C um so we say um void pointer is going to equal the memory address of num which is this right um and then what we can do here in this in this print part we essentially uh we take this we cast it to an INT pointer type that's what this part is for these brackets and then inside the int and then after the Asis the the pointer cast and then we dreference that so we have a void pointer which we cast to an Integer we cast to an integer type it's originally holding the memory
address of int um and then we dreference that after it's casted so it's going to go up to this memory address then it's going to go back to 10 which is the value of num and then we essentially just do the same thing for this F num here um I I have nice little descriptions here that you can read on your own uh and and then a fun little fact so Malik actually Returns a void pointer but we see it point to a specific data type after the cast so what you typically see Malik as
like these these opening brackets uh these this brackets and then you have the actual cast inside of it so what we did over here is what you see in Malik so it's actually returning a void pointer and then you cast that to a specific like integer or a floating Point uh pointer um and and then you can use that For something like like an array um so if we go ahead and just GCC compile this and then run we get our integer which is uh integer type of course and then we get our our float
3.14 which is a uh which is a float type so void pointers are not not void pointers sorry null pointers are really interesting and you probably found void pointers interesting as well um but these are a little bit different so null pointers can actually make our code more robust through if Statements um going remove those binary files for now to clean some space up um but we we initialize a pointer to null um if we try to print this out um it's it's going to essentially return like there's nothing right there's like no space actually
here there's nothing that you can't you can't use that pointer for anything because it's null that's the whole idea here so what we can do is we can check if the pointer is equal to n um and then we just essentially just Report that maybe we throw an error message or we we we put a warning up uh cannot dreference this right if the pointer doesn't have anything you can't dreference nothing to something you can't do that so uh we actually change that up and we we allocate memory uh to pointer so to this pointer
so that we can use it safely later on so uh I'm just going to actually compile this so you can so you can see what it's doing um initial pointer value is nil so We have the pointer type we cast to a void pointer which is going to be n null of course so n that checks out pointer is null cannot D reference good so this this was true after allocation so this is where we get into this part Malik is going to return uh a void pointer the size of int so that means there
is actually something there now there there is something there it doesn't have an explicit data type but we have something There that's like in I think 32 bits so four bytes um and then we check if pointer is equal to n again um and it doesn't print memory allocation failed so that's that's good and then we get to number four after allocation pointer value is this so we cast this to a uh void pointer uh and we can actually see this this this memory address we can actually see that it works um and then we
can you know we we know that this exists now so we can use it for Something so um we we essentially check it for null safe to use now uh and then we have this uh we have this dreference pointer so you dreference that memory address back to the data part and we set that equal to 42 so now you have this uh safe to use um you have this you safe to use memory address and the data associated with that memory address and then we can free that pointer um set to n after freeing
uh and then we see that it's it's it's null again so uh yeah if Pointer is null so we we know that it is null safely avoided use after free awesome so the the whole point here is that we can use no pointers to uh do little tricks and we can make our code Mar by checking if it is null we can avoid running into unexpected errors like seg faults and other weird things that are hard to trace back right sometimes you don't want to have to go through all of that just to figure out
an error so it's Better to just uh write more robust code in the first place and ensure that it works properly so in this example there's quite a few things going on here but I'll try to I'll try to explain this as best as possible so we have an array uh we just declare an integer array five numbers and then we have an uh pointer an integer pointer equal to array so in C because we're just leaving it as AR Ray alone it's going to point to the first element uh because that's that's How memory
is lined up right it's going to point to essentially where does this thing start uh and that's going to be that's going to be 12 of course but we know that an array is a pointer on its own if we don't dreference or if we don't index that array um it's just going to be a pointer alone right so if I if I print f uh and then we go we just go array sure I'll let get up co-pilot complete That not not correct yeah we'll see that this array if we don't dreference it uh
just just on its own it is a memory address it's a pointer to this array um so we set We Set uh let me just delete that we set uh an an integer pointer equal to that so that's a that's a memory address that we have um awesome now we look at our position one which I printed out that's going to be 12 so we have that that start of the array in memory uh and then We just dreference that number so it goes back to 12 that's what this asteris is for and we print
as the the integer type awesome now we have a for Loop going on here so what the heck is this doing we have we have I starts at zero we want to stop it uh uh when whenever it go whenever it equals 5 we stop it and then we increment by one each time so inside of here we have an integer type and that's going to be the D Referenced pointer so whatever pointer is we're going to dreference that back to the original value that it was um and then in here we're going to do
the pointer type of the actual pointer itself so this is the memory address that we're seeing um and then we're just going to increment this each time each time this for Loop goes we're going to iterate it once and we're going to increase we're going to increase uh pointer which is the memory address We're going to increment that so uh I had a little example here that I wrote out um these obviously won't be like the same examples every time uh they're going to be different but uh notice how this pointer is incremented by four
bytes right so this is is not in uh bits this is in bytes so if we do eight bits in a bite times 4 bytes we get 32 bits which is the integer 32 type the classical integer 32 so hopefully it makes a little bit More sense now about how memory is laid out uh at least on the CPU so yeah we just have these essentially skipped by four bytes every time uh 4 bytes time 8 bits per BTE is 32 bits and we get our n32 from that I also make a point that uh
well right now pointers are not in 32 bits in size but we'll see why having them as in32 right now can be a major issue so if you actually do um if we go Python and we do 2 to the 32 we'll get this number so look how big this is this Is uh 1 2 3 4 5 6 7 8 uh 9 so that's that's about 4.2 that's about 4 GB um in po of 2 of course that's 4 GB so if you have say 8 gab of memory which isn't actually that much on
this machine I actually have 64 so I have 64 GB of memory taken up by like a single array I mean that obviously wouldn't happen that's a really large array but let's just say I have like one that's like you know 64 GB long well we're actually going to get Overflow when we try to index that way so you're going to see later on that it's more useful to use uh a certain type for these pointers so if we do 2 to the 64 so u a double Precision integer so N64 you'll see that this
is like extremely massive um this is like I don't know somewhere in the exabytes it's like ridiculously high um yeah just we we're we're going to deal with this later but right now this is the general intuition for how uh how These pointers are printed out so if I scroll up a little bit you'll just see uh we print out the dereferenced pointer um at that uh essentially take that memory address and then we dreference it based on the index that it currently is so we just bump up the index one we we jump ahead
32 bits or four bytes and then we print that that value out uh each time and you see that vertically here um I just maybe run that again after it's cleared You'll see that it's it's just like vertically just skips ahead as we'd expect and then this pointer uh which is just the that memory address and then I just put this out for testing sake you don't need to worry about that um but yeah this is the general intuition on uh how how these things are laid out in memory so number six is an interesting
one it kind of goes back to example number two where we have this uh we have this value and then pointer pointer Pointer just Stacks up uh that that's essentially what sixes so we have these two arrays array 1 and two and they're essentially just these vectors or these these these arrays 1 2 3 4 and then we have an array to uh 5 6 7 8 uh and then we just have an integer pointer uh to those arrays um and then we store another you could say array I just name it Matrix to differentiate
and we store those pointers uh essentially on top of each other so what it looks like is we Have this we have this Matrix so it's pointer one and pointer two pointer one is the uh it's the it's the pointer to that array the array one and then pointer two is the is the memory address for for array two so essentially what we have it is if we if we look at this uh this array of of like this Matrix it has pointer one pointer two if we flip it so instead of like this and
this we we stack them on top of each other so it's pointer one then pointer two it actually Looks like a matrix so you'll have your array one which is 1 two 3 4 and then one underneath which is five six seven8 and so it actually is like a it's it's like a grid right uh and if we iterate through this um oh you'll actually see um we just essentially iterate through these so uh we we we do J and four uh and we we print out the D reference Matrix at position I so that
position I is going To give a memory address for uh it's going to be you know number two uh which is going to be these two arrays um and then we're going to dreference that which is going to give us our actual values and then we're going to iterate this each time of course as the for Loop goes on um and then we just do a next line so that it looks nice nice so that's uh that's pretty much all I have for pointers we're going to jump into custom types now which is more what
I was talking about for this for these weird pointer sizes um we're going to dive into this so now I'm going to show you pretty much the equivalent of the torch dot long type so you might have seen this before if you're you know I assume you have some knowledge of python and pytorch so I figured that's the best way to illustrate this we have this size T this size _ T this is typically how you you write this out in C is you'll have Uh whatever the type is and then you'll have underscore T
to say that this is like a custom type that you made T is for type um and this is specifically for U like big big numbers right so the idea here is this is going to be an unsigned long so uint uh long so int it's going to be a uint 64 that's what it's going to be um if we do this in in torch you'll see I python import torch and then we Can make X this just an array of integers uh and then we go x. dtype we'll see a torch. N64 so it's
just like that 64 uh bit Precision that we want to store really big really big matrices right so especially in Cuda when you have uh like really really big tensors that are occupying like multiple gigabytes um like on my GPU I have 8 gigabyt of storage so if we're using in32 uh that you might get some overflow Errors or you might get some just some some unexpected bad behavior that is going to like mess with things so you don't necessarily want that and that's the whole point of the size type um I kind of wanted
to show you that this isn't so bad after all so you know just to step through this we have we have the same array that we went over last time we do this size T type um we use size and then size of array divided by uh divided by the size of an individual Integer so it's like the total size of this uh entire thing divided by the uh the size of each individual thing in it so you get the total length of the array um uh and so if we go 01 I already compiled
this uh you'll see we get that five right so there's five elements in here uh we print this size out um I'll go over this this Zu part in a second here um but we get that output five and then this eight um we print out the size of this so that's in uh that's in bytes By the way we we when we do a like size of int we if we do like let's see print F uh we'll just say int size uh and then we'll go uh sure in in bites we'll do that
uh if I just compile this again we'll see int size and bytes so this is an int32 this just just an in32 and it's four bytes or 32 bits so when we have this that means it's 64 bits just to put that in perspective there so uh when we Go to this size T we'll see it's an unsigned type def so we do a type definition unsign so it's a it's only going to be positive because we're storing like a you know you can't have like negative size that's the logic and then we have this
long which means it's going to be uh it's going to Lally tell the operating system where we we want 64 bits not 32 we want it to be long um and then just the the size T type so we can actually go into this and we can see oh Type def size type and then we make this we declare this thing where does this come from oh right here long unsigned integer boom just like that super easy right um and uh I guess to sort of clarify like what the whole deal is here we could
just pop back to this link if I just open it on my second screen here and pop it over oh uh we can search for the I'll make this a bit bigger I don't Know can I make it bigger there we go so if I go up uh we'll see that we have this uh we have this we have this Z and then we have the U so Z is uh Z is just going to be uh I can't remember exactly what this was for but uh then we have this U which is essentially just
the unsigned in right so it's U is unsigned um and then we have this size T type which is what the which is what the Z is for um and then we just we just map that out so uh you Know if we had a uh if we had just a regular integer it would still be size T because you can have you know it's still an integer you can do stuff with it but when we have a u uh then you know it's just kind of explicitly you're going to have this size T type
so that that's kind of how we M things there and we can use the Z followed by the U uh to properly print that out to print out the type of that so you know you have all these other ones too like uh pointer Diff type uh but that's that's generally the intuition there and then next up I just wanted to cover uh declaring your own custom types so you know we saw one in the in the standard uh C library the standard iio uh uh C library the standard definition Library whatever you want to
call it the headers um and it's also important that we can declare our own because we might even we might need to use these and we Actually will use these later on in the course so typically how it goes is you do this thing called a type def uh which is a type definition and for let's just say we're going to make a point for example it has an X and A Y and their floating Point values so we do this struct which is going to have some elements inside of it it's going to have
some it's going to have some of these I guess objects you could say these items uh and it's going to have a float X and A float Y and then we declare we we say this is going to be a type point we do type definition uh it's going to be a struct and we're going to make that a point type essentially and then inside of our int main here since this is already declared we can say a point type like you know you could like you would do an INT P or something we're just
replacing replacing int or whatever that type is with point and we're making that variable named p and then we're Populating it with some values here so this is going to be our float X and our float y um and then if we go uh you know size of Point here if I just compile this and then run uh you'll see size of point is eight so 8 bytes is four bytes plus four more bytes so each of these is a float 32 number that occupies four bytes in memory so when you add these together it
occupies a total of eight bytes so this point this point uh type is going to Cover uh 8 bytes or 64 bits in memory um and then just this other C++ script is literally the identical to this so you can you can declare things the exact same way in um in C++ except you might just want to use like the io stream instead of uh like you maybe in C++ you would comment this out and you would go uh include uh IO stream and and then you would use uh using namespace STD and then you
would uh then you would See out that oh identifier SE is undefined okay I guess not I don't know why that's not working um but but you get the point so very minimal changes so now if we pop over to type casting uh I have two files in here so just a just a single C file and then a read me so inside here I have uh static cast Dynamic cast uh constant casts and reinterpret cast so we're only going to Be covering these static cast because these are the safe ones these are mainly what
you're going to end up using if any um so in here it it's it's very simple you have just a like say a floating Point number 6969 and then we have we just declare an INT and all we do is just have this F and then we do brackets int we we put these we just literally put this right in front of it and that'll statically typ cast uh the float 69.6 n To an INT and what this will do is it'll just truncate that last part so in memory in essentially in binary and bits
it'll be laid out as um it'll have that first part so the first uh the first integer piece and then it'll have the decimal and then it'll have the uh it'll have the it'll have the decimal bits afterwards so it'll it'll be like that decimal and then after so what it'll do is when it's when it's typ casting it'll just uh truncate this part and then give Give us more Precision for these uh for these essentially int 32 bits so uh it that that's essentially all it's going to look like it's it's just going to
be 69 uh it's not going to have any decimal places it's going to effectively round down you could say um so if I just pop into uh type casting and run this you'll see uh we get this integer Format so just truncated and then when we do a character um this is actually going to convert to uh asky so if you remember your asky tables I'll go ahead and bring this up on the side here asky table uh oh it's right literally right there okay ask.com um we can see that this one right here is
an uppercase E right So uppercase E uppercase E look at that how how easy was that right it's not not crazy doing an integer to a character conversion so that's that that's all type casting is I'm not going to go over this extensively cuz it isn't like a crazy piece we end up using in Cuda but just to throw it out there and remind you guys of how how simple this type of thing is another topic I thought was uh briefly worth touching on was macros and Global variables so we can we essentially have these
these basic ones like uh you know if if defined if not defined L if else and then end if uh so it it's we're essentially going to use these later on to declare hyperparameters and uh just different Global things that we'll need access to that we don't want to just pass in as an extra you know bloated function argument when you have like 20 arguments in a function you might want to reduce that And just declare some of those locally so you can use them wherever you want as long as they're not changing or you're
not doing anything weird with them you're you're okay right so like in this example I do uh Pi like uppercase pi and then we set that equal to uh a double right so uh we can do these functions too so it's kind of like a a Lambda function if you will a Lambda function in Python we do this area and then we we pass whatever We want in so R is our radius and then we do essentially the the radius is piun r^ 2 so we just do PI * R * R and we get
that so it's just a little Lambda function you can do as a macro um and then we have if not defined radius so radius isn't defined here if and DEP if not defin um theine radius and we set that value to seven so it's going to be an integer seven we end the if we end this this whole block and radius is a now a declared maer equal to Seven uh and then we have some if logic down here so if radius uh you know it's bigger than 10 which is not we Define this so
this this is like grade out um it's not smaller than five also grade out and then else U so it's just going to stay at seven and then it's going to end if so we can do if logic in here as well um and then if I just go ahead and pop out of this to uh macros and we go GCC like This we're going to oh double we'll do uh perfect so area of circle with radius 7 um is going to be this much and that's that's a floating Point number which we have here
so uh this radius I I was not careful there this radius is actually an integer type so we just set that back to D um and then it then it works Bel ly so uh that's that's how you do uh macros pretty easy this part is where my understanding gets a little bit fuzzy I Haven't worked with compilers extensively but I have found some really good resources on uh the C and C++ compilers so I've just provided some links here for you to go learn um GCC is the most popular C compiler so that's gnu
uh C compiler um and then g++ is the same thing but for C++ so uh you know I have different articles on here from free code camp that you can go and look at so uh there's there's this one and then we have the other one As well what does a compiler explain for beginners um so like an analogy essentially just converting uh converting your machine code down to uh down to assembly and and you have all these representations in between that that the computer work with to help understand things better uh and then it'll
convert that assembly code down to uh essentially the uh CPU instructions in uh in bits and bytes so binary ones And zeros uh and that'll get sent through as as essentially electrons and charges through your through your circuitry in the computer and that is what actually executes this stuff um and then just the C C++ compiler is a little bit uh might be a little bit higher level I know C++ is a higher level language than c um but this these are just like really good explanations that I can't really top myself without messing up
so I Provided these links here um hopefully this all makes sense but uh we won't really need to understand too much about compilers Downstream it's good to know what they're doing but in order to debug code you just need to know kind of the architecture of what the compiler is what it's doing like where it's where it's stuff not necessarily like all the math and representations happening um it's good to know of course but it's not needed to write functioning code so uh We'll see that later on like we're just going to essentially type in
these compiler flags and and all this and that that's what the next section on actually is uh it's on make files so make files are really useful they're going to help you uh be more efficient about developing C C++ and Cuda code so instead of going into here and just typing uh you know GCC every single time and maybe maybe you have autocomplete like me but either way you just want This to be a faster process and you want to be able to automate and and have more control over what happens uh and just manage
things better make files is what you want so inside of make files it it looks really complicated and it's like learning this new language but it's really not it's not that bad um you can Define variables so like GCC equals GCC and in order to use these uh I can just do dollar sign and then brackets and then put that variable inside the Variable name inside and it'll just pretty much reference this when it's called um this is a command by the way so you'll we'll see this in a second um I'm going to do
a little experiment with the Cuda script here but we just have this nvcc maaps to the Nvidia Cuda compiler and then we have Cuda Flags so this is just a little thing that's like my GPU architecture we're going to see this later you don't have to worry about this now but this is just like U my GPU Architecture is a uh 8.6 compute capability uh or compute compatibility I think it's capability um either way this is just we could just have flags and we can just have more variables that we plug into this stuff but
if I go back to the read me for this we have these targets prerequisites and then our commands nested inside of that so how does this work exactly well I'm going to show you this um just by Pretty much example so um if I go if I go I can actually delete this line if I just go make 01 see how it makes a binary here and then I can run this binary and it'll say boo this this print F just it just prints boo like it works um just from make 01 so what we're
doing is we have this make Command which is for make files kind of maps the there and then we have the 01 part which is the target so this this is the target this is left Side of the colon and then after is their prerequisites so notice how I I removed that that other part the 01c so this essentially means we're going to uh either confirm that this is that this already existed or has been done um and if it hasn't we're going to do it so you'll see that in these examples down here but
just to fill in the rest so we have a bunch of things happening we have this we have this variable GCC which is just Saying you know it's it's essentially just going uh you know GCC um it's just doing that and then we put this at sign in front of it which means don't print this out in the terminal so if I just uh remove this and go uh and just remove the at and go uh clean I'll just I'll just remove this for for so that it makes the most sense and then I go
make uh 01 you'll See that it actually uh shows us this in the terminal um but if I put an at there then it doesn't right so that just removes it that just makes things more clean and just it's like a best practice just easy to see things um you want to maybe like look at the ones that uh might do weird things and you just want to like ensure that all your variables are correct um but this is a very simple you don't need to print this out um and then just jumping down to
uh like number Two here so uh number two is uh essentially the same thing so uh I'm not even going to execute that we don't we don't even need to run this um and then 03 is just the ca compiler so we do nvcc and then the Cuda Flags so which essentially what it's going to look like is it's going to go nvcc Das Arch uh get rid of that and then um it's going to pass in O 03 CU that that's the binary we want it to be and then that that's going to run
and we should be able to go 03 C and it's going to say boo from here right so just just the same thing um we just include like Cuda runtime and all this just to be fancy but it just it just outputs the the boot the boot command um yeah this this is a this is very Simple example so it's essentially just converting uh it's converting these variable names and not printing anything out um we just go make 03 and it'll do the exact same thing see it takes a little while same exact thing um
we have this clean command which is going to actually remove all these binaries so when we want to clean up everything uh and just you know make it nice and presentable Like we haven't done work like what I'm doing with you guys is I'm deleting these binaries before doing the lessons uh because it looks ugly when I have more files so I can just go uh make clean gone right um so that that's just like a very very simple example and it's just it's just like make and then whatever the target is uh going back
up to these ones these are a little interesting so 01 uncore obj which is for object This is going to uh GCC uh comp uh it's going to take in this C code and it's going to Output uh this o or this object file so it's going to it's going to essentially this but it's just going to do object file instead of a binary um and then this 01 uh obj so this object uh execute run that's going to take in this this previous one as a prerequisite so that means this one has to already
be complete and if it's not complete we're Going to run it and make sure it's complete in order for this to work so uh we're going to uh compile this object file into a binary so you have the this like the C the C representation and then the object file which we do uh here and then this one takes that new object file and converts that into a binary and then we execute that binary on this line so if I go uh make and then 01 uh obj ex uh execute Run and we don't have
any of these files in here it's going to it's literally going to uh ensure that this is called first because it hasn't yet um so it's going to it's going to convert this C file into object and then it's going to convert that object into a binary and it's going to execute that binary so this is just I probably overe explain things a little bit but this is this is pretty much the idea on how you Uh how you can automate uh just C compilation C++ compilation we're going to use this more for uh Cuda
scripts down the road uh but that's that's the general idea and then this phony part at the top might look a little weird but this essentially means uh we're not we're not going to uh it's just like a a a way to make uh things easier to use make it so you don't run into errors I had a decent explanation here so um say we had a make File make file with a Target named clean so in this in this cleanup command that that makes everything nice again suppose we have a directory named clean in
the same directory as the make file so here if we had something named clean um if we run make clean make will not run the command um it will not run the command in the Target clean because clean already exists instead it will see that the director clean already exists will not It'll not run it so in short we essentially take a bunch of mappings from Target names to commands um that's that's where this phony thing comes from so it's like a it's like a phony if you will I don't know what the philos was
behind that naming but that's that's how it works um and then we have some just some other stuff in here so I already went it over the at symbol and then there's this one too so the the colon equals um I don't Think we use this in here but uh equals is used for dividing variables or uh it's called a recursive assignment so both used for dividing variables both of these are this one is a recursive assignment so value of the variable is reevaluated each time it's used um and then this one is a simple
assignment or immediate one it's evaluated only once at the point of definition so this is like typically the safer option you want to go down if you get really complicated Make files you might end up running into weird things with these recursive assignments so generally it's safe to use these ones but it it looks it looks a little funny so I didn't include it in this example um we will we will use it down the road though so last but not least uh we have debers so debuggers are awesome for just uh an alternative to
just adding print lines print just print this print that did we make it here yay we made it ah we failed whatever just Adding those just blows your code up so having debuggers makes that a lot easier on you uh you can actually go down to literal assembly and see where the electrons are in your code uh like in your in your script like what is happening on the hardware so uh debuggers are super useful and in particular we're going to be talking about the GDB debugger for C and C++ so you use them for
both um I'm not going to like explain these super intensely I Don't feel comfortable in my own explanation for these because there's just a lot happening um but there are some commands that you generally want to be familiar with it's mostly just commands and knowing uh what to look for in your script so I have these in the readme file just just with some explanation um but a really good uh overview is here so this is done from lowle learning has an advertisement here but uh essentially It's just it's just a really good overview on
uh GDB uh just going into assembly and doing a bunch of cool tricks and and debuging C code that way so I do recommend you watch that video okay we can finally take a breather now that was a lot uh but I really hope that this is going to sort of just ease that uh this is designed to be a more passive part where you can kind of just sit around and listen and watch and just kind of enjoy It uh there's no coding involved here at all um so I thought I'd provide some context
on different types of Hardware what the whole purpose of gpus are I mean you probably already know what they are but I just want to provide that background just so that we're on the same page entirely um and just to provide some kind of internal I guess preparation uh for for the next part it's good to have these braks just to you know slow your mind a little bit and Uh give yourself some time but first off we have these CPUs okay you already know what a CPU is it's general purpose High clock speed per
core very few number of cores the on chip memory is very large so maybe you didn't know that the the caches on the chip are actually quite large compared to the GPU um this is because you know the memory band with from uh the CPU to the the ram slots on your computer those are going to be uh like that transfer Speed is going to be very slow you have to move the electrons all the way from this part of the motherboard to this one and that takes time right you're you're just constantly waiting for
data to arrive and that's like what takes up most of your time right so you have these big caches for just purposely like load pre-loading things on so that they're ready to use um you have lower latency so the whole idea of a CPU is to just just complete this task as quickly As possible and just return the value just complete it complete it fast um and then they have low throughput as well so low throughput means um it can't do as much comparatively it can't do as uh as much operations per second as a
GPU can if you're talking about simple instructions if they're more complex ones like managing and loading data and doing like file reads and wres like that'll be faster but if you're talking like math and matrix multiplication Uh it is going to be significantly slower throughput is more talked about as like operations per second so if I have a bunch of cores running at say uh 2 billion clocks per second and I have 6,000 of them versus six cores that are running at 5 billion clocks per second do the math right how many operations are you
going to do on this one versus that one that's the whole point of a GPU way more cores a little bit lower clock speed um but way more cores it's is Completely outnumbered CPU and that's why it's faster um and then on gpus we have the 90 hasn't been released yet but I thought it was funny to put there um gpus are very specialized so they can accomplish simpler instructions easier to handle ones hence why they have smaller controllers on them which you'll see in a second um they have a lower clock speed like I
said way more cores and a lower cache so because you have that on chip memory because you Actually have this vram that you can access that is on on the GPU and that this all of the Nvidia Hardware Engineers has essentially optimized for accessing that um you're able to get a lot higher memory bandwidth that way up in the like a high 100 gigabyte per second range um so it's like it's it's in the hundreds for sure um you have higher latency on this remember it's not for you know minimize the amount of time it
takes to complete this task and then Just done right it's it's more optimized for throughput so we already talked about this but um then you have these tpus which came across recently and these are for modern deep learning applications so tpus are for literally just processing tensors like you do fast matrix multiplication fast linear algebra that's that's what it is tensor is linear tensor operations is linear algebra um and it's just specialized for doing that so tpus are faster but way More expensive and specialized in typically not consumer grade Hardware so that's why we learn
how to you know build on top of infrastructure with gpus cuz it's you know you can actually afford it you can have one at your house and for fairly low cost um and then you have these fbt which I don't expect you know what these are but these field programmable gate arrays are very specialized pieces of Hardware that essentially say uh instead of having to Write like a or build a custom Hardware configuration uh like for a certain task for making something that you need to run really really fast um you can just program these
you can just program the actual chips to do uh something more more fine grain on what you want so there's more control over it very expensive very low latency very high throughput uh high power all this right they're these are these are more expensive but uh they allow for Modularity if you will um and then just for some background on GPU history so you know back in 1993 when Jensen started Nvidia they had the uh you know they the GeForce cards all of these I wasn't alive during this time um but you have uh then
you start getting into you know after after the g47 you start getting into uh these these better ones so like the Tesla cards the fery uh the Kepler Maxwell Pascal and then volto is when Things really started taking off the Pascal and the Volta cards then you have taring and then a which is what my card is based on and then you have Hopper which uh in case you didn't know Hopper cards are really really fast like the h100s and the h20s and even the recently released Nvidia Blackwell chips yeah those are ridiculous um this
is this is a little bit outdated of course so there are actually uh like chips on here uh I just got like a an outdated screenshot But you get the idea this is how it progressed uh and then you have like the relative clock speed per core on here so you know some of these were like really really high but didn't have very many cores um and then Nvidia kind of figured out like okay we should just put more and more cores on these things right um and then you get the the overall uh I
think floating Point performance is what this is so uh yeah you once you get to Volta it's It's starting to get uh it's starting to get really high so I think this is uh double Precision Giga flops so uh you know six essentially six Tera flops of compute on the FTA architecture which is pretty good um and then it gets better and better from there on mine I think I have right now it runs at a high of around 23 uh 23 Tera flops on kuas so kuas is the fast linear algebra library that Multiplies
matrices really quickly and I'm on there I'm about to get pretty much like 20 uh 20 gig flops of single Precision compute um so that's that's that's that's quite good um what makes these things so fast for deep learning I didn't actually cover this um on the CPU you have very little cores you have these big control units that are taking up a ton of space you have all these caches everywhere that Are flooding the thing um and like there you you're you're not giving that much uh leverage to the course right like the course
can do Advanced complex instructions but there aren't that many of them so you can only do so much whereas if you have this other architecture where you have simpler instructions simpler controllers simpler uh registers smaller ones uh but a ton of cores like see how most of this is taken up by cores and then just Caches and RAM um that's that's ideal for gpus so on here you're too essentially the the IDE the idea here is you're trying to put together a puzzle you're trying to put together a jigsaw puzzle and the point is is
it doesn't matter which order you do it in so you you don't have to do like this row and then or you this column this column this like it doesn't matter you do this piece here this piece there do like a block like a chunk there it doesn't matter as Long as it's all assembled together properly in the end that's what you care about and that's what the GPU is really good at so typically you'll do things as like uh you know one like multiple puzzle pieces at a time or multiple blocks of puzzle pieces
at a time so you'll have like a 2 by two or like a 4x4 thing of Jigsaw pieces that you'll maybe do at a time that that's like the that's the intuition behind uh Cuda and how how you program gpus to run fast and Solve these problems quickly um on the CPU you might be able to only do like see there's only four cores here so you might be able to only do uh four given pieces of that puzzle at the same at once uh whereas GPU you you know let's say you have like 6,000
cores right uh if this if this puzzle has like I don't know say like 12,000 um if it has if it has 12,000 pieces well you can effectively do that in two operations because you're able to Do the first 6,000 in one and then the other 6,000 in the second so it's effectively two operations that you do it in but if you divide 12,000 by 4 four meaning number of CPU cores um you actually get 3,000 operations see you can see how that can be drastically sped up um that's that's why gpus are so fast
because you can because you can do that um now there there are some there are some common terms that we refer to these things through so CPU is the host you're Going to see this in Cuda once we start writing kernels uh the CPU is called the host which is pretty obvious and then it just kind of just kind of makes sense for that to be named that way and then the GPU is the device so you have the host CPU and then GPU which is the device um the CPU is going to uh mainly
the performance there is going to be latency in seconds so you're looking at latency how quick can I do a given task and the GPU is throughput in tasks per Second so for example if you're doing a rendering task it's like how many pixels can I render per second um or how many uh I don't know how many pixels can I can I yeah sure render per second that's fine um in a typical Cuda program you're going to allocate at uh some memory on CPU memory so it's going to be a classical like C Malik
that's what you're going to do and then once it's allocated on CPU or host you're going to copy from host to device or or CPU to GPU um and then once it's on the GPU you can actually launch a kernel which is what these parallel functions are essentially so on a CPU you have a a function then GPU you have a a kernel which is a GPU function that can be parallelized um and that's that's the main intuition there is you you start off with CPU move everything do everything really fast on GPU and then
once you're done with the results you move them back and then do Whatever you want with them from there you might even continue to just feed it more into into more and more kernels until the whole thing is done right uh but that's like that's the that's the ideal workflow is you have CPU and then this GPU thing is like an intermediary which you have to convert back to CPU to do something useful with um the kernel looks like a Serial program so if you we're going to look at these in a second here when
we jump into Actually writing these but uh it's it's going to be a very simple function and it's going to it's going to have a very few lines uh it's going to it's going to look like this basic serial script except it's going to have some key terms in it um these are mainly threads blocks and grids don't even worry about those terms right now we're going to get into those I'm going to explain the philosophy behind them uh I'm going to explain uh pretty much the Whole Cuda architecture for you and just help you
understand what the heck these things are for now some common terms to remember before we actually start jumping into this stuff are uh well first of all kernels so kernels is like a weird term um you might have thought like popcorn kernels like like this is what I thought I was like what popcorn Kels why are we using those on on computers that doesn't make sense um and then I jumped over to convolution Kernels which is like uh when you do like a convolution operation you might have seen this in like cnns if you've done
a lot of stuff in like maybe pytorch and you've like look through the intuition on that it's like a a sliding kernel that does a that does like an image processing thing on on yeah just images um that that the filter that slides and does calculations that's called a kernel so I was like uh is it that no no it's not it's not a Convolution kernel uh it's also not a Linux kernel either but enough so there's lots of different kernels we have there's actually four kernels popcorn kernels convolution kernels Linux kernels uh but the
best one is GPU kernels so that's the ones we're going to be working with um there's actually a little keyword that you highlight you goore Global uncore uncore and that defines a a kernel on the GPU so there's actually a way we can explicitly say That and uh yeah not not an external story I thought the same thing too it's like which one is it um but yeah so we're going to go into two threads blocks and grids that's going to be one of the main things in the next chapter um and then two more
like sort of just lingo terms are gem so G mm uh this stands for General matrix multiplication so what this generally means is uh you have it's not just multiplying like a and a * bals C it's not it's not a mapal Um entirely you actually do a ml um and then you have this Alpha you have this Alpha parameter which you scale the result of that by uh and then you add it to uh this beta scaler times this times The Matrix C which is the shape of the output Matrix so that's that's like
a lot of linear algebra which I'm not going to cover right now but in case that's like in case that makes sense to you it's essentially this Alpha time uh time mL of A and B and then you add that To a scalar B * C which is the shape of that Matrix um that that's what a gem is so it's it's a mmal but with more uh and then you have S gem so that's just general MMO but with but with uh single Precision so it's explicitly single Precision um you can do a a
half M Mo so like an fp6 uh you can do double mol you typically don't though it's like FP fp64 um but yeah so generally speaking um gem S gem those are important then you have the CPU which is also called The Host which runs functions versus the GPU which is called the device and it runs kernels um and that that's pretty much it I hope I hope that wasn't too hard uh we're going to dig into some kernels now this this part's going to be uh a little bit it's going to be a little
bit intensive you'll need to pay attention a little bit but uh it's going to be fun and I Promised by the end uh you're going to be really enlightened you're going to like the first part of Cuda isn't actually that hard we're just going to cover very very basic kernels like vector addition it's not going to be that bad at all um but just to introduce you to the philosophy and the whole design principles of like basic uh Cuda seat programming okay so now things are going to get a little bit more technical but I
Figured we would kind of enter smoothly by just doing a fun and useful activity so I pulled up a bunch of Wikipedia articles on various GPU architectures then we're going to dive into what does your GPU actually look like like what what are the stats of that um so just like looking at these in general let's you know we're just looking for things that are like useful to know some maybe some little history kind of like the uh intro to GPU section that we previously Did um so like Pascal was an older one that we
used to have um there's a bunch of cool stuff about this so like the 1080 and the and the and the 10 and the 10 70 uh we both based off Pascal um you know you have a bunch of information about you know where it's from all of this um but what's really cool is um if we scroll down you have all the technical details on these things it's crazy how much Wikipedia has um but yeah like you We have these tables that will that will essentially tell us like which which generation which Generations had
what so like you know texture cast per SM which we'll go into later um dedicated shared memory per uh SM or streaming multiprocessor L2 cach per chip right so you have all these statistics and you can sort of compare these over time so if we jump up to emper which is actually what my GPU my RTX 3070 is based off of um you scroll down and uh you get the same thing right so like L2 cache um and then L2 cach so like 512 kilobytes and then this one is um 40 megabytes right so you
get some interesting comparisons here but um yeah these this is just kind of the stuff you want to be looking at uh when it comes to like GPU specs especially if you don't have one right you're going to find a lot of useful information here um You know going to Ampere like you have these a100 s that have been used to train very big models uh and that's it's Amper 100 right that's that's what it's called um so bunch of cool statistics um which different precisions and data types do they support so like the uh
like for example Volta um Volta supports Volta doesn't support brain float 16 but a100 does support brain Flat 16 so interesting stuff like that which you can sort of just do a side comparison of AD love lace this micro architecture is what is used in the 40 series cards so ere is like the 30 series um I believe if we actually go to Volta architecture uh Volta microarchitecture um I believe this is used in the the 20 series cards the 20 it's going to be Somewhere okay maybe not anyways you can find a bunch of
cool statistics on these a love La is the 40 series cards you get a bunch of info on that like the the L2 cache it's again bigger instead of 40 megabytes around here it's 96 which is great um L1 cache is actually what matters more so you know like 18 megabytes and and and so forth um then Hopper which is actually what the state-of-the-art gpus right now Or close to state-ofthe-art is well the state-ofthe-art is actually the Blackwell uh micro architecture but the hopper is like also very like second most recent one and these are
what the h100s are based on these are used to train models like gbt 4 Etc uh so you can you find a bunch of statistics on those without actually going and using one um but if we actually want to uh print some stuff about our GPU I'm just going to open a new terminal tab here um I'm going to drag this to the side if we pop over to um Cuda samples GitHub this is going to print some stuff about your GPU so if we uh take this and we just just get clone it it's
going to take a second to do that but we can scroll down in the meantime and we can see uh if you're on Linux you would you would say CD into your whatever directory you desire and Then and then make uh to actually make the binaries for running stuff with it so if we print this out here let me actually make this bit bigger um we can CD into Cuda samples and then inside of here we have uh samples so we go into our sample directory as seen there so CD into samples and then we
have um we have a bunch of different ones so There's things you can experiment with here I don't know how how easy these are to use I haven't played with them yet but we're going to CD into utilities and notice how we have this device query thing here so this is actually going to turn into a um we can't execute that yet but if we make then we actually can and we can see a bunch of details about our GPU so I recommend you to do this on your own system but uh one cuicable device
so There's one GPU plugged into my motherboard that GPU is the GeForce RTX 370 the Cuda driver version is 12.5 as well as the runtime version uh Cuda capability so this is actually very important this 8.6 here yours is it might be different um you might have the same GPU you might not but this 8.6 is actually very critical in how we uh we know like what is supported on our GPU so there might be some operations that work and there might be some that aren't So if I just drag this um over to the
side here we we don't need to worry about the rest of this as of right now maybe some of maybe some of this later but uh I'll just I'll just give you that information so if we go to the uh Cuda uh capability compute capability [Music] um what's it called sure GeForce products um see 8.6 Just like that uh I have to go back to the Cuda docs to actually get useful stuff about this uh Cuda Cuda docs so if we go to the uh Cuda C we'll just sure we'll do Cuda C++ um no
we're not going to do Cuda C++ we're going to go down to uh Cuda C Cuda search Cuda C programming guide and inside of the cudas C programming guide yes Um capability so like this for example this is what I'm looking for so thread block clusters in in uh two and then you go to 2.2.1 it's thread block clusters um you only get these if you have a compute capability 9.0 or higher um so the higher the compute capability the better uh so I cannot actually use thread block clusters on mine because the architecture doesn't
support it these Are critical things you're going to watch out for and you know as you you might actually be able to take advantage of some features that someone else can't like if you have an a100 and someone else has a v00 you can actually do things that they can't and you can do things faster and more efficiently because of things that the architecture actually supports so these are these are things you're going to watch out for um but anyways uh with that being said we Can actually jump into uh some stuff about the just
essentially how does the Cuda architecture work how does how how do we write code and and how do how does that whole thing fit together so now we can actually get really into what Cuda is doing and the whole hierarchy of that so inside of here I've pulled up chapter 5 writing your own kernels um and then Cuda Basics and then just the readme and the ID exing or indexing file so if you do I Believe control shift V on this or control I don't know what keybind it is contrl alt V contrl shift V
there we go okay um and then we pull up this one on the side here just uh just for reference let's go through this sort of hand in hand so I'm going to zoom in we just printed this out we just printed out device query so we don't need to really cover that um but when it comes to sort of the more easy stuff to Get a grasp on I mean we already went over this so you have the host which is the CPU and uses those RAM sticks on your motherboard and then the device
or the GPU uses the onchip vram or video memory um for desktop PCS the the surface level run time typically goes um you C you you define some input on the host or the CPU uh which you then later want to run on the GPU but in first you have to actually Define it on the whole system memory And then you would copy that over to GPU memory um and then you would uh and then you would execute using that on GPU memory you would execute you you would launch a Cuda kernel and that Cuda
kernel would use that uh GPU memory and do stuff with it and maybe do do some useful computation and then once that's done uh you would ensure everything is all synchronized up like nothing is nothing is still waiting you would you would synchronize everything and then You would transfer it back to CPU so that or or the host so that you can you know print it out or do something useful with it this is typically how the the runtime goes um and you'll see this in our later chapters um the naming scheme like how we
actually um what what we actually name our pieces of data is quite critical so typically what you'll do is you go host or H and then underscore whatever the variable name is so if it's like Matrix a you do hore Matrix a that means it's defined on the host so you're going to do your your Malik your your your C Malik um with this and then you're going to do a Cuda mem copy which we will see later in a second um and that that's where you take this host and you you essentially transfer it
over to this other to this other variable uh device so device a that's the GPU uh version of of that so it just exists on two different pieces of memory um and this is just for the Set variable name a now we have this Global which you might have seen already um this is visible globally and this is very broad this is this is typically what a kernel is going to look like uh unless you are calling uh say a separate uh calling a separate kernel inside of another one you would use say device um
but in this example we'll just stick with global um you know you can read a littleit little bit more into this if you want But we're going to use Global for the most part device we might see that later in the course and then host uh is only going to run on CPU so uh don't don't really worry about that um it's it's kind of just telling Cuda that you're going to run on on the on the CPU but you you may not actually need to because you're just going to use you know like the
void instead of instead of global void right um now this this Cuda malic Term memory allocation on the GP vram so that's the global memory on the GPU itself so in this example you do you know Define a bunch of uh a bunch of uh essenti essentially arrays so a pointer to a device uh a float array which is a pointer on the device uh and it's for a and then the same thing for B and C now you do kudam Malik meaning you allocate it on the GPU so you do the memory address for
that so you put in the memory address for for This thing um and then you go essentially whatever the you know let's just say you have a size defined above right uh like it's maybe it's like a matrix for example and it's size it's like a you know Square Matrix size n byn and all you're going to do is say you know we want to allocate this much memory uh this memory address and that's just going to be a square Matrix of let's say you know 128 * 128 time the size of whatever a float
Is so in that case I think it'll be four because a float is uh four bytes where each B is eight bits you have a floating Point 32 number do the math and then you end up with the total amount of uh bytes that you will need to allocate for uh this device uh a matrix and so on through b and c as well um now Cuda M Copy can copy from both device to host host to device or device to device for edge cases so um you know you would you would slide a little
term In here camem copy host to device or CM copy device to host um and that's that's how that would go um we're actually going to see usage of this in a second here but um understanding camm copy is just going to just going to copy things around and then Cuda free is obviously just going to free memory up on the device so when you you're done with something or you don't need it anymore just you know free that up if it's a big if it's a big uh you know if it's just Like an
integer or whatever like just a float um like a float a equals 1 or something it's like you don't need to free that um but if it's a big array like this you're going to need to free that um now the nvcc compiler is something we'll dig into maybe a little more in the future um but this is all you really need to know so the host code is uh essentially the these nvcc will compile all of this down into uh something that The GPU can actually execute but the CPU is going to run it
so uh CPU is going to interpret what that is saying and it's going to launch things and and tell the GPU to do things it's not just going to compile directly down to GPU right so uh when it needs to run on GPU when when it actually needs those instructions as to what to do it's going to get compiled down to PTX which is parallel thread execution instructions so that's like the GPU equivalent of x86 or assembly uh You know as it is for um CPU or host um and and then it's further going to
compile that down to Shader assembly which we're not going to worry about um and this is just and this is stable across all of the different Nvidia gpus so you don't need to worry about that um and then just in time is just a type of compil so um Cuda hierarchy yes this is this is where things start to get a little bit Intuitive so imagine you have like a imagine you have this giant 3D like a cubic volume uh and and this volume is called a grid right inside of this grid you're going to
have a bunch of these smaller Cube cubic volumes those are called blocks uh and those those blocks are organized uh you know you can make them whatever size you want it's just like essentially uh can think of it like a like a like a prism or something uh and you have a Bunch of these organized in this giant 3D Volume which is the grid and those individual blocks have things inside of them called threads and those threads are going to do your math operations for you so there's there's a lot to unpack here but the
the individual threads um can communicate inside of these blocks and that's an important part to remember for later when we're optimizing stuff but essentially the reason why we have all these different pieces inside of This massive grid is so that we can get the parallelism of gpus so when you have this block doing this you know doing this piece of the puzzle and then this doing another piece of the puzzle and they all kind of do their part and at the end if they all do their part successfully and they're all like synchronized and you
make sure that everything works correctly um you know it's it's better than having a single CPU thread going through each individual Thing in that problem and doing it one by one oras you have like a bunch of these blocks or these threads inside of blocks which are uh doing you know little independent operations it's doing a smaller number of operations and they have a lower clock speed uh but they're it's going to solve the problem much quicker because it's in parallel so that that's the whole idea here is you have this this 3D Volume called
a grid inside of it you have These other uh you have these other 3D sort of Cubes or rectangles whatever um and inside of those you have threads and those threads are going to also do things so I need to breathe but we'll go into uh some more technical terms in a second here so going to these technical terms we can see this grid dim exists here in our kernel in our Global uh kernel we have a block idx which is you know these these three um and block dim exists uh here and here And
here and here and here right you have all these uh and then thread idx so this grid dim is the number of blocks in the Grid at you know say like grid dim dot X is going to be uh in this in this volumetric uh grid what is the X dimension of that so like what is the length and then grid dim doy is going to be like what is the height and then maybe grid dim. Z is going to be the depth of that right um and then the block idx is going to it's
not actually Uh about the block itself but like where is it where is the block within the grid so the the grid dim is like how long is it how what is the what is like the size of the grid itself that is run on the GPU and then the block idx is where uh each individual block is so a block will have a block idx in both the uh maybe x y and Zed dimension and that'll be essentially its coordinates within that grid uh and then the block dim is how big that block is
so grid fits a bunch Of blocks into it a block fits a bunch of threads into it so the block dim is like how how big is this like smaller Cube or this or this rectangular prism um and then the thread idx is like which which thread is it within that block so you can see how this like spatial hierarchy goes down you have this 3D in the grid and then this 3D in the block so it's like kind of 6D if you think about it that way um I don't want to I don't want
that to be intimidating Though like six dimensional I don't want that to be intimidating it's just kind of how the it's it's it's an efficient way of of running things in parallel and a way of visualizing it as like a software abstraction right uh that's that's the idea there um and then threads like I mean I I I assume that this kind of this this spatial idea sort of makes sense now so now we can go into like why this works um and sort of Like the more nitty-gritty of that so each thread um itself
has local memory on it so registers which are very fast and is private to that individual thread so for example if you wanted to add um A and B where it's like 1 2 3 and then all the way up to n which is like the length and then 2 4 six so like counting by ones and then count B is counting by twos um each thread would do a single add so like thread at index say zero would be like a at the at the thread Index right and so the thread index itself tells
you how to index into data and then you can use that element that it gets like from its own index from the thread index in that whole space and you can actually do operations with that so it's like a little hack of uh essentially both both getting the right elements of data uh and adding and doing math operations on them at the same time so we end up doing you know uh 1 + 2 right with a single thread and it's in And it's accessing this index uh that the index the data based on its
based on the thread's index and it's adding them together uh and then same thing for you know maybe thread thread two right um so that's just like kind of how the whole that that's how the whole like uh indexing thing pans out that's why it's so cool um and then warps and it's kind of interesting if you if you look at this Wikipedia article it's like warps warps and weft right so you Have um you have these warps that are going through so like these these uh these these warps that are going through it like
up and down and then the weft is like uh what the the warps are weaving through so they're like interlocked like this and so uh you you you could sort of think of of the uh warps as the uh as like what is what is going forward so you could say like a warp is a group of threads um warp and weft uh the vertical warp Yarns uh plural are held in stationary um and the horizontal we is drawn through them so you essentially have all these War like a bunch of threads essentially it's a
bunch of threads that are that are going in and out and and you can think of these threads as like doing their own math operations and you have a bunch of them grouped together in a warp right that's that's the whole idea there um so you know like I said in The in the in the Wikipedia article warp is a set of Yarns um set of Yarns or other things stretch in place on a loom where the weft is introduced during the weaving process is regarded as the longitudinal set in a in a finished fabric
with two or more sets of elements I I don't expect you to understand that it's just like the idea of threads are grouped into warps um and then the the whift kind of like it's that other uh Perpendicular part um so warps are inside of blocks so remember we have the like the the grids and then blocks and then threads um inside of blocks you have warps which take care of threads so the blocks themselves aren't entirely handling the threads it's actually the warps that are doing a lot of that work so you typically organize
a warp as like a group of threads like uh I believe the maximum is 32 threads so a warp will Handle 32 threads at once within a block um there is no way of getting around using warps the warps scheduler makes the warps run so uh you could think of like maybe the warp scheduler as the as like the weft right so um it's it's sort of like going through and making sure they don't get like disentangled and all this and and ensuring that everything like works out properly you can use whatever analogy Works um
but the the warp scheduler ensures that the warps which are group of threads run um and then you would have typically four warp schedulers per SM and SM is like the smaller like the the streaming multiprocessor on chip that's what those are and you can have four rep schedulers per SM so um you know do the math that's 128 threads per SM um then we have blocks so blocks are interesting each block has shared memory Um visible to all threads within that thread block so all of these like you know thread one can see the
same stuff that thread 32 can uh they can or or even thread like I don't know like 500 for that matter um um they can all see the same data so like within a warp they can they can kind of see their they can communicate faster but within a block they can still communicate very fast uh through this shared memory which we call the L1 cache And I'll dig into that in a second here when we go into the next section but the L1 cache is very important for Speed and optimizing uh kernels so uh
yeah essentially just the same thing what I said uh shared memory shared memory is is more efficient um it's faster I think the maximum memory bandwidth you get with shared memory is like on the order of uh like 15 terabytes per second and then uh Global vram so like when I do Nvidia SMI uh Like this you can see that I get um like this this this is my this this is actually going at like maybe 6 or 700 gabes a second Shar shared memory is like 15 terabytes so it's like really fast um and
and blocks use uh shared memory which is you know uh on an individual SM so the SM will handle that um and then grids um during the chronal execution the threads within the blocks within the grid can access Global memory Um so that's just like universally applied um you can you can make things you know more advanced if you want to use threads but it's going to default using the GPU V Ram that 8,192 megabytes that you just saw um it's going to contain a bunch of blocks um and the whole idea here is that
with with grids and blocks and threads is that you you just have to worry like conceptually what is it doing you don't have to worry about how things Are handled on the hardware because this whole Cuda this whole Cuda hierarchy is a software abstraction right so the so the hardware doesn't actually look like grids and blocks and threads like it doesn't objectively look like that it looks different and is compiled down to Shader assembly which doesn't actually look close to uh close to what this what this is right now and that is actually run on
the hardware right so there's there's Various different levels here that it's hard to sort of navigate through but this is a lot of this is kind of why I'm showing you this stuff if to give you a better grasp on that um so let's dig into what this uh ID exing script is actually doing now going into the actual Cuda indexing scheme like we saw with threads uh except we're going on the level of grids blocks uh and threads so everything uh this this script in particular is designed to Print things uh useful things out
for us so as we can see uh ID you know all these different block idx um all of these and uh oh I'm going to go into these in a second here but essentially like you you have the um if we go down um we we have we have all these terms that we Define right so uh block X block Y block Zed right so B and then T is for Threads so what I particularly mean here is uh this is the This is the block dim so inside of the grid you're going to have
uh X like the length of the X Dimension is going to be two and then the height Dimension is three and the depth Dimension Z is four right so you're going to have this grid uh volume and it's going to be of that shape and then in in each individual block inside of that inside of that grid um you're going to have these thread dims uh which this is essentially the block Dimension this is the um this is The grid Dimension and this is the block Dimension um so the you're inside of each block you're
going to have essentially four long four high and four deep right so it's going to be this this perfect Cube essentially um and so we go down we calc we can calculate the total number of blocks per grid so just essentially base time width time height your classical formula and same for Threads per block and we can get the total number In each of these and then we can go ah and print them out right so blocks per grid threads per block um and then total number of threads so we have a certain number of
threads per block and then if we times that by the number of blocks we get the total number of threads now we have this other type down here called dim 3 which is specific to Cuda but this is essentially just the same thing as we saw before so blocks per grid so we have this these um these These grid Dimensions X x y and Zed and then same thing for uh threads within a block so the block the block Dimensions um meaning x y and Zed and so we plug these into our kernel which is
called who am I we have this Global uh we have this Global header and we do these three um we do these these three symbols I can't remember what these are called it's like the less than or greater than symbol uh and then you put the uh total number of blocks Per grid um or the grid Dimensions as the first parameter and then the threads per block as the second and then there's some other ones which you can do after and you'll see those in a second but these are all all you have to worry
about right now so the grid dimensions and then the block Dimensions uh and then we c a device synchronized to ensure that everything is caught up and we can continue with whatever else we need to do um that this That would be used like practically um so now when we actually go up to here this is where things get a little bit spatially intuitive okay I'm not going to lie this part might be like one of the hardest to grasp but I'm going to try my best to explain so this block ID what is this
well this is essentially you you can think of uh a bunch of apartments in an apartment complex um a bunch of floors within each apartment and then a number like a room On that floor right and so we're trying to find where we are within that apart apartment complex right so you can think of it as um you know your apartment is like a like a paint right it's like a singular pain in this in this volume um and so you in this one you uh in in the apartment complex you essentially do um grid
dim dox so this this length part and then the Y component uh and then times whatever Z Is so the block idx doz is wherever the block position is it's not any it's not like how big how big something is it's ual index or the position so you have this pain which is x * Y and then a depth which is z so it's like however big the pain is and then go that deep so it's like these panes that are like layered on top going depthwise right it's going deep and so you have these
panes that are like going that way um and then you have The uh block idx doy time grid dim dox so you can think of this as uh like the the grid di is is like this like a floor right a floor within that apartment uh building and the block ID x.y is like which Which floor is it so you have to go up that number of floors to get there um so it's like you essentially start from the bottom you go like this many and then this many and then this many it's like each
of those is like a bunch of rooms that you go through to get to The next floor right you eventually wrap up to this one and then you uh and then once you get to the actual X position which is like the x is the length you actually stop there so it's it's like you've went through like a number of pains like paines deep um rows High which is the number of floors um and then you end up with like this this final part which is like okay well what is the offset at this floor
which I which my apartment is and it's like like Right here it's like depth and then goes up depth goes up number of floors and then like this is where I am and that's how you uh that's how you find your block ID um like which apartment complex or which apartment building are you in with that that entire city or the empowerment complex right in a 3D scenario this block offset is essentially the number of you you take the total threads per block so the block Dimensions how many threads is in each You know this
this many threads in X this many threads and Y and as many threads Z you you you multiply all those together you get the total threads per block or say people per apartment um and then times our apartment number so it's like uh the total number of threads up to your like essentially which which thread index um does your like how many threads are before your UH apartment how many people uh are before your apartment uh your apartment number that that's What we're saying here so we calculated this block ID from before and then we
we just find like that but on the level of threads instead and that's the block offset for um calculating you know which thread we're at and then we can continue that and use the same analogy that we used in block ID except for thread offset so you know it's like thread ID x.x block ID x.x it's like these are just like mapped essentially except it's like a lower level in the hierarchy it's Down to threads instead of um instead of uh blocks right and so you can you can calculate which person you are within that
individual apartment like if it's like a if it's like a big apartment with like multiple floors and there's like multiple layers in it you could use that but you you get the point it's a it's a 3D anal ology um and we can find which person we are within that or which which thread essentially in that block it is and so when you add the Block offset so the total number of threads leading up to your apartment plus which one you are within that uh within that apartment number then you can actually find which thread
you are in the entire grid and then you can do stuff with that right and that's what we say sign the global ID to so Global person ID in the entire apartment complex um and that's that so there's a lot to unpack there feel free to rewatch some Of this or even try to visualize some of this on your own maybe write it out um but when we actually go into when we go into our terminal here and go into five um then cud to Basics if we go um nvcc d o we go Zer
we go 01 and then 01 like this um it'll compile this binary which we see here and we can just go ahead and execute that and it'll show us uh precisely all of this that we just that we just unpacked so I mean I can't I Cannot put all of this on the screen but uh like for example if we look at like how it counts upward right so um you have you have all of your different Dimensions here and you can uh at the very end I believe it outputs the uh the particular thread
offset so we notice that it's like 63 and then it jumps to 32 right so it's like 32 and then it goes for um it goes for uh 32 numbers so if we go 30 I mean it's it's technically like minus one uh but the the best analogy you can use here is this is 32 threads right um that is a warp so when we talked about 32 threads in a warp this is exactly what it looks like so go back to here as well you'll see it stops at exactly 32 and you'll go up
from there so it'll be like 0 to 31 so it's like 0 1 2 3 4 so it's like 1 to 31 it's 31 elements and then you'll have the additional zero which makes it 32 That's just the indexing scheme right and then when you go from 32 to 63 it's it's the same idea um because you go from 0 to 63 instead of 1 to 64 so you do actually have 32 elements uh 32 threads per warp in there um and then you can just see the global thread ID in the entire grid so
when we when we actually multiply these up we have you know in the in the grid we have 2 * 3 which is 6 and then that * 4 is 24 Um 24 * 4 * 4 so that that is 16 and 16 * 4 is is 64 so you can see 1536 in this entire thing right and so um if we scroll like backwards we can see uh 1535 it ends right there and that is the final one so um like for example block um it's this has two elements so it's going to be
zero and one and then this is going to have three elements so it's going to be um 0 1 2 and then this is four elements so it's going to be 0 1 2 3 is four right uh and then the threads because those each go up to four it's going to be 0 1 2 3 0 1 2 3 0 1 2 3 um and then you end up with um essentially whatever that number is in the end so you can see how this kind of all adds up and how this indexing scheme works
and how we can use these to index pieces of data um using like the actual thread and block indexes and then and then do really fast parallel math with that um that's the whole idea here let's go Ahead and jump into kernels now okay so now we're going to do a little bit of our math and we're actually going to you know see what these kernels are actually doing and seeing how they work under the hood so it's actually very simple this is the most simple it gets um but essentially we're just going to do
some vector addition as a practice so adding these two together element wise 1 + 6 2 + 7 3 + 8 Etc and we get all this um very very Simple and easy to understand we can we have a CPU example here which is obvious and easy to look at um we have a GPU example which is actually a little weird it's a it's different than this because here we have a for Loop and here we have this this it term which is ID block idx time Block in plus thread IX and I'm going to
explain this in a second here but this doesn't have a for Loop and essentially what this is doing like I talked about before Is it's just unrolling this Loop so you know CPU is going to like do this iteration and this one and then this one and then this one the GPU is going to take all these individual iterations and distribute it across a bunch of blocks or or caor you could say uh and it's going to parallelize that operation and make it really really fast so instead of doing uh separately like 10 million different
operations like in order order it's going to take roughly 10,000 time Units um say you had you know 10,000 cicor to split this across it's like well that's that that's actually a lot less now that's only about a thousand times depths you have to do so that it's it's sped up uh an insane amount just by Distributing it across and that's theoretical of course but um you know we initialize vectors this should be this should be very intuitive if you've written like any random stuff in random gens in C before it's going to Essentially take
uh a random integer between zero and Rand Max so Rand Max is this um very easy to understand it's going to be a floating Point number um and then a timing function just to measure execution time again in this script we are benchmarking so perform War warm-up runs get things you know fired up and then Benchmark CPU to GPU and see how well it does um but this isn't really the important part here what I wanted to Mostly expand on is what's what's what things specifically here apply to Cuda and what do you really need
to understand so we have this Cuda Malik which is the same as Malik except it's on GPU so it's going to do that it's going to allocate memory on on the global Dam or the vram on the GPU and uh all this really has is a device pointer and a size so we have this we have this device a this device a vector or array is uh declared here which is a pointer Um and then we set the size for that right and this is just the memory address of that so uh we we allocate
device memory with Cuda Malik um and then when we actually want to move the stuff that we've created on the host because remember we initialize these vectors on a global or or just a just a regular void CPU function so we actually have to copy these over now and how we do that is we just literally look at this destination source how big it is And what what kind of copy do we want to do so destination is device hence the d The Source is host it's size big um like we declared here and then
CM copy host to device so CPU it's going to move to GPU and that's it very simple um we Define uh this numb blocks which is a little bit different than what we did in this indexing thing uh because it's not actually this dim 3 type as we saw before um it's it still works though The whole idea with this is that uh if instead of say uh if instead of having like 2 three 4 if we just wanted it to be like a length of uh what is this this is 24 2 * 3
* 4 is 24 so you would you could essentially set this to 24 and then set these to one and just having uh numb blocks and then putting this in in that uh in the kernel launch actually just converts the integer to like dim three and then it's like it's like numb blocks and then one and one so it's just Like a it's just length only and it it's still like it still looks like volumetric but it's just laid out linearly so it ends up looking like a line and could interprets it as a line
in Hardware um then you might ask okay well how exactly do we calculate num blocks well this is very interesting so we have a bunch of things going on here and this seems a little funny so we have n plus block size minus one and I'm Going to illustrate this out here now just to clear up what the heck is this numb blocks things means I actually laid out some calculations for this so block size is the number of threads inside of a block it's the size of the block itself which threads are going to
fit into right so so if we have let's just say instead of 10 million elements like we have up here let's say we have 1,24 elements right uh if we're trying to fit 1,24 elements across uh 256 threads per Block that means we're probably going to want four blocks right it'll split it evenly because 256 * 4 is 1024 um and so we have to actually calculate this manually but we have to keep in mind that we are doing uh like we there are more things things we have to keep track of in case say
this number ends up being like 1025 right so I actually wrote out a script that does that does this math uh perfectly for us um so let's first look at this so you have this uh 1024 Plus 256 that's that's the length of the array plus the block size right number of threads per block then you're going to do minus one and whatever that is divide that by the block size uh and then uh the the compiler is automatically going to floor this answer it's going to truncate those those decimal places off so if you
get like 4.99 or whatever it's going to take that 0.99 and just truncate it off so you're going to end Up with four so if we were to do for example like 1,00 um 1024 plus 256 well what's that 1 1,00 + 200 is 1200 and then 56 + 24 is 80 so we get 1,280 um and if we divide this by 256 we end up getting around what's the answer divided 256 we get um we get this number but remember we have the one here which I actually forgot for a second there we have
have the one so it technically is uh 79 so You end up with this N9 part and it ends up just being four because you truncate that off however if you end up having this as like 1,25 then this number is actually going to end up as 1,280 because you're just adding one back to you know 1279 and you end up with five so in case you end up adding an extra element you want to allocate space and resources for that or else you will not get the answer that you want so that's all this
is doing up Here and we make sure and this is just like a careful calculation to make sure that everything goes as as we want um and so this is just a a little script that I wrote up to test this but I don't need that anymore um so going further um we essentially in this kernel here let me slide up so in this kernel we have just this this x Dimension laid out Right so what you're doing is you have this blocks block idx which is which block it is in that in that line
of a grid and then you're multiplying that by the size of the block so how how many threads are there per block times the number of blocks uh and then plus whichever whatever thread we're at right so this gives us the thread um in that in that like line of a grid right and so we end up with whatever place we're at and we use that Thread index to then access elements in A and B and C uh and then we just do an an add operation so whichever you know it might be in some
cases this might be like you know 2.5 million and in some cases it might be like three uh in which case they're going to be the same number uh and then they're going to add and we're going to get the answer that we expect it just might not happen in the order that like a a loop might right so instead of doing like uh the first the Uh the first index and the second index and the third it's going to like scatter and distribute these and it's just going to be fast right so that's what
the whole idea is there um and if we go ahead and actually run this script um go 0 0 and then we could just so 0 Vector ad and then enter we'll just run this file performing oneup runs uh C Benchmark and CPU Benchmark and GPU so the CPU average time is uh about .14 Milliseconds which is really fast however the GPU average time is significantly less than that about 143x speed up almost 144 uh and the results match up when we compare them uh index index wise or element wise so so we just verify
the results here um we ensure that the the absolute value of the difference between those two is greater than uh 1 * 105 which is just a common verification thing so you'll see that when we're comparing things uh you know More like as we go more into Cuda it's going to be this idea of you Benchmark uh you get like an average time across all the runs and then you make sure that you're getting the correct results by having this tolerance Factor so sometimes this might be like super low or it might be like super
high um but that's that's typically how we'll do it then we have the second example of vector addition which is uh very much the same however instead of just having This uh one dimensional like x axis thing where we have one two three four lines um we have a lot more so going back to that example from indexing where we had you know three dimensions um if we actually apply this to Vector Edition we get a noticeable slow down so the first thing you'll notice is that this has way more lines but you're like Elliot
certainly this is going to be faster right it uses up the whole Space instead of just uh instead of just a Little bit right um well the issue with this is that it Cuda is not really going to struggle with uh scheduling things and making them run fast and and compiling down to something that's going to like really work at speed um it's more so like what are the calculations that you're actually doing in a single uh thread right so this is a this is what's going to happen in a thread notice how we do
1 2 3 4 5 six operations so um three adds three Multiplies and three stores so equal sign as well and then this one it's like you have a bunch of these comparisons and and it's just like a bunch of math you it's it's like hard to read right and the point is this does one one multiply one store or one multiply two stores and two ads significantly less than this one so the point is um only use the 3D aspect when you absolutely need to when it is like dependent on your algorithm and you
Don't need to uh when you when you actually have something that that's like uh spatially 3D then you can use something like this because it might actually work a bit easier and you w't have to do all these calculations to end up laying out this 3D space into like this onedimensional thing um and you have to worry about like things wrapping around and and strides and all this um so that's like that's mainly the bottleneck there and I just really did a Comparison between the 3D and the 1D Vector Edition kernel so we can go
ahead and actually compile this here um so we notice that they're both a lot faster however um the speed up CPU versus GPU 1D like the GPU 1D is 106 times faster but the 3D is only 102 times faster so this is actually faster than the um than the GPU 3D um not by a crazy amount but you know by by like 3 4% maybe and if you scale up your Numbers it might grow but you get the point um there's a lot of unnecessary calculations there um and it's just kind of simpler to go
down this route with the 1D kernel now we dive into something a little bit more intuitive algorithmically called matrix multiplication you might have already done this in which case you know this might just be some simple review you might want to skip ahead it's it's up to You really but I'm going to go over this be no matter what because some people may not know and sometimes it's good to get a little refresher on that so we're essentially going to write the naive version the naive version of the matrix multiplication Cuda kernel which is the
slowest one but it's the most basic and intuitive to understand um so a matrix looks like this you have rows and you have columns right um let me actually zoom in a little more here So rows and columns um for example a is a 3 by two because it has three rows and two columns right so it's like three high and two long it's like width by height you could say or height by width and then we have B which is a 2x4 so it's two row rows and four uh four columns right uh and
the idea is is that as long as these two inner numbers are the same then uh then we then it actually works we're allowed to do that matrix multiplication um and you'll see Why in a second here and then these outer Dimensions these three and four would end up being the new size of the new output Matrix C uh so we have you know 1 2 3 4 5 6 and 7 8 9 10 11 12 13 14 and what we do here is is it's very is it's very simple you essentially go 7 and
11 you you take this you have this uh this B it's like this and then a is like this and so you take the seven and 11 in in B and you rotate it and you do a DOT product with uh one and two so you Take the seven and and the 11 you flip it over and so the seven is going to multiply with the one and then the 11 is going to multiply with the two right so you're just like it's like sideways uh and then when you multiply one with one with the
seven you get seven and two with uh 11 gets 22 and then you would add those together to get 29 um and we can see that right here as the first element so notice how it's like the First Column and the first row aligned together and so it's like they're they're like pointing at one spot it's like the first it's like the first row up here instead of down here first row and then the first column column and they meet together and you get this top left corner thing um and that's and that's where we
end up with this 29 value and then you essentially just do this for the rest of them so you go uh 8 and and 12 and then you you flip that Flip that sideways and it'll multiply with the one and the two um and then you put that here you have the the second column and the first row so it's going to it's going to meet in the second column and the first row right um and then you just continue doing this for the rest of them until you end up with your final answer so
you're essentially just like flipping the column of B onto a row of a and you're doing a do product operation Where each uh each of like the like element wise you're going to multiply and then you add all you reduce and you add all of them together and you squash it and then you end up with this final Matrix uh which is of shape uh 3x4 so three uh rows three three rows High by four columns wide and then and then that's how you do a mat mole um so when we go into the I
mean typically when you're writing out you know hard to understand algorithms like this when You're trying to fit this all in your head ideally you want to write it on the CPU first if you just jump straight into GPU and try to optimize you're probably going to mess up you're probably not going to get the answers you're looking for and things are going to be weird so you write out the maybe even go back to Python and write this out in Python first so you can visualize it um and make sure that yours matches like
P towards or nump or something and then And then you write this out in C and you say okay well how do we do a a m Mo on the CPU here so you have your a and your B and your C Matrix um and then your shapes m k n so m is uh this this how high a is so m in this case was would be three k would be two so two and two and then n would be four right so you end up doing this like um M yeah just just like
this autocomplete M * K and then you multiply that with a K byn Matrix and you get an M byn Matrix just space this out so it's easier to look at uh and and that's that so when we look at our our nested for Loops here we can see that we iterate over M so that's the uh that is the height of a right that's the number of rows we have and then we're going to I plus plus that each time and keep in mind when this is laid out in memory it's not actually going
to be a matrix it's going to be an array so You're going to have like one 2 3 4 5 6 instead of 1 two like as an array and then another array below it and then another it's it's not like that it's just laid out at once so you have to actually manually consider like the wrapping over so you have to actually keep that in mind when you're writing these and that's a tricky part too um so then you have J which is going to iterate over um n which is uh n is uh
the number of columns Here and then we plus plus that like each iteration we we make this accumulation sum so we're going to accumulate into the sum right because you're going You're essentially uh accumulating things as you're like when we do the add operation and we have all these multiplies and we fuse and add them together that's what this accumulation sum is for uh and so when we iterate through um when we iterate through k um which is K is uh the The the X Dimension you could say in a or the number of columns
and then K in B is going to be the height or the number of rows right and and so you iterate through that and when you do your sum you essentially add it and you do um you do essentially this is where the dot product comes in right you do a so that's I where like whatever I is let's say I is like um I is zero right so I is going to be um I is going to be whatever this is right It's going to be the first the the first one times whatever K
is and K uh K in this case is going to be well two so when you have zero the zeroth um when when I is zero and K is whatever number it's still going to end up equaling zero and so you have L afterwards and that's going to be whichever spot at what whatever it wherever it is through through K that's where it's going to end up at so like the offset through the row um and it's Going to multiply the same thing it's going to do um l so L is where it's at through
K which is going to be um the going up and down instead of left right it's going to be up and down and then you have this n term which we could say is uh maybe also uh zero if you're just doing the first one here like the top top left corner and then say j in this case is zero so it's just going to end up hitting the it's going to end up in hitting the same value so You end up just getting the first the first points uh and then you you multiply them
together and then you add that um you you you multiply them you multiply the first the one and the the seven together in the first one and then you end up hitting the second one which is the two and the 11 um and that gets summed up together and you're do doing this every single time uh this for Loop this second uh for Loop triggers right so every time this goes through an Iteration you're hitting n and n is uh just n is just whichever value uh whichever value is essentially coming next right and so
you're just getting this one and this one and then this one and then this one and so on so forth until the end and then you end up just writing this out so you you essentially assign to Value C to whatever that sum is so that you can compute the next dot product so uh this this is like very uh visual I encourage you to I mean if this Doesn't completely make sense if you haven't like taken a introductory linear algebra course I completely get it um you might want to just pass us through you
know language models or look at some some intuitive videos on the internet and just sort of understand what's going on here try to understand uh what like how things are wrapping around when they when they do like a dried or something um that's that's very important to pay attention to like this like the K when The K is wrapping for example K is uh K is here and K is essentially this this length so it's going to be like whichever whichever whichever uh row you want you want to wrap around that entire row so you
want to go to the length of it and wrap and then your offset is going to be that and then same idea here except instead of rows it's going to be like columns column offset right um and that's that's the whole idea there um and then we go into the GPU Implementation which is a little bit different but we're essentially using instead of just an i or an ID a single idx term we use a rows and columns so in this grid we have the block ID x.y * block dim doy block idx is you
know where the where the block is at in um where the essentially where the block is vertically um and we're just getting essentially the the vertical thread like which thread are we do we want within uh considering like this vertical grid and All the blocks that we have right uh going back to what I said before and we do the same thing with X so we have this we have the thread in the uh vertical and the horizontal Direction uh and then we as we want to this is actually very this is actually very uh
this is required you actually have this you need this if statement here because if things go off track or if you have like too many threads then they might go and compute values that You don't want like it might go access other parts in memory it's not restrained right so it's not going to stop when you think it should stop you actually need to put careful restraints on it and say okay well we we want to stop it once the row gets to M because there's no other values outside of that and then same for
column as well right so um like when we go up here we have we have M by n right so m is the um m is this Part which is the uh where did it go yes m is row so row is y right this this y this height part and then n is is that uh the the width the horizontal part X and so that's that's columns which to X right and so you have to this is just the kind of thing that you have to be careful with um Cuda handles this very well
but you just have to include this if statement and then you essentially for each thread um because this is itself in a thread you're going to uh Just do a essentially a a DOT product between elements and you're you're going to do like essentially a a row of a row of a and a column of of B and this is going to be done per thread so each different thread is going to have a different maybe a different uh row and a different column of B to to to compute so you have this um you
have this K term which is from here um and you're you're cycling through that and you you just essentially apply the same Wrapping but instead of worrying about all of these nested for Loops you worry instead about um the rows and columns so these are your actual uh these are the you know the way we index with threads as I was talking about before um but yeah this is uh I'm going to dig more into sort of the in intuition behind this later in the course when we end up optimizing matrix multiplication this uh this
is this is called a naive kernel it's it's very it's very limited It doesn't have a ton of optimizations it's not like it's not fast it is like it's like aunds the speed of what state-ofthe-art is it's actually quite slow comparatively um and we're going to optimize this later on and this is going to be the most intuitive thing you will probably learn in this entire course is matrix multiplication in Cuda so don't worry if it this doesn't entirely click right now um just kind of worry about where these threads are how we're Getting how
we're getting the row and column values and then this wrapping that we have here and then the the offset part right wrapping and offset offset um and yeah that's that that's pretty much all you have to worry about for now um and then we just do you know the same route perform warm-up runs Benchmark it across 20 benchmarks or across 20 runs um Benchmark CPU versus GPU and then return the average time in micros seconds so if I just uh open up a Terminal here and go nbcc out to two and we go and run
that forming R up runs okay this is very I actually made very large matricies maybe we should shrink these a little bit um we can go let's see maybe 256 512 256 yeah the CPU is not going to like that One uh and so it's benchmarking CPU and so that takes 89,000 micros and this takes 88 microc so we get just like out of the box with these small matricies we get a 1,000x speed up with using Cuda um and that's that so this is uh this is this is uh this is kind of how
we test stuff but yeah now we're going to go ahead and jump into like how do you profile these um I know we haven't gone extensively into um like how Cuda actually works under the hood completely There's still more to do but um in a little bit we're going to hit up profiling I would like to cover uh actually some more stuff before we do that let me close this out we pop into the read me here just close this close this um going to just zoom out a little bit sure so again we have
these these dim these dim three types um which I was talking about before these should make sense already these these should not be Like too hard to grasp um this is what it normally looks like right you put in you put this in you put this in like I said before it's going to simplify to a dim three so this is going to look like a 16 by one by one uh tensor you could say and it's going to add that to the kernel launch configuration this is the kernel launch configuration there's more stuff we
can add to it um already covered this stuff already uh and then you have more stuff You can add to it um so we have the grid dim the grid dims uh in you know 1 to 3D block di in 1 to 3D and then this uh NS so this is the number of bytes in shared memory that is allocated per block for this call um so you're going to explicitly allocate memory for a block um in shared memory which is really fast so typically you would omit this uh however if you have a specific
uh production like you're trying to deploy a CTIC kernel in production to run Something really really fast you might actually want to capitalize off of this because it'll give you more explicit control over what happens and you can measure performance a bit better and you'll get maybe get some some little some little performance gains out of that and then there's this s term which is uh the stream it's in and I'm going to cover streams actually number five so don't worry about this too much but but streams are pretty cool they let you do Some
some interesting stuff um and then this I didn't talk about this entirely too much Cuda device synchronize and sync threads so Cuda device synchronize ensures all the kernels or all of the uh threads for one problem are all of the like all of the all the different parallel computations for a problem are done before you begin the next so when you when you launch a kernel it's going to have a bunch of blocks in parel and a bunch of threads In parallel run this massive problem um and they might not all finish at the same
time like some of them just like do to physics they're they might like not finish at the exact same time and so you have to explicitly synchronize them you have to add this little barrier this this ume essentially preventing a a race condition so if you have a bunch of threads um like for example in this one when you're bit shifting when you're like moving This one over here and then this one over here and then this one over here it's like well ideally you'd want to do this in a certain order and not like
store something before it's not supposed to be stored like if um for example if I do this one um and then this one is supposed to happen after but it ends up doing this one first because we didn't synchronize properly um you could you'll end up with the wrong answer right so you have to purposely synchronize the Thread so that all of them regardless of like this one might be like way ahead you have to wait for all the other ones to catch up in order for them to hit the same spot so you say
okay this one's done but these ones aren't we're going to wait for all these to synchronize up together and then we can continue the next step right that's what uh Cuda device synchronize synchronize will do uh after you typically put this after launching a kernel and then sync threads Is put with in a kernel um for threat execution inside of it so one is like out like when you're trying to synchronize the whole grid and then one is like synchronize all the threads within a within like a within a warp so as you might have
been able to tell I was a little bit unsure about that last answer so I decided to look it up and sync threads is actually on the level of uh thread blocks instead of warps so you can do Syn warps instead of sync threads actually pop back to here and we go at sync the sync threads you can actually do um if you want to do warps you can do stin warps um to sync all of the threads within a warp and then this one will do that it the same thing but a thread block
instead all reds within a war Um and then this is for an entire thread block so just just a piece of clarification there one other cool thing I came across when uh studying Cuda is how you can actually add in uh explicit flags and you can you can actually convert something like a log to log f using compiler Flags um and I know that there's a little bit to unpack there but if I just go back to uh this compilation here actually no we don't even use we don't even use any of Those M functions
but if I were to say do like log inside of a kernel um that would go slower than if I were to use log F so log f is like a device operation and log is a host operation so designed to run on CPU on CPU course right um so we can actually do do use fast math as a part of the compiler Flags I can go um use use fast math like this and of course we won't really see any difference But um yeah like same 1006 X same thing um but this will actually
convert this to this in case you don't in case you haven't done that uh yet on your own so this actually comes from the Cuda math API reference manual so uh if we look at say like some of the single Precision uh intrinsics yeah so uh single Precision intrinsic functions that are supported only in device code right notice how it has like Co F uh x uh uh exponentiate with base 10 f Expf um and then like you know F add um round toward zero right all of these These are these are designed to execute
on device um and they have F at the end but if you were to just do like just Coast for example from the math.h librar and C that wouldn't that wouldn't run as fast so this is another little thing you could add to your kernels if you're trying to say do like um if you're trying to do like soft Max or something in a kernel or if you're trying to um Maybe do like uh like some Digital Signal processing right you can add these and and get uh some benefits and performance- wise out of those
um and same thing here like if you wanted to do a fuse multiply ad um this will like tell the actual uh this will actually like pour this into the instructions where instead of doing like separate uh multiply and add operations you're fusing them together so you can do little tricks like this and just to Speed things up performance wise but uh yeah now we can uh now we can actually dive into uh profiling I actually forgot to do the tiled matrix multiplication by hand so I figured I'll just squeeze this in now and and
let your mind sit on this for a little bit before we actually start using it and applying it um but before we had this this idea of a matrix multiplication which was um you have like a You have like a matrix a and can you see that maybe not I'm going to move this down switch Mark here a matrix a you with some numbers in it maybe and B and the whole idea here is we do product this with this this with this this with this do the same thing and we bring it down here
right all the way till the end um that is one way to do matrix Multiplication however you can actually make this more efficient by using something called piling so I'll provide some examples on this later in the course but this is the idea here um you have these uh you have these two matrices A and B so I'm just going to you have to look at this a little bit different but this is what it looks like So we have say um let's just say this is a and this is B okay and then you
have this C Matrix and how do you compute like the first element right well you would you would typically take this row and then this column and then you would put that there because that's where they intersect right um but what you can do is you can actually take a chunk you can take a chunk like an actual square or rectangle of a so like maybe this I just put this Into like separate pieces say this is like a like you know maybe a a 9 by9 right and this is also a 9 by so
technically each this each of these is technically like a 3X3 tile or a matrix on its own right and so we're just splitting up splitting this up into tiles and so what you can do here is you can as I've lined out here you can you can go one time you could do a Matrix Matrix here times The Matrix There um Like A and B respectively like you do a * b um and then you add that to the Matrix multiply of two and two A and B respectively and then three and three you start
with these and then you then you add to these and you add to these so it's like A1 A1 * B1 you multiply those and then you add it to A2 * B2 and then add that to A3 * B3 and then you end up with this with this C1 here and that's the output and This is exactly what I've written out in a sort of cube format is like you've you've laid out some Matrix a right here um which is like a a row and then you've laid out some M Matrix B here um
and you're just you're doing this times this and then add to this times this and then add to this times this um and that's and then you just end up with C1 and so what you can do with like the reason why this is so effective is because you can you can Actually put these tiles and you can pop them over to a faster memory like like shared memory uh and then they'll end up running like ridiculously fast and you can end up doing these computations like way faster so if you split it into little
tiles and let each little like streaming multiprocessor on the on the chip actually take care of the individual uh tile or multiple tiles um then you can actually get a lot more useful uh you Get a lot more a lot higher uh compute throughput you could say um but don't worry about this too extensively this is just the intuition behind tiling like the difference between this and the normal version we were doing where we like take a whole row and then we take a whole column and then we dot product them together this is different
than that so that I just wanted to put that in your head for later so that it's not a complete Surprise when we try to make this faster now we dig into how can we actually profile the performance metrics of our own kernels so how do we optimize these right and we're going to use Nvidia andite compute for this um if you're on Windows you might you might not have this it might look a bit different I haven't tried it on Windows yet but this is what we're going to use on Linux here so this
is kind of what it looks like at the end you can see a Bunch of details about things um it's very very interesting but we're going to dig into this in a second here just going to close these off and uh we'll go ahead and get started so let me close these here we'll see in this in this uh number five kernels chapter in profiling we have a bunch of files so we're going to start off with this one the mvtx matmo so what is what the heck is mvtx you guys already know what matrix
multiplication is I'm not going to go Over that nvx is like the the custom profiler for uh Kudo kernels right and what this allows you to do is it's actually quite straightforward if you look at what's happening here like it's it actually makes a lot of sense what's happening so we're able to push this into a range like essentially the timeline um push matrix multiplication push memory allocation right so we're doing the um this is the whole this is the whole Matrix multiplication thing from start to finish um we push things into a range so
memory allocation and then we pop that we pop that out um we copy pop that out so it's like start and finish uh and then we we do our our dim threes we start kernel execution and then it's going to stop that once we've launched the kernel run it and then synchronize all of our um like our everything in our grid and then copy back to host right uh So this is like very straightforward literally all you need so I mean keep in mind like when we start this one we we have another one afterwards
so this one is only going to Target the recent one that was put up right so it's not going to jump back to the first one that was ever pushed in it's going to be like kind of uh like brackets right so you have the uh one layer of brackets on the outside and then one on the inside it's like um it kind of that that's kind of The structure of these of this nbtx tool um so when we go ahead and nbcc um this we want to pass in the uh link NV tools extension
that's what mvtx stands for so Nvidia tools extension we're going to compile that we can go ahead and you know run this it'll it'll run as expected good um and then we can actually if we pop back to this read me file um we can do NYS profile uh stats equals true on the um it's not mammal it's 0 but if we go ahead and run This we will notice that there's a bunch of cool stats that pop up now if you're running from a remote machine you could you could use this you could just
look at this directly from the terminal however the uh Nvidia ight compute app itself is actually a bit more informative than this so what we can do is is type your Windows key and go windows and then type ncu and then press enter and it should bring up um eni compute and It it it popped up on my second monitor I just brought it over here but this is what it should look like um and what you can do from here is um I'm just going to put this on the second one and then drag
the uh report NIS rep file so not the SQ light the SQ light is for for a different thing but we drag this uh into the into the sidebar here now it's in we can see it at the top and now there's a bunch of interesting things in here that we can Look at so this this text might be a little small if you're on a phone but just bear with me here so we have bunch of stuff on threads um you know nbtx what is like what is happening sequentially here we can actually zoom
in and see um you know the memory copy kernel execution takes about 2 milliseconds and we can see everything right so all these are actually pushed into the range and we can see what's happening um and then of course the you Know the memory allocation takes a while uh and then the matrix multiplication from start to finish like we highlighted in the code um so that's that's how that's what mvtx does you can push things into a range and you can see how long it actually takes you can see like when it's happening on the
timeline and you can look more more in more detail as to like what's happening there right so um anyways if we go to the Cuda Hardware at the top here we can see uh it Consists of kernels and memory so there's like um copying so cud M Copy and then there's the Matrix M kernel that we can see here and if we click on this we go show in events view we can click on this down here Zoom to selected on timeline we can rightclick we can go profile kernel and there's a bunch of interesting
things here and this might be a little might be a little overwhelming at first But there's common filter metrics PM sampling warp sampling other so we're just going to use PM sampling right now um PM sampling is performance metric sampling so it's going to give us very detailed metrics about things and we'll be able to optimize from that so it's going to use this binary 0 file that we that we made before during compilation um and it's going to bring up this new menu here which is different than the timeline one um so this timeline
view And then this is different so in here um you know we can see all of our Kernels at the top so in case we were like maybe profiling two different matrix multiplication kernels they they might both show up here like the the the runtime the lifetime of our program that that's what would pop up here uh and all the kernels inside of that so uh if we go to you know say summary there's there's some interesting stuff here maybe we don't maybe we don't care about This too much there's there's details um so you
have uh throughput so overview of throughput for compute and memory resources um PM sampling so uh performance metrics we can bring this down and we can see things like SM throughput uh pipe throughput um a bunch of the a bunch of metrics I don't even understand yet but uh we have things like cach hit rate which is really which is really useful um but if we go to like speed of light throughput for example um This is this this is for the memory resources we have the compute throughput as a percent so that's at about
90 97% and then memory is also at about 97% so um you know we we get we get to see cool things like this and and it'll make more sense in a second here we go down to uh memory workload analysis we can see memory throughput in it like very detailed memory uh I guess memory metrics so gigabytes per second how much How much are we able to transfer back and forth right bytes um Dam bytes per second so that GPU vram how how fast are we accessing that um and that that speed is about
41 gabes per second which um which is not super high and then we have like uh L1 hit rates L2 hit rates all this and we can see a memory chart here there's just like a whole bunch of metrics that we get access to um and so if we can we can we can look at we can pay attention to like this number 41 um We'll we'll keep this number in our head for now um there's also a source too so uh you can look at the actual assembly instructions and see um you know how
many registers is it taken up uh a bunch of very lowlevel stuff um which I'm not going to dig into right now um but yeah there there there's so many settings that to dig through anyways we're going to keep this number um 41 in our head [Music] Now we close this out we'll just put on the side for now we have some other we have some other uh scripts as well so I have a naive mmal so this is the one that we wrote previously this is the exact same just our direct copy and paste
uh and then we have a tiled ml which I'm going to cover a little bit later it's a bit more advanced against um but we're going to compare the performance metrics of the naive versus The til ml so if we go ahead and pop into here we go nbcc uh 01 and then 01 and we link uh Envy tools we run successfully and we can go n this profile and then put in 01 right there and I'm going to go ahead and drag this so we pop up another one I'm going to go drag this
into an Insight compute and if we check out our uh Cuda Hardware Go to kernels Matrix multiply this is the night version remember uh show an events view Zoom to selected profile uh we run the PM sampling again it's going to run that and then we take a look at our new stats um you this is this is the exact same thing without mvtx but just for context details memory workload so we get you know 30 37 it's it's pretty close to what we had before right um maybe a Little bit lower um but when
we when we compile the til MML it works as expected and say profile we're going to get a number three here I'm going to goad and drag this into Insight compute we open this up pop over to our kernels Matrix multiply optimized show in events assum to select it on timeline so We can see the length of this by the way this is how long it takes it's going to go from you know 430 milliseconds 43024 millisecs all the way to [Music] 431.073 is significantly higher than it was before so these are the types of
things you want to look out for when you see your memory throughput drop after you change something it's like uh maybe we maybe we shouldn't do that um you know from here it went from uh the naive It was at 37 and here it's at 60 right so that's making a a better use of memory um and we'll we'll we'll see more optimizations later on especially in this in this um faster matal chapter as to how we can seriously get this number up um but yeah this is this is how you profile there's a bunch
of cool things you want to look out for here um it really depends on which algorithm you're working with with matrix multiplication Uh there's some more like there's some more um fine grain optimizations that are just proven to work so we just we can just run those and and kind of compare the difference uh but the you have you have all the resources at your hand here there's tons of things that you can use and learn from so uh yeah this is uh this is how you profile Cuda kernels using Nvidia andite compute I have
a readme file here with just pretty much everything we went over So um the NS profile command um you can profile python as well so NS profile and then um you can do you have a like an MLP script in Python you can profile that funny enough and it'll just use the whatever whatever Nvidia libraries is you that python file is using um then we have just you can do this some stuff over the command line like this so uh ncu kernel name you can you can do Stuff over the command line um but yeah
there's there's a bunch of useful tools here uh so this will this might be updated later on um it's not in like the the best format yet so this might look a bit different when you when you see it but uh these are kind of the the main ideas and then just to just to I guess leave it off on an end note um cupti or Cuda um Cuda profiling tools interface the PTI at the end this is for like creation creating your own uh the Creating your own custom profiling and tracing tools that Target
specific C applications so you can you can like design your own profiling tools with this um if that's something that catches your interest you might want to look more into it so I'll leave this here uh but that's that's how you profile cutic kernels next up we have this thing called an atomic operation and atomic operations are used in very specific cases so I'm going to try to cover these As best I can by atomic we mean the indivisibility concept in physics where thing cannot be broken down further right so you have an atom it's
like oh I mean technically there are quarks and stuff but you don't worry about those it's just like the indivis indivisibility concept of this thing you you cannot cut it in half right there are Parts maybe inside of it that that make it up but you cannot you cannot cut it in half um and that's that's what This Atomic operation is and it operates as a software abstraction for us so the hardware and the Cuda compiler take care of all this for us um essentially an atomic operation ensures that a particular operation on a memory
location is completed entirely by one thread before another thread can access or modify the same memory location this prevents raise conditions so remember before when we were talking about how there are like multiple threads that Like one might end up being faster and hit the goal before this one and it's they sort of need to like not modify each other's uh they not they need to like not mess with each other's things so that that's what this idea is referring to um so cannot access or modify the same memory location of another thread that's very
it's a very key point right um and and we're going to see a very Crystal Clear example of this in a second um We might lose some speed so if we limit the amount of work done on a single piece of memory per unit time through put an atomic operation we're we're going to lose some speed from that right if we're locking things down and limiting how how fast the program can finish by just having everything like not wait for everything else then it just finishes faster right so uh when we use atomics things will
slow down but it is guaranteed to be Memory safe um and that that's ultimately what you might care about in some cases it might be better to get the memory safe aspect instead of instead of the performance gain um so there's a bunch of different Atomic operations that we have I'm just going to make this a bit easier to see um you have Atomic ad so essentially what this is you have a you have an in uh a pointer to an INT some some memory address and you have a value and all you do is
adds value to The value at address so when we when we pass in like for example say the number four and then we get the memory address to that which is some hex code we put that we put that hex code in here and then we put a Val let's say like two and so what that'll do is it'll say okay well we have the memory address let's um let's get the value for that memory address which is four and then we're going to add the value to that so it's just like this memory address
stays the Same there's nothing new being created it's just you're taking this value and you're adding it on top um and that's that's kind of the whole philosophy of everything in here so substitution um exchange and and and the return value will always be the old value so when we do like Atomic add and then we say like put int equals Atomic ad or of of of whatever is in here it's going to return the old value of whatever this was so it's going to Essentially return um the value at address right um so we
can sort of compare and contrast it's it lets us do that um or you could just not like return anything that's fine you could just if you just want to add Val to that to the value then to the address value then you can just do that um but these are all of the uh these are all the operations that come with atomic uh these are all the atomic operations um there's also floating Point Atomic Operations um so you you you can think of atomics as like a very fast uh Hardware Mutual exclusion operation um
and I'll I'll dig into mutexes in a second here but essentially how this goes is you lock down a memory location um you set old value the The Returned value equal to um like d referencing that memory location so like the hex code and then you get the value for that you set the old you set this old value That you're going to return equal to that um that that D reference value um and then we set the we set the D referenced memory location so that value that goes with that hex code to the
old Value Plus the increment which is which is Val right this is int Val um and then we unlock the memory location we return it so it's just like during this part where we're incrementing and we're storing the old value we're going to lock it down so Nothing else can interfere with that it's just this has to complete this is priority and that'll that priority will exist through however many core threads we we have right so that way they can't interfere with each other so one has to finish before another one accesses it um and
then we just return that right so um in terms of mutual exclusion there's a nice YouTube link on here that I found which was very good um Mutual is is like a like a shared relationship Between entities so all of us threads um we're going to the act of keeping something out or preventing ACD so we're going to exclude uh everyone else from accessing each other's thing we're going to let each other finish right that's that's that's Mutual exclusion and this applies to atomics right um so you don't have multiple threads accessing the same thing
at once um and there's there's like an intuitive example here of like what this Might look um at at a lower level what this is actually doing so uh if we go over to our Atomic ad over here um if I if I nvcc compile this um we'll see like first of all we import whatever we need to the cudar runtime. um we have a number of threads so a th000 threads per block and then a th000 blocks in the grid um these are these are macros that we Define so if there are a th000
blocks with each 1,000 threads inside of them then we're going To have a total of a million threads right um and then we have two kernels here so one is going to increment count counter non atomically so it's going to take in a counter uh it's going to store that old value as the D referenced counter CU this is a pointer right um we're going to set the new value to whatever this is whatever that actual integer value is plus one we're just going to increment by one and then we're going to um we're going
to update Counter right um and then there's an atomic version of this which does the same thing except it locks instead so this part here um this is actually like you're adding you're essentially adding uh not locked and this is not not unlocked right so you're supposed to lock here and then unlock there and return whatever that is so I'm if that's I think that's correct Yes so we go down and everything here is is fairly intuitive we have our numb blocks and our num threads and it's the idea is we're going to have a
million threads that are each trying to update this same this same counter because we pass this this counter this is a single variable or a single pointer that we pass in um and all of these threads have to have to modify the same thing right so when we actually run This you're you're going to see non-atomic counter value is 41 so this means that all of these threads are attacking the same the same memory address and they're all performing modifications on it at the same time but Atomic it's going to take a little while longer
it might take a million operations instead of 41 but it's going to ensure that we get through this properly so it's going to say okay well this thread wants to access it so we Need to lock down uh only this thread can access this value and then all the other threads instead of racing to it they're going to just wait because it's an atomic operation right and so this one gets to complete first and then maybe this guy and then this guy and then this guy and they and they all sort of complete um and
then you end up with the actual true answer which is uh 1 million right because it increments uh it increments from Uh increments from from zero so that's that's pretty much atomics um they're pretty cool maybe you can think of a way that you could use them right now I don't know um but that's that's just something that's super important to cover because uh that's that's one of the the risks with uh kernels is that you have a bunch of these a bunch of different threads accessing the same the same thing and Making changes that
maybe you don't want to it um and not like getting any errors or warnings about it right that's that's a danger that you have so atomics helps secure that and lock that down so now we go into Cuda streams and Cuda streams are one of the most useful things for performance optimization uh in maybe even large systems right so this actually this especially Works in large systems and you're going to see why in a second here um so you can think of the Intuition here you can think of streams as River streams where the uh
direction of operations flows only forward in time so you have this this timeline and the idea is normally you would copy some data over from host to device and then you would do something with that data like a kernel launch and and then you would copy that back from device to host to do something useful with it um and what you have here is you have these little dependencies where it's like you Have to wait for the data to come in before you actually start the kernel launch wouldn't you always want to be running kernels
and wouldn't you always want to be doing computation well streams actually solves that issue for us instead of just having one little timeline you can have an extra layer underneath it too and even even even more you can have as many layers as you want and the the whole idea is you can copy some copy something over do a Kernel launch and then during that kernel launch like when when that stuff gets copied over you can start copying the next stuff over in a separate stream right so you can you'll be doing some computation while
you're copying stuff over and then when this stuff is copied over um you can do the next kernel so it'll it'll look like sort of a staircase and I have an example of this in the uh Nvidia documentation here the Nvidia streams and concurrency Slides um and essentially looks like this so you have um this thing called cuda mem copy async which is asynchronous um and normally if you're doing a Serial program which is what we've worked with so far you'd be doing you'd be going in this fashion where you're you're not always doing you'd
be like C copy something over do something with it copy it back copy something over do something with back and then in this example you like copy a bunch of stuff Over host to device and then you do um maybe uh maybe it's better Illustrated in this example is like you you you copy some stuff over you do you know you do like say like three kernels in a row um and then whilst a kernel is running you're always copying new stuff over so you're not like you're not you're always doing work across all the
Stream right uh and this is super useful especially when you have something like Um when you have things like training a massive language model right when you're trying to when you have this data loader that is like constantly loading big chunks of text in you don't want to be waiting for that you don't want to just do your your your training forward and backward pass and then and then wait for it again you want like you want it to be loaded in while you're doing your forward and backward pass like you want it to be
ready for you so that way you Can just start you can just do it again so it's like non-stop forb back or right just you never want to stop doing that and that will that will greatly increase performance and so this is where Cuda streams come in right um so this this whole idea that I'm talking about with like fetching data um before before you actually need it like it's literally called prefetching software abstraction called pre-etching um so you move data around before it as needed and this Hides the latency of moving data around like
Cuda M Copy right um so we have this we have this kernel launch configuration seen this before we have a grid size we have a block size right and then there were two other things that I talked about which are here now this is the the number of bytes in shared memory right so you're you're doing stuff with shared memory which don't even worry about that right now and then there's this other one s which Is the associated stream right so you can actually put a specific current on a stream as we showed in here
right um you can have these are all the different streams stream one stream two stream three stream four so you have you you launch this one on stream one and Etc right so that's that's the whole idea there um and this this this is just a super easy way to interface with the streams when we do our Colonel launches so there There's multiple things that come in here when we're dealing with streams so you get this this thing of uh priorities so create streams with different priorities and if we go into [Music] um I don't
know if it's in this one maybe this script we if we look at the get priority range here we can see um this takes in a pointer to a least priority int just a variable and then a greatest priority int and so it's like This is the least priority we're going to we're going to plug this in here uh and then we have a greatest priority which which we plug in here right and that's our range and so we can feed these in so that uh Cuda will actually manage which ones get more priority over
others so if you want to uh load in a bunch of data first and that's your initial priority you want to like get that part done as fast as possible you can actually prioritize That um with like least and greatest priority right um and then we go uh a little bit a little bit further down and we have some examples here so let me just touch on the basics here so there's some stuff that you may have not seen before which I probably used earlier but I did mention it these are macros uh these are
the error checking macros that we have to essentially make sure that operations go through successfully so When when we do like a Cuda Malik we want to make sure that that that that went successfully right and that'll just this will um this will return a Cuda error type meaning either success or error like fail right just indicating whether that went through or not um so that that's what that is and then if we scroll down a little bit more and see where the actual streams are happening um keep in Mind up here we we use
this Cuda stream type right so it's a Cuda stream type and we Define two streams that stream 1 and two we create the Stream So we actually have to have custom uh handlers for this to say like okay you made this you made you defined it it's like now you have to actually create the thing it's a it's a weird context thing Nvidia has but it it it ensures everything is safe um and handled properly by the Compiler so we get this other term kudam mam copy async and this essentially just allows us to um
have like these asynchronous copies I mean when you have these ordered like if you go camm copy async on stream one and then later on you have like a like like a kernel launch like right underneath it um it'll actually go in that order so it won't just it won't um it won't try to do like the kernel launch before because it's asynchronous Um it'll just be asynchronous meaning in the context of streams so you can have things sort of um happening I guess concurrently um but it'll still follow that sequential order within that stream
as long as you assign them to the same one um so then we have our thread for block and blocks per grid configuration we launch this on stream one and we have this this B this uh this B uh array on on stream 2 and we can do stuff with that as well So and then notice how we have the commment copy inputs the device asynchronously so this is just a little cheat where instead of instead of copying copying uh a from hosted device then copying B to from hosted device uh sequentially you do at
the same time so a gets copied and B gets copied at the same time and then you don't have this extra barrier here where like nothing no work is being done you can just get right to uh kernel computation right um So we we see that here we have a stream one and stream two and this is all done on stream one so all this all this memory is going to be shared um and uh we we go down further to this you know we copy back we copy C back asynchronously but there's only one
so it doesn't really matter which stream that's on um we just do async because why not and then the stream synchronize so we're going to ensure that all of the streams are then caught up and then we Can um and then we can do something with that right so we're going to you know free the device viice a BC and then destroy both of the streams uh and then it's and then it's done so if I go ahead and actually compile and run this test passed and we got everything correctly and we did this vector
addition um so it's just kind of what what we all we really did here was just uh this is where the magic happens instead of loading a and then B we load And B at the same time um and then we go into um what's it called Advanced so going to lower this a little bit so you can see so when we go into advanced streams things get a little weirder uh but it's not too crazy so there's a few things that I want to introduce here we have pinned memory so it's essentially saying on
on the CPU uh Global Dr it's going to reserve this piece of memory we're going to we're Going to pin it using Cuda Malik host um send it just saying you know this is a part of Cuda it's reserved for uh the GPU to use later so we're not going to modify that we're not going to let the operating system or anything play with this we're just going to pin it nothing can touch it and then we're going to drag that over somewhere else for later and we're just going to like reserve that right um
so we're going to use this we're going to need this for later so Don't play with it is a good way to think about this um events are a critical part of using streams so we can measure kernel execution time given this uh given this example here so we have an event type start and stop so the these don't actually time anything but they are um they're part of uh the input to these uh Event Event record functions so we go and create these with the memory addresses of start and stop and then we Can
plug in whatever stream for example just stream or stream one or stream two we we do an event record we do uh we launch our kernel on this stream and then we do another event record um in this stream and we can take these values start and stop and they might carry metadata I don't know exactly how Cuda handles this but start and stop we can uh synchronize we can synchronize uh everything and then we can plug it into Cuda event lapse time which takes this milliseconds float uh which is going to be a milliseconds
and then you have your start and stop and that's going to tell you how long your kernel took to run right so instead of launching it in the instead of going into the the ncu profiler you can just do this instead if you want to and this will this will not have any computational overhead or it's very minimal so this can be run in like production environments it's not really Going to cost you anything um and then you have the synchronization between streams so um essentially these events will synchronize they will be placed in individual
streams so instead of the whole device or across all the streams it's just one specific stream right that that's the whole idea with these um and then of course you can overlap uh computation data transfer with uh the prefetching idea which we talked about uh before which I Believe pre fetching yes so events are great for that um and then we have callbacks which are used slightly differently you you can essentially set up a pipeline where the completion of one operation on the GPU triggers the start of another on the CPU so this is going
to have some more overhead but if you want to log when something happens when you want to log when something happens on your GPU then you can use a call back um so in in this context we Have a kernel uh and then you know in like we have we have a like say say like some stream like stream one and then we place this call back right after the kernel so in the timeline it's going to show up as kernel and Cuda stream at callback just as the way they are from like top to
bottom in the code and if they're in the same stream um and we put this this call back in and that's the entally going to say when this finishes when when this finishes we're going to Call this function um and it's just going to print GPU operation completed right so that's uh that that's like one use case of callbacks you might not use them all the time you're probably going to use events more if you're really trying to get those optimizations out but let's go ahead and look at the uh Advanced section here so um
we have we have kernel one which is going to multiply by two and we have Kernel 2 which is going to add one all right very simple operations we have our call back here stream call back operation completed just print print out when something happened right um and then just sort of like flowing from top to bottom here we do our our Cuda stream type so we just declare some streams we have our Cuda event type we're just going to initialize an event um we can print out whatever that event is I was testing earlier
so this that's why this Is still here um we do our Cuda malic host for that pinned memory um we could amalik our um our device data we do our our greatest and least priorities like I was talking about before uh we create we actually create the event itself using this previous event type that we initialized here and then we um we do our you know uh Cuda Cuda M Copy async uh we we launch a kernel and then this is where things start to get a little tricky and I'll do My best to explain
so when we do Cuda event record that's going to place a little marker like a little tick right in that stream so we have the stream one here um you know this this is on stream one this on stream one this is on stream one so you're going to do your your copy from hosted device and then you're going to do the kernel and then you're going to put a little tick mark right here um and what that says is um we we might want to do something when When this gets reached so notice how
this is right below our kernel so when the kernel is finished when it is done uh this is going to this is this is going to trigger right and then we have this stream weight event as a little dependency so it's essentially going to wait for everything up to uh stream stream one to finish and then it's going to begin on on stream two so stream two has to actually wait for this to happen notice how we pass in uh a stream we Which is stream two so stream stream 2 will start doing its things
like Colonel execution and and the call back um we have to wait for where did it go we have to wait for this event to trigger first and that's essentially all this is is it just waits for it and then it begins on stream to when all of these previous ones are completed right or at least everything else in uh everything else in stream stream one so These two so then stream two comes along after this is done after we've actually done our kernel execution and then stream two is going to run this second kernel
so it just it's just kind of ordered in that way so you have the async CM copy kernel one and then it's going to wait for that to finish and then drop down in stream two it's going to start um it's going to start the second kernel execution and then when this is done so when when um Once we complete this point this is like another marker in the timeline it's going to wait for all that to complete and then it's going to say okay awesome we can now do a call back and then it's
going to go up to this function here and it's going to and it's going to run that um so that's just kind of like stepping through uh one by one what is happening there um and then we'll just copy back to post with Cuda Cuda mem copy async uh and Then to finalize we always want to uh synchronize our streams so we have all these streams that are happening we've just added another layer of complexity we need to synchronize those up too right so there's the whole device synchronized which is like you synchronize all the
threads in the device and then there's this one which is on the level of stream so you have like maybe stream one 2 3 four and you like wait for all of them to like finish Um before you before you continue right you wait for all them to catch up by adding a little barrier blocking um and and that's what's happening here and then we just destroy all of these we just essentially remove all these contexts and then we're good to go so that's uh that's how stream work that's how this Advanced thing works under
the hood um if I go ahead and run this so we notice how when we when we are printing out uh where did it go when We're printing out the event the event is just a pointer so it's like a it's just like a memory address thing and then we got our our operation completed so that's when we do this with when we do this call back and then we end up with the test passed afterwards so uh you know just referencing back to that Nvidia diagram with all the all the different streams like that
that's essentially what you care about right so I hope the last part wasn't too Conceptually hard for you that that's typically where uh people will sort of break down and and question a lot of things it it was probably hard but anyways I'm glad you made it through feel free to rewatch some parts that is one of the most challenging parts of the course there's lot to unpack it's very spatially intuitive but this part is supposed to not be very spatially intuitive it is supposed to be just like textbook examples uh this is how you
Navigate things it's it's not supposed to be very hard mathematically spatially anything so this is this chapter is on the Cuda API so this is chapter six Cuda apis um we have a few to go through kublos CNN Etc but I want you to navigate over to docs. nvidia.com Cuda so here we have a lot of resources we have a lot of cool things to look at um and I just kind of want to point this out not that it's specific to uh the cud API section but because there's a lot of There's a lot
of useful things here so you have your installation guides for like Windows and Linux right like this is just like everything you need to get started um programming guide best practices all the different you know Maxwell Pascal VTA Turing m here Hopper Ada Maxwell um all these different compatibility guides and tuning guides uh for different architectures and then you have like your PTX which is the assembly instructions for Cuda that's What it compiles down to uh and then just like API references miscellaneous stuff um and tools like nbcc uh GDB for Cuda so when we
covered GDB earlier in the C+ plus review section this is the equivalent for Cuda so when you're debugging Cuda programs you'd use that uh and then there's like Insite compute which we used earlier um and that's yeah just a lot of very informative tools here what we mostly care about is the C API references so in here we have Runtime API driver API math API you can go through those if you want but mainly what I'm going to cover is kublos and cdnn which is over here if you go to docs. video.com deeplearning CNN you
can find this and these are the main ones which I expect to cover in this section so you can think of these uh like kublos and CNN as they're not you're not actually writing you're not writing things out manually you're not writing out your own Kernels it's the the whole idea here is you have like this this black box function that you call or like a it's binded to a shared object file like an so and it's opaque so they use these these this word called an opaque struct type and what that is is is
you're just calling something that is compiled down to to run on the hardware you do not get to see it because it's you know in encoded in some binary format that you can't really read as a human and so you Have to refer to these opaque struct types to be able to call those these are highly optimized so like the state-of-the-art algorithms in the world uh for running you know deep learning algorithms that these are the fastest ones um sometimes you might get something faster depending on the use case but we'll generally assume that these
that the Cuda API provides the fastest functions uh generally speaking so when you're trying to figure out how To get the fastest possible inference to work on your GPU cluster uh you might want to uh you know use something like Cuda API um and then going through uh you know just going through and researching and figuring out how to get it done by going to like Google search perplexity Chad gbt um you know maybe anthropic models and then keyword searching in the Nvidia docs like just a crlf like that um but the the C API
is going to give You the fastest stuff right um You may have seen this before how we did this these like error checks um and these essentially just just say like when you call a function and say like kublos um you're you're going to check if if that return an error or not and if it does you're going to print the error and the line it was at right so these are just custom ways of of printing out errors and when things don't go according to plan so I have these both for um kblast And
qnn so it just checks the function make sure it went through properly um now kuas is short for Cuda so the CU is for Cuda basic linear algebra sub routines or subsystems I can't remember which one but it's it's for it's for linear algebra stuff like matrix multiplication right and sgem which is a short for single Precision General matrix multiplication Um and that's that that's like pretty much what this whole like GRE me file is about I'm kind of like reciting it as we go down but um you know there there are resources on this
like proper error checking Library samples um if we were to go to this there's like a library samples where you can test out each of these um but the the whole idea with kublos and and how it's important to deep learning is in in something like the transformer Or an MLP in the Transformer itself you're going to use this algorithm called matrix multiplication and when you want the MLP to run really fast or you want this language model to have really really fast inference time you want the algorithms to not really have bottlenecks right you
want them to run as fast as possible on the hardware and so using the sub routines in kuas you can actually get that um there are other ways where you can like combine and mix Things together but that's more advanced for now we're just assume that the fastest algorithms exist in kublos and CNN for deep learning purposes um so we're going to go ahead and start here with uh kublos now basic linear algebra sub programs um for accelerating AI high performance applications like I said before um industry standard blast apis and Gem API so General
matrix multiplication With support for fusions highly optimized for NVIDIA gpus I'll dig into fusions in a second here don't worry about that um but what what I've essentially done with each of these is I've laid them out into testing so before I go into actually like uh printing out what the results are and and how well these work um and what the differences are it's important to cover what they actually do what is the difference between these so kubalas Itself is just the super high it's it's it's essentially the easiest one to to use and
get working it's just like the the standard that you typically start with um and it's going to support uh your basic you know uh single Precision so fp32 um and uh fp16 matrix multiplication right um kuas LT is a lightweight extension of kuas that provides a more flexible API primarily aimed at improving performance for Specific workloads um except this is more oriented around larger matrices so kuas LT is optimized a little differently and it can be faster than uh just regular kuas in cases so when you have when you have something that's a lightweight ideally
it's going to be lower precision right you can think of the L as like lightweight or lower Precision whatever you want and and essentially what this means is is it's the same as kublos Except uh when you use lower Precision like fp16 fp8 and 8 um they're they're going to run way way faster and that's what LT has designed for so same idea just lower Precision bigger matrices um different kind of workloads and then you have XT which is I don't actually recommend this because it's ridiculously slow um but you can you can interconnect multiple
gpus and CPUs together to solve a problem so if you have a massive Matrix uh you have a giant matrix multiplication to do you can actually split this across the CPU and GPU and they will talk to each other and get things done um however the the memory bandwidth bottlenecks um really limit the compute because you don't just have this super fast like uh this High memory bandwidth on the GPU that you can just go back and forth like it the memory bandwidth between the CPU and GPU is Really low that's why it takes so
long to copy things over so you have to worry about that uh your your solving speed actually gets slowed down a lot um and this is one of the the holdbacks with XT um but you can run multiple gpus it's designed to be thread safe ideal for large scale computations from you know in distributed workloads um large scale algebra that exceeds GPU memory so if you have like uh if you have giant matrices that it's like 16,384 by 16,384 and you multiply that by itself uh that might not all fit on like an 8 GB
card you know if I do I go Python and I do 16 384 squared that's uh what 8 m that's like 268 that's like 268 Million numbers that's a lot of numbers um and if you have three of these if you have an a b and a c all allocated then that's like 700 that's like 800 Million numbers and then if you you know kick this up to like uh fp32 you multiply by the number Of um you multiply by four that's the that's the size of the that's the size of a float so four
four bytes and you get ridiculous numbers like 3.2 GB of space so if you have a 2 GB card or it's like an embedded system it's not going to fit all that um or if you were to bump this up to like say 100,000 that that's not going to fit right like these type of numbers are so massive that you just need to use external CPU dram in order to actually Store them right um so you can there's obviously other ways of optimizing that but XT allows you to do this um so I did a
run of these um where the size was 16 384 and this all actually fit on my card because um you know I have uh 8 GB of gpv RAM which is low but high in some cases um kublos versus kublos XT so I did five runs each it's about 0.59 seconds on average and then this took about 3.5 seconds on average so the results ended Up matching so it was they were like pretty much identical uh and then yeah it's it's it's just like insane how much of a speed up that gets when you just
stick with using the GPU right and so that's like one of the examples why you want to be careful when you use things like kuas XT um kuas DX is we're not going to be doing that we're not going to be using that in this course um but you can look more into it here with this documentation um now cutless is Something I'll you know I'll cover in the in the extra section A little bit more but um kublos and its variance run on the host whatever comes with kublos DX isn't well super documented or
optimized um and when we're trying to do things like matrix multiplication in a Transformer we may not want to rely on something where the where the operations are scheduled from the host when it when we want to call like a Koss operation the CPU tells it to do that right whereas on GPU it's just like a kernel that's launched and all the operations are are done so they're a little bit different in that regard um when we do like matrix multiplication along with like a r activation and then another matrix multiplication and then another value
and then like a convolutional layer it's like you you typically don't have that in a single operation you fuse those together and That's this idea of fusion which we talked about before um and when when you when you have something like cutless which is a template library that is able to use things together um you know you can uh you can get a lot higher performance so for example um like flash attention it doesn't actually use cutless but it's an example of what fused Cuda kernels look like so flash attention was a paper that came
out you know I think two three Years ago something if we just pull this up it's uh you know it's essentially for the attention mechanism in Transformers and it has a whole thing and the idea is um you have this this this this attention layer in the GPT it's like matal drop out soft Max mask and another mmal and if you feed these together with custom handwritten highly optimized kernels you can make this really really fast and you can speed this up by like 5 to 10x on certain hardware and that's The idea of fusion
so cutless will allow you to develop you know faster matrix multiplication algorithms um and then you would take something like fusion and you would combine what you've maybe written in cutless and you would you would just combine everything so that you don't have to rely on whatever Nvidia provides and you can just do your own thing right that's that's kind of the reason why we do things like fusion and uh and and we use cutless so Template uh template linear algebra sub routines um but don't worry too much about cutless we're not going to go
over cut list in this course uh there's a lot to cover there uh but anyways that's like the whole idea of that's the whole idea of kuas now we dig into these I'm going to sort of go through this as best I can to illustrate what's happening so we need to import this uh kublos V2 right so this is this is a new thing we're going To add we're going to add F fp16 uh inclusions and then just some Matrix sizes right as macros then we're going to include these these macers that check for errors
so we wrap those around like for example here when we when we do a Cuda Malik it's it's running on Cuda so we have to make sure that doesn't return an error uh we just do this consistently for everything to make sure that nothing uh just breaks everything goes according to plan right um and so In this example um I'm actually going to go back to a section there was a there was a point I missed um as we saw in the script I make these arrays and notice how these are small right there's a
few th there there's a few other things like this that you want to watch out for when you're comparing things because what we're doing here is we're essentially comparing the speeds And uh how similar things are together we want to we want to compare like the fp32 with the fp16 see how they perform make sure they match up in the end um and so there's a lot of things you have to watch out for so doing warm-up runs is good because uh Cuda might encour some additional overhead when you do like the first few runs
so you want to get those done with um and then continue with the Benchmark runs so make sure that the overhead like just gets like Removed you want it to like just sort that out on its own for like a few runs and then you do like a 100 Benchmark runs and you take the average time of those and that's way you get an accurate measurement of how long it takes to execute a function or a kernel right um without doing any marup runs you might see like the first thing take like 50 milliseconds and
then the next one take 2 milliseconds and it's like whoa what happened there well that was the Overhead that you needed that that kuo actually took over and required so that's why you do the the warm-up runs um so warm-up and Benchmark runs you want to verify all of your results so uh in in here where was it maybe we didn't maybe we didn't compare results in here but we do somewhere else um you want to verify everything so that it all matches up and then the last one is when you're testing things from scratch
Instead of like randomly initializing massive matrices instead of having like thousand by thousand and just like random distribution you want to populate it with values that you can actually calculate on your own like something that you could take to your whiteboard or do it in your head right uh so when you have something that's laid out like this you can go ahead and write out okay well why did it not work right then it's more more easy to break down the problem And understand what went wrong there as opposed to taking apart a non-reproducible 1,00
by 1000 Matrix you just can't do that um but anyways going back to the point here did we initialize some matrices so a 3x4 and then a 4X two so they should have 12 elements right we scroll back up this goes up to 12 and then this goes up to eight that's a 2x4 we initialize uh these on the CPU so C on the CPU the single Precision CU loss Output on the CPU and then uh the the CQ loss output uh for the for the half Precision uh and then we do a CPU mapal
just to just to test the results just to populate um because again the CPU might be the easiest one to actually write out for us if we're transferring this from python our numpy we just write out the CPU everything will be super easy to uh compare back to it um so we just we just do that first we have this kublos handle Thing which I'm going to go in into in a second here um how like all of these are how these how all of these work together but you have this kublos handle um which
just gives like a kublos context on like what you're doing you just have to initialize this for safety we create that with a separate function um we do all of our our malx and then we have this this new function here which you haven't seen before this is called This is called sjem so single Precision General General with the GE matrix multiplication and inside of here if I control click on this in vs code we can see where this come from we can see where this comes from and I can right click on this and
see where the root of this actually is right so we look at in order what all these are so we have the the handle the operation these operations I'm actually going to pull these up in a second so this makes more sense we have the shape So M and K the alpha term which will make sense in a second we have a the leading dimension of a so in this case it'll it it would be M um B the leading dimension of B which in this case would be n because it's an MN time n
by K and so the first one going to have leading M and then the second one's going to have leading uh or sorry leading K I mean leading k um B is going to have a leading K the leading Dimension is going to be a k and then we Have this beta and a c which we uh element wise multiply by and then leading dimension of C so there's a lot of things you have to add to this and it gets it gets quite bloated fast um so I guess to just sort of illustrate what
all of those mean there's a lot to unpack here if we scroll down to um sjem sjem kuas sjem awesome so this is a super important part um this is exactly What we just saw and look at this so this is this is what the Matrix Matrix multiplication looks like so we have a c and we do alpha times an OP whatever operation which is going to be like maybe a transpose on a um Matrix multiply that with some operation on B which might be a transpose and then plus uh the beta term which beta
is a um beta is just going to be a constant float number so like in this case you Might want to have a as 1.0 and B as 0.0 just so that you're only doing um a * b equals c right um but it does gener it does provide this this abstraction for you so that you can do more with it if you want to like add something on later like maybe a like maybe a bias right um and then we have all these other operations so kublos op n kublos op T and kublos op
C so um we want to we want to worry about the n and the T here so the n is Like no operations the t is a transpose um and then you have this column major format so column major throws a lot of this off so to illustrate this difference of column versus row major as we saw in uh as we saw here so matrices are stored in column major format with these um with these Dimensions m m by K and then K byn and c m byn um column Major versus row major is very
important So it's actually a little harder because it's column major but we'll make do anyways column major Matrix we'll just have a well actually we make it row major first that's a good idea R major a equals uh and then call major a and then the memory layout so notice the difference here so we have a we have a Uh a 2x4 Matrix right it goes 1 2 3 4 5 6 7 8 then here we have 1 5 2 6 3 7 4 8 right so the whole idea here is we essentially transposed it
we the way this row goes from left to right it is now going from top to bottom and now we have to deal with this so if we have something that's like I mean typically when you're going to feed a matrix into a matrix multiplication you expect it to be in row major and kublos kublos sjem expects it to be in Column major so there's a way to get around this and notice how this not by the way notice how this is laid out in memory this is like a very simple way of looking at
it and then this is like okay that's I guess so but a little interesting because of you know it's just like 1526 1526 and that order but uh there's an interesting article I found on how to uh how to deal with this so this is why you see our dimensions are a little messed up um but on this Pay attention to your shaping from stack Overflow I found an answer to this and how to make it actually work to your favor so where is it this guy pretty much said um kuas interprets matrices as column
ordered so when you execute this you are correctly transposing uh cuz you're doing an opt which is going to transpose a and then an opt is going to transpose uh B you're correctly transposing each Input um but KU stumps will result in column major order so you want it to come back in row major order so that you can use it for something else so what you end up having to do to avoid this whole column major mess is Trick KU into Computing differently um and so the way that you the way that you call
this is you say handle op n OPN and you go n MK instead of mkn uh and then you go um Alpha and then your your B Matrix instead of a um Because normally you would do a here but instead you do B um and then you do you're leading a dimension so remember n n is the leading a dimension now and then you have um then you have your a and the leading dimension for that is going to be um it's going to be K I know it's confusing but just bear with me and
then you have the beta which is just like that that number you're going to multiply C by and then the leading dimension for C is Going to be n so there's a lot there's a lot of different there's a lot of weird changes there but essentially that's going to that's going to avoid the column major issue so when we do this in DS code you can see that I call uh Kos sjem with that same idea so n n and then go n MK When we put our when we put device B Matrix we put
n device a matrix K beta device C Matrix then n again so just exactly like copy and paste from that um and this Works so this this this concept applies to H gem as well which is what we have below so I've done a single precision and a half precision as well um and there's like a little casting operation that you do here it's like a flow to half function which um we we initialize these as as half Precision matrices and then we we do a float to have conversion and store the result in those
based on our index Um camm copy High Precision data to the device so the host right this is a host sorry a half um and then we just copy back we we do the hgem which is the half Precision uh version of this and then we copy back um and then we we can just print out the results to make sure everything matches up so when I go nbcc and we have to add this little L like link this is for link and then we Put kublos at the end of it that's what that means
cuz cuos doesn't come just right out of the B you have to actually manually link it because it has to has to do that part separately we just go ahead and run this we can see our matrices so when we go up this is uh row major right 1 2 3 4 1 2 3 4 5 6 7 8 9 10 11 12 and same one same idea with this one it's you know it's a 4X two so it's going to be four high and then two two wide Um so the two the two uh
width is one two and then 1 2 3 4 5 6 7 8 right everything is lined up as we want it to um and when we do a a row major matrix multiplication on the CPU we end up with what we're supposed to get so these inner Dimensions cancel out and we end up with the three and two like we were we were practicing before right and we end up with the three and two here these results these are these are our verification results 50 60 114 140 Etc We do the kuas sjem result
we get the same shape um same numbers and then the HD result after we cast back to single Precision 3x two boom boom boom boom boom boom right so that is just a very uh clear concise example on how on on like the differences between kublos sjem and H gem there all all the differences just half single versus half precision and the key point of uh changing how you uh set this up this is the most Important part of this entire script is just what it what it is what it does and then everything in
between uh that we need to pay attention to in order to keep everything in row majure so now we move on to kuas LT so if we just pop over to um right here Kos LT so kuas LT is the lightweight version and it's designed to hold much bigger matrices and so I figured little something to do with that out the hard Way and I was playing around um you cannot have matricies without multiples of four so if you have like a 3x4 um like three is not a multiple of four or a 2x4 both
of them aren't multiples of four uh those that does not work that will not that will not return successfully but if you do have like a 4X 4 or 4X 8 or like a 12 by 16 or something like that'll work fine so if we like right click on this just like I found this uh in the kublos Documentation um where did where did it go let's search this up oh maybe I should copy this part um but yeah so if you plug if you plug that string into here you'll see um in the kuas
LT matmo um it's going to be scroll down data ordering so four by a line leading dimens leading Dimensions must be multiples of four um Dimensions M andk must be multiples of four right so it's just universally a good idea when You're working with big majores don't do like 4,091 do 496 it's just kind of like makes logical sense to do that so uh that's that's all I kind of I wanted to say for that is to watch out there um but let's go ahead and just dive into like what the actual LT MCO is
doing so we have this new include header or or um this new include that we have to do so Koss lt. and then we have the regular macros for checking Cuda and checking uh kuas for errors we have the CPU imple Implementation to compare against um we have the print Matrix so that's just going to like conveniently print things for us that we can look at them and make sure everything lines up um and then notice how I make the sizes four four and four right so nothing less than that just Square Matrix Square matrices
um I do also make sure to make these uh these like different elements so if these were a clone this was like one 1 to 16 and then 1 to 16 like you Might not get the results you want so you want to make them a little bit unique so that you don't run into like any weird cases where you think you have the right answer but you don't so I changed this three right here to a four so it's four and then four and then instead of 13 to 16 I did 17 to 20
um just to mix it up a bit now the actual magic I mean we have a lot of stuff happening here where we um where we essentially where we Essentially uh make like a like a fp32 matrix we cam malic and we we populate those and we also have a half so this is just the half of a float so it's fp16 is what this is um and then we just populate those with uh we we we we populate these where are we populating it I think that's oh no we already populated them up here
I'm being silly but we go down after we've like CMM copied everything this is all on the Device now um we have this kublos LT handle so this is this just the handle that we need to create the context we go and create that um and then we have this new term called a kuas LT Matrix layout type um so this is just there's a few types we need to ensure that this goes properly and this is one of them so essentially just the shapes um and the data type that we're going to use so
Cuda data type uh and then this this kind of follows The same idea as the whole column major thing so if we I don't know where exactly this was in the box but if we go to uh kuas what was it it was The Matrix kuas LT Matrix layout create if we just enter this in we see it's down here and if we take a look at the rows and columns number and rows and Columns of the Matrix and then leading Dimension leading dimension of the Matrix in column major layout so This is the same
idea um and I'm going to show you how to like get through that it's it's a little bit EAS easier intuitively to sort of see how that how that pans out but yes uh we do need to abide by that column major rule there so popping back here um for for fp32 we just use real um and then 32f so if we actually look at this specific type like where does this come from the Cuda data type you can actually see a list of these so we have anywhere from like um Like real num so
R is real C is complex and then this number is the Precision so 16 is half and then 32 is single and then 64 is full and then you have like the other you know smaller types that you can use uh and then like just normal f is uh essentially what what that difference is is like normal fp16 will have a like it'll have a sign bit that's either positive or negative and then it'll have a certain number of exponent bits so how how big is like the integer Half like before before the decimal place
and then the mantisa bits which is uh how precise can it be in the decimal places right so fp16 is going to be more precise in decimals and then bf16 or brain float 16 the reason it's called brain flow is because it came from Google brain um that that is going to have less mantisa and more exponent exponent bits so that's how that kind of naming scheme goes uh but all we need to worry about in this case Is the um the real 32bit floating point and then the uh real 16bit floating point Point um
so we can see that we use those here uh just for the 32-bit we use that and then when we're ordering this we want to do um so the first Matrix a is going to be of shape n m m by K so we want to flip that so it's going to be K by m and then because we've flipped it uh we need to put the leading Dimension here right so uh leading Dimension is at the end um And that's that's that so Matrix B same idea we have it's normally K byn so we
flip that and then put the put the new n as the leading Dimension and then same idea here as well um then we go to the fp6 which literally just uses real but we replace the 32 with 16 and we do the same exact thing with shapes um and then we go down to the uh the map description type which we just have to create we just have to create that and essentially we we pass in this This typ type that we Define the memory address to that the compute type that we're doing and then
the data type so we look at this it's going to be the map M description with the kublos LT map M description type like we had here and then the kublos compute type which I'll show you in a second here and then the data type which we were doing before which is just going to be um fp32 so we go to this compute type we actually see there's a few of These uh you just do like control click to look at those um but there's a few here so we have like kuas compute um 16
F which is which is what we're going to want for the the next one but we're using this one right now um you can do like fast you can do like fast so it'll it'll like change I can't remember exactly how it changes those inside but it's something in the realm of like accumulating and this and that um but yeah so these can be uh you it kind of Just depends on like what you're doing if you're sticking with brain float then you can you could pick that type you could do like Fast um up
to you but um yeah that's that's the whole idea there so if we pop back to this one you notice we're just using the compute 16 float and then the the data type of 16 uh 16bit float as well um and then we're going to we're going to set an attribute and the parts of this attribute that we're going to need are the M Description type which we finded earlier um we're going to need a uh description attribute which we uh which is if you can literally go to these um and these are these are
essentially just the um I can't remember exactly what this is but it's probably like some transpose like transpose a and then transpose b or whatever that is um that that's that's what I'd assume this is I haven't looked into this in depth but um and then this one is just going to be the kuas Operation so yeah so essentially just like transposing or not and then the the size of uh this CU loss operation type so uh that's just like this essentially so we're taking this this transpose operations um and that we're just setting what
that that op is so when it does like op and then in Brackets a like that's what this is um and then we go ahead and do the kuas LTM which uh itself you know takes in a handle um the map uh M description Type um an alpha a matrix layout B Matrix layout for B beta C uh C Matrix layout uh D and and Etc right um You can pretty much just directly paste these like there's a lot of these that we don't actually need that we can just set to null and aren't really
required so don't worry too much about that you just kind of want things to be in the right order and so similar to how we did for regular kuas you're going to do the B Matrix first and then uh and Then you're going to do the a matrix after right so that's that's kind of how that goes then we just do the check KU blast to make sure everything goes properly um and then and then there's a there's an important part that I kind of like messed up here and it was a little silly but
I was trying to do this uh this uh 16 bit floating Point kuas LT ml with uh with the regular Alpha types so um you know notice how this is like this that This is void it doesn't specifically say float so I looked I looked at that and I was like hm maybe maybe like we shouldn't use a 32-bit number and multiply that by a 16bit floating Point number maybe that that's not how it goes so I was like okay um I and at the time I was getting a bunch of zero output so I
figured this might be a good fix and it ended up working so uh you pretty much just have to uh typ cast this so float to half um and then you just set You know your Alpha is going to be one your beta is going to be zero you just want to do a map that that's all you care about so that's how you're going to set them and then just have Alpha half and beta half and just set these accordingly um and everything will work according to plan so that's how it goes um once
we're once we're done those we copy the uh results back to host uh we're not doing any any like benchmark here we don't worry about That we just want to make sure we have the correct results um for both the kuas LT uh single and the half Precision um and so we just we essentially copy these back we do a CPU ml to uh you know essentially get a ver a verification uh output so that we can compare it to um and then we we do the actual comparison itself so we use a standard Library
absolute value we go this minus that it's going to get give us some value that's like um you know hopefully Less than 1 * 10 ^5 um and if that's false or or sorry if if this is bigger than that number if if it's bigger than what it tolers tolerates then um they it says they don't match and we end up returning uh they they don't match um so if I go ahead and actually uh run this we have to do link Coss and Link C LT cuz remember at the top here we did kuas
lt. so we have to include That and then if we just uh run this we can see that uh we get a matrix a so row major Matrix B um four four and then 17 through 20 as we as we wanted and then we get a c output so 106 664 106 664 106 664 for all of these different precisions and we can see that these match with intolerance awesome so that's just like comparing them and making sure that they work the way we want them to so we can like carry that and Port it
to something else But then for actually comparing it for measuring performance we have a different script here so I essentially did the same thing um don't like worry about a bunch of what's happening in here this is this is just a uh this is just a uh a benchmarking script that I wrote for for comparing very large matrices so we do a 496 by 1024 Times a24 by 496 so the inner Dimensions cancel out the the K is cancel out and then we end up with a 496 by 496 Matrix Um and so I pretty
much do a naive Matrix multiply because these are very big the CPU will take forever to do these so I I wrote a naive Matrix multiply that still gives you know a verifiably true answer in row major order and then you know we have our our our normal distribution uh random number generator here that you know ensures everything is is kind of just goes as we want some essentially like when you do torch. randn it's going to just do that Um it's going to make it nor like Rand n is for normally uh randomly normally
distributed um that's that's what this is doing and then verify results same idea does it does the relative error match with intolerance um we do a timing so with it with our uh with our our previous streams so we don't actually like put the stream in but we just want to uh record the time and do this elapse time thing uh and then just return that to measure it um On the actual device itself uh and then we Benchmark and we just have a bunch of other stuff filled in in between here the same as
what you saw in the in the previous script um and then we we just end up printing out the average time afterwards so um it'll also return the max error we get as well consider there is some error with fp16 so we should know about that too um but if I I just print this out here two Compare we print this out notice so okay so KU loss results match the naive kernel with intolerance results match results match and results match awesome so everything is lined up um I did give it some additional tolerance here
just because of some of the error but here uh we notice that this error is not super significant um it it's not this is the maximum error so most of it is going to be very insignificant compared to this this is just like a Side edge case which might pop up a few times uh very like not often at all so when we actually look at the times we can see normal CU loss gives us fp32 average time of 2.5 milliseconds uh kuas LT gives us an an average of 2 point about 2.8 milliseconds which
isn't amazing uh and then kuas LT FP 16 gives us 63 milliseconds and then LT gives us um about four uh 46 milliseconds which is really fast compared to this naive kernel that we've Written before so this took 28 milliseconds to right this is about the time that it takes me to Ping the Google servers about 28 Mill seconds for it to run the complete naive kernel and the LT took Point about5 milliseconds that is insanely fast um like look at the if you just look back at at at how we were we were doing
a matrix multiplication of like taking the column and do producting it with a row like you have a it's like size uh 1,24 and it does that and it it does for every single combination it's it and it does all of that in uh half a millisecond so that's that's about 5 10,000 of a second uh but yeah anyways that's that is a kublos LT at this point you might be a little upset or frustrated about why I'm just uh showing you code and then reviewing it and not like writing it from scratch like starting
from the very top like let's define these and then write this and Then write this the point is like all of this it is a lot there's a lot of lines I'm not going to type this all manually the course is uh long enough already as it is I'm not going to make it 10 times longer by writing everything uh by hand um but yeah you you you kind of get the point you I identify the main the main uh material that you need to learn the most important stuff and I highlight it um but
I don't need to highlight everything like writing check KU loss is Just redundant writing um I don't know like writing the writing this stuff it's just redundant like you already know what that is um so that's that's kind of why I'm sticking away from that side and just trying to kind of trying to make like Fast progress here um we might write out some things later on just just to kind of help you understand it when it gets more intuitive and and you're actually like building stuff but right now uh we don't This is not
very conceptually hard so we're just kind of flying through it but this next part is on kublos XT so it's essentially the same thing as what we've just done except it's a bit different we still do the handle um we still create it we do this new thing called device select which remember when I talked about um how you can have multiple gpus and and do a computation across multiple gpus in the host that's what this is so we we essentially just do this little Hack um and we just device select whatever the main GPU
device is um and that's that's how we do things across so this is this is just a little hack when you have one one GPU so that you do this um and then we do this XTS gem which is the same exact thing as we've been doing before except you have these things that are on the host and then they're managed by um this this sjem function so you don't have to actually move anything to device you just you Don't even I I don't have a single camm copy in here um you just pass in
your matrices on the host and it'll manage all of that memory back and forth but at some performance cost so you'll see that in a second when I compile this um we don't actually need to link LT but that's fine um and so you can see maximum difference between CPU and GPU results right um and then if we go to Say and then we just link KU Bloss we'll give that a second here I did I did the exact same thing as as our Koss LT but for XT instead and made very big matrices so
16 384 you notice the kuo Run does uh but you know like I like I think I highlighted this before but 0. 59 seconds or 6 seconds on average and then the kuas LT is going to be way longer than that so uh we'll we'll just give this a second here to finish um but yeah you you you get my point it takes a While you don't want to run this maybe you don't want to run this in production um so we get the average time everything matches with in toolerance and we're good um but
yeah that's that's kublos XT for you um go and delete these I hope you enjoy that section on kuas or Cuda basic linear algebra subprograms uh that was that was quite a bit hey uh we got a second part on CNN so when you do when you do um for example like P install torch like This uh and you see like uh where is it kublos qnn right that's this is where this is where it's kind of coming from right and you have all the other things like q fft and C random number generators and
CP solver and CP sparse and Collective Communications across multiple nodes profilers Triton which we'll go into later right I mean this is this is why I'm covering this stuff so that you can uh so you can kind of work with it and you understand how Pi torch Works under the Hood right that's one of the main reasons I'm putting this out so when you go into CNN um there's there's actually a lot more to unpack here as compared to kuas but it's not conceptually hard um some of it is a little bit intuitive but not
really um so CNN is not entirely for matrix multiplication it does matrix multiplication in some operations to really speed things up uh but it's not a performance bottleneck you don't Actually explicitly do matrix multiplication in CNN that's not a thing that's what kblast handles right um so in CNN you're going to deal with things like convolutions um pooling layers soft Max um Dropout right batch normalization uh tensor Transformations like reshaping and concatenation layer Norm all this right so all these other deep learning operations other than matrix multiplication is what qnn is Going to cover a
lot of um a lot of the a lot of the common most Comm L used ones um so this is this is kind of why I'm bringing you to the docs here is because this there's this is a super direct interface with everything um so they actually have their own thing Doc Nvidia deeplearning CNN and you go there and it brings you to this page so there's multiple things here we have like a getting started or installation guide which we don't care about and then The other ones the important ones which is backend API and
developer guide so we're going to be looking at these two today and doing some examples of C DNN operations and comparing them so if we go to like backend API overview um we can see it's like um Cuda so it supports the Cuda streams that we were talking about before um it has multiple things that it's kind of like linked to so there's like I I don't I wouldn't pay attention to that Entirely but um you have these you have essentially have these three parts so you have qnn graph qnn Ops qnn CNN and adver
serial so graph is going to it it's not uh it's not it doesn't support like graph operations where you're like dealing with graphs it's more so how do you combine operations together in the form of a graph so when you're doing like a like a convolution layer and then you're adding a bias and then you're doing a Max pool after it like that That's going to look like a graph right you're going to have these nodes essentially where it's like a node is an operation and an edge is a a tensor right or a matrix
and so it' be like convolution 2D and then there's going to be an edge which is the which is the data flowing from from the output of here to the input of the next node and that next node might be like the bias that it adds right uh and then and then it's going to flow out of the bias into Uh like a Max pool layer or average pool layer and then it's going to go from there and so instead of doing these separately where you do a separate function call for uh convolution bias so
you do like a manual bias kernel and then a manual Max pool kernel you just fuse these all into one and you keep track of all of your all of your uh data in between and it does that for you so q that that's what the whole qnn graph thing is um it supports you know both Forward and backward path so when you're going through calculating the prediction predictions uh and when you're uh modifying all the gradients and and back propagating through it supports both of those right so it's designed for it's designed for kind
of uh just putting something in place instead of having to write like all the kernels from scratch is just kind of makes your life easier that way um so there are multiple things within a CNN Graph so we have these pre-compiled engines runtime compiled engines um I have this pulled up on my second monitor here which I'll probably just bring over um where did it go yes so the pre-compiled single operation engines I'm going to make this more readable the pre-compiled single operation engines pre-compiled and optimized for a single specific operation like a convolution because
they're pre-compiled they offer very Efficient execution and are inflexible in terms of operations they can perform right they're comp compiled down to machine code they only do one specific function on something but it goes very fast because of all the optimizations in b area that it has right um so like for example a major multiplication engine that is pre-compiled and optimized specifically for that operation right like similar to convolutions um and then there's generic runtime Fusion Engines designed to dynamically fuse mult multiple operations at runtime so offer more flexibility compared to pre-compiled because they're generic
and they can adapt right uh these are things that would that would happen during the compilation um not might not be as as high performance optimized but they're they are generic and they can and they can they act as like a generic fuser of operations together so you will get those performance benefits but they're Not going to be as high so you still get them but they're not going to be um they're not going to be as high as something customly written for that algorithm then you have a specialized runtime Fusion engine similar to generic
runtime Fusion engines uh but they're typically uh specifically optimized for certain patterns or combinations of operations right so offering runtime flexibility and leveraging optimizations for particular use cases or operation Sequences and then for example an engine optimized for fusing convolution layers followed by activation functions in neural networks like similar how similar to how I was talking about before you have like convolution and then a bias and then uh convolution bias and then a Max pull layer uh similar similar to that right um It'll recognize your code architecture uh and it'll find the fuse patterns where
you would get a speed up so um it's it's going to just it's going To be um it's going to be smart right it's going to try to be smart when it's when it's compil this down and seeing where you could actually get a speed up from um and then you have the specialized pre-compiled so pre-compiled for specific sequences they offer the same high performance as pre-compiled single operations so these ones that were really fast uh but can handle sequences Of operations rather than just single ones so these are actually these are actually amazing if
you are trying to do a lot of layers like if you have a whole like say a Transformer Block in a neural network uh and you want to do that entire attention block this is an example of what that would be so you have a lot of different operations that you're doing in there but if you just have this wrapper that says multi-ad attention you call that uh You get everything you put everything in that you need and you get everything out that's useful and then you can continue on and it's going to be highly
optimized pre-compiled into binary specifically for that right so this is kind of how qnn is structured and this is these are the things you're going to you know want to pay attention to when you're trying to optimize when you're looking out for how you can take advantage of underlying qnn features Um so uh you know there's an example of like runtime Fusion right here um and then if we go back to the graph API if we go back I know it's bright you'll be fine um we pop over to this this graph API I think
that's where it was yeah graph API with operation Fusion so um convolution forward pointwise bias pointwise value right um that's that's kind of the whole idea and if you wanted to fuse these Together you would do like uh you'd have like essentially some organization you have three tensors that you input um and and that would be like their variable names uh and then like these two would go through here like your um like your X and then your your W your weight kernel the convolution filter itself is your W and that would output something with
this arrow and then this one this bias would come in um and it would essentially add to the output of that Convolution and then you would do a pointwise rue which is it's just a it literally just goes one by one through through each element um and then you get your output so that that's the whole idea of a graph is like you have these which is your data flow the edges is your is your actual data and where it's flowing to and then the points the nodes themselves are the operations so um continuing to
go through this um you know inputs Convolution backward so Alpha Beta Dy uh W and DX um and then you would end up getting um yeah you you you kind of get the point you put whatever in is required for an operation and you get whatever out is is useful right um especially important you pay attention to that in the backward pass of things because there's going to be more data you'll have to take care of um but yeah these these kind of work the Same way all around um normalization you have like your mean
Epsilon and variance um then your scale continuing to go forward um same ideas generic runtime Fusion engines you can kind of just scroll through this and get the idea about how everything is architected um there's there's quite a bit here I don't expect that you'll read all of this um but yeah that's that's pretty much how The whole uh Fusion engine thing works I know it's a kind of a a silly term but it it is you're effectively fusing operations together and you could say that acts as like an engine right so if we go
back to this VSS code here that I've opened the read me file you can actually find these in here so just you know a bunch of um bunch of stuff but like the graph API very important um Matt Mo um convolution forward backward backward data Pointwise um yeah just like pretty much some of the images copy and pasted and then this one was this one was actually support uh that this one is support for the different Compu capabilities right so if you have like for example if if I did um can't remember what it was
it was like device query remember that when we printed out the computer capability and mine was 8 uh 8.6 so um I would actually not get the Uh convolution backward filter fusions I would not get this because it's only supported on 9.0 and up right so pay attention to things like that when you're trying to fuse things together for like research production purposes you want to pay attention to what is supported on your Ware or whatever Hardware you're working on um so that you don't like try to do something and have it not work and
waste time so it's good to just like double check with this Stuff and see this is all in the CNN docs but there's still a few more sections we have to cover so I'm going to dig into those um we have the Ops API which I'll dig into next is is very simple um if we just go to here go to Ops um essentially you have these these same opaque stru types as you did with kuas um except they do different operations so you can do like um like you can like create tensors Pooling um
filter Dropout loss activation all of this so the actual functions here might be hard to read it's very bright um but activation backward activation forward you just have like a massive list of stuff I'm not going to go through these one by one um but but you get the point these are all the operations that are supported with kunan to CNN and we're going to test we're going to test some of them Out so you know you get a bunch of like uh descriptions about each what if each of these do so it you know
in case you're wondering about something or you're not getting an output as you'd expect um you would generally refer to these doc so you could whatever type you're working with or whatever function you're trying to call like let's say you're you know working with this or maybe you're doing let's see maybe something simple like Uh like U activate backward right so you have this you copy it f and you you can find these all across so you have the qnn activation backward and it has all the different types in here that you would use um
and then you have the this one this original one that we highlighted before so that's how you navigate these you just search for whatever is wrong and then kind of just like look at that and see any of the any of the notes on it and see if you miss Something um that's that's kind of how uh you're supposed to approach these um and then going into uh CNN API so this is where stuff might get a little bit interesting um it's not like any graph Fusion stuff you're doing it's just like raw algorithms um
so you'll have um you know convolution backward bias like all just all the different convolution stuff um there is I mean there there is fused Ops um so that's where like some of this would come in but um yeah this is this Is where all the convolution stuff is going to be for like image processing and you name it right so we're going to actually use convolutions in a second here so I'm going to I'm going to save this but it's you you approach it the similar way as you would with with Ops operations and
then you have the uh adversarial API which is um same idea but you know other functions so like you know rnn's um C uh CTC loss multi-head Attention uh we'll do yeah see multi-head attention weight so if I go um multi head attention multi-ad attention forward awesome how do we use this right there's there's multi head attention forward there's 22 of these in here 21 now so you kind of get the point we can scroll through these there's a lot jeez um so this is how you would do a a multi-head attention block forward and
The forward pass there's a lot of stuff in here but that's that that that that's kind of how this goes right um just the adversarial like extra the other section miscellaneous whatever you want to call it um but now we can actually go into some of the uh comparisons to understand uh how to actually use CNN in a Cuda script now we can actually go into some of the code and examples behind CNN and how it works under the hood well not not how it works Under the hood but how we can use things like
P torch under the hood to make operations really fast so in this example um you know we we do the Cuda runtime and the cnn. H I'm just going to do the 10 function for example um and in case you haven't seen the 10 function yet um we go to Google Images uh it literally just looks like like this 10 H um or like this maybe this is a better One it's like between -1 and one it's just a little activation function that you do it's like a nice smooth S curve and uh yeah so
that's that's all we're really doing here we don't actually need to like do the type in the formula it's already done for us um I've actually written out the 10h kernel here and operation is literally just 10 HF for P function on device um so very simple um we we want to have a tensor with the shape um what's it called n by n by C by Height by width that's the format we want to use so it's going to be like n is batch size channels is uh Channel C is channels height and then
width right so the whole idea of like channels is if you have uh like like an image for example like the image you're video you're watching me on right now this is going to have three channels it's going to have RGB right so this is if uh say you've you've done some convolutions and now your now your channel Dimension is Very big so instead of three you've got like 32 elements per pixel that you have to keep track of and and do operations on right so we're making a big tensor here big tensor um if
I actually go into python new 256 we going to go well four times cuz four is the number of of bytes it's going to occupy 4 * 256 * 32 * 2 * 224 uh squared we end up getting this number and if we divide this number by uh 1 million it's about 1.6 gabt that's how big this Tensor is and then we're going to do a 10h on that so Cuda DN is going to handle this and we're going to compare that to the naive kernel um and yeah so just stepping through this same
Cuda Malik initialized data Cuda M Copy we're going to create some events that we can Time stuff on the GPU we're going to do our our warmup and and Benchmark runs um we're going to do some warmup runs for the knif kernel Um we're going to do benchmarks for it we're going to set up qnn and this is where we're actually going to learn a little bit um and then like benchmarks for CNN of course this is where it m takes place so we have this qnn handle type we create that we have this tensor
descriptor type so you actually need to um it's like the when you did like a matrix a descriptor or Matrix B descriptor it's the same idea but we do that for tensors because It's you know it's more in the Deep learning context there's more deep learning operations in Cuda CP DNN since it's deep neural network C deep neural net right um so we have create Tor descriptor which is is going to just take the memory address of this and actually create the tensor descriptor based on the type um we're going to set the tensor descriptor
so it's going to be um this type which we which we did already the tensor format the data type And then each of those uh NCH HW format right so we do this we do this format and you can you can look this up and there's um it's right here tensor format so we can do NCH HW we can do NW C or n nhwc um and Etc right so that's we just we just pick this one and then this data float we look at this um we can have like a bunch of different ones
fast float for fp8 um fp8 so we'd have one sign bit and then five exponent bits and then two mantisa bits right so it's Eight total right um and then fp8 you know more more mantisa bits and then Boolean we have all these different types but we want the float there's no like float 32 here we just want a normal float no no half no bf16 none of that um just something basic to to to use and then we create not only the tensor descriptor because we have the tensor itself and then we have the
activation descriptor which is about what the activation is going to do and We have a custom type for that um and you can go here and there's there's a bunch of different um I think it's I don't know where exactly this is but I just like to right click on things to learn yeah good luck uh we create the ACT activation descriptor with its memory address and here we have the activation descriptor type as before we have the CNN or uh we have the activation type uh mode type so The activation mode uh is going
to be 10h and then the uh propagation type is just Nan um we're we're not we're not doing that um and then the coefficient is going to be uh zero so there's not going to I don't know what what is KF I don't know what that is um but anyways this is just like the template layout we're having and I don't expect you to like go through this and understand every single character that's happening here this is Just kind of a more template example to show you like how we're comparing these how we're running and
testing and you can like take these out and put them into other pieces of code so don't like feel bad at all if you don't understand this it is there there is a lot um but if we go to like this for example we have like sigmoid R 10 clip R um swish all this right so we just want the tan H function um now we go to activation forward as we Saw just like a a few minutes ago um we have the scann handle which we defined before activation descriptor which we which we just
covered the alpha parameter the tensor descriptor which we covered uh up here we have this um we have this void X so that's just that's just the input a beta term which we don't need um and then tensor descriptor type for y so and the output itself is just a uh it's it's nothing it's nothing particularly special it's Just a void so we don't need any like special types for it it's just like a raw data like array output essentially um going to be a bunch of floats right um so that's that's that and it's
going to be on device that's why we have the D there um um we're going to synchronize everything and then do our benchmarks run benchmarks runs we're going to find the average time we're going to verify against the CPU like a CPU tan for example it's not not going to take long since it's like a like a pointwise operation it's just going to go one by one through it it's very it's like linear time um so when we actually uh when we actually compile this 10 H to DNN see it knows we run this you're
actually going to be surprised by something so give this a second to run my machine might be lagging a little bit I'm not sure But we're going to let that run for a second here our Matrix sizes are are quite big remember we have these so um you know tensor size as we wanted um the naive crud kernel time notice how this is actually faster than the CNN activation time um they're both correct we just compare the results um you know pointwise and this is faster why that really made me angry when I when I
saw this I was like what is the point of having a having a CNN activation like What is the point of this um and the point of that is just to give give yourself things like Alpha and beta right so when you have Alpha and beta these are extra numbers that you have have to consider in the operation and when it's so simple when it's as simple as just a like exponentiation or like a multiplication um and it's it's like a very simple like for example Ru takes almost no time to complete 10h is like
a very simple operation just on a single Number um you just output that to the same index it's very computationally simple but when you add in little things like Alpha and beta I suspect these are what actually cause the performance difference it might be mostly these or some cdnn over head I mean again we don't even know what this what this is doing under the hood it's a complete Black Box opaque struct we don't know what's happening so it's hard to actually know why this happens um There's not very many resources on why custom kernels
might be faster than C andn I haven't really found any of that so we're just going to hold the assumption that uh there's this big opaque struct Black Box thing that we don't know um and then you also have just the alpha and beta as well that you're you're um timesing and adding things by right so that's going to add some extra compute compute overhead but these are not very big Differences at all right so you have like 8.52 3 and then 8.6 it's like this is like nothing this won't actually matter in production it's
like if you if you take the difference um if you see how much faster um the naive cter formula is it's like literally 1.3% faster which you're not ever going to notice in a real environment like that it's just unnoticeable so it doesn't actually matter that much if you care like totally just like go go Ahead go and R your own kernels but that that's that's a general idea it doesn't really matter that much um for for convolutions it will matter though um then going down to this I wrote a a p torch script to
just kind of illustrate things out manually so like how pytorch handles um how pytorch handles the custom tan like when you write it from scratch on your own um versus when you just use the built-in the torch the torch. 10 where did it go yes torch. 10 Um so just kind of comparing those side by side and seeing how they perform um so if we write these out um o it's taking some time to do this yeah so custom t h um that's going to take 21 milliseconds remember how CN beforehand uh was taking about
like point I don't know what it was like point it was it was a very small number um the custom like built in 10 is still very fast um so if we go back and we just nbcc compile this and then you know Run and let's just like look at which what the shapes of our numbers are real quick um if I do batch size by say or if I do 256 by 32 by 224 by 224 four Rand n and we wrap these in Brackets here we can we can check this one real quick
and see how fast this runs and then we will compare the python script to that directly without like deleting the output so we can't see it Um just so we understand like how much performance could be gained from say using uh using like a custom written Cuda kernel or custom written uh CNN function so if we go python TCH compare it's going to take a second oh yeah ran out to memory awesome so um Rand yeah no that doesn't work I bump this down to like 128 it might work it's not very fast yeah so
like Custom Custom 10 is super slow and then the Built-in one 4.3 let's say 4.4 milliseconds right um and then we go up and we can see that you know this is this is actually um this is about double that right so if we do 4 point about 4.4 * 2 8.8 right so we go back up and it's like this is less than that so if we write a naive kud kernel like this is just naive if you were to optimize this and imp Implement something like Loop unrolling which we'll go into later and
You optimize this even just something as simple as an activation function you can get this surprisingly faster than Pi torch um and just like write everything manually you can actually get considerable speed UPS so uh that's just to provide some context there um but yeah activation functions don't worry about do that too much it's not really going to affect you um and then we go to like convolutions right this is this is an example of where we're actually using Convolutions um so you know we we we have a lot more things to pay attention to
I'm going to dive into this right now now we can jump into convolutions a little bit um I've been hacking around with some of these and uh let's just going to show you how these how these work so we're going to start off with a visualization first I'm going to bring over a convolutions visualized just pop over to here and um this is just what it looks Like so we can like you have these input sizes kernel size padding dilation and stride input size is this I can change the input image the kernel size the
actual weight itself the the weight term um the padding so how much black pixels are put around the input the dilation of it right um and then stride as well so I can make it stride by one each time or stride by [Music] two um and and that's that's pretty much Just uh that that you can mess around with that in your own time um but I've written two scripts so one for p torch so the P torch and this one use the exact same values in the exact same order um the exact same parameters
here they're all the same and I'm just doing a side by-side comparison of them so that we can get desired output so it's essentially it's essentially like a like a 4x4 the input is like a 4x4 image so 1 2 3 4 5 6 7 8 9 10 11 12 13 14 15 16 and then the kernel itself is 1 2 3 4 5 6 7 8 n and it's just going to right it's going to do that and we put a padding over it uh so that this is going to end up flooring to
one so Cur size is three and then divide that uh floor by two so if we go python go three two we get one and that's just going to be our padding and then torch is going to do that with this functional Library here um and and We get the output right so this should be very self-explanatory very easy we're just reshaping it and then you know reshaping it here as well um but when we look at this part this is actually where the fun kicks in so we do our cian N.H at the top
I've written a naive Cuda kernel for this for doing 2D convolutions takes in an input a kernel the output the width height in channels out channels kernel size uh and batch size so uh don't don't worry about how This works internally just it just let it be there as some like template code that's going to do what we want um it's modular so um and then we have all the same settings as we do in our py script at the top here so um we Define like how big our inputs outputs and kernel elements are
going to be we print this out um we do our classic just malic we have our our values organized Um more kud M Copy stuff and then we create the CNN handle so this is all very similar to uh what we were doing with CNN and our t t function um we created we create an input and output tensor um filter descriptor for the kernel itself um convolution descriptor for the convolution operation we create all of these we create the convolution descriptor with that memory address um we're doing going to use the 4D Descriptor because
it's going to be shaped batch size by Channel by height by width um and then if we look at these so we have the we have the tensor descriptor the format so how which what it was like the shape of it and then the data type which is just a float 32 as we have here um and then we have the N by C by h by W right so batch size by channels by height by width and we do the same thing for all of these um the output is going to be out channels
Because it's not inch it's going to be how many out channels do we get in the end um and then the filter descriptor is going to have a different it's going to be organized a different way it's going to be um out channels by in channels by height by width so out channels in channels height uh height by width right for the for the kernel itself for the convolution filter you I'm going to use those interchangeably convolution kernel and convolution filter same thing um and Then the actual descriptor itself um this is a 2d descriptor
so it's going to be a 2d convolution um and we just dump all these in so the padding H padding W um u and v and dilations we we're just we're not even using dilations um convolution mode so it's going to be cross correlation and the data type is just float um so I don't expect you to know what what all like the convolution laws are and everything we're just comparing To P torch and making sure that everything lines up um and then in terms of the um in terms of the algorithm itself um we
have a little thing that searches through stuff here uh I might change this later this doesn't it's not very beautiful to look at um but what you what you can do is actually just like literally this uh where is it this algo here when you do the when you give uh when you give CNN like a workspace size to do the operation in there's this CNN convolution forward algo type which is right here um forward algo type and there's a bunch of them in here so uh by default what that's supposed to do is cycle
through them and find which one is the best but I find that it might be a little bit better to just cycle through these one one by one on your own so try out implicit gem Tri out pre-comp gem triy out gem tried out direct fft fft tiling WI noat nonfused count right so try all these out and see how they work Um which I which I have in this uh comparison script we're going to do later on but uh yeah don't don't don't worry too much about those just you can kind of just run
the script as is um but we're just trying to find the best convolution algorithm for our problem at hand right so when you have a a smaller kernel and a small image a certain like maybe an implicit gem might be faster than say an fft tiling uh because of the overhead right so you have to just Consider things like that your problem size all that stuff um the workspace size is just how big how big you actually um return the minimum size of the workspace to be pass to the convolution given an algorithm right so
you're essentially just saying how much do you get to work with here um and this is defined by a bunch of things that it it just it just decides this right so we give it a bunch of descriptions and it's going to use that context to decide um What the workspace size should be um now now we can do our Benchmark uh warmup and Benchmark runs so we have this um you know just skipping Alpha and beta we have this convolution forward function which I'll show you in the Nvidia docs in a second here um
this consists of the handle Alpha tensor descriptor for the input the input itself which is just a you just any just a void pointer right um and then the the filter descriptor The kernel uh convolution kernel so a point again a pointer to to an array uh the convolution descriptor so actual uh operation algorithm itself the algorithm um the workspace which we just find in workspace size and bytes the workspace size and bytes um we pass in this we we do this size T which is like a size type for like storing large values and
we put this into here and then this value changes based on these settings right so when we put this back in here it's going To decide um when it's actually running this how much do we need and and what are the resources requirements it's pred decided right um and then we do um we just we just enter the output description and then the output uh the output device array right and then we do the same thing but with our uh con 2D except there's like it's less complex to filter through and then we synchronize all
of our threads and blocks in the GPU with Cuda device Synchronized very simple and we do the same thing for benchmarks runs except we just add a time and an event recording as well right um so fairly simple Concepts happening here just timing and benchmarking and mainly just filtering through what the heck a function takes in and what are all these types doing right that's that's really the mess you have to dig through um now if we go down um we can actually we actually print out the CNN output and The naive kernel output so
and then the flattened one as well so that we can compare back to Pi torch element by element um we just destroy all the context afterwards same thing with the tan uh same thing with the tan Cuda script um go and run this so out 01 just like that link CN we end we run this um all of these are uh as expected and so it's it's going to just yeah it's going to select an algorithm these these Are all messed up I might change these later but um we notice that qnn is slower than
the naive kernel and that's because it's just really small right it's very small um qn probably has more to organize it's got these Alpha Beta terms everywhere it's got to take care of and um yeah there there might just be some extra overhead there so it is it is indeed um you know like three four four times slower than this just just because it's Smaller and it's not a big problem size so if we look at the output here we see1 178 217 and then the end is like 274 275 175 now if I go
and run um torch compare it's going to do the exact same thing notice how we get 111 178 217 and then 295 1 uh or sorry 274 299 295 175 so go back here 274 295 175 perfect so everything we can look through these these all line up 1 2 3 4 5 6 7 8 9 10 11 12 13 14 15 16 elements uh and this one has you know 16 elements as we print Out um at the bottom here just the length of that so I try to be like fa quick with that
it's very you know kind of just a bunch of boiler plate code that we we run through um but now uh now that we know that this works and it's outputting what we want it to we can actually go take a look at the comparison script so the comparison script um actually real quick before I go to this comparison script I'm going to bring up the uh the Cian and docs here just to kind of show you the uh go to CNN so we're doing this convolution to CN convolution forward right so we look at
this um and there's a bunch of things in it so like this descriptor type um handle Alpha Beta so it just describes everything that we need to know right so if something I said didn't make sense maybe just like look at here and it might make better sense to you That way um but if we want to say look at something like the forward algo type we go here click on it and there's a bunch of there's a bunch of values so implicit um expresses as a matrix product without actually explicitly forming the Matrix that
holds the input tensor in so there's a bunch of descriptions here about like different algorithms you can use um and just like when you might want to use it there's also other articles on like which ones Are good for different cases um convolutions are very very well covered uh in the whole deep learning space so shouldn't be too hard to navigate but these are these are going to be your forward forward pass algorithms now if we go back to um we go back to this comparison script I'm essentially doing the exact same thing except I
set the um I set the algorithm used to implicit gem so that's the um that's this one right Here so I just set that manually and uh yeah that's that's that's pretty much it um now we we we set this to algo and then we just plug an algo in there so that's that's like the main difference and then the other one is just how we initialize our data everything else is the same as this initial like uh just the the convolution uh compare like between P torch um so we where is it yes so
we initialize uh on the CPU with just a bunch of random values um And then we just do an operation with those so I make the I make the element a lot make this whole thing a lot bigger so it's 224 by 224 by 11 by 32 by uh 11 11 32 64 it's not it's not times all of these but the input is going to be of size width by height uh it's going to be width by height by by in channels by batch size so n chw as we did before it's going to
take up a lot of space um but we're just going to Benchmark this and see how it Goes so we go and run this get a batch size of four and we notice CN average time is 14.8 millisecs and the naive kernel average time is about 82 milliseconds so if we do that if we do that division there we notice that we get a 5.5x speed up by using 2D andm how awesome is that right I mean if you optimized this naive kernel up here and made it like more specific to your your specific use
case rather than calculating a bunch of stuff It would be faster um but this is kind of just like for demonstration purposes um CNN is still wildly fast and it would take a while to get something that is actually um more performant than this um like significantly more performant it would take a lot to do that um but that's that's the idea right uh this is why you use things like CNN and P torch is because they're they're just like super fast they just it just did a massive convolution operation of like an Image with
32 channels of batch size 4 and a kernel size with like 11 by 11 um it it's just like insane the amount of operations it does in such a little amount of time so that's what we're working with um that's that's uh that's that's C and in for you now when you're working with big massive data centers and GPU clusters even if it's your own local rig that's just on the side and you have 8 409s or 309s connected to it um this part might Come in a little bit of Handy right so larger rigs
or data centers um let me just change that how that looks um so you have kublos MP versus nccl versus Mig uh now these are all different I'm going to start with Mig because it's the easiest one to explain essentially think of it as your like your Amazon your AWS and you have a you have a giant you know GPU inside of your inside of your facility your data center and so typically with this type of GPU most People aren't going to uh use the entirety of it just like a small chunk they just want
the parallel processing aspect for like some some whatever signal processing I don't know and so what you can do is you can actually split that node um you split that node into a bunch of a bunch of smaller gpus it's multi-instance GPU you can have multiple inst es connected to the same card and you can split workloads evenly and securely across those and so that's What that's what Mig does it's used in uh data center environments use cases right um and then you have nccl so nccl is actually really really important for um distributed cluster
Computing so this is essentially going to it's exactly how it sounds right it's not going to it's not going to do operations across but it's going to help manage and communicate uh different things across a cluster so use for Distributing information collecting it Acting as a general cluster level Communicator whereas kublos MP up here is going to be doing the grunt work of doing like say giant Matrix multiplications across like a note of eight 8 8100s um and then nccl is going to is going to uh like run this in batches so remember Collective Communications
uh these the operations within that um and and there's more resources on this uh would be like all reduce broadcast Gather scatter across right so not like there's no like multiply or like fused operations in here it's it's doing it across a cluster and communicating uh communicating data right um so just for reference in pytorch you would use distributed data parallel um for this distributed cluster level Computing so distributed data parallel data parallelism at the module level which can run across multiple machines so module would be like say a function in P Torch right um
which can run across multiple machines um should spawn multiple processes and create a single data distributed parallel instance per process uh and there's there's a bunch of more stuff you can read about this this is used a lot actually in pytorch it's fairly simple to set up um but this is this is like kind of all of that simplified into one usable thing um now going back um there's I do have more resources on this too um I'm not going To cover all of this since I don't actually have a cluster in my house to
experiment it on uh but there are some links and resources that you could you know you could find yourself going down a rabbit hole with these which is what might be quite fun um but kuas MP is actually going to it's literally designed to do distributed basic dense linear algebra so if you're doing like a multi-gpu um tensor tensor operation um this kualo MP would handle that so if we go back here and we go to kuas uh kuas MP high performance Cuda library for distributed dens linear algebra um getting started um for example like
code samples um right you you have these giant like grids and stuff that you handle um how to use it um yeah maybe like how to use it for example cap API um and there's a bunch of Interesting resources on here as to how you would do things maybe there's like an operation I don't know um that's this is up for you to navigate it's optional you don't actually have to know kublos MP because pytorch does a lot of that for you if you're just working with those workloads um but if you're going to be
working on like data center infrastructure this is something you want to learn like Koss MP and nccl So um hopefully that helps to provide some context on uh like larger larger setups give yourself a pad on the back if you made it this far this has been a lot so far and we've covered we've covered actually an insane amount and now we're going to cover one of the more technical parts of the course called uh matrix multiplication and how we we optimize it so this is going to be one of the most technical Parts uh
mainly because we're looking at uh like Lowlevel optimizations how do we actually speed this up on the hardware and so it's no longer just like the general idea of how it works we're actually using our knowledge and additional knowledge that I'm going to share with you on how we can makes uh on how we can make the fundamental matrix multiplication or the mat Mill algorithm uh really really fast so this algorithm is proprietary in deep learning it is everywhere uh and so I figured the best Way to teach you how to optimize kernels would be
to use this as an example and luckily uh we have we have a repo by uh Simon bohim I think I think that's how you pronounce it this guy's a this guy's a performance or Colonel engineer at anthropic so he probably knows what he's doing and uh he made this really cool repo called sjem cuda as well as a blog post to go along with so I'm just going to be following this um and I was kind of lazy and not going To like write all of this from scratch on my own so I kind
of just went along with this and I want to explain to you uh the steps of going through this and how we actually how we Pro how we progress through these different steps getting up to uh pretty close to kublos Performance and gigaflops uh or perhaps even surpassing it depending on which Hardware you have but uh this this is going to be the goal so you might have come across this article already uh but But in case you haven't or in case you have maybe this was too hard I'm just going to go over this
and uh we're we're going to we're going to go superow level things are going to be super clear after you finish this part um you're going to understand how to optimize uh Cuda kernels so let's get started we're not actually going to occupy the cud course repo with this I'm going to link it in the read me file so you can follow along in case you're just going through the in Case you're going through this this course repo but I'm actually going to take some steps back here and I'm going to clone it into my
CA directory here so I'm just going to delete the old version um and we're going to get clone the other repo in so it's just that literally just uh pop in here copy copy paste this in um go Ahad and get clone that uh and then we're going to go ahead and open this up and open this in vs code so I'm going to drag that to my Side monitor here going to close this and open this one up again now inside of here we're going to look at the read me first for setup um
so we can see that it uh in in the in the build instructions we have to do um we have to do make directory build um CD into it oh uh and then we're going to cake it's going to take take a second there and then we go D- build period and It's going to build everything for us um now the idea here is to uh build everything show all the different benchmarks uh after after we actually uh go through uh each optimization so we're going to essentially print out the kuas performance and then we're
going to print out naive and then we're going to print out the next optimization and then we're going to print the next one X One XX until we get to the end then we're going to compare all of them and see Which one is the fastest so we can go ahead and start off with just going into just going into here so have a bunch of different kernels we have naive we have a global global memory colest so if we actually go back to the uh blog post which is what you know I kind of
expect you guys to follow there's not too much here it's mainly just the code so if we go back to the blog post um we're doing we're we're we're Essentially just going in this order and he does it in this order too so the night of implantation I mean we've already done this right um I can actually go back and if I like make this full screen and I go out of this um and I go into the Cuda course writing your first kernels and then matm notice I'm going to copy this for a second
and then we're just going to paste it uh Inside of here just for reference so we have these two kernels and I just want to and I just want to make sure that we're all like caught up here the one I taught you before is the exact same one that we're showing here so this takes in um a b and C this one takes an A B and C it it takes an alpha and a beta as well I mean it's doing it's doing a different it's slightly different operation so it's not exactly matrix multiplication
but it's it's Essentially doing this uh this essentially the the CU loss map that I showed you before where it does the alpha term uh like times every single element in in the in the Matrix that we calculate in the actual matl output and then it adds um beta Plus plus a c Matrix and then assign C to that new one so it's a slightly different it's a slightly different operation that we do but we're mainly going to worry about the matrix multiplication mechanics that Get get us to this temp variable so when we look
at this we have M K and N so it's a matrix of shape so a is shape M so it's like M vertical that's like the batch size you could say and then it's like K as like the length number of columns right and then the B Matrix is going to be K vertically and N long right so we we essentially pass it in the same way and we index them the same way but in this example in in uh in Simon's example we just we just pass These in differently so it's like m and
n as like the edges and then K is the middle one that we want to pay attention to so we save that for the third one I guess maybe that's that's thought the thought process there but anyways we have the we have X and Y so row and column um the Y is the same as the row here so uh which which y index is it at because a row like row is vertical it could be this row this row this it's like a vertical scale right and then the X is uh is column so
which which column is it at this is this is horizontal and so we make sure it's not out of bounds and then we continue with what's inside of that little chunk of memory and and we we proceed right so we have this accumulator sum uh and then we have this L term uh we we could say that's the length and uh and then we have this K which is which is the length of a and then the height of uh the the height of B right So when you're do producting you're you're taking the uh
the row uh the a row of a and a column of B so you're iterating over you're iterating over k and a and you're iterating over K and in B right so that that's where that that comes from that K stuff and so you're just iterating uh like in a row you're going through a like this you're going through each piece like each number and then in B you're going through each number Vertically right and then we just plus plus each time and then this sum output this accumulator uh is just going to be essentially
the so a it we're looking to uh multiply the first the first element here by the first element here and then and then advance and then advance and then advance and then Advance right that's what we're trying to do you could also think of it as like a a nice way I like to visualize this is like a a 2X two tile so you have you Have like a 2X two tile you have I'm try to visualize this from your perspective you have like a up here and then you have B down here and it's
like is that is that correct maybe it's maybe it's yeah it's a here and then B here and so when a has like a row that row is going to like point to uh like the the uh the y-coordinate in C and B is going to point to the x coordinate in C so when they like when they like intersect it's going to find the the index in C That you're going to calculate that dot product result from that's a cool way I like to visualize it for um but anyways getting back to the point
uh so we have this row times uh times K so like which row are we at the length of the row right or sorry which which row are you at so which row relative to you know the the Cuda architecture itself and then K which is the length of it so you're going down you're essentially like wrapping you're striding around and You're doing this as many times as you want to as like depending on which row you're at and then you add the the K offset to it so you might not be all the way
through the the length of it and so you stop and that's where that plus comes from and then same thing for here we have this L term which is K so how um essentially which column are you at right so here we have rows and then here we have columns so it's uh L which is Essentially the the length of of that vertical the length of a column and then you iterate over uh you iterate Over N times right so n is the n is the length there and so you essentially you essentially Advance as
many times you need to to the to the I guess you could say to the right and then you offset at whichever column index it is so so same idea we're just we're just advancing uh instead of instead of going rows we're going Columns right and then we just essentially assign uh whichever in C we we index it like we go uh row time uh time n so it's an it's an M it's an it's an M by n so it's going to be like m is here and N is here so it's going to
go uh row number times n so it's going to stride n every time it wraps and then it's going to do plus the column index which is that X component right and That's how you do the naive again just just to give you a little refresher there that was a while back we did it um and then the same idea here so you have m&n m&n you have the accumulator we have this I term that we're iterating through and we have K uh and then we go we have this temp term we go X so
X is the same as row so notice how row is assigned to Y and X is um well actually got a little bit stuck There I was looking at the uh the block and thread uh indexing scheme here and it was kind of misleading so like notice here how we have rows and those are by the the Y index so whichever y position I it's at that's like the row that it's going to pluck out or the the column it's like X so it's going to pluck out a row or sorry a column in this
in this example we do um like X so that refers to like right here um is is picking out like it it kind of makes sense right Like X matches up with X and Y matches up with Y but when we look in here um like in comparison to this it's like the row times the stride of K so we're going to stride the the K length over and then then come back to the next one and then offset with L in this one we have X which is like a column Index right so it's
like what why would you do that we want to we want a row index but this actually works and we don't have to worry too much because This is a square Matrix so because these values are actually the same because uh the grid and the and the thread index in both the the X and Y dimensions are equ we don't actually have to worry about that so this is something youd want to pay attention to in rectangular matrices but we don't have to worry about this right now so just kind of assume that uh we
can kind of just say that this is uh like why and treat it that way but I'm not going to edit this because we might Have to deal with this later on in uh in future kernels so you kind of get the idea though this is very similar to what we were doing before um don't pretty much just don't worry about the indexing scheme it's it's going to be fine um and then we yeah literally the only change here is that we write out uh using Alpha Beta and C right so that's really the only
difference there so let's go ahead and actually run this now so we pop into uh SJ Cuda and then We go into build now we can go uh sjem and then we go number one so this is the naive kernel that we run and we can see that we're going to do a Max size so Dimensions M = Nal K right so these are okay I might have lagged there for a second but yeah I mean as we can see um Dimensions m equal nals K right so these are all the same it's just like
128 essentially and then 256 512 1024 all the way up to 496 and we can actually see the throughput and G A flops per second so what this means is how many billion Giga right Giga is uh * 10 9 so billion and then flops is floating Point operations per second and this is on a given size right so on size 128 we get on average 46.2 gig uh billion floating Point operations per second and on 496 we get about 166 billion floating Point operations per second which sounds like a lot that Sounds like a
lot of operations right 166 billion per second wow that that's really high but the answer is that's actually not that high it's going to get a lot higher than this so high actually that it it's going to seem like this is minus kill this is going to be seem very very small and actually slow so notice how this took um this took uh eight about is 83 seconds to do 50 runs right so very um very slow or no per per run sorry so not for 50 runs but for for Each run that it did
which there were 50 of it took about 83 seconds to do that on 496 with a naive kernel so a few other points before we actually jump into this um I want to First Look at the uh I want to First Look at the blog post here so when we're calculating the output in the KN implementation I mean like even just like looking at this uh it's like really intuitive uh I I love this example but anyways uh when we actually look at the The simple naive kernel um essentially we're trying to uh we're trying
to find uh a certain part inside of we are trying to find a certain index inside of C that is going to be the output so we're saying we want to do the fastest possible calculation to get say this number uh this index calculated in the C output right in C uh and so right now the way to do that Is to load in a row and a column and then just just calculate that that's that's what we found out naively so far and it takes very few lines of code to do that and so
we just kind of iterate through like I was saying before how you put a on the side here and you let it you let them sort of act as coordinates that's that's what I was referring to there um but anyways uh that's that's kind of one of the one of the goals we want to keep in mind is how do we Calculate the output in index it'll help you it'll help provide some context on how we actually get there cuz when we deal with more complex kernels you'll actually see there's a lot of steps to
actually get to a certain place and so it helps when you're able to keep in a consistent uh frame of thought where it's like okay how are we actually ending up at this result and then you can sort of backtrack through and see what's happening um so instead of just Like going and like reading like a novel from from the start of the konal to the end and just seeing like oh I guess like we we'll see what we stumble into it's like you actually want to see what you're trying to calculate in the end
and that helps and and this blog post refat a lot of context on that so another little note I wanted to add is like don't worry about 3D structures too much so when we have the like the dim 3 type and we have the the YX and Zed uh Dimensions all populated with numbers greater than one it's like four 2 and three it's like don't worry about that we're not going to be dealing with 3D stuff it's not going to be that complicated it's going to be more so like how do you transform uh onedimensional
and two-dimensional um um dimensions and index efficiently so don't worry about 3D stuff we're not going to do any of that um and then the actual uh indexing scheme here is giving Us coest memory access so I'll jump into this in the next current a little bit more in depth but essentially what's happening is uh when we when we're doing this uh like row calculation for example um what it's like when it goes through through um each row essentially what's happening is uh we have this we have this like X term from here and we
put this x term in all of the like in Cuda when you have adjacent meaning like in the X dimension in like in like the Length part horizontal when they are next to each other you actually get CEST memory accesses so when you're accessing um a you actually you can actually uh in in assembly it's actually going to group multiple of the together into one so when you have like a when you have a a block inside of that you have a a warp and inside of the warps you have um you have uh 32
threads per warp right and so we can like in inside of the actual warp itself it's going to uh it's going to Call us memory access if possible and when things are adjacent it actually makes that possible so that's kind of why we're seeing the weird indexing scheme here again doesn't work for rectangular matrices but in this case it's kind of a an efficiency Improvement for for indexing um the a matrix so before we pop over to the global memory colas kernel I thought I should probably highlight something so this is important to know for
all kernels and even the Previous ones too but this is just kind of like how memory is laid out right so when we have a 2 X2 Matrix 1 2 34 um in memory this is going to be laid out as literally just a vector 1 2 3 4 so when we want to like for example in a when we want to go to the next essentially the next row and then do an offset what we're doing is we're going a current row times K which is this Dimension here the the the horizontal one so
we're doing let's just say we Want to get to the number four here right so if we want to get to number four it's going to be current row well the current row is going to be zero and one right so current is going to be one and then K is twoo long so it's going to be uh 1 * 2 which is going to give us this index so uh like the array at index two is this so it's like 0 1 and two and then the offset from that is going to be the
the the column index that's going to be one so it's going to be uh 2 + 1 and It's going to give us array at index 3 so that's just kind of what I mean by strides it's like how how you go and you like jump across the whole row that's kind of what I mean there but going into this uh glob memory Cass kernel scroll down and uh and I'm just going to I'm kind of going to like skip this part and and just lay it out for you but the whole idea here and
this is the critical concept so the Matrix memory layout as I Just highlighted it's going to be it's going to be consecutive memory like this what going to be it's going to be laid out like that um and this is not going to be consecutive memory right so when we do do product of this and this it's going to go to the third uh third row and this is going to go to the third column and we get this value right this is a consecutive this is not in the naive kernel we jump through these
and We iterate through uh we iterate through a so we start off this like B column and then we go and then we we go to the next one right we we we index in that fashion we advance through the arrays in that fashion and what we end up with in the output is we get this like we get this stack of blocks right and this and this is what it looks like when we write to the output it's going to be a stack of blocks because we write um vertically as As the rows advance
in a that's what we prioritize however if we uh instead cess the memory accesses uh we can get we can get these laid out in this fashion so essentially what we're doing is we're changing the indexing scheme here um all of this essentially Remains the Same except we change the way that this is indexed and we ensure that we're using thread idx right so remember when we did uh when I I was previously talking about how um All of the essentially all of the all of the the X like the thread idxx component those are
grouped together in a warp so if you have like for example block size 32 um there's going to be 32 threads in a warp that that's the maximum and so in a in like blocks if you have this like this this Square Block it's like 32 by 32 and you get the X Dimension you're going to get the maximum number of threads in a single warp if each element there is dedicated to a different thread Right and so this way you're maximizing the memory accesses because you can put all of those together and you can
make that load uh you can make that data transfer operation much more efficient when you let an entire warp take care of it it can do all the values at once or or or group them together and make them like way faster as opposed to going through each individual uh each individual uh like y component right so when it goes like thread idx doy it's Actually it's actually not as efficient right um and so we kind of just Chang the indexing scheme here with these to sort of illustrate the previous point I wrote a little
table for uh like what's in the brackets here so this division of thread idx and block size then the modulo of or the modulus of that um so I just kind of wrote a table here of what these would actually look like in practicality so if we just assume block size is four which mean it's not in this Case but we can just simplify and understand what's going on that way I don't have to write out like a bunch of numbers uh we assume block size is four and so because block the because block size
that the size of an individual block is four that means the thread idx is going to have four indices uh in it so it's going to be thread idx Z and then one two and three it's going to have four inside of it right so when we divide we're going to floor the Operation uh that that's just what's going to happen naturally is this is going to get floored it's going to it's going to truncate the end of it because we're doing integer Division and we're going to get 0 0 0 0 right 3 /
4 is 75 it's going to trunk it 75 and you're still going to have zero um and then we jump up to when like this advances then it's going to be uh well the block size is four and when the idx jumps to one then it's going to it's Going to be 1 Time 4 is four and then plus Z and it wrap it kind of just like resets right except it's plus one so we have that going on then we have the modulus as well so modulus is uh you divide so 0 divided by
four um like integer and then what's the remainder of that so if we do 1 / 4 um that doesn't actually equal a whole number so you end up with a remainder of one and then you do that for the rest of them so like 3id 4 is or three mod mod Four is three and then four mod four since it just equals one there's no remainder left so which just is zero right and you get this thing where it's like 0 0 uh 0 0000 0 1111 one and then here it's like 0 1
2 3 0 1 2 3 right so when we actually look at um this example here inside of the where is it no not this one inside of the Coles kernel um notice how in I'm going to show you a second in our code how this row does not actually change And what we're doing is we're just indexing very carefully these values so when we're when we have different threads that are like because each thread is going to calculate its own uh dot product right um like this thread and this thread adjacent to each other
in the same warp they're going to access um adjacent values so when they're accessing adjacent values in the same warp you can actually group all these together whereas instead if you just uh Did this one if you did this thread and then this thread and then this thread that means that the first index of all those uh all those threads um you you you cannot actually you cannot actually col that because you have to do like a stride and they're not they're not adjacent right so that's essentially what we're doing here um and then we
end up with this like instead of a stacking like blocks we end up with this with this horizontal layout um so when we go Here we can see that c row so this is only actually going to change every every um every time we advance right so this is going to stay at zero which means that c row that's going to stay at zero and then the plus I part that's going to advance with with the dot product itself um and then here I is automatically going to advance so that means it's going to uh
it's it's going to advance a column each time while the row is going to stay at the same place Because c row is staying at zero right and so you can kind of see how this works out we have we have C column or or or current column and this is actually going to change over the threads so it's going to go zero it's going to go 0 1 2 3 4 and then it's going to jump to the next block block idea right and so what you end up with is literally what I just
demonstrated um you end up by essentially each each thread within that warp is is accessing an adjacent value And so you can group those and and cess or combine the memory aises together and we get more performance efficiency with this so that's kind of like what this article that this section talked about um and if we if we bump back bump back to here and actually run this so kernel number two we can see um we're actually getting a lot higher Giga flops on this one uh and then we can see that we get about
1183 gig of flops here so that's Actually a pretty big increase of performance I think previously it was in the it was about 10 and uh what was it like 180 or something or like 160 I can't remember but it was very low so this is actually like significantly it's like 10 almost 10x higher this is like maybe 5 8 10x higher than what we had before on the 496 Square Matrix right so that's actually a crazy performance Improvement we were previously at like 83 seconds uh per uh Per um per run and now this
is at point point about2 so if you if you actually do the math there um 83 over uh 12 that's about a 7x increase in performance in throughput so uh that's that's pretty good um now we can uh now we can move on to Shared memory cache blocking which introduces a different concept still uses what we've currently done but introduces a whole another Paradigm that's going to uh really help Accelerate and speed things up so next we jump into something called shared memory or SRAM and this is abs abolutely critical to take care of when
we're optimizing algorithms for performance so let me just kind of explain what the deals with this so right now we're using uh Global memory right uh the the host is just our little Ram slots uh going to the CPU and that's like really slow that's about 5 gigabytes per second still fast but very slow compared to um This 200 GB per second that we get with our vram this is what we're using now or you can get even faster and use shared memory which is around 1.5 tab per second of memory bandwidth or registers which
is about 8 terabytes per second of memory bandwidth we're just going to focus on registers right now or or sorry shared memory right now um now in this blog post he had uh about 700 gigabyt of glove memory band which is really fast compared to this And then about uh 12 terabytes of or 12.1 terabytes of shared memory bandwidth so uh or sorry not 12 terabytes 1 Point 1 Point 1.2 terabytes memory bandwidth um terabytes per second now how do we capitalize on that how do we actually use shared memory well it's actually easy um
you use this little keyword called uh it's not here but I have it it's called Uh shared so shared memory is literally just how you use the that Shar that little L1 cache so when we look up at the actual architecture of this um I could open image and new tab so you have your Global memory so like the the big chunk of memory that you have that's about two 200 gigas 200 gigb a second then the L2 cache for like a transfer medium and then each little SM or streaming multiprocessor um these have their
own Little L1 cache or the shared memory and this is very small compared to these two right um but they are extremely fast and they connect directly with registers and the and the cores on your GPU so when we can utilize these there's actually far less travel distance you have to go so instead of like every time you need to access a float you go all the way through um like s m or shared and then to L2 and then to Global you literally just just uh store a bunch of Them temporarily in s and
in shared memory have all of the threads use them for like like essentially do a ton of work with the memory that it has and then once you're finished with that you can replace it uh you can you can write new values from Global so instead of uh writing from Global every time you need to access something you instead load a you preemptively load a bunch into shared memory and then you use them for a bunch of work and then you then you Replace them with a new one once you advance right and sort of
the goal here is just making sure that we do this properly so if I just go out again shared memory is located on chip much lower latency higher higher memory bandwidth um heed this on a voltage GPU so to go over how exactly we'll be using shared memory it's actually a bit of a different philosophy now I'm not not going to like do like write this out and Everything because it can get like quite uh it can get quite intensive when we write stuff out but this is essentially what we're doing we're doing a little
thing called tiling which I demonstrated earlier where you have uh little tiles that you do Matrix multiplies for in a in a bigger Matrix multiply so instead of doing instead of doing rows and columns we actually go and do something a bit different and instead What that is is is say we have this this Chunk in C here and and so what you would do is you would essentially like if you have um say a let me try to use the current vs code thing as an example so we have this uh we have a
we have a a c right now going back to going back to this one I'm going to try to exp this is this have to explain so bear with me um we're essentially Going to load in tiles and we have this little C like the coordinates here and all we're going to do is we're just going to multiply multiply these two um together and then multiply these two together and multiply these two together and then like we just essentially multiply every Matrix um and then that that that like coordinates up to uh this this final
thing here so we go we go like through this way way and we sort of we start at the very like the the very Top of B and the Very left of of a and we multiply those together and then we add it to the next ones we go in and in and in and in and in until we like maybe Cross or something and then that like intersection Point um that intersection point right here that's where C is right and so when when you have a bunch of these smaller um less intensive map moles
that can be actually done on blocks uh on on thread blocks then it actually Makes the job a lot easier because what you can do is you can be smart about it and actually store these blocks in shared memory right uh if you're doing individual rows or columns I mean sure you could do that but it actually allows us to uh distribute some of the work more when we're when we're using blocks when we're using literal tiles of the Matrix right uh so let's go ahead and dig into how this actually works under the hood
you're going to understand ort Of how tiling Works more once I explain it and how I explain how everything advances as as we dig more into detail but uh this this is the idea here we just we tile and we we we store these blocks temporarily in shared memory and do as much work with them as possible okay so this is the code for a shared uh a shared memory cach or or tiled mapal you could say and uh pretty much a lot of it uh well not a lot of it but the start is
pretty close to or actually the Exact same as as the last C we wrote so we have this uh c row maps to block idx dox c row maps to block idx dox and C column isy C column isy now we have this thread column uh is uh maps to the mod operator and then row maps to division operator right so row maps to division and column maps to uh mod right so these are these are the the we essentially use the the same idea as before and then we add this additional piece in which
is going to Allocate uh some some space in the shared memory which is going to be of size uh block size by block size right so it's just giant thing you could say that like each of these little rows just like wraps around and you have this like super long thing laid out in memory but we're going to treat it as an actual block like a square um and so why we use block size by block size is because um if we just say I mean we're going to lower we're going to lower what what
we Interpret block size to be in in the examples just for intuition purposes but in practicality this would be 32 right block size will be 32 you have 32 threads that fit in the warp and maximum 1,24 threads per block so if you actually divide um if you divide 1,24 by 32 you get 32 so what we end up doing is we have a warp a warp takes care of these warp takes care of these warp takes care of these and we have Like we're literally taking up the maximum amount everywhere uh just by using
block size uh or a shared a shared allocation of block size by by block size right that that's the idea there um and so we go down and I'm just going to pull this up on the side here just for reference um so in a what we do is we say uh we're going to advance the pointers to the starting positions right So essentially we're going to multiply uh c row we're going to do c the the the current row times uh times oh can zoom out the current row times K right so K is
going to be this Dimension here this this this long one the the sort the horizontal one and so if we multiply the current row by K let's just say we have like a current row of uh if we have a current row of if we want to do current row of one right so we want to do current row time K which Is this length so it's going to jump down to this one and then we want to do times block size which in this case since we split it into a bunch of tiles is
going to be two right it's going to be 2 by two uh and so we end up jumping two instead of that so we go um the current row is going to be one so we're going to do this this one here so it's going to jump uh the length of that times the number we want to do Which is essentially one so we don't jump down one and then that doubles because we have block size equal to two right so it's going downum two rows and then we end up exactly where we want we
want to start at the first number um on the first on the first uh like essentially tile of this row right uh and then B we we advance that pointer to uh the current column times block size so in this case b let's say we want B to be uh like two right so the Current column is uh is is 2 so we do 2 * 2 which is four so we go 0 1 2 3 4 and we end up there right so very intuitive uh and then we have C which essentially combines the
to so uh in this case we want to do c so it's going to it's going to be um like it's going to be this row and this column here so we're going to end up it's going to be um the the first row and then and then this column so it's going to be this tile uh that we want to take care of so it's going to Jump it's going to jump over to uh this one from the uh from the uh what's it called from from the a matrix we're going to jump all
the way to or what was it no no no in B we're going to jump all the way here and then in a uh we're we're essentially just going to add the we're going to add the offset right so we want to we want to jump down to because this is the end Dimension so instead of multiplying by K we would do Uh we would do uh we would do times n so it ends up being like essentially this we essentially this plus this right except instead of uh instead of using K we use n
because that's that's the length of C right so that that's the idea there um and then we end up at uh I believe it was this this totle 24 25 34 35 um so we continue to go down and this is where we Define our accumulator right so the temporary accumulator we have uh and then stuff really gets interesting Once we once we get inside of this for Loop this is where the magic happens um so we have this term uh block idx and we're going to iterate over K right so K is that K
is that uh the row the the sorry the column The Columns number of columns in a and the number of rows in B right so we're going to advance block size each time uh or sorry going to advance advance block idx by block size each time um and so inside of here initially we want to store uh the stuff In SRAM right or or shared memory so we want to store it in here and literally all we do is we look at uh the index inside of here so thread row which row is it times
the block size so block size is going to be that stride or that wrapper and then plus the thread column so which offset do we want to be at right it's going to pick out a certain spot in there um and luckily enough uh I picked a block size of two so it's going to be 2 by two and that actually makes Our job a lot more simpler to understand I mean you can abstract it up to like four or 8 or even 32 but we're going to stick with block size of two for now
and this means we're just going to have um we're just going to have two a thread thread index thread idxx of zero and one right so very very basic threads to work with here and so we're essentially just going to load uh into this this shared memory which we defined up here uh and we're just going To essentially that that little spot inside of it we're going to we're going to pick that out from A and B so in a it's going to be the thread row times K so K is going to be that
that that length right uh and then it's going to be uh plus the plus the thread column offset right so just that that ex essentially the the same idea as what we're doing here um and then we're going to have the uh same Idea for B which is going to be n so n is that again n is the n is the top one here um and then K is the top one here so K corresponds to A and N corresponds to B right um I hope that kind of makes sense and then afterwards we
just sync up everything so this part's a little weird because we're doing like sync threads but this kernel itself like everything in here up till now is like a thread so what this means is that in the entire Block it's going To make sure that all the threads catch up to this point it's going to make sure that every it's going to put a barrier and makes all make sure all the threads have like put what they needed to in memory or else if we start doing other things then you might have like a zero
value there where there's like there's nothing that exists at that place in memory and you're using that to do operations which is then going to make your answer wrong so you want to make Sure that all of the threads within the block are actually caught up to here so like these are on the level of threads but we're essentially telling Cuda that we want all of the different threads that are doing all these parallel operations to catch up within the for Loop that's what we're doing um then we uh Advance a uh then we advance
a by block size so this is just like advancing it preemptively we Already have all of this stuff St uh stored in shared memory so we can actually just Advance a we can ADV we can advance the a point because remember a is a pointer right um we can only actually use like the index to get the values but a itself is a pointer so we advance that in memory we advance that in the memory space by block size so a is uh so a is like this this side one that's like going to point
inwards to c and then B is going to point downwards So uh a is going to advance a single block so if a is like here for example um a is going to advance block side so two it's going to jump to here right um and then B uh B is going to B is going to do the same but it's going to jump so it's going to go it it's just going to it's going to Jump N right so it's n is like this length it's going to do block size times n it's going
to jump it's going to jump Down two right and it's it's going to do exactly what we want so it's going to advance the tiles in the directions that we expect Ed them to you might have had some confusion about how we're just using like the thread columns and just a reminder uh these this a term is already advanced to the correct position right so once we're Advanced to like this this Tile For example then we can just then we can pretty much just use threads we can use the the the thread indexing Scheme and
that'll give us exactly what we want so now notice inside of this for Loop we have the same indexing scheme as we did in the global memory colest uh kernel so when we uh when when we're just efficient about going through the columns and having the C as like a as like a horizontal layout instead of like a vertical stack of blocks that we're just doing the exact same thing here right um and so you might be wondering About this temp variable um so this temp this temporary is just is just going to start off
as nothing and all we're doing is each thread essentially each thread has its own temp variable right that's going to be stored uh in the register each thre has its own temp variable and it's going to accumulate this temp variable for uh it's going to accumulate a DOT product so what this is going to do is it's not actually going to Multiply matrices together instead what it's going to do is it's going to just accumulate as it goes through tiles right so as it goes through it's going to like accumulate each value in the output
of C as it as it goes along right so based on the thread it's going to say say one is going to do like the row of this one and then the column of this one right and so when they when they interact together or when they when they interact they're going to end up at like This top left part maybe and the thread holds the temporary value for that specific part um and what it's going to do as like as it goes down through the tiles it's going to accumulate this dot product right so
you get the first you get the first dot product and then you add it to the next one from the next tile right because you're you're essentially just doing the normal naive matrix multiplication but you're just accumulating through the Tiles and so in the end uh you end up with just this this accumulated temp however this is only for a single dot product operation this is only for one tile and the reason why we have this for Loop inside of this one we're being very clever about this is so that we can actually do this
accumulation through the tiles right so that way we can kind of be we could just be clever about how we uh go about doing that uh and then after we're finished we can just go Ahead and uh you know sync up all the threads make sure that they're all caught up and before we actually write this out to C so I guess just going a little like iterating over this again the thread row so that's like which which row within the tile we want times the block size so that's going to be our wrapper and
then the the idx is going to be how we're iterating through it so a is row so we're going to that's the idx we're going to go through this way That's going to be the the offset on the horizontal part and then B is going to be uh idx times block size uh and then plus that offset as we were doing uh before right so we're maintaining that Global memory access uh the that access pattern that we had before um and we're and we're just simply writing out that temporary variable as it accumulates through the
tiles right so that that's the idea here is we're accumulating through the tiles so now we can uh Hopefully that makes sense feel free to rewatch some parts of that feel free to plug it into something like chat GPT or CLA son it or something like that and try to try to visualize what's happening I have I have a separate uh additional like diagram here just of like what this looks like laid out uh I decid to add this to the to the the course assets folder inside of the faster Mill section so if you
want to check this out I might add other ones to it but uh this is yeah This this is the uh shared memory blocking uh cud kernel so now we can actually go in and uh and profile this thing so I up into here and just go sjem number three we run this for a second it's going to be really fast and so if we actually compare this give it a second it's doing the the last one there so if I actually compare this to number two which wasn't uh give it a Second yeah so
our number two with just the Cass memory access was achieving about you know 1,200 and this one is achieving about 1,600 so we have a decent improvement from that right um but I probably should have done this earlier but just to like spoil just to spoil the surprise kublos is actually a lot fast we run the 0 kublos is uh about 11,400 gig flops or 11.5 Tera flops which is really fast especially compared to our previous uh our our previous Naive kernel right this is extremely fast now just to iterate before we move on uh
this this uh shared memory kernel this is not implementing like the full version of tiling this is just implementing like a partial dot product version of tiling known as blocking so when we when we accumulate like dot products that's not actually like the full like the what you would Inuit it as tiling right tiling as I described before is when you like take the Matrices you multiply them and then you you advance and then you multiply again and you like add them every time they multiply uh element wise and this is not what we did
here what we did was a partial dot product so keep that in mind the next one is going to be a little bit different though so 1D uh 1D block tiling is a bit more advanced um but we'll get through it so just to help get tiling crystal clear in your head I'm going to use two matrices As an example just to show how this intuition works and I've actually written out I did a little I was testing a little bit and I I did the math Wrong by hand so we're just going to use
use the computer for that um but I wrote out a matrix a here so 1 2 3 4 5 6 7 8 9 10 11 12 13 14 15 16 and then this one B it counts by twos but it goes backwards so 2 4 6 8 10 12 14 16 and then and then continuous up to 32 so I've written these out here in the terminal um and if We just do a multiply B we notice that we get this output result and these are pretty I mean these are pretty easy numbers to work
with right so what I want to do is work specifically with this upper right tile the 200 180 456 404 that's exactly what I want to work with so how we're going to do this is we're going to use the we're going to use an idea from here Um to get this top right piece we essentially want to uh cross inward right so we're going to start off with multiply a this this a portion with uh with this B portion we're going to multiply those together a * not B * a a * B and
then we're going to add that with the product the the matrix model product of this piece and this piece right so if we start out first by doing 1 two 5 six and go say um A uh temp torch. tensor and then inside of here we're going to have a smaller ones so it's first going to be uh 1 1256 uh and then we multiply that with torch. tensor tor. tenser 4 to 1210 right and if we print out a temp we get this result now we do uh B temp tch. tensor and I'm just
going to Print the uh actually I'll just I'll just print the layout here we'll do a we'll do the same idea for a temp but I'm just going to remove these values and we'll place this with uh with B temp so this is going to be uh 3478 multiply that with uh 2018 28 26 20 18 28 26 all right okay awesome now we print out B temp oh and then we do a temp plus b Temp and we get the result that we were expecting 200 180 456 404 um 2 180 45644 and that's
a TOD M that that's really all there is to it it just helps when you're able to draw this out by hand and understand what the purpose is when we like advance for example when we advance pointers by like a a greater offset than like one or two or three or four it's like when you're skipping entire rows and you're going to like a c when we when we when we do that Stuff this will help you understand why we're doing it um but uh yeah we can go ahead and begin awesome so now let's
go ahead and look at the uh boiler plate code for this as well as the runner script uh for this so in the runner script we'll actually pop down and you can see each uh each little like function and how we call everything in here so like the kuas function for example there's like different ones for like fp32 brain float 16 tensor float 32 Right uh and then we have like the naive the colest the shared me caching which we just recently did and then we have the 1D block tiling right so notice how in
the shared memory block we just have 32s everywhere we have 32 32 32 32 and 32 right everything's 32 because everything is a square but in this one we we actually mix it up a little bit so we we have these essentially this this block uh so M it's going to be this this block on uh on a so it's going to Because it's specific to uh A and C because when we do our our uh like our matrix multiplication shapes we're going to cancel out the inner ones uh K and then you're going to
be left with um we're going to be left with M and N right so just pay attention to these shapes here uh we also have the eights down below so uh just just like be aware of this we use we use different uh shapes here to help speed up operations because we Introduce A New Concept um and that concept is 1D block tiling for calculating multiple results per thread so if we actually go back into uh the shared me uh blocking uh when we write the output we have the specific spe ific index per thread
that we write out it's just one we write out one output of that block or or sorry of that tile and that's it uh we just leave it at that there's no iterations we're not we're not wunning multiple per thread just one Now if we go to here we notice that we're actually writing multiple so we go over this res or this result idx um that's essentially goes uh it iterates through uh TM which is this term that we found in in here which is uh essentially threads per M Dimension you could think of it
that way so in short we're going to be writing out multiple results per thread and that's going to speed up um everything a lot so like imagine if you Had to do uh you had to issue a new thread every time you're going to write an output of this entire Matrix so if you have a 496 uh by 496 that's going to be about 16 different threads that are writing out right that that is a lot of threads you have to there's a lot going on there so uh when we um when when we use
when we iterate Over we can get one thread calculating uh multiple and make things more efficient it does it does make the indexing more complex and this is probably one of the most intuitively difficult kernels to understand but once we get there uh it should be a breeze so going up for our boiler play code we have this c r is block ID x.y so we're going to use blocks uh each individual uh block of threads is going to calculate uh a specific tile on the Output right so we have this block essentially the current
the current row and the the current column so current row is like it's like a like vertical which row are we selecting and that's y right so that's vertical and then the column like we doing before it's you know horizontal Dimension um now we go to here which is essentially the the thread uh the the lower level thread column within that so we have this we have this BN term that's used and this BN term we remember back to here was 64 right so let me pop back to this this BN term we see it
in both the B Matrix and and the C Matrix right this is BN right it's that length right there so when we actually um when we do mod BN what that's going to do is it's like if if BN is 64 it's going to be like um thread idx like zero divide by that it's just going to be zero right and then it's going to go 1 2 3 4 5 because we just have this Remainder that's like not 64 right so once we pass 64 then it then it's going to Loop so it's going
to it's going to iterate through all the columns and it's going to go up 0 to 63 and then once we actually hit 64 it's going to um it's going to it's going to divide right so it's going to floor up it's going to floor to zero for each of these indices leading up to 64 and then once we actually hit it it's going to divide and it's it's going to go to one right Because it's going to floor down to one and we're going to be it's going to be like a bunch of zeros
and then a one right and we use this to pick out our rows so the columns it's like 0 1 2 3 4 5 all the way up up to 64 and then the rows it's like every time we stride this many it's going to it's going to bump up one so the division is going to go up to like one and then two and then three every time we stride that 64 length and then it's going to increase the row Index so it's going to it's essentially going to be like like I said a
row index it's going to move us downward right in C uh and this is this this is kind of why we we have this here so moving further down we have the a shared and the B shared so just the the normal shared memory that we allocate um so this going to be M by K and then K by n right that's that's the space we're storing and then uh in this specific uh in this specific Thread we advance the we we advance the block tile to the beginning of A's row and B's column right
so we did the same thing in our past one where we had Advanced everything uh forward right so this is literally uh this is literally the same idea right so we're we're doing the exact same thing there we're just using a little bit different terms because it's now rectangular tiles um these assertions here are pretty much in place To say uh we don't want to go out of the block dimx range right it's just like a essentially like a you could think of it as a boundary Checker so when we're when we iterate through BM
or BK we don't want to go out of range we want to make sure that these kind of add up we want to make sure that um when we have this like 2D structure that when we flatten it out it stretches the length of block dim dox and that that's pretty much what's happening there um we we assert Both of these so uh essentially when we go back it's like um you know n and K are the same and then M and K are also the same so that kind of lines up there and then
same and then for these ones the same IDE as what we were doing here so the thread column so we do this thisx divided by the uh the X Dimension there which is BN that's the that's that's the trailing dimension in C it's going to be M by n and so in here we just do thread idx divided or for the for the column Index of a the inner column index of k or a sorry uh we're going to do thread idx mod BK so BK is that that horizontal dimension in a right cuz it's
M by K and then the inner row in a is going to be just the the division of that so whenever we stride the length of K it's going to notch up one and it's going to tell us which row index we're at right that's that's kind of how we that's how we use the threads to decide Which index we're at and then same idea for uh same idea for B here except we use the trailing dimension in B which is n uh instead of K in the a matrix right and and then in in
uh we essentially here we we allocate memory this is going to be very important for when we write things out later on so notice how we iterate over this term TM we're going to make thread results like a like an actual uh thread local cache that has the size TM TM is Very small right so in here TM is TM is actually eight so that can that can easily fit in registers um and then we just initialize this with a number just say zero and then we're going to populate that later on right so we
just initialize this beforehand and then we're going to change it later um now we actually jump into a little bit more advanced stuff so this entire sorry this entire Loop here is where a lot of the magic actually happens so when we're When we're in a single uh when we're in a single um when we're in one when we're in one of these iterations we are trying to calculate the uh compl complete tile for uh an output in uh C right within a block that's what we're trying to do a a block a block in
like a certain block idx within the grid is going to calculate uh an output tile in C that's the goal here so we outer we we Loop over these block tiles by iterating over K right K is That um K is the uh horizontal dimension in a and the vertical dimension in B right so we we iterate over those and we advance by this much each time we're not actually going to use uh we're not actually going to use block idx like as you can see we only actually have it in this one line here
it doesn't show up anywhere else so this is just for making sure uh that we don't if we just like iterate by one each time then it's going to go out of range and we're going to do This Loop way more than we need to so we just want to do it for as many blocks or for as many blocks uh as we need right we then populate the uh shared memory caches so this is within uh this is within a single uh tile right so notice how we use the inner row a times K
right so it's the that's the that's the which row are we at inside of it um and this is these are like um these are like very small ranges of indices right and that's going to in a it's going to Loop around K and then that EXT column index is going to tell us which position we're at right relative to uh the thread of course so we can like parallelize the ACT actual loading part and then we do the same thing for B all right so we have this they have this row um and we're
we're we have we have like which row are we at and then uh we want to essentially stride that number based on n and then end up with that offset column index um so that's what This is Here We sync everything up so this is again at the at the Block Level so it so a kernel normally runs at the level of threads but because we're doing sync threads it's going to apply to all of them so all of the threads uh within this within this block are actually going to line up they're all going
we're going to put a barrier and they're all going to meet up and they're going to synchronize at the same same spot right um and then we just Advance the block Tile For The Next Step so when we uh when we need to do this load again this is already ready and we don't want to we don't want to like worry about this anymore right okay so remember A and B are just pointers right when we scroll up we see A and B are Pointers to uh float arrays right so when these are laid out
in memory uh they're they're not like it's not like an array of arrays um or like an an array of pointers where each Pointer inside that array is a new array like we did in the in the C and C++ review chapter it's not like that it's it's literally just a it's literally just a pointer and it's the pointer is at the start of that thing that's start of the array that's laid out in memory so it's not the actual value it's just the memory address so if we take that memory address and we we
plus one it'll go to the next index next one next one next one right um that's what we're Doing here so we already did this in the last we already did this here um where we or is it this part we just we just Advance further um so a advances um essentially plus an an entire block size so we advance the we we just Advance Plus uh whatever this value is to a so it's going to it's just going to increase that much whatever we set that to and then this is going to increase but
it's going to have that n stride right so the the trailing Dimension in B is n so it's like K byn and so it's going to it's going to wrap right it's going to wrap and it's just going to find the sort of the the next the next one in uh in in B right and that's that that's really all we're doing there so then we go to this next part uh this is where actually a lot of magic happens and I'll do my best to explain this but this part's like kind of intuitively hard
so we have multiple Forbes in here We have this idx that we iterate over BK with uh we have this float we have this this specific float um this this this sorry this this temp temporary variable and then we have an inner loop here so I'll try to explain this as best as possible um we jump back to here we notice how uh like initially we have these two matrices that we're trying to multiply together so this is uh this is a and this is B right and we have this this Tile intersection as we
did on the Whiteboard there um and so the really the the magic happens is is like in these Loops right we've already taken um in this outer one we've already actually taken the block tiles we already have these in shared memory and now we have to do fast operations with them so we go down to here where we actually have these in shared memory right this is a tall and and not very wide this is uh wide and a little bit tall right so it's It kind of matches up and then inside of here what
we do is we notice how we do we iterate over idx and then in here we iterate uh through through this this this TM right so we have this idx and then res idx uh over TM so if we actually pop back to here um essentially what's happening is this at the lowest level in the innermost Loop res idx is going through uh like we we have this jump here which I'll explain that indexing in a second like how we Actually arve there but res idx is going through these it's advancing uh vertically downward and
it's multiplying with whatever value this is so that little top left corner in B that top left corner value in B is going to stay the same and res idx is just going to multiply with that value it's going to go and it's going to compute a partial dotproduct along this column right now now when we do uh when we iterate over uh idx what's going to Happen is uh idx is going to it's going to go forward this way and it's going to go down this way right so notice how these these arrows are
are colored very similarly they're they're actually the same color so that means we're GNA idx is going to evolve downwards in B and idx is going to evolve uh to the right in a so whenever we evolve like one it's going to like essentially res idx is going to take this value it's going to go and then we're going to uh Evolve one forward and then where IX is going to reset and then it's going to do a DOT a partial dot product for the next column right it's going to do a partial dot product
uh for the next column and it's going to do this all the way until it is finished inside of inside of uh this this entire section and then when these evolve uh inwards right so when this is when this is going forwards um and like just not even considering res idx just like think about like sure These ones are all filled in this one too but when this goes forward when this goes forward and multiplies with this and they are both inching in one at a time as dot this is what's happening as idx is
is moving up um these are actually acting as little um like essentially little tiles right and so you end up Computing this specific uh you end up Computing the full dot product of this so when when this one moves like here it's like 1/4 of it is Done right 1/4 of it is done and then it moves up half is done half is done 75 75 and then it's fully done once that evolves all four steps this entire Index right here is computed and so we notice that when we do res idx and we go
through all of these we end up completing the entire row so when we go through this way and these this this goes forward we complete one column at a time right one column at a time is uh completed per thread and so when we um When we have other threads acting like thread column and the thread row which is acting as these little blocks that are shiting downwards instead of like little individual 1D columns um you actually end up Computing the entire thing so thread column is laid out this way through like it's like essentially
all the column indices in in the B tile and then you have the thread rows which are here and so this is going to compute all of the all of the columns in C it's going to it's going to cover all of them in the tiling aspect and then this is also going to cover all of them so what you actually end up with is you can complete the entire tile by giving a thread more operations to do so when we actually jump into this um we can see so first of all we have this
temp B right so this is coming from the B shared memory this is so we just say idxx is zero this is the first iteration It hasn't or the zero with iteration it hasn't changed yet so this is zero and it's going to it's going to evolve you know across BN zero number of times right so 0 * that is z and then plus the thread column if that is also if that is also zero then it's just going to be here right it's literally just going to be there um and when idx moves up
then it's going to um like this isn't it's going it's not Going to move this way that the this offset here is from the thread itself the thread index itself but we're actually going to Traverse downward right that's that's the do idx as I was explaining before and then uh you have the uh this res idx the result idx and this goes through TM right so this is this little block that we have here um and when we actually look at how this is accumulating remember this is the size Of um this is the size
of TM we're going to iterate through TM with this red idx or res idx that's going to be the the POS the the amount through TM which we've iterated through we're setting that index to uh a place in shared memory and this exact place is going to be so the thread row times uh TM plus res idx right so thread Row in this case thread Row in this case is whichever one of these it falls at right so that that's a specific row that it Falls at considering that we evolve uh like in TM blocks
right that's that's the that's the amount that we evolve we we progress each time and then this res idx part um res idx is how much are we vertically offset so we we advance like four or like eight or four or eight downwards and then we have this additional offset res idx um but we have to make sure that we actually arrive at that specific piece cuz it's it's going to be laid out in memory like this right So we have to make sure that we evolve straight downwards and that we get to that certain
res ID ex position now we multiply this by the k which makes this a lot easier for us right that's that essentially solves that problem so however many we want to go down this this thread whichever thread row we're talking about times TM which is you know that that block space um plus res idx which is that offset and then times that all of that Times BK right this this K Dimension here and that's just going to times it's going to go right where we need to be then we just add the idx offset which
as I highlighted before is literally just going to progress that way so it's going to iterate all the way to the starting position uh and then idx is going to tell us how much has it gone to the right uh and so you have this do Idx here that traverses downwards and here it traverses to the right now if we go back we're multiplying this um by this one we're multiplying it by uh the the temporary B value keep in mind this is the only thing controlling this is the idx which we already highlighted this
is going to make it go downwards and then the thread column so thread column as I mentioned before again we're kind of just going like starting with the visual example And then going into the code and then connecting that to our visual example so thread column is that that horizontal offset and that that like each thread is just going to get a different horizontal offset right so it depends on which thread we're at um and then we go back to here um and we have this this thread row right so that's just going to depend
on which block we're at so in this case we're not at block uh we're not at sorry we're not At thread row zero we're at thread Row one so it's going to Traverse TM uh layers down which in this case is like maybe four or eight or whatever whatever number we pick right um and then it's going to end up there and then the rest of the math is going to ensure that we get to the correct position with respect to resid and idx some other things you want to pay attention to here are how
these actually uh are coest in memory right so in Memory um keep in mind when we're loading these columns in when we're when we're loading these little column bits in in uh in memory we're loading them as if they're like adjacent next to each other right so this like thread zero is going to be adjacent to to thread thread column one thread column Z is adjacent to thread column one they're next next to each other thread column two three four five right so when we actually load this on The level of threads that memory access
is going to be CEST it's going to be combined we're not going to have to you know consider this stride and then like oh we need to get two memory accesses to get both of these it's like no you can actually fit um like a bunch like however many as you need into one right so technically what you're going to have here is you're going to have um since BN is 64 BN is 64 so this this whole length Here it's going to have two warps so it's going to literally going to be uh like
two memory accesses that we need to do because um that like an entire warp that can actually make memory accesses really efficient when we have two that's that's effectively just two memory accesses uh that we have to worry about so it's really awesome that we have these that we have these colest right I mean this itself this other one isn't going to be coess but that's fine um Because we you know we're we're still using shared memory what we do care about though is that these are colest right the column accesses are colest and that's
going to make things really really fast so to iterate um we we essentially iterate over and we complete we let the threads complete uh The Columns uh like partially and they they Advance over and the and the dot products are going or the the dot ID EXs are going to evolve and they're they're Going to close inwards and then they're going to complete that slowly right and these these individual threads are going to complete the columns right so they're going to they're going to move through the res idx and then the do ID XS are
going to evolve this way so you end up just completing a whole column because these line up and this one lines up and so you get you get a bunch of these and then one of these right so then we sync up the threads we Make sure that they're all caught up so that we can actually write out the results safely right this is for a specific block tile so when we have like a bunch of them in the entire thing we have a bunch of block tiles we're worrying about um we want to make
sure that we've synced them up for this current block tile just for safety purposes right we don't want to mess anything up so we're just going we're going to be safe there and then when we Actually write out the results it's going to be very similar to what we actually did um up here right so we iterate through this TM term again um and we're going to have thread row time DM plus red res idx and then times n right so n is in the bigger picture of that whole that whole C Matrix um and
then plus the actual uh thread column itself which is going to be that offset uh and that that's the actual uh index that we write out and we're going to Iterate over TM or eight indices every single thread so each thread is going to write out eight elements right instead of just one writing out eight elements um and then we're we're just going to keep in mind this you know this this thread result results we're just essentially each time we write out it's just going to populate that index so it's like a very easy way
of just keeping track of uh of like which ones we write out at the lowest level of Hardware like SM and registers so it's just going to make our jobs easier on that level so we could literally just store them one by one it's like eight an array of eight elements and then we write out that array of eight elements we don't have to worry about strides or any of that stuff right um we multiply Alpha by that um for each for each one right for each index and then we do the same with beta
so beta is another term and we have C which uh I mean c is just We're essentially just element or we are we are pointwise multiplying beta so it's like whatever beta is maybe like 0.5 or three or whatever it is we're just multiplying each each one uh and so we consider the the strides and the offset as as well for that okay awesome so now we can actually generate or we can actually see how this performs uh so remember how bad our initial kernel was I'm going to go ahead and run SJ 00 just
to show kuas um it's Going to iterate up and we're going to get about 11.4 11.5 Tera flops of performance and then if we go ahead and run the block to one so kernel number four go ahead and run this we're going to get like actually quite a bit faster than the previous which was 03 and this one uh give it a second this one gave us about 1 1600 uh 1600 gig flops this one is about a 3X Speed up of what we previously had which is really good so that pretty much just shows
uh that the memory access patterns we use so that that coling of of memory access was really really useful and even more useful was using a single thread to do multiple computations to compute eight elements instead of just one right so that really really SP up our throughput and performance there so now if um I actually wrote a like off camera I Wrote a separate uh I wrote a separate function here or not function file main. cuu inside of the Kel's folder so so we could easily like compile it um what I pretty much did
is I just uh imported this so the the for essentially the block tiling kernel the the header for that right here uh I included the macro which we had in the previous file I initialized the majores so 1024 1024 1024 um and then our previous like 64 64 8 and 8 and then I just populated these Um could amalik manage just use like this this unified memory which is like going to just reduce a bunch of boilerplate and make things uh a little bit sped up for us but you're you're going to see the the
main thing that we're looking for in a second um I initialize everything properly and then I call this kernel uh and we're just trying to see like what is the actual code look like under the hood here so if uh if I go up to this command that I ran Recently nvcc D PTX that means parallel thread execution parallel thread execution is what Cuda compiles down to it's the Assembly Language for parallel processors uh and then you have just the file that we're compiling and then we output kernel. PTX right or I have to get
out of this um and then go into SRC kernels uh and then go and run that this is going to give us this kernel. PTX file which I'll just open here we Bring this up we go into uh kernel. PTX we notice uh there are a lot of lines in this there are 308 lines and it doesn't tell us anything super specific specific right like we can see um like for example like an ad an ad operation or uh like a fuse multiply ad with a with a floating Point 32 number um it's like I
think output and then like multiply these and then add this One I can't remember the exact order but like fuse multiply add right you can find all these instructions in here [Music] um multiply right um yeah we have the the load instruction so LD so it's going to load uh a floating Point number into uh shared into the into the SRAM and then we leave this if I can exit Vim uh I have a separate one that I also outputed this is the Shader Assembly so initially nvcc is going to compile everything down to PTX
and then PTX is going to further compile to Shader assembly which is then actually run on the GPU Shader assembly is what it executes so if we compile uh you know Cuda binary right this actual the actual binary that we run and then we and then we uh compose this back up into the Shader Assembly Language that uh is actually executing and then we output that in the Cu uh the Cuda binary Format we can uh Oh wrong one let me let me check real quick we go yes so we've compiled it into this and
now we we uh we look at it again through the special command so Cuda object dump uh dump Shader assembly and then just open essentially open that and it's going to give us the exact uh assembly code or what we just what we just uh compiled right that entire script So if we look look very carefully for like load instructions right so if we look for LD um which I know is from the it's from here so PTX compiled to Shader assembly the S shared memory loads from from B shared are vectorized right B shared
was the one where we had uh these individual uh columns right so when that was in shared memory the smm loads from shared are vectorized remember when we had the threads that were adjacent to each other Those are what we're looking for so if we look for LDS so we have LDS um U 128 right LDS u32 right we have all these ldss here um and this is when they're not coest so this this LDS when we have the 32 that means it's it's it's not uh it's not cess together right these these um when
it's when it's not accessing like four in a row so if you do a a 32-bit floating Point number 32 bits * 4 is 128 so when we're accessing Four in a row it's going to be 128bit load in uh Shader assembly so this is what it actually looks like when we get those cols memory accesses going and this is what it looks like when we're not right so we end up having to uh you know maybe load more so we have like two loads here uh but anyways that this this is the entire Point
here just to show you what the actual loads look like in binary format that this this is what they look like uh and we're going to Further optimize uh these kernels to perform better right fe uh I think this is f ffma is like fuse multiply ad floating Point fuse multiply ad I can't remember we can actually search that up uh to uh F FMA in uh Shader assembly so yeah fused fused multiply ad there's probably a manual somewhere which I'm not going to look through right now you can do that but uh these are
the Shader assembly instructions that we're working with Um Now we move on to 2D block tiling which Builds on what we've already done but makes it even more efficient and makes it even more performant okay absolutely give yourself pat on the back if you made it this far this been quite challenging so uh you know feel free to take take a coffee break or whatever um get some tea I have some tea with me right here so you know it's it it is a grind um but if we step back to just this blog post
Here we go to Kernel number five so increasing arithmetic intensity with 2D block tiling before we were just calculating columns right we were just calculating columns and now this one is going to calculate entire blocks it's going to calculate like a mini block inside of the big block tile right that's the idea so before we just had this idx in the in the in the the B tile this was going to go downwards and we just had a single thing that was Iterating down and calculating you know a column so you have this you would
just kind of intersect and you get this column filled out but now we have this res idx uh n component right so that's just that's just going to go and make this essentially cover um like like a square or like a row and a column right so they intersect and it's going to fill up like a square area um so we have this we have this term which we're going to iterate Over and then we have this new TN term so TM is literally just this component and then TM is this component underneath right um
so now like stepping into this this is kind of just what it looks like under the hood when we sort of visualize how this is how this is being calculated so we look at our um we look at our our a tile and we look at our B tile and it's literally just we're storing a column um in reg M so that's like an actual register memory in this Kernel we're actually using register memory so we're we're occupying it a little bit more we're uh as you can see we literally populate it so reg m
is going to be of that size and then T reg n is TN size right um and the total results is going to be the surface area of that total area there um and we just we essentially just store a column and a row and those will those will dot product through this entire thing and they will intersect and you'll Get this little square right here um and you can we can see how that evolves at each step right so now there's my marker let's actually step into this kernel so we go back to here
and we see um you know run sjem 2D block tiling right so we have this we we have a we have this same BK term right so BK is just going to be eight in this case um and we have TM which is also the same and we have this new TN term right so We're essentially just going to calculate um like this area that we fill out is going to contain 64 elements it's going to be 8 by 8 that's going to fill that entire thing up and we're going to have 64 in there
now we have this little hacky situation for handling like the very very low like the smaller matrices that are going to be tested when we do a Benchmark so this is why we have this little out statement here Um so in case we you know decide to use um in case we decide to use like a very small Matrix this is able to deal with that effectively but normally we're just going to we're just going to pay attention to this first if statement for now um so if these are bigger than bigger than or equal
128 right um yeah so in here pay attention to this we have a grid dim which is going to have um an X Component right and then a a y component right so that that's going to that's going to stay the same and then this block Dimension the the number of threads within a block right it's the that like the block itself the dimension of that the X component there's just going to be one value here and that's going to be um essentially the the total number of elements in the output tile so you know
we have this B and this BN and then they then they they you sort of Just get this this filled out area of C the C tile that is going to be of this of this size right and then we divide that by the total surface area covered by um by just what a thread calculate so a thread is going to go through those 64 elements it's going to be 8 by8 it's going to go through those and they're going to calculate a small little mini grid for us um like per thread right um and
so if we we divide the total number of output result results by the uh by The space covered by a thread we actually get the number of threads right because each little piece here is a thread and so if we divide this by this we actually get the total number of threads within that entire SE tile um so if we do this math here we're going to get so 128 times8 and then divide this by 8 by8 and this simplifies to well 128 is 2 To 7 right because remember like if you if you know
like int 8 Precision it's it's like it's like an image essentially like number of number of like uh RGB values in a single U like in a single Pixel so you have like RGB and each of those is like Zer to 255 so that that's like how you can go down to what like uh 128 is 2 to the 7 cuz it's like in 7 instead 8 that's how I made that Association but we have this 2 7 7/ 2 3 * 2 3 and what you end up with is 2 14 / 2 6
and we do our exponent laws and we get eight right so 14 - 6 is 8 so two the8 that means we have 256 my marker works properly 256 threads right 256 threads my writing is messy ignore that um awesome so we know the number of threads that we're calculating now this is going to help us when we Actually jump into this kernel here so you know we have our our BM or BN BK TM and TM again right there's a lot happening here let's break this down so to start we have our our row
which is going to be the the typical y component we've already went over this the total results in a block tile are as we already said in the in the runner file uh this is just essentially the the the whole the whole seed Matrix so you have the M Dimension Then you have the N Dimension you multiply those and you get total area right that's the number of results we're going to get calculate and then we get the number of threads per that entire thing so how many individual squares are there that a thread is
occupying right and so that the square surface area is this which we already calculated and so this number of threads per block tile should equal 256 right and then we just assert that down here so we want to make Sure that 256 value is equal to what we just calculated which is going to hold true of course and then it won't it'll actually continue with executing right um let go down a little bit further um don't worry about these right now we're going to get into those in a second so we do the the classical
just allocate shared memory we advance the block tiles based on um you know where they're supposed to be at in the uh in in the in the current block Right or or I guess in in in the current thread this is where a lot of the magic happens right here so this this part is crucial pay attention to let's first go over the easy stuff so thread results is just like how big is that that little square that thread is going to calculate that's just going to be um this is going to be 8 by
8 right we have this reg M term which we saw in the blog post so reg m is this and reg n is That TM and TN right that's just going to be the the little the I guess the the iterations of the dot product so each dot at each iteration of the of idx it's going to store those in registers and it's going to calculate them really really fast right it's going to be like it's going to be like eight it's going to be like 8 by one and then a 1 by 8 and
it's just going to evolve that way now we look up at these So in a row a so we just essentially have the thread index and we divide that by BK right in a row same idea but we use the mod oper then we have this new term called a stride right and now we're actually going to do the math we're going to do the math for a stride here so so stride a stride a is going to be number of threads per block tile which is 256 Divid by BK which in this case is8
so here if you divide this out you end up getting 32 so our stride a is going to be 32 right my marker is a little weird let's pay attention to that term um and then we have this other stride down here stride B is the same thing but instead of dividing by BK we divide by BN so BN is actually 128 so if we divide 256 right 128 the answer is two now these are going to be important these are going to be very important as we sort of Step through this so let's jump
down to this actual uh loop here now so inside of a shared look at how we Index this start starts here and ends there we have this first thing in the brackets which is uh inner row a so it's going to be a certain row that we're looking at plus a load offset right so the load offset is going to iterate up To BM which in this case is 128 so you can think of it as us having this um this is the a tile right and so this is going to be this going to
be BM and that's going to be BK right so inside of here we're going to iterate up to BM in strides of stride a now stride a is size 32 right stri a is 32 so if we actually look at how many times it's Going to stride through this until it reaches the end it's going to start at zero and then it's going to go down to 32 I can and then it's going to go down to 64 and then it's going to go down to uh I believe 96 and then it's going to stop
right it's going to it's it's not going to actually hit this it's going to stop there so we're going to have this this initial offet of zero and then it's Going to bump up to 32 in the next iteration and it's going to jump to 64 and then 96 so notice the actual area that we have to fill in here right notice the actual area we have to fill in so this area is 32 and then this BK we already know is eight right and it's going to be the same for this and same for
that and same for That so this is actually where where some really cool stuff comes in now this this inner row a here this inner row a is calculated as the thread idx divided BK right so this value if we do the math here idx is say Max is out at 256 my marker I need to get a 256 ID BK which is a right now this number is going to max out at 32 and that's going to be our row right so remember this if it's 32 this number this this inner row which is
based off of the thread itself is going to max out at 32 now this inner column on the other hand is going to do mod BK right so when we do this it's essentially going to it's going to go like 0 1 2 3 all the way up to eight and then once it hits eight again it's it's going to jump rack zero and it's going to reset so it's going to be like 0 through 8 and then reset 0 through 8 and reset right and then we're going to have These these rows uh the
row index that goes from 0 to 32 right so every time we hit the next eight it's going to it's going to bump up one right and so this actually makes a lot of sense so inside of here we have this load offset which is going to be strided by this much this 32 here and then we add whatever this row offset is so we have the row offset plus whatever that number is we can effectively populate this entire area here so it's like the Zero or the or say it's like I don't know 64
and then plus whichever row it's at from the thread index itself which we which we calculate up here um it's going to be that times the K Dimension so it's that's why it's going to stride over as many rows as it needs to and it's going to end up at some certain index and then once we multiply that we know where it's at vertically and then we simply add the inner column index to that so the inner column index Like I said before is going to cap out at 8 right so it's going to cap
out at 8 and it's going to land somewhere here so by doing this we only actually iterate over this four times and each thread spanning you know 32 * 8 CU if you actually do 32 * 8 that's like 2 5 2 5 is 32 and then uh two uh 2 the 3 is 8 so 5 + 3 with our exponent laws that's 2 to the 8 which is int 8 maps to 256 right so that that's how I kind of make Those associations you don't have to follow along but 8 * 32 is 256
look how awesome that is each thread is going to occupy an individual spot in here so we're going to load this Chunk in each thread is going to take a little spot in there 32 * 8 and then we load in the next one each thread takes its own spot so it's like one operation for every single iteration right so we don't have to go sequentially through it each thread is just boom done it's one Instruction same for this same for this same for this and then we just index accordingly we just kind of adjust
it so instead of BK being the being the stride over you know we do we times K so it's able to stride over the entire thing when we're actually loading from the GPU vram um because it's it's actually bigger right so the these matrices are much bigger when we're when they aren't um tiles yet so we have to stride like the whole K Distance instead of just the the the the tile K distance and then same idea applies to um BS right the the the not BS bshar not not that if I get up for
a second and look at what BS looks like it's literally this let me actually get a different marker terrible it's going to be like this go Down this way right that's what that's what BS is going to look like now if we look at if we look at these values inside we have this load offset which is going to iterate up to um up to up to BK right and BK is this remember it's not it's not this part anymore it's it's the side and then this part is BN right because it's K byn as
the B Matrix so when we when we iterate in these Strides it's actually going to end up being um well BN in this case is 128 so it's going to be this uh this stride value is going to be um or stride B sorry is going to be 256 / 128 which is two right as we calculated um down here so it's actually going to stride um it's actually going to stride it's going to stride two right and two times the length of this is actually a quarter right so if you have eight values you
have eight different Eight different rows you split it once now you're in half and there's four rows here and four rows there now if you split it in half again then you have two and two and two and two all that that up adds up to eight so when we actually stride we're just going a quarter of the way down same thing in here we go a quarter of the way quarter quarter right same idea applies here so whatever this stride value is it's going to start at zero and It's going to go up to
six because it's going to it's going to cap out at um it's going to cap up at B whatever BK was in this case is eight and it's just going to stop so it's going to go 0 0 2 4 6 and it's going to stop right then we have this inner row b which is from here and this is just the same idea so inside of this we have the thread idx um in this case it it's just going to max out at 256 and we divide that Number we divide that number by BN
which in this case is 128 and the column is the same idea it's going to go zero all the way up to 128 and then it's going to reset right so it's not just going to iterate every time we stri 128 it's going to to uh it's going to go up it's going to essentially one mod 128 is one 127 28 is 127 right so that's that's literally all it's going to do here um in case you haven't noticed already This is the same idea as here except we're just dealing with kind of like a
a more like very stretched out thing instead of instead of like these nice to look at I candy looking blocks right so the idea here is is that we just go however much we need to in here CU this this total thing is like 128 and 128 that totals up to 256 so it's essentially each thread gets its own little space in there one thread two thread three thread four Thread right they all get their own little piece in there and they're able to load in quarters downwards right that that's that's essentially how we're loading
into Shar memory so just given this new context we're just loading um you know we're just being clever about how we load things so given that we understand how it's everything is loaded into share memory we can go and jump into the next part here and this part is like where Things get a little it's a little funny it's not actually as as intuitive and bad as this part um but it is still a little bit weird with the indexing part so if we jump into this it's we iterate over this idx right and this
idx going back to this is literally just it's it's going to evolve right so idx index0 1 2 and three right they're going they're going inwards like this uh one thread is in charge of this little block at the center um and the Threat the each thread is is responsible for uh loading in a column and a row right one thread takes care of that um now if we look inside of here we load into the registers right so the registers are the extremely fast pieces of storage that are literally right next to the core
in in the in the GPU and so we have this reg M right which is going to load that column in so how do we load this we have to look at this thread row right and to understand everything else Let's go look at thread row here so where is this thread row so it's the thread ID x.x so this could be a maximum of you know 256 and then we divide that by BN / TN right so BN is 128 and TN is 8 so you divide 128 by 8 and that's 16 so we
have 256 divided or 0 to 255 and then whichever one of those it is divide that by 16 right so inside of this we end up having 16 different numbers that could we could be through right so if we look At this original atile Here There are 16 different um There are 16 different rows we could be right and these are just offsets keep in mind we're loading in columns that are eight elements long so we have like 16 16 16 all the way down uh we have this eight times um and each of these
or no sorry 16 times um each each each little column here this little like colored in area you Could say that is going to be eight long right so we essentially are loading in like we go eight that's like that's like a single um that is a single column and then whichever one comes next it's like this is another eight and we go all the way down 16 times and that multiplies up to the total length of M which is 128 so the math is mathing um the same thing applies to thread column right I
mean these are these are square matrices so it's not actually too bad to deal with This um so same idea here um and we end up with some range between 0 and 50 right so if we go back down thread row time TM so TM is uh TM is which uh like TM is essentially eight right so it's going to be whichever thread row we're at so which whichever one of these out of um out of out of 16 are we at and then times um times TM plus I and I is going to be
that little iterator here that goes up to TM Right TM is like that the length of that column or the like yeah you could say the height or the the length of that column it's going to iterate up to I and it's going to put that into the register M right we multiply this whole thing by BK so that we get this offset going because we have to go through this k thing and reset every single time we want to get a new column you can't just go directly down you have to stride one entire
length over to get to the next One and then we add idx to this so This actually becomes very intuitive when we look at it from a glance so hopefully this is sort of hopefully this is sort of making sense in your head um but this idx is just going to evolve us it's going to be that that horizontal offset and then this is the vertical offset right this whole portion here that's the vertical offset um and then we apply the same concept to loading into register n right so let Register n isn't as bad
um because we're actually loading uh we're actually loading horizontally so it's going to be the idx which by the way idx is going downwards now so idx times BN BN is the length of it right so you're going to go down um whichever idx you're at um you're going to go down that many layers and then you're going to do uh whichever whichever thread column you're at so each thread is going to have its own uh it's going to have its own little Section of that right it's going to have it own job cuz the
thread is like loading a specific a specific Square in that tile so thread here thread here thread here thread here it's like yeah each thread has its own thing so we're just worrying about a single thread um thread thread is like you know thread one is like here and then thread 255 is or thread zero is here and then thread 255 is here because it goes to like the Very edge and then the very edge and then they intersect at 256 right that that's how that's how I'm sort of visualizing this now we have this
extra I term which is literally just the horizontal offset so when you when you've like looped around how many whatever amount of do ID EXs you need then you have that additional I which is going to be the offset so you're going to load in the first first element in the row then the second then the third Then the fourth and then the same applies for this column up here which we already did it's just going to do 1 2 3 4 all the way down to eight right and it's going to store this out
in like a register memory like a line and this allows us to easily do product that right so when we drop down to here um this is the entire Loop yellow to Yellow um we start off with the the M component right so thread m is this part and then thread n is this part so this this n Component is actually inside of it now the thread result is calculated as res idx M so whichever however much it is through uh TM right that times TN which is the which is the horizontal stride that you
need to do to get to the next the next um the next row right and then you have this TN as well so TN is how how far along you are so it's or sorry res idx is how far along you are uh so this is going to be your your vertical stride and then this is Going to be the horizontal offset right so that's how that's we mean we're storing it in linear memory but this is this is how we're going to index into it right and then we do whatever that is um and
this keep in mind this is an individual um this an individual grid right say you're you're looking at a point within that grid you're doing um essentially a DOT product across those so you have to iterate through you know eight and then eight again so it's 64 Iterations you have to go through filling up that entire tile um and then you just use you know as you would expect that that value whatever it is so you're just essentially just crossing them you're finding where they intersect and then you're setting whatever this is in that so
it end is just becoming this entire uh Matrix light out it's like instead of being uh loaded like this you just take this row and you attach it to the end and then this attach it to there And then this one it's even further right that's all we're doing there so it's like literally as you would imagine in your head this is how it's working um it's just it's just important to actually highlight like what the indexing is actually doing instead of just trusting that it works it's really important to actually dig deep into what
this is doing under the hood so I encourage you if this doesn't entirely make sense it's very intuitive I Encourage you to test it with your own examples so even just like get a piece of paper write down on a whiteboard whatever you need to do um and just and just sort of write this out and try to visualize it through each step right so you can even set for example TM to and TN to four right you can make it much easier on yourself you don't have to go to the full extent that we're
using with you know our parameters like eight and two 128 here you don't have to even go That far you can be very simple about how you exercise that um but yeah so this is actually how we calculate the the individual thread tile so the This Thread tile this little 2D thing inside of the bigger block tile and we calculate one of those per thread right so 256 threads are laid out um so it's it's like 0 to 16 0 to I think 240 and then over here it's 256 that that it might be like
shifted based on how you're seeing that the picture in my Hand waving but that's the idea is you go from from0 to 256 right let me just make sure everything is uh synced up you know we make sure that all these are done um you know as we're iterating through all these all of these block tiles right we have to go like on the on the bigger matrices A and B we actually have to take these tiles and we have to uh move them closer together right so this is what this whole Loop is doing
we want to Make sure everything is synced up both after the uh shared memory um population so after we we we populate those we want to sync everything and then once we've written once we've written all the results here we also want to sync everything up make sure all the threads are caught up before we you know evolve to the next one and mess with stuff um so then we have this write out um and this isn't actually too bad this part's pretty good so inside of here we iterate Over the same things that we
did here when we were actually calculating uh when we were we were multiplying those those thread rows and columns those little thread tiles and if we just step through this this is actually going to seem a little bit weird at first but if we scroll up remember that we advance everything to the starting position given this thread right or given this block rather so we have these initial terms which are the Blocks these are which tiles we which tile we actually care about within C and this is already stored here so we already know which
tile we actually want to worry about and the the memory address has gone through it's skipped a bunch of spaces through just like integer operations it's been multiplied and added up to the point where it's where we want it and then we just do everything from there so we can if we Stride like an entire length K it'll go here and then the remainder of it and it'll end up back to where it is but just like one one element lower right so that that's really all we're working with here now if we scroll back
down it's literally just like this end term that's that's like the end term um that that's the that's the horizontal part right so that's the part that we're actually striding over so if we have um we're looking at the C Matrix we have thread row times thread M right or or TM which is 8 plus the res index remember we it's the same same idea as as uh as what we did up there and so when we are um it's essentially the same as this except we're doing I instead so you know I is you
could think of i as like up to um you know TM it's like the same idea we're just iterating through that that's Going to be the um offset inside of that tile right so like relative to um relative to the actual SE tow that we're working on this is going to be like the relative off set right um so that's going to be downwards time n right so that's going to give us our our downwards um our downwards movement and then to progress sideways we have the red column time TN right so an individual thread
um individual thread Times times that uh that TN length of eight right so essentially we're going to have a bunch of uh a bunch of threads occupying like a square and those threads are going to um or no not not the threads occupying a square but they're going to occupy the whole thing and then threads are each thread is going to iterate through that TM and TN right and so we have this this vertical offset we have the horizontal offset and then plus that Additional little kick to the right we're going to iter this is
how much we need to actually like stride over like how big steps we we take um and then the initial just like inside of that inside of like one of these steps it's like how much do you actually go forward right how much do you do you add to it and then we just use what we've already computed so thread results um same indexing scheme here this should be fairly intuitive um we just multiply This element wise know for each iteration in the loop and then we have our beta times you know element wise this
which is literally the same same indexing scheme that we use here so hopefully the the block tent kernel sense now we're going to jump into well actually before we actually jump into the uh vectorized kernel I want to run this so if we go sjem we go sjem 04 right this is this is block ping normal this is regular 1D block tiling Right then if we step this up to number five look at this 4800 gig flops on 496 right that's decent but if we step it up to five we double it so if we
do uh python we go at 9162 / 4873 got about 1.9x speed up right which is really good now we compare to the results here um so about about this time 1.9 roughly Is it's pretty close to 70 right so I mean we're we're essentially getting the same results here uh so everything is working out we just doubled the speed by using 2D block tiling instead of 1D and now we're already about 2/3 of the way to kuo Performance we're actually really really high up there so now let's go ahead and continue with vectorized memory
access which is going to give us an additional little performance boost okay awesome so now we have this new Colel to worry about number six on vectorizing the shared memory loads so if we look inside of here essentially we do this we everything in here Remains the Same except we have this new float 4 type right so notice how we have this this float 4 I'm going to just highlight that and see where it shows up so it shows up here when we're loading into uh when we are loading into shared memory right so a
shared and B shared Right this is where it comes up as well as when we're writing out the results so when we're going in from Global vram into shared memory we use float for loads and then when we're writing out from registers we load uh we load with float FL as well right this is what's happening here now before diving in right into this I want to go over and review just like what the heck this float board does there's a lot of terms like reinterpret cast and all this all This weird symbols and stuff
so let's just like go and clarify what this all means I wrote a separate file here called float for. cuu you can write the same thing but I'm just going to go over this kind of Step by Step so we have an array length n right 1 3 4 all floats we have a host input host output we initialize device input and output we K like those with n * size of float we kud M Copy that from host to device host to Device we we you launch this with a uh with a grid size
of one there's a single block and within that block there's a single thread so it's just one thread that's actually being used here now we run this and then we copy back and then we display these based on their indices right so 0 1 2 3 then 0 1 2 3 the inputs and the outputs and now what actually happens inside of here is what we want to pay attention to so we pass this this device input and the device Output in right these are Pointers two arrays um output as well now we have idx
which thread index in this case is going to be zero right it goes from like zero up to whatever the length is minus one and so this is just going to be zero so when we actually look at this this idx pay attention don't don't worry about this yet this idx is going to be Time 4 so 0 * 4 0 * 4 0 * 4 0 * 4 it's just going to be 0 1 2 and three right these are going to be our x y z And W components now let's actually look at
what's happening here so this new float 4 type it's part of the it's part of the Cuda runtime it's part of the well it's not part of the Cuda runtime if we actually look at this it's part of um x86 right Vector types we have this float 4 we have a bunch of different other Vector types that are device built-ins so we can't actually um we cannot actually uh see what these are under the hood they just kind of work For us U if I try to click on these right it's just like that's really
all it is so there's Parts in here a lot of this is built in handled by the compiler Etc and so when we break down what's happening here um we notice that we have a few parts we have this reinterpret cast and Lally all this means is that we're going to reinterpret as this uh in in the actual instructions right so this isn't going to manipulate memory or do Any data Transformations it's literally just going to uh reinterpret as a float 4 that's that's what the it's going to tell the compiler what to do right
and this is going to be a pointer to float 4 right so we're we're transforming uh this essentially so this is a memory address this ENT is a memory address to whichever index we're looking at so in this case it's going to be you know idx * 4 in this case this is just going to be um This is just going to be like idx is z so it's going to be 0 uh 0 * 4 that's just the beginning element right that's literally all all this is is just um we're we're doing input at
index zero and then we're uh we're getting the memory address for that so it's the memory address so the first element in that entire array and then there's the following memory addresses for for the extra ones and then we uh we we we we reinterpret this as a float for pointer So we got the pointer the the memory address here and we're reinterpreting this as a float 4 pointer so we're just going from pointer as a float to pointer as a float 4 and the float 4 uh is just going to contain essentially the starting
index plus an additional uh three afterwards right um and then we just have this stored as as uh index zero uh for this specific data type we don't want to be you know redundant and take up extra Space so we're just going to index zero and then the compiler is going to know what to do with that later on um it's just literally just going to be thex component is going to be index0 Y is going to be index one Z is two and then W is three right so that's that's literally how we have
it laid out how we have this thing laid out here and that's literally all the all the float 4 data type is so hope that that kind of makes sense to you um you know when you read Complex uh when you read kind of like complicated expressions like this it's good to just break it down step by step right so you have this like you have this thing with its open and and it's closed and then you have this thing with it's open and it's closed then this thing with it's open and it's closed you
just kind of see like you do like your order of operations or simplified however you want but yeah hopefully that makes sense and if we can uh I'm Actually going to uh oh sjm CD into Source kernels and then if we go and compile that into float 4 we notice that we get everything as expected right so 1 2 3 4 that is the poost input so that's how we initialized it here um and then the host output which is um exactly how we want everything to be stored um that is all checking out now
this next kernel is really fun Uh it it plays around with some things that are usually played around with and toyed around with when you write really really uh performance optimal crud kernels right so the idea here is like remember how when I showed you before those uh we go back to here and uh I'm going to step out and go to SRC kernels and then we did the we did this one and we saw um we go up we saw the these um like this load this this load instruction the Load. E and then
there was like some load uh 128 so like load 32s and then load 128s right so that that's like the whole that's the whole deal here is we're going to try to make more of these load 128s a single floating Point number is 32 bits and so if we um if we if we make this like a vector type meaning you know we just put multiple numbers with each other in the same type then we can have more and we can load more Things so let's go ahead and actually jump back to uh this part
here and let's explain like what the heck we're doing so in this one we are essentially uh we're essentially taking the a tile so it's like normally vertical so it would be like tilted downwards like the bottom would go here and then this part would go right there we're just transposing it Right and this transposing is going to let us cheat a little bit um we still get the same amount of memory in that shared block except we index it differently and this will allow us to coass memory accesses right so normally we would um
if we go back up we would be taking these and we would be advancing to the right here but notice how um for example like when we're actually loading this in uh our threads are going to be loading in um from like top to Bottom right so we're going to have like a like threads essentially organized in in different pieces and we're going to be iterating downwards to populate this right if you remember how we populated it before um these axises were not CEST but uh the B the B tile the B shared tile um
was CEST because our our threads were uh loading horizontally so when our threads we need like thread one thread 2 thread three thread four those are all next to each other so Cuda is going to Go ahead and load those in um as a like if you have four of them adjacent to each other it's going to load all those in as a single load operation instead of four separate ones so that's what we're aiming for here and the idea here is instead of advancing instead of having this vertical tile and then taking this and
advancing to the and like having idx to the right it's going to be flipped and we're going to iterate downward so our threads are going to be paired like This next to each other and it's going to iterate downward right that's the whole idea there um but what's even more important isn't even how uh they iterate downward that's just what the graphic looks like what it's more so about is how we actually um are able to load from Global into shared right so how do we take the a how do we take the a tile
just on its own and then load that into shared and then populate it like this right so we pop back to here we notice a Few things so first of all this is the same this is the same this is the same but these and these are different right so if we pop down here just pay attention to the inner rows and columns for now so notice here how that this this is actually very familiar but notice how we don't actually have that Loop so if we go back to uh block tiling for example this
two block tiling we were loading uh in four Loops so we had um BM was 128 long and then this load Offset would increase an increments of 32 and it would do four different iterations of the four Loops totaling totaling eight different iterations per thread so each thread was doing eight different instructions or I guess at the high level eight different instructions for uh for moving data around and that's like kind of a bottleneck a little bit so we can actually speed that up and notice here we don't actually have any Loops it's Literally just
we store this temp variable um this is doing this is done once per thread by the way so this is like once per thread um but we essentially we go into we go into a we get this inner row and we essentially just we essentially just find um where exactly uh where exactly this is at and we're going to load this into shared memory as if it's transposed right so for example I have this thing written on the Board here this is the a tile and I drew a little section at the bottom with 1
2 3 and four these are four different values that we're going to count as a float four all right so when we actually transpose this when we do a tile then say t you might not be able to see all those just don't worry about it um we transposes and essentially we're like flipping over over this this dotted line here so these are going to flip over they're Going to go from this to this right those are going to flip across that line and they're going to end up like that what you're going to have
is you're going to have when these when these flip over they're going to be ordered one two I'm sorry bottom bottom I one two three four now don't worry too much about how these are in uh how these are in like a column Format what we do care about is just that we're loading these in a coest manner right so notice how I've kind of Taken like half of this tile here and I've actually done this for a reason so if we if we go ahead and look back at what these inner rows and all
this stuff is saying it's essentially the same as what we had um over over here in 2D block tiling except instead of just BN or BK it's that and then divide by four right so I mean it's it's four for a Reason it's literally because we're just we're just um we're using the float 4 type so if we're going to do uh thread idx which in this case is going to max out at 20 it's going to max out at um say 255 and then BK is 8 so it's going to be 8 / 4
which is 255 / 2 which gives us the indices 0 to 127 now this one on the other hand is going to be um same idea except we're doing the mod right so 255 mod 2 that Means every two times it's going to reset at zero again so we're just going to have the two numbers zero and one essentially this indexing allows us to treat this as a group of four so when we divide that means it's shrinking to a fourth of its length and then when we go down here and multiply by four again
which you'll kind of see the intuition for in a second and when we multiply by four again it's just going to stretch that back out to what it normally used To be so this is just considering uh this little Flo float for indexing scheme we have now if we pop down to this here uh we can see that this I'm actually purposely making this um match our a tile here so notice how we have this inner row a right and inner row a is between 0 and 127 so the row for this tile is between
zero let me put this here for now Z and 127 right so you might not be able to see that but 0 127 this is very long This is like the longer side um and then we have 0 to one so two values for the for the column right column A so 0 to one or or one rather and all this allows us to do is just sort things more easily so notice how we have like uh we have this thing that's normally of size 128 by 8 and 128 by 8 if we actually do
the multiplication for that um that's 1,24 right so 1,24 and and then reduce this number we divide this one by four right that actually reduces the whole thing from 1024 to 256 guess how many threads we have 256 it works out perfectly so each thread is essentially taking its own little one of these right so this is going this is spanning down 127 0 to 127 and this is going 01 and which just like split in half right so you have you have like 1 2 3 4 5 6 7 right eight and we're just
Like splitting this in half and then it's it's spanning the length uh spanning spanning the height downwards right and all we have to do is just store this as a float so this is what we do here we we literally uh take the inner row we do that times case we need to you know stride around and and get back to the same to the same uh to the same column again and then we do plus the inner column A offset this is all in context of like this a tile being Advanced where it needs
to be so we're literally just adding K considering that we're in this bigger Matrix right that's all we need k for everything else is it it just works because we're in the we're just dealing relative to this specific tile as a part of the whole bigger Matrix now inner column we're actually going to stretch this out back to four again because uh because we previously shrunk it right so we just need to expand that back Again and this is just going to index um in the old fashion style right where we where we find the
the vertical offset meaning uh meaning here and then we add that so vertical offset and then we plus to the so we like we find which row we want we multiply by the by the K term and then we get where we want to get and then we Plus for the horizontal offset right and we ex we have to multiply by four to like to actually uh span that entire length right so if you wanted to Go to the very end of The Matrix um if you want to go to the very end of The
Matrix here you'd actually have to take this two term or whatever that is times four and it would it would get you all the way to the end right that's that's the whole idea there um but if we go into this look at the way we store these right this isn't actually too bad so in a shared we have these four different they have these four different stor which is each four different component Of the float 4 variable so we have this x y z and W term this is the first one index zero and
then index one index 2 Etc right so all we're doing there is we're looking at the inner column whichever column that is keep in mind we have this new tile of this shape we're doing it relative to this because this is how we've this is how we're storing everything so we're going to go um the inner column whichever that is so in this case The the column we have to keep in context how we stored column for this one the column in this case is which one of these but since we um since we transposed
it we have to consider the column in the context of here right so it's actually a little bit different so instead of having row as this it's actually column because we interpreted column from this originally that that's kind of what's going on there hopefully that's hopefully that's Easy to understand um and then we have this times 4 which is obviously we're going to stretch it out as we need it to and then whichever index we need to plus right we're storing this as like a as like these these vertical values right so instead of horizontally
laying them out we're storing them vertically and this is why you have this extra index here this one this is going to be like the the the column Offset you could say Um like which which sorry which yeah like which row are you at rather and then the the BM term that is just this and then we move it over here so it's going to stride across as many times as it needs to and then we can add the just inner row uh a part right so so the row originally came from this part and
now we're just flipping it over to this side so we get the actual offset there and that's literally that's literally how we store it it's like literally that easy Um so then we go further and we look at b b shouldn't actually be too hard I'm not even going to explain this it's literally like be we're just explicitly adding memory cols uh memory coling here like if I go back to this um what's it called shouldn't the compiler just be able to colest the second version and generate the 128bit loads um the and then the
reason is that the compiler has no way to verify that the float B Pointer is pass to the kernel um as as 128 bit aligned right which would be a requirement for this so essentially we're just saying like like in the in the previous example where I showed all the Shader assembly there might have been some instances where it did not actually know that it's okay to store as a 128 bit right is it like a float Fort like an implicitly 128bit align type um but in this case we're explicitly passing reinterpret uh cast and
we're We're explicitly setting it to to float for or 128bit and that's promising the compiler that this is aligned right this is telling the compiler you can you can do it what you need to with this we've set this up properly work your magic and we're just helping out the compiler that way so that that's what's happening here same like it's literally this this identical indexing scheme um not really much to to talk about here But uh after this is all done keep in mind this is done once per thread right so we do we
store and then we write right right right and it's just super fast right so don't don't worry about the uh don't worry about how we're writing this we don't actually have to make the rights coess so then the rights don't have to be um you know adjacent like this they can be uh separated like by rows uh and then as long as the reads Are coess that's fine so the reads coming from here and then we're just we're just flipping it over and it's Landing there which is perfect and then we move on to actually
calculating the results of that little of that little thread block the the essentially the thread mini tile within the bigger one and we iterate through with normal. idx right s similar scheme to what we had before except the indexing scheme is a little bit Different um we remember how we we have b as like this this rectangle where it's like this is short and this is this is long right a is the same way now now that we've transposed it a is also like this so instead of a being uh like this it's now flipped
over like this right and so all we have to do is just change up how we index it and that'll work so I'm not even going to go over b b is like very obvious understand but uh going over a right how do we iterate Through this so idx right when we look at this we go um so whichever whichever index we're at we'll just disregard that for now um we'll just say that's zero maybe um and then this since this is multiplying by zero that's going to simplify to zero so it's going to be
uh zero plus and then we'll say uh maybe the whichever thread row it's at um whichever thread row it's at is going it's going to multiply by TM which is Eight so it's going to stride however much it needs to right um and then we simply add I to that right so thread row instead of being here thread row is actually here because it was previously right you can see how that translation works this was thread row this was long this is thread row now now this is long right so it's it's the same idea
it's we're just we're just making the naming a little bit confusing there that that's really all it is we're Just stay consistent with whatever this term means because we have to transpose it right um and then we just iterate through through um through I as we need to right so this should be intuitive I don't really think I need to explain that too much it's just like mainly paying attention to the uh the naming convention so thread Row versus thread column like why are those different um that's because you you're uh Transposing and then you
do the typical write out um so if we go back to this uh up this is all it's doing right right so revolving idx downward all of these all of these threads are sort of next to each other in memory that's why we're striding um TM right TM is that um this is TM so whichever thread row we are at um we're going to stride TM because each thread is going to take care of multiple of those values Um and yeah we end up uh we end up just just sort of looking this a bit
differently uh and then yeah just just some more visual examples instead of having it as like here and then these these like inch these like uh inch forward it's right but this is actually switched over so it's just kind of the transposing spatial reasoning you have to have to get through and then this all like is pretty straightforward um but Yeah now we can actually pop over to the the write out section awesome so we're actually almost done we just have to write out the results now and we have to make sure that these our
these are also uh in this Flo float for types so also uh colest into uh the the uh global view Ram right so we have the the normal um iterate over TM and iterate over TN except we change the iterators a bit differently so in TM the rows we're iterating over we're we're doing we're Iterating up one each time so it's going to go one one one one one right and then for TN we're going plus 4 each time so we have eight values here and we have um we have two values here right so
when you have this total 8 by8 thing you would normally have to do 64 values but because we're doing float 4 We're storing four of those times 16 total right so you can kind of do the math it's like four values time 16 different uh rights um so it's going to do four Values each right for 16 of them and we're going to pop full that full 64 thing across the TM and and TN tile right um so we we set this temporary variable as the current uh C the C the current C value right
so this whatever uh whatever the the the current C is that we care about relative to how we've indexed through these right and this is all keeping in mind to where we are actually at in the entire in the entire C Matrix the entire C Matrix right so The the thread row offset times this plus the res idx um M offset and then all of that times n which is the stride of that and then plus our our columns time TN and then our res idx n this should all make sense this indexing should be
like pretty much Crystal Clear um we've we've done very similar to this already um and a lot of the syntax is also similar to this float 4 we did here so if something doesn't make sense just Look back at this and break things down again that's the easiest way to do it um but in here we have this we have this temp type right and now temp keep in mind this is what C originally was so we can actually store uh things from the existing uh TMP or the temp variable inside of it against we
can actually do more to and then right back inside of it cuz we don't care about the old C result we just want to calculate the new one right so we have this thisx part which Is the index zero so we're not going to add anything and then index one and then two and then three these are all x y z w respectively uh so we have this Alpha term the thread results which is with with respect to the thread results uh variable in the register so it's going to be the res index M so
which which row are you at right and then the um and then TN which is which is how that spans so you're going to stride over and get to whichever row you want then you're Going to offsite offset by this and then based on which Val which index you're at within the float 4 array within that specific the the float 4 window right you're going to add uh these to the actual uh memory addresses or the or the index themselves right store it as like kind of a vector type so uh this way we can
actually get the the value that we want and then we simply just add that to the beta scaler and then multiply that by the existing C value as we got from Up here right so that should be very straightforward um luckily this is only in register so the indexing isn't too complicated uh and then we simply just write back right so using the same idea that we did back here the same indexing scheme uh and we simply uh write write out c um on the level of threads that's Factor memory coing okay awesome so now
uh we can actually just print out how well these do right so we just finished up the Vector the V col colest memory access uh with vectorization kernel let's go ahead and print that out how well does that do so the last one was uh 2D block tiling kernel number five we go and print this out and we get a peak of about um 9,000 so about about 9100 gig flops and this one about 10,800 gigaflops which is quite a big increase from before so that's about what roughly uh 1,600 more Giga flops than before
which is pretty solid right it's like a 15% 16 whatever perc increase in performance um so now let's actually go ahead and print like some more right uh I know the the autot tuning one was good so we go print 09 this one did about 11,000 so relative to this one it did you know moderately better and then we can print out the last one which was kublos so kublos was supposed to be the fastest we can Actually see that this 11,496 is very close to the autotuned kernel right so if we actually look back
to what we previously did which was number six we are very close to coup loss so 10,000 we'll just do 10,800 divided by um 10,800 ID 11 uh 11,496 so we get about 94% uh kuo performance just using the uh vectorized uh uh like the float 4 loading right so that's ridiculously Good and we can still optimize further with these ones right so consider that if we were to optimize these further and maybe use um some additional tricks that you'd find in like research papers like this could actually get really really fast right so that's
uh it's pretty cool that we can do that just on our own hardware and we can actually see it from start to finish and understand it intuitively um the reason I'm not going to go over Anymore is because it's just more and more complexity to dig through as you go through each one um and I want to save some time for the last final project in the course which we're going to do shortly um but yeah I'm not going to cover all of these I just kind of cover the main ones so uh cols memory
access from from Global just like a bump up from naive and then uh all the different tiling variants and then how we can how we can vectorize memory access Right so given that um let's actually go ahead and print out the uh the assembly instructions for this specific kernel so if I pop out of here and go into Source SL kernels do nvcc PTX and then we go number six out and we can just go Um number six. PTX okay so instead of that uh I just remember that we had this main file here which
we can reference so if I just go Ahead and save this if I like take the the title of this and I replace I repl that in here uh and then we go ahead and compile we're going to get our actual uh PTX instructions here so uh it seems like we got some errors which is because if I actually go in here we have to copy this copy it back oh we're getting vim and And so pretty much what happened there was I had it imported properly but we just weren't including the TN at the
end here so I just added that um and now it now it's successfully uh compiled so we get kernel. PTX we open this um and we can go ahead and see um let's see if we can find any the 128's aren't in here so I actually have to go in and uh and change this to Shader assembly we can go ahead and do um n BCC Das will do Arch is SM oh Arch equals sore 86 and then we'll do Q binary um main dosc um and then out and we'll do it main main. Cuda
binary and then we'll go ahead and C object object dump and we'll do main dot key binary just like that we go ahead and move this up and we can see that um if we look for the specific ldg doe instruction ldg do 128 128 128 1288 128 128 and so on and so forth so how cool is that we can actually verify that all of these um may we can find like a 32 in here somewhere oh that's just going to be in uh that's a register that's a register as well that's a register
so we actually do not have any 32-bit loads any 32-bit transfers at all everything is perfect um everything is great how wonderful so now uh now that that kind of makes sense that we are able to literally see what the uh instructions are looking like when we provide optim optimizations um you know we can we can actually we actually feel a lot more confident in our ability it's not just like me telling you that this works and Trusting it it's like you can actually see it this is what is being uh this is what's being
run on the gpus controllers the little microcontrollers inside that issue the instructions right and so if we pop back to here um there's one little thing I wanted to cover it's an extra optimization which is using tensor cores so we go to programming tensor cores um you literally just search it's on the Nvidia blog programming tensor cores in Cuda 9 So Cuda 9 um I mean we already actually have I go here Nvidia SMI we're on Cuda 12.5 so that's fine we don't have to worry about incompatibility issues um but essentially this gives the whole
instruction sets on how to use tensor cores right so um ca9 provides these new features these tensor cores will essentially like for example on the on the Volta architecture you can you can do this where it's like You multiply these two fp16 matrices and then you add another one right the the fuse multiply and add operation we saw previously um except on the level of 4x4 tensors and these are supported in the in the CU loss Library um so two tensor two Cuda libraries that use tensor cores are kublos and CNN right the ones we
ones we covered earlier kublos use tensor course to speed up gem Matrix multiply uh operations and CNN uses it to speed up convolutions and rnns so That's cool but what if we want to write our own what if we want to write our own code that isn't dependent on CU loss right because CU loss we could just call like a separate function but it might not be as slow or we can't like fuse the actual tensor core instructions with a specific kernel that we want to do like for example um flash attention right if we
wanted to write that kublos might not let us do that because it's sort of independent we can't include those calls Inside of kernels um so if we wanted to actually look at how to use that um where did it go scroll down a little bit tensor course and CNN and then um programmatic access to tensor cores and that's where ca 9.0 comes in so we're good um essentially there's this new thing called a um the complete namespace is NV and then in C++ it's like the the W the W MMA um This means warp Matrix
multiply accumulate which I'm not going to go over like exactly what that means nor do I entirely know what's happening under the hood there but um that's that is the tensor core uh operations that we can call right so there's a bunch of examples here I'm not going to go over this part but uh this is just kind of like a nice little um you know dock for understanding how the heck to use tensor core operations and you might you might Might even want to implement those inside of the block tiling kernel right so the
ones that we just wrote you might want to say take like a single thread and have like a thread or a piece of it and try to like block these actual tensor core operations right and make these really really fast so that way it's not just so that way it's not iterating through eight and then iterating through eight more and having 64 total operations to do but rather Just having one right so these are literally going to be organized in a 3D structure inside of the tensor cores on the the GPU um and it's it's
literally just like a a 3D thing or a 2d thing depending on how big Dimensions you're using um because you can do like batch by uh Time by Channel if you're using Transformers or you can do um yeah just there there is there is a lot going on in the hardware but you can actually you can capitalize on those so Anyways I'm not going to ramble on this is this is tensor cores uh you have permission have fun with this um I encourage you to do so I might add some more to this course later
on in the GitHub repo that'll you know sort of talk more about tensor course but this is it okay so we can finally take a breather now matrix multiplication is pretty much finished um there's there's a little bit more that we'll do later on But for now you can consider matrix multiplication finished for the next section or two um now we go into Triton which essentially takes the previous uh takes the previous chapter and says let's abstract that and make it easier to use um so so taking uh you know matrix multiplication or like tiled
optimizations where you're tiling things into blocks and then you know multiplying them together more efficiently we can actually take that And do it in Python with much simpler syntax so this is Triton um Triton is a bit different than Cuda all right so before I actually go into the the whole design here and what Triton is about I want you to pay attention to something so if I go pip install torch you'll see that we get all of these all these all this Nvidia stuff which we've seen before and then we get this Triton Triton
3.0 right and Triton Is used by pie torch under the hood or accelerating and making things faster with python syntax right Tron is also fast just like Cuda and so there there are some differences between them which I thought I should highlight um so if we pop over to the uh pop over to the Triton website search up Triton doc or Trident website or whatever uh this will come up they also have a GitHub as well so the GitHub has you know a lot of uh you know useful stuff um yeah just Playing around with
it so setting up configuring tridon doing custom things uh but you can just PP install tridon like that and it'll work the same way um but if you do look at at the Triton website you'll see a bunch of sections so like how do you install it um tutorials on how to use Triton so there's like a bunch here which I don't necessarily cover in this course but you can you can go over more of these uh if you want to um and then there's the Important ones that we care about so Triton um what
are like the Triton docs there's like jit autotune heris all that um just going through going through functions um and then we get into Triton language which is the most important part of all um we have a bunch of different operations here with tridon and I'll go into the whole design of Tron in a second here but this it just like makes it really easy to see that All of the operations are right here so um like the programming model uh operations to know creation Ops um so if you have like a if you have
an X tensor and you want to make a y but you don't want to populate it with anything or you just want to make it zeros you can say zeros like right as a creation um shape manipulation linear algebra so dot product um pointer Ops uh memory pointer Ops bunch of things math there's a lot of Math Ops reduction Ops so like maximum or you have an array and you're trying to find the maximum of it and you reduce it to just returning a single value uh scan and swort operations atomics like we went on
previously random number generation and Etc right there's there's a lot here even even uh debugging and printing too so try and this is this is where all of the operations are that you're going to find um which makes this really easy to go Through um but if we go through uh where is it introduction yes so the whole idea here and if I go to uh Triton paper yes this one so I'll look at this in a second here but this is essentially what Triton was inspired by is this this paper here for tille neural
net computations like we went on in the previous chapter right um and and this this is the whole idea here is you have scalar Pro Cuda has a scalar program and block threads versus Trent which has a Block program and scal threads it's like okay what does this mean this is super weird um there's a lot of like geometry happening here so like how do we actually break this down um now to clarify the reason why Cuda is a scale scalar program with block threads is because you write a kernel to operate at the level
of threads or scalers in this case so that's why it's a scaler program each individual kernel runs on a Thread um but you need to be aware you need to be implicitly aware that those kernels also operate on the level of groups too so when you have uh like for example shared memory like that's something you need to worry about right um Cuda has Cuda has blocked threads so scalar program it's like the actual kernel that you write and then block threads with the idea of when you actually write the the kernel itself which runs
on a thread It has to be aware of of all the other threads too that that's kind of what I'm getting out there and then Triton is abstracted up to thread blocks so um this this essentially means compiler takes care of all these thread level operations uh for us so when you write something in Triton instead of having it run on each individual thread and have them communicate and be aware of that it's going to write on the level of blocks and all of those like thread Level instructions and optimizations are going to be handled
by the compiler for you so you don't have to actually worry about those um and then when we talk about um when we talk about when we talk about scalar threads it means you don't have to be uh as worried about them talking inter uh like interconnected with each other you don't have to be aware because Cuda actually handles that part so since you're Writing on the level of blocks you don't actually have to worry about interthread Communications you just have to worry about what exactly the block is doing um write the oper out clearly
for that and then TR will actually handle that under the hood so you saw how um there's there's very little operations in the tron do language section this is because the compiler is able to handle a lot of the additional operations that that allow for for performance increases Right um so so that's that's the whole idea behind um that's the whole idea behind Triton and that whole uh blocked versus scalar uh blocked versus blocked and scalar thread philosophy so why can't we just skip Cuda and go straight to Triton why can't we do this well
Tron is an abstraction on top of Cuda so you have lower level stuff that offers optimizations and that you can be explicit about to the Nvidia compiler The nbcc um and Triton takes advantage of those and bumps it up a few layers uh to something that you can sort of understand easily and and write less boiler plate code for so we still need to understand how Cuda Works to ensure that we're applying the right optimizations you can't naively write Triton code without knowing uh what's going on on a low level it just helps helps you
prevent boiler plate Um you also may want to optimize your own kernels in Cuda right so going back to what I said before you kind of need to know the low LEL operations uh in order to make sure that everything is working as intended right um and if you want to build on top of Tri or build things like it or abstract above Cuda which is shr you you need to learn Cuda you need to understand what is Cuda doing so that you can build on top of it so you can Leverage What it contains
Already right um and so if we go to the Triton paper here Intermediate Language and compiler for tile neuronet computations that this is It's essentially just um it it does everything that kublos and and CNN does but does it um roughly as fast and without a ton of boiler plate so that that's like the whole idea is you have these tiled computations that You have to do in kublos and cdnn and it takes care of those so I'm not going to go through this um this is like this is a separate course going through all
of Triton but we're we're going to go over like how how do the basics work right so that you understand um how Triton can be applied um and maybe it'll give you some ideas as to what to do later on okay so now we actually go into an example of a vector Edition kernel in Trine all right so I'm going to try to break this down As kind of as as efficiently as possible uh this stuff isn't too hard it's supposed to be kind of a break from doing uh things like matrix multiplication so uh
you you'll you'll probably find this you'll probably find this is a end up end up being you'll probably find this ends up being a breeze uh so we start off you know we import torch so Triton is very closely linked with torch uh so we we end up using that to to handle some other stuff Like initialize arrays and matrices and stuff we import Triton the Triton language and then shorthand version of that and then we go down further um we initialize uh a seed so that the results are reproducible when we when you randomly
initialize stuff um to ensure that you know we don't get errors or whatever it's a good practice and then we have a size of 2 to the 25 so if we go into here we go uh this is 33 million elements long Right so if we go this 33.5 million elements long um and then we just initialize our X and Y the two two that we're going to add on device that are randomly randomly initialized uh and then we just have some benchmarking stuff down here don't worry about this this is just for testing and
and seeing how perform which we which we'll see in a second here um but going up when we're actually adding them together this is when you when you Do um when you're actually adding them you're going to add X and Y which are tensors and then you're going to return a tensor right so it's just X Plus y return output that's it very simple um this is essentially uh an easier way of doing Cuda Malik so instead of Cuda Malik and C or or CA c c C++ you're going to go tor. empty like so
it's going to have the same shape as X but it's going to be populated with zeros uh we do an assert so we make sure all of Our all of our tensors are on the device we set num elements to literally just num elements of the output so how many what is like the length of this array um and then we have this weird uh configuration of uh of like how we how we actually launch a kernel and how we Define like the the dim three and and the grid size and all that stuff um
so we have a Lambda function here don't worry about this too much by the way this this you care about performance not Not like understanding how the syntax Works under the hood um but this is a just a Lambda function and inside of here all like all you have to worry about is that we're doing a ceiling division of n elements so let's say n elements is like24 you have an array 1024 elements and you want to add them together in blocks and your block size is 256 so what you would do is you would
par that 1024 over four different blocks of size 256 right but if you have say 1,25 elements then you want to make sure that you give it an extra block so that it doesn't miss that element right or else you're not going to get the right answer so you have to actually do a ceiling div um so that it rounds up to five blocks instead of just rounding back down to four because then you'll end up missing that extra one right uh so that's all we're doing here um and then just to launch the kernel
you I know it's you do like this this this uh This function and then you index with this grid term and then you pass in your variables after it's like hm that's weird um but don't don't don't worry about this too much so we just pass in the grid as like that uh those like those like alligator symbols um that's that's all this is that's your kernel launch configuration and then you have the actual parameters themselves so instead of going we just Go we just do that very so it's it's like a syntactical thing right
um anyways that's that that that shouldn't be too much of a question I'm I'm not going over this because we care about performance as opposed to like what the heck what the heck all these what the heck the syntax is um but yeah so so going up to the actual mechanics of a kernel inen and comparing that sort of side by side with with Cuda um we Have we have X we have we have to actually I forgot to say we add this Tron jet decorator at the top to say that we want it to
we want it to be jet compiled by tridon just like be aware of that CU if you don't add this you're going to get errors um but for all the different variables you know you have your X and Y your output your Nom elements and then the block size um which you you know pass into here XY output output elements And elements block size now we have these as pointers because in memory it's going to be it's going to be laid out as the the first element in that array is going to or essentially this
this pointer is going to be the first element in that array so you want to start from the you want to base it off of the start of that entire tensor or array and you want to continue from there right so that's how Triton is going to interpret that uh and then you Do the same for uh y output pointer um and then we just continue on so so jumping down a little bit we see uh p and so P essentially says which which block are we add in the grid right um now we have
to be careful about this so a a good way to think about which block we are in the grid is to actually go down to here and see how does this apply right so when we're actually in this array um let's say block size is 64 and we have 256 elements in this array Um you don't want to just say zero or one or two cuz those are going to be individual elements right when we're looking at the actual data cuz remember this is how we're actually indexing data we want to make sure that uh
we're keeping this block length in mind CU block size is Big right so we're going to advance um block size times the number of blocks and then the offsets are actually what's important so it's like whatever that Number is and then we're going to arrange an additional thing of 02 block size so for like say 64 to 128 you're going to start start the block start is going to be 64 and then we're going to arrange a bunch of different uh indices between 64 uh which essentially just going to be an array of 64 up
to one up to 128 right and uh that's going to that's how we're going to index our data so we do Triton language. a range zero to block size and that's what that is And then we just add whatever block start is to that so hopefully that kind of like makes sense in your head now jumping back to P here you might want to pay attention attention to this term so in here we have axis and Builder don't worry about this just worry about axis so axis is like uh block idx dox right um block
block like X is the same as axis zero a uh block idx Y is the same as axis one and Z is equal to three right so we have to keep this in mind When we're writing more like you know 2D you know 3D spatial uh kernels then we have to keep in mind this access term so luckily right now this is very simple but this is something we're going to want to keep in mind if if would you end up writing uh this is something you want to keep in mind if you end up
writing uh more you know 2D 3D stuff um now going down a little bit um we have this mask term so mask equals offsets mask equals whatever the Boolean Uh I guess the the the Boolean output of whatever uh of if offsets is less than num elements so what this essentially does is we have these offsets which are the indices in the actual arrays itself so the input and the output Point input sorry the X and Y pointers whichever indices we're at in those we want to make sure that those do not surpass uh we
don't we want to make sure those don't do not equal to or uh pass num elements right it's going to be zero up To num elements minus one so we want to make sure that we mask everything off that is num elements or past that point right and that's what this is so mask is just going to be essentially an array it's going to do uh like it's essentially going to uh say you know we have all these offsets we have this giant like array in memory and we're going to see um if like we
have a you know 64 65 67 122 whatever we want to make sure that those numbers are less Than a numb elements right um so we want to essentially just making sure that we're not accessing something that's outside of uh our data structure in memory we have this whole Space we want to keep it masked to this one section right that's what this does and so we get a new array which is mask and that's just a bunch of essentially just a bunch of ones and zeros um and this this behaves the same way that
this if statement does inside of an addition Vector Edition kernel in Cuda right same idea um now going down further um we actually load these efficiently into a shared memory so don't um don't worry about how it actually how Triton handles data how how it you know transfers data that's a that's an optimization that's taken care of for you so just assume that these are going to load in um like starting from the like the beginning of X up to um up to the end so it's going to Essentially just each each point each point
in memory it's going to each each data point in memory it's going to load those in and it's going to do a mask and it's going to say do we want to actually compute these values or not that's what this is doing so whichever point it starts at all the way up to all the different offsets so it's like this point and then it's copied and then all the different offsets um and then you have a mask applied to those as well to Say which ones do we want want to compute so if these ones
are like extra just like compute this section um that that's what that's what this uh load is going to do and it's going to efficiently load this into um shared memory so the the the fast memory on the GPU the one on the actual uh streaming multiprocessor that that's what that's what this is taking care of for you and then we do the exact same thing for y now try and Implement um these blockwise Operations very efficiently so you don't actually need to do any advanced stuff you literally just um have these loaded onto SRAM
and it'll do a uh element wise addition so it'll it'll go through each one and just add together and notice how this is blue instead of red that means like it's taking care of by uh Tron for us so um that's that's literally how you compute the output um and then we just store this back again with another um you know with another with another data Transfer operation find and so that's just going to be the same idea as here so uh the starting place in memory plus you know the offset of all the offset
indices for for that block um the output itself so we're going to just store the output um and then have this mask as we did here and that's how a tri kernel works so hopefully this makes sense feel free to rewatch some parts if they didn't Entirely you know click in your head uh but now we're actually going to jump into the uh softmax Trident function okay so now we jump into softmax and instead of just jumping right into code I'm going to do a manual like hand example with this um so let me delete
that real quick um essentially what we're doing here I have a C file we're just doing this in C to understand What it's doing intuitively um we have an array of floats 1 to three so it it literally just looks like this um x x is that and so we're going to calculate the soft Max of X um so how this typically goes is if we search this up on uh on Google soft Max activation function it looks like this right so you have this exponentiate this input so you have an input Vector um and
this this this Symbol is a softmax function and you go over each one uh and then you essentially see how much each exponentiated value contributes to the total uh the total sum of all the exponential all the exponentiated values right so if we do if we open here uh if I just open I python if we import math and go say we go math.exp of 1.0 we're going to get 2.71 because that's what e is right it's going to be E to the 1 um so our first value is going to be uh 2.71 and
then the second one is going to be two so 7 say 7.39 and then the third one number uh three is going to be 20.1 roughly now we sum these Al together so it's trying to autocomplete for me 2.71 + 7.39 + 20.1 0 and we get 30.2 right now in order to get the Actual softmax output we see how much each of these each of these exponentiated values contributes to the exponentiated sum of all of them um well not exponentiated sum but when you exponentiate all of them you take the sum of those which
is 32.2 or 30.2 and then you you see how much each contributes so 2.71 / 30.2 so that about 9% roughly so we're going to go um 0.09 Um and then we go 7.39 is 0.24 and then the last one's going to be 67 if we go and do it uh if you round up it's 67 so you have that right and then if we add these all these numbers together 0.0 09 + 0.24 + 0.67 you get 1.0 right and these are all rounded of course um but but but the point here is this
is the softmax notice how we had this this initial distribution here and then we went to a New one which kind of just made everything add up to one and uh gave it a bit of gave it a bit of extra weight to the three right so notice how like a like three is three times that 1.0 um the 6.67 is way more than 3 times uh 0.09 so you kind of have that extra waiting for the bigger values right and that's what the softmax does um so it's going to like essentially find like the
biggest number and and um put a lot of weight on It or highlight it the most um but there is a flaw with this approach and I'm going to explain this right now so essentially the flaw here is if you have say um if you have X as say 1 1,000 zero and uh negative 1,000 right so some of these the sum of these is zero right you have You have a problem with that and and that essentially means this is is going to um this is going to contribute a big chunk of this or
at least it's supposed to It's supposed to contribute all of it um but it's not going to because you cannot contribute like it just doesn't make sense how can you contribute like what what percentage does a th contribute to zero it's like Infinity right so if you end up doing softmax on this um like even if you try to math. Exp of 1,000 you're going to get math out of overflow error math range error because it's just too big of a number right so what you can actually do is you can subtract by the max
of of all of these right so we can see um what is the maximum uh what is the maximum number here so the biggest one is a th and so what we can do is we can subtract each number by that value so we go we can say x we'll just say like X2 Equals um 0 and then 0 - 1,000 is th000 and then 1,00 minus th000 is 2,000 right and so if we go um we go math.exp of zero notice we get one math. exp of 1000 is going to give us well pretty
close to zero it's not quite going to be zero but it's going to be very very it's going to be a very small number right and then of course the same Thing with 2,000 is just going to be the same right it's going to be very small and so you notice how if we if we originally just if we just did this one normally using these big numbers would have actually given us errors so we can subtract by the max we can we can um you know pointwise subtract by the max number and then we
get something that makes more sense so you know zero contributes to all of it because that's what the that's what the the sum Is and so this is how we actually follow through in the softmax function in C so we have three separate for Loops here the first one finds the max value in the array so we just set the initial max value to be the first number and then we iterate through this uh starting at the next number we don't want to start at the first we don't want to start at the first one
we started the one after it cuz we already we already know what this one is um and we essentially just Compare if if the new one is bigger than the max we set the max to that one um and we end up with this this Max term which you know same as we did up here and then we have this we have the accumulation sum so we iterate through the length of the array and we do that index minus the maximum and then we we add that total to the sum right we we add whatever
this was to the sum so that we can you know accumulate all of it and then we just write out Um we just write out the same value we we essentially just take the input and then replace it one by one uh and we set it to uh whatever that exponentiated value is uh minus uh or sorry not minus but we we have that exponen exponentiated value we divide that by the sum uh very simple I probably could have explained that in in a bit shorter time but I just want you to like gain the
int intuition for that you've probably already written the soft Max and Pi torch and nump I get that uh but just to kind of provide that review as to how it works under the hood and this uh you know numerical stability add-on we have um so now I have an example in uh Cuda as well so I'm not going to go over this um but the idea here is uh in Cuda mean yes you could just you could do um you could go over you know the length of one single array but in deep learning
you're not actually trying to do that You're typically going to have a batch size and this batch size is going to have like a bunch of these it's going to be a batch of arrays that you're going to softmax right and you're going to do the softmax on them rowwise you're going to do here here here uh right instead of just like to each element so it's going to go through the rows and this is where we can actually get a speed up from Cuda because we can give each each of the threads we know
we have batch size many Threads and we give each of them uh we give each of them a softmax job right so we see in here how we see in here how we actually give one to each um we we we give each we give each thread a separate softmax drop that's going to go it's going to span 1,24 iterations or goes up to the length of n right as we can see in these so like theoretically it's going to take 3 n iteration because has to go three Different for Loops um that's that's kind
of how that works there so we want to we want to pay attention to batch sizes right um but there's there's an example in in Cuda here which you can look over on your own and and get an in intuition for the batch St Max but it's very similar to the one we didn't see now we jump into the one in Triton okay so now we actually go into the uh softmax Trion kernel itself uh a little bit more advanced in Vector Edition but We're going to go through step by step so we obviously import
at the top I'm going to go sort of from the bottom here explain what's happening and then what we're going as we're calculating the the output um so we set our manual seed we make a random uh normally uh normally distributed random tensor of floats um so mean zero and variance one so it's a normal distribution and all of the uh essentially the shape is is batch size by um by n so B by n batch size is 256 n is 1,24 elements long we're just going to softmax um those 1024 element rows uh and
we're going to do this on Cuda now we're going to calculate and make sure that torch and TR now put the same thing so typically you would do torch. softmax or or f. soft Max or whatever and then you would go um Dem equals 1 right and then we want to do that same thing for Trident and then make sure that um you know the max value isn't too ridiculous we're going to Print that out then we're going to make sure that this is this is all close with torch all close right um so we
do the Triton Triton softmax we go here and in here we have uh rows and columns so when we print out um I'm just going to print out uh input shape so we go here input shape is as we want right um output we're just going to do a malic essentially right there and then uh instead of doing some weird like meta Parameter uh like doing like the whole like Lambda function calculating we're just going to do Tron and then next power of two so what this says is it Returns the smallest Power of Two
greater than or equal to n so similar to what we were doing before but just a little simpler um and then we're going to we're going to set block size equal to the minimum of 1024 and this right um so you can kind of see how we you can kind of see why we why we would do that Now we set our grid to n rows because in our grid we want a block for each row right when we're processing in parallel we want we we can't uh we can't split a single row amongst multiple
um or at least naively we can't split it across multiple threads so we' want to do it uh for each block so each different um each different row would get its own block essentially and that's how we launch the grid here um and then you could assume that you know why we have this um why we Have this trailing is just that the the trailing Dimensions you can just assume are one right and so that's how like Pi torch shap shapes work if you do like batch comma it'll be like B by one and so
it'll just be like a column Vector sort of you you could think of it that way uh and then the softmax kernel we do this we call this the same way as we did Vector ad except we add two more things in so we add in this x. stride this this is just an input parameter to what What's going to be upstairs here so we got x. stride which is the essentially the The Stride of of the row so we when we um when we go across it's like it's stacked in memory it's like Row
one row two Row three row four right um but the stride is like how far do you have to go to wrap around to a new one so when we say we want to go to row four um you actually have to go okay well what is the what is the strride right how long do you have to go across to get to the Next one it's like essentially the length um and that's you know we we we we could say n columns but we're just going to use the um you know objective attribute x.
stride um passing and columns and then block size right so we go up and we see that we get the uh where did it go output X stride stride and columns and then block size uh output input stride stride and columns block size now we do the same we we we do the Same like pram ID and and the the start pointers the same way um we calculate this normally so which block are we at right and then we have to advance a number of indices forward in memory so it's like we we essentially we
take the initial uh input pointer so where does it start at where does where does a starting place in memory and then uh we add that to we we we take that and then we plus uh row idx so which row is it times the Length of the row right so then we can get which row where is the starting row within that batch right so which row do we want to go to and then this whole thing is actually in the bigger picture which is the whole memory right that's that's what we're doing there
and then same idea for the output uh start pointer so we're essentially just finding the place in memory where we start based on based on these three um and then we load in so uh you know we do The typical load so uh pointer and then we want to uh load in all of the indices so similar to how we were doing it before and then our mask is uh we're just going to make sure that this is smaller than n columns um right making sure that we don't go out of bounds and then this
this important term other is is a bit critical as well so this other term means that if you have um for Example if you have 1,000 elements in a row and the block size is24 so it's going to be a bit longer um then that means you're going to process some additional elements it's going to think that there's 24 extra ones at the end so what you can do I mean this is not this is not going to happen in our case because we've very objective about how we Define things but in some cases this
will be important to pay attention to where um you actually want to explicitly Set the edge so that it doesn't mess up everything else right if that was like one for example then in our whole softmax calculation that would contribute to it quite significantly because it's you know it's it's not just like massive sparse integers it's like a it's like decimal places that are around zero right um so it's important to do this when when we exponentiate when you do um if we go into uh python here Import uh import math we go Um can
just say x xal negative float and then INF right and then we go um math.exp X we notice that we get zero right where we we did math. exp of one we would get we would get this number so we just want to make sure that that is not contributing anything at all that that's all we're doing there um so all the other additional values if They happen we don't want those to contribute at all just kind of a safety thing it's good to look out for this um and then we just do the the
the normal s softmax calculation which is actually only takes four lines um so we calculate the max across across you know that row and then we get the numerator which is remember we we subtract the Max from that uh we exponentiate this so we exponentiate whatever that whatever that result Is and then we get the denominator which is a sum across each individual each individual one so there there's going to be some sum number and then we're going to do essentially this array it's going to be an array of elements and we're going to divide
this by a scalar value so it's going to just like take this and it's going to divide divide divide divide divide right and it's and that's how we get our softmax output and then we'll See that we store this um similar to how we actually loaded things in in initially so instead of the row starting pointer it's the out row starting pointer same idea um we want to store a value which is the softmax output which is what we calculated here so that's the actual value uh inside of it um and then our mask is
same as as we did up here so we we want to make sure that we're not uh doing reads and wrs out of bounds right and that's that's Pretty much the entire softx calculation in Triton so you know I encourage you to uh you know play around with this you can do you can actually do um you can actually go uh t. device print and then we can go um like P and then just put like row idx or we could do row idx like this and we can actually print that out so you know
maximum difference between TR TR pytorch and Tron results Is is very small results are close is true um and then we can see each each individual one of these so like P ID is you know 255 this is in the X Dimension right so if you had like a you had like a um this is Axis so we do axis Z same thing we access of one then you know this would be on this on this spot instead of instead of X right so yeah we we print out whatever that value is and we get
uh we we can Print stuff out in the terminal if I do like normal just like save now it might be a good idea to actually dig into pytorch or not even dig into it but rather understand how you can add on top of it make things a little bit faster uh for your own custom use cases and whatnot so we just finished off the Trident chapter uh I hope you enjoyed that but now we're going to go a little bit more into Python and more on the torch side so I've written a few files
here I have some descriptions about what's going on uh what's going on with all these like different types and names and stuff in uh in the readme as well as some intuitive examples of what we're going to be looking at I wrote a setup script for just compiling a separate Pythor extension uh a separate function that we're going to use to do a polinomial it's very simple operation um and then uh a Cuda script That is going to uh compile and bind into pytorch so that we can actually use it um in Python and then
the python script itself which we Benchmark against uh naive pytorch so just all we're really doing here is x^2 + x + 1 that's all we're doing so going here we have this include and this is giving us errors but don't worry about this uh when we set up it's going to actually uh it's going to handle this properly so we don't actually need um a dedicated Include file or or any arguments for this we don't need to specify where the extension. H file is um but going into the actual kernel itself um so just
like top to bottom we have this new thing called a template I didn't go over this yet but uh well I I did I I guess I did in the uh in the manal section but uh template is it essentially if we go down it'll help if if we kind of go down and and look at where this supplies um so when We call this kernel we do this and then we provide our arguments right we have the kernel configuration here and then we have this this this is where the template comes in so we
specify this scaler t type and that essentially means um we're just going to make sure that this uh the X the y or the the input the output uh are of this type and so this type is essentially going to be handled by P torch and instead of specifying like a Float or or a double or like I don't know some other some other like maybe quantize like fp16 type um it's going to handle that for us and it's going to just automatically recognize which one it is and it's going to compile that down and
deal with it appropriately so this is something built into py torch and it's custom type that we have uh so this is kind of just like the default to use here um easiest and then we have this restrict so restrict in short Essentially means we're not going to be overlapping memory uh we're not going to be overlapping memory accesses so we have uh we have X here we have an output here all we're doing is we're doing an operation on this thing and then we're storing that in here um we're not we're not mixing things
over we're not doing two things on like the same location and then having some output that's stored we're not doing anything messy like that so we can just say restrict and that'll Allow the compiler to aggressively optimize U essentially what the binary code code is um and so in here we we simply just do a uh we do this over the X Dimension the typical Kuda kernel indexing um and then we do you know the square the plus and then the plus one so uh that's the I mean the the kernel is surprisingly simple there's
just some new colors and new keywords to pay attention uh to pay attention for but uh then we scroll down a bit and then we Got some C++ syntax going on what the heck does this do well we have this Auto which essentially figures out like which which type to this to so it's going to recognize that this is going to be some torch type and it's going to automatically select that and this is just torch. empty like so it's going to have the same shape as X the input um which is a torch tensor
type so Auto is going to recognize it's going essentially going to uh it's going to It's going to do this we'll just leave it as Auto for now because it looks nicer um and then we have our threads which the typical 10,24 threads per block as per the maximum and then we have our you know numb elements plus threads minus one divided by number of threads so this is the typical we already went over this this should be very trivial stuff um and then we have um essentially just some some extra stuff about Uh how
the kernel is going to be called so which which what things are we feeding into it um we return an output based on that um and then down here we just have our are python bindings so uh don't worry about this too much just kind of trust the process um I can kind of read off of like what I was able to uh find about this exactly so um Pi bind 11 module this this is a macro that defines the entry point for the python module um Torch extension name uh is it's a macro defined
by pytorch that expands to the name of the extension so usually defined from the setup.py file over here then we have an m and an m.de so that adds a new function to the module so the first argument polinomial activation uh is the name of the function in Python so that's the function we end up calling be P polinomial activation open close Parentheses um the polinomial activation Cuda pointer uh or it is it is a pointer to the C++ function to be called and then the last argument is a dock string for the function so
this it's just like a a simple doc string it's not like entirely required but we we put it there anyways so anyways this is the this is the full Cuda script this is essentially as simple as it gets you can't really do Anything more simple than this uh so this is kind of like a template you can work off of and then in here we uh we import our compiled polinomial Cuda function which we'll compile in a second here we have a class so we use torch autograd and by default when we when we when
we do an autograd when we do an autograd function we have to include a forward and backward method um these are both going to be static so we just add this decorator that says this is Compiled elsewhere um and then forward we're going to do um just this polinomial Activation so comes from the bin error that we compiled and then uh polinomial activation of X right as we said before and then backward uh backward we just don't support it yet so we could just say not not implemented error backward pass not implemented um and then
in here where we actually do our n and do module the py should be familiar to of course this this should Look this should be super easy to understand um from a from a separate standpoint um but we just do the init we do the forward in here we we say you know implementation is going to be the P we just set it to a string P Tor so it's kind of easy to read um and then if the implementation is p torch we do this raw and if it's not then we do this uh
if if it's Cuda then we do this this other one which we specified up here so it's going to do this Um and it's going to apply that to X and then else we just we just say oh if you did like uh if you like missed the T it' be like oh you Pi orch is not implemented right unknown implementation and then so we go down and let's just go to the main function first then to the Benchmark so in here random seed normally distributed random tensor on device implementation on pytorch Implementation on Cuda
we move these to the device so to Cuda this is just like essentially uh saying that this function is going to be executed on that you should have probably seen this before it's not too bad um and then we do um we can actually just print out uh whatever that input was um and then here we do um like here we we essentially just Benchmark so we go um the actual activation function itself the input we're doing it on Um and then just a string that we're going to print in the uh in the name
here so here we just set a time we go for a number of runs uh and then we we we Cuda synchronize so we ensure everything is all caught up and then we end the time and then we essentially return the name so whatever whichever these it was um the the Delta time so like the essentially the not the Delta time but the difference um and then we divide That by the number of runs because we're doing an average times a th so that we can get it in milliseconds format um and that just that
just kind of works as we expected to now to actually compile this um we go to uh we go to the read me and literally all you have to do is just python uh setup.py install give that a second it's going to use ninja to build um so we'll we'll give that a moment um but this is going to create see a build A build build folder in here and we'll print out um forward and backward in a second we're going we're going to print both of these so okay awesome it just it just wrote
that out so now we can go ahead and python polinomial activation and it'll it'll do these this Cuda activation. forward of x uh and then it'll print whatever that output was and so we get like a tensor and it it actually formats this properly which You're like oh my gosh we just we wrote this in in in Cuda and c and now it prints so nicely like this yeah that's what pytorch does for you um and then we see that the pytorch built-in gets about 10.47 milliseconds over uh over a th000 runs on average and
then the Cuda extension gets about 0.0 243 milliseconds so if we actually compare these so if I go um this divided by uh this we will see The speed up that we get from kud so we get about a 431x speed up which is pretty good if you ask me especially on bigger tensors right this would be awesome uh so so that's that and if we actually do a DOT backward here you'll see that it's both you know it changed to White so that that's a good good sign that it doesn't work and if we
actually run this it'll say uh has no attribute backward right um so essentially raise the attribute Error um doesn't work and then we default back to forward and it'll pop back to this to this nn. module uh awesome okay so that's uh that's pytorch extensions for you you can feel free to add whatever you want to this um so you know if you have your own custom like research that you want to add and make it super easy for others and and yourself and your organization to use uh totally feel free to go down this
route copy this copy This template code do whatever you want with it um this is just the easy the easiest example I found um to both you know write and explain so uh yeah that's that uh that is pretty much the first the first uh I don't even know I'm not going to unify a percent but that was the majority of the course now we actually have a final project to go into so this final project is super exciting and it's going to help you understand uh neural networks from scratch how to Optimize them for
performance um as well as like data loaders we're going to add a bunch of things a bunch of optimizations into making a real world training run work I am so so excited for this part in this last section of the course we're going to be doing the final project this final project is awesome we're going to do an mnist MLP training run from scratch it's going to go in the following order we're going to start in Python pytorch super easy right then we're going to go to numpy make it a little harder but understand what's
going on under the hood and then we're going to go take our numpy code and Port that over to C right it's going to run on CPU it's going to be super easy to read and comprehend and understand right then we're going to push that over to Cuda and then we're going to rank it fast in Cuda awesome so navigate over to this folder we're going to do a Different one so it's not going to be uh SL Cuda course it's going to be slash mnus Cuda is like a just a separate thing to help
organize things better maybe you want to show this to a friend or whatever or or present as someone and this way you can kind of just have things separated out and neatly organized right so you can consider this as like kind of a separate part we're just kind of building on what we did previously uh so if we copy this we're Going to go ahead and actually clone this into uh a new directory and I'll kind of walk you through how things are going to go so I'll go ahead and full screen this up sure
already saved now I'm going to CD into that going to go uh UV VNV just like that I'm going to activate this I just create like a python virtual environment that's all I really did there uh and then we're going to go pip uh UV pip install d r Requirements and it's going to go ahead and install everything that we need um okay sweet now we're going to pop into the uh we're actually just going to open this up in vs code go ahead and do that um now if we pop into the uh let
me full screen this perfect okay so if we go into this python folder just to like help you navigate the structure of this so we're we're going to what we're going to do is we're going to progress up from uh python so we're going to go through Pytorch uh as seen in here uh so that pretty much just like an entire P torch training run for a multi-layer perceptron uh and then a little Jupiter notebook that's like the same as that uh but just in a notebook format instead and then we have a numpy script
so just uh going through and writing everything from scratch and numpy um this may not look the same by the time you're watching this but it'll be Very similar and very easy to understand um at least for the python stuff so I mean you you've probably already written some pytorch already or at least you understand like the basic you know nn. linear layer right you probably understand that already so all we're actually doing in this one and this is what I'm going to demo initially is we're just uh we're literally just training an mnist MLP
from scratch using basic Pi torch so I import everything Initially so like time nump torch right uh the data loader and the torch vision for the data set itself which is mest um we specify hybrid parameters here so um you know learning rate uh batch size number of epoch I think there's like an extra one here I don't know why that's there um you know train size for like number of elements in the train set and then we're going to go and adjust this data directory uh just print this out Actually take that inject it
into here and we'll go slash SL python all right now uh sure SL data why not now this is going to make sure that we're using tf32 so that's going to use tensor cores and make things really fast um this is going to initialize the data set properly with like you know mean and standard deviation um this is just kind of the best the best practice for mnus So a lot of this here I'm kind of just following uh some boiler plate uh code template examples that kind of thing uh and now we go down
further and it's you know we initialize our data sets we initialize our loaders we load in all of the data uh and we have this exist on the CPU so notice how we're not doing um device equals Cuda or do Cuda yet we're not doing that this is this just exists on CPU right uh system Ram so we load all of our train get in Right Lo of our test data in we we're just printing some stuff at each step here it per Epoch so per epoch we're going to do train size which is 10,000
divided by batch size which in this case is four so it's going to be about 2,500 iterations per Epoch and we're going to do uh three different epochs so 7,500 uh steps total now we go down further and we have the actual architecture for this itself right um so we take in we take in an X Which is our which is our input we reshape this to batch size by 784 um we do our first layer second layer third right so it's just like mat one activation m 2 and this is organized as such um
in features hidden features hidden hidden features and then the output Dimension or num class uh we have our in feature set to 784 so uh this way it's going to be like a like a batch size by um batch size is the X and then weight is going to be 784 By 256 right so that's what that's that's the shape of this it's going to multiply by this linear layer and then we have the rally which is going to take that and it's going to do the Rue activation on it you can search that up
if you don't know what that is already it's very very basic to understand um it's literally just a graph and in. linear same idea we're going to take that previous um batch size by hidden features we're going to Multiply that by a hidden featur feachers by num classes and we're going to end up with B by num classes right or B by output Dimension whatever you want to say right and that's the idea is we just want to keep forward and back propagating through that and making the network smarter we're going to go Ahad and
transfer the model to Cuda we're going to we can do we can do torw compile for a faster version but we're not going to do that just because It like takes a little bit of extra time to do that um we're going to use cross entropy lws for this for the entire project here cross entropy loss is is critical to uh understand um I'm going to go over some of this as well like don't worry if this doesn't make sense yet we're going to like literally write this in C so don't worry if this doesn't
entirely make sense I'm just kind of giving you the rundown as to like what everything is based off of We're going to use stochastic gradient descent so that's just your literally your Optimizer so it's going to just nudge the uh you know when you calculate like a gradient or the S so the error for a given weight uh it's going to just literally do learning rate times that and then subtract that result from the from the actual weight itself so uh stochastic rate in a sense sounds comple uh complicated but it's not it it's not
that bad uh and then we Just have our training Loop here um and I'll I'll I'll go through sort of more intimately what this means in the in the numpy script in a second here here but all that matters is that we kind of understand uh this boiler plate this is designed to be like quite minimalistic um just kind of match what we're doing everywhere else and uh yeah I'm not going to highlight this too much but we'll go ahead and run this uh just just for just for fun you know CD into there We'll
do python forch reference and literally what this is going to do it's just going to install our nness data so notice how we got it in the python data directory um awesome so now it's initializing everything it's loading all the data um so we can see this this is learning over three Epoch total of 25 200 each and we end up with an average batch accuracy of 90% which is really good so when it's classifying those digits it's getting About n out of 10 of those guesses correct which is really good uh and we can
see that by the loss here right the loss is if I move this up the loss we start from you know loading everything in start from a loss of about 2.38 which if we pop into um if we pop into Chrome here go to go to wol from alpha just to like provide a reference um exp of -2. was it 2.38 that's about 0.92 if it's like if We round down and say -2.3 it's about uh 0.1 which if you convert that to a percentage is about 10% accuracy which is exactly what we want they
their images arranged or or the labels are between zero and N9 so zero like literally there's 10 values there so there should be at initialization a 10% chance of getting one correct because it's randomly initialized right right um and so that's exactly what we want everything is initialized properly there Um now before I actually go into uh the numpy implementation like numpy is like taking P torch and seeing like what the heck that's doing under the hood um just like kind of a from scratch approach I would recommend that you pause the video right now
and watch um Andre carpo's micro guide video so he made this micro guide video about two years ago it's done really really well and it literally just explains the concept of back propagation on the level of scalar Values so in this one we're using the uh we're using back propagation on the level of tensors but understanding this uh is crucial for moving up the tensors so after after you're done this and it's like still a little bit confusing about how we're going to bring this up to like bigger matrices I would recommend that you uh
also take a peek at my back propagation video this is just on on my YouTube channel here Elliot codes um about right now 5.7 th000 subscribers You should be able to find me um and I just kind of made like a funny title um because back propagation is annoying to understand sometimes and so I I did a I tried to do my best job to break down uh what the heck that means on the on the level of tensors on the Whiteboard um this does have this does have uh 1440p quality so you can actually
you can you can see stuff um but yeah and then there there's just like a ton of like content that you can watch right I don't Encourage you to just like consume all the content out there but these are the three that I thought were the easiest uh to like build an intuition on what back propagation is um we're going to be going over back propagation as well um but this is uh this is like where you want to start from if this is like a completely foreign concept to you um so Entre aroy does
really good I I go above Andre arpo um lecture and go up to tensors and then Three blue and brown which you you've probably heard of already uh does does a a quick little lecture on uh on back propagation intuitively so let's go Ahad and jump into numpy okay awesome so now uh let's go Ahad and take a look at what exactly this diagram is supposed to be um I could I could walk through and sort of just like explain what's going down uh like what essentially what is happening Step by step in here but
first I want to make this obvious how our neuronet architecture is structured and how the neurons actually work right what is a neuron that type of thing um so I drew this little diagram to help us understand what's happening and I'm going to lay this out here so we essentially take an image this is the uh hand handwritten digit it's 28 by 28 and we're going to have this in a batch right so it's going to be 28 by 28 and Then depth be our batch batch size you could say um just a bunch of
panes essentially layered on top of each other we flatten these so 28 * 28 that's going to is going to have this this whole image and we're going to take a row and we're just going to add it to the end until it stretches out to the full length it's going to be 28 of these rows that are added to the edge right and then we we plug this into the first weight so X1 * W1 that's going to be b b By 784 so B by 784 and then times 7 84 by 256 so
a column uh the the the the size of a column in the weight Matrix is 784 and then the length of a row in X is also the 784 so it's going to layer on top of those right um and we're going to end up with P by 256 then we go to the next one and we get this we essentially just feed this through the Rue so it's going to just it's going to do the the rally Function on each value pretty simple then we do X2 * W2 and that's going to do B
by 256 which was output from The Rue it's going to Matrix multiply that with 256 by 10 10 is our output size right so we have this B by headden size which is 256 that's each uh that's each neuron output that's that's uh that's essentially how many um neurons we have is 256 in our in our in our hidden layer there and then we just have to ensure that broadcasting is done correctly so Uh I mean you could always you could pop over to like pytorch uh broadcasting broadcast rules broadcasting semantics here so this is
pretty much just how you're allowed to like multiply things and and do operations with tensors when they're certain sizes right so um you know if you haven't gone through this already it's it probably is a good idea um it's not too hard to learn pytor handles this stuff pretty well so it's just a little Short short read to do just kind of understand like what's happening there but um essentially you just want to make sure those inner values are the same and then the outer ones are going to be your output shape right so we
have this B this B by 256 and then the the 256 here is going to just it's going to do product it's going to take each column and do product there and you're going to end up with a total of uh 10 values for each batch element right and this is Essentially uh this this this 10 here is a distribution of probabilities so prob probability distribution in batches and in in a batch um and those are going to be our predictions the probability of which digit it is so if the screen says like a zero
um then what's going to happen after our network is really smart is the if we go to say any batch element so any any essentially row and we go to the first the zero with index in that um that's Most likely going to be the highest number in the entire distribution right that's kind of what's going there um and then we just do the a loss function on this called cross entropy loss which I'll explain in a second CR cross entropy loss isn't too bad um it's different than MSE loss but it's better for batches
and kind of what we're doing here um so we get our loss which initially is going to be around 2.3 um based on the wol from alpha based on the W wol from alpha calculation you can do right where you go exp uh like exponentiate negative uh Negative X so um exponentiate negative 2.3 you get about 0.1 for that um which is 10% accuracy and then you do the derivative of the loss which is just going to essentially element wise subtract the softmax probabilities by the true one hot probabilities and I'll explain those as well
what one hot means and then we Just back propagate right so this is kind of the forward pass here where we go um matl one activation m 2 calculate the loss and then we backwards this way um so we do derivative derivative of the loss and then we do our chain roll back propagation so we calculate dw2 and that's just going to be uh keep in mind the gradient of the weight is supposed to match the shape of the weight itself so notice how W2 here was 26 256 by 10 Here we do 256x B
matal that with B by 10 and so we end up with the Dimensions 256x 10 and that matches up um then we do dx2 which is needed for you know continually back prop back propagating through the Rue out layer um and so here it's literally just taking the dx2 and then uh doing an element wise multiplication with the with the derivative of the r function of X so whatever the whatever the um the input was into That and then we end up with the same shape that we got here we simply plug this we plug
this Rue out into both of these we don't actually need to do it for dx1 but it's just kind of here just in case in case you have like a deeper Network and you want to modify things um but dw1 it's going to be so x x1. t right so we're transposing X1 X1 is over here so just flipping those flipping those Dimensions instead of being B by 784 It's now going to be um 784 by B so you have each column is an image right instead of each row being an image um we we
we map that with B by 256 which was the Rue output so that's like the the last output uh gradient um and then we get our our our weight value right so uh and then from here we pretty much just uh modify the the weights value we get the same shape there so that kind of checks out and then dx1 I mean we don't actually Need dx1 here but I include it uh just in case um kind of the point there is uh you know dx1 relies on uh on W1 so uh we we we
don't actually need to like update anything for this it's just if there was like a a dw0 if there was like a layer before that um cuz notice how uh sorry notice how this Ru layer relies on this right so if you had like a like if we had a Ru um if we had a ra layer like before this if we had a rail Layer somewhere in here then you would actually need to like dx0 for example and dw0 you would actually need to uh use this but since we're not we can kind of
just understand that it's something you would have if it was a deeper network but you don't actually need it to make the network improve in performance right it's just like an extra calculation that's redundant so you you can just kind of exclude it unless you want to modify it um but I'm Not going to ramble on about that for too long let's actually get to what the heck these neurons are doing all right so I got this little like editor open here it's like my first time using it but essentially what's what's H how a
neuron works is we're going to just like zoom in how a neuron works is we're going to take a bunch of X values all right so X1 X2 X3 and uh these are going to go see These are going forward uh into a neuron right what's going to happen here is these are going to go um maybe I should draw these a little better so this is our neuron here we're just going to put a plus there and you'll understand why in a second this neuron is g to have a bunch of different weights okay
this neuron is g to have this neuron is gonna have one one weight for each of these X values so w W1 W2 and W3 and all this is going to do is just going to do product these so it's going to go W1 X1 plus W2 uh X2 plus W 3 X3 and that's going to give us output right so this this times this this times this and this times this right that's a Single neuron and what we're going to end up with is uh when we sum these together we're going to end up
with a single value end up with a single value one Val one value here now when we jump up to a bunch of neurons so if we had say um like X X1 X2 and we have say 1 two three neurons this one is going to have each Of these are going to have two neurons right so this going to have um one two one 2 and one two this looks very familiar to something you've seen before which is the MLP that I previously showed you right there the images youve probably seen like you know
clickbait thumbnails with these before and this is exactly what it is right so you're going to have uh two weights in here two weights in here and two weights in Here and so it's going to do prodct with each of these you're going to have G to have this which is going to be um you know like a W1 X1 plus a W2 X2 and then the same for these as well right it's going to do all of these and you're going to end up with three total values so you're going to end up with
one two three values in the Output now if we actually go to linear algebra and try to understand this concept things are going to actually make a lot more sense okay so we go to linear algebra say we have um something of size one by uh say 784 all right and then we matal this with something of size 784 by 256 okay ignore my handwriting it's terrible um but this is this is Going to be each x value right X1 and then X um 784 and we're going to have 256 neurons okay so this is
number one and this is uh 256 okay now all we're going to do is literally take the at this is going to be like essentially a it's going to have this is the number of uh rows it has right this is the this is the height of the Matrix So it's going to essentially just look like a vector it's going to be it's going to be this and it's just going to be a line and this one is going to be quite tall so it's actually going to look like this it's going to be 784
by 256 like that now this this column right here is going to be a single neuron right this is going to be um say One neuron this is going to be a set of Weights that's going to map it's each each of those weight values is going to multiply with a single x value right so W1 is going to multiply with this one um W2 is going to multiply with X2 down here and then all the way down to whatever n is or or sorry down to down to the down to 784 which is the
length of it or or the the length of the column I guess you the height of the column Whatever you want to interpret that as um and this a is a single neuron right as long as that's clear we're good now we have a bunch of these neurons as a matter of fact we have 256 different neurons right I don't know how to write with my hand yet I'm still getting used to it but we have 256 different neurons right and they're each dot producting with the input Itself and we end up with a final
output so notice these you know cancel out and we end up with 1 by 256 so for one example we're going to get 256 neuron outputs now if you envision this as say um batch by 2 784 so instead of one image flattened it's a bunch of flattened images right each flatten image is a row then essentially all you end up with is this B just replaces the one so you You you get rid of that and you end up with this B here and this is just uh a batch of neuron outputs right so
it's like think it's like imagine thinking about this entire this architecture here where you have each x value plugging into like a different neuron just imagine this but you but you like layer them on top of each other so you have like you have like say you have this like as it's as it's looking at you at the screen and Then you you plop it down like this then you put another one on top batch element one batch element two batch element three batch element four and each of these is going to give you something
so this all these outputs is going to give you like say uh this is going to give you [Music] um what's it called 256 different outputs and you're going to have these in a batch batch size right so there 256 Outputs are all layered out here and then each one stacked on top is just another set of 256 right that's how I like sort of like to to reason through this in my head you might want to reason through it differently but I find that to be a pretty cool trick to understanding how these are
working now there's another term that I did sort of leave out and this is the bias right so the bias each one of these each little one Of these neurons is going to have its own bias right so you know X X1 X xn uh and now each of these little neurons is going to have its own bias so we're going to do you know a do product operation as we normally would we're going to do like X2 or X1 * um X1 * W1 Plus X2 * W2 all the all the way through all
the different weights inside of a neuron and then once we get that we're Going to add a bias to that and the bias is just going to be a single number because of course it's a scalar value right so it's going to be essentially it's going to look like this W * X we're going to do we're going to do all of these that we need to dot product essentially a like a like a vector a vector vector multiplication and we're going to add a single bias value to that right so the vector um Vector
X is going to Look like this and the vector W is going to look like this it's going to be a column so we take this column and we we do a essentially a matrix multiplication but they're vectors so it's like literally what it looks like is and you just take this element and you you multiply with this one right so you kind of you kind of like put like a stick through it you go and it's like cut up into a bunch of Little multiplications and you sum them together and you do your bias
and we can back pop get through that as well so that that hopefully that just clears up some of the intuition as to how we're actually structuring um this part here so that rule that I just showed you also applies for the X2 and W2 right the point is we're just trying to understand what the whole design of the neuron is and how we can abstract that up to linear algebra and then write Really really fast C and C++ and Cuda code to to make this like run fast instead of just considering each little neuron
operation independently we can build we can put a layer of abstraction up and say this is we we've proven that this is uh this is how this works in linear linear algebra and now we can step forward and try to really optimize that based on our knowledge about matrix multiplication right this is one of the reasons why emphasize the Mel so much is Because it's an extremely important algorithm in all this deep learning stuff right um but yeah now we can uh now let's look at how we can like you know cross entropy loss and
back propagating through all of this all right awesome so now we next have to do the loss function and the loss function isn't actually too bad so if we pop over to here notice how we have uh this cross entropy loss right this is our this is our loss function Once we get the we do model. forbo from our X batch and we get the Y predict did and then a cache right uh don't worry about the C just worry about these this y PR and the the batch y right so we go over to
our cross entropy loss and inside here we're going to dissect this thing by the way don't worry too much inside of this thing we have batch size um so just we essentially just take an element from the shape do our probabilities from the softmax function Which we did go over before we have this piece of work here uh and then uh and then we just finish it up by calculating the loss right so assuming that we understand how our softmax function works we can actually go ahead and dig into this so I'm going to open
up open up a Jupiter notebook here so going to go ahead and import numpy then we're going to define the cross entropy loss uh Function itself and softmax so let's go ahead and take these and uh pop these into here then we're going to say set our batch size as um as two and then we're going to set uh num classes to five all right then we're going to go and make a shape we're going to go ahe and make our both of our um inputs to cross inoc here the Y PR and the Y
true all right so yred we're going to set this equal to uh This nump uh Rand n batch sized by num classes right so that's going to be our predictions we have a bunch of uh we have a bunch of batch elements each with a probability distribution about which which uh which output it think should be those are the predictions right and then we have a y true which is going to be random integers um and I'm going to print these out so you can see so y looks like this we have batch Size of
two so 1 two and we have a bunch of these elements right this is our probability uh actually these are not our our probab probability distribution yet these are actually called lits so I skipped a step there but lits are the step before the softmax right softmax is going to make sure that everything uh is above zero right it's going to make sure everything is like zero between zero and one right that that's idea there and it's going to express with confidence Which numbers should should be high right because it's exponentiating um these are lits
because it's like um like the lodge it I guess you could say it's like the log like the log probabilities so because you have to exponentiate up to get to softmax it's like log because you go down it's going to do Ln not actually log with base two it's or log base 10 it's going to be Ln so base two base e or 2.71 and we can go ahead and print out our y true so this is um this is an array it's very yeah you're you're you're going to see this you're going to see
why this is important in a second here um but if we actually pop to our next step we can go probabilities equals softmax of Y PR so we're going to see these values get exponentiated we can print out our probabilities so we can see that as a part of this which values Were the biggest right so this one was the biggest like you know closer to positive Infinity um and the this is like negative negative negative negative right so this is like the biggest this is the second biggest right so we can see this is
the biggest number this is the second biggest and this is like these are these numbers are like smaller right um and same for this one we notice how oh this 1.95 is really big and then we have a 1.2 so it's like this is the Biggest second biggest right that's kind of how that plays out then we're going to go and do correct uh correct log probs is going to be um or correct correct probs we're going to do um this part we're going to do this part here so probabilities and then we're going to
stick these two inside of it all right so when we do [Music] this we notice that what this does is it Gives us um it gives us the indices of the correct probs inside of the prediction in inside of the prediction uh Matrix right so inside of here if we actually print out um if we print out you know np. arrange right and then we have our y true we can essentially think of this four and one as our correct labels so in in batch number in batch uh in in this First batch element the
correct index the the the correct answer is uh is number four right so it Go 0 1 2 3 4 this is supposed to be close to one if this is close to one we're doing a good job that means the loss is going to be low right this is the this is the correct answer so if everything is like favoring this index here if this was the correct say class to pick um that that's what we want to optimize for then this one is picking out the Same thing but for the second element right
so that's why we do when we go up to Y true here we're doing um that's why we do this batch size here so it's going to span the elements the total number of elements in batch size um and it's going to just select the the indices right so we kind of just do a random number here because it's between zero and numb classes so you know it goes from zero to essentially four so one 2 3 4 5 or 0 1 2 3 4 um and so that that's what's Happening there we just initialize
things randomly um but we see that we did number four so it's going to pluck out number four of the first one so 1 0.165 then same thing for the second right we have we have index one so it's going to go to 0.227 now we have this we we have this correct probs which I just explained here and if we go down or sorry if we if we pop up a little bit further we see that We just did this part right so now if I wrap np. log around that term np. log we'll
just say um we'll just say correct uh log probs we'll just do np. log of that um and then if we do correct log probs uh we notice that we're just doing the log of each of these of each of these number right so so if we go import math and then we go um math. log of 0.165 we get this number right so uh - 1.8 we're just doing this for each of these elements right and then we continue further and we go loss is the sum of loss is the uh sum of all
of those so the correct log problem is going to sum these all up together so it's going to be like uh negative 1.8 and then negative we're on 1.5 so they're going to add and they're going to get about - 3.3 umga 3.47 or 3.27 Um and then we divide all of this by batch size to kind of you know normalize AC cross batch we don't want it to to get too massive like if you increase your batch size to like a thousand then your loss is going to be insanely high and you're going to
get numerical instability from that you just don't want it so you want to normalize over the over the amount of samples that you actually have in the batch and that's going to help stabilize things for us Later during the training process we don't want things to like step up and get worse every single training step um so if we go ahead and print out the loss we notice um we notice how we get this 1.64 right so go back going back up here um this was you know this was quite off this was a little
bit less off but it's still fairly high like these are still like this is like 16% 177% chance and this is 23% chance and so that's not very good so our loss is going to be Higher but if our um if our correct probs array sorry our correct probs array was um see numpy do array and we go say um 0.9 and 0.8 and then we uh you know continue to go through this so correct uh correct log probs uh equals and then and then we do our loss right and we print out out our
loss again loss is going to be Significantly lower because these values the the the difference between uh the difference between our prediction accuracy and the actual label was very close right so we we thought there was a 90% chance that this index was going to be it right and we were we we were we were correct right so that's a very high confidence that we were correct and that's a good thing this is also quite high confidence that we were correct so we want to reward ourselves for that or Minimize the loss right so if
we have values like 10% chance or 5% chance our loss is going to be stupid high but uh if we get closer and closer to what what we sort of minimizing the difference between what the model thinks it is and what the actual thing is that is a good thing that's that's what we're trying to optimize for here now there's another little step that comes along with this and that's the derivative of the loss Right so if you go over to Gro here and say um what what is what is the derivative of cross entropy
loss so it's defined as this which we just went over so Yi is the true label either zero or one and this is the predict so so Yi without a hat is the true label and Y hat I is the protective probability and we run through this we do some we do Some differentiation um we go a few steps later I'm not going to really cover the math behind this differentiation part this part is you know you can you can do that on your own if you really feel it's necessary um but really what we
care about is just the answer so the actual derivative so putting it all together look at the gradient um what we what we actually care about is um why hat minus y and notice y hat was Uh the predicted probability so this so that soft maxed uh the soft maxed logits right uh the probability distribution and then just normal Y is the true label so if we go back to our code here um and we look at how that's calculated we pop down and we see it is the softmax probability distribution minus the true labels
right so that's exact what we want it to be um and a lot of this what we're doing here this is mainly just converting things to the Actual one hot Vector um so uh yeah that's that that's pretty much that's pretty much how you do soft Max and then derivative or sorry cross entropy loss and derivative of it right now going back um what's next so now we have now we actually have to go through and calculate the the gradient of of our W2 our X2 even maybe possibly Ford ones and the bias right so
let's go and look at that I'm going to do an example where we pretty much do uh we calculate dw1 and Then we kind of just bring uh the intuition from that into everything else and then go ahead and apply it right so in in dw1 I'm going to I'm actually going to go to this in a second here um but I'll bring my whiteb a little closer so I don't know if you can see this but I pretty much did um based on you know the micr tutorial I did uh like an output this
is a neuron output right so X1 * W1 + X2 * W2 where it's like each of the X values Go in and then um the the neuron will a s like two x values go in and there's a single neuron that has uh two weights in it um W1 and W2 and then it outputs those by doing um by doing a doc product between so it does X1 * W1 and then plus that to X2 * W2 and I just wrote this in the context of microG grad so there's a data and a grad
attribute for this there is a a data and a grad attribute for this so notice how I did the the this is a plus Sign I know you can't see it because it's yeah it's very small but ient did a plus sign so those two added together and the gradients are going to the this grad right here of two that's going to flow to both of these nodes this X1 * W1 and X2 * W2 that's going to flow to these um the same so when you when you like uh for example when you're try
to differentiate a constant um it it ends up just it ends up just becoming one right so there's actually no change when You have um like a graph which is which you add like a bias to it and just shift that curve upwards it still has the same slope right so that's essentially what's happening here and then we continue forward and this now becomes just a multiplication so W2 uh or or sorry X1 * W1 and then we have a data and a grad attribute for those so that's just like kind of how a neuron
is going to be structured in the context of micrograph now uh if we pop over to Um if we pop over to this example which is over here so this dw1 output what I pretty much did is we go uh 784 Time by B so let's just draw that out really quick um so 784 by by B and then we have um B by 256 right this is an at symbol it's really bad Drawing B by 256 all right so how do we actually Matrix multiply here well we take a column of this and we
draw product with a row of this right and notice how this is batches right so this is going to be a batch element this is a batch element this is a batch element so it's going this is we're essentially doing um we're we're taking the first pixel Across the first batch element so if we were to just go here that would be an entire image right that would be the first batch element it would be an entire image but we're doing the first pixel across the entire batch right so across all the different batch elements
we're taking we're do producting the pixel values um so like for example X um x. data at index0 right and then in this context This is B by 256 which is the same as the uh output layer so if we did like for example the the classical input of um you go back to this it's like B by 784 * 784 by 256 you end up with B by 256 and that's our output gradient right so we're we're essentially just just taking this and we're shifting it around so we're doing we're taking this B by
256 that stays the same but we're transposing the input so it's like x.t or sorry x. data Transpose um Matrix multiply that with the output output gradient and we're getting the gradient for the weights right the dw1 value um so if we go back to here 256 remember um 784 is how many weights are in a single neuron but 256 is the amount of neurons we actually have in that hidden layer so 256 is going to be like this is this these are all the neurons laid out right but what we're going to do is
instead of taking like a A single a single set of all the neurons from a single batch element we're going to take all of the all of the the index zero gradients uh across the uh across the across essentially uh batch element no sorry not batch element zero across we're going to take the first neurons across the entire batch that's what we're doing so this ends up being um we'll just say y. Grad um y. grad at index zero we're doing it across the entire B batch so it's just a single neuron right it's just
a single neuron but we're generalizing that across the entire batch so we have this x component generalizing across the whole batch and this y component generalizing across the whole batch we use the same intuition that we got from the microgr lecture and we just apply it here except we get that generalization Ability from using batch processing that's where the big thing comes in here because we're doing we're essentially doing uh columns here do product with rows and notice the shapes are oriented in a certain way yeah it's it it is a lot to take in
but in the end we end up with um so this is this is like 784 by B and then B by 256 so the B's cancel out and we're left with Um I know these shapes are out of proportion 784 by 256 right so this 784 that's the first pixel value so each of these or sorry each each of these elements that's a pixel right that's a pixel in the whole flatten image and these are all the neurons so we end up calculating these um in a way that we can that we can actually update
uh all of the weights properly right so when all these are Laid out you have um the gradient for each neuron across the first uh across the first pixel value and that is the that is the same way that our initial weight Matrix is organized right so in our weight matrix it's taking these Columns of of like a single neuron of weights and do producting that with with a single um with a with a single image right and it and it's doing that and that's very intuitive and it makes sense uh but in this example
Um you know we we end up getting those we end up getting the same ones that we would we would want to update those with so you can kind of Translate and see like what is this column here what does that consist of and what does this row here consist of and we can plug that in and we can see that our weight updates are actually going to make sense here so in this one we we essentially end up with this thing of 256 values and that is just going to be the essentially the Gradient
of all of the neurons with respect to a single Pixel right cuz this is a single Pixel across an entire batch we're again we're just using the batch generalization idea here um we're just like generalizing across whole batch instead of using one specific sample that way it's like better for stabilizing training um and and we're just we're taking that and we're just laying everything out for um for all of the neurons across a Single um across a single Pixel right that's how we're calculating these so this this uh it's going to be like this row
this is our pixel AC like all the pixels for like for all all the first pixel for all the batches and then we have our our single um we have our our first neuron and it's going to go first neuron boom it's going to put the first value there and then second neuron boom all the way to 256 neurons and it's going to spit this out In a column right that's all of the neurons um for the for the entire first pixel and then if we look at how it goes down columnwise then we get
um then we get all the neurons for the second pixel and the third pixel and the fourth one right and so we can sort of see that this ties back again into uh the original forward pass example that we were doing um if this if this doesn't Make sense I know my explanations might be bad um you know you might want to go back and and I mean you you could draw this out your yourself um that does work and just sort of visualizing it in your head that's a good idea to do uh that
is a good idea to try to understand how this is working um alternatively you can you can watch my tensor uh my tensor level back propop video I think I did a good job on that um it's about 30 minutes long so uh Anyways well we if if this doesn't entirely make sense we're going to use this intuition of we have this 784 by 256 and this is the same as just our our W um our w. dat right so our w.g grad and our w. dat have the same shape so what we can essentially
do is we can take um say in in the grad in the gradient For example we can take this value multiply it by a learning rate of say LR equal 0.1 and we can then subtract this from the original one right so if the gradient is really high that means there's a lot of error and if the gradient is really low um that means that there's there's going to be um that means there's going to be less error right this is why it's called a stochastic gradient descent cuz you're Descending the gradient um so it's
going to be essentially um w. data equals LR times um just do X for times learning ratees times the grad element right and then we do um minus equals so that if the gradient values really high and learning rate is 0.1 then it's going to be positive time negative and then this is going to get adjusted in the negative direction if the gradient is really high um and if The gradient is really if it's really negative gradient is really negative um then this is going to this is going to multiply with this it's going to
give a negative value and then since we're subtracting a negative it's going to go up and the way it's going to go up so that's that's literally all we're doing in gradient descent and we're doing that for each element now we can sort of take that Intuition and Branch it off to you know dw2 right and we can apply that to dx2 um you know this isn't really a course on back propop so don't worry too much if that doesn't completely make sense it is important but if it doesn't completely make sense you're still going
to be okay um cuz we're going to implement this and you're going to actually be able to see the network learning and you can actually print out things to understand what's happening Under the hood and of course we do need these uh these these X values for calculating the intermediate these intermediate layers right with activation functions um and the activation functions like literally if you want me to like draw out how that would work um Rue it goes like this right it's like it's like a line and then it goes up just like that so
what You can do for this is you can say if my value is zero or less I'm going to set the gradient to zero because there's no slope the slope is zero and if it's if it's if it's greater than that if it's greater than zero then uh we're going to set that to one right because if it's it's really is going to make it remain the same if it's above zero um okay awesome now let's pop into um sort of This this python script that we have running here and uh just dissect everything that's
happening so we can just tie it back to uh this image that we that that I wrote in excal draw just so that everything kind of makes sense on the code on on a conceptual and a code level all right so just kind of going through uh this numpy script now uh we import numpy normally um I mean I actually already went through this part I'm not going to review this again um but if we go down you can see a bunch of functions here right and these are all these are all super useful functions
that we're going to use to essentially uh train a single layer single hidden layer multi-layer perceptron from scratch um using the intuition we previously built on that from you know microgr Etc right so we we scroll down and in this main function we declare some some variables here so like hidden Size which I'll just set to like 256 in this case um output size is 10 right so 10 different digits 0 through 9 and our input size is 28x 28 pixels flattened out um and then we're going to put our bat size I'll just put
eight here so we can get speed um learning rate of 0.1 or or um alternatively 1 * 10 -3 and then epox we're going to do five so epox is how many times you go through the entire training set right so you go through it once that's like certain Number of iterations certain number of like forward and backward passes it's like one iteration and then you do multiple epochs which is you know times that you go over the train data so inside of here we declare this model neural network right input hidden and output size
and then we just have this train function which is going to actually do that for us so inside of here we have number of epochs that we're going to do and inside of each eoch We're going to do we're going to train in batches right so we have this batch size a batch of images that are all flattened so it's like B by 7 784 and we're just going to step through um kind of going through one by one here so in the model. forward I mean we're just we're in this this one we're just
taking um the X train is just input images and then this is the output labels right it's the it's the batch y so in the model forward um we input a batch and we Get an output cache and we get a we get y right the Y predictions the probability distribution in a batch in batches right uh after we do model forward we're going to do take the loss function of Y PR and batch Y which we got from here and then we're going so cross cross entropy loss calculates the loss and then separately we're
going to take that output again which keep in mind this is logits so not actual um probability Distribution it's uh cross entropy loss is going to softmax those um and then it's going to return a loss right so it does soft Max inside of here so when we're actually getting the uh derivative of the Cross entropy loss we have to go and do that separately right we have to get our probability distribution and then we have to essentially just um like I walked through before how we actually do the how we do the cross entropy
loss Derivative I walked through that with grock previously and uh this is literally all we do so uh you know feel free to like print this out but this should be fairly intuitive if you work with python and pytorch before um and then we just you know do the do the minus for our gr out output and then we back propagate from there right so we take our grad output and we use the cache the cache um so keep in mind when we do Model. forward we have ypr which is the logits and then we
have the cache which is literally just um the inputs right so all the different pieces of the layer that we're going to need like for example our dx2 the derivative of the second um the second x value or um for example The Rue output right so so just stuff like this that we're going to need to back propagate through all the layers and not just like a single weight or single weight here we're going to need That whole cache of like through the forward pass right um so that's that's all that is it's just just
a coule of those and then of course that output the loits right so just to clear up like what the heck cache means there I know that can be like sometimes misleading um so we do model. backward and then we just do model upd weights and we pass in you know weights bias um weights and bias again so let's walk through what's happening In forward this part I assume kind of just makes sense we'll walk through model. backward and then update weights so in forward uh model. forward over here so inside of here we have
the batch size as x. shape at position zero so it's going to it's going to list the shape it's going to be B by 784 or sorry B by is going to be um the batch that we get so when we when we take this part we're getting an actual batch so I and then to I plus batch size so it gets a little segment of like eight eight images um and inside of here we're going to take the first the the the leading dimension of that which is batch size and we set batch size
here and then we do reshape we go batch size by um and then the essentially just the the last the last one so it's going to be reshaped to batch size by um this is just a short way of doing 28 * 28 so 784 that's what this is going To reshape to and then we go ahead and do our our linear forwards and these are these are should be very uh sensical right so in our linear forwards um we take in a weight sorry we take in an x a weight and a bias right
so we do X at w + B right instead of w WX plus b it's x w Plus plus b um so that's it's I mean it's it's B by 784 we go back to this so we go in here B by 784 * 784 by 256 and we end up with B by 256 right um should be fairly Intuitive and then we add the we add the bias as well which is another term I actually did not include in this but you can kind of just we can kind of just think of the bias
as like an extra extra thing that it adds on um now scroll down to relu right so relu I mean this is self-explanatory it's just going to do a point R it's going to be num. maximum it's going to apply that to every single value in there doing a you know if it's uh if if the value is like Negative 1 then zero is going to be the maximum it's like which one is higher Z or negative 1 then it's going to pick zero and if it's like one then it's going to be like oh
one is higher than zero right so it's just kind of the relue and then really derivative is you know as we explained before how you have like the chart and then goes like this D gradient of derivative of zero then it's going to go gradient one after after the zero right um so that's just that's what This is doing here um because we want to ra you derivative right um now going back another linear forward we take the Rue output so that's the new input to the to the next line your forward layer the the
weights the weights two and then the bias two right so that that should also make sense and then we just return that so forward pass isn't actually too complicated we can sort of just walk through and understand How the shapes are changing this is more a template example of how to understand this from scratch Now we move down to backward which is a little harder um go to backward here we have the W1 B1 W2 B2 right so we put in the grad output so the starting the wherever we start from in back proper ation
and go for and go backward through the layers and then cache as well which is the which is the forward pass like intermediate cach stored values right um so we go into Backward here and we see um we get in this grad output and the cache as we'd expect um and then we just lay out that Tuple so fc1 input so we just um fc1 input fc1 output uh value output right um so just kind of just unpacking this again um now we go to here and it's linear backward so if we step back to
this linear backward one is going to um it's going to calculate both of these right so linear backward is a bit bigger Actually um we go here taking a grad output select the output thing the input and then the weights right so we can calculate both the uh the the grad attribute for both the X and the W value right so in here we do um grad weights um is X is X transpose times the grad output and so if we go to here we can see uh X transpose and then times the grad output
which in this case and the first layer is is derivative of the loss um and then in this dx2 for example we See the gr output times the transpose weight 2 right so gr output times transpose weight two and then the bias um I'll break that down more so in in the C- section but um this is this is the grad bias right so um I can actually just like print that out let's let's pop into here really quick and just exit that um so how did this go again we do np. suum so I'll
just do um NP just do I python import numpy As n p then we go x equals just do torch. and um we'll do 3 by we'll say 2 by 4 right we print out Imports import torch then go back up print out X and we get this right so if we do um we print out torch. suum of X we do axis equal 0 and we go at keep dims I think it's keep is it keep dims How does it go keep dims equals true we can see that literally all this does is it
is it mushes these together So it's going to go two + 1 and then this is like 21 plus that so it's 3.23 and then so essentially like mushing knees moing knees mushing knes right right um and it's going to do this across the the across like this the horizontal right so it's going to Mush cross hor vertical sorry because that is the that is the zero axis right the the leading Dimension here so that's that's this vertical part so it's going to Mush vertically Um and so that that's really all that is um so
we're just combining things across the entire batch right but you'll see this more intuitively in the in the C version now we do the you know this as I as I mentioned before and we just essentially return those right for the linear backward layer we return all of our all of our gradients and then we perform a optimization step so we do the model. backward and we do model. update weights And we pass one 2 3 4 as well as the learning rate in and inside of update weights we'll see right here we literally just
do self. weights self dobias weights and bias and we do minus equals the learning rate times the gradient right so as I was talking about before you're trying to reduce you're trying to essentially gr do gradient um gradient descent that's what this is just that the stochastic gradient descent because it's it's doing it Constantly every single time and uh yeah that's that's how we update the network so you know if if if the gradient is if the gradient is really high that means there's a lot of error right so if we do um learning rate
times something really high so a positive times a positive and then subtract that from here um that's going to mean it's contributing a lot and then it's going to mean it's it's initially contributing you know a lot of error and we want to reduce that we want To change it significantly um and then if it's like say lower we don't we don't we don't want to adjust that as much right so it's kind of just going to balance between in the middle whichever one gives us the most error right um and we do this we
do the same idea for all of these and we just just do this essentially this scalar value multiplied by each thing in the entire weights and the bias Matrix we do that Everywhere and that's pretty much it U we do that for every single every single iteration we do a we do a we get we get whatever inputs and output uh predictions we need we do a forward pass we do loss function derivative of the loss model. backward so backward pass update weights and then if we need to we just like print out the progress
over time right so if we go ahead and run this um python C friendly we can go and see This is actually training quite well so we this is training quite fast as well you know numpy is bed to C which C is really fast we can see that you know over the first one over the first 7500 iterations we get 93% accuracy so just to iterate a little more about this whole linear backward um np. suum cross axis zero where you take each column and you squash it together the reason why we do that
is because each of those is like across the entire batch right so this Would be like a single uh uh a single layer right single bunch of a bunch of biases for like all the neurons or whatever you want to say and what we're doing here is we're taking a single neuron and we're squashing everything together cuz like imagine if you have a really big um like a really sparse really big reward signal for a single example and then like you do 20 other ones and they have the complete opposite right the idea is to
like kind of Average all them together you're not you're not like divide you're not adding them all together and then dividing but you're you're just like accumulating all of them together so you end up with something that's like close and pushes in the direction of like where generalization should be so I know that sounds like really conceptually Advanced but it's not it's you're just trying to push in whatever way the average favors so that's why you do it AC cross the Actual batch itself CU if you had just this Vector laid out I mean you
could do that but training might not go as smoothly whereas if you were to just accumulate everything so you get like on average what is the best way to move what is the best way to move that bias value then it then it helps a little bit more so that's why we do that um but now let's get into C this is pretty much a port of just the last script that we ran so this v1c you'll find this in the Naive CPU because this is a naive algorithms these aren't like really really fast are
just like the easiest way to write them um very like intuitive to understand um but gives us a basis for how we can modify this and turn turn it to Cuda right um so inside of here we do the same idea we have a little neural network thing at the top I mean it should probably go from like top to bottom but uh yeah so inside of here learning rate Same learning rate we have 10 hex which is a bit different I Chang batch size to four because have having it as 8 or 16 or
32 just took a ridiculous amount of time to compute for through each layer so I set this a little lower to four input size Remains the Same it has to hi and size 256 output size is 10 train size 10,000 test size we're not going to really need this but 1,000 for that um and then we have this neural network struct right so we can't actually do a CL we can't do a class in C but we can do struct we don't we don't have like the the class and and objectoriented as aspect that we
do in C++ right this is a functional functional language so we're only allowed to use strs and inside of here we just store a bunch of arrays so all the weights and biases and then the gradients for those right uh just to kind of Mark everything down easily and and use this very simple uh struct right now we have some functions for um For actually loading the data now I don't want you to worry too much about the loading data aspect um this part it kind of just depends on like which use case you have
but in this case um I I run the uh down downloader script so this downloader script uh just saves everything to a binary file um and then inside of C we just write those back again so or sorry we we we read them we read from the binary so notice how we do like file open and then the file name And then a read binary um and then it just turns that into into a usful format right so uh yeah it's not not entirely uh too too crazy um we essentially just like directly read this
into um into bytes and then we modify that as needed later on we do the same thing for labels so very simple uh data loading functions um not too crazy compared to the mest one but this is in C right so it's obviously going to be a bit different now we have this interesting thing here Called initialize wage which I probably should have shown you back here in our um where did it go in our C friendly script so notice in here how we have multiple functions right we have r r derivative initialize weights initialized
bias and then these other ones which I already went over um initialize initializing weights and biases are kind of simple all right they just follow specific guide so if we do start off with initialized bias it's Literally just going to be um just a bunch of zeros right it's all it's going to be just need the bias is a bunch of zeros that's okay we can start and we can move up and down from there um but the weights cuz so so bias is bias is floating flowing from the previous layer so having it as
a zero doesn't actually matter it doesn't affect anything the bias the the bias gradient are just flowing directly from the previous layer those unmodified The same gradients um but the weights themselves are a little different so how we initialize weights is I'm actually going to go over to here we going to search up P torch timing initialization and this is how you actually initialize um I'll just do I'll just do uh torch do uh nn. linear um we'll go to linear so in pytorch we do this um where is It yes so the biases are
initialized um in this distribution which we we can we we can do we don't entirely have to worry about that it's not a big deal um but then the then the weights themselves these are nor these are initialized uh on this basis right so we have um of shape output features by input features and we make this from uh from negative square Ro TK of K to positive square root of K where K is Um K is one over the input features so if we pop back to this we're doing a random normal distribution right
and with each of these numbers we have to we have to Clump them to this range right so these values are these values are in some normally distributed range and all we have to do there is um we do we we initialize to this right so K in this case okay so if we actually go to the H ination paper he init Paper um this is I think this is it climing hey so climing and hay climing and it hey and it are the are the same thing um but if we go into here we
go two ided by no maybe it's not there formula is somewhere in here um where did it go I search up um Rue initialization maybe that's a better term to look For yes this right here so this leads to a zero mean G CH distribution whose standard deviation is square < TK of two over um over this term and this term is the um I can't remember exactly what this is but I think this is length so we have an input size here which you could say as the length I don't know if that's specifically
what L ties to but we'll just hold that assumption for now That that's that's the idea there is you would have um standard deviation is this um and if we continue to go forward maybe we might find something else here too um if we continue yeah so some layers other solution is to small Factor on the weights right anyways Uh yeah this is pretty much the the inspiration from it so just looking at like kind of the purpose of this um this this specific initialization as compared to the P torch one um which I probably
should have looked into beforehand the pytorch one is a little different um but the hay initialization is designed to work well with railu so it uses Square < TK of two / um input size as a standard deviation for the distribution that it's generated on Right um it essentially counts out for the rause activation to zero out negative values so you might have these um so-called dead neurons that come up when you have like the Rue that just zeros something out and then when you try to uh like multiply that by something it ends up
just like zeroing it out and you might like end up through the training process with like a row of zeros that just don't do anything and they're like Useless and so you're not actually compressing information down into those because they're just zero so this helps deal with that now jumping back to C script um this is what we're doing here so we essentially have this we're we're just we just have to use like what we're what we're defaulted to with C we get this weights with the size that it's in we make this scale so
square root function You know like we were doing before um square otk of two divided by size in this case um which size would be um you know size may not be appropriate I just kind of found this to work and and training exceptionally well with this so we're going to stick with that um but the size we're going to iterate through this and essentially for each weight value we're going to generate a value between Rand so Rand is going to be anywhere between zero and Rand Max so Two one whatever this is so essentially
this this in here is going to be zero between that Max number it's going to this is going to simplify to between a value between 0 and one decimal floating Point 32 number between 0 and one we're going to multiply this by the scale um which is which is going to be that and then we're going to subtract it by the um by the scale divided by uh divided by two and this is just going to give us a Nice normal distribution for uh for our weights right this is going to do essentially the same
job as we were doing before bias initialize all these to zero as we were doing before Ru is also very simple um the softmax I mean I think I showed you the softmax in the Triton section so um this is yeah this should be fairly intuitive we we get this you know we get this max value right and then when we're Actually doing the exponentiation we we subtract the max value so we get still remain with numerical stability um not having that would just like give these crazy you know e to the whatever super crazy
numbers when we have um ridiculous arrays um with like you know th negative a th000 negative 10 it's just it just gets out of hand right so we want we want Max to normalize that and just get rid of any of those instability Um and then we yeah we just compute the soft Max right this is this isn't too bad same function we looked at before we have a matte mole so I specifically worded these so that it would make make the most sense so it's a map mole but this treats it as like you're
taking in an array a and you Matrix multiply that with B right so say for example 2x4 is a and 4x three and so you'd end up with a 2x3 and it would organize that in row major order right made these as simple As possible um you can dissect these but we already did a ton of stuff on matal so don't I'm not going to go over this for the like 20th time um then we have a a * B transposed so it's going to take in B is like say it's like a is 2x4
and then B is a um 3x4 and so it's going to uh do this operation as if it's transposing B to a 4x3 so end up with a 2x3 right um and then same idea for this one if you end up with a 4X two and then a four four 4X two as as a and then 4 by Uh 3 as B it's going to transpose a and it's going to make it a 2x4 and they're going to match up you're going to get two and three right so that that's just kind of the idea
there and then we do um the the ru forward I probably wrote an additional um might have wrote yeah so this is like designed to work in batches um I might have probably written an additional one just like accidentally which I'll probably remove um oh R you there yeah so I should Probably remove this actually but um well we'll I'll worry about that later and this will be updated by the time you're working on it um and then we just just have the bias forwarded which is going to you know add the bias um so
literally what this is doing is it's iterating through uh it's it's going through batch size right and then we iterate through the actual size itself which is um which is the actual uh like the the The row length so it's going to go skip over as many number batch elements as it needs to so it's going to skip it's going to stride over then it's going to add this ey offset to it and it's just going to plus equals bias at that that value right so we we essentially just have this this row of biases
and it's going to um just essentially add each of those it's for for like a given batch element for like batch element one um it's going to just Add you know say it's like 10 values here it's going to add all 10 to the bias values and it's going to go down it's going to add those same values again it's just applying the same bias to each to each row right that's what this is doing scrolling down further I'm not going to go into these quite yet because there's like more happening but scroll down to
um the actual uh train function and the where Is this the in main function so in here we have a a pseudo random number generator um these are pseudo random they're not you can actually have completely random numbers that's like a very hard uh you know cryptographic graic problem and everything that's like something I'm not going to go into um you know in this case we're using srand to to to Generate random numbers but in Cuda you can use Q Rand so it's going to Generate random Numbers in parallel really fast so you don't have
to like wait for the CPU to do this one and this one then this one right it's kind of faster um we initialize this neural network class with NN or sorry struct struct got to use the politically cor correct terms we initialize the neuronet so we go here and we just have this NN and then the weight attribute right uh equals then we do Malik just a regular C Malik so weights one is going to be um hidden Size by input size right so that's the 256 by 784 and then the weights two which is
output size by hidden size so um this is going to be um what's it called 256x 10 so it's going to take the BX 256 and then 2 6 x 10 and it's going to multiply those and it's going to get a B by10 output right for the after the weights um you know bias bias one is hidden size just adding again to that to that output of all of Those neurons each value for each neuron IUS 2 same idea the grad weight so just this but the it's just a different uh it's just a
different variable right so we're storing the gradients of those the error um and they're just going to be the same shape right um and then we initialize so we have initialized weight and initialize bias now this is going back to um the the climing init that we did the the hay Initialization and the initialized bias that we did before um now now that we've initialized those with random values we go into here so our X train is going to be the train size so train size in this case is uh you know 10,000 let me
go down a little bit more train size times input size so an image is 784 um you know flattened and then we have the train size which in this case is 10,000 um the Y train is just going to be a bunch of integers that are that span this so we don't we don't actually need 784 there's only one integer value per sample um which is the label and then we have the same for for the for the test set right we load these in using the previous um loading loading scripts that I showed you
before we can print the first image in the terminal so this going just going to print things out Using the X thing right um so if I I'm going to compile this later and you'll kind of see what I mean but it just kind of shows us um like how good our our actual predictions are going to be um so we can actually like look at look at an image in the terminal and see okay what did it think this was what was the actual label right so we can kind of like look and sort
of match things up in our own head I don't want to use like open CV or a custom extension to put a Window cuz that's just a bunch of extra work it's easier to do it in the terminal um and then just the training labels for those as well right and then we go through and we do the train function which is comprehensive and then we free everything up we don't do Cuda free this just C we just do free and it get gets rid of the weights uh biases all the gradients for those the
train set and the test set right now we go into TR inside of here There's a bunch of things happening all right so if I click this can see where the end is we have this we have this um this hidden right here so that's going to be you know the B by 256 as we looked at in um the B by where was it batch size by hidden size so that's like going to be the actual hidden layer output right so so here we get a B by 256 that's the hidden layer it's the
That's the first you know mmal output essentially and then we get the output which is batch size by output size which in this case is p by10 and then we do num batches so the number of batches we're actually going to do is train size divided by batch size and the reason we do this is because we don't want to just like offset each time we don't want to give it the same data each sample so if we take that total 60,000 and divide that By batch size meaning like four uh or sorry train size
is 10,000 and then batch size is four we're going to get 2,500 total um total batches each with four images in them so we're going to do four and then four and then four and then four this way we don't like overlap right containing the same images in adjacent batches we just kind of give it new data every time and we do Epoch over that right so we do all of the batches and then we do another Epoch Over that so what's going to happen it's it's going to it's going to do like up to
50% in the first Epoch or some some some number like that 50% and then it's going to start the next Epoch and it's going to learn from all the examples that it had previously and it's going to be like oh we saw those again we know exactly what to do there so it's going to it's going to get you know accuracy is going to like it's the loss is going to look like this it's going to figure Start figuring everything out tuning whatever it can get its hands on and it's going to drop because it
figures out what to optimize then it's going to Plateau through that Epoch it's going to sort of plateau out and then the next next Epoch starts and it's going to it's going to drop again because it's because it's seen those again and it can optimize for more it can compress more features into that because it's seen that already um so it's going to you Know continue dropping again and then it's going to sort of plateau and then it's going to drop again and and then we're just going to end up at some place when whenever
all the epoch are done right so we iterate through Epoch now this is um if I look at this actually um this finish is here so inside of a single Epoch this is where most of the work is done right we just do like free hidden and output so most of the work is Actually done in the epox loop inside of here we do a total loss which we initialize to zero the number of correct answers so we also set that to zero this is just for tracking the accuracy so we can see the loss
dropping versus what the percent accuracy is over the over the U over the the training samples right so each training step we can see which or every sorry every um every thousand every 1,000 or or every 100 training steps we can see what the Accuracy is over the batches then inside of here we iterate over num batches increasing by um by this each time right um batch batch Plus+ and then we use start idx this is going to be batch times batch times batch size we do our forward so we get essentially inside of here
we pass in our neural net we passing our like our neural net struct pointer um an input so that's going to be train and it's going to be The um the start idx so whichever whichever this is um whichever actual batch it is um times the times the batch size so it's going to skip in increments a batch size right so it's going to it's going to instead of uh skipping like this isn't going to actually like plus equals um like batch itself this is going to add one each time so this is just going
to act as like an increment so we're jumping right that's what That's what that's doing is it's going to jump four at a time instead of just one we just plus plus uh and then we pass in the hidden layer we pass in the output and then the batch size as well right so all of the inputs um hidden output size right um and this is just going to do our forward pass all the way from uh you know taking this flattened image which we've done already I'm just because it's just laid out in Binary
it just like exists as that you can reformat it and interpret it as whatever you want but in see in memory it's actually laid out as literally one through zero you know Z through 784 or whatever um so it's like not that hard to actually like mess around with we do the forward pass we calculate our cross entropy loss right using the uh same cross entropy loss idea that we did in the C friendly script so we're just porting that over to C um which if There's like if if if this doesn't like make sense
then you can actually go in and you can see okay well what are we doing here versus here right you have tools like language models and and the internet which you can investigate these things through through and you can kind of see what's happening um yeah so we calculate our loss we add um we add the uh we add that loss to the total loss so inside of that actual Epoch we see okay well what was the uh what was the Average loss right um you know in here we do total loss divided by you
know numb batches so we kind of we kind of average that out um we do that every single Epoch and then inside of here we simply just this just acts as little increment for the correct counter so this is just going to see okay well um were we close or not um so this should be self-explanatory um This is also just like not necessarily part of the training run but just like an extra feature that you can use to print out uh what the accuracy was over time um not the loss but the actual percent
accuracy the backward function so this takes in you know NN and it takes a uh pointer to uh to the input right so this is this is a memory address to this at this index which is going to be um starting index times input size right And then inside of here we pass in a few things meaning hidden um you know this neural net is going to contain all of our all of our weights and stuff so don't this is like all contained within that uh the input itself um hidden output labels and batch size
so very similar structure to the forward pass except we also include uh we also include labels right update weights everything is now updated after that and then we can print Out some useful stuff okay and that's pretty much all that happens in this training Loop a lot of it is just like print and keeping track of stuff um but yeah so going up if we actually look at our uh if we actually look at our let me jump up to the forward path where did this go okay awesome so inside the forward um we it's
very simple right 1 2 3 four five six um not too bad now inside of Here I added the extra sof Max just because I didn't want to be redundant and included in the whole like training Loop thing there was a lot happening in there it was it was quite you complicated to sort through everything but yeah it's it's really helpful when you break things up into smaller chunks this is super manageable I wanted to make the forward and backward pass as as modular as possible so that you guys could like really Performance optimize it
if you wanted to like on the side um but this is like literally identical to what we did in or almost identical to what we did in the C friendly function or the C friendly script right so in there we had this like linear forward method which would do the M mole and the bias um and then the linear backward which would do you know two mmoles and and uh and and a bias backward um but in this one we kind of just split it into easier more Manageable chunks so a map mole specifically uh
is like an operation that you can optimize on its own and so like optimizing a linear forward or or even more generally linear backward it's like kind of hard to do that right you have multiple things in there you have to like fuse kernels together it's more complicated so I decided to keep this like as as manageable as possible super hackable um you know modular but in the map mole the Ab um yeah this is this is literally the same as C friendly so if I pop this over here um actually maybe I'll bring it
actually downward um but in here linear forward right we just do x * W this is x * W we're not uh x * W A and B same thing we're not transposing anything and inside of there and I already went over this function but you you kind of get the idea we just Do a maple between A and B that goes um we do a bi bias forward so that's also going to we pop over to there yeah I already reviewed that too don't need to go over that again Rue forward it's just going
to apply that to each element very simple M Mo A and B so same thing again except it's the hidden it's it's actually the the hidden to Output instead of the output to Hidden so next one and then we do the bias forward again and then softmax right so Obviously like this is very very simple to follow um it's more like more of the complexity happens within the actual function so like this is a lot more to handle than the than the uh than just the the for pass function itself right so I exit on
that and then um and then go down to say the backward function which is a little worse to be honest go down to here backward function so inside of here um we're going to zerog grad everything So what this means is previously our gradients we're accumulating items right so our grad um our grad bias and our grad weights are actually accumulating stuff so we want to just zero those out right this is the equivalent of zero grad and P torch when we go here um we do Optimizer do step so that's like the actual update
weight so you you know do the forward and then you calculate the loss then you do backward And then you update the weights with gradient descent and and then you zero grad so you're just zeroing out every single gradient um in the entire network and then you're going to recalculate those when you do the next Optimizer do step right or sorry no loss. backward rather when you calculate the gradients again they're not going to accumulate further they're just going to set them initially and you're going to update based on those gradients and then and Then
put them down to zero again um so that that's all we do here we zero grad and there's actually a function for this so mem set literally just a c function um Set Set n bytes of s to C so Set n set set um so byes of s which is the first one so grad and then C is the value we want to set it to so zero and then the N the length of it is just the size of grad right so size Is the number of numbers and then a float is like
the number of bytes essentially so the number of bytes that grad occupies in memory we're going to start from the beginning of that uh and we're going to initialize all those values at the at those sequential memory addresses we're going to set those to zero that's what zero grab does on a very low level um so we do that with our weights and our Biases now we do a grad output so this is just going to a malic batch size time output size so B * 10 right B by 10 they compute output gradients so
we go to this Lally all this is doing is it's taking this this grat output which we initialize everything is like zero and we have this output which is the um which remember from the forward pass is the output of the softmax which is actually a probability distribution it is not low jits it's not before the Exponentiation it is actually a probability distribution with each value between 0 and one then we have the labels and literally all we do here is we just element wise we set the grad output to um the actual output value
so which which uh which floating Point number is it right and then we subtract one based on the actual label of it so notice how in before in C friendly we did um we did out grad output equals softmax probs minus y true we're doing The same thing here except we can't just do a simple numpy element wise operations we can't just be be dumb and say this right we have to actually we have to be explicit and we can be a little clever by just doing the minus equals 1 uh there so uh that's
it's literally doing the same thing we're just using a different trick if we just continue going through we just did compute output gradients now we now we can actually use those Gradients and start using like Matrix multiple highs and bias backwards and Ru backwards and all this stuff right so the first one here is Matt Mo um we go through uh we we calculate w2. grad now w2. grad is right here so x2. T times the derivative of the loss which is grat output so here we do a hidden which is X2 here in this
case um or sorry yeah X2 so the um essentially the the input going into that um and then times so this is times B right so B is In this case is the grad output so we're transposing this with this a here and then times this and then that's going to equal C or the grad weights 2 right so grad weights number W2 right um yeah so that that that that should be fairly intuitive now we go further we go to bias backward bias backward isn't actually too bad so bias backward is uh literally just
going to we're going to iterate through um the Size I mean keep in mind we have batch size right so we're going to iterate through the entire size of it uh you know iterating and incrementing I each time gra we're going to uh store uh a bias value a gradient bias gradient this index as zero and we're going to iterate through the entire batch size and we're literally just going to set that specific value we're going to iterate remember we're iterating through the Entire batch size so like we were doing before how we were like
smooshing the numbers we're going to go through that we're going to just um essentially do B times size so the entire uh the entire length of that the entire length of of um of like a of like a row and then plus I and we're just going to set um um because this is going to increase each time so we're essentially just going Down one one row at a time right and we're we're smooshing it together because we're plus equal accumulating that value here so our grad bias is the this is the equivalent of np.sum
across axis zero keeping dims true right uh and then we go back to where is it we pop back to the backward function awesome so now we get bias backward we pass in the uh grad bias right so we're calculating the the gradient bias and we Pass in the grad so that would in this case would be the grad output and then batch size and size right so that should be fairly intuitive it's just the gradients are directly flowing and we just do an accumulate operation across the batch because we want to generalize over a
batch right it's more useful to do that um and then we just do since we're done the W2 now we actually move on to uh the DX X2 right so dx2 uh is right Here we Malik this cuz remember this is just temporary we don't we don't actually need to store this this doesn't need to be updated anywhere we're just calculating this because it's a prerequisite for calculating W1 so we we can free it after we don't need to store this in memory just be like efficient um and inside of here we literally just go
uh grad output time W2 transpose right so we go grad output a W2 transpose T and we store that in dx2 right going Down further D out which is this part here d r out is dx2 * d r of X we allocate memory for this we go through um we go through the entire batch we literally just do dx2 so dx2 time D um d of of whatever of whatever that value is just just going through it right and this is going to be um if this is this is going to evaluate to a
a true so or essentially a one if this if this If this value is um essentially just relue derivative right Rue derivative that's all this is um we might not actually even need the Rue derivative backwards in in this whole thing but we're going to keep it anyways um this this does work though so this stores the D out that's what we want right d out is good then we update using the using the um what's it called we calculate D out from dx2 which we which we used up here right we stored that stored
the gradient For that the temporary gradient there we don't need it for later we just need it for now calculate dout based on that and then we use D out d Rue out uh later and we essentially go to calculate W1 we go x1. t time d r out right so transpose so a tore B that's what this is going to be a tore B we go input so um input X1 transpose that times D value out and store that in we it's one awesome Bias backward as as per usual so we just have the
uh the bias itself um and then the the one that it's flowing uh flowing from right so whatever it's whatever the um whatever the previous layer gradient was that's just going to flow directly into bias right because um you know adding adding does not uh change the gradient of something it just changes the like position the offset of it but the slope remains same um but yeah that's that's literally the backward Pass not too bad that might have been like a little hard to keep up with my my D you outs constantly it might have
confused you but uh yeah that's that's pretty much it and then inside of um inside of yeah so that that's backward and then after backward after this we do update weights then we print some stuff out so let's just pay attention to update weights here don't don't worry about the rest of this you can parse this on your own what we really care About is the actual learning mechanics of it right you can print anything out any day you want it's very easy um but we care about what the actual mechanism is here so if
I go to update weights we pass in the neuronet struct right the pointer to that we access we go through each one in here and we literally just um we just do the same thing so hidden size times input size so that's going to be um you know 784 by 256 that's the Weight one we we iterate through each index remember this is laid out sequentially in memory so this is going to evaluate to whatever 784 by 256 is that's a large value just going to iterate through that in memory it's going to go through
the lines or this straight thing and it's just going to do learning rate times whatever the grad was and then it's going to minus equals accumulate that into um weights one it's going to do the same thing for weights Two remember weights two is um output size times hidden size so hidden size 256 output size is 10 um bias hidden size two out size very straightforward and that's pretty much it um let's go ahead and train this thing so going back up let me just make sure these are all set correctly we'll do 256 sure
we'll do batch size of four that's fine learning Rate 0.01 that's okay as well we'll set theox to five just to be less redundant or we we set it to actually set it to three why not so now we go into here GCC Das o V1 and then V1 doc which is the file we're going to compile and we do LM for link math right so inside of here we do the math.h file we need to link math for this to work because if we don't right and um Unidentified reference to this these are all
the math functions right but if we do LM it'll work we can go and run this so we get the first this is a five printed out first Trend training labels is five as we see here and then 04 1 9 2 1 31 4 and we can see the accuracy starts off at about well the loss is about 2.3 which is uh random as we'd expect it to so 2.3 evaluates to about 10% accuracy and we can see that through the first Epoch it goes through 2 200 HS and we can see that the
accuracy goes up to about 60% which is solid right loss is going down and then in the next one it sees oh my gosh wait we've seen these samples before and it's going to drop even further it's going to go down to 088 and accuracy is going to fly up you know 15% because it's already seen these samples before um and then it's going to do that again it's going to go up to 86% and we end up with about 88 8.6% here um and uh yeah I mean you could always print out the the
ending samples if you really wanted to um you could always print out like some extra samples and just like how it um how it matches those up um but we're going to notice that in our uh in our Cuda file so uh anyways that that was a lot to unpack there but that is the C file that's how we transfer from numpy to see it's not actually that crazy of a jump it's Mainly just writing the algorithm you know the hard way um and just kind of being more aware about things right it's very easy
to run into issues but as long as we're careful about things it shouldn't be too bad let's go and jump into Cuda now okay okay everyone so this is one of the last parts of the course actually and this is part this part is intended to be is intended to be a little shorter so this is designed to give you s of sort of a template for Continuing on this is the final project right so uh I'm not going to give you all the answers right away a part of your job is to figure this
out on your own and use what we've developed beforehand to continue and optimize performance further right so I have this um I have this naive GPU file right here uh or sorry folder inside of Cuda so we go to we go to um go to the Cuda directory and then we CD into n View and inside of here um you're going to find this file this vew one right I just have this as like versions so you can I'll like update more versions later on if something breaks uh in future Cuda releases or whatever but
um yeah so this is essentially just a direct Port from our our C file so literally all we do here is we we load in the same things um we initialize way it's the same all these are done on CPU as you can see the only things that we actually change are The m Kels right so we can see the well there's more than just mapal kernels but you can see so we have this mmal A and B um so this is this is not transposed uh and then this is B transposed and then this
is a transposed right so when we're doing our backward pass and we need to transpose certain values uh that's what we'll use that for right so we have certain kernels that dedicated for that and we can actually see based on the indexing scheme in here Um like notice how we we iterate Over N every sing single time except this one this one is a little different this one is M but uh if we go in here we can see a this is just the normal one right so row * n u plus I and then
if we go to this one B it's I * k + column right and this is different so notice how this a stays the same but because we're changing B and making it transpose this part this Indexing changes right and then same idea here is uh we just transpose a so this part I K and then column i k and then column and um this part is going to be different right so instead of row N I it's I N row and uh yeah that's those are pretty much the major changes the reason why we
do this for um we do this for a is because a is transposed um and and the m is m is a Little different but these are these are naive kernels I expect you able to dissect these but if we continue further we have the ru we have our bias uh we have a softmax kernel so this is going to do a single softmax uh output so a distribution for every single batch element so it's going to go vertically downwards each each thread is going to do a a row we zero our great gradiance with
this simple kernel so it's just going to Go you know it's going to go through every single value and just set that to zero um probably faster than mem set I'm not sure but and then we have our D kernel so this is just the derivative of Ru multiply gradients um so element wise multiplication of gradients which we can see is used down here in multiply gradients and this function is used uh is used right here so when we're doing our when we're doing our Rue Um when we're we're doing our actual uh we're going
through D and we need to um multiply those values it kind of makes sense why we would put that there um going back up we just have our forward so the typical a * B I don't know why this is T um okay um Bim is not working all right and we just do a ml add the bias Ru ml add a bias then softmax right very Simple cross entropy loss is going to be done on the host we're going to compute our output gradients on the GPU because there there is actually going to be
a lot of you have to consider when you're actually writing Kel you're like what is the how useful is it right to actually go and write your own um actually go and write your own so like for example this one we could probably turn this into CPU and it might be faster but who knows um the kind of the idea here is like if you Have a big one if you have a big update to do like update to gradients and you have these big giant um you have these giant W matrices that you're trying
to change and modify then having a thread to do each little uh to do each little like point update will help speed that up but if you're doing just like a B by10 for example which is what this is you could probably get away with just doing this really fast on CPU and you'd be you'd be fine uh cuz there is like Kernel launch overhead when you have to like literally launch this it has to tell the GPU what to do and then it has to trigger a bunch of threads to go and execute that
right um and then in our backward pass we zero out the gradients to make sure that they're not accumulating and giving us you know mix signals um we have our uh compute compute output gradient so that's going to be the essentially the These the output probabilities minus the the true labels right and then we have our our a transpose times B so we go back to here um this this dw2 right we update um we update gradients for bias 2 so there's specific kernel for that now remember when we're launching these there's it it seems
like there's a lot to sort through but really all this is is looking at that previous Technique we did where it's like you you Have to launch um say if you have 1,25 elements and you would normally only do um like 1,024 uh threads right so what you do is you add on add an additional block right with a with a single um with a single thread inside of it or or just or another Block in general you could say and since you have those bounds the like that little if statement that checks if everything
is is worth so that it's not like out of the out of the matrices that You're working with like out like outer outside of that memory um then you can that that's essentially what this is right so we're just being careful about how we launch this stuff um and yeah this this goes back to the you know chapter number five on on kernels right so uh these launch configurations can like really mess you up and make things look more complicated than they are but if you can just like look through this one bit at a
time you have the uh you Have like the grid size and sorry the grid dim and the block dim right and and that's all you're really working with and then of course the the arguments for the kernel launch itself more mmols right going back to here this times so it's a * B transpose a * B transpose uh and then inside here we just do our we just go backward through our ra function all this is like very close to our C file it's just like it's just run In parallel right um same idea here
I'm just going to go further downwards updating our weights um you know it's kind of I guess I have two of these are we using this let me see yes we are we're using that one but this one update gradients yeah that's also okay so so these are different things right yeah so the the update gradients that's for the Bias and the update weights that is for um that that is actually where gradient descent itself takes place um and then inside of this Loop we go through uh initializing our our device training sets so when
you have this D prefix remember that's for device um you know Y is labels train is the train set we C AAL all of those we mem copy them over to device because they're initialized as pointers on the host and we have to copy those over with respect To their memory addresses over to device um and then aside of here we just iterate over all the epochs we need to do which in this case is Define at the top and then number of batches right and then we we set a starting index we make sure
to like stride a little bit so we have whichever batch we're at here so number of batches in the total thing which we actually calculate by doing train size number of divide by batch size so if you have a th 10,000 training Uh examples and a batch size of four you're going to have um 2500 batches right and so when you do um whichever batch you're at which is going to go through you know it's essentially going to go zero uh three um 0 3 7 11 it's going to skip by four right we do
our forward pass so keeping this uh this simple this nice little concise NN struct right with all of our our gradients and our our weights Right we calculate the uh we we C essentially what this part is doing is we're calculating the loss we're adding it to the total running loss of where is it on this level we have we initialize the total loss inside of the epoch Loop right so this is for the entire Epoch that's why we're that's what we're kind of doing there is when we add the loss we're just like appending
it and then we're you know dividing it accordingly So we're just taking like the average loss over the entire epoch um in this case we are essentially just like we were doing in the C file we're just um adding to the correct counter so however many samples we got correct that's that percent accuracy going into backward pass I already walked through this there mean you can kind of sort through all these different arguments uh we update we do an update Weights for each of our individual weight matrices um so it's just going to essentially element
wise uh it's going to element wise multiply um the gradient times the learning rate and it's going to accumulate that into the weight right on device and then in here we just print some useful stuff right go down here make sure that we free the training sets uh the hidden and the D output that we initialized Before we have our initialization of the entire neural net so just essentially doing our malic initializing those so each of these are going to be set to like random values or in this case biases are going to be set
to zero and then we do our Cuda Malik so we so we allocate on on CPU we initialize everything on CPU we allocate on device we move everything to device um and then we're ready to run right and then in this case all we would Do is um initialize this neural net we we initialize it with with with random data with random data values uh then we load in our entire uh training set into um into the host memory we go and train everything and when we're done we can free whatever we need to on
CPU and free whatever we need to on on device so if I go ahead and give this a run here B1 not going to run with good Boss so variable I was used member reference don't worry about that a warning then we go and run this we can see um this trains insanely fast uh we go from uh Epoch one we have three epochs in here total each one doing 2500 HS and we get a loss of about 2.3 which is as we'd expect and then we see the accuracy increase up to 60% and then
it gets even it jumps right goes up to goes up to about 87% and then jumps even higher and we end up at around 90% right So that's pretty good and we can uh we can actually run this with bigger Hye parameters so I can go ahead and plug in 10,24 there and use a bigger batch size maybe like maybe eight and then epox is five we pop into here compile that we go and run it we can see that um um get a lot better accuracy right so even up to 92% now so it's
kind of what what this part is is it's called grocking so you get the first part where it's where it's like just starting on on Its training steps and it's sort of figuring out which weights to push in the right direction and then you and then it figures that out and then it plummets the loss drops like really fast which is what we're seeing um right here with the loss is like 2.3 and then it's 1.72 and then boom 0.5 then all the way down to like 2.9 0.3 is um and then what's Happening Here
is it now no it now can no longer use the easy patterns that it recognized and now it has to Search for more for more difficult attributes there might be certain images that it has a really hard time recognizing and it has to and it has to you know learn additional stuff which takes more training steps to do um in that process of deeply understanding the data set or or generalizing over it that's called grocking right um hence the grock language model I was using before um but yeah so if we step out of This
and go over to um go over to this this v file I named it V because it's supposed to be fast and it's the one that you're supposed to edit later go to room and I was doing some comparisons here but going remove those compare and compare and we have this other comparing file which was experimental but I'll probably remove that soon um and then we go into this other one v1c inside of the room file and this One is pretty close to what we had before now the only thing we actually change here is
instead of having uh in we actually make this easier for you so in the past one we kind of simplified it and had all of the and had and did like the map Ms a bit differently where we transposed inside of the kernel but in this example um we want to make it easier for to just plug your own code into here and have it work um so using like the sjem the the sjem Cuda Optimizations we did before in the faster mmal chapter like that's what you would plug into here right um you'd have
your your own kernel and you would launch it and from here um and then inside of um and then inside of if I go down we can see a transpose kernel up there but if we go into backward pass there's nothing modified in the forward because there's no transposing there but In the backward pass we can see that there's just transpose Matrix function right transpose transpose transpose because we have to do this three times we have to calculate uh this one this one and this one there's no dx1 right we we don't have to that's
redundant because we don't have a layer before it um so we do three three of those three transposed mammal operations and so in here this literally just switches it from column major to Row major that's all it does uh it's just a cool little trick there is a custom kernel for it that you can review if you want to um we where did it go right here so there's this transpose Matrix function that we call we pass in these device inputs into it and then inside of here we actually do the transpose launch and we
we make sure that no errors happen and we synchronize um all of the threads on on the GPU Right this is where the actual uh this is where the actual trans uh trans transposing happens um which isn't too conceptually bad um but don't don't worry about this too much it's more so worrying about how do you speed this thing up so I can go Ahad and run this actually and uh like I'll we change here is literally just the just the transpose oh I I had some KU stuff at the top let me remove That
Bloss I'll just add that in temporarily we just compile I was messing around with Koss like this is a totally experimental file so don't like I'm just kind of like screwing around with this one um but we could just do link Koss like like that and go and run this and we can see it's it's also pretty quick too um yeah so it trains it trains the same on 250 On hidden size 256 which is what we have or this is 1024 actually um so 1024 and we give it a batch size of eight only
three Epoch to learn though um it takes you know it gets up to about 90% accuracy which is still good um but yeah on a reduced on a reduced um on a reduced number of training samples so we do batch size eight instead of four so it gets it gets more like it gets twice the amount of generalization because it has double the batch size but the amount Of training samples is cut in half right so it's actually like not that bad um when you think about it so we could like bump this epox number
up to six and you would see how how much of a how much of a difference that actually makes so we can see that it's kind of going up to 92 which is you know this last phase here was it was grocking is what it was doing there um but yeah so we got up to about 92% um close to 90 93 in some Cases um but yeah that's decent um that's you know I know most humans are better than that but for 10 seconds of training I think that's pretty good for having no knowledge
about the world at all this neural network did fine now over time I am going to add optimizations to this but since you're watching this right now this does not exist in the current repo the version of this course you're watching right now whether that be 5 Years From when it was Posted whether that be two months one day um this is the current version that you're seeing right now and so this might be different by the time I've updated the GitHub repo in the future uh I do plan to maintain this and add in
you know additional like maybe a V2 with like you know I I'll make sure name everything of course but uh just to just to go in and like add some extra features for example like I might I might add in like a a really fast uh Like custom uh row major kernel where we do like tensor core operations so the warp uh the Warped Matrix multiply accumulate the W MMA with tf32 Precision that stuff is really fast uh and then as well another optimization you could take over is using Cuda streams so remember in in
uh in the concurrency chapter and and no in the in chapter number five where we went you know more deep deeper into kernels and the whole Cuda architecture you can use streams to uh Make things run concurrently right so you could be loading in some data uh and then you know doing say like a a forward you could do like a forward and um a forward and a backward pass and then while that's happening you could be loading in the next piece of data right so I mean obviously this is just like a digit digit
classification and you're not going to be super performance limited here there's not a need for like having super super high throughput CU You can you can get this thing up to like 99% accuracy if you if you make you know deeper layers and you increase hidden size and adjust all these things it's pretty easy to get this thing to perform well but this is the type of thing you want to practice so that when you write more more comp complex kernels it's not as difficult to start with right so you know there lots of optimizations
you can do you can add in uh in this where is It in this uh Matrix multiply kernel in here you can switch this out with stuff I'm not going to switch it out right now because that's something that you kind of want to do as a part of the final project something you want to do self-guided and and sort of go into it on your own so I mean you can use this as is but if you want to have some fun this is just simple mamal kernel here there's no transposing or anything this
is R major and you can have fun with it Uh so so that's that feel free to change this kernel maybe experiment with tensor core operations WMA stuff um and then you know Cuda streams or something like that feel free to use the uh ncu profiler um and yeah hopefully this gave you a better Insight on how to kind of build up projects and how um and how while they they might look Lex on the outside you can sort of dig in and figure out what's going on now just really quick to run all These
again just so everything is crystal clear that these are performing the same um we'll go ahead and edit each of them back to you know 56 so we'll do 256 there epox we'll do like three we'll do bat size four learning rate is 1 * 103 and then in here we'll do 256 as well uh batch size we'll low that down lower that down before inside of our CPU we will uh turn this up to 2506 batch size is four Epoch three that's good then we pop into our python here set the uh torch reference
script to to um this is 256 already uh 1 * 10-3 batch size 4 we're looking good and then we go to the C friendly script I scrolled a little too far 26 good bat size four awesome so now now we go into python I'll run python uh torch reference give this a second the data loading is Takes a little while in Python sometimes it's not the most optimized thing ever so uh awesome so we end up with about 90% 90% accuracy in the end you know 89 here we have 87 in this case so
we end up with about 90 in the end let's memorize that number 90 and then we go to python C friendly and we get 87% 89% about 90% I had I had five ax in there um yeah about 90 90% as well 91% and then we navigate over to the CD into naive CPU we go GCC compile with math we'll go and run this in the this is going this is going to take a second um it's not used to going this fast I know numpy probably has more specialized Mill routine so a lot of
This is just uh or sorry um yeah yeah numpy it probably has more specialized routines here so just doing it in raw C like naively is going to take a while um yeah so we can see this we end up at about give it a second pretty close to 90% as well so 88.5 slightly worse um but that's that's almost negligible now We have to what am I do CD into Cuda slash GPU and then we'll do nvcc compile without Coss onun that look how much faster that is right new total of three Epoch and
we end up with boom 90% oh how how convenient is that hey and then we'll head out and we'll go to um the the room file room And pile with Koss you I just added the kublos thing because you can add your own kublos sjam or like the LT matol in and just play with that um you run this about the same speed and we end up with about 90% as well so everything's getting about 90% which is good shows results are kind of consistent just like make sure that's all cleared up give yourself a
pat on the back if you made it this far it's pretty much the end of the course you made it good job Um I'm just going to go over some quick little little tips points in the right direction if you want to continue with this stuff um you know it it probably was hard to grasp everything so I understand if you don't but if you do uh I have some extra resources for you so inside of the read readme file here I have a section on you know like what is Unified memory memory architectures which
I thought would be you know kind of useful and you might be interested in But mainly what I what I want to cover right now is I'm going to add to this I'm going to add to this read me file as well in the future um but there's there's a section on dive deeper and this is like if you want to take that extra step and really figure out how you can apply deep deep um deep optimizations and advancements and whatever you want to call it in in Cuda and GPU programming uh especially in deep
learning this is this is what you Can do so there's this thing called Quant ization which I'm going to start with quantization is where you is where you go from uh say fp32 and you go down to say fp16 or int 8 you can you can actually go down you can actually go from fp32 to int 8 and you can still have really really good performance and and quality of the of the Precision on models right so there are specific ways you can you can do tricks around this but a lot of it has To
do with uh you know if your if your range is is limited so if you if you can hit like a maximum of say like I don't know 10 and a minimum of - 10 then you don't actually have to worry about a lot of those exponent values right if your weights are initialized and your training is stable and nothing's going to go like above or below 10 you don't have to worry about it um you could literally just cap that as your Precision right and that'll be the Maximum it can go um those will
be like the the more sparse values right uh so quantization is pretty much just the art of doing that which is like taking numbers that are really high precision and then moving them down to lower Precision doing really really fast operations with those because I can tell you for a fact int 8 is a lot faster than fp32 like not just by four times it's by quite a lot um and we saw that in the kuo versus kubos LT section where We compared 32-bit versus 16bit and then performance was pretty substantial so you can imagine
what in8 would be because it's just integers there's no floating Point numbers to to worry about there's no decimal places right just inate so quantization is pretty cool it's used a lot in current models like uh you know say gp4 or like llama uh llama 405b if you've heard of that one uh like a lot of these actually use uh quantization right so most likely like Bf16 or like fp8 or something like that some of them even use float 4 which is cool um then there's tensor cores which I talked about already but I can't
I can't leave it out tensor cores are great um I'm just not covering it in this because this is kind kind of like an intro it's kind of an intro course so I triy to like pack as much as possible into a into a certain amount of hours that you could you know uh digest and then if you want to continue with that There's obviously tensor course too um sparcity is a cool one so sparsity is you can think of sparcity as um if I have like an array um say like it would be like
0 0 0 0o um like7 0 0 z0 0 and then say over here we'd have like a like a six right this is this is what sparse means so there's a bunch of zeros and there's an occasional like very big number that represents a Lot right based on its position maybe based on its position relative to other numbers um but the idea here is that you can actually store these in much smaller memory so it's a it's more of a memory and compute thing more than just like is this like what quality do you
get from this it's really performance so what we can actually do is we can say um you know we're going to have two matrices one with the values and one with the coordinates so we go -7 and six and then this other Matrix would be um you know 0 1 2 3 4 so this would be um 4 and then 5 6 7 8 9 10 11 12 12 13 14 15 16 right and so you would end up storing only four integers instead of instead of 16 integers and you reduce everything by a lot
now imagine this when you scale up to you know 2D or 3D structures you're saving like orders of magnitude of memory and it can be really really efficient right so this is something to Consider when you're Divi uh when you're you know designing highly performant neural networks is um can we capitalize on things like sparsity right that might be encouraged by the you know the people who are writing the neural net outside so when they're just writing like the P torch architecture if it favors sparsity if it does really well with that and that's what
it runs on then this is really good for you this makes your job easy um but sparity is just a Performance hack uh you you know take it when you can right then there's this book Cuda by example so um this it's literally just a book in a general purpose GPU programming I found this off of a Google search so it's just like one of those Edo websites and uh yeah it has it has a bunch of things in it so like CPUs rise of GPU Computing right a lot of what I covered um so
like what is the c to architecture Um pretty much a lot of a lot of what I said or a lot of a lot of the a lot of the important parts in here are compressed down into the course right so obviously not all of it is and I didn't I haven't read this book either um 300 pages so I haven't read this book book but a lot of what you're going to find in here is going to be uh compressed down into this course now there's this other article by Simon The guy who works
at anthropic on data parallel distributed training of deep learning models so that other that other chapter where we were talking about getting um getting uh big big algorithms to train across multiple instances this this is a good example of it so distributed training is a big problem right now is getting like data centers into one compact place there is research around it and helping reduce that you Know dist distributed aspect but when you have you have when you have a massive data center of a bunch of models and you have to get them to talk
to a bunch of bunch of gpus sorry and you have to get them mod talk to each other a certain way it's hard right so this kind of goes into that um I'm not going to go through this entire thing but this does go through more performance optimizations things like all reduce which are used for um the Actual uh optimization process so you'll see like an atom W all reduce or something um there's a yeah it's there there is a lot to consider here but I don't even have a cluster to train this on so
I can't really teach this part um we go back there's a few projects that I found was that were really cool one of them was mnus Cuda or CNN sorry I did memis Cuda which was this and then This is the actual qnn uh qnn and kublos for training on the nness data set this uses I believe convolutions so if we like were to go into yeah see it's like a V Visual Studio code project or whatever so this might be easier if you're on Windows but like if you go into for example the the
network C++ file um yeah I'm not going to dig through this but this is a cool little project that I found um you know feel free to do Whatever you want with it but it would it came up in the GitHub search results when I searched for mist Cuda so do what you will with that um I'm not going to go Cuda mode right now that's I'm going to save the best for last microad Cuda is very similar to um microad by kpoy so this is something I touched on earlier and this is something you
should review heavily for understanding uh how how things like back propagation work so it's pretty Much like a like a like a pie torch autograd but very very small so if we actually go into the files for it go into the microgr files itself there's an engine for it so the values there's like a like a value thing for it so what like the op operations you can do like a like a power so when you go double asteris it's going to call this underscore uncore power as a method right um then the add is
just like same thing you have the plus and that's going to all the the Add method then outside of engine you have the actual neural net. py which is like brings up all the abstraction of like going from neurons to layers so you have like a single neuron with a set of Weights in it that taken you know all the different X values and then dot product and then output one that's a neuron right so you does like a do product there we can see that very clearly and then there's uh you know like a
layer where it does a bunch of Neurons um and then it will and then it'll just like a layer of neurons just like that right a bunch of lons stacked on top of each other and then the MLP which is like that layer but there's multiple of those um and then micro Cuda is just that but implemented in Cuda right there there had to be one so uh yeah feel free to like have fun with this and everything it's it's supposed to be faster so you can kind of just Understand things on a level of
uh compute unified device architecture there's you like operations all the Cuda operations so move to gpus is like Malik and mem copy um you know it's very simple interface you can imagine pytorch being similar to this um probably more performance optimal but um you don't want want to do like a Cuda M Copy and a malic every time you want to move something or use a piece of data you know you have the naive matal Kernel of course um the tanh kernel right all this uh but yeah so bunch of cool projects people are doing
and then there's this other interesting one I found second second best one uh GPU puzzles so you can use the qy library so go qy [Music] python so qy open source GPU accelerated Computing with python so it's essentially Cuda but you get to use it through a python interface which is Awesome um we go to the GitHub for this Cy right there's a bunch of cool stuff on this you know you just import it and then you can you can make like shapes and stuff and do stuff with that um similar to something like p
t or nump right but yeah so these GPU puzzles are just like going through um you know solving like essentially the logic problems where we Had a krel solve an issue for us but doing that for a bunch of different examples right so instead of just matrix multiplication there's like a lot of other things in here which you might find fun to practice um and then the last one which I decided to save for last is Cuda mode so they have a they have a g Hub they have a YouTube channel they have a Discord
server and pretty much a bunch of this Is it like actually contains a lot of material and Beyond what I covered in my course um this one was more to be like video assistive but the community behind Cuda mode is amazing they have really really good engineers and researchers here um just like building cool stuff constantly people being super active in the community it's a great place so uh this is something I'd absolutely recommend you check out um and uh yeah there's there's a lot of Chapters like you see like flash attention right they have
everything cutless Triton um fused kernels data processing um tensor cores right so a bunch of cool things um I'd recommend that you join their Discord server you can find that where's their Discord server here uh yeah bunch of essentially bunch of cool uh bunch of cool groups and everything it's like beginner Section right Super Active like today the last message was the last message was like not even what like a few hours ago and that's just one channel right so you go down here the last message was like 1 hour ago so if you enjoyed
this course um you can totally find me on other platforms you can find me on YouTube you can find me on x/ Twitter you can find me on Discord I have a Discord server full of a lot of people uh you know there's Cuda Mode as well but I also have a server with a bunch of people and we you know like to learn stuff and collaborate and all that um yeah find me on YouTube find me on LinkedIn find me on X find me on Discord those are all going to be either links in
the description or if they're not in the description they'll be in the GitHub repo um in the description below thank you for watching