Welcome back to the channel guys my name is Daryl Wilson today in this video I'll be showing you all how to create a car rental website with WordPress step by step with this website you can offer car rentals Lima websites or pretty much any type of rental website you like so here's how it all works the visitors come to your website where they can select a pickup location and the time they can then search for the rentals on Your websites after they have searched they will then get a list of available rentals and they can
then select the rentals they wish to rent on the next page they can see the details and you can also offer additional services like premium seats or any extras you want to add for your rentals next the customer will be brought to a checkout page where they can order the rental directly on your websites after the customer is ordered they will then get a purchase Receipts and you will also get an order notification it's pretty straightforward you also have your own personal custom dashboard where you can view the rentals make any changes you want adjust
customer details and a whole lot more and the whole website is drag and drop so even if this is your first time making a website you'll have no problem so with this tutorial you guys can pretty much make any type of rental website you guys like I know the title Of the video says car rentals but you can make rentals for tractors or for limos or for equipment or for anything that you guys choose now we're going to be using a free plug-in to create this rental website in the first part of this video I'll
be showing you how to use the free version of this plugin however this plugin obviously has a pro version so later on in the video I'll show you guys how to utilize all of the pro features of this plug-in the pro version offers Various features and also allows you to integrate payment gateways so you can start accepting credit card payments on your website and don't forget we're also using a drag and drop Builder so even if this is your first time making a website you guys will have no problems now we're going to build your
car rental websites in four simple steps in step one I'll show you how to get your domain and hosting a domain is the web address for your website like MyCar Rentalwebsite.com and web hosting host your website online 24 hours a day in step two I'll introduce you all to the general settings I'll also show you how to import a pre-made starter website in this part of the video you'll get more comfortable with the Builder and I'll show you how to navigate and design your website in step 3 we will then install a free plugin that
will convert our websites into a car rental website with the free Version you can create listings add search navigations and much more in Step 4 I'll introduce you all to the pro version the pro version allows you to accept payments on your website it also offers various features like extra add-ons cron jobs and a whole lot more so first let's go to step one and get web hosting now there is a link in the description of this video it'll take you to a page to purchase fast Cloud web hosting and welcome to namehero.com now I'm
recommending name here.com for years and people love it uh this week alone I've had zero downtime with name hero so you guys will have a reliable website and also my websites load at under one second with name hero so we do test these servers to make sure that you guys do get the best web hosting possible now once you guys are here you'll click on get started now and then it'll bring you to four different pricing options so we have the starter Cloud the plus Cloud The turbo cloud and the business Cloud now I personally
recommend the plus Cloud if you guys are just getting started out like you're just getting your feet wet for the very first time but for those of you who have been using Wordpress for a while and you want to upgrade and get some more performance I would definitely go with the turbo Cloud because with the turbo Cloud you guys do get the new nvme storage which does just give you a little bit more performance With your website so you'll go ahead and pick a package that works best for you and your budgets and then once
you guys figure your package out you'll go and click on order now all right and here you're going to enter in your domain name so this is the name of your new website so portfolio website.com or you know my newswebsite.com or whatever whatever Niche that you're building you'll go ahead and put it here so I'll just put it in tutorial domain1.com And see if that's available all right cool it's available now I know it takes time to figure out the domain of your website so you know give it some time you know it does take
some thoughts for your new websites once you guys figure it out you guys will click on continue alright cool so next we have the billing cycle and we have three years two years in one year now personally I'd recommend one year you guys do get a large discount and this Does give you enough time to decide if this is for you or not however if you guys are feeling very confident I would recommend going with the two or three year plan you guys do get the deal the longer you sign up for so it really
depends on your budget but I want you guys select a billing cycle we'll scroll down and I don't recommend any of these upsells personally you can do this with free plugins so yeah you guys don't need Those and then we do get a free SSL with name hero so that's pretty cool once you guys select your billing cycle we will then click on continue all right next we have the domain configuration now I personally recommend the ID protection guys this will protect your personal information from spammers and people trying to sell you SEO packages and
Viagra and all sorts of nonsense whenever you guys get those weird emails in your inbox it's Generally because they found your domain online so this will actually protect you so you don't get spam in your inbox so go ahead and click on ID protection and then click on continue and look at that for a year of Hosting you're paying less than a hundred dollars you're paying only 70 bucks you guys can also go the cheaper routes and get the cheaper plan if you're on a really tight budget but I think this is a great deal
for web hosting for the Entire year for this specific performance so you guys are getting a reliable and a fast server for this price so it's definitely worth it so go ahead and scroll down just keep scrolling now you're going to go ahead and fill out your billing information here so your first name your last name uh additional information you'll put in your password and also a support pin so this would be the pin that they would use to verify that it's you And then also we have a payment methods so you can pay with
PayPal coinbase which is cryptocurrency and credit card here you'll go ahead and put in your payment details and if you guys do want to get their spam or their emails now they actually send some pretty good emails guys I'm not gonna lie they have some cool promotional offers you'll go ahead and check that box and then you'll of course agree to their terms of service right I'm sure you guys are all Going to read uh this here right you guys are all going to read this I don't think anyone ever reads any of this stuff
but uh yeah you'll go ahead and uh check the terms of service and once you guys have checked out I will meet you guys in the customer portal all right and welcome to your new dashboard so this is your current dashboard as you guys can see I had many different packages many domains and I also have tickets with name hero and they really Help me out with all of my problems so this is just your interface on the left side you can see your hosting packages these are your current domains you can always register a
new domain also billing so if you want to see your payments or you want to add funds or you want to adjust your payment methods you can do that here and also the support so if you guys run into something weird I know with websites things just kind of get weird sometimes you guys can always Open a ticket here and they will help you out with all your problems and they are pretty fast I mean I think maybe under one hour they can help you guys with all your problems so once you guys are here
let's go ahead and install WordPress onto our new domain you'll first click on my cloud now here we have hosting packages now you should probably only have one here so just go ahead and click on your hosting package And next we're going to see this log into cpanel go ahead and click on login to cpanel all right cool so now we're going to go ahead and install WordPress onto our domain so up here we'll type in WordPress here we go we have WordPress manager by Soft taculus we'll click on this all right and from here
we're going to install WordPress you guys can see I have many installations of Wordpress Already but right here you'll click on install and now we're going to look for the domain that we purchased so right here you have the choose domain section so you'll probably see your domain that you purchased I'll just go ahead and select this one but you're going to select the domain that you purchased and for the protocol make sure this is https which is the SSL now for in directory make sure nothing Is here all right I don't know why that's
there by default but oops whoops but I make sure nothing is there because that will install your domain onto like your website.com something and you don't want that there it's yeah just don't have that there make sure that's make sure that's empty now for the admin username go ahead and give yourself an admin username and a password and this is what we are going to use to log into the website so whenever you want to Build your website you're going to use these login credentials so make sure you write these down I'll just put admin
never put pass guys uh make sure this is something unique I'll just put uh paddy whack and your admin email make sure that this is an email that you have access to because when you forget your password they will send this information to your email so I'll put in my my Gmail account here my famous PC hoarder which I do get Tons of spam and below that you can always select your language we can always adjust the language as well inside the WordPress dashboard and I'll show you how to do that in just a bit
and we're going to keep scrolling down here to the bottom they have these other themes they want us to use but we're not going to use these and right here you'll click on install yeah they said three to four minutes that was not three to four Minutes right now here we have installed WordPress and this is the administrative URL administrative URL so just go ahead and click on this link and this will log you in to your website alright and welcome to your new WordPress dashboard so this is where all the magic happens now if
you guys want to see what your website looks like right now here at the top left we'll click on visit sites and this is your new WordPress website It's using a default WordPress theme but not to worry we'll make this site look really really good all right cool so congrats on your website so now that we have our websites we can now go to section two where we're going to import a pre-made website so in this next section of the video I'll introduce you all to the general settings we'll import a pre-made template and I'll
show you how to use the Builder and navigate and customize your websites you guys ready Let's get started so let's go to our dashboard now before we install anything or change anything we first need to adjust some of the general settings so over here under the settings tab let's first click on General now if you guys do speak a specific language you guys can actually change it right here right so for example if you guys speak any of these other languages they have quite a bit you guys can Adjust it right here also make sure
that this is the email address that you guys have access to because if you guys forget your password it'll be sent to this specific email so make sure you guys have access to this specific email and then we'll go down and here you can adjust the date format and the time formats and then we'll click on Save changes all right now let's go over here and go to users and click on profile Now here we can actually adjust the backend color scheme right this was actually like the first one that came out for WordPress it's
it's really weird you know it's kind of it's awkward but uh you know that's that's Des for you and uh yeah you guys can actually change like the back end here I like midnight I think Midnight's just easier to see on the eye right it's just really easy to see and I do like the the um like the darker scheme so almost like midnight For this video also modern's really nice modern also is really good as well you know but uh you know what I'm sold on Modern we're going to go to Modern all right
I changed my mind here last second like the Shark Tank you know and then for the contact info we will make sure that you guys have access to this email again uh again this email is sent to uh if you guys do forget your password all the information will be sent to the specific email right here and then below That if you guys do want to adjust a password or change it you guys can change your password for WordPress right here and I'll show you guys how to log in and log out in just the
minutes but uh yeah you guys can create a new password for WordPress right here and then you'll click on update profile next we need to adjust our permalinks so over here under settings let's click on permalinks now for the common settings we're going To select post name and the reason why we do this is because when you go to a website it says you know your website.com about us right or contact us not archives123 it's it's a disaster so I make sure it's selected to post name this is actually the optimal method for SEO purposes
so this will actually help you get boosted up into Google rankings we'll go ahead and click on Save changes all right now let's go ahead and click on our dashboard Now let's say for example if you guys want to log in and log out of your WordPress websites first I'll go ahead and log out so the top right I'll click on logouts and I'll go ahead and go to my browser right here and I'll delete all this and just press enter all right so now you guys can see I am not logged into my websites
I'll go over here at the top and I'll type in dash WP Dash admin and this will bring you to The login screen and this is where you can log into your WordPress so this is where you can pretty much work on your website from any location just make sure the password is correct I'll click on remember me and I'll click on login there you go and we're back to square one so now we can start designing the websites all right cool so you guys got your domain in hosting and now we are all ready
to go to the next step so in this next section I'll be showing you How to import a pre-made starter site and I'll also show you how to customize and use the drag and drop Builder it's really easy so let's get started all right so in this part of the video I'll be showing you guys how to import a pre-made starter website and get your website up and running now the first thing we have to do is install a WordPress theme so over here you can see appearance and I'll click on themes into the top
right here we'll click on Add new now before we talk about which theme to install I first want to explain what themes are and what they do to your website first let's talk about what is a WordPress theme every website you make with WordPress requires a specific WordPress theme without getting too techy a WordPress theme is a general style and layout of your current website each WordPress theme has different options in the theme customizer the Options can range from a header and a footer Builder different blog post layouts controlling the width of your website like
a blocks or a full width or specific eCommerce features like product layouts or different shot page layouts a WordPress theme generally controls the layout and style of your current WordPress website a WordPress theme does not build the website itself but it's more of an outside shell for the page Builders and a starting point to build Your WordPress website feel free to check out many of the WordPress themes to find a style that fits for you and your WordPress website you guys got that so what a WordPress theme does is it pretty much controls the header
and the footer of your website it also controls various blog layouts and also your products if you guys are running some sort of e-commerce websites but the theme that we're going to use is called Astra this is it right here if you guys Cannot find it go to search themes type in a s t r a and this is the thing that we're going to use make sure you guys install this theme and then click on activate all right once you guys install the actual theme you'll get this little notice right here that says do
you want to install the Importer plugin you can click on get started if this notice did not pop up for you over here under Astra options we'll click on this and you can Always get this option right here that says install importer plugin and this is like the same exact thing so just go ahead and click on install importer plugin you can see here how it's uh it's activating both both notices and once you guys activate that plug-in it'll prompt you to this little setup page where it's going to create this really annoying Auto playing
video we're going to go ahead and scroll down here and click on build your website now Now here we have three different page Builders and for this specific website I highly recommend to use Elementor it's pretty much the best page builder out of all of them as of this very moment that's a little controversial and subjective but in my personal opinion most people prefer Elementor because it's stable it's really easy to use and it's very lightweight so we're going to click on Elementor all right and once you guys do click on Elementor you will see
a list of templates now these templates did not show up for you just click on the refresh button here at the top left that does happen sometimes in some of my videos I have seen that the just like the templates don't load at all for whatever reason and uh here we can go ahead and scroll down now since we are building a car rental website let's just enter a car and see what we got right here Now there are premium kits and there are free kits the ones that don't have the premium are free and
the ones that have the premium are paid if you guys do want to upgrade to the pro I'll leave a link below but I do not recommend to purchase the pro you don't need it right now there's a lot more to cover and you guys can obviously build your own you don't have to purchase one of their templates but this is the one I want to use right here it is called the limousine rental Agency so let's click on this one here and just remember guys you can always go back and change the templates you
can you know go from template to template you're not stuck right this isn't like the um you know this isn't like the Shark Tank where you have to make the deal right now so uh once you're at this page you can go ahead and upload your logo if you guys do not have a logo don't worry about it I'll show you a really cool website where you can get a Really nice logo for your websites but right here we'll click on Skip and continue next it'll prompt you to select some colors now again you guys
can always change this a little bit later but essentially they're just trying to give you some sort of color scheme that you might want to add for your website lights and IT Supplies throughout the website right so for example you can see that uh you know we can change the colors here and so on and so forth but I Think maybe we should leave it to you know I like this color it's more brighter it's a little bit more vibrant I do like that and then below that we have fonts and you guys can also
choose between various fonts I do like Poppins and lato but for this specific websites I'm not sure about it you know that's um you guys can kind of go through here and just take a look at some of these fonts Let me see here which one works got which which one works best here let's let's take a look here this one's pretty cool you know it's not bad right this one's a little bit too friendly this one's too this is like for like home decor you know and this one yeah we're gonna go with the
default one they did a good job selecting that font next we'll click on continue here you guys can go ahead and choose in to opt in to their email you guys do not Have to and then right here you'll click on submit and build my websites now this process can take anywhere between I don't know one to two minutes so just go ahead and just wait it out and uh yeah all right so that only took me about 23 seconds not too long right here we'll click on view your websites and then we can close
this other window all right and this is our new WordPress website you know it's already looking really really sharp you know And here we go let's just go ahead and take a look here make sure everything has loaded all right it's awesome everything looks great and then we can go ahead and scroll back up here let's go ahead and scroll up and then we'll take a look at the other Pages just to make sure that they have properly loaded there we go we got our limos and just remember you guys can change everything and I'll
show you guys How to do that in about a few seconds but uh yeah as of right now you know we have a full-on rental websites that is renting limousines but of course all you have to do here is just change the pictures change the fonts and you can turn this into like you know anything you can turn this into a normal car rental website or a Truck Rental website or whatever you want just by simply adjusting the images so next let me give you guys a five Minute crash course on how to use the
Elementor page builder if you guys already have experience with this Builder you guys can go ahead and skip to the next section but for those of you who are total noobs no problem I got your back we'll go ahead and show you guys how to use this builder at the top right here you'll click on edit with Elementor and this will enable the page builder where you can start designing and customizing your website All right now once you guys start the Builder for some reason there's this gradient here I have no idea why it shows
up there to be quite honest you can actually get rid of this gradient color by clicking on these six dots going to style right here and then just switching from gradient to Classic and it goes away I have no idea why that comes up but uh it's probably just from the template whatever but I'll go ahead and click on these nine squares right Here and this is going to enable the elements now how this works is you can see that there's elements on the left side there are free elements and there are also Pro elements
we can take these elements and simply drag them onto the page like that right and we can click on the squares again and we can keep dragging stuff in there right and we can drag in a video we can drag in all sorts of stuff but uh since this Text is a little bit more advanced and stuff like that I want to go ahead and start from scratch so let's do that I'm going to go ahead and right click on this pencil and delete everything right I want to start from scratch with you guys let's
right click on this pencil deletes right click and deletes and then we'll also there we go X and then we can go ahead and delete that as well so now we're starting with just a blank little uh spot right here so next let's go Ahead and click on the X1 this one right here and there you go so now we're just left with this like just one little column now we can do here is we can take an intersection and we can drag that into the two squares and this creates two columns right if you
want to create three columns just right click on this one and duplicate it now we have three columns and we can go ahead and drag and drop elements right so for example we have the heading I'll put that in the Column one and then also we have the text editor put that on column two and then also maybe like a button here column three and so on and so forth and over here I'll just throw in an image and then below the image I'll just throw in a button right you guys get the point right
it's totally drag and drop you can just drop in elements anywhere as soon as you drag in an element and there's that blue line uh that blue line pretty Much tells you where it's going to be dropped at so if I drop it right there you can see it enables it right there right so now let's talk about the actual elements for every element there is three columns there is the contents the style and the advanced the content pretty much controls the content and also some of the position for example right here you can see
that this is adding your heading text I'll put in something like make your cool website With Daryl and here we can control the alignment right you can adjust alignment right here now for the style this is where you can control the color the topography and also add some cool animations here I'll go ahead and put in the white color right oops I mean I didn't mean to close that and then for the topography you'll click on the pencil here and this is where we can adjust the size which and then there's also other various Styles
like for example if you want to italicize it you can do that or make it oblique or whatever but they're just more styling options for your text then also there's like text shadow where you can add like a shadow behind the actual text if you want to enable that and there's also blend mode but that's a little bit more advanced and that allows you to blend the text into specific backgrounds next you have advanced now the only thing I want to show you from This column is probably the motion effects where you can add little
animations to your text that you know to fade them in like that you know some people like that stuff just don't go too crazy like that that's too crazy a bouncing I don't like Bouncy Stuff I like let's see what else we got here Flash oh no that that is way too much here all right we're getting too crazy we're going we're going to default all right Just just keep it simple all right and also there is layouts now the one thing I want to talk about is padding padding essentially controls the space so let's
say you want to add space above your elements you'll just add in space right let's say you want to add in space below the elements then you'll just put in space like that so that's just a quick introduction to padding and also to you know the animations and stuff like that but now that you guys have a little you Know that you're a little bit more warmed up with this page builder now let's create a real life heading background that we're going to use for our website so I'm gonna go ahead and close this all
again and let's start from scratch here we have heading right I'll drop in the heading and what should what should be our main heading like rent your dream car and then we should put like a pinto or something you know Something really like something really like uh like old you know but just as a joke and then for the style right here we'll go ahead and change the color and then for the topography I'll go ahead and make this a little bit bigger right something like that and we also need some filler text filler text
is essentially text that pretty much goes below this right just so it's not so alone right just so it's not so naked here I will adjust the alignments And then also we'll change the color you can see here how it just adds in like filler space you see that see how it looks a little bit more structured and this is just demo content obviously right now one thing also is let's say for example you don't want to have like a really high-end service this guy in the back right here he's wearing a suit he's on
his phone so if I'm a visitor for the first time I'm going to assume that this is a very expensive website Let's change the background to change the background of your website you'll click on these six dots here at the top and right away you'll click on the style and here you can see the image I'll go ahead and trash this image now if you guys just want to add like a basic color you guys can just you know throw in like a basic color here or whatever you know you can go ahead and do
that but I want to go ahead and upload an image so here I'll click on choose image And I have demo images for all of you guys in the description below of this video however if you guys are using the Astra theme you will see this free images tabs if you guys are not using Astra then this will not show up so Astra has a free integration with pixabay that pretty much allows you to get images for free from pixabay.com now what I'm gonna search for over here is like car Mustang or something like that
let's just see what pops up here now Whenever you guys search for something it does take like a minute this is the one I want to use right here I'm going to go ahead and download that one before it disappears and there you go all right cool so there we go we can see that we have our really cool background but you guys can use any image that you want so for example I'll go back over here and I'll just put like car or something or anything that represents your business you'll get a Lot of
options my dad actually had this car right here the Ford GT an amazing car we got it when it first came out back in 2000 it was like 2005 when this car first came out and now like the new ones cost like easily like half a million dollars or way too expensive but that one only costs about 150 Grand when it first came out so we definitely got a deal but uh yeah so it's probably getting a lot of cars right here but you'll just go through this list and Pick out some uh cars or
background that fits your need looks like it's going a little crazy there so I'm gonna go ahead and close that now oh it stopped yeah it does that it just Imports a lot of cars and stuff that's actually a really cool background right there I like this one with the blue that's like the legardo or the I'm sorry Gallardo that looks a really cool background I like that I'm gonna go ahead and close this now all right cool so now that I added the Background image I now want to adjust the color of this so
I'm going to go ahead and click on this we'll go to the style and the text color and I want to match the rest of the font on the website so I'm going to go ahead and just paste in that color code and then maybe we'll just change this something more simple like rent a car or something rent a car I don't know something simple you know something something basic something that everyone Knows what we're doing all right so at this point we now have a pretty nice looking landing page now you guys can go
through the rest of the website here and you can adjust it as needed now let's say for example you guys want to add a new section somewhere in between these sections right here we have this plus icon I'll click on plus and this allows us to create a new row Within These two columns so I'll go ahead and click on the plus And here I'll just put in like a I don't know two column row I'll click on the elements and then we can build this just as usual so I'll go ahead and you know
drag this in there like that so we can put in an image and then we'll just throw in like a little button or something like that right button now remember these are just placeholder images so if you guys do need images you'll just click on choose Image I believe I have some in my media file right here yeah so I'll go ahead and just put in this guy there we go and then like uh this is super easy right super easy and for the advanced we can go ahead and add some padding right so for
example this is too close to this Edge right here notice that so I'll just go ahead and uncheck this and just throw in Sun padding you know just a little bit be 50 and 50 maybe for the bottom as Well I meant this one down here I'm going to go ahead and add in some batting here to the bottom right there we go and then of course we can do this throughout the website now this is pretty much like a crash course on how to use this Builder if you guys do want to learn more
about how to use Elementor in this specific page builder I do have another video that talks about this page Builder it's about an hour and a half long so it's a lot more detailed but for this video I really want to focus more on the rental aspect so that's pretty much it for the crash course you know if you guys do have any questions on how to use this Builder just let me know but as you guys can see it's pretty simple right it's just drag and drop I mean you guys can simply just you
know drag an element here and it's really really simple now of course there is a lot more Advanced stuff you can do with this Builder like the theme Builder and a lot more other things but again I do have another video covering all the advanced features with this Builder one thing also I do want to mention is that if you guys ever messed up or something or you want to go back in history they have a history button right here where you can just go ahead and back Trace to every step right here to exactly
where you might have made a mistake this is a very Cool feature and I do like it so if you guys do want to back Trace you guys can use the history button I'm gonna go ahead and close this now and then scroll to the page now I want to go ahead and update this just make sure that my progress is saved and then I'll go ahead and close the Builder so I'll go ahead over here and click on view page all right cool so that's how you guys can use the Elementor page builder now
Let's talk about how to add pages and also how to assign them to the menu let's say for example you guys want to add more pages right maybe you want to add like our team or something like that let's do that over here under plus new we'll go to page this is how you guys can create new pages for your websites and this will be like our team our team there we go I'll publish this and publish And then I'll click on edit with Elementor what this will do is this will activate the Builder on
our new page that we created and here we go we can go ahead and build this page as usual now to speed this up Elementor actually does have a lot of cool templates and also Astro does as well here I'll click on the Astro starter templates and I don't want to use these right here because these obviously don't really match the Criteria and color scheme of our current websites but I want to click on blocks right here and with these blocks we can go ahead and choose a specific category so let's say for example you're
looking for like testimonials or staff or team I'll go ahead and just see if I can find something here let's just do team right here and I'll go ahead and import this block here I'll click on import block All right and then you can just you know put in the images for your staff right so this would be like our team or our staff and here you'll just go ahead and replace this image with your current staff member maybe it's like this guy here right the image is a little bit small maybe we should find
a better image yeah this is 100 by 100 pixels which is a really really small image do we have any other Images here no we don't all right so it looks like it looks like we're stuck we're gonna have to use these ones these are 300 by 300 so you'll just want to make sure that you add images for your staff and then let's say this is Jenny right this is Jenny Craig and she is the founder and CEO right and then here you can put in some description about Jenny and then also you can
link her social profiles like Her Facebook her LinkedIn and also her Instagram or her you know Twitter or her Tick Tock whatever these kids use nowadays you can just throw it in right there all right and uh once you guys have done that we'll then click on updates so that's how we can create new pages and also design them with the page builder now let's go ahead and add it to the menu let's go back to exit the dashboard And there's a little view Pages button there it goes that little WordPress logo shows up a
little late for some reason under appearance we will then see menus now first you want to make sure that you select the primary menu all right so when you import the Astro starter website they do create a menu for you automatically and they also do create Pages for those menus as well here we have the home about services our Fleet and con contact I'll click on view All right here and we can go ahead and add in the our team page so under the our team I will add this to the menu and then we
can adjust this right I'll put it right there now also if you guys do want to create a drop down menu let me just explain to you what that is I'll just use the sample page and also add this to the menu and then I'll create this drop down so You see here how I'm dragging it below services so that means on your menu when people hover over Services it'll also show the sample page so let me go ahead and show you guys now once you guys have added that to the menu you'll then go
to the bottom right and click on Save menu all right cool now let's go ahead and click on visit sites and here we go so we have the home about the our team right if I click on our team you're going to see that our team Page shows up right here pretty cool and then also we have this drop down so here under Services notice how there's a sample page this is actually very useful if you have subcategories like for example if you have services and you want to label all of your services in different
categories like rentals or buy it now or I don't know massage services whatever you want to offer for your rental websites you can create categories below your services which Looks a little bit more organized and here if I click on the sample page obviously it'll just take them to whatever page that you have created right so that's how you guys can create pages and also add them to the menu and the last thing I quickly want to talk about before we install the free plugin to turn this into a rental website is the actual theme
customizer at the top right here you'll click on theme customizer Now what the theme customizer does is it pretty much controls the header and also the footer of your website it also allows you to add in your site identity and also your logo to the website for example here we have site identity here we have site icon the site icon will display at the way top left so for example I'll go ahead and just grab in some sort of sample icon here alright so I went ahead and I uploaded my coffee websites copy coffee and
I'll click on Select now notice here at the way top right you can see that the logo displays in the browser so that's how you can add a site identity to your actual website and it'll click on crop image all right cool so it's there at the way top right there you can see it I probably should have used the white text but you guys get the point right you can pretty much upload a icon right there and that will display in your browser now let's go ahead and go to back but First let's click
on publish just to save that now the next thing I want to show you how to customize and organize is the actual header here we have the header Builder now the header Builder pretty much controls the header of your websites this is where you can add in your social icons you can adjust the menu and also adjust the button for example we have three columns right here if I click on plus it'll create a list of little elements that we can use here I'll click on social notice here at the top the social icons have
displayed and you guys can drag these right so we can see there now I'm dragging them over there or I can drag them to the bottom and what this does it creates rows so as of right now we only have one row you can add up to three rows with this WordPress theme if you choose to do so for example I'll click on plus again and then we can add in like a widget Right a widget is essentially just adding in some sort of widget right and there's tons to choose from there's text there's images
there's videos there's buttons there's a whole lot of widgets that you can add to your actual menu and spend hours getting crazy with it but I'm just going to go ahead and put in something very basic here like uh let me see what should I put in here like I'll just put in more social icons you know just for total purposes Now if you guys do want to customize the actual elements you'll just simply click on the actual element here and then you'll get two options you'll get the general and the design the general pretty
much allows you to enter the URL into the actual icon and the design you can completely change the icon color the background color you can adjust the size and so on and so forth so for every element you guys can adjust the actual General section and then also you can Change the design for every single element that you guys add to your menu now also you guys can choose to add in a background color by clicking on the gear icon so for example I'll click on this one here because we're using this row and then
we can change the heights of this and then we can also change the design right so we can add in like a background color or padding and so on and so forth now as of right now we're using a Transparent header so in order to design the background of this specific menu we'll first click on transfer menu here at the bottom because we are you using a transparent header and then we can go ahead and design it right here because we are using the transparent header options so for example if you want to add in
like a background overlay we can add in a white background or a black background or any sort of background that you guys want if you guys don't Want a background just click on the little defaults and now we're using the transparent background option so on your own time feel free to go through the header options you know mess around with these options you'll go ahead and put the social behind the button all right I mean we have a pretty big menu but uh you guys get it right so that's how you guys can pretty much
design and customize your menu and also how to add in your logo and your site identity I Think I did Cover the logo right for the header Builder you'll click on the title and logo and this is where you can upload your logo so for example I'll just go ahead and throw in my Kobe Coffee logo here we go all right we'll go ahead and put that right there all right and there we go so now you can see our logo is right there and we can also adjust the heights so this is a lot
larger So for the logo width we can go ahead and make that a little bit more smaller like that and then once that's done we'll go ahead and click on publish and that's pretty much it so again the theme customizer controls the header the footer and other various parts of the actual websites on your own time feel free to go through this check it out and yeah that's pretty much all it takes is just a lot of trial and error I'm gonna Go ahead and close the theme customizer now all right so that's pretty much
how you guys can design the website add pages and also use the theme customizer now one thing also I do want to remind you all is if you guys do need a logo I would definitely recommend going to fiverr.com fiverr.com is a service or it's a Marketplace of Freelancers and they can create a really nice logo for you for maybe around like uh I don't know like five to a hundred dollars just Depending on on your budgets and this website actually has really really cool Freelancers and I myself I got my first logo from these
guys so you can find some really nice designers on this website so if you guys do need a logo for your websites go to this website hire freelancer pay like maybe 25 30 bucks for a logo if you guys go to those free logo websites on the internet that you find you legally cannot use those logos so I highly recommend not to use Those websites but if you guys are a you know a business that just needs a logo really quick I would definitely definitely recommend going to fiverr.com so now that we cover the website
aspect of this tutorial now let's go ahead and move on to the next section and talk about the rental aspect of this website all right welcome back guys so now that you guys know how to use the Builder and you guys know how to you know customize and design your websites now let's go to Section three and install a plugin that'll turn this website into a car rental website so in this part of the video we'll install a free plugin I'll introduce you all to the general settings we'll create a listing and you'll pretty much
learn how to create a rental website in this part of the video you guys ready let's get started all right welcome back guys so in this part of the video we'll be showing you how to turn this website into more of a rental Website now we're going to be using a free plugin in order to accomplish this so let's get started let's go over here to our dashboard and then over here under plugins we'll click on add new and for search plugins we're going to type in v i k v i k and you're going
to come across a plugin called Vic rental car management system this is the plugin that we're going to use right if you guys do want to create like a hotel website I actually have a Video with this plugin but for this video we're going to be using the Vic Vic rent car car rental management system so go ahead and click on install now also go ahead and put a link to this plugin if you guys can't find it for whatever reason and then we'll click on activate so once you guys install the plugin on the
very left side you're going to see Vic rent car So go ahead and click on Vic rent car all right now when you first come to this uh plugin It'll ask you to import the sample data I highly recommend to do this because this will give you a better understanding of you know where things are and how to customize them so go ahead and click on select sample data and right here we have select sample data we have campers Vans trailers cars and rentals and scooters and motorbikes now of course you guys can always come
Back to this later and change this but to help follow along on this video just select car rental and click on install sample data and now it's going to import the sample data to help get us started with this plugin all right so now let's take a quick look over here to see this has imported everything so I'll click on the car list and voila it has imported the car list now before I go on in any of these options I first want to add the search form onto the websites right so We'll talk about
all these options but let's just first add these search navigation to the actual website so let's go back over here to the home page and click on edit with Elementor alright and here we go uh this gradient I have no idea why it's there guys I really don't know in fact if you click on the Dots here and you go to style and you just switch between gradient to the classic it goes away again it's just weird WordPress error glitch is whatever But it doesn't display on the real website now we're going to go ahead
and search or go down to the bottom here and go to Wordpress and we're now going to see this Vic rent car search form we're going to go ahead and drag and drop this form onto the actual page right here now when you import the actual uh short code it propagates a vertical form you can also change this to a horizontal view so for example we have horizontal right here and then it changes it to a Horizontal style now if your form came out a little distorted this does happen on some browsers and I have
reached out to the developer and they will be fixing this in a small update so by the time you're watching this it'll all be all good now one very important option here is the page you really want to select search your car the reason why is because if you click on search nothing will happen so you need to basically tell the actual search Ajax where to go So here we have search your car and one other thing too is if you guys do want to get a little bit more customizable here in the advanced section
we can add a background to this so for example we have the backgrounds we have the classic and then we have a color so if you guys do want to add some sort of color here you guys can also do that I will probably leave the color on for this tutorial because it's just easier to show you guys and you can see The letters so that's how you guys can add a background here to the actual form so I'll go ahead and click on update and then I'll view the page now I'm going to quickly
go ahead and run through a little test search just to make sure that this is working so I'll put Monday and there and then I'll click on search all right so now you'll see that we have a available list of cars that we can search so we do know that it's working Now a lot of this is demo content so don't worry about it we're going to change that in the very next section here I will click on the Hyundai we can see the car they can click on the price and then they'll click on
book now and then this takes them to the actual summary area where they can go ahead and purchase everything so we know the actual plugin and everything is working now we need to go ahead and customize it so let's go Back to the dashboard here now we're going to go down to Vic rent car Vic Ren's car is this such a weird name Vic rent car you know they should probably change the name here all right now we're going to go through each tab one by one here and I'll explain what all these are after
we're done with the free version I will then be talking about all the features in the pro version because you guys will come across many of the Because you guys will come across many of the features that are only available in the pro version so let's get started you guys ready now let's say for example you guys want to add tax to your you know car rental service right and this is actually you know pretty pretty common right so the new tax rate name we'll just put main tax and what is the tax rate you
want to apply to your cars well I'll put like maybe a five percent tax rate okay and then we'll click on Save now as we go in this tutorial um you guys are going to see that a lot of these features build on each other right because we're first going to create tax and then we're going to create characteristics and then we add those to the actual car listing so next we have type of prices and the developer thought it'd be a good idea to create something like rental cost non-refundable and full damage cost refundable
now I think what we should Have done here was put rental costs refundable and full damage non-refundable right that would have made more sense so I'll go ahead and add in one more right here of new price so this will be the rental car refundable re-fundable so next we have price attributes now price attributes can be a little bit more outside of the box let's say for example you guys want to rent based off the miles per day or the Kilometers per day you guys can do that you guys can pretty much rent based off
of any sort of attribute that you want like distance or time or how many people but most traditional car rental places will just you know have like a daily service but if you guys do want to rent based off of a specific attribute you can also do that but I'm going to leave it blank because I'm just going to rent everything per day and then we'll also talk about hours a little bit later so I'll go ahead and save that so now we have the rental costs non-refundable the full damage cost refundable and then the
rental car the rental car refundable now I could make one more that is the full damage non-refundable that's basically saying you're going to rent the car with a specific type of insurance hope that makes sense right so now that we've created these three or that we have these three let's keep going here so now we have the pickup and the drop-off Locations now for example you guys would want to put in your locations here now if you guys are a larger Enterprise you guys will probably have a lot of locations right so this can take
a long time however to simplify this I'm just going to add one so I'm just going to imagine that I am a car rental service in Las Vegas and that's pretty much it but if you're like you know Enterprise or if you're Hertz or something you're obviously going to have like hundreds of Locations and hundreds of pickup locations and stuff like that so this again this part can be very broad but uh let's go ahead and click on new location location name you guys can go ahead and give this location a name this will be
the Las Vegas Center for the location address I'll just put in an address here Las Vegas Boulevard now here we have latitude and longitude so let me explain where to find this Okay so I opened up Google Maps and this is basically applied to Google Maps now let's say for example my location is you know maybe it's at the Luxor Hotel right so obviously you're going to find your location and then you're going to right click on it so over the Luxor Hotel and Casino I'm going to right click and then you're going to see
these little um these little coordinates right here right so we have 360962 and then minus one one five we're Going to go ahead and paste that back onto our website so I'll go ahead and paste that over there and then we're going to take this one and this is our longitude right longitude right and just make sure everything's backspaced just like that so that's how you guys can apply the latitude and longitude later on users will be able to click on an actual map and go directly to that location here we have the override tax
rate so What we can do is say you know what I want to apply the main tax five percent remember earlier how we created that well there it is so that is the main tax rates here you can give a brief description about the actual Center so this is the best loss Vegas car dealership rental service okay and I believe that's it next we have the opening time so what are your hours right go ahead and put your hours over Here now I know in America we don't use the 24-hour system so we can change
that in the global section but for now let's just pretend that we do okay we'll change that in the next section okay because I do have a very large audience and it's really hard to accommodate everybody so I'm going to select that we open at 10 pm I'm sorry 10 a.m and we close around I don't know we close around 5 p.m so that'd be 17 right so we open from 10 to 5. you can Also select a suggested time so let's say for example you guys are just available you know around 11 o'clock you
know that's when usually you guys are around the office more so next we have override opening time let's say for example you guys want to have different hours of operation on specific days for example Sunday is a very common day where you guys might be open from just like you know 12 to you know 12 to 4 or something so open up Sunday right here and I'm gonna say you know what we're gonna only open from 12 o'clock two maybe like I don't know we'll put like uh let's go down here uh we'll do like
uh until four o'clock right so we're open from 12 o'clock to four o'clock only on Sunday now sometimes when you guys are working um you guys might want to take lunch breaks right this is where the lunch breaks come into play now if you guys can add breaks to Any part of the day as well so let's say for example uh two o'clock right here would be a break for us right so two to three is a break so I'll click on breaks right here and for the time we're going to select 14 all right
14 to 15 is our lunch break right 14 to 15 is our lunch break and now I'm basically saying so from Sunday we're only open from 12 to 4 and we take a one hour lunch break from two to three right so we're pretty much only Open for just a few hours of the day just to basically accept rentals and really not going to work that really hard you know so that's how you guys can override opening times now let's go ahead and keep scrolling down so next we have closing days right so when is
your you know rental service close well for closing days we can select the days right here so I'll say you know what we're closed uh you know the 16th the 23rd or the 30th and we can select daily Or every week for example let's say we're closed on the weekends right so I'll click on the 16th and I'll put every week right here so I'm basically saying we're closed every week from the 16th I'll have that date and then also I will add the 17th and say we are also closed every you know every week
for uh for every week for that specific day you guys can also choose to say you know what we are closed only on specific holidays so maybe uh Christmas or Something we have you know Chris Christmas December 30th or 31st right and we can always add that date as well so we're basically saying we're closed every other week from these dates and we're also closed on specific days as well so that's how you guys can add closing days to your establishment now once we have filled all this information out we'll now click on save all
right cool now click on Save and close so that's how you guys can add Locations right it does take a little bit of time to get used to sometimes when I'm messing this with myself sometimes I do make errors and I'm like oh yeah I forgot I have to add this so feel free to come back to this and if you guys do have any problems let me know in the comments below and I'll do my best to help you guys out the next is restrictions however restrictions is only available in the pro version so
we'll have to come back to that once we Talk about the pro next we have cars right here we have categories categories are essentially saying what type of car right so we have truck we have limo and we also have uh just like a normal car I'll click on City car right here and I'll change this we're gonna put just car and then under City chick we're gonna change this to truck right so maybe we have trucks and then also we'll create a new category and this can be something like limos right you guys can
Also add description you know like what is a limo and you know limos are awesome and then we'll click on Save so that's how you guys can add categories uh next let's take a look at car options now car options are available in the pro version car options are essentially adding in extra services like I showed you guys in the beginning of the video where they can add little features to add-on next we have characteristics characteristics are what Is inside of the car or what does this car offer for example does the car have air
condition well we can create AC extra passenger a larger luggage or a smaller luggage but let's add in one more let's add in a turbo charge right so some cars are turbocharged and some are not so over here we have new characteristic and for the kerasic name we're going to type in Turbo next you're going to see the text next To Icon now we need to go to I think it's called found or font awesome and we're going to go ahead and get some uh icons all right so this is font awesome.com it's a free
service you guys do not need to pay or sign up at all so what I'm going to do over here is go to the search and I'm going to type in Turbo now I did talk to the developer before this and you guys need to make sure that you're using the 5.15 version or else it will not work so the six Point version doesn't work yet for some websites so just make sure you select 5.15.4 but if you guys are watching this video for maybe three months from now uh it would probably be fixed by
then so again I'm not sure but I know that this is a stable version for the Vic booking plugin I'm going to type in Turbo turbo or actually no speed I think I typed in speed yeah speed all right and we're gonna go ahead and Grab one of these right here now you need to make sure these are free okay so these are the free ones and also like this one right here we'll copy this we'll go back to our websites and then we're going to paste that in there now you guys can also choose
to assign this to specific cars but we can always assign this to cars when we create them so I don't think that's really necessary let's go ahead and click on Save Alright and here is the actual icon if the icon does not display for you double check the version and double check that if it's free if you are using like the paid ones it will not work and if you are not using the correct version it also will not work so that's how you guys can pretty much add any characteristic that you want to the
actual car alright so that is characteristics now let's go ahead and go to car list All right now these are the available cars that we have for rent right so we have the alpha the Hyundai and this Renault I have no idea what that is but let's make a new one right so let's make a new car here and start from scratch so I'll click on new car all right now what kind of car are you going to offer well we're gonna put in an Infinity this is the car I actually have Infinity you guys
can get a quick little preview Of my car you know how many of these cars do you have well I have about three what is an image of the car well let's find one I'll click on choose file now I actually do have demo images for all of you guys in the description below this video These are from other videos but I'm just going to use these two right here uh these are the cars I'm going to be using so I'm going to click on this one here again I will clean all that up and
I'll have only the cars for you guys In the description below of this video and then here we also have extra images I'll just go ahead and throw in this red run you guys can add more as needed you guys can also choose to resize the image now this will actually resize the image to make it more responsive for the actual search results you guys can go ahead and check that if you guys want to it actually might help I actually don't know to be honest we'll have to see next we have category so what
categories does This car belong to well obviously it's a car right so I'm going to sign it to the actual car the next thing is the pickup locations and drop-off locations so where can they pick up this car and where can they drop it off well I'll go ahead and click on this and this shows a available list of the places that we have created right so we did create the Las Vegas Center and these are other demo places as well but let's just go ahead and click on the Las Vegas Center Because this is
the one that I created and we can choose to drop it off at various locations right so they don't have to drop it off only at Las Vegas Center they can drop off the car anywhere they want right maybe they're driving across you know across the country uh we'll go ahead and select the Florence the Florence airport the Las Vegas Center I mean Paris and London that's not even on the same continent but uh you guys get the point right I'm Basically saying that you can drop off the car at any location that they choose
to next we have characteristics what characteristics does this car have well it is a turbocharged in fact the Q60 is Twin Turbo maybe I should have added that in there as a an extra characteristic right we have twin turbo and then we also have these other features that we can add right so basically any characteristic that you create you can add it to the Car so going back to the demo website this is the actual short description when they actually click on the actual car that will show the long description so this is something just
to encourage them to rent the car so I'm gonna go ahead and copy this and place the short description right here all right and then also we have the long description so let's go back over here and I'm actually just going to you know Copy this and just duplicate it twice right there we go like that but again the long description is the description on the very next page for example this right here is the long description so it's just giving more information about the car all right and then you also have some parameters where
we can show cost per day in the search results I believe we do have cost Per day in the search results over here so you guys can choose to have the cost per day and then this is the total so let's say for example they booked for four days right here this is the price for four days however you can also show the per day as well so let's go back over here per day and if you guys do want to enable the request info this actually creates a little box I believe it's on the
very next page and the user can Actually request information about the car before they book it personally I don't know how I feel about that because I would rather have them rent it and then we can talk about money later right and then here you have the custom starting from Price this text will display on the actual search results so we have starting from but you can change that to price from right so price from right next you have Additional email this will actually be an additional email that bookings are sent to your inbox when
someone books the actual car next we have the Custom Image Car status we'll come back to that once we actually create the car it might make a little bit more sense after we create it then we also have the custom page title where you can actually give a different page a title instead of the car name so maybe you want to change it to something else And you can also adjust the position of the custom page title and then we have the keywords meta tag and the description meta tag as well this is strictly for
SEO purposes or you might want to you know put in some information for the search engine all right so let's go ahead and scroll to the top here and click on Save after you guys save the car it'll then greet you with a setup wizard this will actually help you price your car so for Example we have the rental cost non-refundable the full damage cost refundable and then the one that we created earlier was the rental car refundable now the cheapest one on this list is going to have to be the rental car the rental
cost non-refundable and websites like expedia.com do have this where if you book a flight and it's non-refundable it's usually cheaper than a booking that is refundable so for the non-refundable it'll be 25 per day we Will change the symbol to dollars so if you're from any country in the world we can go ahead and change the currency I'll talk about that a little bit later but for now we'll just use the euro but again I'm American so I will use the dollar in just the bits and for the rental car refundable I want to put
something here more expensive than the non-refundable so this will be thirty dollars and then for the full damage cost this Will be something like fifty dollars so let's summarize here the rental cost non-refundable which means they do not get a refund once they book will be twenty five dollars if they do want a refund then they will have to book the rental car refundable and this will be thirty dollars if they want the full coverage insurance you know that'll be fifty dollars per day right so that's basically what we're referring to here now you guys
can also Add the insurances in the extra services in the pro version or you can add it this way right it kind of achieves the same exact results so I'll go ahead and click on insert fares all right and let's go ahead and scroll down here now here we go we have the rental cost non-refundable in the full damage cost and then the rental car refundable so all it does here is that it just multiplies the days to give it the accurate price you guys can always Adjust these prices to your liking so if you
guys want to charge more or less we can go ahead and do that as well I'll go ahead and change that back to 300. so as of right now we have now created the actual pricing now before we keep diving in on pricing I quickly want to go back to the actual cars here and keep talking about the actual car options right so let's click on car list and let's go back to Infinity now right here we have managed Distinctive features let's first click on manage distinctive features this will actually propagate features about the car
for example one of the most popular ones is license plates right let's say for example we have three different Infinities right because we do have three different cars but we need to distinct them from one another right we can't all lump them together because obviously they're gonna have different license plates different insurances Different registrations and so on and so forth so I'm gonna go ahead and close all these right here and I'll give you a very ideal situation all right the first Infinity that we have the license plate number is one one one one one
one one right the second car license plate number is 222222 right and the car three license plate is three three three three three three three right And you guys can add more if you guys choose to do so like you know maybe uh maybe the miles right you'll say this is you know four thousand or something like that um that's up to you you know but most companies they write it down because you'd have to constantly go back and update this every time which can be a little tedious so I'm just going to leave it
as three license plates and then I'll click on Save All right so now that I saved that let's go ahead and click back on the manage distinctive features all right so we can see that this did save now let's say for example you guys have three different cars right but maybe one car has a scratch or maybe one car is you know maybe there's something different right maybe they might have a damage or a dink or something which is very very common for rental cars I mean let's be honest when you rent cars you pretty
much Thrash them right so uh let's now go ahead and add an image right here so we're gonna go ahead and click on the Custom Image Car status I'll click on this and then we're going to upload that Infinity so I'll go ahead and select the file so there's the car and I'll click on select and then we'll scroll to the top and save it we are now going to click on manage Distinctive features and let's say for car one we want to create some sort of damage for the car right we'll click on damage
and status and now we're brought to this image this is the image that we uploaded earlier and if I click on part of this car right here I can list the damage or something that I want to let them know right so for this specific part the rim is scratched right the room is scratched right And I can do this one more time so over here under the window we will put the window is window is ugly right and then for the front maybe the front is like a fender bender right fender bender by doing
this you can distinct the difference from the cars from each other you can also you know put license plates I mean you can pretty much put anything that you want right here as a custom field right but essentially right now We're just basically saying that this is damage okay so once that's done I'll click away from the page and then click on Save so now what I'm saying here is the Infinity with this specific license has damage to it so if I click on damage and statuses we can then see that there's damage to the
specific car however for car two and three we don't have any damage right now if there is damage to another car we can say yeah actually This part is broken you know this part's broken right and I can save that so now what I'm saying is the first car had severe damage right the second car had a little you know problem right here and the third car you know it's perfectly brand new right so we can actually you know report different damages for different cars you guys with me all right awesome all right so let's
go ahead now and click on Save and close so I went Through the rental options over here right we went through these options we went through cars and now let's go ahead and keep tackling pricing so I'll click on fairs tables all right and here is a list of the cars right so we have the alpha we have the Hyundai infinity and you know this one right here so let's just go ahead and click on Infinity now since I have three columns it actually displays it here at the bottom so unfortunately uh two Columns will
display on the right side but three columns puts it at the bottom no big deal whatever now here are the daily fares right so this is the actual daily cost of the car you can also adjust this to hourly fares if you want to do that right um I'm not really going to go into that because a lot of cars don't rent on the hour however there are some that rents so the ferris tables allows you to adjust the daily fares the extra hour Charges and the hourly fares now let's find my Infinity let's go
ahead go over here and find the infinity now since I have three different columns the plugin will put them here at the bottom right so we have three different options we have the daily Ferris which we've already adjusted we have the extra hours charges or we have the hourly fares now hourly fares is more ideal for very very large trucks right so for example if you are moving I believe some companies do Offer hourly basis for the actual trucks so what we can do is we can set up hourly fares if you decide to do
that for example right here we have hours right so what hours is this car available to rent right but from 10 two seven all right now what is the price for these hours right well you know uh for the rental cost non-refundable I'll put twenty dollars for the full damage 40 and then for the refundable we'll put in 30. remember so the non-refundable they don't get a refund so obviously it's cheaper and then the car refundable is more expensive and then this is like full coverage insurance which is gonna be the most expensive so let's
click on insert hours all right so the next section is the table fares this is where you guys can adjust the daily fares the extra hours or even offer hourly charges let's go ahead and find my Infinity let's go ahead and click on the infinity Now if you guys do add three columns like I did earlier you can see that the plugin will bring them down here now let's say for example you guys are renting a moving truck and you want to charge people on the hourly basis for that moving truck you guys can always
adjust it from daily Affairs to hourly fares right so for example from I'm assuming what's the most they can rent right maybe one to eight hours right one to eight hours Now what is the price for the rent rental costs non-refundable maybe twenty dollars right 20 per hour the refundable will be 30 and then the full damage cost will be 50. so essentially what I'm saying here is you can rent our truck right I'm assuming this is a moving truck you can rent it between one to eight hours and the price of that will be
twenty dollars per hour or 30 dollars per hour or fifty dollars per hour if you have the full coverage insurance now This scenario is only for moving trucks because I think normal cars uh people don't run by the hour right I mean you you can I think like Lamborghinis do and like parts of California but the normal renting company usually does daily fares so I'll click on insert and then that creates another table right here that you guys can use for hourly's now let's talk about extra hour charges now let's say for example somebody wants
to rent my Infinity right But let's say they return it late right what's the what's the fee for that right so let's go ahead and put from you know one two we have zero or no one to 24 hours right now anything more than 24 hours there's probably going to be something else going on right you probably have to call them or you know there's going to be a little bit more of some sort of Direction I'm sorry interaction with you and the customer but you can you know Say this could be 48 right so
1 to 48 hours maybe after two days you should give them a phone call say hey man what is going on where's our car right so if they are late on returning the car what is the rate for the hourly charge well up at 30 and then 70. okay so they're going to pay us a lot more if they I think it's a 40 right 40 50 or yeah 70. they're going to pay us a little bit more if they return the car later So let's click on insert all right there we go so now
we have our extra hours charges applied so that's pretty much it for the fair tables if you guys do have any other questions feel free to ask me again this plugin is very Dynamic and there's a lot you can do it's very easy to get confused but just do your best and stick with me all right let's keep going here next we have special prices unfortunately special prices are in the Pro version only this Allows you to create special prices on specific days or discounts on specific days over here we have the drop off and
pick off fees this is essentially where you want to charge someone an extra fee for dropping it at a specific location we have the out of our fees and sorry to say this is also a pro version and then we also have the fares overview this just gives you a big overview about what's going on right here so if someone Rents something these will actually turn orange I believe and once it turns red that means there is no more of that car available okay so right now we're looking at the alpha but we can go
ahead and look at the other ones right like the infinity and say you know what is you know is the infinity available how many are being rented this is where you can view all that information all right so that is pretty much it for the pricing all right next we have orders Now if you guys do get an order they'll be displayed right here all right next we have calendar the calendar is where you guys can get a better idea and you know a better look an overview about what's going on with your cars so
for example uh you can see where the car is being rented you can see all this information right here once it's rented you guys can actually click on the actual uh the dates and that will actually show the customer who's renting It and also when they are returning it you guys can also assign this to a specific customer as well let's say for example someone did not want to use your website that happens quite often let's now create a booking for a customer alright so Daryl wants to rent my Infiniti from July 26th to July
27th he's going to get here at 12 o'clock and he's also going to drop it off at 12 o'clock right now where is Daryl going to pick up this car well Daryl's going To pick it up at the Las Vegas Center and he's also going to drop it off at the Las Vegas Center here is a payment method now we don't have any paid methods as of right now no problem we'll always you know we'll do that a little bit later now if you guys do have customers that have signed up to your website you
can assign a specific customer however if you guys don't have one you guys will have to create one right so this will be Tara Wilson Right here you guys can search by you know by pin or by name but since we don't have any customers now obviously nothing's going to be there right uh here we go for the email all right this is where like you're on the phone you're like hi sir can I get your information you know and all that stuff and what's your address or you know Road all right Country right probably
America right I mean there are a lot of people traveling from other parts of the world and they might um you know they might be from other parts of the world and these companies do get that quite a bit here we have the website rates or we can set a custom rate maybe this is like your homie or something your boy but we're just going to select a this rate right here All right and then click on to save reservation all right so we have now booked the reservation for our uh clients and here I'll
click on view details and we can always go over here and click on the customer check-in and this will generate the PDF so now we're going to download the checking document and this is something that your customer is going to get right so it's going to Have like the receipts and everything else and you can print this and you can also email it to your customer so over here you'll click on the send customer email and this document will go directly to their email inbox all right that's pretty much what the order list is I'm
sorry the calendar and how you can create reservations right now since I created that reservation you guys will now see that this turns orange this is basically informing you that this is Being rented like something's being rented there right and again if this turns red then I believe that the car that was trying to be rented is sold out or rented out and there's nothing more available guys got that all right well let's keep going you guys are doing very very good all right so we went through orders or the calendar now let's click on
overview here's an overview this is basically showing you what has been rented and you guys can get more Information about your cars and you know what has been rented and the license plates and all that cool stuff right over here we have the dashboard this is just like your general dashboard whenever you guys do log into your website it'll usually bring you to this specific dashboard next we have managements and I believe Management's everything here is in the pro version like the customers the coupons however I believe the graph Statistics no that's also in the
Pro you know so yeah all of the advanced features as well these are I believe available in the pro version cron jobs are amazing now what cron jobs are is let's say for example somebody booked something and they return the car you can send them an automatic follow-up email to say hey thank you so much can you please come back or let's say for example someone has rented the car and you want to remind them that the car has To be returned tomorrow right you can set all that up in cron jobs so crime jobs
are actually pretty cool right this is just tracking this is pretty much just saying like who has rented and so on and so forth right now let's go and talk about the global right Global is actually pretty important so let's first click on configuration all right so now let's talk about the global options now to be quite honest the global options are probably the most Complicated part of this entire tutorial so get your thinking caps on and let's do this first let's go over here to shopping rentals now this is just the general settings right
so for example if you want to enable renting on your websites you would go ahead and have that checked if you want it disabled you would disable it maybe you're on like a break or something or you're just not working or something like that here we have the admin email the sender email And then here we have the always open right so you can choose to have your shop always open or you can select a specific time you can also override these settings in the actual location listing where you can create the time and override
it or you can choose the global option it's really up to you it just really depends on how many shops that you have but I'll go ahead and just select something like 10 o'clock and we were also open till I don't know two or Something like that here we also have the force pickup and drop off time if you do want to have Force pickup and four shop off time you can always go ahead and set that here that's basically saying that the customer must pick up the car at this time and they must drop
it off at this time as well now early in the video I did mention the times so if you guys want to change it to hours which in USA we use AM and PM other countries not so Much I think we're probably one of the only few countries out there who use this time format also for the date format in the United States as well we use the month day and year other countries like in Asia they actually swap it so make sure if you are in America to put month day and year because that
would be that would make the most sense and then you have some other General options here where you can you know Auto Assign car units enable coupons you can choose to have pins and so on and so forth these options here are a little bit Technical and just depending on how accurate you want your website to be you can go ahead and adjust those settings there all right let's go ahead and scroll up and then we'll go ahead and click on Save now on the right side we have some additional options right these are the
Search and Rental parameters for example the first one is the minimum number of days of rental so how many days can the actual customer rent the car usually one is acceptable but if you want to say you know what you must rent the car for at least two days in order to book you can go ahead and enable that there days in advance for booking I would say usually one day is good because this actually restricts same day booking if you don't you know if you don't want to have the Days in advance booking you
can just leave that blank and that means people can book on the same day the next one is the maximum date in the future so let's say for example someone wants to book three years into the future you're going to say no you know the the latest that will let you book is two years right or maybe even one year right I mean that makes more sense uh more than one year that's a little weird you know maybe someone might book a car Two years in advance I don't know but uh you can go ahead
and uh select that option there you have the choose pickup location cars category filter this is for the actual filter on the actual search page of the home page you can adjust the search here filter by characteristics I'm not sure about that that basically means that earlier in the video I showed you guys how to add turbos as the characteristic that's basically saying they can filter By air condition or Turbo or something but that doesn't really make a lot of sense to me so I'm just going to leave that unchecked all right and for the
rest of the options they're pretty self-explanatory so I'm going to click on Save and move on to the next section so that is shops and rentals now let's talk about prices and payments so the currency name I want to put USD I'll put in the symbol of the dollar the transaction currency code I'm going To put in USD here you have the number of decimals the decimal separator and then the Thousand separator on the right side we have price tax included which it basically applies to tax you can choose to show the tax in the
summary only you know if you don't want it on the you know on the actual details page here we have the pay entire amount or they can leave a deposit of something like 50 and that would give them access to rent the car and the Payment transaction name you want to change this to something like your website right like Daryl tutorial Daryl's car rental or something like that so you'd want to put your company name all right and click on Save now some companies actually do leave a deposit so if you do want to leave
a deposit you can say that you must leave a deposit of at least 50 and then when you arrive to our establishments then you'll go ahead and pay us the other 50 Which some companies do you know I've seen that before so if you want to you know add that in that's really up to you next let's click on views and layouts so next we have the views and layouts now on the right side we have preferred colors these colors can influence the search page and also the details page for example for elements with background
we can go ahead and adjust this changes like purple foam color we'll do black Hovered elements we'll do like a green or something and also the font color we'll change it to like white and for the headings and details we can also change that to something like teal or something just to give you guys an example and then we'll click on Save now once I adjust these settings here and I go back to our website and we search you will then see that now the Colors are different and stuff like that this is created so
this will actually match your branding so if you're like a company with like a red brand those options would apply for that right also I'll go ahead and select this date here and click on search and now you'll see that we have the I guess the teal section and then also this influences the buttons and when I hover over it that also influences a lot of the colors so that section there is Basically allowing you to change the colors to match your brand so let's go back to the Vic red car and then go back
to Global now I'm going to change this back but uh yeah that's how you guys can you know adjust the actual color but those colors are really tacky and ugly so I'm just going to change them back and click on Save now on the left side over here we can see that we can choose some more technical settings like calendars first Day of the week thumbnail size number of months to show over here we have the customer email customer PDF customer check-in PDF invoice and CSS overrides now if you guys are not familiar with HTML
I would recommend actually giving this work off to a developer now this is actually pretty important information the developer actually created these PDF forms and on this line of code right here right here this is where you would actually enter in your Contract or whatever it is that you want to enter now once we get to conditional text I will give you guys another example of how to edit this but I actually recommend going to something like upwork.com or fiverr.com search for a WordPress developer and just ask them saying hey you know we actually have
all this code for the email templates can you please help us you know with this and you guys can do it for like maybe 50 bucks I'll show you guys how to do it Yourself but I would recommend to hire someone that knows a little bit more HTML because this here is HTML and I didn't really want to start teaching you guys HTML because obviously this video can get hours and hours long right so but I'll come back to this I'll come back to all this and we'll discuss where you can customize this and then
below that we have the opening page text and the closing page text I'll be very honest I believe this is on the Emails I'm not really sure where exactly this appears I actually look for quite some time and I could not find it all right but let's go ahead and click on Save here now let's go over here to orders and companies now this is essentially where you can add in your logo this is very important because this will display on PDFs and also email check-ins so for the company logo right now they're using the
default vicrentcard.png but you guys Will need to select your own logo obviously right all right so I put in my Kobe Coffee logo right there on this section this is more for iCal calendar so if you guys do want to integrate it here's some additional options on icalcal calendar and if you guys are using advertisements and you want to track the code this is where you can edit the HTML code for the tracking and also for the conversion code again I would hire a developer if you guys are Not sure because a lot of this
is using bear HTML code all right now once this is done you will then go to the top here and click on Save after we've done that you guys can notice that the logo is now being applied this is also being applied to the emails so any emails that are now sent will have your own personal custom logo on all of your PDFs and all of your emails pretty cool now let's go over here and click on conditional text now Conditional text are probably the most complicated part of this video and I'll do my best
to make it as simple as possible to understand this is actually a very powerful feature and the amount you can do with it is pretty overwhelming but let me just give you some brief examples of how you would use conditional text first let's go ahead and click on conditional text now a very popular one would probably be A contract right so basically what I'm saying here is I want to create a contract but I want to create a contract for specific cars right maybe someone's renting a limousine and that contract would probably be a little
bit different than a car right so right here I'll put in car and we will put in uh let's see contract car so what I'm saying here is that this contract is specifically for cars and right here you guys would actually Go ahead and put in the contract so this is the contract contract for the car right now we've created a contract for this car right obviously this is going to be a lot larger you're probably going to have bullet points and like you know number one number two like rule you know and it's going
to be very very large right but um we need to actually set when do we want this contract to be applied well over here we have add a rule right so Let's click on ADD rule but before I do that I want to change that there you go change it to rule right all right so let's click on add a rule now here we have a list of options right we have the day of the weeks the days days to arrival options and Extras rental dates and so on and so forth now what I'm saying
here is I want this contract to appear when well let's click on car and click on ADD rule Now if the actual customer decides to rent this specific car which is the infinity then I want the customer to receive this specific contract you guys with me so let me repeat that if the customer rents the Infinity car then they will then receive this specific contract specific specific contract okay now let me give you guys a more advanced method of how to apply this let's say for example the customer Rented the Infinity but they rented it
on a specific holiday or a specific day that was unique right maybe it was different maybe it's the weekend we can go ahead and also add a rule and this would be days of the week and I'll click on ADD Rule now what I'm saying here is if the customer books on Monday and they booked the infinity then they will receive this contract if they do not book I mean if both conditions are not Mets then this contract will not Be received you guys got that so let me let me go ahead and reiterate here
if they book on Monday and they book The Infinity then they will receive this contract if they book on Tuesday Wednesday Thursday or whatever days they will not receive this contract so essentially these are conditions that must be met in order to receive this contract now days of the week obviously that's a pretty Advanced example but I'm just going to get rid of this right Let's just do something more simple let's just say infinity right so now that we have this contract for the infinity let's click on Save now let me give you a more
advanced example that might be practical let's say for example a customer rents the Infinity but they rent it at a specific location that might have a different contract than another location for example over here click on add a rule and then we're going to find locations right so here is the Location and I'll click on ADD Rule now stay with me here so what I'm saying here is I'll go ahead and find a location I'll click on Las Vegas center now if the customer books the car rental the infinity from the Las Vegas Center only
then they will receive this specific contract you guys with me now if they book The Infinity from another location they will not receive this contract because both conditions must be met in Order for the person to receive this specific contract you guys got that now you guys can combine as many rules as you want and get very Advanced so this form actually can be extremely Dynamic I mean you guys can add another rule saying for example on the rental dates right or let's see here on the booking dates you can add in another booking date
saying well if they book from the Las Vegas Center and they booked the Infinity on these specific Dates then they can get this contract right so as you guys can tell this is a very Dynamic form and there's a lot you can do with it but I'm just going to only assign car for now you know I'm just going to make this a little bit more simple but I just want to demonstrate that this form can be extremely advanced over here I'll click on Save all right and I'll click on Save and close So we
have this contract right here but we need to apply this contract so over here I'll go ahead and copy this shortcode right we're going to copy the shortcode so now that we created the contract where do we want the contract to appear well we can make it appear in the customer email the customer PDF the customer check-in or the PDF invoice let's go ahead and select the customer PDF here and I'll just demonstrate what we're talking about now here we have the Rented vehicle I'm going to put the contract right next to the actual item
name the reason why I'm doing this is because if the customer did rent the infinity I want them to view the contract now let me reiterate here if they rented something else like the Hyundai then this contract will not display because remember the conditions must be met in order for that to display so that's how you guys can apply conditional text to these specific Template files now you guys can add more right so maybe for example you guys want to add in another one here I'll click on conditional text now let's say for example someone
booked a car but you wanted to give them a message before they actually visited the center maybe they need to have their driver's license license maybe they need to have their passport or their insurance or something that they need to bring and you just want to remind them this will be a Reminder under the ad Rule now we have a few options here right we can filter by days or we can even do rental dates you know there's various ways on how to do this you know and it doesn't really matter what you select you
can pretty much use anything to sort of meet your conditions right now just remember with conditional text you guys can pretty much mix and match these conditions to pretty much meet any sort of criteria that you want and then I'll select days Of the week and click on ADD Rule now what I'm saying here is you know what if people book any of these days which is you know all the days then they're going to get this message right now you can you know customize this a little bit more like for example let's say on
Monday you guys have a different office hour or something or on Sunday or Saturday you can send them a message to say hey if you guys come on Saturday or Sunday We're close go around the back or something and you can get the keys or something so you can adjust this message to be set on specific days now here we have type and we can get a little bit more customizable right so we have pickup drop off and pick up and drop off that means if they decide to pick up the car you want to
give them this message if they are dropping it off then they will also get this message or you can just do both right but I'll just go Ahead and leave it as both and select all the days so let's just reiterate here if they book on any of these days which are all the days and they pick up and drop off I want to give them this message right makes sense I mean I think pickup would make more sense because then I'm saying you will only get this message when you pick something up or you
can say drop off right and this can even be a coupon code you know we can even turn this into a coupon code or Like a thank you so much for coming once they drop it off saying oh you're the greatest customer or if they pick up you can say Hey sir please before you come bring your you know bring your license or something like that so bring your license all right and then I will click on Save and close all right now here is the actual code so I'll go ahead and copy this and
I will put this on the customer email so right when they actually book I Want them to get reminded that they will have to bring their driver's license which makes a lot of sense right so for the customer info all right so you guys with me all right great you guys are doing very very good this is probably the hardest part of the video now I want to talk about contracts right so how do you guys create a contract for your website well we need to do that with conditional text so over here conditional text
And this is going to be the contract right and then this would obviously be the main contract here for all cars and this is the contract for all the cars all right now let's add a rule now I'll select rental dates right and click on Adderall and this is going to pretty much apply for my entire business so I'm just going to say you know what we're just going to Set this really far in the future so anyone booking for the next two years will see our contract right that makes sense again you guys can
use this however which way you want and uh yeah but I'll click on Save and close so now let's go ahead and paste this contract right so I want to give them a copy of this contract every single time someone actually rents any of our cars over here under the views and layouts we're gonna go back to that one section Where I told you we're going to go back and under the customer PDF I'm going to show you guys how to insert this short code into the actual HTML file now we're going to go to
line 134 right and this right here this line this is just demo text okay so we don't need to really use this so I'm going to click on backspace and then press enter I will then go to line 134 I will hit the tab button and then I'll paste that in there like that now what I'm saying Here is this a short code will appear with this specific conditional text hope that makes sense right so basically anyone who books the car in the next two years will automatically get this contract in their PDF file makes
sense and you guys can also use other shortcodes in these emails as well here I'll click on Save and write source code all right so it has successfully been updated so let's go ahead and recap what I've done here is I've taken a contract and I've applied it to every single car that is rented right so I want them to all get a contract when they rent any of our cars now make sure to have this shortcode handy because we're actually going to use this shortcode one more time and we're going to use this for
people to agree to our terms of condition right before they actually book but uh now that we've talked about conditional text hopefully that was easy You know again the conditional text there's a lot you can do with it if you guys do have any more questions about conditional text feel free to let me know I did my best to teach this part and this is probably the hardest part of the entire video so congratulations if you guys got it it actually took me a few times I actually had to hop on the call with a
developer and they did help me out and teach me everything so it does take a little bit time to get used To now we're pretty much almost done with the actual free version we have translations and custom Fields now if you guys do want to enable multiple languages on your website it's really really easy all you'll do is go to the settings over here and go to General you will then select a different language in this case I'll put Africans and click on Save changes now what I want to do here is I'm going to
go back to English and then click on Save changes so essentially what I've done here is I've loaded two languages right we have English and we also have the secondary language now I want to go back to that area and now we'll have the option to use that specific language so for translations you will now see the Africans right now which part of the website do we want to translate well we can go ahead and pick right here and for example we'll go Ahead and load the cars right and uh for example we have the
let's find the uh let's find the infinity we have the infinity right here if we want to change the translation we'll click on afrikans and then we'll go down to the infinity and this is where you can enter in your country's characters or the translation for that specific product it is a lot of work I'm not gonna lie but if you guys are running a multilingual website you guys can use this uh service Or you guys can also use G translate I will leave that plugin in the description below this video it might actually be
a little bit more easier I'm not sure because again plugins might not work with other plugins and it's hard for me to really know everything so I'll give you guys a one-click solution to translate your whole websites and I'll leave that video in the description below of this video alright but that's how you guys can enable translations Payment methods are not available they're only available in the on the pro version I think I did cover that and now we have custom Fields now for the custom fields in the free version you guys only have the
option to the I agree to the terms and conditions and for this one right here you guys can just go ahead and paste in your terms and conditions page and this would be a page that you can create now I don't think you guys can actually use the Short code I thought you could but you know what I think you can only use now if you guys do have the terms and conditions you'll go ahead and paste the link right here and this is the terms and conditions they must select in order to rent any
of your cars now all you have to do is insert the page for your terms and conditions if you guys don't know how to do that or you're not sure let me just quickly show you over here under plus new we'll go to page and I'll Just simply create a terms and conditions page and this will be the link that people will have to check in order to agree to the terms of service all right so this is the terms and conditions you must be awesome and then I'll click on publish and publish obviously you
want to put your rules like rule number one rule number two you know this is the terms and conditions page and then you'll just Take that link right there and copy it and that will be the link that you insert so let's go back to Vic rent's car and then we'll go to Global and custom fields we'll click on the I agree to the turns and then we'll paste that in there and we are done and then we'll click on Save all right so at this point we have pretty much gone through all of the
Options in the free version now the pro version is pretty simple to understand if you guys do understand everything in the free version the pro version is a piece of cake because all it does is just have a little bit more extra features but now that we've actually completed all the general settings let's go ahead now and have a quick crash course and see if this is actually working I should probably change that actual uh I think that text right there Is too light huh I think I can change that in my options now here
on the pickup dates I will select the 25th to the 29th right and we're picking it up at 11 A.M and we'll also drop it off at 11 A.M we can also select the category remember that but um we've already selected the infinity be in the car so again this is just if you want to create an additional filter here I will click on search and there is our beautiful Infinity I mean that is a nice car I Mean I'm so I'm so glad my car is so amazing you know they don't sell this in
like any other country but USA I'm pretty lucky and uh once we are here we can see the Kera 6 right and the Infiniti the car we have some short description here click on continue we have the long description we have the car we have additional pictures of the car There it is I will close that now here we have three options right we have the non-refundable the rental car refundable and then the full damage cost refundable all right I'll go ahead and select the rental car refundable and click on book now here is an
order summary of our booking and we can enter a coupon code we're actually in the free version we can't sorry uh here we go Daryl Wilson and for the country I'll put uh who Should we give a shout out to uh we'll put we'll put Bulgaria we got Bulgaria in the house today and then in my date of birth we'll just put something like 1997 30 something like that and I agreed to the terms and conditions now if I click on this page right here it's going to open up that page you must be awesome
remember that so there you go and then I will click on check and click on confirm order and voila now the actual customer will Get an email and you will also get an email notifying you of a new booking here the customer can review the order by clicking on this page and there we go so we can see that the car has been confirmed now I believe you guys can actually automatically bring them to the thank you page in the advanced options let me let me double check that I believe you can so I believe
in the payments and prices I need to select pay entire amounts and That will basically uh confirm the booking all right guys well that is pretty much it for the free version if you guys do have any other questions feel free to let me know in the comments I'll do my best to get to them now let's go ahead and move on to the next section we'll be talking all about the pro version and how to integrate payment gateways onto the website all right welcome back so as you guys Can tell the plugin is pretty
simple to work with right after probably like an hour or two you guys can definitely get the hang of it now in this next section we're going to talk about the pro version as you guys noticed the free version is pretty limited right you know they have a lot of parts where it says you have to upgrade to the pro and stuff like that so in this next section I'll show you how to use all of the features in the pro version I'll also show you How to integrate payment gateways so you can start accepting
credit card payments on your rental website you guys ready let's get started all right in this part of the video we'll be talking all about the pro version of the Vic plug-in now the evic plugin has a pro version and with the pro version you get a little bit more features now I have two websites here and on one that we just worked on this does not have the pro version on it and On this one this does have a pro version installed now if you guys do want to purchase the pro version you guys
can go to Vic wp.com over here under plugins I'll also leave a link to this plugin in the description of this video I'm not an affiliate so if you guys do use it I don't make any commissions but this is the actual plug-in that you guys will need it is called Vic rent car what this plugin does is it just gives you more features right now I'm going to go Through each of these features and I'll explain to you what they do and how they can you know improve your current car rental websites now I
also do want to let you guys know that this Price Right Here does not include the payment Gateway you guys will also have to purchase the payment Gateway for the stripe integration which is about another I think it's 60 Euros so in total uh if you guys do want the uh pro version and the stripe integration it'll Be about 200 Euros and as of right now I think it's around like 200 or something like that right but let me just go ahead and quickly go ahead and go through these features and explain to you what
they all are now I'll go over here to my dashboard all right now this one already has it installed if you guys do want to actually install the actual Vic booking plugin uh first let's just let me show you guys where you would install it now The pro version is not a plug-in it's just a license code so over here you'll click on upgrade to Pro and if you scroll down you will then see that you can paste the actual license key you guys can get your license key by going to the website and logging
in once you guys log in it'll give you a license key and you simply go over here and you page that license key in here and that gives you access to the pro version right and if you guys are really running like a Big car rental website you should really upgrade to the pro because I mean let's be honest you know it unlocks payment gateways customer management coupons a whole lot of stuff right so let me go ahead and walk you guys through all of the pro features let's go over here to Vic rental now
I wrote These down here because there were so many and I wanted to just go over uh one by one so I wrote These down right here the first one is restrictions so I'll click On restrictions now restrictions do is they basically allow you to restrict specific dates for example we have this one called holiday and I actually created a new restriction called holiday what this does is this basically refrains people from renting from a specific period right we have uh you know you can set these specific days and this is ideal for holidays right
because maybe you don't want to rent cars on Christmas you know or Thanksgiving or Halloween you can restrict specific dates right here and then there's more options where you can set days close to arrival and then on the right side we have some other options where you can restrict drop-offs and pickups for specific dates for example the weekend the weekdays close to departure and the weekdays close to arrival right so if you're saying you know what you guys cannot pick up cars on Friday and this one is You cannot drop off the cars on Monday
and then we have another option where you can force the arrival weekday right so this is basically saying you have to actually pick up the car on this day to this day so all it does here is it just basically creates a little bit more I guess you want to say restrictions on the car rentals next let's go to the next option which is the car options now car options are essentially add-ons for your products so for example if you want To offer premium seat covers maybe you guys purchase something specifically for that car you
can go ahead and add that as an add-on right and there's a few options where you can charge it per day or you can say you know what this is a one-time fee of twenty dollars you can also assign the tax rate that we created earlier and you can assign that to the actual add-on as well and then there's other options right here we have it like always selected and stuff like that and You can also assign the seat covers or any add-ons to any car that you'd want for example we have the premium seat
covers right and here I selected all of the cars so that means that all the cars have the option to select the premium seat covers when they check out right so it's just more ways for us to make money so that's an example of the car options next let's talk about special pricing so here we have special prices now let's say for example you guys want To offer specific prices for specific Seasons right maybe there's a season where people travel more or they don't travel more and you want to offer either a discounted rate or
you want to charge them more we can do that with this feature so for example let's say on the 26th to the 30th on these days right or we can just select all of them right we'll go ahead and scroll down and we can also choose to add specific weekdays in this season As well right so season is referring to like a long period so you can select specific weekdays in this specific season and for the special price name we can put something like promotion right or promo next on the right side we can choose
whether we want to have an increased charge maybe an increased charge of something like five percent or you can say you know what I want to offer a discount instead so for these specific dates right here I want to Offer a five percent discount and this could be like a promotion this can be a fee it can pretty much be everything you can also assign these specific promotions to specific cars right so let's say for example you want to select the promotion maybe you want to get people to rent a specific car right maybe you're
saying you know I really want people to rent these two cars because no one's really renting them you know and I really got to get rid of them So I want to offer a discount for these two cars and on the next section we have type of price we did create a few of the type of prices so you can go ahead and add those type of prices there remember earlier how we created three we had three different selections where we had like the non-refundable and so on and so forth you can add the discount
for those specific prices and then also you can set it for specific uh areas as well so For example if you want this only to apply to Las Vegas you can go ahead and apply the discount only for those cars during those days in Las Vegas so overall I think this feature is actually really helpful this can actually encourage people to either Rent Out Cars that are not being rented and during busy Seasons you can have like a maybe five to ten percent increase on your cars in order to make more profit so I'll go
ahead and click on Save next Let's talk about the pickup and drop off pick up and drop-off fees now I do like this you know for example I'll go ahead and click on new right here let's say for example you guys wanted to charge a fee for people picking up cars now there's a few options right we can either choose to charge a one-way fee or we can charge a fee for specific pickup locations and drop off locations for example we'll first just do pickup location for Las Vegas and Paris right So I want to
incur a fee if the user picks up from Las Vegas or if they drop off from Paris place right you guys can also change this as well by having a one-way fee but you would apply the fee right here and you can choose to either make this a daily cost or a one-time fee that means for example let's say they visited I'm sorry they rented for five days you would charge the daily cost that means they'd be charged fifty dollars in total if you have this Unchecked they would be only charged ten dollars now you
can also select a one-way fee a one-way fee does the same thing except this is just basically charging them a fee regardless right this is just a fee on your website saying this is a one-way fee of ten dollars and and IT supplies for any combination of pickup or drop-off locations and of course you guys can make this daily right and then on the right side you can incur a tax or a fee To this specific fee as well all right makes sense all right let's keep going here click on Save next we have the
out of hours under pricing I'll click on out of hours now out of hours is actually a very interesting feature and I actually had a one-on-one call with the developer and after we talked about it I finally understood right now this can be used in various ways for example you can actually charge someone for picking up a Car out of the hour and you can charge them for bringing the car after hours let's say for example the customer want to pick up the car at six in the morning but you guys aren't open you guys
can say you know what we will let you pick up the car at six in the morning but we will have to charge you a fee that's where this feature comes into place right so I'll put like early bird early bird and the time Is going to be from you know we'll do 4 AM to something like uh 9 A.M right the pickup charge will be five dollars and also the drop-off charge here you have the max charge which is saying this is the max charge that we're going to charge now these times right here
are for pickup only so what we can do is we can make multiple of these right we can make it for pickup we can make it for drop off and we can also do pick up and drop off right so you can Have various factors in here and there's various ways on how to charge your customers so basically I'm saying here with this option is if you pick up or you drop off the car from four in the morning to nine a.m We will then charge you a fee of five dollars right so that's basically
what this option is referring to and then also we can select a tax rate for this fee as well and we can select the weekdays the cars and also the locations so I really do like This diversity of options right here you can get very customizable and you can also have as many rules as you want so that is the out of hours fees right so over here I will click on Save and of course you guys can make more right so we do only have one right here but I mean you guys can make
as many as you want right so under new this will be like late night right and this could be something like if they drop off the car at nine at night till Uh let's see nine at night so I'm sorry wait have that backwards there hold on here's I'm not on the uh the other time zone as well so uh 20 to 23 right so I think that's 9 to 12 o'clock right so we can incur a fee for this and this is a drop-off fee of 20 dollars right then there you go and for
the weekdays I'll select all of them And click on Save so you can see here how we can have a diversity of rules to pretty much meet anyone's situation now let's go over here to orders I'm sorry not orders the management and let's go through these Pro options so I'll click on customers and here's a list of our customers right now when people sign up on your website they'll get their customer information stored right here or we can see their Order list and everything so let's say for example obviously you can see here I've been
planning this is horror for a long time uh Daryl has booked all these cars right we can go ahead and look at Daryl's booking we can also open this little arrow right here and we can get more information on the actual booking we can also go ahead and download his contract to see what has happened you know like maybe they said hey I didn't agree to this or I'd agree to that we Can view all the details from the customers we can view their contract we can see their bookings and everything right so that is
pretty much what the order list is it's just basically showing the customer and everything that they have ordered so that's pretty much what the customers are the customer section allows you to allow customers to register on your website you can either pin you can also view their orders and also you can see The contracts so it makes everything a lot more transparent and to be practical you probably do need to have this feature if you are running a real car rental website because you need to view the customer's information next let's talk about coupon codes
so over here I'll click on coupons and coupons are pretty easy you guys can see I was already messing with this but let's just make a new coupon so the coupon code we'll put Patty right Now this coupon code type this could be permanent or a gift right but I'll make this permanent now you can select a percentage or a dollar amount I'll do a percentage of 80 off this applies to all of the vehicles and what dates do you want it to be uh to be active right well I'll say you know what this
sale is only going to go on from August 1st to see here August 7th and the minimum order total is they must order you know At least 30 or something you know I don't know you'd put the minimum order total in order for that discount to be applied so that's how you guys can create coupons and during checkouts they can enter this at checkout and get the discount so I'll go ahead and click on Save all right cool so you can see that we got uh we got two coupon codes right here pretty cool now
let's go to the next option which is graphing statistics Here you guys can get a little bit more information about your sales right so we can see how much we have sold and there's just a little bit more information here so next we have graphing statistics right and here you guys can get a view of these sales right we have the sale date where you can filter here to see you know who's renting the cars you guys can also filter for example if you want to see how a specific car is performing You can go
ahead and select that car and just get the information for like maybe the Q60 Infinity but obviously we have got no booking so it's not going to show anything at all so any car right here that is on your list you can go ahead and see if people are booking it and just get a little bit more information on all of your orders next let's go over here and let's click on reports first reports is just another area where you guys can get more reports right like Your Revenue so I'll go ahead and click on
Revenue we can load a specific date over here to the 10th filter all the cars and then it'll give us some information about like how much cars were rented here it says cars sold you know we didn't sell any cars but I guess you know renting cars sold I don't know same thing but uh it just gives you a big analytics here of all of your sales and the performance of your overall store So export this as a C8 you guys can also export this as a CSV in case you guys want to use this
for like I don't know QuickBooks or some other accounting purpose and one of the last features is called the scheduled cron jobs let's click on scheduled cron drops here now I've already obviously created a few different cron jobs this right here is an email and with this Cron job you'll see that I can actually send specific Email reminders to people for example here I have the Cron job name which is email right now here we have class file so this can either be a web hook notification an email reminder an iCal integration or a backup
Creator so you can have the website actually create backups for your website and also send automated emails now when you want this email sends right here we have recurrence right we have twice daily once a day once every other day and so On and so forth right so we can go ahead and send out this email any anytime that we want pretty much but I think once a day is good now the reminder type here we have pick up reminder remaining balance payment reminder or after drop off purchase now this is good because let's say
for example they book something and you want to let them know hey don't forget about your booking I will send you an email right however you can also use this as a thank you where You can send them a thank you message after they have returned the car right so it can work both ways but for pickup reminder we have two days I'll just do one day in advance right and for the message right here this is actually where you would build the email now also I remember earlier in the video how we created those
special short codes you guys can also assign these short codes to be dynamically sent if Customers meet a specific condition for example uh here we have the condition new contract right we can put this inside of the email right and this is basically a contract that will be assigned for all the cars Also let's say for example someone rented a limo and you want this email sent to people if they have met the condition of renting the limo you can actually create specific conditions on what you want in this email depending on what people rent
It's very very dynamic as you guys can tell there's a thousand ways on how you guys can use this but um we'll go ahead and take a look right here so this is an automated message to remind you that pick up for your car we have a pickup date right you guys can add more to this right like for example here I'll put in like uh you know thank you so much for renting our cars and then here Daryl cars you know Zerocars.com and then I'll click on visual here and you'll get a little preview
right so Daryl cars uh you're the customer name we have the pickup dates and then just some other general information right you guys can also choose to design this form right here so for example if you want to bold this you'll click on Bold if you want to change something over here you guys can use this little editor right here and this will actually influence the colors The size and also the fonts so with the Cron job you can actually send reminders or some sort of notification to people when they either pick up or they
drop off cars so I'll go ahead and click on Save now this right here was obviously a reminder right but we can create another one that is more of a thank you notice right so here I'll put in new Cron job and I'll just make one this will be like a thank you right and this is a reminder email right we'll Do once daily right now I believe they will only get this email once if this is a drop off so for the reminder type we're going to select after drop off message now how many
days after in advance will they get this message well I'll just put one right and if we scroll down I'll change this to something like thank you so much and then obviously we can go ahead and design and customize this any which way we want we probably also need to fix This because this is saying pick up dates so for example here I'll put like uh you know thank you so much for renting our car and then maybe I'll put in like the order ID just to remind them like what they ordered and stuff like
that and maybe here I can even put in like a coupon code or something you know so that's something that I can add for the actual Cron job so the crown jobs are Actually really helpful you guys can also integrate the iCal calendars as well there is an integration right here using the iCal calendars this will actually sync up with your current um calendar on the actual iMac and if you guys do use the iCal calendar you can integrate it with your actual computer and then also you guys can do the same thing for like
a backup Creator so if you guys do want to create like a backup of your websites you guys can Always go ahead and create backups of your websites you know once daily once every week because if you guys are a large company and you start getting a lot of sales you guys might want to add this because if your website ever gets hacked or if something ever goes wrong you guys can always just load a backup and then you know go back to business as usual so I'll go ahead and now click on Save and
close so the cron jobs are actually Really helpful if you guys are using the pro version I think it's a great thing to add to your actual website and just make sure that you want to execute these cron jobs so now the backup has been successful and the Cron job has been started so now we are executing the Cron job and the last option that we're going to use is the payment methods now this is how you guys can integrate credit cards and PayPal onto your website now if you Guys just do want to basically
use an offline credit card you'll click on offline credit card now this actually will record the credit card information but it will not charge them you guys will have to charge them on your own right so for example if you guys do enable this you guys can turn this on right here the offline credit card you can charge also a additional amount or a discount this is actually helpful if you are charging with a specific Merchant That has higher fees you can use this in order to protect yourself right or you can have a dollar
amount or like a you know like a one percent charge if they use like you know this service maybe your payment processor charges you more money so you guys can go ahead and add a charge there you guys can also set this to Auto confirm and then they have some more selling options for your firm as well on the right side you'll have the request CVV code so if you get guys do Have the https on your websites which you guys do because you guys are probably using like name hero or hostinger you guys can
turn this on and you can record the credit card and the CVV code so offline credit card is very helpful it's actually a good method on how to record credit cards you can store the credit card information and then once they arrive you can then charge them next we have the PayPal option now PayPal option is pretty standard right with PayPal all you have to do here is put in your email and that's it so you'll go to paypal.com and you'll simply just go ahead and create an account right once you guys create an account
I don't know why this is in Spanish here I have no idea why but uh once you guys create an account with PayPal all you'll have to do is you'll just go ahead and take the email that you used to sign up with and you'll Simply paste it in for example my PayPal email accounts I'll go ahead and put it in here is mrwilson email.com when people purchase on my websites all the money will go to my PayPal accounts or I can actually transfer it to my real bank accounts also make sure that you guys
do have published on publish means that this is a real payment Gateway that people can use so you do want to make sure that if you do want to enable this payment Gateway that you have it Published so I'll go ahead now and click on Save and the last option that we're going to use is the stripe method now I'll show you guys how to integrate this website with stripe we're going to go ahead and go to stripe.com now in case you guys are brand new to stripe stripe is a free service with no credit
check it works pretty much in all of South America all of all of the United States and all of Europe it's a very popular method there is no monthly fee there is A 2.9 transaction fee but it's a very convenient system and a lot of people use stripe because it's really easy to integrate with your website so I'm going to go ahead and log in right here and I'll show you guys how to integrate your website with stripe so I'll click on sign in so this is stripe.com and we can use this website to accept
payments on our website uh for example I'll go ahead and click on the developer section and show You how to integrate this it's really really simple all you have to do is copy and paste something and you're done over here under API Keys you will then see you have a publishable key you'll go back to your website you will paste in the publishable key right and then you'll also click on reveal secret key and then you'll go ahead and paste in the secret key right there like that you will then select the currency And then
for payment type you want to make sure this is selected to pay right so then they'll pay on your website and then here you'll put in your company name your image URL and so on and so forth you'll also go ahead and put in your custom logo and then you also have some other styling options right here like Auto set to confirm which I do like because that makes it so there's no hold up with your payments once you guys put all those options in you'll just click On Save and that's it your website's fully
integrated with stripe your website can now accept credit card payments on your website so let's do that let's go ahead and go to visit site here let's just take a look at the actual checkout process so I'll go ahead and select Las Vegas to Las Vegas here we go we'll go ahead and put the 29th to the 31st I don't know why why that's getting all weird right there that's weird all right so here we go we got the Q60 Infinity I'll click on continue here we have the pricing types and we also have add-ons
as well right so we did have the add-ons so I'll click on book now and here's our order summary right and we can also enter in our coupon code so if you guys do have a coupon code for Your customers they can go ahead and apply it here and it'll reduce the price and then below that we have the driver information where we have the first name the last name and all the information uh they'll go ahead and click on I have red now there's a few options right we have the offline credit card we
have the credit card and then we also have PayPal with these options with PayPal and credit card you guys will receive the payment immediately with bank transfer And offline credit card they'll go ahead and pay you at your establishment so it really depends on how you want to approach the rental website but uh right here I'll click on credit card and click on confirm and once the customer enters in their credit card information it'll then take them back to their confirmation page where they'll see their personal details the order details and all of the information
they can also go ahead and Download this PDF and they can also ask to cancel or modify the appointments one thing I also do want to mention that the pro version does not include the actual payment Gateway of stripe right so you guys will need to purchase the stripe plugin as an additional add-on right so you'll go ahead and purchase the pro version and then also purchase the stripe integration and then you'll integrate it to your actual website I do feel like the developer should add the Stripe integration in the Pro but again it's really
not my plugin so I don't really have any saying it's well thank you guys so much for watching party people this video took me a long time to make took me about six to seven hours of recording I went through pretty much everything right we went through the free version the pro version and also how to integrate payment gateways so I really do hope this video helped you guys out if you guys do have any Questions feel free to let me know in the comments below I will do my best to get back to them
also if you guys do need help you guys can go to their website and get free support because you guys have purchased the actual products all right Party People congratulations on your car rental website now usually at the end of the video I'm always like oh it was so easy right but you know with this specific plugin there is someone of a learning curve you know so After using this plugin for maybe I would say like a month or two you'll get the hang of it there definitely is going to be some trial and error
where you're gonna have to like you know find out where you made a mistake but after using it for a few months you'll definitely get the hang of it and before I make these videos on YouTube I actually go and I purchase like seven or eight plugins and I test them out that's actually half the battle of these videos You know before this video I tested out modal press and all these other plugins and to be honest none of them really had a lot of good functionality and I just couldn't feel confident recommending it to
anybody but this plug-in the Vic WP uh WP rental or Vic rental it's a great plug-in and the developer is constantly updating it and adding more features so I think you'll be really happy with this uh websites so if you guys have any questions for me feel free to let me Know in the comments below and let me know how I did you know was this easy to follow was this a good video let me know in the comments and until then I will see all of you party people in the next video take care
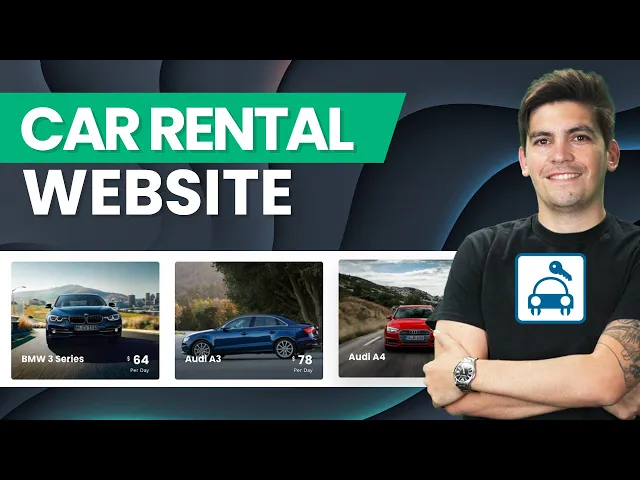


![How To Create A Landing Page In WordPress 2025 [MADE EASY]](https://img.youtube.com/vi/guIiC5kYeas/maxresdefault.jpg)