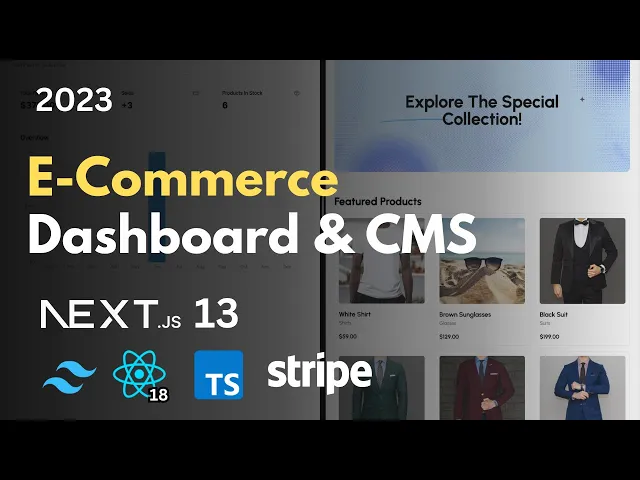
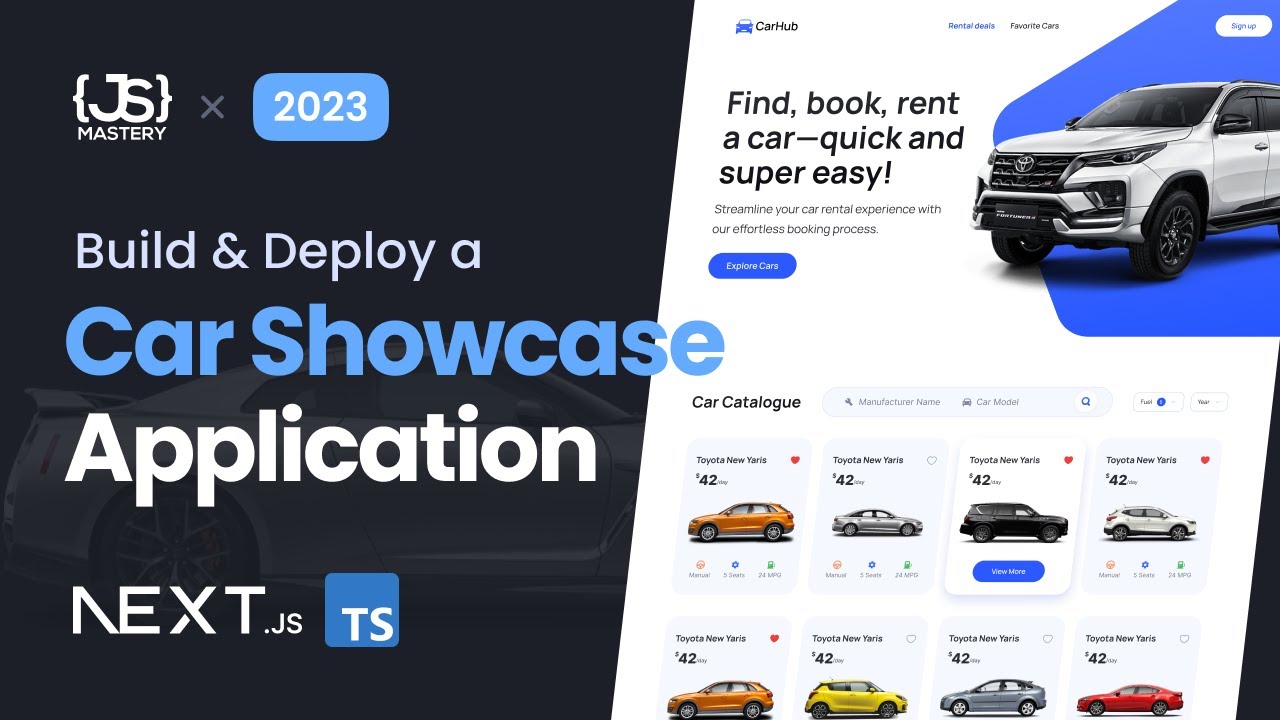
Hey there my name is Antonio and welcome to the newest e-commerce project on my channel in this video you're going to build not one but two separate projects on my left side right here I have the actual e-commerce store this project will display all of the products which are configured in our dashboard from my right side right here and in this e-commerce front you will be able to Quick preview every project and add them To cart you will also be able to actually click on a specific category and from here you can filter by color
or by size you also have the single product page right here which holds a gallery of multiple photos for that product it also includes the related items list at the bottom right here and of course we can actually check out and that is going to create an order in our dashboard so let me demonstrate that real quick once I've clicked check out right here I'm going To get redirected to stripe and you can see that I have white sunglasses selected right here I'm going to go into my orders here and you can see that I
already have an order for that but the paid status is currently false so let's go ahead and let me enter my email right here let me enter a dummy phone number right here let's add the stripe test card like this let's give it my name like that and let's give it some fake street name just for now let's give it Some number and a city and once I check out right here you're going to see two things happen first we are redirected back and the item has been removed from the store now because we don't
want you we don't want other users to spam you with the purchases of items that are out of stock and once I refresh my dashboard right here you can see that now the status of paid is true I have the total price I have the address where I have to deliver it and I have the phone number Of the customer who purchased this product and once I go back to the overview you can see that I just made my second sale right here and my total revenue has increased but this dashboard is not only going
to be able to handle one e-commerce page no it's going to be able to handle as many e-commerce Pages as you want for example here I have the suit store and I also have the shoe store right here and once I select that you can see that right here I have a Completely different Revenue a different number of sales and all of my Billboards and categories are completely different and yes our admin will also generate API routes for us so we can quickly check them and connect them to any other front-end application we want now
I'm going to demonstrate you how easy it is to add a new category using this dashboard so I'm going to select my suit store because that is what I'm seeing right here and let's play around and Let's change the title of this big billboard right here so I'm going to go into my Billboards I'm going to find this one so explore the featured collection and I'm going to click update right here and let's change the featured to special collection and save changes and yes I can also upload a different image if I want to now
I'm going to refresh here and just like that now it says explore the special collection here now let's demonstrate how easy it is to Add a completely new category which is going to be displayed in our navigation bar right here first I'm going to create a new billboard and this billboard is going to say explore the shirt collection like that let's just not misspell it I'm going to upload an image using cloudinary so I'm going to select an background image like this and once it is uploaded I'm going to click done right here so let's
just wait a couple of seconds for that to finish great and Now that I have this billboard ready I'm going to click create right here and that is created the new billboard right here in my data table and yes I can actually search for this on top of that we also have the pagination ready now I'm going to click on the categories right here and I'm going to create a new category and I'm going to name it shirts like this and I'm going to select the billboard to be explored the shirt collection and I'm going
to click create And now I'm going to refresh right here on my store and you you can see that I have a new shirts page right here but since we have not added any products with the shirt category it is empty right now so let's go ahead and let's actually add some products here I'm going to click on products right here and I'm going to click add new but before we do that let's actually explore the sizes and the colors yes we can add filters through this dashboard which are Then displayed right here so let's
see we have the colors blue red green and black how about I add a new color called White so I'm going to name the color white and I'm going to give it a hex value of white like this so let's just make sure one two three one two three like that and click create great and now we have the new color and now let's add a new size as well so we have large medium and small and let's add extra small XS like this and click create and Now I'm going to go into my products
and I'm going to click create new product so first let's name this white shirt like this let's give it a price of $59 so it's a very expensive shirt and let's give it a category of shirts a size of extra small and a color of white and now let's upload the actual image so I have this prepared right here in my shirt folder so I'm going to add two images right here both of them are going to be uploaded so let's just wait a second for Upload to finish great and now that I have these
products added I can select whether I want this product to be featured or not which means that this product will appear on the homepage so let's click featured for that and I'm going to explain archived in just a second now I'm going to click create and you can see that now I have the white shirt so let's refresh this uh route right here and there we go we have the new white shirt and you can see right Here I have the active Gallery in my fast preview and I can try and filter by white and
you can see it's still here but if I go on black for example no results because we have not added anything yet perfect and now let's go to the store and you can see how my new shirt is right here with the featured projects that is because we have selected featured true so if I go back and update this product right here and remove the featured check and save the Changes and then refresh my page you can see that it is completely gone so let's go ahead and let's bring that back now so I'm going
to update that and I'm going to click featured again and I'm going to save the changes and what I'm going to do is I'm going to purchase this white shirt and some sunglasses so let's go ahead and let's add the white shirt and let's add this Black sunglasses right here you can see that I have two items right here in my store And what I'm going to do is I'm going to demonstrate you that I can even refresh this page and it's still going to stay here so we're going to use special storage to preserve
this in our session great and after this is done what I'm going to do is I'm going to click check out right here you've already seen seen this but now I want to demonstrate that to you with two products so you can see that it combined the prices of these two so now I'm just going to fill this out Again so I'm going to give it my email I'm going to give it a fake phone number like this I'm going to give it the stripe test card like that and I'm going to give my name
let's give this a test Street like that a random number and a city and let's click pay again and after that you're going to to notice that this white shirt and the sunglasses that we added will have this archived status turn to true so I'm going to refresh right now and there we go white Shirt is now archived if I go into this details you can see that it's checked as archived meaning that this product will not appear anywhere in the store this is a safety mechanism so that if our product is out of stock
users cannot purchase it multiple times and now let's look at our orders and you can see that I have the white shirt and black sunglasses along with my fake phone number and my fake address and I have the status paid true meaning that this Order is ready to be delivered so once this is back in stock all I have to do is go into my products find the white shirt and let's go ahead and let's just uncheck archived and save changes and this brings it back into our stock so I'm going to refresh this store
again and there we go our shirt is back here with the featured products and it's ready to be purchased one more time perfect and this is how easy it is to use our dashboard and this is something You're going to build in this tutorial on top of that our dashboard will also support dark mode I think this is really really cool and we're also going to play around with clerk authentication so we'll be able to connect multiple accounts you will be able to add multiactor authentication you'll be able to modify your security change your profiles
whatever you want and you can also choose the system along with the light and dark you can also change your Store settings and let's say I want to change from suit store to Shoe Store all I have to do is change one environment variable in my front end right here so I go into settings and I just copy this uh link right here perfect so I just demonstrated to you everything we're going to build this is the most advanced project uh in my channel and I'm so happy to share it with you and just the
last thing I want to show you is how easy it is to create a new store so Let's say you want to have a laptop store for example you can do that so just create a new store and there we go a complete blank slate no Billboards no categories no sizes and no colors meaning that you can create everything from scratch and it's not going to get mixed with what you already made in the past and you can easily switch back to suit store or shoe store so on top of building a really cool and
beautifully designed e-commerce project you're also Going to build a fully functioning software as a service which is a very good explanation for what this dashboard is capable of you can run this as a complete Standalone project and modify it to serve as a com as a dashboard for something completely different I'm very excited to share this with you and what I want to say next is the Technologies and prerequisites which are needed for this tutorial so both of this project both the e-commerce front end and the Actual dashboard will be uh built using nex3 and
we are going to be using the newest uh app router the design on both side is going to be using Tailwind but in the dashboard we are going to use Shad CN UI and radic UI for the database we're going to use MySQL Planet scale and we are going to use an orm called Prisma which if you've already looked at my previous Tut tutal you might be familiar with so without further Ado let's get Started so the first project we are going to build is going to be the admin dashboard and for that we're going
to use shaten UI so usually you might see me working with the next 13 documentation page but now I'm going to shat CN UI so you can see how to set up a new next 13 project using shaten UI in order to get to this website you can either use the link in my descript description or you can simply Google shaten UI and click on the first link Right here and you can see you have a display of some of the components available in this beautiful project but what I clicked on is the documentation and
I pressed on installation but first let's explain a little bit about what shet CN UI is so as it says right here it is not a component Library what this is comparing to is for example material UI kit or chakra chakra and material y kit are primary npm packages so you cannot individually install uh let's say A button but even if you could that is a bit different from what shat CN UI offers so shat CN UI is not a library in any sense because what it offers you to do is to copy and paste
individual components that you need into your project and that gives you much more configuration for example let's take a look at the button element right here you can see that right here we can use the command line interface built by shaten right here or you can click on Manual and then you can see the exact code which is going to be added in your project and you can see how here you can modify whatever you want let's say you want to change the radius you can change it right here let's say you want to uh
rename the variance for example if you don't want to call it distractive you for example want to call it danger you can change that right here so that's why I think shat cnii is really cool because it enables you to build your own Component system and you're not dependent on any uh third party npm Library which then needs to be updated or maintained so let's get started and let's go into this installation tab right here and first thing we're going to do is we're going to run the official create next app so this is not
related to shat cnii this is the official uh next3 setup so right here on the left I have my visual studio code and I've opened my terminal so I'm going to run Uh this exact command let's go ahead and write npx create-- app at latest so we use the newest version and now let's name our project something in my case this is going to be e-commerce dadmin like this let's give it a D- typescript so this will automatically select the option that the next 13 project is built using typescript let's also give it an option
D- Tailwind so this is going to pre-configure Tailwind for us in this Project and let's also give it a D- Sint so you get a bit of linting available in your project which is going to make your code much better great and now just press enter uh and let's see if we are going to get a couple of prompts so in my case I got this prompt you might not get it if you already Ed this newest version so I have to press Y and enter great now I have the question of whether I want
to use the source directory so I would highly suggest that you do exactly What I do because using the source directory will change a couple of stuff you can still work with it of course but for the sake of um going through this tutorial with is Select no because I'm going to select no as well so just press enter and make sure no is selected uh if you don't know how to choose between this you can use arrow keys on your keyboard so make sure no is highlighted and press enter for the app router please
select yes this is very important So next3 uh offers either Pages or app router pages is the old way of working with next we are going to use the app router which is the new version which heavily relies on server components which is a really cool thing so make sure you select yes and press enter for the question of whether you would like to customize the default import alas I want to select no here that is going to default it to the at sign I'm going to explain that when we do some imports in The
code uh if you know what you're doing you can select yes and write your own but I would highly suggest for the sake of following this tutorial select no so you have the same options as I do great and this is going to start installing the project so just sit down relax and wait for it to install great so now my packages have been installed and I have the new application ready so what you have to do is go and find the folder where your app Has been installed so I'm going to click open right
here and I'm going to select e-commerce dadmin because that is what I named my folder so now that I'm inside of my folder you can see that I have the next 13 structure right here so far nothing is different from your usual next 13 configuration if you want to you can already start the project and play around but before I do that I'm going to run this second command from the shat cnii documentation so going to collapse The sidebar I'm going to go back into my terminal right here and I'm going to run this command
npx shat cn- at latest in it so go ahead and run npx shat cn- UI at latest in it like this and press enter and now you see uh exactly what uh is uh provided here in step three so we have some questions here if you want you can experiment with this I'm going to keep the default options so you can select the default style you can choose New York with arrow keys or default I'm Going to choose default because that's what I built the original project with you can change the base color if you
want to so none of this really matters uh but your project is going to look a little bit different in mind if you choose different options so I'm going to select slate like this uh now it's asking us where is your Global CSS file and by default this is the correct uh location uh if you're wondering what file this is so it's referring to this App folder global. CSS right here and it's the same thing uh it prompted so just you can press enter for that you can see it selected appg global. CSS for the
question whether you want to use CSS variables for colors I'm going to select yes uh so the same thing as where is your Global CSS it's now asking where is your tailwind and that is at the root of our project so we can just press uh yes uh the import alas from components yes I like that it's add/ components so make Sure that you also have the alas at uh if you configure the project exactly as I did you will have no problems with this so you can just press enter and the same thing for
util just press uh enter here as well it's asking us whether we are using react server components we are we are using the app router and we will be working with them so select yes as well uh and now it it's asking us to confirm to write this configuration into component Json file so write yes and It's automatically uh going to uh start installing great and now we have our project ready so I'm going to go ahead and write mpm run Dev like this and it's going to fire up on Local Host 3000 so right
here my project uh should be visible there we go so perhaps yours is looking a little bit different my screen is collapsed to mobile perfect now let's go ahead and let's clean this up because we don't need all of that so you can keep the project running or you can shut It down I'm actually going to shut it down uh because I'm going to do some changes which are probably going to mess up hot reloading so I would recommend you do the same uh shut down the application for now and go back into the sidebar
here uh and first let's go ahead and let's check out our page and our layout great so what we have to clean first is our page folder so in this main home you can just go ahead and remove everything inside great and just write a Paragraph which is going to say hello admin dashboard like this and you can remove this import for image we are not going to need it perfect for layout. DSX file well pretty much everything can stay here if you want you can change the title to admin dashboard and I'm just going
to change the description to the very same thing great uh and now inside global. CSS uh everything that you have here can Actually stay and should stay because this has been modified uh by this shaten UI command uh the only thing I'm going to add is the height configuration so I'm going to go into this global. CSS right here and I'm going to write HTML comma body and root like this and I'm going to write height 100% great and now that I have that uh what I want to do is I want to organize my
app folder just a little bit so I don't want to have uh my page. DSX File in the root of my app folder instead I'm going to do something called route grouping so for that I've opened this documentation official next3 documentation using the app router so uh app uh sorry route grouping is used to organize your pads and sorry not to organize your pads but to organize your components and your let's call them little pages in the app without affecting the URL because if you you ever worked with next you know that Every folder that
you create inside uh the pages folder or now the app folder is a route for itself so what if you just want to organize your things in folders and don't necessarily want to create routes with that well you can do that now using route grouping so what I'm going to do is I'm going to create a new folder and I'm going to call it root like this and I'm GNA later in the app I'm going to have two more folders like this the other one is going to be called The dashboard and the last one
is going to be called out so uh what's cool about this uh folders right here is that they do not affect the URL so no this is not going to be slash root or something like that no this is just a normal organization folder uh but what's cool about it is that each organizational uh folder can have its own layout. JS in our case TS which is really cool because that's exactly what I want my root state of the app is going to have one layout My dashboard is going to have another and my uh
out folder is going to have a completely different layout so that's perfect for my case and all I'm going to do here is create page. TSX inside and you can just go to your old page. DSX copy everything and just paste in this new one and save and you can go ahead and remove the old one like that and if you're wondering what has changed now oh absolutely nothing so you going go ahead and actually run your project again so I'm going to go to npm run Dev like this go ahead and open this and
there we go it just says hello admin dashboard so the fact that this folder is called root has nothing to do with the URL this is still the Slash the root uh uh URL which is exactly what I wanted uh perfect and now just to demonstrate that we have added the shat cnii properly let's play around let's for example add a button component so I would heavily recommend that whenever I Am looking at the documentation of shat cnii you are doing the same thing because while the majority of these components can be added just by
using the command so you can just look at what I do in my terminal and you're going to get the same result there are specific uh components which are not uh you cannot add using a command for example the form the form itself needs to be added uh by uh sorry I'm going to find it it's right Here uh I can't find it right now but when we get to that I'll promise I'll explain better uh so there are specific things that we have to copy from here and it's a large amount of code so
I'm not going to write it uh from scratch because it simply doesn't make sense we will not be using shaten in a way it's supposed to be used so that's why I recommend that whenever you uh you see me using this documentation go ahead and look at it yourself so go into the Button right here if you want you can play around to see how it looks in New York style how it looks in default style and all we have to do to add it is run this CLI command so I'm going to do that
again you don't have to shut down your application but since I'm working with one terminal and I just don't want to open many of them I'm going to close it right now so what I'm going to do is I'm going to run this command npx sh- UI at latest add button and just press enter Like that and now it's going to ask you ready to install components and dependencies proceed you can just press Y which is going to mean yes and now it's installing our button so I'm going to show you what that did right
now so I'm going to run my project uh one more time and I'm going to go in my sidebar and let's take a look where is our button so our button is located in the new components folder UI button. DSX and there we go this is our entire button And everything you see here is controlled using Tailwind CSS so if you don't like it for any reason if you think that it should be larger you can increase the height if you think the padding should be bigger you can change the padding if you think the
rounding should be even more round you can increase this to Exel instead of medium if you don't like the size names you can change that as well so this is our entire fully uh accessible button Component so this is a much higher quality component that it would have been if we were building our own that's why I really like this Library uh and now I want to demonstrate how to use this button which we just added so I'm going to just refresh my admin dashboard right here to ensure that it still says hello admin dashboard
I'm going to zoom in a little bit just for you and what I'm going to do is I'm going to add know just create a small little structure Here so a div and I'm going to add a button and you can see how my uh vs code automatically autocompletes the import so add/ components slui SL button like this and important thing when adding shat CN UI components is that all of them are using the constant export so you will Almost Never See export default with uh buttons so you have to import them like this because
if you try and do this uh you're going to get a different result in fact you're going to get an Error so make sure you destructure the button like that and you can just go ahead and write for example clickmate like this and there we go we have a nice little button uh so just to confirm that your Tailwind is also working you can add a class name to here and let's give it a padding of four like this and there we go now it's moved a little bit and you can play around with let's
say size of this so let's give it a size of small like this And now it's a little bit smaller let's give it a size of Icon and now uh you can see that it's supposed to take an icon so it looks kind of weird uh you can basically play around I'm going to give it a default size and let's change the variant for example so the variant will also Al autocomplete uh let's say how destructive looks so we are going to use destructive for example for deleting our stuff for deleting uh images for deleting
products a bunch of stuff like That uh and you can also play with link outline I think it's a very very cool project definitely worth exploring and I hope this becomes a standard of developing in the future because I feel like it's much better quality that we have all of the components we're using inside of our structure rather than having it in a random and PM library inside of our node modules where we have no access to it great so you've successfully set up uh your next 13 Project for the admin dashboard and in The
Following part of this tutorial we are going to implement uh a very simple and very quick authentication using clerk so let's continue and let's add the authentication for our admin dashboard in order to do that we are going to use clerk Authentication so I have their website right here you can either use the link in the description or you can Google clerk authentication so let's go into clerk Right here and let's find our sign in button so if you already have an account you can log in if you don't you can click sign up so
I'm quickly going to finish this using uh my email so after you logged in you're going to get greeted with a similar screen so I'm going to add my application name here called e-commerce Das admin like this if you want to you can play around you can add phone number username Facebook Apple but I'm going to leave it as it is so I'm going to leave email address and Google and you also have 19 more so I think this is a great great package and now let's just click create application right here great now that
you have this uh you can select what you're working with in our case this is nextjs so we can just continue and follow and add these environment variables to our product but before we to that let's actually create our environment file so I'm going to collapse everything here And I'm going to create a new file called do environment like this and by default this is going to get committed to our project which is not something we want so in order to fix this what we have to do is we have to add it to G
ignore so let's go into ourg ignore file right here and just below environment local at environment like this and then you can see that your in file environment file will be grade out meaning it will not be committed this is Very important you never want to commit your secrets to your GitHub repository great and now you can feel free to just copy this entire thing you can see this is hidden so you can just or maybe you can but I'm going to use this copy button right here and I'm going to paste it here and
you can see how that added the next public clerk publishable key and clerk secret key perfect and then in order to continue what you have to do is click here continue IND docs and that is Going to open uh the documentation uh for clerk perfect so first things first let's go ahead and let's run this npm install at clerk nextjs so I'm going to go ahead in my terminal right here I'm going to shut down my application I suggest you do the same because we're going to have to add some middle vers and stuff like
that so go ahead and install that and wait a couple of seconds great so now that this installation is done let's take a look At what else we have to do so we already added our environment keys so we can skip this part but now what we have to do is we have to mount the clerk provider and one thing I absolutely love about clerk is that it offers both configuration for app router and for Pages this is very rare to see about third party librar supporting the newest app router so that's why I like
this very much because it gives me confidence that it's going to work in our project Great so before I run the app what I'm going to do is I'm going to go into my app folder and I'm going to select layout. DSX right here and I'm going to import clerk Provider from at clerk nextjs so the package we just installed so go ahead and import clerk Provider from at clerk nextjs like this and what you have to do is you have to wrap the entire app so clerk provider like this wrap the entire application inside
the app perfect Just like that let's take a look at what we have to do next so it's telling us to add a middleware which is exactly what we are going to do so make sure you are on this page right here uh I will leave a link in the description if you want to you can Google clerk authentication nextjs and you're going to find it right here get started so just make sure you are using the same documentation that I am or if you clicked here continueing Docs and you have nextjs selection make sure
you're looking at the same thing I am uh now we have to create this middleware dots file so go into your project collapse everything and create a new file at the root of your project if you're using Source you might need to put it inside the source folder that's why I said that you configure the application the same way I am because things are a little bit different if you did everything the same so far as I did No problem just create a new file called middleware dots like this and we're going to go ahead
and copy everything everything that is inside and paste it here so I'm going to import out middleware I'm going to export default out middleware and I have a config this is a config uh in what I for my understanding this is a specific config uh needed for the clerk authentication I know when we write our own matchers using next out it can look a little bit Different so I'm assuming that this is uh specifically needed for clerk uh great and what we have to do now is we have to build our sign up and sign
in pages so the way I'm going to do that before I run the application uh I'm going to organize that into my uh into our uh R Group the same way I did with root so I'm going to create a new folder called Al like this perfect and this out is going to have its routes so go ahead and write routes so this is another Organizational folder because inside out I'm also going to have a separate layout later on the project so I just want to create another organization just so we practice uh how to
organize our files a little bit better and inside of here we have to follow this exact structure of creating a page so go ahead and create a new folder called sign Dash up like this and inside of that you're going to create another folder but this time it's going to be in double square brackets Like this so make sure it's double square brackets and spread sign whoops sign Dash up inside like this so this is another convention in next 13 which will allow clerk to have all the routes it needs to handle the authentication in
our project if you accidentally misspell this if you miss a DOT or if you miss a square bracket it is not going to activate the convention that clerk is expecting so be very careful that you write this exactly As the reccommendation says say exactly as I have it in my project right here and now finally inside of that we can create a new file and we can name it page. DSX great and inside of that you can actually just copy this entire thing and paste it here so import sign up from at clerk nextjs export
default function page and return the sign up like this perfect and you can just save the file and now we are going to do the very same thing for sign in so you can just copy This route paste it inside the routes so now you have sign up and sign up copy and just rename this sign in like this and very important inside of that new folder also rename sign dashin right here so like this sign in great and now go inside this page. DSX right here and what you're going to do is you're going
to copy uh this signin option right here so instead of sign up copy this and paste it like this perfect so let me just see uh why do I have this error Perhaps I made a mistake here or is it just a visual studio code error if you don't have it perhaps everything is fine maybe just some cach in my project I have a feeling like everything is fine and it was just a cash error great so the shortcut I did to open and refresh my visual studio code I am on a Macbook so I'm
using command shift and letter P and all I have to type is reload uh window and that is going to serve as a refresh of my visual studio code without The need of me shutting it down if you are on PC perhaps it's going to be control shift p uh if you're interested in how I did that great and now that we have this last thing we have to do is we have to add some more environment variables so scroll down and look at this environment variables that we have to add click copy go back
into your environment file like this and you can just paste them right here so make sure that this if if by any chance you can Rename this you don't have to have it sign in and sign in you can name it login and login register and register just make sure it matches this environment variables uh what I recommend of course is that you follow exactly what I'm doing and then at the end of the project modify it as much as you want and I highly recommend you do so because that is the best way to
learn break stuff and then fix it uh great and now that we have that uh we Can actually go ahead and try and run our application and let's see what we have let's see if we are missing something let's see if this is enough configuration for us to see our login screen so if I'm not mistaken uh when I refresh this Local Host I should no longer see this click me but instead I should be uh redirected to the signin page so let's see yes I am correct so I'm redirected uh to my signin page
page right here Perfect but something's missing I really wish that this big model was centered in my project so there are several ways I can do that if I want to I can go into my app folder I can go into the out I can go into these individual pages and wrap this into a div and use flexbox to center it or you can remember what I said in the beginning and that is that each of these grouping folders can have its own layout which is going to reflect all of the routes inside of that
group So that is exactly what I'm going to do now so inside of my out I'm going to create a new file called layout. DSX like this and yes now I have an error because next3 expects layout to return something but ours is empty so that's why I have this error right here so let's go ahead and write export default function out layout it's going to accept children and the prop of the children is going to be react. react node like this perfect and Just open this function and return a div which is going to
render the children and now if I refresh nothing much has changed but the error did go away and now we have this div which we can add any styling to and it's going to be reflected to all of the routes inside of our out uh folder so let's go ahead not class name Flex items D Center Justified D Center h- full and w- full like this perhaps we don't need w- full yeah we don't let's not add classes We don't need great and now our app is officially uh centered and let's see if I click
on sign up for example I'm redirected to sign up but it's also centered so this is how I reused my layout throughout the entire out page perfect great and now let's let's go ahead let's try and log in with Google so I'm going to click continue with Google and I'm going to see uh if I have uh yeah so I only have one account in my Google so it automatically selected that That account if you have multiple accounts in Google it's probably going to show you the page from Google where you can select which account
you want to use to log in perfect so our authentication is officially working uh before we continue let's just quickly go into the root folder in page. DSX and let's change this uh just a little bit so I don't want it uh to be called uh home instead I want it to be called uh setup page so I'm going to write const Setup page like this it's not important but I just kind of want to uh name my pages to be a bit more logical like this and remember with Pages you have to export default
same thing with layout so export default setup page if you want to you can also name it root page and we don't need this button so I can just remove it and instead I'm going to write this is a protected route like this and I just want to show you one cool thing so Obviously we're logged in because if we weren't we would be redirected to the signup page using clerk but let me show you a cool little component that clerk has it has a lot of cool components but this is a very cool one
called user button so go into the documentation uh or you don't have to but I would highly prefer that you do so you can read things yourself and you can experiment yourself if you want to and let's go ahead and see how we can use this user Button right here so what I'm going to do is I'm going to just add uh let me just find it this user button right here so inside of this protected route I'm going to write user button like this and I'm going to import that from at clerk SL nextjs
and I'm going to write after sign out URL is going to be equal uh to slash like this if you don't write this after you log out you're going to be redirected to clerk page if I'm not mistaken which is not the greatest uh Developer and user experience so make sure you add this prop uh it is after all written right here into documentation and there we go you can see my little icon right here you can see the email I used to log in and I can also manage my account you see how easy
we just added the authentication in 15 minutes we created a worldclass authentication thanks to clerk now I understand if some people have a concern with Outsourcing the authentication Database to a thirdparty company uh first of all I want to express I have full belief in clerk clerk is gaining traction for a reason it's getting funding for a reason and it's being recommended uh to use with next1 13 with versal with a lot of new and upcoming projects and I truly love how easy it is to work with this but if for any reason you are
uh concerned uh by the fact that you don't own this database entirely and you Want to build your own authentication I have a lot of tutorials on my channel like Netflix clone Airbnb clone messenger clone and Twitter clone where we all build our own authentication from scratch but for this project that would take at least a couple of hours so clerk officially saved us I don't know how many hours building this uh and we can now completely focus on building this amazing admin dashboard that I have prepared for you so in the next part uh
We're going to work a bit more with organizing our routes we're going to create a new one called dashboard and we are going to add our navigation bar and we are going to then connect Prisma and Planet scale and we are slowly going to create our first entities and entries into the database let's continue and let's create the first model of our admin dashboard this model is going to be used to create a new store and it's also going to be Triggered if we log in into our admin dashboard and there is no store created
or if we want to create additional stores I am of course talking about this model right here so this is what it's going to look like and you will not able to close it until you create a new store like this and then you will be able to open it again when you click create store but we're going to create the navigation and uh the actual component called combo box later for now we're Going to focus on just this model so in order to do that I want you to go to shaten UI documentation and
find the dialogue component it's right here under the letter D along with data table data picker and drop down menu so let's go ahead and let's run this command npx shat cn- UI at latest add dialogue so when you click copy from shet CN UI you can choose npm yarn or pnpm I'm working with npm so I would suggest that you use the same command great I'm going to go Ahead and uh shut down my application and I'm going to run this command so npx shat cn- UI at latest add dialogue and press enter like
this and just press yes for this and it's going to install the dialogue in uh your project so let's just wait a couple of seconds for that to finish and there we go it's right here and you can go ahead and npm run Dev your project again and just refresh so you ensure that the project Is running and you can collapse the terminal now great and where is our uh dialog component well the same place where where our button is inside components folder UI folder dialogue. DSX right here and you can see that it is
not exactly uh what you might expect it's not a component uh like just dialogue and then we put what we want inside instead no it gives this headless UI so we can build our own skeleton of the Avatar but it has some pretty cool Styles but since we are going to have uh maybe you will want to have multiple models in your component uh sorry in your project we're going to create a new file called model. DSX and this model is going to uh standardize the use of this dialogue components so let's go ahead and
first let's mark this as use client because we're going to add some interactivity uh to this component right here now let's fight the interface uh it's going to be called Model props like This it's going to have a title which is a type of string description which is a type of string as well is open which is a Boolean it's going to have an onclose function which you can describe as just an empty void like this and it's going to have children optional of course which is react. react node uh I I said optional of
course because I know what I expect in my models it's not a practice or Something if you think that's what I meant my my mistake great and now let's actually go ahead and write export H model react. FC and let's give it um model props like this and then you can go ahead and open this like that and let's go ahead and just extract our props so title description is open on close and children like that perfect and now inside of this uh let's write our on change function which we're going to Append to Shaden
UI dialogue component so const on change is going to accept an open prop which accepts a bullion how do I know that it accepts this well I'm going to show you that in a second when we add the dialogue component so open this Arrow function if it's not open sorry if open like this on close like that so very very simple function basically our own change is going to accept this prop code open which can either be true or false and if We detect this exact State we are going to trigger on close now let's
go ahead and let's return our dialogue which you can import uh make sure you don't accidentally import it from radex UI make sure you import it from dot SL dialogue so it's from this dialogue component right here be very careful when importing shat cnii components because underlying uh package which shat nuui uses is radic so they are named exactly the same there is a Dialogue inside radic Library which you have installed because shaten in it installed it and there is also a dialogue inside of our UI library and that is the one we want to
use because radic dialogue does not have the styles that shaten provides great so now that we have this uh I'm just going to go ahead uh and add a carrot here I think I switched my keyboard layout so just a second let me Fix that all right so write the dialogue like this my apologies I I pressed the shortcut which changed the layout of my keyboard great and let's give this some props so open is going to be is open and on change sorry on open change is going to be on change so this is
how I know that on change will receive the open Boolean because if you hover right here on open change uh provides uh the open Boolean right here so that's how I know what to expect Here great inside of that I'm going to open dialogue content so dialog content like this again you can see that it offers me to import from radic I don't want to import it from radx I'm importing it from do/ dialog like this inside of that same thing with dialog header and inside of that let's write the dialogue title like this and
inside of this dialog title we are going to render the title like this perfect and now inside the dialog header as well We're going to render dialog description and inside description like this perfect and just below the dialog header we're going to open another div and render the children so that is going to be the content of everything else inside of our model that we want to put there perfect and one thing I want to do oh see I made a mistake I just want to bring your attention to this so I added two imports
from radic UI because I rely on vs code To automatically import stuff from me but all of these have to be imported from do/ dialog so I'm going to remove this so you can see which components I added and now I'm going to add them again but I'm going to use do/ dialogue so I don't make the mistake so dialogue description from do/ dialogue like this perfect and I'm just going to collapse so you can see uh in one line right here and also one practice that I want you to follow because I honestly think
it's a Good thing to follow I don't want to use do slash I want to use uh the alas so at uh my apologies I changed my keyboard layout again so go ahead and write add sign slash components slui like this so it is the same thing at using do/ dial L but instead we're using uh the add sign perfect so now that we have this we can go ahead and try reusing this uh inside uh root page For example so let's go into our app folder into root page. DSX right here and let's mark
this as use client because model is a client component so instead of this user button which we're not going to need right here let's add our model which you can import from at/ components slui model like this and inside I'm going to render my children like this I'm going to give it an is open of true so writing it like this or writing it just like this is the same Thing and on close it's just going to be an empty function like that uh and we also need a title and description so title is going
to be test and description is going to be test description like this and there we go you can see that on my page right here I now have a working model of course nothing happens if I try to close it because I did not add any Dynamic Boolean to this is open instead uh I just hardcoded it to is open perfect and Now instead of writing it like this we're going to add a library called twoand and we're going to use that as a global State Management uh which is going to control whether our model
is opened or not so let's go ahead uh and let's write that so head into your terminal right here I'm going to shut down my application and I'm going to write mpm install to stand like this so wait a couple of seconds for this to install great and now go ahead and run Mpm run Dev again and refresh your application so your hot reload is up to date because when you shut down your application and then just expect it to work again it's not going to Great uh and now what I'm going to do is
I'm going to go and create a new folder in the root of my application and it's going to be called uh hooks like this so let me just write hooks like that and inside I'm going to create a new file Called use- store- mod. DSX like this perfect now go ahead and write import create from suent like this now let's create the interface so interface use store model store or maybe interface is a better way to uh explain what this is is open it's going to be a Boolean on open is going to be a
function and on close is going to be an empty function as well uh like this yes in typescript you can either use semicolons or commas so let's be consistent and I'm just Going to name this store I know it kind of looks weird but this store and this store is not the same thing and I'm going to reuse Sy a couple of times in the project and I'm going to use the same uh suffix store so I just want to be consistent with that I know it looks a little bit weird but it's going to
make sense when you see the other uh states which we're going to have and now let's just add export cons use store model is equal to create and go ahead And open pointy brackets and write use store model store like that go ahead and open a parenthesis like this open another parenthesis and extract set from that fire an arrow function and go ahead and return an immediate object like this great and now in here we have to assign the default values so is open is going to be false and on open is going to be
a function which calls the set which we extracted and sets is open to True like this and next we're going to have on Close which is going to call uh set is open to false like this and now let me just see uh what kind of error I have here uh why exactly am I getting here so first things first what I'm going to do is I'm going to refresh my visual studio code perhaps I'm not seeing the error it's still here so obviously uh I'm doing something wrong let's just check for a second what
that is the issue is in my configuration of The interface so I return an empty object and my error is saying that the type of void is not assignable to type empty object so that is a mistake I made so instead of this empty object what I wanted to write was void like this my mistake great now our uh store is ready and what we can create now is a store model so let's go ahead and let's go into components and outside of the UI folder I'm going to create a new folder called models like
this so we're going To have some reusable models inside go ahead and create a new model called store- model. DSX like this perfect first things first let's mark this as use client like that and what I'm going to do now is I'm just going to export const store model like this it's not going to accept any props and I'm going to return our actual model component from do/ UI model like this inside all I'm going to write for now is future uh uh create store form like this let's Give it the title of create store
let's give it a description of add a new store to manage products and categories or you can write whatever you want and is open for now it's going to be false and on closed for now it's going to be an empty Arrow function like this so now let's add two done to the mix so we can actually control whether our store is opened or closed so go ahead and write con store model is equal use store uh use store model from at/ hooks use- Store- model like that perfect and so you can see I made
an obvious mistake here so I opened uh the function right here but I forgot to wrap this entire thing in a return make sure you wrap your entire model in return my mistake great all right and now that we have this store model right here what I'm going to do is I'm going to use its values to control that is open and onclose so is open is going to be store model do is Open like this and on close is going to be store model do on close like that so perfect now that we have
this first thing I want to correct this so again I don't want to use dot dots I want to be consistent throughout my entire project and I'm going to write at/ components slui model like this I feel much better uh when it's consistent perfect and now what I have to do is a model provider because I want to add this to the layout of my application I want this model to Be available throughout my application I don't care whether I trigger it from the products page or the navigation bar or from a completely different uh
route organization here so that's what I want to achieve with this so in order to do that I have to create something called a provider so I'm going to create a new folder in the root of my application called providers you could technically categorize those as components as well but I want to separate it even more in a Completely different folder and inside I'm going to create a new file called model- provider D DSX like this let's mark this as use client let's import use effect and use state from react like this perfect and now
let's write export const model provider like this let's write uh something called uh um well let me just write it out and then I'll explain what it does so go ahead and write a state Called is mounted uh with an option set is mounted as well from use State and default value is going to be false now we're going to write and use effect life cycle like this and inside I'm going to write set is mounted to be true so very simple use effect like this don't forget to put the dependency array here and now
I'm going to write an if Clause so if it's not mounted in that case we're going to return Null whoops let me just fix this like that so what exactly does this do well we're going to add this model provider inside of our app folder inside layout. DSX but our layout. DSX is a server component meaning that I cannot just add a client component to it I have to uh ensure that there will not be any hydration errors especially with models because there are a lot of ways you can trigger a model and that can
cause the synchronization between the server side Rendering and the client side rendering for example the server will not have any model open but the client will and that is going to throw a hydration error so this way I ensure that until this life cycle has run which is only something that can happen in the client component I return null so if it has not mounted if I am in server side rendering in that case I will return null so that there is no hydration error possible of happening so this is a small trick that You
can do whenever you have that hydration error you will see me do this a couple of times in the project I will try to do my best to demonstrate this is more of a precaution to avoid it so I can't exactly demonstrate it right now but there will be one case when we build the store part where you will actively see that hydration error being thrown and this is exactly how we are going to fix it great so this is what happens if our app is not mounted meaning that we Are in server side we
are not going to render any models in server side but if we are on the client go ahead and open uh a fragment and render the store model which you can import from add/ components models store model one more practice I do in my code is I separate Global Imports like this from my local Imports like that so I separate that with a space you can follow that convention or you don't have to but I like to be consistent with my code great And now that I have this model provider as I said we're going
to go ahead and go into app folder layout. DSX and just inside uh this body right here so I'm going to collapse this entire thing and I'm going to add uh the model provider like this and you can import the model Provider from at/ providers model provider and I'm going to do the same organization here like this I think this looks much better and it's logical so we know okay these are the Global Imports this is my personal and this is uh a relative import from do/ globals great so now that we have that what
I want to do is I want to attempt and Trigger it instead of this test model right here which is in our root page right here so we're going to delete this model right here and let's go back and write root page like this and we're going to write some use state to trigger it uh and open so let's go ahead and let's extract the on open function from Twoand and is open state from twoand so you already saw that we can do that using cons store model is equal use store model like this and
you can import use store model from at/ hooks uh use store model like that but there is also another way you can do that so this store model works fine but it doesn't work fine when you need to use it inside uh us effect so what you can do is you can write on open like this and then use the state and directly import state DOT On open like this and you can do the same thing for our status is open like this perfect and now that we have that let's add the use effect here
you can import the use effect from react again I'm going to separate my inputs let's go ahead don't forget to add a dependency array and just put the semic colum in the right place and first I'm going to check if it's not open so if the model is not open in that case I'm going to open it like That and all I have to add in my dependency array is is open and onop like this great and you can see that that triggered our create store model and if I try to close it you can
see that I can't that's exact Behavior I want from this model because this model is going to hold the form and this form is going to redirect once we create um the our first store and from the navigation bar we are not going to have this exact feature so obviously when I Open it in my navigation bar I will be able to close it but if I'm viewing it from this root uh organization file that is going to mean that I don't have any store created yet so I don't want to allow the user to
go anywhere else besides this model right here perfect so you successfully added your first reusable model and it uses Global store to be triggered so in my opinion this is a much better way of triggering our models than having to write store model Uh every single time and then having to add the is open and blah blah blah so I think this is a much better way because our model Now lies inside the app layout inside the model provider so all of the models we want globally accessible can be here and then we can easily
trigger them however we want inside the root page inside the out routs whatever you want to do and you don't have to render them there I think this is a much better way of doing things great so I'm going To collapse everything and close everything and what we are going to do next is we're going to add some shed cnii components to create a form and you're also going to learn how to validate your forms using Zod and react hook form now let's go ahead and let's add the actual form for our create store model
in order to do that I want you to go back in shaten UI and I want you to find the form component right here in The sidebar as you can see you can read some description about this form and you can see uh what underlying packages it uses in this case it's going to be react hook form and Zod perfect so in order to do that what we have to do is we have to run the command npx shed CN UI at latest at form so copy this under npm like this I'm going to go
open my terminal right here I will shut down the application and I'm going to run this command so npx shat cn- UI at latest add form and I'm Going to press Y and there we go now it's installing my form and installing a label and while we are here I also want to add another component called input so it's right here below form so we have form hover card and input right here because of course we're going to need inputs in our form so again npx shed cn- UI at latest add input so go ahead
and copy that npm as well and press enter in your terminal and Y again and there we go it added it Perfect now you can go ahead and npm run Dev your project again and just remember to refresh perfect let's see what has been added to our project so inside of my UI I now have the form component I have the input component and the label component perfect you can see this form has a lot of components and it uses react hook form in the underlying hooks which is perfect because we are already familiar with
react hook form we used it in some of my previous tutorials you can See there's a lot of stuff going on here and this is very good code which is going to enable to write very good forms perfect now let's go ahead and let's go into our components models stor model. DSX first thing I want to do is I want to define a schema for my form so I'm going to do that outside of the store model I'm going to write const form schema is equal to Z now we have to import Zod in a
specific way so import asteris s z from Zod like that perfect And now we can go ahead and write z doob and inside write name Z do string Min one like this so at least one character is required to properly name our store perfect and now that we have that let's define the hook for our form so inside of store model this time go ahead and write const form is equal use form which you can import fromt do/ UI form oh my apologies use form from react hook form my apologies I thought that it was
an Export from uh from this new component that we have form right here but let's check use form is not inside okay great now that we have that go ahead uh just confirm you imported use form from react hook form and move it to the top alongside zot open pointy brackets right here and write z do infer like this open pointed brackets again and write type of form schema like this great open parenthesis and open an object inside now let's add our resolver so that our Form can actually be validated using Zod so resolver like
this is going to be Zod resolver like that so I think we're going to have to add a package for this form schema like this so it cannot find Zod resolver which is imported from Hook form resolvers Zod so let me just quickly check if maybe Shad CN has added this or not so let's see Zod resolver from at hook form SL resolvers SL Zod I do have it in my project so obviously let me just check my uh changes so in Package Json after I ran uh the add form yes hook form resolvers has
been added to my project so you can check if you have inside of your package.json go ahead and find hook for/ resolvers if it's here that is completely fine you can continue watching the tutorial and just add this import Zod resolver from hook for/ resolvers it looks like the intellisense for the import did not work and that's why I assumed that maybe we did not have the package installed but Looks like the shat ceni uh command lined uh uh interface added it for us in case you're having problems for any reason you don't have this
hook form or you don't have react hook form you can install those packages so make sure you have hook form resolvers and make sure you have uh where is it react hook form right here perfect and now we can continue so inside of our form hook right here here let's add default values like this and I'm going To give it a name of an empty string like this great so now I have a form and now I'm going to write an onsubmit function for which is going to be triggered uh in our uh form right
here so it's going to be an empty function for now so const on submit it's going to be a synchronous so we're going to prepare that because we are going to make some calls it's going to accept values which are type of z. infer open pointy brackets type of form Schema like this go ahead and open an arrow function and for now I'm just going to write a commment to do create store like this but if you want to what you can do is console log values like this so you can see what you're working
with perfect and now that we have that let's go ahead and let's actually create our form so I'm going to remove this text right here and I'm going to create a div and this div is going to have a class name of space- Y-4 p y-2 and pb-4 so we are giving it some spacing for all of the fields which are going to be inside and before we continue wrap this entire thing inside of a div because our button is not going to be needing this spacing right here and so we're obviously going to add
a button somewhere here we'll see at least that's what I'm planning now great and now let's actually add our form so form which you can import from DOI form so let's see how that was Imported right here do/ UI form and change this to slash components UI form like this I clicked save and I didn't close the tag so obviously I have this error right here okay and now let's go ahead and spread the entire uh form like this and we have this form from this hook right here perfect so now inside what you can
do is open the actual HTML element for the form like This and give it an onsubmit of form. handle submit onsubmit like this so now this handle submit is going to use our own submit function and provide the values which are going to be defined inside with our inputs great now let's go ahead and let's add the form field so form field is going to be imported again from at/ components slui SL form like this great and now this form field is going to have a couple of props it's going to Have a control of
form. control it's going to have a name of name is going to have a render which is going to take this Arrow function and immediately let's extract field inside and then go ahead and just return uh something inside like this and it's going to be a self-closing tag so this is I'm getting an error that the children is not the type of this that is because you can see that I open the form Field here and I close it here but it's a self-closing tag without children so I actually have to remove this closing tag
and add a self closing tag to it and now the error has gone away now let's actually render something inside so I'm going to render form item again from at/ components ui/ form like this so let's see form item form field and form so far imported from s/ components UI form make sure you don't accidentally import it from react hook form so from react form We only imported use form and make sure you don't accidentally import something from radic great now that we have this form item let's add the form label again you can import
it from the same place and inside I'm going to write name like this and there we go you can see how our little name has appeared right here perfect and now let's add form control again you can import that from UI components form and let's add the input component now make sure you import Input from do/ uiinput and I'm going to immediately change this to slash components like this perfect now let's go ahead here so input is a self- closing tag uh and I want to give it a couple of properties so placeholder is going
to be e Commerce for example and I'm going to pass in the entire field so what does this mean exactly well if you ever worked with inputs you know that they take on change they take value prop on blur and On Focus usually we have to write those ourselves but this way we are spreading the field prop and if you hover and if you explore a little bit you can see what the field prop has it has on change on blur value name and ref so this way I just spread the field prop inside this
input and that way I'm now handling on change value on blur ref and name props from it perfect that is exactly what I wanted and now what I want to do is inside of this form but outside of this Form field I'm going to create a div and I'm going to give this a class name of padding top six to separate it a little bit I'm going to give it a space- X-2 because I'm going to have two elements inside of this div so I'm going to need to separate them a little bit it's going
to have Flex I items Das Center so they're equally aligned justify end because I want to have them in the right corner of my model right here and alongside justify end it's also going to Have w- full so it takes the whole space and what I'm going to add here is a button from dot do slui button like this and of course I'm going to change that to slash components like this perfect and now I have a button here and this one is going to say cancel like this and then I'm going to duplicate it
like that and this one is going to say continue like that now let's go ahead and play with variance a little bit so this is a cancel button and I Want it I want to differentiate it from the continue button so I'm going to write the variant outline like this perfect and on click for the cancel button I'm going to run an arrow function my apologies I'm not going to write an arrow function instead I'm going to use this store model hook right here and I'm just going to write store model do on close like
this so I'm just going to collapse this for you so you can nicely See everything it has perfect and for this one all I'm going to do is I'm going to put type submit so I don't need an explicit onclick on this button because this button is inside of the form element meaning that once I click on this button it's going to trigger the onsubmit prop passed to this form right here so let's go ahead and try and click here you can see that I have a name right here written in red that is because
we have An error but we are missing an error message that's because I forgot to add it so let's go ahead let's go back into our form field right here inside this render prop and just below form control go ahead and add form message which is another component you can import from at/ components UI form so let's just see where I added it it's right here form message so you can see we have a lot of components I'm just going to collapse all of that for you so you don't have to Strain your eyes or
pause the video for the perfect scroll position there we go so we have form form control form field form item form label form message from at/ components UI form we have input from UI input button from UI button model from UI model and use store model from hooks use store model and these are the Global Imports perfect and now we have the message as well and now let's go ahead and let's check our console log which we've written right here in the Onsubmit I added a cons log of the values so I'm going to open
uh my tab right here I open the inspect element but it's uh it it's not on my side there we go okay so it's right here let's go ahead and write test I'm just going going to close this and click continue and there we go you can see that it has successfully been passed to this onsubmit function right here which means that these values are ready to be sent to the server where we can add them to The database great great job you added some very important components which we're going to reuse throughout the entire
project we're going to have a lot of forms in this project and you have a fully working uh fully working Zod validation of your form perfect great great job now let's continue and let's add our Prisma packages so we can safely connect that to Planet scale so first things first let's go into our terminal the First package we're going to have to install so I've shut down my application now and the first package I'm going to install is mpm install Das capital D Prisma this means that it's going to be saved in Dev dependencies so
run this and wait a couple of seconds and make sure it is installed after this is done go ahead and run another command mpm install add Prisma SL client like this and again just wait a couple of seconds and make Sure it is installed and now you can go ahead and run npx Prisma in it like this and just press enter and there you go let's take a look look at what has been added to our project you can see that it says that the schema was created at prisas schema. Prisma great let's go ahead
and let's take a look at our project now so you can see that I have a new Prisma folder inside I have a schema. Prisma right now It's set to postra SQL we're going to modify that to use MySQL because that's what we're going to work with we have the environment variable uh sorry we have we are loading the URL of our database using the environment iable called database URL so let's take a look at our environment file and see if anything has been added and you can see how it preserved our existing environment variables
and it added this big comment that this was inserted by Prisma in it and this way we have this dummy database URL postra SQL link right here of course we're going to change that to our planet scale URL later what I want to do now before we move on to Planet scale is just create a lib for our Prisma database so close everything and go into lib folder you already have it and it was added by shet CN UI you can see right here in utils you have the CN function which is used to merge
our class names in Tailwind so inside this Lib folder go ahead and create a new file prismad db. TS like that go ahead and import Prisma client from at SL Prisma SL client like this now let's go ahead and write declare Global bar Prisma which is a type of Prisma client or undefined like this and now let's write const Prisma DB is equal to Global this. Prisma pipe pipe new Prisma client like this and now let's write a simple if clause which is going to decide whether to use Global this or is it safe To
add uh to initiate a new Prisma client so if process. environment. node environment is not identical to production so if we are in development in that case go ahead and write Global this. Prisma is equal to Prisma DB like that so this is going to save us uh because if we initialize new Prisma client every single time so if you just did this and exported this what would happen is that next 13 uh with its hot reloading would initiate a bunch of These Prisma instances causing a warning and degration of performance in your development so
now what you have to do is export default Prisma BB like that perfect and now you have the Ule and if you're wondering why we added this well try and remove it and you will see that Global disc has an error because it doesn't have Prisma so we added the Prisma to Global disc this that's why we added this great now let's go ahead and set up our planet Scale so right here I have the planet scale uh website you can either use the link in my description or you can Google Planet scale and press
on the first link go ahead and find the sign in button and I'm going to use uh one of this to yeah if you if you don't have an account just click sign up for an account right here you can continue with GitHub or you can create a new account so I'm just going to do that very quickly great and you should see a landing Screen similar to this one so if you want to you can click see how Planet scale works so that's going to give you an idea of what you're going to build
but instead I'm going to click on this little button right here which says ready to create so I'm just going to zoom in a little bit so this button right here I'm going to create my database so this one is going to be called e-commerce dadmin and I'm just going to click create database I'm going To leave the region as it is and now you can see right here that my database has been successfully created I'm going to zoom out a little bit and we have to wait until it has been initialized after the database
has been initialized we're going to get a prompt here to connect so for now just be patient and wait until this is initialized I'm going to pause my screen and I'm going to show you how it looks once it's done great as you can see it's still Initializing something here but there we go now it's done and now I have this button get connection strings and I also have this prompt ready to connect to your database so I'm going to click this right here and it prompts us to create a new password so you can
leave this exactly as it is and click create password and there we go now what's cool about uh Planet scale is that you can choose connect with and select Prisma right here and there we go now you can See it gave you the a do environment file and the things you need to modify in your schema. Prisma so first I'm going to go ahead and grab this environment file I'm going to keep copy right here I'm going to expand my code screen and I'm going to go inside my DOT environment right here and I'm going
to replace this entire database URL string with this new database URL uh holding the MySQL my password and everything inside perfect and now what I have to do Is I have to go into my schema. Prisma right here so go into Prisma folder schema. Prisma and let's go ahead and let's modify the provider according to this right here so the provider instead of postra SQL is going to be MySQL like this and let's go ahead and add relation mode as well which is going to be Prisma like this perfect and the rest can stay the
same if you want you can copy this and then paste it here but it was very simple to modify great you've Successfully connected um you've successfully connected to Planet scale so what I'm going to do now is I'm going to add a simplified model of our store and then we're going to attempt to push that to the database to see if we are successfully connected or not so let's go ahead and let's write model store like this let's give it an ID which is going to be a type of a string it's going to be
an ID and it's going to be uh default to uyu ID like this great Let's give it a name which is also a type of string let's give it a user ID which is also a type of string if you want that there is a certain practice here that you align everything in one line I think it looks nice on eyes but of course you don't have to spend time doing this great and now that it has this let's also give it a created at which is going to be a date time and it's going
to have a default operation uh of now like that and updated that is Also going to be a date time and it's going to have uh at updated at uh type right here great so now we have this now let's go ahead in our terminal and let's just try and run uh npx Prisma generate and there we go so what happens now well nothing nothing has been sent to the database yet but you can see that our nod modules Prisma client has been updated that means that now in the code I'm just going to attempt
something so Go into app folder go into layout. DSX right here go ahead and write con store is equal to Prisma DB and import Prisma DB from at/ li/ Prisma DB and let's see if it's going to autocomplete store so dot store there we go and now I can use find I can use delete I can use update great so that's what npx Prisma generate did it added Store to our uh node module of Prisma so we can safely use it in our code with intellisense so I just removed that from the layout that was
just to Test you don't have to add anything from the layout I just wanted to demonstrate you what npx Prisma generate did great and now let's check if we successfully set up our database string so for that after you've run npx Prisma generate go ahead and run npx Prisma DB push like this and let's see if that is going to work so I'm just going to wait a couple of seconds and there we go your database is now in sync with your Prisma schema perfect so we can actually go ahead and Refresh this and you
can see I have one table right here and it's a store table perfect that is exactly what I wanted so we have the ID the name user ID created at and updated that perfect if you had any trouble running this go ahead and check the following check that your environment variable is correct make sure you didn't accidentally put a space before this make sure you don't have space at the end basically make sure that you copied it exactly from the Connection strings that was provided to you in Planet scale uh other than that you can
also check that you don't accidentally use environment. local because for me that happened during development I had a environment. looc file and unfortunately schema could not read from it so when I ran the command npx Prisma push I got an error so make sure you have that set up if everything is working great job you can now uh go ahead and we we're Actually going to go attempt to create the store model and push it in our database now so in order to do that we have to create an API route so feel free to
start your project with mpm run Dev if you want you can keep Planet scale open if you want to play around with it or you can close it whatever you want so I'm going to refresh my Local Host right here and before I continue back into this form and actually fill the onsubmit with something I'm going to create the API route that we we are going to call so inside the app folder go ahead and create a new folder called API this is a reserved folder for well you guessed it API routes and we're going
to use something called route handlers so inside of this folder go ahead and create a new folder called stores like this and inside create a new file called route. DS like that and we are going to go ahead and write export asynchronous function post Like this and it is going to accept a request which is a type of request like this and we're going to open a function like that let's open a try and catch function here so I'm going to write catch and inside of here let's catch that error let's resolve that first so
a big uh tip that I want to give you here is to conso log your errors especially during development in production you can think of any other logger you want to use you've heard of that's completely Fine but in vment this is going to help you a lot so this is a store API route so go ahead and write console.log and you can use kind of square brackets like this stores unor poost so you know that this is in the stores folder like here in the post method and just tag that error right here so
if anything goes wrong you can always look at your terminal and you're going to see this and then you know okay okay whatever went wrong whatever is the Reason I got an error in my form for example I know this is where I have to look perfect and let's actually return what we have to so return new next response which you can import from next SLS server right here at the top go ahead and write internal error like this comma open an object and give it a status of 500 like this perfect now let's go
and let's try and create the store uh using uh the information we have so first things first I want to use Clerk to authenticate this post route so I'm going to write const user ID is equal to Al like this and we can import out from clerk so let's go ahead and write import out from at clerk sljs great so now we have access to the currently logged in user ID who is trying to create a new store using our API so let's check if we don't have that so if there is no user ID
in that case we can immediately return new next Response and we can write unauthorized like this and let's give it a status uh which says unauthorized so that would be 401 if I'm not mistaken great and now that we have that let's also extract our body so const body is equal to await request. Json like this and now from our body we are going to confirm that we have what we require in our store model so for that you can check Prisma schema. Prisma let's see what we need we need an ID but that is
Automatically assigned we have we need created ad but that is also automatically assigned we also need updated ad but that is also handled by itself so we only need to check that we are receiving these two Fields this one name is received from this model right here and the user ID is received from clerk so we already handled what happens if we don't have user ID so let's now handle what happens if we don't have a name before we do that let's D structure Our name so it's easier to work with so we we are
going to destructure name from body great so if there is no name return new next response name is required and let's give this a status of 400 like this perfect so now we handled what happens if we don't have enough information to create our store but if we do let's go ahead and create one con store is equal await Prisma DB which you can import from at/ li/ Prisma DB so we already did that for a test in Layout so you can do that right here I separated it because this is a local import great
so a wait with Prisma db. store. create like this and let's give it a data object and let's pass in the name and user ID and there we go that's it this is going to create our store and now let's just return next response. Json store like this perfect so our store sorry our API for creating a store is now ready and now we can go back in our Uh components models store model right here so first thing I want to do is I want to add uh a new state here so const loading and
set loading like that is equal to use State BS and I imported use state from react right here and I'm just going to move that uh to the top great now that I have this loading first thing I want to do is assign which elements are to be disabled one once our form is loading so let's go ahead and let's find our input and alongside placeholder Let's also give it a disabled disabled like this uh my apologies not disabled but loading I just said that great and I'm just going to collapse so you can see
exactly uh everything I have in this input and I also want to disable both of my buttons so I don't want user to be able to cancel if we are loading and I also don't want user to be be able to submit again if I'm already loading great so now all of our elements our interactive Elements are uh disabled if we are submitting our form so now let's actually do that but before we do that we have to add one package called axios so let's go ahead I'm going to shut this down and write npm
install axio like this and I'm going to press enter and then mpm run Dev again and I'm going to refresh this if you shut down your application please refresh again otherwise your hot reload is not going to uh start working again until you Refresh great so instead of console logging this values let's remove that and the comment and open a try and catch block here so in the catch I'm going to catch the error and for now I'm going to conso log the error like this in the finally block I'm going to turn set loading
to false which obviously means that in the try the first thing I'm going to do is set loading the true like that and what I'm going to do is I'm going to attempt uh to create a new Store so let's go ahead and write const response is equal to await axus and I imported axus from axus right here and I'm going to move it uh to the top like that along with Zod so axis. poost like this and I'm going to write slash API SL stores and I'm going to pass in values from our form
which is the name and if you check the route that's exactly what we expect so/ API SL stores we can confirm that by going in our app folder in our API folder SL stores route TS so This is going to be the equivalent of SL API SL stores that's why this is going to work perfect and once this is done let's go ahead and write console log response. data like this perfect so what I'm going to do now is I'm going to expand this screen and I'm going to open my inspect element uh right here
I'm going to refresh and I'm going to write test- store and I'm going to click continue you can see how my element is disabled and there we go look at this It's our created store we have the created at date uh date Tim stamp we have the new ID we have the name updated that and the user ID so the logged in user which created this store perfect this is exactly what we wanted so what I want to do now is I just want to find a better way to handle errors so let's go ahead
and do that for that open your terminal again I'm going to shut down and write mpm install react-hot-loader toast great I'm going to refresh one More time and what I want to do now is I want to add that toast uh to trigger right here but before I do that I have to create a toast provider and add it to my layout so that's the trick we have to do uh when using uh next 13 so let's go ahead uh and let's find our providers so in my app folder uh where are there the Prov
providers and create toast D provider. TSX uh right here and inside what you are going to do is write use Client client at the top and we're going to import toaster from react D hot- toast so the package we just install and expert cons toaster provider all it's going to do is return poster like this so it's a self closing tag you don't have to write it like that okay there we go uh that's it great and now let's go into uh our layout again so in app folder inside layout. DSX and just above model
provider at the toast provider Like this so import toast Provider from at/ providers toast Dash provider like this and what we can do now is we can go back into our components models store model right here and instead of conso logging the error we can actually display a nice little error that something went wrong so I'm going to write toast. error something went wrong like this perfect and of course we have to import the toast from react hot toast so import toast from react D hot- toast Like this perfect and we can do the same
thing here so toss. success store created like this so let's go ahead uh and let's check that now so whoops I'm going to expand this I'm going to refresh my page I'm going to write test store 2 continue and we should get a nice little message right here perfect now let's go ahead and try and throw an error so I'm going to throw new error here like this you don't have to do this But I just want to demonstrate a little bit and there we go you can see how nicely we handled the errors now
perfect so what we're going to do next we are going to use this response ID to uh reroute to redirect to a new structure to a new group route which I talked about called dashboard and then we can slowly start to implement our navigation bar which is going to load all of the stores we just created and then we're going to create The settings form from where we will be able to delete the store perfect great great job you added some crucial things in this project which we're going to reuse uh throughout the rest of
this tutorial so now that we have some stores in the database what we can do is we can create our organizational folder for dashboard so let's go ahead inside the app folder right here I'm going to close everything else and let's just collapse Everything I'm going to create a new folder and in parenthesis I'm going to write dashboard like this great now inside this dashboard what I'm going to do is I'm going to create a new folder store ID like this so inside my dashboard I created a new folder in square brackets store ID so
this is a convention in next 13 meaning that this route needs to have a store ID and now inside of that I'm going to create a new File called layout DSX like this great and now inside let's go ahead and write export default asynchronous function dashboard layout like that it's going to accept children and it's going to accept parms parms are what this store ID uh uh value will be stored in so let's go ahead and give it uh those so not comma but uh this great so children is a type of react. react node
and params are a type of object which stores store ID which is a type of String like that and then you can just open this function great so first let's see if we are logged in so const user ID Al which you can import from at clerk SL nextjs like that if there is no user ID in that case redirect which is imported from next SLS server but I'm getting this weird import so I'm going to write it manually so import redirect from sorry next SL navigation like this and you can just go ahead and
write Redirect Das SL sign- in like this perfect and now if we have the user ID that means that in this dashboard layout which in the URL is going to have the store ID we can actually fetch the store and see if it exists so cons store is equal to await Prisma DB which you can import from at/ li/ Prisma DB just like that and go ahead and write do store. find first so we are going to load the first store with this ID where ID is params That store ID and where user ID is
equal to user so you can either write that like this or you can use the shorthand like this perfect and now I'm going to check if by chance this store doesn't exist because technically user can write whatever they want inside of this store ID they can write 1 2 3 4 so we have to check that this store actually exists so if there is no store in that case we're going to redirect to slash like this otherwise we're going to return we're Going to open a fragment and for now I'm going to create a div
and I'm just going to say this will be a Novar for now it's just an empty div and below that I'm going to render the children like this perfect so now that I have that what I'm going to do is I'm going to go ahead and create my routes folder so another organizational folder so go ahead and write parentheses like this and I switched my keyboard layout again so just a second so in your store ID Create a new folder called for some reason I cannot write parentheses just a second I have to resolve this
so inside store ID create a new folder called uh routes like this and inside create a new file page. TSX like this great and now that you have that uh well for now you you can just name it dashboard page so I'm going to write a shorthand dashboard page like this and all it's going to do is it's going to write a div saying this is a dashboard Like this perfect great and now what I want to do so I have this dashboard grouping ready I have the store ID folder I have my layout which
is inside of the store ID right here which is going to check for authentic and for the existing store and now what I want to do is I want to modify uh the layout of this root right here which right now doesn't exist so since we're going to change uh this layout I'm going To shut down my application for now so make sure that this isn't running so you don't run into any problems great now let's go ahead and write a new file called layout. DSS inside of this root right here so go ahead and
write export default s synchronous function setup lay layout like this and it's going to accept children and children are a type of react react node like that perfect so go ahead uh and open this function right Here and let's also extract our user ID the same way we did that in the dashboard layout so from out and you can import out uh from clerks let's add that to the top import out from clerk nextjs perfect if there is no user ID we are going to do the same thing we are going to redirect from next
SL navigation to sl- sign- in like this perfect otherwise let's go ahead and let's find the first active store our user has so in this Layout right here in root we don't have the store ID so there is no specific specific store we have to load we are just going to attempt to load the first one so that's how we are going to check uh whether we're going to redirect the user to these dashboard routes or if we are going to keep the user inside the rout and show the model to create a first store
so that's why we did this organization great now let's write con store is equal to await Prisma DB which You can import from at/ li/ Prisma DB I'm going to separate the Imports like that store. find first like this where user ID is equal to user ID like this or you can use the shorthand like that perfect and if there is a store in that case you're going to redirect now open template literals or back ticks so these are not your normal ticks these are back taks make sure you use those and write slash and
open special object store. ID so are you getting what we're Doing here we're loading the first store available with currently logged in user and then if that store exists we're going to redirect to slash store ID what route is that well this one store ID and then we're going to get redirected to the dashboard the dashboard layout is going to confirm again that that store ID exists in combination to the currently logged in user if it doesn't by any chance it's going to return back to the rout if it does it's going to Render the
navigation bar and the children great that's exactly what we want perfect so if the store exists we are going to redirect to the dashboard otherwise we're going to just return a fragment like this and children like that perfect and before we run the application we have to reorganize this a little bit so inside of my root folder I'm going to create a new folder folder called routes again and I'm just going to go ahead uh and copy everything from Page that or you can just drag and drop uh route inside like this great and I
just want to bring your attention to something so what happened I dragged and dropped my page. TSX inside the routes folder and now in my tab right here I have this weird file which I never seen before and it says that it's unsaved that file is fromex folder which which is the cache you can fix this very easily go inside that file click save and that's it if you suspect that you Did this wrong you can always just remove the whole next folder that's it and it's going to get regenerated again when you run uh
npm runev if you didn't get that notification that you have an unsaved file just continue but what I did I dragged and dropped the existing page from the root folder into the routes and that triggered that next cache to be updated so I had to manually save that file so it's important that you save that otherwise uh you're Probably not going to get uh this structure working as intended but if you cannot see any label for anything saying unsaved you're good to go for precautions you can remove that next folder and just don't worry about
it it's going to get generated again uh next time we run mpm run Dev great and now inside of this routes page. DSX uh one thing I just want to change is we don't have to return absolutely anything here I'm just going to return null like This so I only want to use this setup page to trigger the model great now I think that we are ready to start the project so in my terminal I'm going to run mpm run Dev like this and I'm going to refresh my page and you can see that folder
I deleted it's right back back here perfect so let's look at the flow what's happening with our application right now there we go see it says this will be a Novar and this is a dashboard and look at the ID I can see the exact Store ID right here so what happened well inside of my app folder the first thing the application saw was this layout. DSX which renders the children by default since we did not Define any routes we just typed logol 3000 like this the default route that was activated was not out it
was not dashboard it was a rout right here in this layout what we did was we checked for the currently active user since there was an active user we did not Redirect so we went further and we checked if this logged in user has any stores created and if it did we redirected to the dashboard so then we went into the dashboard let's see what's happened in the dashboard so we redirected to slash store ID and here we have the folder accepting that store ID and that folder has a layout so inside we did the
very same thing we checked if there is a user ID there was so no need for this redirect and then we attempted To load the store with an ID that was passed from this redirect in the root folder and then we use that in combination with user ID to finally confirm yes this store definitely exists so that's why we did not redirect back to the rout instead we rendered this will be a nbar and the children which are in routes page. DSX saying this is a dashboard and there we go that's how we created uh
our uh system to always ensure that there is at least one store That user has created before showing the navigation bar before showing any statistics before showing any tabs for settings or products or categories or colors perfect great and now I want to show you how to reset your entire database so you can see right now there's not much we can do here right I cannot delete the except if I go in Planet scale and run some SQL queries I cannot delete this so I want to show you a way to reset your entire database
Using Prisma so I'm going to shut down your application and I highly recommend you do the same uh and go ahead and run npx Prisma migrate reset so this is what we're going to run npx Prisma migrate reset this is going to delete your entire database you can see the warning right here it's asking us if we are sure all data will be lost and we are going to do this a couple of times throughout our project so until your project is finished make sure that you don't put Anything in database that you're not ready
to lose and just press yes there we go and you can press enter and there we go database reset successful and now what you have to do is run npx Prisma generate again and then you can go ahead and run npx Prisma DB push so I'm going to npx Prisma DB push so you have to push everything again because our database has been completely removed there we go it's back again and now let's go ahead and try our locol 3000 again oh we can actually try and run it first that would be a good idea
so npm run Dev and I'm just going to uh increase the size of this screen right here and let's see what happens now so I'm just going to wait a second and there we go now we have the create store back and if I try and manually write an ID for example I'm trying to yes a store ID you can see that I'm redirected back because that store does not exist so one more Thing we have to fix here right now if I create a new store I'm not going to get redirected to the dashboard
and that's something I want to do so let's resolve that let's go back into our components models store model right here and as I said we're going to use this response which holds the newly created store ID and again again all we have to do is we have to redirect to dashboard store ID so user can see the actual dashboard so go back into store model right here and You can actually remove this toast. success so we're only going to catch the error right here because we're going to do an immediate redirect so there is
simply no need uh for us uh to show any uh to show any uh success messages so go ahead and write when window. location. assign open backx slash open a special object response.data doid like that now you might be Wondering why am I using window. location. assign and why am I not using the router from next navigation that is because window.location assign is going to do a complete Refresh on our page meaning that I uh meaning that this webs sorry this store that I just created after this refresh is going to be 100% loaded in
the database but if I use the router at least in my case what happened was there was specific cases where the database was simply not ready the data Was not in sync and I kind of got stuck well I didn't get stuck but the model was open in the dashboard and I just didn't like how that user experience felt so I feel like this is a better solution for now so let's go ahead and attempt this now I'm going to refresh this and I'm going to create a new store called test- st-3 even though you
can write you can write whatever you want the names are not unique and click continue and let's see if now we are Going to get redirected there we go we are now redirected if I refresh I stay here if I remove the ID from the URL I get back to that ID perfect this is exactly what we want and if you want to you can go ahead and play in side dashboard page. DSX right here let's go ahead and see how we can still access this store ID so what I'm going to do here is
I'm going to write interface dashboard page props you didn't have to Do this this is just for an example so we have a store ID of string let's say that here so react at FC dashboard page props this is going to be a synchronous and uh what sorry as see like this let's destructure the params like this and I'm going to go and attempt to load the store so con store is equal await Prisma DB from ATL Prisma db. find sorry. store. find First and I'm going to write where store ID sorry ID is equal
to parents. store ID like that and then I'm going to write active store is equal to store. name like that and we don't have to put uh this sign and let's just add a question mark like this and I'm going to refresh and there we go so the active store is test- store das3 perfect this is exactly what we wanted to do so in the next part we are going to create a navigation bar which is going to hold our store switcher so from there we will be able to change our active dashboard Store ID
with other stores we created and it's also going to be able to trigger the model that's what I was talking about that's why we created the provider for the models and a twoand store so we can trigger them from multiple places at once great great job let's continue and let's create our navigation bar so where we left off last time was this dashboard page in here I called the first store using the param store ID and I printed out the store Name right here and I told you that you don't have to write this since
yes we are going to modify the dashboard page in the future but for now I am going to leave it here so if you want to you can pause the screen and write this exact query so call the Prisma import the Prisma and add the interface to the dashboard page so you have the active store the same way that I do so what we're going to do now is we're going to turn this text this will be a Novar into An actual navbar so in order to do that first let's go into our dashboard folder
right here inside store ID and select layout. DSX right here and instead of rendering a div which says this will be AAR let's actually write Navar like this which is going to be a self-closing tag of course we going to get an error once you save because Navar does not exist so let's go into our components folder and not inside UI but outside of the components create a new file called navb Bar. DSX like this the reason I'm not putting it inside the UI folder is because it's not really a reusable component this is just
a component for one specific layout that we have and it's it doesn't really match The Logical structure to put it here with all our other reusable components so inside this Novar let's just quickly fix that error so I'm using this short hand this is an ex extension called um uh react simple Snippets so you can install that if you Want so Novar right here and a div which is now going to say this is a component knobb bar like this and we don't need a semicolon at the end great and now we can go back
in our layout. DSX and we can actually uh try and import this so let's go ahead oh and one thing I want to change uh in my Navar if you want to um you can actually export the constant you don't have to export default but you know what I'm actually going to keep it this way I think it's simpler all right So now let's go right here and add import Novar from add/ components Navar like this lowercase Navar great and now you see the new text this is a component knv bar like this perfect and
now that we have that we can go ahead and start developing this so let's go ahead and let's add a class name to this div right here let's give it a border bottom that's the first thing and now you can see I'm going to zoom in you can see how I have this little border right here which clearly separates the rest of the content and I'm going to remove this text for now and I'm going to create a new div and I'm going to give here a class name of flex h-6 items D Center and
PX D4 like this great so now you can see how my Navar has a specific height of 16 the items will be centered meaning they will be aligned uh because by default Flex uses the row system which means uh in Combination with items Center each item that I have inside is going to be aligned by the center where my cursor is going right now great and now what we're going to do here is we're going to add a div and for now I'm going to write this will be a store switcher like this now I
have a text here so this is where I'm going to add the button to switch my stores great uh and below that we're going to create a new div and inside we are going to say Uh this will be the routes right here so just next to our switcher we're going to have the routes like that and now let's go ahead and let's add another div like this with a class name of ml- AO meaning that it's going to be moved all the way to the right because we adding the margin to the left so
giving it some space from that side give it a flex value and items D Center like that and let's also give it a space- x-4 meaning that all of the items inside are going To have a bit of spacing between them and the only component we can actually add inside for now uh is the user button from clerk nextjs so that's something we already experimented with great and now you can see that I have my button for the currently logged in user inside and let's give it an important prop after sign out URL go to
slash like this great and now that we have this let's actually go ahead and let's create uh our routes component right here so for that I'm Going to replace this div right here and I'm going to call this main knob like this uh of course we are going to get an error because it does not exist so let's go ahead and inside the components folder create a new file main dn. DSX like this let's mark this as use client like that and let's write export function main nov like this it's going to accept props of
class name and whatever else we pass inside it's going to have a type of React. HTML attributes like this open pointy brackets and write HTML element like that great and you can go ahead and open the function just like that perfect and now inside what I'm going to do is I'm just going to quickly return a paragraph main navigation like that so we can go back into our navb bar. DSX and import uh this from components so go ahead and import so you have to destruct this because we exported the constant or the Function in
this case so we cannot use uh main nav instead we have to use or uh the destructed main nav like this from do/ Main nav but uh I don't like it with a DOT instead I'm going to use components just to stay consistent and now after I save you can see that I have this main navigation text right here which comes from this component uh right here and while we are in the navb bar. DSX let's go ahead and add this a class name uh of MX-6 and if if you save nothing will change because
we have not found a way to pass this class name prop to our element right here so that's what we are going to uh do right now so go ahead and remove this paragraph and let's use a nav attribute like here let's go ahead and write class name like this open an object and write CN and you can import CN from at/ li/ so that's something that's been added by shat CN UI and using this Library we can actually merge Multiple class names so we're going to write some default class names here first and that's
going to be Plex items D Center space- x-4 LG space- X-6 and after that write a comma and go ahead and write class name like this so that is going to merge the class name we passed along with this default class names right here great and now what I'm going to do inside is I'm going to iterate over the routes that we are going to have the problem is we don't Have any routes yet so let's go ahead and add them so write a constant routes like this and open uh an empty object and while
we are here let's also add uh our path name and our params so cons path name is equal to use path name from next navigation and const params is equal to use params from next navigation as well and I'm just going to separate this inputs like that and now we can go ahead and create objects inside of these routes which are going to be using the Path name and the params so what I want to write first is the settings uh navigation because that's the only thing we can control right now so we have the
store model in our database meaning that we can create a form in the settings which is going to be able to update that very same store and remove it so go ahead and write HRA like this go ahead and open uh backck Slash and go ahead and open on special Object par. Store ID because we Are uh using this m navigation bar and NV bar inside of the dashboard layout right here which has the store ID so this layout uses the Navar meaning that regardless of the fact that our Navar in this case main nav
is inside this components folder where it's used we'll define whether we can find the store ID in the parameters and we can so we can use it right here so the HRI is going to be slash this special Object perm. Store ID slash settings so this way when we Click on the link we can ensure that the settings which are going to be loaded are only going to be for that specific active store great and now that we have that let's give it a label of settings like that and let's give it an active prop
which is path name is identical to open back again and this very same route so parms that's store ID slash settings like that perfect and now we can use this routes array to iterate over it inside of this navigation bar right here So open uh uh curly brackets and write routes do sorry routes. map so you're going to get the individual route right here and you can immediately return a link component from next slash link so make sure you import link from next SL link uh like that and inside of that link you're going to
render route. label which is this text settings right here and now we have to give some attributes to this link uh component so first let's give it a key of something unique in our Case that is going to be the href so route. href like that let's give it an href which is also route. href and let's give it a class name which is also going to be dynamic so open CN like this and in the first string I'm going to write some default classes so text- smm font D medium transition Das colors and hover
text- primary like this and now you can see how I have my settings right here and I'm going to add a comma and in the Second parameter of this CN U I'm going to add a conditional so if route is active in that case I'm going to add a a class name text- black and on dark mode it's going to be text- white because uh in dark mode our background is going to be uh dark so we have to add a light text to notice that this is active otherwise we're going to write text- muted
D foreground like this great and now you can see that when I hover on my settings It gets a nice little effect and later when we click on it it's going to get uh activated and stay like this even when we don't hover if you try now you're going to get a 404 because this uh uh URL does not exist yet great so we have that done and we're going to play around with the settings later but for now what I want to do is I want to add the actual store switcher component so in
order to continue doing this I want you to go to shaten UI right Here and what we are going to build is a form of combo box right here so it's going to look something like this we'll be able to search and we'll be able to select and we will see what is actively selected now uh combo box is one of the components in chat cnii which cannot be installed individually instead you have to add the popover and the command so it's going to be a composition of these two components and then you can either
follow the instructions right here but We're going to do something a little bit different so we're not going to copy this but if you want to you can just copy it from here so first thing we have to do is we have to install the popover and the command components so let's click on popover right here or find it um in this sidebar right here and let's add npx Shad cn- UI at latest at popover so I'm going to click copy and npm I'm going to open my terminal right here I will shut down the
application and there We go you can see the command npx shat CN I uh Shad cn- UI at latest at popover and press enter like this just press yes for this and it's going to install the popover and once that is done go ahead and find the command uh component which is also in the sidebar right here and there we go another command we need so MTX shat cn- latest at command I'm going to copy that as well and I can paste it here so npx shat cn-ii at latest at command and press enter and
now you're Going to have those two components that we need just select yes for this prompt and that should be it we can now safely go ahead and create the store switcher let's just wait a couple of seconds great so I'm going to rerun my project again I'm going to collapse the terminal and I'm going to refresh my page to ensure that everything is up to date and now I'm going to go into my components folder right here here and I'm going to create a new file called store- Switcher dtsx like that and the way
I'm going to write this well for now what we can do is just export default function store switcher like that and just go ahead and return a div which says store switcher like this so a very simple uh function like that and now that I have the I'm going to go back into my Navar and I'm going to remove this div which encapsulates the text this will be a store switcher and I'm going to add that new store switcher Component like this and it's going to be a self-closing tag great and I'm going to replace
the import from dot to slash components store switcher like this great and now we have the text store switcher in our navigation bar so let's go ahead and let's continue developing this so let's write um some props for this store switcher I'm going to go ahead and write interface store switcher props and that is actually going to Extend some popover trigger props and our popover trigger props are going to come from the shat CI popover component that we just added so go ahead and write extends popover trigger props do not import it yet we're going
to write our own so before we continue working with this you can just add an empty object right here and you can see that I have an error because we cannot find popover trigger props so let's write that type so type popover trigger props like that Is equal to react. component props without ref and inside I'm going to open some pointy brackets like this and I am going to write type of popover trigger and you can import popover trigger not from radic but from do slui popover and as always I'm going to replace this with
uh SL components slui popover great so now we have the popover trigger props which is a react. component props without ra and in the pointy brackets we're using a type of Pop power trigger And now we can go back into this empty object and add the actual items which we want to be rendered in inside of this store switcher and that is going to be an array of objects and those objects are going to be our stores so items is going to be a type of store which you can import from at Prisma client like
this so I'm just going to move that to the top and separated and it's going to be an array of those stores like that perfect and now that we have that we can Go ahead and go into the uh parenthesis of this store switcher function and we can extract class name and items like that and I want to give a default value to these items of an empty array so we can safely iterate over them even if they are not loaded and just go ahead and give a type to this object to be store switcher
props like this great so now that we have that let's go ahead and let's actually mark this component as use client because it is going to use The popover and the command which are client components and we are also going to ourselves use some inactivity here so let's go ahead and let's first Define uh all of the it and find items and constants we need so we can safely add them to our elements right here on the bottom so first let's go ahead and add this store model so con store model is equal use store
model and you can import that from as/ hooks use store model like that then let's add the params use Params and you can import that from next SL navigation I'm going to move that to the top below that let's add router so router is also so from uh next SL navigation so not from next SL router but next SL navigation the same place we imported our uh use params and go ahead and just execute that like that and now let's go ahead and format our items so con formatted items because we are going to iterate
over them it's going to be items. map it's going to accept a single Item and go ahead and return an immediate object so we just need the label which is going to be it item. name and we need a value which is going to be item. ID like that so now we using this store object which has the ID and name and well you if you remember in Prisma created ad updated that and user ID as well but we only need these two values to create an array which is going to be used in those
popover and command components which we just added great and Now let's go ahead and let's find which of this store is the currently active store so what is the ID in this dashboard we have to Define from all the stores that the user has which one do we show as selected in this store switcher so for that we're going to use a constant called current store const current store is equal to formatted items. find item and we're going to use item. value and we're going to check if it is identical to param that store ID
So let's go ahead and look over this so we're ating over formatted items we are picking the specific item and we are comparing this value which we know is the ID of the store and we are comparing it to the currently active ID in our URL which is uh of course the actual store ID so that's how we know okay so whichever item in this array has the same ID as what is currently in the URL is the currently selected store great and now that we have that left let's add One last function which is
going to trigger uh what happens once we click on a different store so const on store select it's going to accept uh store which is a type of store like this uh actually it's type of formatted items so well we can just easily do this open an object and write value which is a type of string and label which is a type of string like that uh go ahead and open this Arrow function and just write set open to be False uh oh yes we also need uh the state for the open my apologies so
this is going to control uh the actual popover so go ahead and write const open set open use state which you can import from react and default value is going to be false like this great and now we can replace this set open like this and router. push is going to be backtick slash store that value so once we click on a new store we're going to close the store Switcher and we are going to redirect to slash store ID but the new one which we selected from the nav uh from the store switcher great
and now that we have uh all of these things here we can go ahead uh and start creating our popover so instead of a div it's not going to be a div so you can remove that go ahead and write popover and you can import that from add components slui popovers like this so just make sure uh I'm going to move React to the top just make sure that you imported popover and popover trigger from s/ components UI popover not accidentally from uh radics great let's give some values here so open is going to be
open on open change is going to be set open great now inside we're going to add the popover trigger which we already have imported uh like this and let's give it a prop as child like that inside of this pop over trigger we're going to use our button component which you can Import from /ui button right here but of course I'm going to modify that to go to SL components because I just think it's much cleaner that way great now inside of this button component what we are going to do uh is we're going to
add an icon and a label so the icon we are going to use is going to be store so go ahead and write a store like this and you can see I have an uh import from Lucid Das react so uh obviously what I have to do you Can see that I have a mismatch right here so let's try and uh rename this so I'm using the store import from Prisma client and the icon is also named store so let's try and rename this so in this import from Lucid react let's add store as Store
icon and now you can see that the conflict has gone away and I'm just going to move this along the top with the rest of the Imports uh if you're wondering where do we get this Lucid react that has been added using Shad Cnii if you're getting any errors here uh you can go ahead and manually install that but I'm pretty confident you should have it you can check in your package.json let's see Lucid D react and there we go uh it is right here and it was added when I installed my shaten in it
great so now we have the store icon so instead of writing store here I'm going to write Store icon uh like this and you can see how I have a big button here with the store now so let's go Ahead and let's actually give it some uh class name so class name is going to be uh mr-2 so margin margin WR 2 h-4 and W-4 like that and let's go ahead and let's give some values to this button component so variant is going to be outline size is going to be small like this roll is
going to be combo box uh and our area- expanded whoops area- expanded so this is some access these are some accessibility Features we are going to map that uh to the open value like this area- label is going to be select a store which is also an accessibility feature and the class name uh we're going to use CN feature again so you can import CN from at/ Libs U right here go ahead and open parenthesis and first let's give it some default values so w-200 pixels like this justify Dash between and then add a comma
class name like this great so you can see now that I have my uh store right here perfect and inside what I'm going to write uh for now we can just write something like uh I don't know current store like this but let's actually move this below the store icon like that and now just after this current store text let's add another icon called Chevrons uh Chevrons up down so let's go ahead and write that Chevrons up down like this and that is also imported from Lucid rea so the same place where we Added the
store and remed it as Store icon but we don't need to do that for Chevron because we don't have the same name anywhere so we can use Chevron up down right here and let's go ahead and let's give this some class name as well so class name is going to be ml- aouto h-4 W-4 shrink d0 and opacity D50 so we get the desired uh look right here great now this button is starting to look like something great and that finishes our Popover trigger so now we can go outside of that and create the popover
content so go ahead and write popover content and make sure you import it from at/ components UI pop over right here the same way we did with popover trigger and the actual popover uh like that great now uh what I want to do is addit a class name so give a class name w square brackets 200 pixels and padding zero like that great uh and inside I'm going to add a command component which You can import from /ui command like this and I'm going to immediately reimport this at slash components just to stay consistent great
now that I have this command component inside of it I'm going to add another component command list which is also available from at SL component slui SL uh command so just make sure you have both of those Imports and then I'm going to add a command input also available from add/ Components UI component like that let's give it a placeholder of search store and it's going to be a self uh closing tag so placeholder like this great you can see uh how it says search store right here and you can see when I I click
it opens and when I close outside it closes perfect this is exactly uh what we wanted to do uh great now that we have that let's go and add command empty uh and make sure you import Command empty uh from uh s/ components UI command as well like this and the command empty is going to say no store found like this okay so we cannot see that yet uh yeah because we're missing some other content but you're going to see how that looks in a moment great so below that add command Group which you can
import from at/ components UI command as well and this command group is going to have a heading Of stores like that and inside we are going to iterate over formatted items which is a constant we created just a couple of minutes ago and we're going to write map we're going to get the individual store like this and we're going to return another command item which we have from at/ components UI command and inside let's go ahead let's give some props here first so we're going to write uh okay we have an error Cannot find uh
formatted items so let's see what I did wrong here oh looks like I made a mistake my apologies uh you don't have to remove everything I think I just uh remove my formatted items somehow yeah I think I selected it and then removed it so I'm just going to write it again so formatted Items Map store like this return the command item from at/ components UI command so make sure you have the command the command input command list Command empty command group and command item uh from s/ components UI command all right let's go ahead
and give this a key of store that value let's give it an on select to Be an Arrow function which is going to trigger on store select and pass in the store and let's give it a class name to have a small text inside like that and let's add the store icon in here again let's give it a class name of uh margin right 2 h-4 and W-4 like like that and inside we're Going to render store. label and after that label we're going to add a check icon also from Lucid react so make sure
you import the check from Lucid react uh and it's going to be dynamically styled so it's a self-closing tag and let's give it a class name which is going to be CN of course because it's going to be dynamically styled so the first parameter is going to be the default Styles which is margin left Auto so it's all the way to the right h- 4 and W-4 And then in the second one we're going to check if the current store question mark. value is identical to store that value if that is the case in that
case I'm going to add opacity -100 otherwise opacity d0 like this uh perfect so now that we have that let's see if something more is visible there we go uh so you can see that now I have my stores heading right here but Curr L we don't have any items to iterate over but that's completely Fine uh we can continue uh to develop this so outside of this command list component but still inside of the command uh let's go ahead and add command separator which is also imported from at/ components UI command and actually it
is a self-closing tag so I imported it right here great and inside of that let's add command uh list again so a new command list command group again and command item again and this one is going to have On select to Be an Arrow function it's going to close the current command and it's going to trigger store model on open so this is if you might guess going to be a button which we're going to use to create new stores so let's add an icon plus circle from Lucid react as well so I added it
right here it's a self closing tag let's give it a class name of mr-2 h-5 and w-5 like this and create store as the text right here so now you Can see that at the bottom I have a create store which when I click triggers this model to create new store perfect that's exactly uh what we wanted and we can use this create store uh to actually create new stores because it's working so that's the power of that sued uh store management that we created uh in the previous tutorials we can trigger the model from
anywhere and the functionality is going to work great so now what's actually missing is that Instead of rendering Uh current store right here uh we actually render the name of the current store and for that we can use this current store constant right here uh but what's going to happen right now current store question mark that label is going to yield empty because we have not passed any stores to this store switcher you can actually see that it accepts the items but in our Novar component we have not passed any items here so let's go
ahead and use This Novar component to actually fetch all of our stores available uh which this user owns So const user ID first from out we can import that from clerk like that if if by chance there is no user ID in that case we're going to use the redirect from next navigation to go to slash sign Dash in like that otherwise let's go ahead and get our stores so our stores are going to need Prisma and we're going to need to await that function so let's Mark our Navar function as a synchronous first and
then we can write await Prisma DB which you can import from s/s Prisma DB I'm just going to move this next navigation to the top Prisma DB store. find many because we want to find all the stores where user ID is equal to this user ID again this is a short hand for this if you want you can write it like that great so now that we have the stores we can go ahead and pass that in as items stores right here and there we Go you can see that the current store I have uh
right here is the test store so I can actually even search for it but if I search for something else you can see I get that empty message but if I click create store and let's add let's name it new store for example and click continue if everything is done correctly there we go the active store is new store and you can see how I have the store right here in the dashboard and I can go back to this one and there we go my dashboard is Saying active store is test store three new store
active store is new store and you can see how dynamically my URL changes great you completed a very important component and now we we are ready to go to the settings and show you how we can rename our store or delete it now let's go ahead and let's create our settings form so in order to do that I'm going to collapse everything in my navigation bar here and I'm going to go into the dashboard folder inside store ID inside routes where our page. DSX is and I'm going to create a new folder called settings like
this and inside of this settings I'm going to create a new file page. DSX like this and I'm going to use a shortcut settings page like this and I'm going to create a div which is just going to render hello settings like that and save that file and now when you click on this settings right here you're going to get redirected to that exact uh page and that exact text Right here uh great so what I want to do next is I want to check in this page if I am authenticated and if I can
get the store in the URL because you can see my URL is the store id/ settings because that is a structure that we created here so we use the store id/ settings this parenthesis again mean nothing it's just an organizational folder which does reflect individual layout but it has no effect on the URL so regardless of this same dashboard our Route is SL Store id/ settings great now inside let's go ahead and do that so first I want to extract the params because we're using server components we are using next 13 that means that we
always have the params in our server components so let's go ahead and write uh an interface settings page props like that and params inside are going to have store ID which is a type of string like that and then you can assign those props right here so react. FC settings page Props and you can get the parms right here perfect now let's start with our user ID so const user ID is equal to out from clerk nextjs right here at the top let's check if by chance there is no user ID in that case we
are going to redirect from next navigation to slash sign in like this great and now let's find the store from the parameters so cons store is equal to await prism db. store. find first like this and I made a couple of Mistakes in this line so first things first for the await to work we need to Mark our uh function as asynchronous at the top next I have to import Prisma DB so let's go ahead and do that import Prisma DB from at/ lib Prisma DB and lastly I made a typo so find first like
this and then where inside I'm going to search for an ID which is parents at store ID and user ID which is equal to this user ID right here great so now we have that and if there is no Store in that case we're going to redirect to slash like this so what why do we do this how is this even possible of happening well don't forget uh while we are using our navigation bar we are going to get the correct URL but if we are not using the correct uh navigation but let's say I
manually type in 1 two 3 like this you can see what happens we're going to load the page and I'm back on my dashboard so when I click the nov bar yeah almost always we going to get the Correct ID but always remember user can write whatever they want so that's why we have to protect against those kind of stuff uh great and now that we have that let's go ahead and let's add uh some styles to this div right here so go ahead uh and write class name let's give it a flex Das call
go ahead and open uh another div surrounding uh this text and let's give it the class name of flex D1 space- y-4 padding eight and padding top six like this now you can see that it's A little bit centered like that and now I'm going to create a new component here called settings form like this so where are we going to create that well anywhere you want the components have no rules to say in next 13 but to stay consistent this settings form component is only going to be used inside of this settings route meaning
that we can safely create it in here so I'm going to create a new components folder inside of this settings folder uh in the same lay Uh uh in the same level of the page. TSX and inside I'm going to create a new file settings- form. TSX right like this perfect so let's go ahead and write export con settings form like this it's going to be an arrow function and I'm just going to return a div which says settings form like this and now I can go back in my page. DSX and I can go
ahead and import that so import settings form uh from do/ components settings form so this is the only time I will allow using The uh add sign I mean allow I'm not forbidding you to do it I'm talking about myself you know I like to add the uh add sign and be consistent but this is not the same thing so I'm per I need a DOT here because I'm accessing this level of components I'm not accessing this component so this it's a completely different folder that I'm accessing that's why it's fine to use it this
way and no need to use an alas because it's a very specific case great and now that We have this settings form uh what I want want to do is I want to give it uh this store because this store uh along uh for serving for us to check whether it actually exists to confirm that the URL ID is correct it's also going to serve as the initial data for our settings form so we load the store here and then we're going to pass it in this settings form which is going to be a client
component and that way we're going to prefill the input for the name Of our store or any other settings if you might expand your store in the future so let's go ahead and add uh the properties for that so I'm going to go ahead and first I'm going to mark this as use client and now I'm going to write uh the interface settings form props like that and I'm going to write initial data to be a type of store which you can import from at Prisma SL client like this and then you can go ahead
and assign this to react FC settings form Props and I'm going to extract the initial data like this perfect and now if I go back in my page. TSX you can see that it's expecting that so initial data is equal to the store that we just fetched and also if we didn't do this we'd also get an error because store is potentially undefine so this is a both types typescript protection and well user experience protection and now we can continue developing uh in this settings form right here so let's go Ahead and add some class
name here class name is going to be Flex items D Center and justify Das between like that uh and now instead of having this settings form right here I'm going to use a heading component which we do not have yet uh and this heading component is going to accept two props it's going to have a title of settings and it's going to have a description of manage store preferences like this or I mean whatever you want it's just a label and if I save Of course um we are going to get an error uh because
the header component uh does not exist yet so let's go ahead and let's create that I'm going to create it in the same place where our buttons are because this is going to be reusable throughout the project so inside components folder inside UI I'm going to create a new file called heading. DSX like this I'm going to write an interface heading props title is going to be string and Description is going to be string like that and then I'm going to export const heading which is a type of react FC and accepts The Heading props
like that and then I can destructure those so title and description like that and let's go ahead and just return this Arrow function and I'm going to return a very simple structure so the div is going to encapsulate an H2 element which is going to render our title and below that we're going to have a paragraph which is going To render our description so let's go back and add that in our settings form so I'm going to go uh right here and I'm going to write import heading from at/ components UI heading like this and
you can see that now I have the settings title and the manage store preferences right here so let's style that a little bit so we can see what we're doing so class name inside of this heading component for the H2 element is going to be text D3 Excel which is going to enlarge the text then I'm going to give it a bold styling and after that I'm going to give it tracking Dash TI which is just going to prove the letter spacing a little bit if you're wondering how do I have this Tailwind auto complete
and how do I see these classes when I hover it's an extension uh for Tailwind so just type in Tailwind in your extension and it's the first one The Tailwind CSS intellisense great so now that we have that uh that's good let's go ahead and give the paragraph also some Styles so I want to give it a smaller text so small text like this and text- muted D foreground like this great I think this looks really good uh and we're going to reuse this across the project so now we can safely go back uh in
our settings form and what I want to do is I Bel alongside alongside this heading I want to say I want to give Another element which is going to be our button to remove this store so go ahead and add the button which you can import from add/ components UI button uh like this uh let's go ahead let's give it a disabled actually it's not yeah we're going to have disabled later when we add some states but not for now so the variant is going to be destructive uh the size is going to be small
uh and on click for now can be just an empty function like this and It's going to hold an icon trash which you can import from Lucid react like this and let's go ahead and give this a class name of h-4 and W-4 like this if you want you can experiment with size icon maybe that looks even better so small or icon choose one of those uh great so now we have that and you can see how that's going to trigger I mean you can see but that is going to trigger our alert uh Model
uh great now that we have that uh I want to add a separator uh after this entire uh thing so uh the way I'm going to do that is well first I'm going to encapsulate all of this in a fragment like this so all of this is going to be in a fragment uh and in here I want to add that separator what separator am I talking about I'm talking about a component from shaten UI so go into the components find the separator uh in the uh sidebar and here you have the Installation so npx
shat cnii at latest at separator so I'm going to copy this from the npm uh I'm going to just expand my uh code screen a little bit I'm going to go in the terminal and there we go this is the command so npx shat cn- UI at latest at separator like that and let's go ahead and just press yes for this option and that is going to install our separator and then you can mpm run Dev again and I'm just going to refresh my page because of course I shut down uh The application so just
below this div which encapsulates our heading and our button I'm going to add that separator which is now available both from radic and component but of course we're using it from at/ components UI separator because that is the shetan UI version of it and once I save you can see how and I have a nice line uh right here separating everything else great uh and now it's time for us to actually build our form So first thing I'm going to add is the form schema so const form schema is equal to Z and if you
remember there's a specific way we have to import Zod so import uh asteris as Z from Zod like this and then we can say Z doob and inside the field name is going to be z. string with a minimum of one letter like that perfect now we have a form schema now that we have the form schema let's also just create a type for the settings form values so type Settings form values are going to be z. info open pointy brackets and write type off form schema so that's just so we don't have to write
the this every single time we can reuse this when we need it uh great and now that we have that we can go ahead and we can actually uh create our form so I'm going to write const form is equal use form from react hook form and I'm going to immediately move this library to the top of my imports uh and in this use form first I'm going to give it the settings form values like that and inside I'm going to open an object and I'm going to add the resolver which we can get from
Zod uh resolver from at hook form resolvers Zod so I'm going to move that to to top as well because it is also a global UT this ad sign don't be confused but this ad sign same thing with Prisma so this at sign has no correlation with our alas at sign this is how the package was named it has nothing to do with our AD Sign You can see that our AD Sign always requires a slash but this one doesn't just if you're by chance confused by this great so we have this Zod resolve from
ad hook for/ resolvers Zod and inside I'm just going to pass the form schema like this and I'm going to give it a default values of initial data which is the prop that we have and we are passing uh the store as initial data perfect so now we have that working and now let's go ahead uh and let's actually Create some states here so we're going to need the uh open and set open from use state which is imported from react right here and give it a default value of false let's also do the same
for loading and set loading which is also use State false and let's just move this uh to the top so the open and set open is actually going to control our Alert model and if you're wondering why did I not create the Alert model in the two store that is because Our Alert model is going to call different API routes every single time so unfortunately I cannot reuse it the same way I did with the create store model for example which wherever it's opened does the exact same API call to create a new store but
our delete Model is going to confirm uh deletion of different entities such as this settings is going to delete the store in our products is going to delete the product categories Etc so that's why we're going To have to uh use it in a different way great now let's go ahead uh and well I think we can go ahead and actually start creating our form but we do that before we do that I'm just going to add an on submit function here it's going to be as synchronous the data is going to be settings form
values like that and for now you can just console log those values the same thing we did uh before so data or values however you want to call this prop it's Not important great so now let's actually go ahead and let's start creating this form so just below this separator right here what I'm going to do is I'm going to add the form and you can import that from at/ components UI form so the same thing we did in our store model uh and inside of this form before we continue I'm just going to go
ahead and spread the form which we have from this use form hook right here and inside I'm going to open The native HTML form element and I'm going to give it an on sub MIT to be form. handle submit and it's going to uh get onsubmit which is our custom on submit right here at the top inside great and let's also give it a class name I'm just going to expand so you can see what I'm writing so the class name inside is going to be space- y-8 and w- full like this great so I'm
just going to move it back great and now inside of this form uh I just want to make sure That you can see this so space- y -8 and w- full very simple uh and now inside let's go ahead and create a div with a class name of grid grid ds-3 and GAP d8 so I want uh my fields to be in a grid uh it won't make sense now because we're just going to have one input which is the name but later when we make products and categories they're going to have a lot of
inputs so it doesn't make sense to make the inputs fill the entire screen instead I want to create a grid Of only I don't know three uh uh three inputs in a row or something like that so let's go ahead and actually add the form field now which you can also import from add/ components uh UI form so make sure you do that and Inside Yes form field is a self closing tag don't forget that so self closing tag like this now let's give it a control prop which comes uh from form. control and let's
give it a name of name so this name is referring to the property is to Control in our case it matches the name because that's what we have in our database for our store it has a name field so just by accident this is called name this is called name our types is called name but yes this is correct that's what it's referring to uh and then we're going to have the render field uh which is going to immediately destructure the field and it's going to return a jsx like this which is going to be
a form item which you can also import From at/ components UI form uh like this and this form item is also going to have form label the the import is the same and I'm going to write name in here so just make sure that you have the form the form field form item and form label uh imported from s/ components UI form uh great and now I'm going to add form control same import uh and I'm going to add input from at/ component UI input so I just added the uh form control and Input right
here great so input is a self closing tag and it's going to be disabled if we are loading otherwise the placeholder uh is going to be store name and let's see what else we can add here well we have to spread the field this way our input uh gets all the uh on change on blur and values and you can see how my name is out of fill that's because I've passed in the initial values uh right here which is the initial data which comes From my page which is the store which holds the name
test store three perfect so that's exactly uh what we want now that we have that let's just go below this div but inside of this native HTML element form and add a button component like this which is going to say save changes like this and I'm just going to give it a disabled prop of loading class name of ml- AO because I wanted uh okay uh perhaps it's not doing Anything yeah so maybe we don't need it but I'm just going to leave it and a type of submit uh great uh so you can actually
go ahead and try and click save and you can see how we have our name uh required and if you refresh it out of fills great and one thing that's missing below this form control let's also platform message another thing we can import from as/ components UI form so that way if you try and remove your name and click save You can see that you get a proper uh error right here so form form contr form field item label and message from UI form input from UI input make sure you didn't accidentally import something from
radic uh great now that we have uh all of these things uh we can actually go ahead uh and try and consol log our data so I'm going to go ahead and expand this right here I'm going to change this to test store update and I'm going to click save Changes and there we go you can see that I have a conso log of my new changes perfect that's exactly what we want and in the next part we're going to actually uh create the API call which is going to update our store uh one more
thing I want to do before we move on is uh use this loading prop also on this button remember that I Tred to add the disabled prop but then I remember that I have nothing to disable it by so now I can do that so in this destructive icon right Here you can do that now and the on click is actually uh going to trigger set open to True like this because our open is going to control the Alert model which we're going to add uh here but later not now uh great so now we
have to create the API routes which this form is going to submit the dat 2 so let's go ahead I'm going to collapse everything here I'm going to go into my app folder into API and inside the stores folder I'm going to create a new folder store ID like this so this is where we are going to Target the individual store and inside route. DS and we are going to create two routes in here first one is going to be the patch route which is going to be used to update the store and the second
one is going to be the delete route which is going to be used when we click this delete button right here so let's go ahead and write export asynchronous function patch which is going to accept the uh request which is A type of request like this uh and it's also going to accept the parameters so params you can destructure it and type it's going to be parms with which holds an object and has a store ID which is a type of string like this how do we have this store ID where did these parms magically
come from well these parms are always available in here and the store ID comes from the folder name which is automatically in the route name so now we can go ahead and open our try and Catch block let's get the error right here and we are going to do the same thing we did in stores route. TS so we're going to make this kind of console log so you can copy it from here and just paste it here and instead of stores post it's going to be store post uh sorry it's actually going to be
store patch like this so this tells us okay this is the individual store the patch method so when you see this in your terminal you Know this is where the error is coming from it's going to help you so when you see the individual store you know okay I have to look inside the store ID folder and when you see the stores you know okay I have to look in this stores folder route uh great and now let's actually go ahead and return this new next response from next server you can import that at the
top let's write internal error and let's give it a status of 500 like this uh great and now in here we have to check if we are authenticated to update this store so const get the user ID from out which you can import from clerk if there is no user ID in that case uh you can return new next response we're going to write unauthenticated and I'm going to give it a status of 401 like this perfect now let's extract uh the body from our request so const Body is equal to await request actually rec.
Json like this and let's D structure the name from the body like this perfect so we solve the case if we don't have the user ID now let's solve if we don't have a name so if user decided somehow bypass our front end validation using Zod and passed in an empty name we're going to return new next response name is required and give it a status of 400 like this uh great and lastly we're going to check if there is no params that store ID so if store ID was not passed in that case return
new next response store ID is required and give it a status of 400 as well great and now let's go ahead uh and find and update our store so cons store is equal to O8 Prisma db. update many and before we continue let's import our Prisma DB so import Prisma DB from at/ lib Prisma DB right here and go ahead And open this update menu uh right here but it's not prism db. update menu it's actually store my apologies and inside first let's find where so where ID is equal to params that store ID and
where user ID is equal to user ID and we have to pass in the data which we are going to update in that in our case that is just going to be the name like this and then all we have to do is return new next response actually we don't have to initiate it with new because we're going To use Json method so next responsejson store like that perfect and now that we have this we are ready uh to create our delete method as well so let's go ahead uh and let's well we can just
copy this entire thing so I'm going to copy this entire patch function and I'm going to paste it here and I'm going to rename this to delete like this I'm going to go in my uh error first and I'm just going to remove this store patch to store delete like this perfect So in our case for the delete function it's actually not going to have a body so inside your delete function you can remove the body and you can remove the destructuring the body and you can also remove this check uh for the body as
well and this store is actually not going to work with update menu instead it's going to be delete man like this meaning that we don't have the data object right here perfect and yeah you can still uh send it back in Json uh so Why am I using delete many and why am I not using delete well you can see we have an error here because user ID is not unique so we have to use delete menu for this prompt to work perfect and that's we now have our delete function and we now have our
patch function one more thing I want to mention to you is that when you are adding this request and this params don't accidentally remove this request because it's not used there are no errors being thrown Here but this will not work that's because the parameter the parameters is only available in the second argument of this delete function not in the first one so even though we use we don't use the request we still need to add it here if you want to you can add an underscore like this to uh to tell you that it's
unused but it's it's kind of a convention to do something like that but you don't have to and same thing goes if you're using the request you can't Accidentally switch places with it so it has to be the second argument uh perfect so we have both of this ready right now so we can go back in our settings form now so I'm going to go in my dashboard routes settings uh components settings form like this and I'm going to modify this uh on submit to do something else so so I'm going to open a try
and catch block let's get the error first and what I'm going to do is toast which you can import from react D hot- toast so I'm Going to immediately move this uh to the top right here and I'm going to call Toast that error something went wrong like this perfect and I'm also going to add a finally here the finally is going to reset the loading to false so in try I'm going to add set loading to True like this after that I'm going to call await axis. patch and of course we have to import
axis so let's go ahead and add that import axis from axis like that and now we have the axis Patch and we are going to Point open btic so SL API SL stores and now we have to pass in uh the store ID so in order to get that we have to get our params so go ahead and add con params is equal to use params from next SL navigation like this make sure you've added this so you can see my import right here and I'm just going to move it to the top with the
Global Imports okay so I have that and I'm also going to need a router so const router Is equal to use router also from next SL navigation so make sure you import that from next SL navigation and not next SL router that's an incorrect way of doing it great now that I have that I can open an object here and write par. store ID and I can pass in the data like that so I'm going to go to/ API SL stores store ID which is the exact route that we defined SL API SL stores SL
store ID and we are going to Target this patch function right here so let's go back in Settings form here right now after this has been complete we're going to call router. refresh this is going to uh kind of resynchronize uh This Server component right here which fetches our store and it's going to call it again so that way we're going to get new initial data which is going to be the data we just updated and after that I'm going to fire toast. success store Updated just like this perfect let's go ahead and try this
I'm going to refresh everything and I'm going to uh change this name from test store to test update and click save changes and there we go store has been updated and you can see how my navigation bar now shows taste uh test update and if I refresh entirely you can see that that is now the default value here perfect now what we have to do is we have to create a model which is going To uh fire when I click on this delete button right here so let's go into our components folder I'm going to
close everything in components in models create the new file alert DM model. DSX like this let's mark this as use client and let's go ahead and write xort const Alert model like this perfect and now let's write the interface so interface Alert model props it's going to take is open which is a Boolean it's Going to take on close which is going to be an empty void it's going to take on confirm which going to be an empty void as well and loading which is a Boolean like this and then you can assign these props
right here so react. FC Alert model props like that and D structure all of those so is open on close on confirm and loading great so now that we have that uh we can go ahead and add some other things here so const is mounted set is mounted is Going to be equal to use State pulse I imported use state from react right here so you might be familiar with this we already did this in providers in model provider but since our Alert model is not going to work the same way our store model is
meaning that I will not add it here that means that it's not going to be protected by this is Mount trick for hydration so I have to do that manually again inside of here so use effect also import it from react Go ahead and open that make sure to add the dependency array and I'm going to add set is mounted to True like that and in here I'm just going to check if we are not mounted return null like that otherwise we can go ahead and return the actual uh model component so return model which
you can inut from do /ui model but you already know that I'm going to replace this to components great so now we have uh the Model and inside let's just assign some props to it first so title is going to be R you sure like that and description is going to be this action cannot be undone is open is going to be controlled by his open prop and on close is going to be controlled by on close like that and inside I'm going to open a div with a class name of padding top six space
that - X-2 Flex items D Center justify D end And I'm also uh going to add uh w- full which which ensures that this div fills the entire width of the model body and inside I'm going to add a button which you can import uh from. UI button but of course I'm going to replace that with add/ component this button is going to say cancel it's going to be disabled if we are loading which is a prop and variant whoops is going to be outline like that and on click is going to be triggering The
close functionality the other button is going to be continue and this button is also going to be disabled if we are loading variant for this one is going to be destructive okay let me just see how do you spell destructive like this okay and on click we're going to call on confirm great so now we have uh that model and it is ready to be used so let's go back uh in our settings form Now so go into the app folder inside dashboard store ID routes settings components settings form and inside of this fragment we're
going to add the Alert model like this from add/ components / models Alert model like that so I added it right here Alert model great now that I have that I can use uh the fields inside so this open is going to be controlled by open like that on close is going to trigger the set open to false so I already have this uh Right here in this state great great and now on confirm is going to be empty function for now and loading is going to be loading like this so let's go ahead and
let's see what happens now so once I click this delete button you can see that I have a prompt are you sure this action cannot be undone perfect that's exactly what I want what we have to do now is connect this continue button to actually delete the button uh to delete the store and we Do have an API route for that in the store ID because we just created it right here so let's go ahead let's go into our settings form and let's create our on delete function so const on delete it's going to be
an asynchronous Arrow function let's go ahead and open a try and catch block so I'm going to catch the error here I'm going to write toast. error and I'm going to write make sure you removed all products and categories first that is because we're Going to uh it's not going to be possible to delete the store if you have active categories and products and everything inside it's going to be a safety mechanism uh we did not manually do this so if you look at my delete function I don't check for that anywhere but the way
we are going to create our relations in the schema Prisma file is going to control how the relations will be able to get deleted right now we have no relations in this store yet so we Won't ever get that error but later on we're going to add relations to this store such as products and billboards and categories if you want to uh you can add a special on delete Cascade to that relation so it's going to enable you to delete the store and it's going to delete all the products and categories and everything along with
it but for safety features uh I'm going to do something a bit different in this tutorial and I'm going to explain that Again but I just wanted to explain why am I throwing this error right here how do I know that's going to happen great and now in the finally right here let's add set loading to be false and set open to be false again so we close the model after this uh great now in the try let's add the set loading to be true and let's call await axus do delete go ahead and open
backx SL API SL stores slash open special Object parames Store ID like this and then router. refresh so we do The same thing as when we update something and then router. push we're just going to push to the slash route because our slash route is the root right here and once we get to the slash we get in this layout and in here we're going to check if there is any other existing store so after we delete this store what's going to do is going to default to this new store and if we then delete
the new store it's going to default to uh the page inside root which Triggers the store model so it's going to ask us hey you need to create your first store all right so now that we have that all we have to do is write toast. success store deleted like this perfect let's go ahead and now use this on delete instead of this empty Arrow function here so I'm going to expand this a little bit I'm going to go ahead and uh try and delete this test update so I'm going to click continue and there
we go store has been Deleted and you can see I'm redirected back to root and now I'm in the new store right here and there is no deleted store so let's go ahead and delete this store as well and see what happens I'm going to get redirected back and you can see I cannot close this window because I need to have at least one store so I'm going to call this existing store and I'm going to create it and that's it we finished our settings and now we can update this store to let's say choose
Store and save the changes it's immediately reflected right here and I can also try and delete it one more thing I want to add is just in this nov bar currently we have no way of going back to the dashboard so we can only select settings so I just want to quickly add that for that we have to go in our main nav component so go ahead go into components main nav and like you added this route go ahead and copy it just uh above it and the route is going To be just SL store
ID the active is going to be just SL store ID and the label will be overview or you can name it home or dashboard practically it doesn't matter but I just want you to be able to redirect to this right here and one last thing we have have to add to this settings page is uh a little alert right here at the bottom which is going to show the environment key which is going to be very useful later on when we connect to the front end so go ahead and Go in shet CN UI and
find the alert component and here we have the CLI to install this so I'm going to copy this for npm I'm going to go in my terminal right here and this is the command so MPX shat cn- at latest ADD alert press enter and confirm that you want to install it and that's it that's going to add uh this component you can go ahead and run Dev again I'm going to refresh my page so everything is up to date I'm going to Close everything and I'm going to go in my components in my UI and
I'm going to create another component which is going to use this alert it's going to be called API alert so API D alert. DSX like this great so let's go ahead and create uh an interface for this so interface API alert props like this we need the title which is a string we need description which is a string and we need a variant which is a type of public or a type of admin because we are going To also reuse this API alert for all of those routes which will be shown in the products tab
in the category stab a bunch of other stuff so I just quickly want to show you what I'm talking about I'm talking about this component right here this is what we are building right now so we can give it a title we can give it a description and we can copy that and you can see how here I use it on the settings for the environment variable but in the products for example Uh I use it uh for API routes so that's what I'm talking about okay so now that we have that we can continue
developing this uh after we have the API alert props let's go ahead and write a text map so con text map is going to be a record the first argument is going to be API alert props we're going to pick variant from it like this the second argument is going to be string like that so go ahead and open that object and We're going to write public to be public admin to be admin like that and we're going to do a very simple same thing for the variant map so you can go ahead and copy
this and paste it and rename this variant map and in this case the public is going to map to secondary and the admin is going to map to destructive like that great now let's go ahead and continue developing our component so export const AP alert is the react functional component which Takes in the AP alert props like that let's go ahead and destructure the props so title description uh and variant which by default is public like that and let's go ahead and return this like this and I'm going to go ahead and write return alert
from do/ alert but I'm going to remap it to slash components slui alert like this and then inside what I'm going to do is I'm going to add a server icon from Lucid react And I'm going to move that to the top like this it's a self closing tab I'm going to give it a class name of h-4 W-4 and while we are doing this we can already go ahead uh in our app dashboard routes settings components settings form and what I want to do is just below this form I'm going to add a separator
again we already have that imported and I'm going to add API alert like this and I'm going to give it a title of test and a description of test description so I Just want you to see what we're building here so you can see the render great let's go back in API alert and let's continue uh developing this so we have the server icon now and now let's give it the alert title which is also something you can import from at/ component slui alert great and inside I'm going to render the title like this now
you can see how test has appeared here let's go ahead and let's give this a class name of flex items D Center and GAP dx-2 like that and inside of this alert title I'm going to give it a badge so for that we have to go and find the badge in Shad CN UI and I'm going to use this command for npm to add it to our components let's go ahead and run npx shat cn- UI at latest add badge and press enter confirm and that's it you can run the project again and if you
shut it down just remember to refresh and now we can go ahead and add the badge right here fromt SL badge and I'm Just going to remap it to components slui like this great inside I'm going to render this the uh text map so go ahead and write text map and I'm going to pass in the variant so that's why I created this map because the only variants available are going to be public and admin because our routes will be available either to public like get routes or they will be admin routes for patch and
delete and post so that's why I wanted to do this cool little uh MTH App to show you how you can create uh safe objects with typescript using existing props great and alongside this badge displaying the text inside I'm also going to go ahead and give it a variant and this variant is going to be the variant map passing in the variant like this there we go uh and let's just quickly see uh why this is not working yes that's because uh in this variant map I Define that the second thing can be any string
that's not true So the badge variant only takes secondary destructive default and outline so let's go ahead and remove this and instead I'm going to write badge props which I can import from add components UI uh badge like this and I'm going to pick the variant from here there we go so I'm going to expand a little bit so you can see how my variant map now looks so it's a record the first uh string right here is either public or admin and the second can be something in The choice of badge props variant like
that and now the error Here Is Gone perfect and now we are finished with the alert title let's go ahead and ADD alert description I imported the alert description from at/ components UI alert inside I'm going to go ahead and add a code element which is a native HTML element and inside I'm going to write description like this so now let's go ahead uh and let's actually add uh some class names for this code so Class name inside it's going to be uh relative rounded BG Das muted PX is going to be 0.3 R like
this py is going to be 0.2 RM like that font is going to be mono so it's a bit robotic text is going to be small and font is going to be semi like this great so I'm going to expand this one more time so you can see the entire code so relative rounded BG muted PX py font mono text SM and font semi Boldt perfect now let's add a class name To this alert description I'm going to give it a margin top four Flex items D Center and justify Dash between like this and just
below this code I'm going to add a button you can import that from SL button but I'm going to change it to components slui like this great so now that I have the button inside I'm going to go ahead and add a copy icon from Lucid react right here along with the server icon and it's a self closing tag and I'm going to give it a class name of H-4 and W-4 great let's give this button a variant of outline size small or icon depending on what you want to use and on click click we're
going to go ahead and for now give it an empty function like this so you can see how we have this icon uh right here so let's go ahead and actually create this on click function what we're going to do is we're going to add a copy function so const on copy it's going to Be uh accepting a description which is a type of string like this and inside what I'm going to do is called Navigator do clipboard. WR text description like this and I'm going to call toast from react hot toast and I'm going
to move that to the top right here so to. success is going to be uh API route copied to the clipboard like that and then we can use This on copy like this and paste it here and I'm going to refresh and you can see right now in my disc destion I've passed in the test description oh my apologies this is going to be an arrow function like this which is then just going to pass in the description or actually we don't have to do that so you can do this yeah this works but technically
you can do on copy and you can just use the Description from here so no need for this you can just use the description it's going to be the same thing my apologies great so now that you have that you can see that in my settings form I'm just going to pass this a variant public like this so the error goes away so let's see in my settings form I added this API alert to the bottom I give it a title of test and a description of test description and Apparently when I click on copy
it's going to copy that to my clipboard so let's see if that is true so I'm going to click copy it says API route copy to the clipboard and if I paste there we go you can see that I pasted test description so whatever I passed in the description prop was copied to my clipboard great and now let's go ahead and actually write a proper title so the title here uh I want to help the user by Showing them what environment variable should be named for this store when they connect to their front end so
I'm going to write nextore public _ API uncore URL now you don't have to name it exactly like this next public is important uh but what I'm trying to say is whatever you put here won't matter for this project so I'm just helping you to create a good dashboard so it connects well to any other front end so that's why I'm kind of doing this this Component won't be function won't improve the functionality of this project but it is a cool feature to have and we are building a very complex dashboard so we are backing
it with a lot of features such as stuff like this uh great and before I fill my description uh I want to go ahead and add uh another hook here so let's go ahead I'm going to close everything I'm going to into my Hooks and I'm going to create a new file use- origin. TSX so I'm going to create a hook where I can safely access the window object in next3 so that's a little bit tricky because uh you know that a lot of stuff in xer is serers side rendering and on the server the
window object does not exist that's only available in the browser so let's go ahead and write export const use origin it's going to be an arrow function and let's write const mounted set mounted use state is going to be false and let's just import use state uh From react so I'm going to do that at the top so import uh use state from react like that and let's also immediately add use effect perfect now that we have that uh let's actually get our origin so we're going to do a long line which is going to
do kind of full backs for the origin so const origin is equal to type of window is not undefined so if window is not undefined and and if we have a window.location do origin in that case We are going to use window. location. origin because it's available otherwise we're going to use an empty string so it's a long line but what we're doing is we're checking if the window is available if it is we are checking if window. location exists if that's true we are using window location. origin otherwise we are passing an empty the
string perfect and now that we have this let's go ahead and write use Effect set mounted to true so this is the hydration trick that I already did a few times if we are mounted just return empty otherwise return origin like this perfect now you can go back in the app folder dashboard routes settings components settings form right here and you can go ahead and modify the description now so I'm going to open curly brackets and I'm going to add back tick I'm going to use the origin so I actually forgot to use the hook
and we Are using the window object but I'm going to fix that later and I'm going to write slash API slash and I'm going to use ps. store ID like this and you can see how that generated the correct URL to access my store so later on when we get to our front end store uh we are going to just copy this we're going to paste it in our code and our entire store will be connected to this API which is later going to be even more advanced than just a couple of um just a
Couple of routes uh great so that's it the reason I wanted you to create this in the settings I know it doesn't kind of make sense so I just told you okay we're going to create settings and some routes and all of a sudden we're building this component that's because every single form uh that we're going to create from now on is going to have this component and we just saved ourselves a lot of time because now it's finished and we can just reuse it throughout uh The project perfect and one last thing I want
to do is I want to go in the alert uh API alert which we just created and I just want to mark it as use client so the reason it's working right now is because the only place we are using the API alert component is in the settings form which is a client component but if we were to add it in a server component we without explicitly mentioning use client at the top it Would have bro broken the app so this way we just ensured that does not happen good good job great job you did
a lot of useful things and a lot of things we can reuse in the future forms to speed up this process so I made a mistake in my settings form right here so I used origin right here but what I forgot was to actually use the hook use origin you might have noticed that uh so why is this working well because This is referring to window. origin or window.location that origin but you don't have to type those because they are Global but this can cause hydration errors regardless of the fact that it's working so I
just want to ensure that we are doing this the proper way so I'm going to write const origin is equal to use origin like this and you can import use origin from uh hooks use origin like that and then you're going to use that origin and now that you can See how when I refresh for a second there is nothing in the origin so this ensures that during that Split Second in the serers side rendering uh we're not going to get a hydration error uh great so what we'll focus on building now is the second
entity in our database which is going to be uh the Billboards so let's go ahead let's close everything here and I'm going to go in my schema Prisma so I'm going to go in Prisma SCH . Prisma right here and one thing I want To mention if you're not seeing these colors so my generator client is blue my strings are yellow and my variables are white my brackets are uh what is this red or pink uh if you're not seeing this it means you don't have the extension for Prisma so just go in your extensions
type Prisma and install the first package right here so I just wanted to give you that little tip great so we have to create a model for our billboard let's go ahead and do that so model Billboard is going to have an ID which is a type of a string ID and default is going to be uu ID like this next is going to have a relation to the store so Billboards can only exist inside a specific store so let's go ahead and write store ID that's going to be a type of string and we're
also going to have store and that is going to be the store object sorry the store model and it's going to have a relation which is going to be called Store to billboard like that it's going to have Fields so I'm just going to expand my code so you can see everything that I'm writing so fields are going to be store ID and references are going to be ID like that and now we have an error because we have defined a relation here but we have not defined it in the store model right here so
just below this user ID go ahead and add billboards like this and add a billboard like this and add an array at the end and add a Relation here as well and call it store to billboard as well great now the error is gone but we still have a warning which we're going to fix with an index decorator later great so we have that now so let me explain just a little bit here so we have added a store property to this billboard actually we have added the store ID property and we defined a relation
here so that relation is uh a connected relation to this store it's named the same uh and it's targeting the Field store ID and it's referring to the ID in the store so that's what these references and Fields mean great besides this billboard is also going to have a label which is also a type of string and it's going to have image URL so a single image which is also going to be a string uh and it's also going to have created ad which is a date time and default of that is going to be
now and it's going to have updated at which is also date time and that is a type of at updated at Like this uh actually we did not execute this my apologies so the same as this and the same as this perfect and now let's just fix fix this warning so you can Google how to fix this I found this solution so store ID and that resolves that error great so what do we do now that we added a billboard because right now if you try let's go ahead let's go into uh this layout right
here or let's go somewhere where we have Prisma I think that's root right here so we have Prisma here let's just try and write const billboard to be a wait Prisma db. billboard and what happens billboard doesn't exist on property Prisma that is because we have not run npx Prisma generate on this billboard right here so let's go ahead and let's go in our terminal I'm going to shut down the appli and I highly suggest you do the same every time you make uh changes to the Prisma so what we have to do first is
npx Prisma Generate and now you can see that if I go in my layout there we go it's no longer an error and it autocompletes to the billboard perfect see you can now remove that we don't need it so no changes needed to the root uh great so go back in schema. Prisma right here and the next thing we have to do is we have to push this to the planet scale so go ahead and run NPS X Prisma DB push and let's see what happens now so after a couple of seconds there We go
your database is now in sync with your schema Prisma perfect and now you can mpm run Dev again and just refresh your page to confirm everything is working as it should uh great now that we have that working uh what we are going to focus on is creating the uh navigation for the billboard so let's go into app sorry let's go into components main nav right here and you can just go ahead and copy this actually maybe better copy the Settings and just above the settings add this and replace this routes with billboard like that
uh sorry Billboards like this so it's uh it's multiple and the label is going to be Billboards as well and there we go now we have the Billboards and if I click here I'm going to get a 404 because this page does not uh exist so let's go ahead and and let's actually build this page so I'm going to go in the app folder dashboard store ID routes and the same way I did with Settings I'm going to create a new folder called Billboards like that and inside uh inside I'm going to create a new
page. TSX like this I'm going to call it Billboards page I'm going to return a div which says Billboards like that and once I refresh there we go now it's fixed it says Billboards so this is my structure inside the group dashboard folder inside the store ID inside the group routes I have a billboard folder in the same Level as my settings and inside I have a page. TSX uh perfect so what I want to do now is I'm just going to style this a little bit so class name is going to be flex-all like
this inside I'm going to add another class name like this this is going to be Flex D1 space- y-4 p-8 and pt- six like this great uh and inside I'm going to add another component called billboard client like this and I'm going to go ahead and create a components folder inside of this Billboards folder components and I'm going to go ahead and create a new file client. DSX and this is you guessed it going to be a client component where we are going to load all of our Billboards for now we have no Billboards so
we won't be building that whole component with no data but we are going to prepare uh a couple of stuff inside so let's go ahead and Mark this as use client and let's just write export con billboard client like that And for now you can just return a fragment like this let's go ahead and create a div here class name of flex items denter justify Dash between and just say billboard client like that and then you can go back in your page. TSX file and import this uh from your components so import destruct billboard client
from do/ components client like that and there we go now it says billboard client right here perfect And in this client I just want to add a heading which is a component we already have so heading you can import that from at/ components uh UI heading like this uh let's go ahead and give the title of billboards and I'm going to add hardcoded zero for now this is of course later going to be uh it's going to be dynamic and description is going to be manage uh Billboards for your store like this uh great and
now just below this heading I'm going to add a button Element which you can add from add/ components UI button and we're going to add a plus icon inside I'm going to give this a class name of uh margin right 2 h-4 and W-4 like this and it's going to say add new like this there we go for now that's all we're going to do in this billboard client component uh and we can already prepare the separator so go ahead and add the separator from add/ components UI separator like this great so this is Ready
now uh what we're going to add here later is a big data table uh but for now uh we have nothing to iterate over so really no need to build the whole component if there is no data for us to look at so instead we are first going to focus on creating the form to create new Billboards so I'm going to go ahead and add a router to this client so const router is equal use router from next SL navigation and let's also get the params so con params is equal use Params from next SL
navigation like this perfect and now that we have those and I'm just going to move them to the top I'm going to go ahead and add an on click function uh to this button right here which is going to say router. push I'm going to open backck and I'm going to slash par. store ID slash Billboards Slash new like this so once I click you can see I'm uh I go to 44 because we have not created this Slash new route but the trick is this route right here slash Billboards SL new won't be hardcoded
to new in fact we're going to create a new folder inside of this Billboards folder we're going to create a new folder called billboard ID like this so go ahead inside and create a new page. TSX and I'm just going to go and quickly write uh billboard page like this so a single billboard and inside I'm just going to say uh this is a form for Billboards like that and once I refresh here there we go now it works so yes I can write Slash new or slash1 2 3 1 2 3 and this is
still going to work so you can see how we are going to use this uh here I purposely redirect to Slash new and you're going to see why in a reason in a minute so inside this uh page. TSX right here what I'm going to do is first I'm going to mark this as an asynchronous function right here and I'm going to go ahead and extract the params From here because it's a server component so this is how I can get them and let's also give here a uh type so billboard ID is a type
of string how do I know that in my params I'm going to get a billboard ID because I have that in this folder right here perfect and now what I'm going to do is I'm going to attempt to fetch an existing billboard using the ID in our URL so const billboard is going to be await Prisma DB which you can import from at/ La Prisma Db. billboard. find unique where ID is equal to perm. billboard ID like this perfect and we actually don't care if this billboard exists or not so let's see I'm going to
write existing billboard is going to be billboard do label like this and there we go it says nothing and that's correct because in my URL I am at Slash new and we are going to use this we're going to use the fact whether billboard is found or not in the database to know Whether to display a new form or an edit form so this is how we going to decide whether the user wants to edit an existing billboard or create a new billboard so that's why we redirect to Slash new because that is technically mapped
to this billboard ID and then this ID is Tech it's searching for this technically which obviously is not going to be found meaning that yes we are going to use that fact that nothing was found to turn on uh a specific form Which is going to trigger the creation of a new billboard rather than updating an existing one but in other cases if the billboard ID in the URL is correct we're just going to use that as initial data like we did in the settings and then we're going to uh trigger an option to update
rather than to create a new one great so let's go ahead and modify this a little bit so I'm going to oops I'm going to create a div here again with the class name of flex Das call I'm Going to open a new div with the class name of flex -1 space- y-4 p-8 and pt-6 like this uh great and what I'm going to actually do now uh is I'm going to copy the settings form so let's go into settings let's go into components settings form and go back into your billboard ID right here create
a new folder called components and just paste it here and we are going to rename this to billboard form like that great so let's go ahead and while we are in this Billboard form let's just rename all the instances of setting form so I have the setting form props I have the setting form values I have the setting form setting form props again setting form values again and setting form values again here and I'm going to rename this to billboard form like this so now you can see that all of my instances are in billboard
form perfect and now I can go in my page. TSX in my billboard ID and I can add that billboard form right here And I can import it from do/ components billboard form because we are referring to this components right here and we have an error here because it expects initial data but we have not passed it so let's go ahead and say initial data is equal to billboard and we are still going to get an error because remember we copied this from server settings so our server set sorry our store settings so our store
settings is expecting store to be initial data but that is not going To be the case here so let's change the billboard form props to for initial data instead of store is going to take a billboard or it's going to take null because there is a a chance that uh the billboard was not found and let's also just import the billboard in place of store from Prisma SL client like this there we go now let's go ahead uh and let's see uh what happens here so I still have an error here so let me just
check why that is happening I assume It's because initial date is not the proper name it's initial data like this there we go so now the error has gone away perfect but of course we have some other uh errors now so let me just go ahead and just I just want to reorder a couple of things so I'm going to move this form schema above my interface I just feel uh better with it uh that way uh great and I want to move this right here at the bottom great like that perfect so now that
we have that uh Let's go ahead and first let's remove um let's fix this default values first great so we have the initial data right but we have an error because there's a possibility that it's null as I defined right here so in order to fix this I'm going to add a type pipe right here and I'm going to manually add the label to be empty and I'm going to add image URL to be empty as well but we still have the errors because we're using Zod and our Zod has some different fields Defined right
here so let's go ahead and fix that instead of the name is going to be label because that's what we just named in our schema Prisma right here in Prisma schema you can see that we have a label not a name right so we have the label and we also have the image URL like this so add z. string for that to I'll say a main one like that and there we go now our errors for the default values uh officially went away great now obviously we're going to have To modify our onsubmit and our
on delete as well you can see that the API is still pointing at the stores but we're going to do that uh when we get to that so for now change this settings so we're going to go and modify this title so it actually uh looks the way it should and we're not going to hardcode it here uh instead we're going to go ahead and we're going to go just above our form right here and create cons title it's going to check if there is initial data If it is it's going to say edit billboard
otherwise it's going to say create billboard and you can copy this and now we're going to use the description so if there is uh initial data instead of edit billboard we're actually going to write edit the billboard otherwise it's going to be add a new billboard now we're also going to have a tost message in that case we're going to say billboard Updated otherwise we're going to write uh billboard created like that and I like to use a dot in my messages and last we have the action so if there is initial data in that
case we're going to say save changes otherwise we're going to say create like this so let's go into our heading right now uh where is it right here and let's change this settings title to title like this great now it says create billboard right here and for Description let's change this to description right here perfect and now let's go ahead let's find our button where it says save changes and let's change this to action like this great and now it's changed to create perfect and for now we can remove this API alert because we're going
to do something different here uh perfect now we have to add the proper fields for this uh for this uh well entity because it doesn't have the name field instead it has uh a Label field so let's go ahead uh and change this by adding the label like this so label and there we go the error went away and rename the form label uh as well and instead of store name here we're going to write billboard label like this there we go so now it says label billboard label create a new billboard and create a
billboard and you can see how it's very similar to settings but we access it through here Perfect and one thing that looks weird is that we have a delete button in a form to create a new billboard so let's go ahead uh and let's add some checks which are going to hide that so go ahead and find this button and we're just going to wrap it uh inside a conditional which is going to check if there is initial data in that case and that case only you're going to render this button like this there we
go so now it's gone so Only after we successfully create a billboard with a label are we going to be able uh to actually show that delete button uh perfect so before we actually do anything that is able to create the button uh and before we modify all of this messages right here and all of this wrong API routes for now what we are going to do is we have to create another component we have to create a component for image upload in order to do that we first have to set up our cloudinary Account
so go into Google or use my link in the description and find the cloudinary website and from here go ahead and either click sign up for free or log in so I'm just going to do that real quick great and after you've successfully logged in you're going to be seeing something similar to this perhaps you will see this dashboard screen and this is where I want you to stay I want you to stay on this screen which has your Cloud name right here so You can easily copy that because we're going to need it now
so what we need besides the cloudinary is the next- cloudinary npm package so you can also use the link in the description or Google next- cloudinary and go ahead and select installation right here and we're going to use npm install next- Cloud inary so let's go ahead and I'm going to open my terminal and sh shut down my application and I'm going to write mpm install next- cloudinary and I'm going To press enter wait a couple of seconds for this to install and then we're going to go onto step two right here uh which is
configuration great so I'm going to go ahead and run my project again I'm going to go ahead and I'm going to find my environment file right here and I'm going to copy the next public Cloud iname so you can just go ahead uh and copy this and I'm going to paste it at the bottom here so there we go next Public cloud in rename and we have to replace this your Cloud name with our dashboard Cloud name right here so just click copy here and paste that in here perfect and now we ready to create
our image upload component so let's go ahead uh and let's do that I'm going to close everything here I'm going to go into my components into my UI and I'm going to create a new file called image- upload. vsx great so let let's go ahead and write con image upload like this and I'm Just going to quickly return image upload like that uh perfect and now let's slowly uh modify this to actually connect to cloud inary and for us to be able to upload images so I'm going to write use client at the top right
here uh and let's go ahead and create an interface so interface image upload props disabled is going to be an optional Boolean on change he's going to take a value which is a string and he's going to return it on remove same thing String and void so this is going to be both a component uh to upload an image and a component to display those uploaded images and we're going to have a value which is an array of strings so it can display multiple images at once great so we have this image upload right now
and let's assign this to react. FC image upload props like that and let's extract all of those so disabled uh on change on remove and value like this perfect and Now let's do the good old trick for mounting so if you want you can go into your providers model provider and just copy this is Mount set is mounted use effect and is mounted and paste it here and just add the use State uh and use effect from react so to do that uh you can just import use and use effect from react like this and
there we go and this just ensures that we have no problem with hydration regarding this component great and let's Export default image upload so we don't forget to do that later great and now that we have that uh let's go ahead and let's write our onchain on upload function so const on upload is going to take the result which is a type of any because Cloud inary doesn't have the typings uh and we're going to call on change and the result is going to be uh result. info. securecore URL like this so result. info. securecore
URL the way I found This out the way I know this is not really from the documentation but I conso log the result that I got after my image has been uploaded using this next uh cloudinary component and I figured out okay it's this exact thing that I need perfect so now that we have this uh oh yeah and we also let's just move this right here so I don't want to break uh this before that great so make sure your is mounted is below on upload like that and now let's go ahead uh and
let's Actually uh create this vidget so inside of this div create a new div with a class name mb-4 Flex items D Center and GAP D4 so we are preparing uh our positioning for the images so now I'm going to go ahead and iterate over the value so our value is an array of strings meaning it's an array of image URLs so I'm going to write map URL like this and I'm going to go ahead uh and show you uh how to render uh how to continue so go ahead and write A div like this
and let's give it a key which is going to be the URL like this and before I continue I'm just going to show you what we are going to build so you're not confused so we are going to be building this component right here right we'll be able to click upload image and we'll be able to select a billboard and we'll be able to preview it right here so that's what we're building right now this value. map is going to be an iteration Of these images so that's what we going to add here in a
form great so I'm going to close this and continue working here uh great so we gave this a key now let's go ahead and give this a class name of relative w-200 pixels in square brackets like that uh h- 200 pixels in square brackets as well around it- MD and overflow Das hidden like that and I'm going to expand this so you can see better great now inside I'm going to open another div with the class name of z-10 absolute top-2 and wr-2 this is going to be a container for our delete button of individual
images I'm going to add that button from do/ button and as you already know I'm going to replace that with components slui like this and I'm going to separate the Imports perfect and I'm going to add the trash icon from Lucid react and I'm going to move that to the top it's a self-closing Tag and let's go ahead and give it the class name of h-4 and W-4 the type is going to be button and on click what we are going to do is we're going to call on remove this specific URL whoops that we
are iterating over so this specific URL we're going to trigger this on remove which is going to be I prop perfect and let's also give it a variant of destructive and a size of Icon like this perfect so now we have that and just uh Below this div we can go ahead and add a next image like like that make sure you imported the next image like this perfect and now that we have that inside I'm going to add a Field property a class name of object D cover and I'm also going to add an
ALT which is image and source is going to be URL like this perfect and now just outside of that but still inside of this main wave we're going to add the CLD upload uh widget like this so let's go ahead And first let's import this from next- cloudinary like that and let's go ahead uh and let's write on upload here to be on upload which is what we a function we defined right here and now we have to give it an upload pres so go ahead and write upload pres it right here now what do
you write here well you have what you have to do is go into your cloud inary and go and find the settings right here well I cannot zoom in that far but if You can see the settings right here in the lower left corner go ahead and click in the settings in the cloud inera here wait for this to load and you click on upload under product environment settings right here and you're going to go ahead you can see in my upload presents here I'm going to zoom in a little bit I have a lot
of things here you're probably if this is your first time using Cloud inary you're not going to have this you're probably just going To have the ml default what you have to do is Click add upload pres right here so go ahead and press add upload pres and make sure the signing mode is unsigned this is very very important so I'm going to zoom in see signing mode needs to be unsigned and this is your present name so you can copy that already and click save at the top and you can see I have the
newest present right here and mode is unsigned and it's red that's what we need perfect and now I'm going to go back in my code and I'm to paste that upload preset right here there we go that's exactly what I need and now inside we're going to open this uh render that clld upload widget is expecting so open an object like that go ahead and open the props and D structure the open immediately like that and go ahead and uh return a function and let's write Con on click it's going to be an arrow function
which is just going to call open like this and now we're going To go ahead and return a button like that which is going to hold image plus icon which you can import from Lucid react so image plus like this great uh now that we have the image plus icon it is a self closing tab and let's give it a class name of h-4 W-4 and mr-2 like this perfect and let's go ahead and just give this a type of button disabled to be uh disabled like that variant is going to Be secondary on click
is going to be on click so this is going to be a button which is going to actually open the cloud inary widget and this was to iterate over uploaded images uh right here perfect that's it that's all we need uh for the image upload so now we can go back uh in our upload form so let's go and find our upload form I'm going to close everything I'm going in app folder in dashboard store ID routes Billboards uh compon sorry billboard ID components billboard form right here and what I'm going to do is I'm
going to copy this form field right here so it's a self-closing tag so be careful how you copy it and I'm going to go outside of this div with grids right here and I'm going to paste it here just make sure you indent it properly like this there we go I'm going to save and now you can see if I refresh right here yeah So make sure you refresh your application if you're shut it down there now I have two labels here and I'm going to replace this one with image image URL and the label
here is going to be background image like this there we go and instead of having an input here I'm going to have my new component image upload which you can import from at/ components UI image upload like I did uh right here great and now that we have that uh we can go ahead and add it some Values so it has an error now because we have not passed in any values so let's go ahead and add those so value is going to be field. value question mark in that case we're going to pass it
inside an array because yes billboard only takes one image but uh our image upload expects an array of those so we're going to mock it we're we going to create an empty array and inside I'm going to put field. value otherwise if the current billboard has no image which're just Going to pass in the empty array like this great and now you can see it looks much better and I think in my image upload component I forgot to add some text to this button so let's quickly go back inside image upload let's find this button
which says image plus and just below that add uh upload an image there we go now it looks better and now we can go back into the billboard form and add uh the necessary fields to this so besides the value it's also going to Have disabled which is going to be mapped to loading like that it's going to have onchange which is going to accept the URL and it's going to called field. onchange on that URL and we're also going to have on remove and that is going to called field.on change and just remove well
it's going to completely remove the URL perfect so I think we are ready to try this now let's go ahead and let's click upload Image I'm going to click browse I'm going to select a billboard and there we go it's uploading my assets and what happened well this is actually a good sign this is working as intendent but the problem is we are using uh next image in this image upload component you can see it right here and whenever we use that if we are using foreign hosts and sources such as Cloud inary we have
to add this host name to our next config so you can either copy it from here so Rest. cloudinary dcom or you can just watch what I do so I'm going to close everything here I'm going to go in my next. config.js and I'm going to uh modify this to write domains sorry images domains and open an array and just paste rest. cloudinary dcom inside so I'm going to zoom in so you can see nice uh go open an images object domains array rest. cloudinary dcom or you can also just click here so see more
info and it's going to take you to some other Ways you can build this you can also use the remote patterns if you want to uh but you can see that uh this is saying that this is the older version but for me it's still working the domains way if it's not working for you if you're watching this into the future perhaps it's completely deprecated but I've been using this in every project it's much simpler for me you can go ahead uh and add it in this way great so now I'm just going to go
back to my project and what I recommend you do after you modified next uh. config.js go ahead and shut down your application and run it again because technically it the hot reload works with next. config.js but in my opinion it always causes very slow uh development great now let's try again so I'm going to go ahead and upload my billboard let's see what happens let's see if this works I'm going to click done and there we go my image is right here and if I click remove there we go It's gone perfect that's exactly what
I wanted and now uh what we have to do is obviously we have to modify all of the routes inside of the billboard form so let's go ahead uh and let's do that so I'm going to go uh in my app folder inside my dashboard store ID routes Billboards billboard ID components billboard form and let's go ahead and let's actually modify this routes so first let's do the onsubmit so the route is Not going to be SL API SL stores and I know we don't have the API route yet but I want to prepare it
either way so instead of SL API SL stores it's going to be SL API slop a special object actually we can use this so/ API slams. store ID and then we're going to go slash Billboards like this but we have to modify this just a little bit so I'm going to expand this like that so instead of patch it's going to be post so on submit we're going to set await Axio that post SL API SL params that store ID SL Billboards like this but I'm going to wrap this in an if Clause so if
we have initial data in that case that means that I don't want to post but I want to edit the current billboard so you can see how we have to create some modifications so go ahead and copy this and paste it here and then this is going to be our block for updating so leave the low the bottom one as it is but change the second one to patch like this And then the route has to be updated as well instead of Slash Billboards is going to go to slash that specific uh perm. billboard ID
like that perfect so that's what we're going to do if initial data exists in that case we're going to patch the/ API slash this store slash Billboards of that store slash that specific billboard ID otherwise we're going to go to SL API same thing but just slash Billboards because we are creating a new one perfect and now Instead of uh changing it manually here uh because it can either be updated or created I'm just going to pass in the toast message which is a component we defined right here above so if we have initial data
in that case we're going to trigger billboard updated otherwise I'm going to say billboard created perfect this something went wrong can stay the same and now let's do the same thing for the on delete function right here so instead of running SL API stores it's Going to be/ API slams. store ID SL billboards slash uh par. billboard ID like this perfect and after saying store deleted we're just going to say billboard deleted like that uh and for this error message well Billboards will not be able to be deleted if they have an active category so
let's just give a more informative message here make sure you removed uh just all categories using this billboard like That so it's a descriptive message to why something could go wrong uh perfect I think that that is pretty much uh everything we need before we start actually developing our API routes for this so I'm going to refresh this and now uh we're going to go ahead and we're going to create the APA routes so let's go ahead and let's go in our API folder right here and inside I'm going to create a new folder this
folder is going to be Called store ID that this might make sense if you look back in my dashboard routes billboard billboard form you can see that when I update I'm going immediately to the store ID so that's why I created a new API route which goes immediately to the store ID like this and then inside I'm going to create a new folder uh which is going to go to billboards like that and let's create a routee inside so route. TS inside and first we Have to create our post route which is going to be
able to create a new billboard under the store so for that we can actually go in our stores route. TS and I'm going to just copy this entire uh thing right here so then I can go back into Billboards route. DS and I can paste it here and now we're going to change uh what's not needed for us so first things first what I want to modify is that I'm not getting the name from the body instead I'm getting the label And the image URL like that so let's modify it first if there is no
label in that case I'm going to write label is required and then I'm going to copy this and paste it and do the same thing for image URL so I'm just going to write image URL is required and I'm just going to expand so you can see more of the code and I'm not creating a store I'm creating a billboard like that so a wait pris db. billboard. create like that and I'm not passing in the name I'm passing In the label and I'm passing in the image URL like this and I'm also not passing
in the user ID like that uh but I am passing a store ID so go ahead and write store ID parents. store ID whoops let's just see uh oh yes we have to add the params to this post method my apologies so go ahead and add the params here and let's add the typing so parms is an object which has store ID which is a type of string inside now how do we have this store ID well because of our API structure it goes slash API SL store ID slash Billboards so that's how I always
have the store ID and in this store ID API we're going to add routes for products and categories and everything else so always in our params we'll have access to store ID so we can always check uh that we are doing things in a correct store perfect so for that we also have to do a couple of more changes so first let's finish this so label image URL and store ID and Parents. store ID like this perfect now let's go ahead and just check if by chance there is no store ID so if there is
no parents with store ID in that case you can just go ahead and copy this and paste it here and just say store ID is required like that perfect and in the next response. Json we are going to return of course the billboard and change this to Billboards post like this so you have a better knowledge of your errors in the terminal perfect and Now I just want to go ahead and add a another check to this so what I want to do is I want to confirm that this store ID actually exists for this
user so I'm going to add cons store by user ID is equal to await Prisma db. store. find first where ID is parents the store ID so it's the ID of the store and user ID is the current user ID so what I'm doing here is I'm trying to find the store uh that is passed in this store ID and because This user can now technically steal someone else's store ID and create a billboard in their store even if they are authenticated all we check for now is that they are uh authorized right here uh
sorry let's instead of unauthorized let's actually write unauthenticated here it's a proper message so if there is no user ID that means the user is not authenticated at so what we have to do here is check if there is no store by user ID so if the User uh if the store ID the user is requesting in combination with their user ID is not available that means that the user is trying to update someone else's store which is not something we want to allow so in that case I'm going to return new next response unauthentic
sorry unauthorized with a status of 403 like that so unauthenticated means that the user is not even logged in but unauthorized mean that user is logged in But does not have the permission to modify what they are trying to modify so that's the check that we're doing right here perfect so we have the billboard we are creating the billboard with the label and image URL and we have the store ID perfect and while we are here uh I just want to reuse this so I'm going to copy this entire thing again and I'm going to
add another route to get all of our Billboards so go ahead and rename this to get you can leave the Store ID right here we are actually not going to need the body the user nothing so you can remove all of these checks just leave uh this store ID like that and we're not going to need to do this check either and instead here we're going to write Billboards so we're going to get all Billboards find many like that uh and all we're going to do is write where store ID is equal to param store
ID like this perfect and we are going to send all of those Billboards And I'm going to change this error uh to get there we go so we're going to use this on the front end we're going to go slash API slash this store ID slash Billboards in a get route and that is going to load all Billboards that are available uh in that store perfect so that's exactly uh what we want great and now let's go ahead and let's actually create the routes for a specific billboard so inside my Billboards folder in the API
I'm going to create a new Folder billboard ID like this so similar to store ID and you can actually go into store ID right here and copy everything inside side because we are going to need both patch uh and uh both patch and delete functions here and we're also going to add a get function inside but that's going to be for later so go inside build board ID and create a new route. DS inside and paste everything just like that and now let's go ahead and modify this a little bit so instead Of having store
ID in our pars we we still have it but the only thing we're going to need is the Billboard ID so we use the same thing we just replace this with billboard ID like that perfect and uh what I'm going to do now right here besides having billboard ID I also actually need the store ID so store ID is a string and a billboard ID is a string as well great so we have the user ID we have the body and the same thing so we have the label and image URL like This so let's
change this to label label is required let's copy and paste this for the image URL like that so image URL is required and instead of params store ID we're going to check for billboard ID like this which is going to say billboard ID is required perfect and then we're going to go ahead and we're going to try and Patch the current store so cons store you can actually go in your uh billboard route. TS to copy that speed up the process so go in your Basically find this store by user ID so just go ahead
and you can copy the error as well like this go into billboard ID route. Cs and just paste that here and it's going to do the very same thing perfect and now what we have to do is instead of updating the store we're going to write billboard here so billboard Prisma db. billboard update menu ID par. billboard ID like that and the data we are going to pass uh it doesn't need the user ID and the data we Are going to pass is label and image URL because those are the only things we can update
and just pass in that billboard right here and change this to billboard patch great so we just modified this patch to work with Billboards and we have the store ID and billboard ID in the patterns because of our API structure which has store ID and billboard ID we are checking for the label and image URL the same way we did inside the post function right here and We're also checking if the user is trying to do something in someone else's store so we add this layer of protection by checking if the user is unauthorized by
chance and now let's modify the delete function in the very uh same way so in order to do that uh what I'm going to do is I'm going to add a billboard ID here as well so go ahead and add billboard ID string uh so the same thing uh we did here so in our params in the delete Function we have the store ID and billboard ID and what we're going to check first is if we are unauthenticated then we're going to check if there is no billboard ID and we're going to write billboard ID
is required let me just check if I checked that yeah I I moved that great we're going to check that and then we're just going to check for the very same thing here so I'm going to write store by user ID and I'm just going to copy this thing and I'm going To paste it in here like that perfect and then instead of deleting the store we're going to delete the billboard so Prisma be. billboard. delet money and the ID is going to be store. billboard ID like that perfect uh and we are going to
return that deleted billboard and I'm going to change this error to billboard like that perfect so now we successfully finished this but I want to add just one more route here so I'm going to go ahead And I'm going to copy this delete function right here and what I'm going to do is I'm going to add uh to the top another function called get like this so I copy the delete function because it's very similar so I need instead of store ID all I need is a billboard ID in this case so we don't need
that in our parameter matters and also we don't need to be authenticated to get the single billboard uh and we don't need this Store ID and we don't need this check so all I need is a billboard and instead of delete manyu I need find unique like this where ID is params billboard. ID and the error is going to be billboard get like this there we go so we have finished the entire uh API we have the individual get the individual patch and the IND idual uh Delete right here perfect so I'm just going to
collapse this so you can see better so we have three Routes right here perfect and I'm going to remove un needed space here great uh and what I'm going to do next is I'm going to go ahead uh and try and create this so apparently we it should all work now because we have the post right right here so let's go ahead and let's find uh our form so billboard form right here let's check if the apis are correct so for post we have SL API SL param store ID Billboards data let's go ahead and
see if that is correct so I'm going to Refresh this I'm going to go ahead uh and upload an image here for example this one and I'm going to write test billboard like that and I'm going to immediately open my network console so I can see uh if something will go wrong I'm going to uh just a second uh preserve log okay and I'm going to click create and let's see let's see if we have an error so apparently it says billboard has been created so let's see Uh let's see I have a request payload
here how about the response and there we go see I have a new billboard with my store ID with my label with my image URL perfect so this is working and now I'm going to copy this ID from the uh response and I'm going to try and replace that in place of Slash new and there we go now it says edit a billboard you can see I'm refreshing and it's loading the exact image that I want with a test billboard so I'm going to modify The label now and save changes and see if the update
works it says billboard updated so I'm going to refresh again and there we go that works as well perfect so what I want to do is that after we save our changes I think we should redirect to slash Billboards right so we can actually see all of the Billboards in our table so I'm going to do that real quick so let's go back uh in our submit function here and after this uh success message Actually before it we're going to write router. push I'm going to open backck slash parents. store ID SL Billboards like that
great so now I'm going to to refresh this and I'm going to go ahead and write test billboard 3 I'm going to save changes and there we go I'm back on my Billboards page and this is where we're going to add the table which is going to actually load all of our Billboards now let's continue and let's Actually create the data table to load our Billboards so first thing I want to actually do is I just want to go in my billboard form so I already have that opened and and I just want to see
if there is something unused here for example we have this API alert so we can remove that and we also have this origin we can remove that hook as well and that import I just want to clean up my components because we're not going to need any of those in this form we have Right here second of all I can see that my billboard is not active right here in the navigation bar when I'm here so let's quickly go to the main nav component so inside components main nav and let's see yes so I'm missing
the multiple so Billboards instead of billboard and there we go now it's active perfect I'm going to close everything and I'm going to go inside app dashboard routes Billboards and page. DSX so this is where uh we just Added the billboard client and what I want to do now is I want to use Prisma to fetch all existing Billboards and we have already created some if you haven't go ahead and use the form to create one so what I'm going to write is uh const Billboards right here and I'm going to use a weight so
in order to use a weight I need to make this asynchronous like that and then I can add Prisma DB from add/ liip Prisma DB I'm going to separate this components And I'm going to say Prisma db. billboard. find many like this but of course I can just find all of the Billboards I want to find Billboards specific for this active store so for that I'm going to go ahead and add params in This Server component so I'm going to destructure params from the props and I'm going to give it a type so parms has
a store ID which is a type of string like that and then I can go ahead and add an object here and write where Store ID is equal to param store ID like that and I'm also going to order by newest so I'm going to write created at descending like that perfect so now I have my billboards and what I can do is I can pass them as data to the billboard client so I'm going to write data uh Billboards like this and now I'm going to go inside my billboard client and I'm just going
to write an interface here so interface billboard client props the data is going to be Billboard from at Prisma client and I'm going to move that to the top because it's a global import and it's going to be an array like that so I'm just going to go ahead and add react. FC billboard client props and I'm going to destructure the data and then I can change this hardcoded Billboards into a dynamic text so I'm going to use back ticks like this and I'm going to replace this zero with data. length like this and there
we go it says Billboards one So if I go ahead and create a new billboard for example I'm going to go ahead and try that now so I'm going to click done and test and create and let's see if that is going to change the number it does Billboards to perfect so that works now and what we have to do now is we have to add a data table now let's go ahead and go into shaten UI so let's talk about data tables for a second so I fully agree with what shaten says here every
data table or data grid I've created has been unique they all behave differently have specific sorting and filtering requirements and work with different data sources it doesn't make sense to combine all of these variations into a single component if we do that we'll lose the flexibility that headless UI provides so instead of a data table component I thought it would be more helpful to provide a guide on how to build your own and I fully agree with this uh don't worry we still have a Table component if that's what you're looking at yes this exists
and you can add that like that and we are going to add that but we're talking about data table so this is a completely uni Unique Kind of table who knows what we want to filter who knows if we want to have this checkbox who knows if we want to sort have these columns or actions or paginations so all of this is very custom right so that's why instead of having a single component here we have The instructions on how to build our own data table so please go onto this website because I'm going to
copy some code from uh this steps right here we're not going to write everything uh ourselves because it doesn't make sense we would not be using shaten uh uh Library the way it's supposed to be used so uh go ahead and find the data table right here in sidebar and let's start with the installation so I'm going to copy this Right here and I'm going to install that package first so I'm going to go into the terminal I'm going to shut down and npx shat cn- at latest ad table like this and just confirm that
you want that and there we go and the second thing we need is a dependency so the underlying Library behind this data table that uh shaten uses is 10stack so let's go ahead and copy that as well and we're going to install this mpm package so mpm install At 10stack SL react-table so go ahead and press enter on that as well and just wait a couple of seconds for this to install and after this is done you can go ahead and mpm run Dev again and just refresh your page and make sure it's working so
what we're going to do right now uh is we're actually going to well you you can kind of see here we're going to create a similar data structure like this we're going to have columns and we're going to Have the page so in our case the client is going to be the page The Columns is going to be something we are going to create and data table is going to be reusable so we not going to put it inside of this components we're going to put it inside of our global components because we're going to
reuse it uh a couple of times uh great so first thing we have to do is create this columns uh right here so I'm going to go ahead and scroll down to these column definitions Right here and copy this and inside of your billboard ID sorry my apologies inside of Billboard's folder inside components where you have the client. DSX which is right here like this go ahead and create a new file called columns. DSX like that and paste the entire thing if for any reason you cannot find this column definitions if I don't know the
documentation has been updated and if you are really having trouble with this you can pause the Screen and copy or you can visit my GitHub and copy The Columns copy the cell actions which we're going to create and and copy the data table because I'm not going to write it all out I am going to use chat cnii otherwise what's the point of even using the library if I'm not going to use it the way it was intended great uh so we can save this for now obviously we are going to modify it uh according
to our needs so I want to remove these Commments here and I want to rename this uh from payment to billboard column like that and then we also have to change that in the column definition right here so it's going to have an ID but it's also going to have a label which is a type of string uh and it's going to have created at which is going to be um a string as well so I know you might be wondering well in our Prisma it's not a string it's a date don't worry we're going
to format before we pass into the Data table and then we have to modify this accessor key and headers according to these types right here so the accessor key needs to match either ID label all created at so I'm going to add label here I'm going to add the header to the label and I'm going to add created at right here to be the accessor key and the header for that is going to be date like this and we're not going to have the third one so you might be wondering well why do I need
an ID for Well that's because we will add the third one and it's going to be our actions from which we will be able to copy this ID so that's why we need it but we're not going to do uh that right this moment for now this is fine so now let's go ahead and let's go back in our uh page. TSX right here and instead of sending the billboard Billboards to the billboard client what I'm going to do is I'm going to format them so con formatted Billboards are going to be a type of
billboard column from do/ component columns like that and it's going to be an array so go ahead and run Billboards do map item and immediately return an object like this we're going to have an ID of item. ID we're going to have a label of item. Lael and we're going to have created ad but we have to turn it into a string so in order to do that I'm going to install a package called date- FNS so go ahead go into your terminal And just write mpm install date- FNS like this and press enter and
just wait a couple of seconds for it to install and mpm run Dev again and refresh your page so the you can see my my Styles have been lost because I shut down the application great and now that I have the date FNS I can go ahead go to the top of my imports and add import format from that date- FNS like this uh and then I can use this format right here so I'm going to write format like that Item. created at which is a date and I'm going to write 4 m d comma
and then four y like this so this specific format perfect uh and then instead of sending the data uh which is pure Billboards I'm going to send in formatted Billboards like that so so we have to go inside of our billboard client to modify our props instead of accepting the billboard we're going to accept the billboard column which you can get from do/ columns like that and Then you can remove this billboard right here so now what we have to do is uh inside of this billboard client right here uh we're going to go ahead
and we're going to add a data table here so before we do that we actually have to create one so the way we're going to do this is you're going to find the step three render the table so right here we did this uh oh my apologies no so we just did the uh number one column definitions so now go to step two the Data table component so there it is this is the data table component which we are going to use uh so go ahead uh and copy this and we're going to put that
inside of our components UI so inside of here create a new file data dot. DSX like this and go ahead and paste all of that inside again if you cannot find this if shat CI documentation changed and this is no longer available for any reason even though I highly doubt that will ever happen uh perhaps it's only going To be improved in the future uh you can go in my GitHub go ahead and find my components UI data table right here and then you will have all of this inside perfect and now that we have
that data table we can go back uh into our app folder d dashboard routes inside store ID Billboards uh and find the client component right here the billboard client which has this title right here uh and just after the separator we're going to add the data table which you Can get from add/ components UI data table uh like this so you can see how I imported it in a destructing way great and what I'm going to pass here now uh is the columns like that so I'm going to pass the columns which I import from
do/ columns right here so that is the thing we created right here with the label created at and the date great and we have the data so I'm also going to pass in the data like here data and there we go that's it you see how easy that was Uh but of course now what's happening is that this data table is not as advanced as we'd expect first thing I want is the search option second thing I want is the pagination and the third thing I want is the individual actions for these items so now
we're going to go ahead and do that so let's go and look at shaten together and see what we have to do so we are at step two data table component we just copied that thing pasted it in our data table and we just added it to Our billboard client so now let's go all the way down uh so after the data table we have rendered the table in our own way we don't have to follow it specifically we're not going to do any cell formatting now we are going to do row actions but we're
going to skip that for now I'm going to show you that later first thing let's try and add pagination together so find the pagination right here and we're going to follow this together let's go in our data table Right here and let's see what we have to add so we have to add get pagination row model uh inside of our input here so that looks easy enough so get pagination row model like this great and after that I have to add that to use react table so let me find where that is all right it's
right here inside this function data table so after this get core row model I'm going to add get pagination uh row model like that it's going to be equal to this import with Which I just added right here and I'm going to execute it like this perfect all right let's see if that change anything H looks like everything's the same so let's continue and let's see what else we have to do so we just updated the functionality but I think now is what we're going to do which is called controls great so let's see what
we have to do here it says that we are go back into the data table so let's go here I'm back in my data table and I'm Going to add an import of my button at the top okay I've added the button let's see what else I have to do so I can see that first I have to wrap my entire data table inside a div you can see that if it has a div at the beginning it obviously means that it's wrapping the entire thing so let's do that first so let's find this rounded
MD border because because that's the same thing that's named here and I'm going to call div here and I'm going to wrap the Entire element inside of that there we go until the error is gone and I'm going to indent it like this great and now that I have that it it looks like this is supposed to go at the end of the entire table okay let's go ahead and try that so I'm going to go all the way down right here and let's see uh what this says so it it tells me to find
the end of the table that's right here and then it says the end of this div so we found the end of the table we found the end of The div so obviously this is the place where we have to add this stuff so if you want to you can just copy this entire thing right here I'm going to paste it like this so let's see what was added we have a div with the class name Flex items D Center justify end and space-x and padding uh on top and bottom of four and we have
two buttons butons one which says previous and one which says next the previous one calls table. previous page and the next one table. Next page so pretty logical if you can't copy this I I'm giving you some chance now to pause the video and write this yourself I think this is simple enough so we don't have to copy it even great and looks like that is it so let me check if something has changed there we go I now have my previous and next and and if you add more than 10 Billboards these are going
to get automatically activated great now let's go back and let's see what else we can do so we can Do sorting but I decided not to do that for my case uh so let's go ahead and find the filtering great let's see how we can add a filter so that we can search through our labels for example it tells me to go all the way to the top and to add a column filters state from react 10c table so I found my column dep right here and I'm going to add the columns filter State like
this great after that it also tells me to add get filtered row Model so I'm going to add that after get core row model and I'm going to add a comma like this great after that it tells me to import the button sorry to import the input so I'm going to add that the place where I imported my button it doesn't have to be exactly the same so he has a different component here but I have my own that's completely fine great okay now let's see so I'm going to go inside my data table right
here and let's see so now things are a Little bit different it seems like he has the Sorting here and his react table has a lot of more options than mine does but that's completely fine that's because I missed a couple of steps before because I don't need everything but it's clearly highlighted what I have to add so let's go ahead and let's add this so on the top of my data table here just above my use react table I'm going to add this filter right here and let's go ahead and I can modify this
I don't Have to do it the exact same way uh he does instead I can add the use state from react so let's go ahead and do that import use state from react and save okay so this is what I added I added a column filters and a set column filters in a US state column filter State and the default value is an empty array okay let's see what else I have to do I have to add on column filters change to call the set column filters which is this function right here so I'm going
to add That uh just after the get uh get pagination role model I'm going to add it here like that and it also tells me to add the get filtered row model so I'm going to copy that as well and add it after that great and now it also tells me to add the column filters to the state but I don't have the state well no problem we're going to add it ourselves state and you can see inside of the state he has the Sorting but I'm going to add the column filters right here Because
we don't have sorting great and last thing we have to do is we have to add a input uh inside just above our table so our table begins here with the rounded MD and border so I'm just going to go ahead and I'm going to copy this right here and I'm going to paste it here like this and I'm just going to expand a little bit if you didn't copy go go ahead and write this div yourself so we have a div with the class name of flex items D Center and padding top and Bottom
of four we have an input which says filter emails and then it searches for emails and searches through those values all right let's see how that looks like w great one problem here is that it says filter emails and if I try and search nothing is going on so let's see how we can fix that obviously we don't have uh emails in our uh form uh so let's go ahead and see what we have to modify here so I'm going to go ahead uh and modify this filter emails and This key email to be dynamic
so we can pass it in our client because we're going to reuse the data table many times and not always we be be searching by email or by name sometimes it's going to be label sometimes it's going to be name so let's go ahead and do that so in my table props belong uh alongside columns and data I'm going to add a search key like this and I'm also going to add a type for this so I'm going to write search key to be a type of string like This great and now I have this
search key right here and I'm going to instead of writing filter emails emails I'm going to write just search so at least that can stay the same uh in every component that I use a data table and then I'm going to replace these instances of email with the search key like this great so let's go ahead and let's see if that changed everything anything so right now I still think it won't work That's because we have not pass the search key so let's go ahead and let's go into our data table right here sorry in
our client component here and let's add the search key to be label for example and let's see if that's going to change anything so there we go now I can write billboard and I can search for my billboard but if I do test both of them are visible if I type three or only this one is visible perfect so that's how you're supposed to Work with chaten UI right you can see how great of a documentation this is now and you can continue and add visibility and add some row selection you know play around and
do whatever you want with this uh again if you had troubles with this or just don't want to follow this you can just go ahead and copy the entire data table from my uh components UI data table right here great and now you actually see the power of Shad CN UI so this is how you're supposed to build Your own components you can see that nowhere in this example uh was there uh an example for the search key thing but we added that because we need that for our project because that's the way we want
to reuse uh our our data table and that's completely fine like there is no wrong or right way of doing this sure there might be some preferred way but I think this is completely fine for our project we added a search key label maybe we can re name It to filter key because this is called filters I don't know but I think this is just fine enough great and now what I want to add is the cell row action right so I want to have a third action right here sorry a third row right here
which is going to have quick actions uh to edit these items and to delete them so let's go ahead and do that now so you're are going to go back in your components where you have the client and the column and you're going to add a new file Called cell- action. TSX like this go ahead and write export const cell action like that and just return well nothing for now great uh and what I'm going to do now well you can return just action something like this and now what I want you to do is
I want you to go back into your columns right here and you're going to add a third option here called ID actions like like that and you're going to have a cell which is going to be an Arrow function like this and it's going to return the cell action from do/ cell action which we just created and now you can see how I dynamically render this text action through a cell uh Arrow function so we are obviously going to turn this into a button but before we do that I want to give uh some attributes
to our cell action so we can pass in some prod prop s so let's go ahead uh and do that now so first thing I want to do is I already Want to prepare this cell action to be a client component and then I'm going to write an interface cell action props data billboard column and you can import that from do/ columns like that perfect and then you can go ahead and write react. FC cell action props like that and extract the data inside perfect and then go back into columns and what you're going to
do now is you're going to extract the row from this Arrow function Right here and you're going to pass in the data as row. original so this is not related to shat cnii this is the 10 stack react table so this is how we can access the original uh object uh that this cell is working with and that object is this it has an ID label and create that perfect so let's go back in our cell action and what we are going to do now is we are going to create a drop down so that
we can actually uh see the options and I mean actions for this Billboards so in order to do that we have to add this drop- down menu component right here so let's go ahead and add that so npx shin-i at latest add drop-down menu so I'm going to go in my terminal right here I will shut down the app and I'm going to add this Command right here so npx shat cn- UI at latest add drop down menu and press enter and just confirm with yes and now it's installing the drop down menu and after
that is done we Can go ahead and rerun our project so mpm runev and I'm going to expand this screen right here and I'm going to refresh perfect and now we can start developing this so instead of rendering a div I'm going to render a drop- down menu from at/ components slui drop- down menu like this and I'm going to separate those perfect now inside of the drop- down menu I'm going to add a drop- down uh menu trigger from at/ components UI like this and I'm already going to start Collapsing it so you can
see everything that I'm importing we're going to add the prop as a child to this inside and inside I'm going to add a button from add/ components UI button and I'm going to move it uh along with the drop down menus inside I'm going to add a span which is going to say open menu but I'm going to give this span a class name of Sr only this means it's only going to be visible uh in the server s so this is going to ensure that it's not going to Be um it's not going to
be visible on the client also so I just said that it's only going to be visible on the server no it's going to be visible with screen readers my apologies I I accidentally said server uh great so it's kind of an accessibility feature uh great and after that we're going to add the more horizontal from Lucid react so just go ahead and add that to the top and let's go ahead and give this a class name of H-4 and W-4 like this and now let's add some properties to these button so iant is going to
be ghost and class name is going to be h-8 w-8 and p- Z like this and there we go you can see how now we have the nice little uh button right here what we have to do now is we have to give it some options so just outside the drop down menu trigger go ahead and add drop- down menu content like this and import that Uh from from the drop- down uh menu right here great and go ahead and give it an align and like this great and now I'm going to add the drop
down menu label from add/ components uh dropdown menu I added it right here and we can just say actions like this there we go you can see now when I click I get the label actions and below that label I'm going to go ahead and actually add my first drop down menu Item so drop down menu item again from add/ components drop down menu make sure you did not accidentally import something from radic and inside of that I'm going to add an edit from Lucid react so just go ahead and import that icon right here
uh it's self closing tag and let's give the class name of mr-2 h-4 and W-4 and I'm just going to say update like this so let's see what happens there we go I have my update action right here perfect and now we can Go ahead and copy this drop down menu item so this one is going to be uh let's say copy so again from Lucid react uh and we're going to say copy ID there we go so now we have the copy ID icon here and let's uh copy this one more time and this
one is going to be trash from Lucid react as well and we're going to say delete like this there we go so we have the copy ID update and delete and what we have to do now is we have to add well The actions for all of these things to happen I think the simplest one to do is the on copy so let's go ahead and let's write our on copy if you remember we already did that uh in one component so we can go ahead and find that it's inside components UI API alert right
here so just go ahead and copy this on copy right here and go back uh into the cell action component and you can paste that here but this one is going to be a little bit different so what I'm going To write is the ID which is a type of string inside of his parenthesis and that's what we're going to write to the clipboard and we have to import the toast from react hot toast so import toast from react. host uh toast like that great and now I have this on copy right here so what
I can do now is add an on click to this drop down menu item which encapsulates the copy icon and the copy ID text and write on click open an arrow function and write On copy and I'm going to use my prop data so I'm going to say data. ID like this and let's see if that worked so copy ID it says oh it says API route copy the clipboard because I did not change it here so let's just modify this to um billboard ID copy the clipboard like this so when I click now there
we go billboard ID copy the clipboard and if I paste you can see my ID is right here perfect that's what we want the reason search is not working for this is Because we targeted it to label so don't be surprised we can only do the label thing here great now let's go ahead and let's add our update I think that's the second simplest thing we can do because all we have to do is we have to redirect to this exact form the same form we click for new but instead of Slash new we have
to actually pass in the ID so for that what I'm going to do is I'm going to find this drop down menu item and before I do anything I'm just going To add the router so const router is equal use router from next SL navigation and I imported that right here and I'm going to move it to the top great now I'm going to use this router here and inside the edit I'm going to add on click right here an arrow function and I'm going to paste the router so router push I'm going to open
the back TI slash and we also need the params I forgot about that so let's go ahead and add That con params is equal to use params from next SL navigation make sure you have it great and now I'm just going to add param that store ID like this slash Billboards and what I have to do then is go another slash let me just expand this so another slash open a special object data . ID like this perfect let's see if that works now so I'm going to go here I'm going to refresh and let's
see we have this test let's go ahead if I click Update will this work it does it redirects me to that exact thing so I'm just going to call this updated and click save changes right here and there we go now it's updated and if I search you can see it says updated and if a search test only this one is available perfect and last thing we have to enable is the delete so for that we can actually go in our billboard ID inside our components inside the billboard form and what I want you to
do is I want you To copy this on delete function right here because it's exactly the same as we need it great and go back into your cell action now and just add that right here so on delete right here and let's go ahead and let's add these states that we obviously need so const loading set loading use state from react so I imported a use state from react right here and I'm going to move it to the top let's see what else do we need we need set open because we are also going to
Have the confirmation model so const open set open is equal to use State like this we need axio so let's go ahead and import axio let's see what else we need so set loading okay let's give the default value to false and default value to false like that the API route is correct the error is correct and the toast. success is correct as well and what we have to do now is we have to wrap this entire drop down menu in a fragment so We can safely add the Alert model here so let's go ahead
and encapsulate this entire thing in a fragment like this and let's go ahead and let's add the AL Alert model so Alert model from add/ components model Alert model so this is where I imported that so import Alert model from at/ components models Alert model perfect and now inside I'm just going to fill that uh with the necessary props so the is open is going to be controlled by open the onclose is going To be an arrow function which calls set open to be false and on confirm is going to be on delete and loading
is going to be loading like this perfect let's see if that works now so now this is a very cool thing because I can trigger the oh I cannot so let's see what I have to do first yes I did not add any action to the drop- down menu item which holds the delete so all we have to do here is open the model so on click Arrow function set Open to True like this let's try now so now I'm going to click delete and there we go it acts is we are sure I'm going
to click continue and there we go the billboard has been deleted and let's see what happened okay so we got to redirect all the way back to our store let's see if that is exactly what we want well no it's not what we want in fact uh we don't need any kind of redirect in this one uh I just want to confirm that let's see yes we don't need any redirect here Uh so let me try this again so I'm just going to refresh oh looks like it was not deleted so let's see what's going
on with that well what happened the reason it was not deleted is because uh right here I'm using par. billboard ID when in fact I should be using data. ID like this because this is this cell action it's not inside the billboard ID this is inside this client where we load all of the Billboards not individual one my Mistake so the on delete function inside the cell action is pretty much the same as the one in the billboard form but the one in the billboard form uses the params to get the ID and it also
redirects but in fact uh I don't think this one has to redirect to slash it can redirect to a different route so what I want you to do is I want you to go back into the uh billboard form right here so I'm inside find the on Delite and modify this router. p to be a little bit Different so instead of going to slash I'm going to open backck and I'm going to write perm. store ID slash Billboards like this perfect so now let's try both of those things if I delete through my dashboard I
think it should just go away there we go but if I click update in this one and try to delete through here it should redirect me back here there we go that's exactly what I want and we successfully finished our Billboards let's go ahead and play around and add a New one so I'm going to upload an image here like this and I'm going to click done and I'm going to click create right here let's see if everything works there we go this is it that's all we need and I just want to remove this
line right here from my form so I'm back in my billboard form I'm going to go all the way down and I'm just going to remove the separator and let's see if we need that either way we do need it okay this is good enough for now uh what we're Going to do now is we're going to reuse we're going to do a similar thing that we did in the settings so we're going to add this uh API alert but we are going to create a reusable way because we're going to add many routes available
for the Billboards and then we're going to reuse that for all other entities in the project so let's go and I'm going to close everything here I'm going to go in my components and inside UI I'm going to create a new file called API dl. TSX Like this and let's go export const API list like this and let's just return a div API list like this let's imediately mark this as use client and now I'm going to go back uh in my app folder dashboard routes billboard components client and just below uh this just below
this data table right here I'm going to go ahead and add a new heading so heading we already have that imported I'm going to give it a title of API and a description of API calls for Billboards so let's see how that looks looks great and below that I'm going to add a another separator we already have that imported and inside I'm going to add the API list component from at/ components UI API list which we uh just created so let's just import that at the top import whoops API list from at/ components slui API
list not API alert but API list and now it just renders the API list so Let's go back inside and let's actually um let's actually develop this component so first let's create an interface for it interface API list props like this we need the entity name which is a string and the entity ID name which is also a string and let's just go ahead and add that so react. FC API list props like that and let's extract The Entity uh entity name and entity ID name like that great now let's Add the params so const
params from use params from next navigation and con router use router from next navigation as well and uh sorry not router my apologies we do not need a router we need the origin so const origin from that hook we created use origin from add hooks use origin like that and now we can use those two to create our base URL so const base URL is going to be equal btic origin like that slabi slams. store ID like this perfect and What I'm going to do here is instead of the div I'm going to do a
fragment and I'm going to add the API alert we can import API alert from our components so go ahead and add API alert from do/ API alert but you know I'm going to modify that to the decorator and I'm going to give this a title of get and I'm going to give it a variant of public like this uh I'm just going to collapse because we're going to have a lot of this Options like this and I'm going to have the description to be dynamic so it's going to be uh base URL slash entity name
like this so now we have slash undefined that's because in my client where I added the API list I did not add the entity name for this so let's go ahead and say entity name to be Billboards and entity ID name to be billboard ID like this and there we go now you can see it generated the get Route for this Billboards right here so let's go ahead and duplicate this API alert for other routes I'm going to duplicate it again this one is going to be get again but this one is going to be
for an individual entity name so I'm going to add another slash here and be careful now I'm going to add uh this curly brackets but without the dollar sign so I actually I literally want the these brackets to show inside and then I'm going to do this special object with The brackets inside and write entity ID name like this so you can see how now I show you how to get the individual billboard using this curly brackets billboard ID because I I don't know what you want to put here but I want to show you
that that's what you have to put if you want to see the individual billboard great and now let's go ahead and let's duplicate this again and this route is going to be our post route and the variant for this is actually going to be Admin because only admins will be able to post new rout through the API so the description for that is not going to have this entity name it's going to be the same as the get all uh Billboards great so now I'm going to copy this one with the entity ID name again
and I'm going to paste it below I'm just going to fix the formatting a little bit this one is going to be patch and it's also going to be admin and you can see how that looks so the same as this get it Looks the same but it is a patch route and I'm going to copy one more time the last one is going to be delete and it's the same perfect so that's exactly what we want and you can see how cool this is because we are no longer going to write this anywhere in
fact all we have to do is add this to our client and we're going to reuse this API list for products and for categories and you can see how it's going to generate these routes right here so I want to play Around and I want to test something so let's see if this copying thing is working well we already confirmed that it is I'm going to click copy here and I'm going to go in a new tab and paste it and let's see if that's going to work uh so there we go you can see
I have an array uh of items right here but I'm just going to quickly install an extension so you can see this a bit better there we go so I just installed this extension so what I did was I Copied this Billboards right here and I pasted it and you can see how I have an array of my Billboards and now I can go ahead and copy this individual IDE and go to slash and I'm going to get not an array but only that single ID so you can see how useful this is going to
be for our front end because if you just want to load all of your Billboards in one place for any reason just click copy and paste it in your front end want to get individual ID just click copy want To play around in Postman or maybe create some forms just go ahead and copy this ones but I give you an alert that this is admin so you are going to have to add authentication C or jvd whatever is the way clerk works perfect uh one more thing that I want to do is if you go
ahead and try running this in incognito mode I'm pretty sure it's not going to work so I'm just going to pause the video for a second and prepare that to demonstrate something so when I copy This Billboards right here and paste it in my Chrome uh it's working but what if I am not authenticated that's what I'm interested in because our front end is not going to have to be authen indicated to load our Billboards and our categories and our products so I have prepared here uh insomnia so which is kind of like a postman
to test routes so let's try and send here look at this I get 401 unauthorized this is not good because I want my public route to Actually be public but right now I can only use the Local Host in the browser that I'm authenticated in right here so this is obviously not good there is something we have to do uh before we can do that and for that we have to go in our middleware so go ahead and find the middleware dots right here go ahead and extend it and write public routes like this open
an array SL API slash path asteris like this there we go and now let's see if anything has Changed there we go now I have 200 because my AP routes are now not authorized so what does that mean does that mean that every single route is now available to public well remember when we build our routes every place where we want to create something or patch or delete we manually use clerk using user ID and in some places we go even further and we actually confirm the uh not only the authentication but also the authorization
so you don't have to worry The only routes which are going to be public are the get routes which is exactly what you need for this project so that's how we ensured that now uh our public routes are actually public and we can test with this one as well so I'm just going to copy this individual ID and see if I add that to the end of these Billboards right here and click Send there we go that works as well perfect you finished an extremely important part of the tutorial if Anything here here is not
working it's quite important that you try to resolve it before you go any further because the way I'm going to develop uh the next which the next entity which is the category I'm just going to copy everything from the Billboards because it doesn't make sense to uh manually write everything again right we can reuse a lot of this logic right here so please ensure that your uh update is working that your delete is working that Your copy is working that your form is working that uh your image upload is working all of those things because
we are just going to reuse that great great great job so far what we are going to add next is the category entity so to begin we have to head into our Prisma so let's go ahead and let's go into schema. Prisma right here and what we're going to build is the category model so let's go ahead and write model Category right here and let's give it an ID which is a string and and it's it give it a decorator of ID and a default value of uu ID like that after that let's give it
a store ID which is a string and let's give it a store store like this and we also have to define the relation so go ahead and write add relation store to category like this Fields store ID I'm going to to expand my code here so we have store ID and we Have references ID as well and now we have an error because we have this relation here but we don't have it in the store so the same thing that happened with the billboard so let's go ahead and write categories category and let's add a
relation store to category like this and then we can go back and and you can see the error is gone but we do have a warning and you already know how we Going to fix it with this Index right here but for now let's continue developing so besides that it's also going to have a billboard ID like this which is going to be a string and it's also going to have a billboard relation so go ahead and write billboard model at relation and it's going to have uh well we're not going to Define it in
instead we're going to write field billboard ID like that and references ID Like this and now we have an error again because we don't have an equal relation in the billboard so let's go ahead just below image URL and add categories category model and give it an array like this great and now that that is done let's give this a name which is a string and let's give give it created at which is date time default is now and updated at which is date time and uses The Decorator updated at like this and now let's
go Ahead and add add at index open an array store ID and add at index open an array billboard ID like this perfect and now that that is done what we have to do do is we have to regenerate our Prisma and push it to the database so let's go and shut down your application and run npx Prisma generate there we go and now run npx Prisma DB push and press enter and wait a couple of seconds and let's see if everything will be successful it is and Now you can go ahead and npm run
devb again and just refresh your page great so we successfully uh added the categories now we connected it to the store with a store to category relation and we connected it to the billboard like this great and now let's go ahead and let's add the navigation for our categories for that we have to go back in our main navigation right here and after Billboards I'm going to copy this and I'm going to change this URLs to Categories like that and the label is going to be categories as well and if I click here now I'm
going to get a 404 because it does not exist so the first thing I'm going to do is I'm going to reuse the entire billboard uh client and form everything because it's going to be pretty similar the only thing that's going to be different uh is the search key in the data table uh we're going to have some different options and we're going to have a relation with the Billboard in D form so let's go ahead and let's go into our app folder into dashboard right here into store ID inside routes you can go ahead
and copy the Billboards and past it into routes and I you'll have Billboards Billboards copy and settings rename this Billboards to categories like this and now if you click on categories you're going to get well the same view as Billboards but it's not going to be a 404 error so now we are slowly going to go uh through This categories right here uh and modify what needs to be modified so let's first go into page. TSX and let's rename this page uh to categories page so categories page like this and let's go all the way
down and fix the default export great next thing that I want to change is instead of loading this Billboards I want to load categories so instead of billboards it's going to be categories like this and await Prisma DB do category instead of billboard and Instead of using formatted Billboards we're going to use formed categories like this and instead of using Billboards do map it's going to be this categories right here and we're going to pass them to the data right here and now we have some more errors so let's go ahead and resolve those so
the ID can stay the same but label is going to be name so name is going to be mapped to item. name and we're also going to have a billboard label which is going to Be item. billboard. label whoops my uh intelligence autocom completed to billboard ID that's not what I want I want billboard. label and now I have an er error that billboard doesn't exist on the categories uh on the categories object and that is true unless I add include and pop poate the billboard so billboard true so I'm going to populate the relation
that category has with the billboard because when we create our Category we're going to select which billboard we want to use and that way I'm going to have that object inside and you can see how the error went away great uh and now let's just add a comma here so created ad can stay the same and you can see here we have an error because billboard column expects some different data from what is said right here so let's go ahead and let's resolve those columns I'm going to go ahead in my Components inside the categories
of course and this still says billboard ID don't worry we're going to rename that later for now just go into columns and instead of billboard column name it category column like this and instead of ID and and sorry instead of label is going to have name and it's also going to have billboard label like this so now let's go ahead and change the accessor key the name and the header the name let's Change this accessor key uh to billboard and this header to billboard like that and we're going to add a cell here which is
going to extract the row in this parameter and we're going to return row. original. billboard label like this great and we're also going to have the created ad so you can just add this name it created ad and header is date like this and now that we renamed the category column we have to go back into page. TSX inside of our categories and We have to reame this to category column as well and there we go now the errors went away so now let's go ahead and let's actually change our client component here so go
inside this client. vsx right here and first replace this invalid import so it's no longer billboard column it is now category column like this and it's no longer called billboard client so go ahead and replace all instances of that in my case it's this tree it's going to be category PL like this and now that we renamed this we have to go back in our page. TSX and replace this UT of board client and this usage of billboard client here with category client like this and now the errors are gone let's go back in our
client. DSX to see what else we have to change so instead of staying Billboards we want it to say categories like this great now it says categories and instead of manage Billboards is going to be manage uh categories great now the add new button is not going to redirect to store id/ Billboards but slash categories like this great and now the API calls for Billboards are not going to be for Billboards but for categories and same thing for entity name is going to be categories and entity ID name is going to be category ID so
you might be thinking why did I copy all of these files and why just not Create a completely smart component custom component component so I can just pass in the keys and they are magically going to rename all of this for me well if you want to at the end of the project you can experiment and create that but my concern is that this individual uh entities like category and product and filters and the end and billboards are just similar but also different and in my opinion it's just not worth it to try and create
a super smart component which Is going to be able to handle all types of entities we have in our project sometimes I like to repeat myself because honestly I think it's less confusing than having a huge component which can handle absolutely everything if you think it's better feel free to do that uh but I highly suggest you follow the tutorial uh to the end and then go ahead and try and experiment try and reuse as many things as you want if you don't like repeating yourself I Personally think it's fine but of course it's your
code and you can do whatever you want I I'm not right uh I this is just the way I like to do things uh great so we have that now and what we have to change in this data table here is the search key so we won't be using the label instead we'll be using the name because we don't have the label in the categories if you remember in my schema. Prisma we only have the name and that's what we're going to use to search Using the data table in the client component uh great and
you can see okay we have the routes here none of these routes are working of course because we have not created the API for this at all so now let's go ahead uh and let's actually create this uh uh a form so inside billboard ID I'm going to rename this to be category ID like that and I'm going to go inside page. TSX and let's see what we have to change here so inside this page let's Rename the page to category page like that instead of having billboard ID we're going to have category ID instead
of using prism db. billboard we're going to use pris db. category and instead of the constant being billboard it's going to be category and that's what we're going to pass to the initial data and of course this is going to uh throw a couple of Errors uh and what I want to do now is I want to go inside this billboard form And I want to modify that so go inside component and what we are going to do is we're going to rename the billboard form to be category form like that so let's immediately go
back to page. TSX and fix this so just save this like this and you can already rename this to category form if you want but I'm going to first do that inside the actual category form component so what I'm going to do right here is I'm going to find all instances of billboard form so 1 2 3 Four 6 and seven and I think that's it so I'm going to replace all of those with category form like that so I replace the category form values category form props category form props here I named the component
category form here again category form values here and here and that's it and now I can go back to page. DSX and I'm going to rename it here as well so category form like that and now we have the error because the initial data in my Category form is still a billboard so let's go ahead and let's change that to category and you can import that from Prisma client and then you can remove the billboard from here perfect and now what we're going to have to do is we're going to have to modify our form
schema so it's no longer going to take label instead it's going to take a name and it's going to take a billboard ID like this so I'm going to save that now and let's actually go Ahead and let's try and click add new here to see uh if that works okay so it redirects us to/ categories SL new but it still says create a billboard don't for you we're going to change that now so let's do that we have this Dynamic titles descriptions toast messages and actions so I'm going to replace all instances of billboard
to category and then I'm going to do the same here there we go we go now it's all about a category perfect and now that I've changed this form schema I also have to change the default values so it's going to be name and it's going to be billboard ID like this great so now that I have that let's go ahead and let's modify uh our inputs in this form we are not going to need the image upload so we can entirely remove this form field for the image URL like this so we can just
leave the grid and be left with the label component when we remove this let's go all the way to the Top and let's actually remove the image upload component so it was right here go ahead and remove it we don't need it here instead of label we are going to Target name and we're going to change the label to name and right here I'm going to change this text to category name like this there we go this looks much much better what we have to do now is we have to add a new field here
which is going to be a select field which is going to well uh provide us uh with the Options of existing Billboards that we can attach to the category so for that uh let's go ahead in our shaen UI I'm going to zoom out just a little bit and go ahead and find the select component go ahead and install it using npx uh shet cn- at latest at select so I'm going to copy that from npm I'm going to go into my terminal right here whoops I pressed on something wrong so terminal I will shut
down the app and I'm going to add the select component And I'm going to confirm that after it's been installed I am going to run my project and refresh my page so let's just wait a second for this to install and mpm run Dev there we go and now I can refresh this page and let me just find a way to close the model there we go okay and now what I am going to do I'm going to copy this form field right here and paste it just below uh just below the name like that
and I'm going to change this to billboard ID like that I'm going to change this to be billboard so now I have the billboard label here and this form field will control the billboard ID value in my form values so what I have to do is I have to use the select component instead of the input component right here so what I'm going to do now is I'm actually going to remove everything inside here and I'm going to write uh select from s/ components UI select so make sure you imported that Right here all right
uh and inside let's give it a disabled prop of loading let's give it an on value change to be field.on change let's give it a value of field. value and let's give it a default value of field. value as well so I'm going to collapse all of this so you can see it uh without me needing to expand my screen so no information gets lost for you great now that I have that what I want To do is I want to open uh I want to open form control inside we already have that imported and
inside of that I'm going to add the select trigger from add/ components UI select so make sure you've added that right here and in here I'm going to give it a default value again of fill value I'm going to give it a placeholder of select a billboard and that is going to be uh it oh my apologies no I made a mistake So you can just go ahead and remove this so these are not the props for the select trigger instead these are the props for select value so add a new select value option here
from add/ components UI select and this is is where we're going to add those fields so default value is going to be field. Value Place holder is going to be select a billboard like this and that's it for our select value uh and then just uh below this form Control but still inside of the select form I'm going to add the select content which you can also import add/ components uh UI select like this so make sure you have the select the select content select trigger and select value and just confirm there should not be
any radics in your project great so now that we have select content let's go back here and in here we have to iterate over our Billboards but that's not something we have right now so let's go ahead and Add that let's go back in our page. TSX uh right here and and let's fetch our Billboards so const Billboards await Prisma db. billboard. find many where ID sorry store ID is equal to parents. store ID for that we also have to add it here store ID string like that so we are going to load all the
Billboards created in this store and we're going to pass it right here so Billboards Billboards like that Alongside my initial data and obviously we also have to change the props in the category form so let's go back in category form before we iterate here and let's find my props so here Billboards are going to be a type of billboard from Prisma client and make sure you put an array at the end so import it from Prisma CLI same place from category and just add it to the category form props great and now let's go back
inside of this select content right here and what I'm going to do inside is I'm going to run Billboards of course I did not actually extract the prop I only added a type to the category form props but alongside initial data I also have to add that prop my apologies and now let's go back here and let's run Billboards do map individual billboard like that and let's immediately return a select item from add/ components UI select which is a self closing uh sorry it's not a Self-closing tag like this inside we're going to render billboard.
label like that and in here let's go ahead and give it a key of billboard. let's give it a value of billboard. ID as well there we go so now you can see how I can select one of my created Billboards so just for test I'm going to create another one and I'm going to call this well another one like this and let me just upload a quick Image here so I'm going to try and upload this for example let's let's just wait a second for this to upload uh okay it's processing there we go
and create like that and that is going to create another billboard so if I go to categories and I click on add new right here you can see I have either another one or test perfect this is exactly what I wanted uh and that is pretty much it for our category form What we have to do now is we have to modify all of this uh API calls to match uh the actual API which we are going to create as well so let's resolve the onsubmit uh the edit is going to be to patch SL
API slpm store ID but instead of categories it's going to be sorry instead of buildo is going to be categories and the same is true for post and for the router push and for the delete so what we can do is match this This this and this and rename all of those two categories like this there we go and now instead of having toast success so yeah our onsubmit is now finished so what we Chang was this categories this categories and this categories but no we're not done yet we can because we have to change
the params to category ID as well my apologies once that is finished uh in one delete let's go ahead uh and change that here as well so category ID Here and instead of build word deleted it's going to be category deleted and after this what we're going to say here is make sure you removed all products using this category first so I just want to give a bit more informative message here and what we can do now is search billboard just to see how many times we mention Billboards to ensure that none of the routes
accidentally Still Point to billboard so yes billboard ID is fine billboard billboard this is all fine Great what I wanted to ensure that accidentally no route was left behind perfect and what we are going to do now is I'm going to close everything everything and we are actually going to go ahead and we're going to do the very same thing we just did with the client we're going to do that with the API so let's go into store ID and copy the Billboards and paste it and rename it to categories like this and first let's
resolve the categories route. TS right Here so let's change what's needed in the body instead of label and image URL we're going to use name and billboard ID and no this is not a mistake remember we are sending a billboard ID using this form right here so if we select test now our form will submit test billboard ID if I select another one we're going to choose the another one ID great so if there is no name in that we can just say name is required if there is no billboard ID in that case we
can just Say that billboard ID is required like that the uh store ID can stay the same because we need the store ID we're going to have this check this is completely fine they can stay exactly as it is and instead of creating a billboard we're going to create a category and we're going to use prismad db. category for that we are not going to use label we're going to use name and we're going to pass in billboard ID like this and we're going to send Back the billboard and I'm just going to rename this
sorry we're going to send back the category and we're going to rename these two categories like this perfect and now let's do the same thing with the get route right here so uh this store ID can stay the same Billboards are going to be renamed to categories Prisma db. category go ahead and just push the categories through the Json and rename these two Categories perfect now let's search through billboard here again to see that it only appears is where we want it so we have the billboard at in the body the billboard check yes this
is good that's exactly what we want perfect and now let's go ahead and let's fix the uh billboard ID here so first we have to rename it to category ID like that and then we can go inside of this route right here so first we are not going to use the params billboard ID Instead it's going to be category ID like that so replace that here and replace category ID is required we are not going to find the billboard we are going to find the category so Prisma be. category here as well and perm. category
ID and return the category and just change this to category unorg as well perfect so we just fixed our get route now let's go ahead and resolve our patch route so yes we still have the store ID but we no longer have uh billboard ID Instead it's category ID now let's fix this error right here bill ID and category ID is required this is a patch route meaning that this is how we update our category our patch route does not accept label and image URL that's for billboard in our case we need name and billboard
ID so let's change this to name and write name is required and billboard ID and just write billboard ID is required this authorization step can can stay the Same and instead of creating a billboard sorry instead of updating the billboard we're going to update the category so pris db. category and instead of ID params billboard ID it's going to be category ID data is going to be name and the other option is going to be billboard ID and send back the billboard and change this to category like that great and all that's left is to
fix the delete route right here and that won't be too hard so uh Let me just find it there we go we have to change this to category ID again we have to change this to category ID rename this to category like that this authorization step can stay the same instead of billboard deleting it's going to be category deleting so prismad db. category and par. category ID like that and just return the category and change this to category like that perfect now let's go And search billboard through this just to see that billboard only appears
where we want it to appear and it's not accidentally left somewhere else perfect now that we have that let's go ahead and let's try and create our category so I'm going to go here I'm going to refresh this I'm going to name this category test category and I'm going to choose the I don't know whatever billboard I want and I will immediately open my network tab just because I want to be Aware of what's going on I'm going to click create let's see if something will go wrong or will it work looks like it works
exactly as it should I have the store ID I have the billboard ID I have the name and I got redirected to my categories page and you can see that my category is right here perfect and let's go ahead and test this route right here so I'm going to go here and paste and there we go I see the test category so my API routes are working And what is not working right now is this functions right here so copy ID is probably working yeah that is exactly the same but the Le and update need
to be modified so let's go ahead and modify that I'm going to go in my components I'm going to go sorry I'm going to go into app folder into dashboard into routes categories components and let's go inside C action right here rename the billboard column to category column like this let's change this to category ID Copied to clipboard let's change this to categories like that category deleted and make sure you removed all products using this category first like that and instead of redirecting the edit to Billboards it's going to be categories so let's just search
Billboards again and there we go no instances of billboards here so let's see if that is truly it I'm going to go ahead and try and update this okay there we go we're here test Category I'm going to change this to test Category 2 and select test for the billboard and save my changes there we go the billboard is now test and the name is test Category 2 let's check and try the create another one this is going to be search I'm going to choose another one and click create and let's try and search search
is working test is working let's going to try and delete from Here looks like it's working and let's try and delete uh from the form there we go looks like that is working as well and before we move on make sure you have at least one category so I'm going to add shoes for example and I'm just going to add a random billboard so we can safely continue to the next route great great job we're going to continue and now we're going to add the entity for our colors so let's go ahead U sorry not
colors sizes so That's what we're going to do first I mean it doesn't really matter but that's the order I want to go in so let's go in our Prima uh Prisma schema. Prisma right here and let's create a model for size so model size is going to have an ID which is a string it's a type of ID and the default value is uu ID like that it's going to have a store ID which is a string and it's going to have a relation to the store the same way we did for Billboards and
categories so relation is Going to be store to size like that with fields which hold the field sorry which hold the store ID and references which hold the ID so nothing you have not seen before let's go ahead and resolve this error by going back to the store and adding stores store array and relation store to size like that and let's just see uh what went wrong so yes I accidentally wrote stores stores that's not what I meant I meant to write Sizes and size and we have stored the size like that and now let's
go back to our size down here and the error is gone we do have a warning but we know how to resolve that let's give this a name of string and a value of string as well products U my pardon we are going to add products but later when we actually create the product model so for now we're not going to do that last it's going to have created ad which is a date time default is going to be now like That and updated at is going to be at update sorry it's going to be
uh date time at updated at like that and let's add the index store ID like that great and now you already know uh what we have to do so let's go ahead let's shut down the application and run npx Prisma generate like that and now let's go ahead and let's run npx Prisma DB Bush and press enter and that is going to push everything to Planet scale let's just Wait a couple of seconds and there we go we can run the app again perfect so just refresh your application so that everything is working fine and
let's go ahead and we're going to do the same thing uh we did uh with the Billboards and categories so let's go ahead inside our app folder dashboard store ID routes copy the Billboards and paste them inside the routes so now you have Billboards Billboards copy categories and settings and and rename This to sizes like that let's go inside the page DSX right here and well before we do anything here what I want to do is I want to go inside my main navigation and I just want to copy uh these categories uh rematch this
to sizes like this and add a label sizes like that so after categories we're going to have sizes which for now is loading the Billboards so let's go ahead and resolve that so right here I'm in my routes sizes Folder in this which is practically this Billboards folder that I just copied so we're going to go ahead and resolve that so first let we name it to sizes page next we're not going to load Billboards we are going to load sizes so we're going to use Prisma DB do sizes sorry do size like that and
this can stay the same instead of formatted Billboards it's going to be formatted sizes so let's go ahead and pass that here and instead of using Billboards we're going To use sizes like that instead of having uh ID Item ID and label we're not going to have label we're going to have name which is item. name and we're also going to have value which is item. value like this so now what we have to resolve is the column so let's go inside of my components columns right here and rename the billboard column to size column
like that and this size column uh is going to have an ID it's going to have a name and it's going to have a value like this so We can change this accessory key to name header to name and we can just copy this and rame this to value and value right here great now that we resolved that we can go back into our page right here and let's fix this import to be size column right here perfect and now let's go ahead and rename this billboard client to our actual size client so first let's
fix this broken import to be size column and now let's find all instances of billboard client so I have three of them And call it sizes client like this uh great and now we can go back into page. DSX and my apology let's not call it um Yes actually everything is okay all right uh and let's just fix this so sizes client like that and just paste it right here there we go now let's go back uh inside of this client right here so we already fixed this to be size column that is great and
let's just rename this to sizes right here uh inside and once That is done let's change this to man sizes for your store and let's change this to go to slash sizes instead of uh SL Billboards API calls for sizes entity name is sizes and entity ID is size ID like this there we go great so now that we have that uh what we can go ahead is well let's change the search key to be name if you want to you can also make it value it's going to depend depend on uh well it's your
it's your personal Opinion of course now let's go ahead and let's go and modify this billboard ID to be size ID so inside choose size ID like this and go inside page. TSX of that file so we're going to rename this billboard page to size page like this and instead of having a billboard ID we're going to have the size ID instead of calling the constant billboard it's going to be size and we're going to use prism db. size like that and we're going to pass in this size right here great so Let's go ahead
in the components and rename the billboard form to size form so we can go back into page and just save the file like this and now let's go back in the size form and let's uh rename all the instances of billboard form like this the same thing we already did to uh size form like this and you can just save the file and then you can go back to page TSX and rename this to size form as well there we go and of course the initial data is now uh not uh Compatible so let's go
back inside size form and change the initial data from billboard to size which can import from Prisma client and remove the billboard from it there we go nice what we have to do now is change the form schema so instead of having a label and image it's going to have a name and is going to have a value like this meaning that we also have to modify that inside of here so name and value like that perfect so now let's click add New in this sizes so we can see that we redirected correctly there we
go sizes Slash new great and now let's change the dynamic messages here so Billboards are going to be sizes so size singular and this is going to be size and all of that looks good great now let's edit the forms before we go to the functions so instead of uh we're not going to have this image upload so you can remove this entire field and just leave the grid the first One is going to be name and it's going to be name like that uh and let's see what else uh we're going to call this
size name like this and then you can just go ahead and copy this entire warm field and rename this value and rename this value as well and this is going to be size value like that uh perfect so that's exactly what we need for this now let's go ahead and let's resolve our onsubmit so instead of billboards it's Going to go sizes instead of using parents. billboard ID it's going to use size ID because that's what we named our folder all right this looks fine let's not now resolve on theit so again instead of billboard
it's going to be sizes and instead of par. billboard ID it's going to be size ID like this instead of billboard deleted it's going to be size deleted and we're going to write make sure you removed all products using this size first so that's going to Be a more informative message and let's search through our code for billboard so no instances this looks good uh great and now let's go ahead and create our API routes so I'm going to collapse everything right here I'm going to go into app folder API uh in store ID and
I'm going to copy the Billboards and paste it right here and rename it to sizes like that so let's go and fix the first route inside of here so instead of label and image URL we're going to have Name and value if we don't have name in that case let's say that name is required if we don't have value in that case of course value is required we can leave the uh authorization part to stay the same but instead of using billboard we're going to use size instead of the constant being named billboard it's going
to be size again and name is going to be instead of label and value is going to be instead of image URL and make sure You uh return the size and instead of billboards it's going to be sizes host like this uh great now let's also resolve the get so this is fine but instead of billboards it's going to be sizes instead of Prisma theb that billboard is going to be size and you can just paste that and rename this to sizes as well great and instead of this folder being billboard ID it's going to
be size ID inside so let's go inside let's resolve Our get functions instead of size ID it's going to have sorry instead of billboard ID it's going to have size size ID so let's go ahead and fix that here and write size ID is required instead of billboard it's going to be size so meaning Prisma db. size and same thing for the params here and return the size and here we're going to write size get perfect now let's go ahead and let's resolve our patch function here so again instead of billboard ID is going to
be Size ID like that instead of the body being a label an image URL it's going to be name and value so we can check if we don't have name in that case name is required same thing for Value like this so value is required and params do size ID meaning size ID is required this can stay the same instead of creating a billboard we're creating a size sorry updating a size meaning size update many size ID and we're passing the name and value like this and just just return the Size and change this to
size patch and last part is the delete so same thing it's going to have size ID meaning we check for params size ID size ID is required authorization can stay the same instead of deleting a billboard we are deleting a size so size. delete money and size ID and just paste in the size and you can just rename this to size as well perfect now let's go ahead and run billboard through here to ensure nothing Has left and through this one as well billboard all right so this looks like it could work let's go ahead
I'm going to prepare my network tab right here I'm going to create a size called small with value of s and click create and there we go looks like everything is working fine so now let's go and fix our cell actions so I'm going to close everything everything going to app dashboard routes sizes components cell action right here instead of using the billboard column I'll be using the size column like that instead of billboard ID is going to be size ID for the on delete instead of billboards it's going to be sizes and it's going
to says size deleted and make sure you removed all products using this size first like this uh and for the update we're not going to redirect to/ billboard b/ sizes like that and I think that should be it so let's go ahead and try and update this now so we just notice that the ID is Working I'm going to update the size to M for example and update this to medium and click save changes and let's see if that's going to work so it says size updated great let's add another one so this is going
to be large value of L and click create we have two of them let's see if we can search medium like that large great perfect now let's just check the API routes in a browser right here so I'm going to paste this and there we go Looks like it's working let's test the individual size uh let's see oh we're having some errors let's see what that is about okay so the error was I copied an invalid ID it seems oh yeah I missed a zero so let me just copy this again yes it's working fine
yeah there we go my apologies everything is fine uh great and that's it so our sizes is now complete and we can go on and create uh the colors so let's continue and let's create our Colors now so this is going to be very simple because it's exactly the same as sizes except it's going to be well obviously named colors and it's going to have some different uh category uh different IDs tou color ID instead of size ID so let's go into Prisma schema. Prisma right here and we can actually copy uh the model size
and paste it and we're just going to rename that to model color like this and instead of store to size it's going to be stored to color Like that uh like this and let's go back into our store at the top you can copy this line and just name it colors and use the color model and use store to color like this and there we go the error is gone and this is our new model for color so it's exactly the same as size it's going to have a name and a value great so now
what I want to do is uh obviously we have to go to terminal and we have to run npx Prisma generate like this so go ahead and write This and press enter and now go ahead and run npx DB push and press enter again and let's see if everything is working there we go and now you can run your project again and just refresh the page like this great now let's go into our main nav in components and after sizes go ahead and create the colors so I'm going to replace these two routes with colors
and the label is going to be colors like this and if we click click we have a 404 here great so let's go Into the app folder dashboard routes and I'm going to copy the sizes this time because it's the most similar to Colors so just rename this to colors like that uh refresh again and there we go now colors load exactly the same what sizes does so let's go ahead and resolve that so we can rename the sizes page to Colors page like this instead of searching for sizes we're going search for colors and
use Prisma Tob do color Like that instead of having formatted size it is going to be formatted colors and instead of sizes it's going to be colors that map like that and you can see that this is pretty much the same we're just going to pass in the formatted colors like that and now let's just rename the column here so go into components uh columns. DS and rename the size column to color column uh like this so one difference that color is going to have that Size Doesn't Is going to have a special cell here
so go ahead and add cell go ahead and extract the row and return uh this Arrow function and open a div like this and give it a class name of flex items D Center and GAP dx-2 and what we're going to do inside is we're going to render uh the actual value and we're also going to create a div uh which is going to have uh which is going to display our color because I think that's really cool so it's going to be a self closing tag Give it the class name of h-6 w-6 rounded
D full and Border like that and also give it a style of background color to be equal to row. original. Value like this so if you're wondering why am I not using Dynamic classes in this one that is because Tailwind only works uh with predefined fully written classes so there is uh basically it uses just in time compiler which means that if you do Dynamic classes there is a chance that Tailwind is not going to Compile that CSS and your styles are not going to work so it's safer to use Style with such Dynamic classes
so otherwise we're going to have to do something like BG and then inside we'll pass in our d class but if there's a chance that doesn't work there are some problems with tailwind and those kind of specific styling great now that we have this uh let's go ahead and let's go back inside page. DSX and let's modify the size column to color column like that so just Go ahead and paste this here perfect and now we have to modify the sizes client so let's go into this client right here and let's modify this column to
be color column like that and rename the instance of sizes client to color client and let's actually make it colors client to follow uh the proper uh the proper naming let's go back into page. DSX and let's import the colors client like that and let's just paste it here there we go and now let's Go back into this client right here and first thing I want to modify the title instead of sizes is going to say colors and manage colors for your store the add new is going to go to slash colors SL new like
that and the API is going to AP calls for colors and entity name is going to be colors entity ID name is going to be color ID just like that perfect uh and now what we have to do is we actually have to create this add new route so let's go Ahad head and Just rename this size ID to be color ID like that let's go ahead and let's go inside so size page is now going to be color page it's not going to have size ID it's going to have color ID we're not going
to search for size we're going to search for color using Prisma so Prisma docolor and params docolor ID like that and we're going to pass in the color like that perfect so now let's go into components and let's replace the size Form to be color form so we can go back in page and just save this uh input right here so make sure you reimport this from Color dash form great now inside let's go ahead and change all instances of size form uh into color form so color form like this perfect and the initial data
here is not going to be size it's going to be color from Prisma client so go ahead and assign that right here here uh great and now go back into page. CSX of This individual color ID and change the size form to color form like that now let's go in our color form and let's change the schema for the value just a little bit so yes it's going to be a string but it's going to have a minimum of four characters and it's going to follow the Rex uh for our specific hex so we're going
to add a slash we're going to add a carrot a hashtag and we're going to end the Slash and I'm going to add a specific message Here to say a string must be a valid hex code so we want to confirm that only hex codes can be entered in our form so let's actually click add new to see uh what we are working with here perfect and now we have all of this things for the color but let's just uh rename uh instances of text size to color so color like that and color updated like
this perfect so we're going to resolve the onsubmit and on delete later for now let's go ahead and focus on our forms to See uh what exactly we have to change here great so it's not going to be size name it's going to be color name here and that is pretty much it and now this is going to be a size value but uh along this input we are also going to add a little dot which is going to show the current color so let's wrap this input into a div right here like that and
let's give it a class name of flex items D Center and GAP dx-4 like that and Below I'm going to Add a div it's going to be actually a self-closing div let's give it a class name of border p-4 and rounded Dash po so you can see how now we have a little color right here and a style is going to be background color field. value like that so now if I write a hex code for Black you can see that it's going to become black if I write a hex code for white it becomes
white that's exactly what we want perfect and that's it for our form Now let's go in our onsubmit and let's modify the instances of the text size into colors so colors right here and colors here instead of param size ID it's going to be color ID and that is it for the onsubmit now let's go into the on Delite same thing here so colors and par. color ID and for the message uh of those success just color deleted and here make sure you removed all products using this color first there we go let's search for
Size uh okay this is a size of button that is fine and nothing else perfect so now let's go ahead uh and let's create the API routes for this so the good thing is that they are exactly the same as sizes so we're just going to have to rename them great so just go ahead and copy these sizes right here and rename them to colors like that perfect let's go ahead and resolve the first one so name and value stays exactly the same everything stays exactly the same but Size it's not going to be size
it's going to be color and it's going to be Prisma db. color. create and we're going to send the color and the error message is going to log colors post perfect now let's resolve the get function so same thing here we are not calling the sizes we are calling the colors meaning prism db. color and send the colors and just fix the error message to colors that was very fast great and now let's go ahead and rename this size ID to color ID like That and let's go inside this route change this parameter to color
ID like that replace it right here and just write color ID is required we are not finding a size we are finding a color so Prisma db. color and par. color ID and of course uh replace size with the new constant and replace this with coloror get perfect now let's resolve the patch so instead of size ID again it's color ID meaning that we have to replace that here as well color ID and color ID is Required the authorization stays the same but we are not updating size we are updating the color meaning Prisma doc
color. update many and par. color ID and we send the color in the Json and let's just rename this the color as well and the delete is the very same thing in the parameters it's color ID in instead of the size ID so check that here as well and color ID is required authorization stays the same and we are not deleting size we are deleting a color so Prisma Db. color. delete money and par. color ID and of course the response is color and lastly color delete now let's go ahead and search for size here
no instances great no size here perfect let's go ahead and see if this works so I'm going to refresh here I'm going to name my color black and I'm going to add a hex value for the color black and click create and let's see it says color created let's see if I can search black white result returns nothing perfect now Let's resolve all our cell actions so close everything go into the app folder into the dashboard routes colors components and just select cell action here instead of size column it's going to be color column like
that perfect it's going to be color ID copy to clipboard on delete we're going to Target colors like that and color deleted and make sure you removed all colors whoops all products using this color First and the edit is going to match colors instead of sizes perfect I think that is it let's go ahead let's try and update this so color ID is working the update right here let's call this black two and I don't know let's modify the values a little bit and click save changes and there we go it says it's working let's
go ahead and try and add new so I'm going to add I don't know random whatever x value we think of how about something that doesn't look uh Dark okay something like this create that there we go let's see if we can delete it from here uh we can great let's see if we can delete from here delete we can do that as well so I'm going to remove return my uh black right here there we go and let's see if I can uh of our API is working so I'm going to try here it's
working I'm going to go ahead and copy the individual ID and that is working as well great great job you finished all fil all this left is to Create products and orders connect that to stripe and we can start working on the front end store now it's time to create our product entity let's go ahead and let's start by going into Prisma to create that model first so I'm going to collapse everything here I'm going into my schema. Prisma and the same way I added this models above I'm going to add a new one called
Product so let's go ahead and write model product like this it's going to have an ID which is a type Of string with a decorator ID and the default of uyu ID like that besides that it's also going to have a relation to the store so we have to write store ID which is a type of string and our relation with the store like this add a decorator relation and it's going to be named store to product like that let's go ahead and add some Fields inside so I'm going to add the store ID field
and of course the references to the actual ID of the store and before we move on of Course we have to create the equivalent relation in the store model so let's go ahead and find the store let's go ahead and add products like this add the product model make sure it's an array and add the relation with store to product like that and there we go the errors are now gone and yes we have the warning we're going to fix that later but besides the relation to the store we're also going to have a relation
to category so go head and write category ID which is a string and a relation category so go ahead and write the model category and relation is going to be category to product like that with Fields category ID and references ID like that so now we have to go to the category and add that very same relation so let's go ahead and find our category there we go and I'm going to go just below the billboard right here uh and I'm going to add products Like this which is going to be a type of product
model which is an array and it's going to have an relation uh called category to product like that and there we go now we connected our category model with our product model right here perfect and besides the uh store and category our product is also going to have relations with our filters but we're going to get to that later now let's add some general properties that product is going to have So it's going to have a name which is a type of string it's going to have a price which is a decimal like that it's
going to have a Boolean is featured which is going to be a type of Boolean and it's going to have a default value of false then it's also going to have a Boolean called is archive which is a Boolean with the default value of false as well we're also have uh this filter relations that I was talking about so let's go ahead and create the size ID which is a string and let's give it a size relation so we use the size model at relation decorator like that uh and no no name for this one
instead we're going to do Fields size ID and references ID like that and obviously we now have to do the same thing uh in the size model so let's find our size model right here so we have a relation with the store what we have to do now is add a relation with the Products so after this value right here I'm just going to add products like that I'm going to use the product model and add an array and if we scroll down you can see the error has gone away uh perfect now that we
have that we also going to have to add the relation with the color so in our product model I'm going to add color ID which is a type of a string and a relation to the color so color color is going to have a relation and it's going to have uh Fields color ID and references ID and now we have to add the very same relation like we did here in the size so you can just copy the products array here and just add it after the value here and there we go our errors are
gone but we still have some uh warnings we have to resolve uh great before we wrap this up we're going to have to create another relation with this product it since this is not going to have a single image like billboard does for example You can see with billboard we were able to just add image URL and add a string but our product is going to be able to have multiple images so we have to create a model for that as well so let's go ahead and add that first so just below the model product
before we finish it we're going to add model image like this it's going to have an ID which is a string with The Decorator ID and a default value of uu ID like that and it's going to have a product ID which is A type of string and a product product like this with a relation decorator it's going to have Fields product ID and references ID and one thing I'm also going to add here is a special rule for what happens with this image model once product has been deleted since this is a very specific
case where we should be able to delete our product even if we have an existing image model which uses that product otherwise any product we create we wouldn't be able to delete Unless we actually deleted the image from the database so now what we can do is just on delete Cascade like this so this is going to allow us to delete this product after it's been created and after the relation with the image has been made so now that we have this we can go back uh into our product and we can add a relation
uh to the image so just after my color right here in the product I'm going to go ahead and add images to be The image model and an array like that and let's just wrap up the product before we just add a couple of more fields to the image model it's going to have created ad which is the data time uh type and a default value of now and updated at which is a decorator updated at like this uh of course it's also a type of date time there we go and now let's go back
in our image and let's finish this so in my image I'm also going to have a URL Which is a type of string and create at which is the date time with the value of default of now and created sorry updated at date time with a updated at decorator like this so let's go ahead and fix this Warning by adding at at index open an array and write product ID and we're going to do the same thing here so we have to fix the store ID category ID uh size ID and the color ID so
let's go ahead and write at add index store ID I'm going to duplicate this and add category ID duplicate it again add the size ID and color ID there we go now our Prisma has no errors and no warnings save the file and go ahead and shut down your application and run npx Prisma generate like this there we go now that's added to our node modules and now let's push that to Planet scale so npx Prisma DB push like this and let's see if we have any errors if maybe we're going to have to reset
the database no Great everything is fine and now feel free to just npm run Dev again and refresh uh your local host and now that this is ready we can go ahead and go inside our main navigation so inside components inside main nav right here I'm just going to copy the colors and paste it below that so just uh just uh before the settings and I'm going to rename this routes to products like this and the label is going to be products as well perfect now what we have to create Is the actual route for
the products because if we click we get a 404 let's go ahead head and I'm going to copy uh the existing route that we have so let's see which one uh is the closest I think that we can actually go ahead and use the Billboards because the Billboards has a form which uses the image upload and we're going to have image upload uh in the product form as well so I think this one is the closest that we want for our products so go Ahead and copy this you're going to have Billboards Billboards copy categories
colors settings and sizes and rename the Billboards copy to products like that and after you refresh your page you should no longer have a 404 instead products should lead to the very same page as Billboards and now we're going to go and slowly change everything we need for it to successfully load the products instead so first things first let's rename this page to products page Like this okay now that that is done we are not going to load Billboards instead we're going to load products so we're going to use await prism db. product which we
just push to the database and instead of having just a where and just an order I'm also going to add include inside make sure you don't misspell include like this and we're going to include the category so write category true we're going to include the size relation and we're going to include the Color relation so we are including this so we can access those individual models in in a form of an object and then we can display them in the table for example I want to show that my product has the color white something like
that so that's why we need to let's call that populate that even though populate is more of a at least I think more of a mongodb thing even though we are using MySQL I'm not sure what's to proper term you can correct me in the comments uh if You know what that is great and instead of calling this formatted Billboards uh we're going to call it formated products but first let's fix the iteration here so we're not iterating over Billboards we are erting over this products right here and we're not using formatt Billboards we are
using formatt products like that which means we also have to pass that to for now this thing called billboard client which of course we're going to rename to product client and Let's just fix the structure uh inside of this so item id can stay the same instead of label it's going to be name and we're going to pass in a couple of booleans so is featured going to be item is featured same thing for is archive is going to be item that is archived like that now we're going to use the price and for Price
let's go ahead and let's create another util in uh in our a code Base called formater so for now I'm going to just write item. Price inside and we're going to go ahead and create a formater now for this because I want my price to be formatted in a nice way so I'm going to go ahead and I'm going to find my uh lib folder right here and I'm going to go inside urals like this and I'm going to write export con formatter to be equal to new inl do number format I'm going to pass
in n- us like this I'm going to open an object I'm going to choose the style of currency and I'm going to pass the Currency to be us doll like like that perfect and now I'm going to go back in my page. DSX right here where I have the formatted products and I'm going to wrap this in that formater so I'm going to write formater which I can uh formater which I can import from at/ lials like this so I'm just going to move it right here with Prisma and that I have this format I'm
going to say form. format and I'm going to wrap the item uh that price but our Item. price is a type of decimal if you remember in our schema Prisma that's what we defined uh the price to be and that is uh the way we can turn it into a number is very easy just to number like this and there we go the typescript error has now been removed now let's get our category so category is going to be not the entire object but I'm just going to use item. category. name like that for the
size same thing item. category. name name and for the color I'm going to Use the value so that I have the hex code so I can display the actual color available so item. color. value there we go and now let's go ahead and let's just resolve this billboard column so instead of billboard column it's obviously going to be product column so let's go into uh our components right here inside columns and let's replace rename the billbo column to product column like that ID can stay the same label is actually name like this price is a
string because We format it into a nice looking string size is a string category is a string as well color is a string and we also have the is featured which is a Boolean and is archived which is a Boolean as well and now it's time to create uh the actual um well how do we call this actual columns matching this type so accessor key is going to be name and the header is going to be name like this accessor key here uh well we're going to add the created at last so you can Actually
go ahead and insert an object inside let's add the accessor key here uh to be is archived that's the second thing I want to show and the header is going to be archived like this so you can play around you can reorder this how you want uh the second after the archived I wanted to be is featured and show whether this product is featured or not uh then let's see what else do we want so I just I'm just pasting this don't be confused uh and then I have the Price we're going to display the
price I'm going to copy that and paste and the next one is going to be category and I'm going to display the category so you can see how that is appearing right here right and then I'm going to go ahead and copy this again again the next thing is going to be size and give it a size header there we go now we have the size and after that let's go ahead uh and let's create a color so I'm going to write color and The header is going to be color like this but uh our
color is going to have a special cell because I want to render a little icon showing what color it is so I'm going to write cell I'm going to extract the row like this I'm going to go ahead and write a div with the class name of flex items D Center Gap dx-2 like that I'm going to render the row. original. color like that and inside I'm going to add a div which is going to be a self-closing tag like this it's going To have a class name of h-6 w-6 rounded Das full and border
and I Style with a background color of row. original. color like that perfect so you might be wondering let's let me just quickly go inside of my colors components column so you can see here I'm using value so how does that work why do I have a value here well that's because that's the way I formatted my colors here see I use value as item. value but in the page for my products Right here the color is still item. color. value but I mapped it to color because I just want to worked with color like
that and then when I have the color in my colums I also have to use that very same field so if you perhaps notice the difference and are wondering hey why are you doing that well that's the reason why the created ad can stay the same and the sell actions are going to be fixed later so just save this file make sure you rename this to product Colum and let's go inside our page. DSX back again and let's remove this billboard column with product column like this perfect and now let's go ahead uh and let's
change this billboard client so first I'm going to go ahead and go inside the client right here I'm going to rename this billboard column to product column like that and I'm going to rename the build the instances of billboard client to product client like that and then I have to go back in my Page. DSX and add product client from the import and actually render that here so just like we did for our previous entities now let's go ahead and let's see everything we have to change uh inside of this client right here so instead
of billboards it's going to be products like that and it's going to say manage products for your store the router. push for the new one is going to be slash products like that and API calls for products entity name is Products and entity ID is product ID there we go so now we have our products looking like something and now of course we have to create the actual form so let's go ahead uh and let's do that now so we have to go into our app folder into the dashboard store ID routes products and let's
rename this billboard ID to product ID like that and inside inside page. DSX it's not going to be called buildbest it it's going to be called Product page like this and the parameters are not going to be billboard ID but they're going to be product ID meaning that we are not going to fetch the billboard but the product using prism tb. product. find unique uh like that but I'm also going to include something here because remember we are having an array of images which are separate model model so if we want to load the URL
of those images and not just an array of IDs we have to add Images through inside this include object right here and then we can pass this product right here and of course that gets the error because it's not the type of data that we are expecting so now what I want to do is I want to rename this billboard form input and this billboard form component into product form so inside the components I'm going to rename the billboard form to product Dash form I'm going back into page. TSX you can see it automatically Fixed
my import so if you hasn't go ahead and fix it and save the file and now let's go inside the product form and I'm going to go ahead and as always change all instances of billboard form so 1 2 3 4 five 6 right here and change that to product form like that and now we can go back inside page. DSX and fix the input to be product form and there we go so the only error is the type error let's go inside the product form and resolve uh that now so uh our Product form
props it's not going to be a simple product like this because we are populating the images so what we have to do obviously first import this product uh from Prisma and you can remove the billboard import like this and now let's go ahead uh and we have to extend this product a little bit so I'm going to go ahead and add an add sign like this I'm going to open uh an object and I'm going to write images and the image is going to be a type of image From Prisma client and it's going to
be a type of array so I imported image uh alongside product from the Prisma client and there we go that is the proper uh type now and now what we have to do is obviously we have to resolve the default values here so the default values are going to be either initial data or this right here so instead of label it's going to be uh name instead of image URL uh we're going to use images which are going to be an empty array at the Beginning price by default is going to be zero category ID
is going to be empty like this let's see what else color ID is also going to be empty size ID is also going to be empty is featured is going to be false by default and is AR is going to be false by default as well and now we also have to resolve that very same thing inside Zod so change the label to be name uh change the images are it's not going to be z. string it's going to be z. object like that it's Going to be URL inside which takes z. string and that
whole thing is going to be an array and then let's add the price so you might be thinking oh it's just Z number but since we're working with the decimal uh and we have to add Z do curse I actually Co like this I'm not even sure how to spell it uh like this and make it at least one like that and category ID is going to be z. string do at least one besides category ID we're also going to have color ID copy that And do the same thing for size ID and we also
have the is featured which is z. bullion like this. default. false and it's going to be optional so our uh schema can work properly and is archived like the uh is the very same thing and there we go now we should not have any errors here but we still do so let me just go ahead and see what's going on with that so what we have to do is we have to modify this initial data just a little bit so instead of usually just Adding uh the initial data I'm also going to do a little
uh I'm going to add a question mark here like this and I'm going to open an object inside and I'm going to spread the initial data inside like this and let's just quickly replace this pipe pipe with this so we have a proper uh question mark and else here and I'm going to modify the price of the initial data to be par float uh string initial data question mark. price and there we go now our Errors are gone so if we have the initial data in that case we reuse the entire initial data but we
have to modify a price a little bit because in Prisma and MySQL that's a type of decimal but here it has to be a float so we have to play around with formatting a little bit just make sure you replace this into a proper uh I cannot remember what the name of this sign I'm sorry let's call it double dot so just make sure you replace the pipe pipe with the Double dot right here uh great now that we have that as always we're going to resolve the onsubmit and on delete later and I'm going
to click add new here in the products just to see what I'm seeing there we go so let's go ahead and let's now uh change these titles right here so instead of addit billboard and create billboard and all of this description is going to mention a product and the tost message is going to be product created like that perfect and now we can go Ahead and we can actually modify uh our form so I'm going to go ahead and find our images first let's go ahead and resolve that so instead of background image it's going
to be images like this the name is also going to be images like this now the value is going to be a little bit different so what we're going to do instead of having this ter we're going to have field value. map we're going to get the individual image and we're going to just return image. URL Because we're working with an array of images so the value has to be an array of strings that's what image URL expects if you hover here see it expects an array of strings so that's what we are doing we
are iterating over our current images which have been loaded or an empty array if we are using the default values and we are just passing in the URL string now let's see what we have to modify with the on change right here so the on change gets the URL we're going To call the field on change like this and instead what I'm going to do is I want to add this URL to the existing uh to the existing values so I'm going to spread the existing values using field. value not values and I'm going to
add an object URL like that and for the on remove I also need the URL here and I'm going to call the on change again and what I'm going to do is I'm going to iterate uh over the field values again but I'm going to filter it out so I'm Going to spread the field. value. filter I'm going to get the current image that we are iterating over and we going to check if the current. URL is not equal to the URL passed from this Arrow function right here and that should uh resolve our images
let's just go ahead I'm going to refresh one more time and let's try and see if this works so I'm going to go to my desktop let's see I have some uh shirts right here so I'm going to add this too and I am expecting That two of this will be rendered now in this field let's check if that is correct I'm going to click done uh there we go and if I click remove on this one it should only remove that one and if I click remove here it removes all of them perfect that's
exactly what we want so now let's continue and let's change this uh label field right here to be name field and it's going to say name like this and this is going to be product name like that there we go and now that We have that uh we have to add select options uh for our categories but before that let's actually go ahead and I'm going to copy this entire form field here I'm going to paste it like this so now we're going to have two of those and I'm going to change this pasted one
to be price like that and the form label is going to be price as well the this is going to be instead of product price let's write something like 9.99 so we indicate what has to be passed in here And let's give this input a type of number like that so we can only work with numbers perfect and now what I want to do is I want to go inside of my category so go inside categories category the components category form and we're just going to copy and paste this form field which works with select
Fields right here so that that's uh what I want inside so I'm going to go ahead and I'm going to copy this uh entire form uh this entire form field right Here so let's go ahead and do that go back in the product form and after the price go ahead and paste this entire thing and instead of having uh the billboard ID first we're going to do the color ID uh sorry the category ID so we're going to choose the category for this product we have to import the select so go ahead to the top
and you can just add import select from at/ components SL Ui/ select like that let's go back down to our select we also have to import the select trigger so we can add that we also need to select value we need to select actually let's just basically fix all of the errors so we have the select content and select item so I'm going to add those as well select content select item like that let's see what else we have okay and this is what we have to replace from Billboards to categories but let me Just
show you everything I've added here so I've added the select select trigger select value select content and select item like this perfect and now if I save we're going to get an error because Billboards does not exist because we won't be working with Billboards instead we're going to to be working with categories we don't have categories yet so the C so the error is going to stay but I'm going to modify this to category and I'm going to go ahead and use the Category ID category ID here and I'm not going to use category label
I'm going to use category name because category does not have a label now let's go ahead and fix this right here so what we have to do is we have to go back in the page that holds this form right here so the server component where we load our initial product and I'm going to go ahead and call the categories so const categories are going to be equal await Prisma db. category. find many like that And I want to find all categories inside this store ID so along side our product ID being in the params
we also have to add the store ID which is a type of a string like that and we have it because all of our routes are inside the store ID great and now we can just write store ID to be params store ID there we go and besides categories we are also going to need to call all sizes so let's go ahead and do sizes like that and copy and paste this one more time and do the same Thing for colors so Prisma db. color there we go and now we're going to use these three
and pass them to this uh client component which is our form so besides initial data we're going to pass in the categories we're going to pass in the colors and we're going to pass in the sizes there we go and now we have to fix that uh in our types of the product form so let's go back in my product form I'm Going to go all the way to the top and find my typings and after this initial data I'm going to add categories to be category from Prisma client and it's an array I'm going
to have colors so color from Prisma client it's an array as well and sizes so size type from Prisma client and it's an array make sure you've added uh all of those here so category color image product and size from Prisma client and after you've added this types we also have to Destructure them in the props so categories colors and sizes there we go and now you can see that my error is gone right here and let's just change this so I'm back here with the name category ID the select form field which I copied
from the billboard sorry from the category let's change the form label to be category here and let's change this to select a category like that and let's see if when I select there we go my category is shoes but if I go in my Existing categories and let's go ahead and try and create a new one just to demonstrate so besides shoes I'm also going to have glasses for example I'm going to choose a random billboard and create this and now if I go back in my products and create new right here there we go
I have either glass classes or shoes to choose for my product category which is exactly what we wanted great so now that we have the category setup we can just copy this entire form field Right here and just paste it below save and there we go now we have category again and we're going to change this one to be size ID and the label is going to be size this is going to be select a size like that and instead of iterating over category is we are going to iterate over sizes like that and let's
see if we have to modify this so we have in instead of category uh we're going to call all of this size like that so let's see if that works fine we have medium And we have large perfect that's exactly what we want and we have to copy it one more time for our colors so just paste it right here and call this color ID give the form label a color value select a color like that and we are iterating over colors so replace this parameter to color as well there we go so now we
can choose the color to be black perfect and now that this is done uh what we have to do oh my apologies we are not done uh so we have two more Fields we have the is featured and is archived and for that we have to add a check box so let's go to shaten UI uh let's go ahead and let's find the comp components so let me just see where the components here they are okay and find the checkbox component so go ahead and add this npx sheni at latest at checkbox I'm going to
go ahead and do that so I'm going to shut down my application paste this so npx shat cn- at latest add checkbox and press enter and confirm the Installation wait a couple of seconds and then we can uh rerun our application again so let's go ahead and run mpm run Dev there we go go ahead and refresh your application and I'm going to pause the video until my site is rendered so you can see clearly what I'm doing in real time there we go and okay what we're going to do now is we're going to
go uh just below this form field and let's actually go ahead and let's copy one form field so we speed up the Process so I'm going to copy this form field for price because it looks Fair really simple it just has an input and I'm going to paste it after the size ID form field sorry after the color ID so the last one like this so if I save this right now you should have the price here uh of course we're going to change this to something else so instead of the name price it's going
to be is featured like that and now what I'm going to do is I'm going to actually remove everything Inside and just going to leave the form item and I'm going to go ahead and give it some class names so I'm going to write class name to be Flex Flex D row items D start space- x-3 space- y- Z rounded DMD border and p- 4 and I'm going to save that and you can see how now this looks like a little box so I'll just expand this a little bit so you can see uh the
entire thing Flex Flex row item start space- x-3 space- y-0 rounded in the border and Padding for on all sizes sides sorry and now let's add the form control which we already have and now let's add our checkbox which you can import from s/ components UI checkbox and it is a self-closing tag so just make sure you've imported that uh right here okay now that we have the checkbox let's go ahead and give it a checked value of field. value which is a Boolean and let's do unchecked change to be field. unchange uh like this
and Here's the thing so there is an error happening here because um well the types for this are not compatible and I filed an issue uh on this in Shad cnii library and I got a response that this is actually an issue with react hook form so uh the way uh one thing I noticed is that this still works as intended regardless of the fact that it's throwing a type error meaning that no functionality is affected at least in my case so what you can do is add a comment Uh ts- ignore uh actually make
sure to add this comment because otherwise you won't be able to deploy with an error great and below this form control go ahead and add a div here with a class name of space dy-1 and leading dnone like here add a form label inside featured like that and a form description right here and here I'm going to describe what's going to happen happen once this is checked so this product will appear on The homepage like that there we go so now I have a better description on what happens once I click check right here perfect
now let's go ahead and we have to copy this entire form filled one more time for our is archived uh Boolean so change this is featured to is archived of course make sure this is the copied one so you still need to have the is featured one uh let's go ahead and change the form label here to archived and we're going to change the Description to this product will not appear anywhere in the store like that there we go so we finished the form for our product and now we have to change the APA routes
so let's go ahead uh and let's go the onsubmit first so first things first we're changing this to Billboards to products and param is using the product ID instead of billboard ID and the rou that push is going to products not Billboards Like that uh now we have to do the same thing for the on delete so it's going to be slash products and product ID same thing for the redirector slash products like that so multiple products products here perfect and it's going to be product deleted and if we cannot delete the product uh well
we can just write something went wrong like that there we go and now what we have to do is we actually have to create uh the routes For this let's go ahead and let's copy one of the existing API routes now so I'm going in my app folder inside API inside store ID and let's go ahead and let's copy the Billboards for example and let's rename that to products like that not going to expand this because we're going to be working with code now so first as always let's resolve the global products. route TS file
right here so first thing let's change the body we're not going to need The label and image URL instead we're going to work with name price category ID color ID size ID images is featured and is archived like that so we have to do the changes uh sorry we have to the checks for all of those so first let's do the name if there is no name in that case name is required if there is uh no price in that case of course price is required let's go ahead and copy this so if there is
no category ID in that case category uh ID is required like that Same thing is going to be for size so size ID is required whoops not size but size ID like that and same thing for color ID so color ID is required like that and we're not going to check for is featured and is archived um because well they can be false right if nothing has been sent from them that means it's false by default it has a default value in schema Prisma uh great and one more thing I want to check of course
is for the images so after the Name I'm also going to check for the images so if there are no images at all or if we passed in an empty array of images uh in that case so just make sure you put the exclamation point here uh at the images length so if the length is negative then this is going to work in that case return new next response images are required and give it a status of 400 like that uh perfect and now now we can go ahead go all the way down so this
Stays the same this authorization part stays the same as well and instead of creating the billboard we are creating the product with the Prisma DB product. create and the data we are passing inside is going to be name uh is going to be price it's going to be is featured is archived uh it's going to have category ID it's going to have color ID size ID store ID oh we already have the store ID like here so after the store ID let's go ahead and add the images but Images are a separate model so we
can just pass in the images instead we're going to write images we're going to open an object and write create many we're going to add the data open an array and we're going to spread the array of images which we will send so images. map get the current image the current image type is going to be an object which has an URL of string and we're just going to return that image so this way we fixed the typescript error And just pass in that uh in next response and change this to products underscore poost like
that and now let's go ahead and let's resolve our get function here so uh it's going to have the store idea this is fine this is fine but uh it's going to work a little bit different so our get route for products is going to be used heavily on the front end side so I want to give it filters so that we can only uh load products for this specific category ID for that Specific uh color ID size ID and stuff like that and of course the featured flag and the archived flag so let's go
ahead and write const D structure search params from new URL request.url like that and then let's get the category ID from search par. getet category ID make sure you don't misspell that uh pipe pipe undefined find if it's not inside go ahead and copy that and replace this with color ID copy that as well and replace it with Size ID and now we're going to get to the featured so you can copy it again and just say is featured search params is featured like that and you don't need this pipe pipe for that one perfect
and now let's go ahead and let's write uh uh products here instead so Prisma to be. product. find many like that and let's also send back the products now we're going to modify this where so yes it's going to have the store ID it's also going to have a category ID if one Has been passed it's going to have the color ID if that's what we want to filter by same with size ID and then for is featured we're going to use if is featured has been passed in that case we're going to say true
otherwise undefined so we don't want to write explicitly false we have to use undefined so it completely ignores this filter if that's what we want and is archived is always going to be false so we never want to load back Products which have been archived in our store and we also have to include all of these relations so it can properly be displayed on the front end so images are going to be true category is going to be true as well color is going to be true size is going to be true like that and
we're also going to order by created at descending so we always load the newest ones and change this of course to products get there we go so we now finished that and now we have to do the Same thing inside billboard ID so just rename this to product ID and go ahead and go uh inside in here first let's resolve the get function so instead of billboard ID it's going to have product ID if there is no params product ID in that case product ID is required we are not fetching the billboard but the product
so I wait Prisma db. productfind unique using the product ID and of course we have to include the images because again On the front end we want to display those URLs same for category so we can display the name of the category same for the size and for the color like that and then we can safely pass in the product uh and just rename this to product get like that perfect and now let's go ahead and let's resolve our patch function so uh let's go ahead back in in our route. here and let's first copy
this body object so we don't have to repeat that so I'm going to replace That in the patch function here there we go so now this is what I get from uh my my body I'm going to remove this inside like that and I'm going to go here and I'm going to copy everything here so from name images price category all the way to color but without the params that store ID because you can see we already have that here so I'll just paste it right here and there we go we speed up that process
uh by a lot we can leave this store ID authorization to uh be as It is and all we have to do is we modify this so the product we are updating is product of course not billboard uh the where is correct but the data is different so we are updating the name price category ID color ID size ID images so whenever we uh update the images what we want to do is call delete manyu like that uh all right uh and let's see uh why are we having uh this error right here but before
we do that let's do is Featured here uh and let's do the is archived like that and now I'm just going to go ahead and see what's going on with the images so the issue was that we have to modify this query a little bit so we are actually not going to need to have this in a constant we're going to do that but later first we're just going to do a general query to update this specific product using update like this so now you can see this error went away and Then we're going to
go ahead and uh add a constant to this actual product by creating new images so now we deleted all images and now we're going to create new ones so const product is equal await Prisma db. product. update like that where ID is equal to params product ID like that and let's go ahead and pass in the data so the data is going to be images and inside we're going to go Ahead uh and create so create like this sorry create manyu data which is an array we're going to spread the images map we're going to
get individual image which is a type of URL uh which is a type of object which has the UR L type of string inside and I'm just going to return that image there there we go and I think we are missing the product ID from my parameters here so let me just go ahead inside of this patch function here yes Of course so I forgot in in this patch I still have the billboard ID so it's going to be product ID inside of here and then we also have to change this check for billboard ID
and say product ID is required and then we check this with product ID as well uh so this is this General update that we are doing and inside we use this perfect so that is now uh resolved and now we can go ahead and just pass in that product right here and Change this to product patch like that perfect and one more thing uh we have to resolve is the uh Delete function let's go all the way down first let's change this to product ID like that change this to product ID as well product ID
is required this authorization step can stay the same we are not deleting the billboard instead the product so await Prisma be. product. delete manyu using the product ID like that and I think that is it so we just pass in the Product here and we replace the billboard with product delete let's go ahead and search for billboard inside of this route nothing let's check uh here nothing I think this should work as expected so I'm going to go ahead and refresh this page right here I'm already going to prepare my network tab here let's go
ahead and let's upload uh some images so I'm just going to expand this a little bit there we go so we add this two images uh let's see what happens With that so okay that is uploaded I'm going to add this white shirt so white shirt like that the price is going to be $99 the category is going to be glasses size is going to be medium color is going to be black and it's going to be featured and and I'm going to click create and it seems like it's working and it has redirected us
back and there we go white shirt it is not archived but it it is featured the price is $99 the categories glasses oh it says the size Is glasses as well so we made a mistake uh here so let's see if that is a mistake uh in our individual product uh in our form or in our sorry in uh in our table so I'm just going to go ahead and let's debug this together so I'm going to go inside the app folder inside dashboard or routes inside my products and I'm going to uh get this
product to see the formatted items first uh yes so it's a mistake inside of the Formatted products so you can see for the category I say item. category. name and for the size I also say item. category. name instead it has to be size and now size is medium great so our form is working as expected perfect uh and now let's go ahead and fix the cell actions right here so while we are in this folder right here go inside the sell actions so this is all inside the product folder change the billboard column to
product column like that and Let's go ahead and resolve this so this is going to be product ID is copy to the uh clipboard instead of billboards it's going to be products it's going to say product deleted this is going to yield uh something went wrong like that and the edit is going to redirect not to/ Billboards but slash products like that and I think that should be it let's go ahead and try so I can copy the ID that works let's click update here I'm going to change this from white shirt to Random shirt
like that I'm going to change the price to 39 I'm going to change the uh category to shoes and I'm going to uncheck featured and I'm going to check archived and I will click save changes let's see if that is going to work it says product updated there we go random shirt archived price has been changed category there we go perfect so what I want to do is go back here and just unchecked featured and checked sorry unchecked archived and check Featured so we can safely load this uh in our uh store perfect and I
think one thing is not working and that is the search yes I cannot type anything inside that's because my search key is from the Billboards which is the label so we have to go back uh in my client right here when I do the data table so inside routes inside products components client change the search key to name so there we go I think that should now work so if I go random random shirt it works if I Type something else it doesn't perfect let's just check the routes right here so I'm going to check
that uh here let's see if it works there we go it works and let's try and add uh let's try and only load those uh items which have this size ID so I'm going to copy this size ID and I'm going to add a question mark size ID equal to that and I should get the exact same result perfect that's exactly what I want so our filters are working let's confirm that our color ID is working as Well so I'm going to change this to that specific now it's not working because I forgot to change
the size ID it should be color ID there we go that works as well let's go ahead and check the is featured to be true like this that is working perfect let's check explicit false okay uh yeah basically any value that's given is going to uh amount like to True uh great great that is exactly what I want and I'm just going to test and I'm going to Update this to archived and save changes and then I'm going to refresh again to see if that is working as well so I'm going to load the products
again and there we go no products loaded now because this is archived perfect and if I move it back it should be loaded so let's get the product is updated there we go it's back inside and let's just check if the individual one is working so I'm going to copy the ID for this product just make sure you copy the Entire one slash there we go no array only that individual product our images are all populated our category is pop so I can see what it is same for our size and color perfect you finished
the products great great job let's wrap up our entities by creating the last one which is the order so I'm going to go ahead and I'm going to go in Prisma schema. Prisma I'm going to go all the way down and we're going To go ahead and create our uh order model so go ahead and write model order like this it's going to have an ID of string which is a type of ID and the default value is uu ID like that the second field is going to be the relation with the store so store
ID is going to be a string and store is going to be a store relation store to order like that and you already know uh how this has to look so we're going to have to add the fields Which takes in the store ID and the references which takes in the ID like that uh we're going to add the relation in the store later for now let's continue and let's add order items which is going to be a relation with another model which we're going to create now uh order item like that and it's going
to be an array and yes there's an error because right now it doesn't exist we're going to fix that then we have the is paid which is a Boolean and default Value is going to be false we're going to have a phone which is a string with a default value of empty because uh we are only going to fill this after the order has been paid same thing with the address so address string at default empty like that we're going to have created at uh which is going to be a date time with a default
of now and updated at which is a date time with at updated at uh decorator like that and let's add the Index for the store ID like that now let's go all the way back to our store and just after products let's add the orders like that which is a type of uh order model in an array with a relation uh store to order like that make sure it matches the one right here and now we have to create uh our order uh item so let's go ahead and do that so our order item is
going to be an intermediary for a many to many relationship between uh order item and Product so go ahead and write model order item like that uh you can copy the ID and just paste it because it's the same so ID is the ID default UI ID uh it's going to have the individual order ID which is a string and the relation order order at relation Fields order ID references ID like that and there we go you can see that the error now went away besides that it's also going to have a relation with the
product so give a product ID which is a string and a Relation product product at relation Fields product ID references ID like that and let's add the index for order ID and the index for product ID like that and what we have to do now is we have to add our relation to the product model so this error right here goes away so go ahead and find uh your product here and just after images I'm going to add order items order item which is an array there we go that is our last Model in Prisma
so shut down uh The application and go ahead and run npx Prisma generate like that and then npx Prisma DB push so you we've already done this a few times and just wait a couple of seconds and that should be it go ahead and mpm run Dev your application again and I'm just going to collapse this and refresh what we're going to do now is we're going to create uh well the option to actually look at our orders but our orders are going to be much simpler because there will be no form to Create an
order so it's only going to be a table and we're not going to have an API for it so go ahead in the components in the main navigation right here and after the products copy this paste it and name it orders like that and rename these routes to orders like this so there we go that's our last route if we click of course we get a 404 so let's go ahead and fix that so great now you can go ahead and do the good old thing we do always in the Dashboard routes go ahead and
copy the Billboards and paste it inside and rename that to orders and once you refresh this 404 uh will go away one cool thing about that is that we don't need the this ID folder so we can completely remove that one it's not going to have the ad new at all so let's go in page. DSX and let's replace the Billboards page with the orders page uh like that great and then instead of calling the Billboards we're going to Call the orders using Prisma DV so orders uh the wear is fine sorry order individual uh
the wear is fine but we're also going to include we're going to include order items like that and inside we are going to include the product like that so we can use those array of order items because our order can have many items inside which have individual products so that way uh we can combine the prices of all of those great so I'm going to Extend this now and we're going to iterate over orders instead of uh Billboards and it's going to be formatted orders like that and that's what we will pass to the client
now let's go ahead and let's just resolve our uh our orders here so remove the label instead give it a phone with item. phone like that address with item. address uh products is going to be item. order items like that map order item individual one and we're going to return Order item. product. name so we just created an array now and then we're going to join that array and turn it into a string and separate each product with a comma and a space like that so that's going to look really nice in our table and
for the total price we have to do a similar thing so I'm going to immediately add my formater here so formit with from at/ li/ URS and I'm going to move it to the Prisma right here form that format like that and Inside I'm going to run uh the iteration so item. order items. reduce go ahead and open parentheses and write total comma item like that go ahead and open a function uh and just at uh the after this function give it a default value of zero like that so that's what we're going to start
with perfect and we just write uh return total plus whoops total plus number item. product. price and just add a comma like this and there we Go so this is what we did we wrapped our uh array of U well not an array sorry we run a reduce function over all of our order items and we combined the previous item with the next item and we combined their total price starting from zero and we then turned that into we then formatted that number uh great and now let's go ahead and let's resolve the billboard column
so I'm going to go uh inside my components right here I'm going to go in the columns and I'm going To change the billboard column to order column like that uh the ID uh can stay the same but instead of label we're going to have a phone we're also going to have address we're going to have is paid which is a Boolean uh we're going to have let's see we're going to have the total price which is a string because we format it and we're going to have products which is also a string because we
turn the array of products uh into a String using do join and now let's just modify this so this is going to be uh products products like that you can see how now this says products here uh we're also going to have so I'm just going to copy this and paste it besides products it's going to be phone phone like that besides that we're going to have the address there we go I'm going to copy that again uh alongside address we're going to have the total Price so total price like that uh and we're also
going to have the the last one is going to be actually is paid like this and the header is going to be paid there we go just like that and we don't need the last one so we don't need any actions because we won't be able to do anything with the orders besides actually displaying them because stripe is going to create their orders not us uh great so just make sure that this total price address phone products and Is paid match everything inside of this order column and then meaning match all of this here so
let's go ahead and change this billboard column to order column like that uh perfect and let's just see uh what's wrong here so I think it's because oh yes let's go into the order column uh and let's see if something is missing so just a second yeah we missing the is paid I think yeah it's nowhere here so just add is paid to be item that is paid there we Go and now the error uh is gone and now let's just go ahead and let's uh change the build boo client to so I'm going to
change all instances of billboard client here to uh be order client like that change the billboard column to order column there we go and change this uh yeah yeah we have to go back to page. TSX and just fix the import so it's order client like that right here and in the import here perfect and now we can Go inside of our uh inside of our client here change the Billboards title to orders and manage orders for your store and there's not going to be this button meaning you don't need this so yeah I just
deleted this button if you didn't see so this button right here for the Billboards no need for that and you can also remove this D because there's nothing that needs to encapsulate this heading uh great and let's see if there's something else we Have to remove this yeah so basically we don't need this at all so no need for this heading no need for this separator and no this for the API list at all meaning no need for router and no need for params we just need the data and we just need this data table
and we're going to search by products like that meaning no need for this button no need for API list for Plus or this so a very simple uh components Perfect okay and we can also remove the cell action because we're not using that anywhere as well there we go so that is finished that has finished the front end for our orders what's left to do in the dashboard page is the actual dashboard so this overview tab right here and the API calls for the web Hooks and the stripe but before we do that in my
sense it doesn't have it doesn't make any sense to uh do that because we have no Orders and we cannot manually create orders it can only be done through stripe which needs to be connected to the front end store so what we're going to do is we're going to start creating the frontend store right here I have the new environment and we're going to go ahead and go into our terminal so just prepare that have a new terminal open new vs code and open a new tab and we're going to go ahead and run the
command to start a new next 13 project so run npx Create-- apppp at latest and let's name this uh e-commerce Das store D- typescript D- tailwind and D- Sint like this so I'm going to expand so you can see the entire command so npx create-- apppp at latest give the name of your uh project so the last one was called e-commerce admin this is going to be e-commerce store D- typescript D- tailwind and D- Sint and go ahead and press enter and let's see the questions which we have to answer so no for Source Yes
for app router uh no for customization and just wait for this to install great so this is installed now and one thing I just want to mention make sure you are running your admin so your admin needs to be running at the same time and your admin is going to be running on the port 3000 so you can see I'm refreshing here and it's right here on Port 3000 and this one is going to be running on another port but before we go there let's go ahead and open this newly Created uh app so I'm
going to click open here and I'm going to find uh my so this was the e-commerce admin and this is the e-commerce store this is the new application right here there we go and before I start the project I'm just going to go inside the app folder inside global. CSS and I'm going to remove absolutely everything from here and I'm just going to add HTML comma body root and give it a height of 100 % so that's it for my Global CSS I'm not Going to explain what's here because this is the second time we
are opening the next1 13 app uh I'm going to remove the page. TSX from here so we're not going to use it here instead inside the app folder I'm going to create a new organizational folder called uh routes like that and inside I'm going to create a page. DSX file like that and that file is going to be called homepage like this and all I'm going to say is hello store like that so very simple structure Inside my app folder I have the organizational routes folder which doesn't affect the URL so this is still the
index page and in the globals that CSS uh I've kind of removed uh all of the stuff except this HTML and I left the Tailwind directives uh this warning is fine that's because it's it's it's unknown to CSS but you can fix this with an extension uh or some other way anyway it doesn't affect our development great now let's go in our layout. vsx right Here and what I want to do here is I want to add a specific font so we're not going to use enter instead we're going to use urbanist so go ahead
and use that and replace this with urbanist and uh you don't have to name this inter now because it doesn't make sense let's name this font and just pass font. class name here uh perfect and change this title to store and change this to be uh I don't know store again perfect and now that we have that you can go ahead and try and Run the application so uh let's I just have to update my terminal so let me just do that so just go ahead and run mpm run Dev and make sure that you
have the other app running so you get the same warning that I have and that is that Port 3000 is in use using 3001 instead so now you have two applications running one is the uh store right here you can see with the urbanist font and our text hello store which comes from the only route we have page. thex right Here uh and this and here I have as you can see the I'm just going to zoom out here so here I have the uh dashboard on 3000 and here I have uh the store perfect
so now that we have that let's go ahead and let's start developing here so I'm going to go uh inside of my layout. DSX here and what I'm going to do is I'm going to collapse this children inside the body and at the bottom I'm going to add add a very simple footer component and Of course we're going to get an error when we save because that does not exist so let's go ahead outside of the app folder and create a new folder called components like that uh and now inside of there we're going to
create a new file called footer. DSX let's go ahead and write footer like this and all I'm going to do is write footer like that and we can save for now and we can go back in our layout and import that uh from components so go ahead and write Import putter from add components Booter like that and I'm just going to reorder my imports the way I like it there we go so nothing has changed yet but the error has gone away so we can go back in the footer now and let's give this a
class name of vg- white and Border DT like that so there we go this whole place is now going to be a footer because we don't have any content at the top and let's go ahead and create a d here with a class name of mx- AO py d10 like that And inside I'm going to create a paragraph with the class name text- Center text- extra small and text- black like that and I'm going to write add sign copy so this is going to create the copyright sign uh I don't know 2023 uh fake store
name like that incorporated All Rights Reserved like that uh something like this so fake store name a Incorporated All Rights Reserved there we go and now that you have that uh we finished our Footer so we can go ahead and start creating uh our navigation bar so I'm going to go back in my layout and the same way I did with my children here I'm going to add a enough bar right here uh and once I save of course I'm going to get an error because navbar does not exist so let's go in our components
and create a new file called navb bar. DSX like that and inside of there go ahead and quickly create the Novar component uh with a div and give It a class name of Border DB and just say navbar like that and then you can go back in layout right here and we can go ahead and import that as well so import from at SL components slash navbar like that there we go uh so now we have Navar we have the children and we have the fter right here so let's further develop our nav bar uh
before we can continue we actually have to create uh another component which is going to Be called our container so let's go ahead and let's go inside the components and create a new folder called UI and inside I'm going to create a new file called container. DSX go ahead head and name it container like that create a div with a class name of mx- aouto and Max DW D7 XL so if we uh have an extremely large screen uh there is a limit to how much our container is going to extend let's go ahead and
create an interface for container so container props like That it's going to have children which is react. react node like that and we're going to pass those props here so react. FC uh uh container props and we're going to extract the children so let's go ahead and let's write children like that perfect and now that we have that we can go back in our Navar component and we can continue developing so just below add the container from Dash UI container like That and you already know I'm going to replace that with SL component on uh
UI container like that there we go perfect now what I'm going to do is I'm going to create a link here so link from next Dash link like that uh inside I'm going to add a paragraph which is going to say store like that and we have an error because we have not passed anything into the link so let's get it an hre of Slash like that so that fixes it uh and let's give it a class name of margin left D4 Flex l l g ml- z and GAP dx-2 like that and now let's
just go ahead uh and give this a class name of font Das bold and text whoops font Das bold and text- XL like that there we go so now we have a nice uh store here and it's a link to the root of the page perfect and just uh I want to wrap this link inside the div so I'm going to go ahead and write that I'm going to write a div here like this and I'm going to give this a class name Of relative PX D4 SM smx-6 LG px-8 so different padding depending on
the screen size uh Flex height is going to be fixed 16 and items are going to be centered so there we go you can see how now our navigation bar looks much bigger uh great so now that we have that I'm just going to expand a little bit so you can see the entire thing uh let's go ahead let's continue developing and outside side of our link let's go ahead and let's add the main Nav component and this main nav component uh is going to render our routes so let's go ahead and yes of course
we get the error now so not inside UI but inside components create a new file main dn. DSX like this uh let's go ahead and write main nav like this uh just don't misspell it so main nav there we go and inside I'm just going to return uh let's return a nav like this and I'm just going to say main nav text perfect So we can go back into the N bar and fix that import now so I'm going to go here and write import main nav from s/ components SL main dnv like that perfect
now that we have that we can go ahead inside the M main KN component uh and let's go ahead and let's add some props to this so I'm going to go ahead and write interface uh main nav props like that it's going to take some data and this data uh for now let's go ahead and give it an any we're going to fix that In a second uh and let's go ahead and write react. FC to be main nav props like that and just extract the data inside uh perfect so now we're going to use
this data which is going to be an array of our routes so go ahead and get the path name first cons path name is equal to use path name and you can import that uh from next navigation so mark this entire component as client and write import use path name whoops use path name from next SL Navigation like that and execute this hook right here perfect and now we're going to use const routes to be data. map we're going to have the individual route like that and and the H ra is going to be backx
slash category slash special object route. ID like that perfect and label is going to be route. name like that and active is going to be path name is identical to backck SL category SL Route. ID like that and yes this is an error but it's going to go away once we Define the props uh instead of any here uh there we go now let's go ahead and let's go inside of this uh knob right here and let's give this a class name of MX-6 Flex items D Center space- x-4 and LG space- X-6 like that
uh all right uh and I just want to to fix this error uh you can go into the nav bar and give this a data of An empty array like this there we go uh so now we don't have that error and we can continue developing so instead of this text right here we're going to go and iterate over the routes so routes. map take the individual route and immediately return a link from next link inside we're going to render route. label like that and give this a key of route. hre and a hre of
route. hre as well and a class name so for class name we're going to need to use uh uh our Util to merge the classes and we can actually copy that from our previous project so I'm going to go in my previous project right here in my Libs in my udil right here and I will copy these two things great so we're going to create the same structure so lib and udil so go ahead here and go ahead uh to the root of your folder and create a new folder called lib and inside create .ds
and paste this inside so obviously we need to install this two let's go Into our terminal right here I will shut down the app and write mpm uh install clsx and Tailwind Das merge so make sure you install clsx and Tailwind Das merge and just press enter okay and npm run Dev again and you can refresh just to confirm that it's working and now we can go back here and we can import that CN from at/ Libs slil like this perfect there here we go and now inside of here uh what we can do is
open the First route so text- smm font D medium uh transition Das colors hover text- black like that if route is active in that case it's going to be tax- black otherwise tax- neutral D 500 like that perfect so now let's go ahead uh and uh let's create the actual type for for this data so go and open your sidebar I'm going to close everything and at the root of my file I'm going to create a new uh file called types. DS and first I'm going to define the billboard so Export interface billboard like that
it's going to have an ID of string and it's going to have a name of string uh and it's going to have image URL of string as well and then we can export our interface for category which is going to have an ID of string and name of string and a billboard of billboard like that there we go and now we can go back uh inside of our components inside our main nav and change this to category like this from types and make sure it's An array like this and there we go now all of
our types have gone away perfect and what we can actually go ahead and attempt now is to load our categories uh so one thing I want to mention is that I have no affiliation with this fake store name so this is just for educational purposes right here uh great now let's go ahead and let's go uh and try and fetch this route so I'm going to go in my nav bar right here and this is where we are going to uh fetch this so in Order to do that uh we have to do one thing
first and that is we have to create uh our environment file uh and inside of that environment file we have to create uh a specific route so let's go ahead and do that I'm going to go here and I'm going to create a new file do environment and before I do anything inside please go to GE ignore and add that here so do environment like this so it's not accidentally committed to your project Okay and now inside which route will I put here well we have to go to our store click on settings right here
and just copy this so next public API URL paste it here and value is going to be this so just copy that and paste it there we go that's how easy that was and now we can go back in our navbar and we're going to go ahead and create an action which is going to call our categories so in order to do that let's go ahead and let's create a new folder called actions like That and inside I'm going to go ahead and create uh a new file called get- categories. DSX and first I'm going
to import the category from my types like that and I'm going to write const URL is equal to backx process. environment do so this new environment variable which we just added so next public API URL and just paste it here slash categories like that and then I'm going to write const get categories to be an asynchronous Function which is going to return a promise and inside of that promise a category so let's go ahead ahead and write const response is equal to await patch URL like that and return response. Json like that and Export default
get categories like that there we go let's go in our nav bar here and what we have to do is we have to mark this as a synchronous and I'm going to write const categories to be await get categories From actions get categories like that and we're going to use these categories to pass that data right here and there we go you can see I have my glasses and my shoes that's because we are fetching the categories from this store do you see how amazing that is so let's go ahead and let's rename these glasses
to I don't know something else uh dresses something like that and save the changes and you're going to see what happens once I refresh Here uh there we go dresses so you have to hard refresh I click command shift r or you can just put uh export con revalidate zero so it's never cached there we go now it says dresses and if I remove shoes for example delete this entirely oh I have a product using this category so this is our safety mechanism let's see maybe this one uh can be deleted yes this one can
and if I refresh here uh again there we go so just shoose you can see how cool uh this Is great so now that we have the main nav finished we're going to go ahead and create the Navar actions so go ahead and write Navar actions like that and save the file and of course we get the error because it does not uh exist so I'm going to go inside components and create a new file navbar D actions. DSX like that and inside uh let's go ahead and Mark this as use client like that and
let's write uh the knv bar action And I'm just going to return a div which is going to say hello actions like that so we can go back inside Novar and import that uh the same way we did with main so Navar actions from navbar that actions like that there we go so now it says hello actions so let's go inside and let's add uh some Styles here so I'm going to write class name to be ml- aouto Flex items D Center and Gap dx-4 like this so now it's all the way to this side
exactly uh what we want Perfect and now we have to create our button component so let's go ahead and let's do that uh I'm going to go inside my UI and create a new file button. TSX like that and the way we're going to do that is we're going to write uh const button is going to be forward ref which you can import from react and inside we're going to add uh the interface so let let's create that export interface button props uh it's going to extend so extends React. uh button HTML attributes and inside
passing the HTML button element like that and just give it an empty uh object right here so now we can add the HTML button element with the props button props like that go ahead and open this function uh sorry it's a ref so open parenthesis and open parenthesis again and then you can open uh the object so add the class name children disabled and type the Default button and the rest of the props great and after this object just add a ref like that and then go ahead and return this so just write return uh
and I'm just going to return a button so native element and to fix this big red error what we have to do is add it a display name so Buton but. display name is button like this so we are creating our own components in this one uh because I need uh I needed more freedom from the shat CN style for now in the Future if I know shat CN better I'm probably going to add it in all of my uh projects but for now it was just for the dashboard uh but for the store I
needed to look a little bit different uh great so let's go ahead and let's play around with the styles of this button so inside I'm going to render the children that's the first thing and let's not forget to immediately add uh the ref right here great uh and now let's go inside our Navar actions and I'm going to add That button so we can actually uh see what we're doing so I'm going to add a button here like that uh and let's just see I think I forgot to export uh the button yeah I must
certainly did so export default button there we go and now we can go back here and let's go ahead and import the button from s/ component slui button like that and one thing I don't like is that it's capitalized right here so I want to change that I want to make it lowercase Because all of my uh all of my imports are lowercase there we go uh okay so now I have this error right here because I did a renaming so what I'm going to do first I'm going to try and reload the entire window
let's see if that resolves it uh I think it does let's see the terminal if everything is fine it is okay good that resolved it so I just had to refresh my uh UI perfect so now that we have that inside of this nobar actions button uh what I'm going to Actually do is I'm going to add an icon and a text so the first thing we have to do is install Lucid react so let's go here I'm going to shut down the app and write mpm install Lucid D react like this and mpm run
Dev okay and now that that I install that I'm just going to refresh my window again and I'm going to refresh this here and I'm going to add the shopping bag from Lucid react right here so it's an icon it's a self closing tag let's go ahead and give this a size Of 20 and a color of white like that so nothing we can see yet uh and let's also go ahead and give this button a class name of flex items dent ENT rounded D4 BG Das black uh and P x-4 py -2 like that
okay and now let's go finally back in our button component here and let's apply those things so let's go ahead to the class name prop it's going to be CN from lib UIL so I'm just going to reorder those like that okay and I'm going to Open CN like this and I'm going to open back Tex just so I can write in multiple lines so you don't have to use back if you don't want to uh it's going to be W AO is going to be rounded full like that BG is going to be black
border is going to be transparent like that uh PX is going to be five py is going to be three so you can see how we slowly this is starting to look like something uh okay disabled is going to be uh uh cursor Das not- Allowed uh disabled opacity D50 text- white font semibold cover opacity d75 and transition like that and I'm also going to pass in uh the class name like this there we go so what this does is it enables me to overwrite any of these classes here the way I did in nvar
actions you can see that I added some of the custom classes so I changed the padding I changed the roundedness and stuff like that great so we can go back Uh inside of our navbar actions now and what I'm going to write besides the shopping bag is going to be a span and this span is going to be for now zero but it's going to render the amount of items I have in my cart so give it an mL of two text- smm f- medium and text- white like that perfect uh okay and now that
that is finished uh let's go ahead and let's just quickly add the mount fix for this sbar actions because our cart we're Going to use our cart here and our cart is going to use local storage to preserve the amount of items someone has in a cart so that can cause problems with hydration so I'm going to do a little prevention for future uses so const is mounted set is mounted from use state from react give it a default value of false like that and let's write use effect from react like this and set is
mounted is going to be true if it's not mounted in that case Return null like that uh perfect so that is it for now for this part uh that finishes our navigation bar and what we're going to do now is we're going to start working uh on loading the individual big billboard and some products so let's go inside of our page. DSX in the app folder right here okay and uh what we're going to do here is going to replace this and I'm going to write container which we can import from as/ components UI container
which we Created let's add a div with a class name of space- y- 10 and pb-10 like this uh and we're now going to go ahead and create our billboard component so go ahead and write billboard like that and let's go ahead uh and let's add that so inside of my components I'm going to create a new file billboard. DSX like this let's go inside uh and first things first I need the billboard type so import billboard From typ types like that and let's create the interface billboard props so data is going to be billboard
so I'm just going to rename this so billboard as billboard type like that and then I can pass in the data for billboard type and then I can name my component billboard there we go uh great so let's go ahead and assign this props react. FC billboard props like that data like this uh and let's create a div here with the class name of P-4 uh SM whoops p-6 LG p-8 rounded D Excel overflow Das hidden like that and inside I'm going to create a div with a style to be background image go ahead and
open backs write URL and inside open a special object data question mark. image URL like that and besides this style we're also going to have a class name so give this a class name uh of Rounded D excl relative aspect d square like this MD aspect uh is going to be a special aspect 2.4 SL1 so this is the custom value I found that looks good and overflow Das hidden and BG Das cover like that perfect so we have those class names now now inside of that div you're going to open another div with a
class name h- full w- full Flex Flex D column justify Das center items D Center text- Center and GAP dy-8 like that and inside what we are Going to do is we're going to render another div with a class name of font Das bold text- 3XL SM tx-5 Exel LG text- 6 Exel SM Max D width of XL and Max D wxs on other devices like that so I'm just going to expand this entire thing so you can see that nicely okay and inside I'm going to render the data do label like that perfect so
now I have that uh okay so the property label doesn't exist on the type billboard uh let's see what that is About uh it should exist uh billboard type let's go in our types let's see oh sign put name instead sorry label in the billboard interface great now go back in your billboard uh where is it okay and now the error is gone there we go so just make sure you have all of these classes here surrounded Excel relative aspect Square special aspect for medium overflow BG cover uh here we have some special alignment for
the text and here We have the styles for the text depending on the viewport so it looks nice on all devices great now let's go back to page. DSX and what we have to do is we have to add the data right here so we're going to do this the same way with did with the navigation bar uh first let's add the uh revalidation so export con revalid date is going to be zero so it's not cached accidentally and now let's go ahead and create a function to fetch the individual billboard that we Want here
so I'm going to go in my actions I'm going to copy get categories and paste it and I'm going to call this get- billboard so the individual uh billboard right here and what we're going to do inside is we're going to get the billboard type like this and I'm going to change this to slash Billboards and it's going to be called get billboard like that it's going to take the idid which is a type of string it's going to return a promise with a Type of billboard but not an array it's going to be a
single billboard and this can uh be modified a little bit so we're going to open back text here wrap this in a special object slash ID like that so we're going to go to slash billboard slash ID that's where we are going to go great so we have that now so we can go back inside our page. DSX here and let's go ahead uh and let's mark this as a synchronous like this so we can get the billboard const billboard is going to be A wait get billboard and what id do I put here well
whatever I have in my Billboards so let's see what I have here uh in my Billboards I have another one and test so I'm going to go ahead and copy the ID of this one and see what happens I'm going to paste that here I'm going to refresh and let's see uh if that works so billboard is not defined I forgot to import that so let's go ahead and write import billboard from at uh Slash components slash billboard like That and let's pass in the data of billboard I forgot to do both of those there
we go it says another one and I have my background so if I rename this to something else let's say I uh say I say I don't know explore the special collection and save the changes right here and then update this there we go now it says explore the special collection uh perfect so now that we've done with this we can go ahead and add some Featured products to this page so to add our products we first have to add the types for that so I'm going to close everything here and I'm going to go
inside types. DS here and let's go ahead and Export interface product like that it's going to have an ID of string a category of category like that it's going to have a name which is a string uh price which is also so a string is featured which is Boolean like that size which is going to be a type of size Which we don't have yet so just leave the error and same for color like that uh and images which is going to be an array of uh image which we also don't have so let's go
ahead and create those so export interface image is going to be uh have an ID of string and URL of string and let's see what else so export interface uh size it's going to have an ID of string name of string and value of string like that and that is going to be The exact same uh for color like that perfect so now that we have that uh let's go ahead and let's actually first create uh the route which is going to fetch our products so I'm going to go ahead and I'm going to go
in my actions and we can copy the categories so just copy the categories like this and rename it to get Dash products like like that and inside let's go ahead and let's first import the product from our types and we need to install a package called Query string so I'm going to go in my terminal here I will shut down the app and write mpm install query-string so make sure you run this command npm install query-string and press enter and then go ahead and npm run Dev again and just refresh the logo holes 3001 great
and now let's import Qs from query-string and if you want you can separate those Imports perfect so now instead of using the SL categories we're going to use SL products like that and Change this to product there we go and name the function get products like that uh perfect and now let's go ahead and generate our URL so const URL is going to be qs. stringify URL because we're going to have some uh filters here so before we do that we have to create an interface that's going to accept those filters so interface query is
going to be category ID which is an optional string uh color ID which is an optional string as well and size ID which is an Optional string as well and is featured which is a bullion like that and then we can add the query in here so query is a type of query like that perfect now write the URL to be the URL like that and query is going to be color ID query do color ID like that size ID query do size ID uh category ID query. category ID just make sure both of these
are the same great and is featured it's going to be query do is featured like that there we go and the Rest can stay the same perfect so now that we have that uh let's go ahead and let's go uh inside of our page. TSX again so app routes page. TSX here and the same way we fetched our billboard so const products is going to be a wait get products from actions get products like that and it expects a query so I'm going to go ahead and give it an is featured true so on this
page this is the landing page this is where we're going to load our featured products so let's see if we Have any so in my database right here uh sorry in my admin I do have a random shirt so that's what should be rendered here perfect so what we can go ahead and do now is a div here with a class name of flex flex-all Gap dy-8 PX D4 s smx-6 and LG px-8 like that and in here I'm going to create a new component product product list like that with a Title of featured products
like that and items are going to be products which we just fetched from right here so if we save of course we're going to get an error so let's go inside of our components and create a new file product-list do PSX so you can see I'm kind of inconsistent with what I put inside of my UI for example billboard can be inside the UI folder so practically it's a matter of what you're going to reuse versus what is only going To be used once you can pick and choose how you want to do that just
you know uh make sure you import it from the same place so you don't get errors uh great so product list let's go ahead and develop that now so I'm going to write the uh the quick uh shorthand product list inside great let's create the interface so interface is going to be product list props like that title is going to be string and items is going to be product From our types and it's going to be an array of those great so we can now assign those props so react. FC uh product list props like
that with title and items perfect and now inside go ahead and open a div with a class name of space- y-4 uh give it an H3 uh which renders the title like that and let's save for now and go back inside and import this so import product list from s/ components product-list there we go and We should render the featured products right here perfect now let's go back into the product list and let's give this some Styles so class name is going to be font dbol text D3 Excel like that there we go now it
looks much better uh and let's go uh ahead and first what I want to do is I want to create a no results component which we're going to reuse every time uh our results are empty so let's go ahead let's put that inside UI because we're going to reuse it so no- results. DSX no results like that go ahead and let's return a div with the class name of flex items D Center justify D Center h- full w- full text- neutral d500 great and inside we're going to say no results found there we go now
go back in the product list and what we're going to do is we're going to check if the length of the items is zero so for that Uh let's go ahead and let's pretend so instead of sending products here send an empty array like that and go back in the product list and we're going to render if items that length is equal to zero in that case render the no results like that and that's should say no results found perfect and I'm just going to change this to SL components like that there we go uh
and now we can go back and change this to products and it should go away because we actually have Some products it's right here it's the random shirt perfect so in my product list right here what I'm going to do next is I'm going to create a grid which is going to render our products so grid grid ds-1 on small device is going to be grid ds-2 on medium it's going to be grid D calls D3 and then large is going to be grid ds-4 and I'm going to give a gap of four to all
of those grids so grid grid calls one on on extremely small devices On small is going to be two on medium three and on large is going to be four great now let's go ahead and iterate over this item so item. map like this and item like that and let's go ahead for now uh let's just return a div which is going to say item. name like that uh and let's see uh what is my mistake here I think I'm missing I'm definitely missing something I'm just not sure what okay yeah and let's give this
a key of item. ID there we go so it says random Shirt right here so it's loading this product right here so now we have to create a card which is actually going to uh render this so let's go ahead uh and let's do that now so I'm going to go inside of my UI and I'm going to create a new file product- card. DSX like that let's go ahead and write product card like that and let's give this a div product card for now and let's mark it as uh use client so use client
like this perfect and I'm going to go uh back Inside of here and instead of rendering uh this I'm going to go ahead and render the product card so I'm going to say product card from at UI product card so we can change that components if you want to you don't have to great and let's go ahead and give this a key of item. ID and data is going to be it item like that perfect so back in the product card and let's create the interface so interface product card it's going to take data which
is a type of product From types like that let's assign that so react. FC product card like that and let's extract uh the data inside so data like that uh perfect now let's go ahead and let's actually make this look like something so the first div is going to have a class name of BG D white group cursor Das pointer like that it's going to be rounded D excl border padding D3 and space- y-4 great so you can see how it's already starting to look like something uh great I'm just Going to expand a little
bit so you can so you can see how this is responsive right you can see how it changes the aspect ratio when we get on mobile uh perfect great so now that we are here inside I'm going to go ahead and I'm going to create uh my images and actions so open a div inside and give it a class name of aspect d square rounded D Exel vg- gr-100 and relative like this great you can see how now there's a space for my image inside And I'm going to go ahead and render the image so
import the image from next SL image I'm going to move it and separate it right here it's going to be a self closing tag let's give it an ALT of image like that and as well as give it a source of data question mark images question mark DOT first one. URL like this and what we get is that uh well we are missing the vidth so and to fix that just add fill like this and now we have the invalid Source prop So we have to add the host name which is the same thing we
had to do here so you can copy it from here find your next config JS oops sorry and just copy the images here so go ahead and go back in here next config JS and just paste that inside and I recommend that you shut down your application and restart it so mpm run Dev again and restart your entire application so you don't run into any problems and I'm going to go back in my product uh card right here okay there We go so I have my image right here so now let's go ahead and let's
add some class names so class name for this image is going to be aspect d square object D cover and rounded DMD like that there we go so now it looks better perfect and what I want to do now is I want to create uh a space for our icons to show when we hover on individual product so go ahead and create a div with a class name opacity uh opacity D z by default but when we hover it's going to be opacity 100 so what does this mean so by default this element is going
to be hidden but once we do group hover it's going to be visible so what's group hover well group hover means when we hover on this and on this parent right here so when I hover anywhere here I'm going to show the three icons here sorry the two icons the quick preview and add to card icon great so let's go ahead uh and inside let's just create Another d class name Flex Gap D X-6 and justify D Center like that perfect and now inside I have to create a new component called icon button like that
so let's go ahead and do that so I'm going to go inside of my UI and create a new file icon Das button. DSX like this and this is going to be well a simpler one so let's go ahead and write the uh shorthand icon button like that uh and it's going to render a button uh let's go ahead and give it an On click which is going to be on click we're going to add that uh let's go ahead and give it a class name which is going to use the libs so CN like
that the default class is going to be rounded D full Flex items D Center justify D Center BG Das white border Shadow DMD uh we're going to have a padding of two on Hover we're going to scale to 110 and transition like that uh so let me just collapse this classes just a bit uh actually Yeah I can't collapse them but I can do uh this there we go okay so now you can see everything Sur rounded full Flex item Center justify Center B wi border Shadow MD padding to hover scale and transition perfect uh
and I'm also going to passing the class name which is the prop we're also going to have and inside I'm going to have an icon so let's go ahead and add those props now so interface icon button props like this is going to have an on click which is Optional it's going to be a mouse event handler which you can import from react and inside HTML button element like that or undefined like that then the icon is going to be react. react element like that and class name is going to an optional string like that
so let's go ahead and assign that react. FC icon button props like that and uh let's extract on click icon and class name and all of our errors are going to go away perfect so now let's go back in our Product card so we can use those so in this first icon button let's go ahead and import that so import icon button from add/ components slui SL icon Das button like that perfect now let's go ahead and give this an on click of empty like that and icon is going to be expand from Lucid react
so make sure you import that as well uh great so expand and we're going to give it a size of 20 like that and a class name of text- gray- 600 like that so let's see How that looks uh looks like I'm not seeing anything yet so let me just go ahead and debug why this is happening uh it's happening because I did not finish uh styling this so opacity is zero on group opacity is 100 but I did not position it so give it a transition class an absolute class w- full p uh P
PX uh 6 like that and bottom-5 like that perfect so you can see my entire class here and as you can see now when I hover I have this icon Popping up perfect so I'm going to go ahead and copy this icon now like this I'm going to copy that and this one is going to be shopping cart like that and now I have two icons one for to card and one which is going to extract sorry is going to expand this into a larger view perfect so now that we have this uh what we
have to do is we have to create our description so I'm going to go ahead and add a comment for description here and let's go ahead and Create a div inside let's give it a class name whoops no class name for so it's just going to be a structural div which is going to hold a paragraph which is going to say data. name so you can see how now it says random shirt and give this a class name of font semi bold text- LG like that and inside another one which is going to render the
data. category. name like that with the class name name of text DSM text- g-500 uh there we go so now it says Random shirt and the category shoes right here perfect uh now that I have that outside of this div uh go ahead and we're going to write the price in here so div with a class name Flex items D Center and justify Dash uh between like that and inside I'm going to add a new component called currency we don't have it yet but let's go ahead and give it a value of data question mark
price like this of course if we save uh we're going to get uh an Error so let's go ahead and inside of our UI create a new file currency. DSX so currency like this and inside uh I'm going to give a div with the class name of font semibold and I'm going to run the format so before I do that I have to create the format first so we already did that uh in our uh the dashboard so go ahead in your lips here in UDS and you can just copy this format right here and
paste it here there we go So now you can use that format inside form. format uh number value and we're going to get the value from our props right here so let's go ahead and Define that interface currency props value will either be a string or a number like that and assign those props so react. FC currency props there we go uh so we have that now and now we can import this currency the same way with did uh with the icon Bon so currency and Currency like that there we go and now you can
see uh the price here but what this can cause is hydration errors so I'm going to go inside the currency right here I'm going to mark this as use client and I'm going to create the good old is mounted trick so is mounted set is mounted is going to be equal to use state from react default value is going to be false like that uh use effect from react as well don't forget the dependency Array here set is mounted to True like that and if it's not mounted in that case return null perfect and now
that we have that you can see for a split second the price is not loaded and then it loads great so that's exactly uh what I wanted with the product card right here uh and we officially finished that of course we'll have to go back later uh to create some uh activity here when we click on the expand when we click on the shopping cart uh Etc uh nevertheless we Also finished our product list if I'm not mistaken so let me just go here to confirm that yes we have finished our product list uh and
now uh what we can do is uh well we can go ahead and add another product just for fun so I'm going to go here and add a new product just so we can have a better look of our store so I'm going to go here I don't know uh let me choose a suit so I'm going to choose suits like this I'm going to go ahead uh and I'm Going to wait for this to upload and then I'm going to click done I'm going to name this navy suit like that it's going to be
$199 I'm going to choose some completely random uh stuff here and click create like that I'm going to refresh here uh and there we go the navy suit now uh appears here perfect yeah one thing that just looks weird is that this looks very close to my footer so let's go back in my page That PSX and you can see here I have this dip which wraps the billboard and we close it right here so let's not do that let's instead close it and unwrap both of these things inside my homepage right here and there
we go now the space looks much much better great so now uh I'm going to go ahead and I'm going to implement the individual page view so let's create the individual product page in order to do that first let's go back in our product card and we Have to add a redirect when the user clicks on this to get redirected to the individual product page so we going to go ahead and write a constant handle click which is going to be an arrow function and it's going to call the router so we need a router
const Router is equal use router from next SL navigation like that and router. push go ahead and point into slash products slash data question mark. ID like that perfect And let's add that to this onclick right here to the main app great and now when I click on something you can see uh I'm going to be redirected to a404 so let's go ahead and let's resolve that again make sure you have your dashboard running so you can see it's right here on local Hol 3000 and this is on 31 in the app folder in the
routes I'm going to create a new folder uh it's going to be called products uh like that my apologies not Products but product so product and in inside create a new file product ID like that and inside a new page. DSX let's go ahead and let's call this product page written a div individual product like that and now if you refresh uh so you're still getting the error uh let's see why so product product ID let's go back in components uh UI product card so yeah redirected to SL products instead it's just individual Product and
just go back to the homepage and click now and there we go now it says individual product so in the handle click in the product card component make sure that you redirect to/ product data ID and make sure that your folder in routes is product not products and inside you have a product ID and inside of that you have a page. DSX like that perfect let's go ahead and create uh an interface so interface product page props is going to have params which have The product ID which is going to be a string let's go
ahead and assign that so react FC product page props and go ahead and extract the params perfect now that we have the params we can go ahead uh and let's first uh fetch the let's fetch the suggested products for this individual product so we're going to use the same category so I'm going to go ahead right here and I'm going to write con suggested products is going to be equal to a weit which means that this Has to be a sync like that and we're going to call get products from actions get products and inside
add the category ID and use parents sorry product question mark. category question mark. ID but I just realized that I made a mistake because I don't have the product so go ahead and write con product and just make it an empty object for now and what we're going to do is we are going to go ahead and uh create a Function to fetch the individual product so let's go ahead and let's go in our actions copy the get products sorry you can copy the get billboard so copy get billboard and rename it to get- product
like that and instead of SL Billboards it's going to be slash products there we go and rename this to get products perfect and re change the return type to one individual product like that and everything else can stay the same and now that you have that go Back to page and replace this empty object with await get product and let's see why we're not getting that so get product right here uh yeah I renamed it so instead of get product it's individual get product my apologies so get product is the constant name and that's what
we export let's go ahead and try again get product so not get products but get individual product so we have both get products and get product but for this one we need uh The get product first and we're going to use the rams. store ID uh sorry do product ID so we get the product that the user actually clicked on and then using the category that product has we're going to load all the other products perfect so let's go ahead and give this a class name of BG Das white let's go ahead and add a
container from at components uh UI container and inside create a div with a class name PX -4 py -10 SN px-6 and Large px-8 so different padding depending on The View part inside create a div with a class name LG grid LG grid - calls -2 LG items D start and LG Gap D x-8 like that and inside of that uh we're going to go ahead I'm just going to leave a comment gallery and for now create a div Gallery like that and in here create a new div the class name mt-10 px- 4 small
mt-16 uh small bx- Z p x-0 and large mt- Z like that and Inside I'm going to leave a comment and write info and for now just go ahead and write info so that's going to be the product gallery and this is going to be the color uh the product info like this and if you extract you can see how it's side by side but on small devices it's going to be one below each other great so I'm going to zoom out a little bit so it's side by side uh great whoops uh and now
my uh let me just okay uh what I want to do now is I Want to find a way to render the suggested products because we already have the components we need for that so we can do that first so uh go outside of this div right here write an HR give it a class name of uh my10 like that and render the product list from at/ components product list give it a title of related items and items suggested products like that and there we go you can see how now uh all Of these are
in the same category as uh well we only have these two right so it's a bit hard to see but when I click on an AV suit you can see that it shows all the items in that same category which is the shoes but if I add uh another category let's say I do that now so I'm going to go here and I'm going to add a new category uh called I don't know uh glasses like this with a billboard of test and click Create and I'm going to go ahead to my products and I'm
going to change that random shirt is going to have a different category so it's going to have glasses I'm going to click save changes here so now I have two products each of them has a different category and I'm just going to refresh again okay and we're still getting the same thing uh let's see uh why is that happening okay so when I click here okay it's still the same thing uh let's go Ahead and let me figure out why exactly is this happening well I think I found a reason why it's happening let's go
in our get products right here you can see that I generated this URL constant but I never use it I only use this URL which loads all products let's go ahead and try loading just this so inside get products I'm using this constant Qs stringify URL where I actually add the parameters and there we go now it's a different result So now if I click on navy suit you can see it only loads the item which right now is only the navy suit right here perfect so great that is done now let's go ahead and
let's create our Gallery component so inside of here I'm going to replace this comment and this div with the actual Gallery component right now nothing should be visible because there's no way uh for us because we don't have the component uh okay and I'm already going to go ahead and pass In the images so I'm going to write product. images like that and now let's go inside of our components and create a new folder called Gallery because it's going to be consisted of multiple items inside create a new file uh index. PSX and go ahead
and write the gallery like that and just return a div Gallery like that go back into page and feel free to import that component so import uh gallery from s/ components Gallery like that and then it still just says Gallery Great now go back into components get Gallery index. DSX and we have to install a package headless UI so we're going to use headless UI instead of Ric just so we practice a bit with different Technologies mpm install at headless UI uh SL react so make sure you have this package and it click install like
that and once it's done I'm going to rerun my application okay now that I have that uh I'm going to mark this as use client Like that and I'm going to import tab from at headless UI react like that I'm going to import image from next image and I'm going to import image as image type from add/ types like that perfect and now let's write the interface so interface Gallery props is going to have an images which is an image array sorry image type array like that let's go ahead and assign that so react. FC
it's going to have a gallery props like that images great and Now we can start working so instead of a div we're going to render tab. group like that we're going to give it a property as div and the class name of flex flex-all D reverse okay now inside I'm going to give it a class name of MX - AO mt-6 hidden w- full Max dw-2 XL SM block and LG oops LG is going to be Max dw- none like that great and inside I'm going to add a tab. List like that let's go ahead
and give this sorry it's a capital list so list with a capital l like that and let's give this a class name of grid grid ds-4 and GAP D6 like that and inside I'm going to go ahead and run the images. map which holds the individual image like that and we're going to return another component Gallery tab which we have to create so give it a key of image. ID and an image of image like that if we save obviously we're going to Get an error let's go ahead uh and let's resolve this so in
the gallery create a new file Gallery Das tab. DSX Gallery tab like that I'm just going to quickly return uh a div inside so div oops Gallery tab let's go back inside the gallery index and just import that or we can import it here because it's it's right here like that okay And let's continue developing inside uh the gallery tab right here so first let's grab our image so import image from next image like that let's import the tab from headless UI react let's import CN from at Libs utils and let's import image from types
but let's remap it to as image type like that perfect now let's create the interface Gallery tab props it's going to take an image which is a type of image Type whoops image type like this make sure you uh fix this typo right here and go ahead and assign this props so react. FC Gallery tab props and add that image right here perfect now instead of having a div inside we're going to have the individual tab like that let's go ahead and give this a class name of relative Flex aspect d square cursor Das pointer
items D Center justify D Center rounded DMD and BG D white okay and inside uh we're going to Go ahead and open a render function like this so open parenthesis and immediately the structure selected like that and go a uh go ahead and return this like that return a div whoops like this inside open a span like that and give this a class name of absolute h- full w- full aspect d square inser d0 overflow D hidden and rounded DMD and inside we're going to go ahead and render the image component which we Imported from
next image give it a fill property source is going to be image. URL like that alt is going to be empty and class name is going to be object D cover object D Center like that uh great and below that outside of this spam create another spam component uh which is also going to be a self-closing component and we're going to use this to create the Border uh around the around the single tab let's go ahead and write class name CN like That absolute inset d0 rounded DMD ring-2 ring- offset D2 like that comma selected
ring- black otherwise ring- transparent great uh perfect now let's go ahead uh and let's see uh okay so this looks like that now uh I'm going to continue developing before I uh debug this so let's go ahead now and let's go back in our Gallery in the index right here uh and let's see where we added the Gallery actually so inside this page Gallery product. images uh okay so we have the images obviously okay let's just continue developing from here so uh outside of this div right here which holds the tab list go ahead and
create tab do panels like that and give this a class [Music] name of aspect Das Square w- full like that and inside you're going to go ahead and iterate our images again so images That map a single image like that tab. panel like that it's going to have a key of image. ID and a div inside with a class class name the class name uh is going to be aspect d square relative h- w-o SM rounded dlg overflow D hidden like that and inside we're going to render the image component like that let's give it
a fi property source is going to be image. URL and ALT is going to be image like this and class name is going to be object d cover object D Center like that all right so we have the big gallery now but something's going on with the gallery tab right here it's not rendering properly uh you can see how it's responsive but let's see why my gallery tab is not working so first things first let's check uh if everything is okay here so the MX out is correct mt6 is correct hidden uh yes we Want
it to be hidden but on small it should be blocked correct uh this seems correct class name grid grid calls 4 Gap six okay let's go inside the gallery tab uh to see what's going on there so we have the relative Plex aspect oh it should be aspect square like this there we go so my aspect was mistyped there we go and now I can click on this one and it focuses on this one perfect so we uh finished our Gallery great and we going to reuse This Gallery uh for the model as well now
let's go ahead and do this info on the side so let's go ahead and let's go back in our individual page right here where we have the info and I'm going to replace the comment and this with the info component and I'm going to go ahead and pass the data here so data is going to be product like that let's go inside of our components and create a new file info. DSX like that so F sfc info like that and let's go ahead and build these Components so first I want to give it the props
interface info props data is going to be product from types like that let's go ahead and assign this so react. FC info props like that and just D structure the data like that perfect uh and now I'm just going to go ahead and render a div inside like that let's go back to the individual page and just like we did with gallery now let's do with the in And just from info like that great now let's continue developing so let's give it a heading right here which is going to render data. name so there we
go now it says navy suit right here and let's give this a class name of text D3 Exel font D bold text- gray- 900 and that should be it and just font Das bold was my uh typo apologies all right and now below that create a div With a class name of mt3 so we separated from the title Flex items D end and justify Dash between like that okay so that was just some positioning now inside open a paragraph with a class name of uh txt-2 Exel text- gray- 900 and go ahead and render the
currency from at uh from slui currency but I'm going to change it to components like this and give this a value of data. price there we go so now it says the price nicely perfect uh and outside of This div go ahead and create an HR element and give it the class name of my4 so from both top and bottom it's going to be a little bit separated perfect and go ahead and create a div here with the class name of flex items Center Gap dx-4 like that and it's going to have an H3 element
inside and it's going to says size like this let's give this H3 element some props sorry some classes so font semi bold and text- black like That and let's give it a div which is going to render data do size do value like that or you can change it to name uh regarding on what you prefer so whatever you think is better for user experience here great now outside of uh this div right here you can go ahead and actually copy this so I'm going to copy and paste like that and we're going to change
the size uh to be color like this but instead of just rendering this we're actually going to render uh a nice Little uh Circle which is going to show the actual color so go ahead and write class name h-6 w-6 rounded D full border border D gray- 600 and give it a style of back ground color is going to be data do color. value so this one needs to be value great and now let's check if I go ahead and change my navy suit color I'm going to create a color here and I'm going to
add a new color and I'm going to call this I don't know something else And let's just enter a random color here and create that and I'm going to go in my product now here I'm going to go into my navy suit I'm going to update it and I will change that to that new color and save the changes okay and now if I refresh here let's see there we go so after a hard I have to refresh a couple of times and then it works perfect so let's just go ahead and wrap both of
these items this one that shows the size and this One that shows the color into another div so I'm going to open a div here and encapsulate both of those like that so we can indent them and give this do a class name of flex flex-all Gap dy- 6 like this there we go okay that looks uh better and I have a typo here so font there semi bold here and semi bold here there we go now the size is darkened uh like that perfect now I'm going to go ahead I'm going to go uh
just outside this div create a new div with a class Name of mt10 flex items D Center and GAP D x-3 like that and I'm going to add a button component so go ahead and import that from /ui button or from SL components like this and let's go ahead uh and just write add to cart like this and let's add a shopping cart from Lucid react so make sure you import the shopping cart from Lucid react and while I'm here I'm also going to mark this as use client like that and let's give some Class
names to these buttons so class name right here is going to be Flex items D Center and GAP dx-2 like that there we go now it looks better perfect and let's see how this looks when I Collapse there we go so it's completely responsive beautiful uh what we're going to do now is uh we're going to create the individual uh category screen let's continue and let's create the individual category page so right now if I click on glasses or shoes I get A 404 so let's go ahead and and resolve that I'm going to close
everything and inside of my app folder inside the routes I'm going to create a new folder called category and inside of there I'm going to create a new folder category ID like that great and inside of there I'm going to create the page. DSX let's go ahead and call this category page like that and create a div category like that so now if I click on glasses let's see that works the reason that works is Because in main nav uh you can see that the h is SL category SL category ID so don't have a
title here make sure this category matches the folder name right here great now let's go ahead and add the props for this so interface category page props it's going to have params of category ID which is a string like that and it's going to have search params because we'll be able to filter by color ID and by size ID great and let's also add the export con revalidate so we don't have any cash here great now let's go ahead and assign these props so react FC category page props like that and let's extract the params
and search perams perfect now let's go ahead and fetch the products by these filters and the category so con products are equal to A8 get products and before we do that we have to add a sync to this function And then let's import get products so multiple get products from actions get products and inside I'm going to go ahead and pass the category ID which is from pam. category ID I'm going to pass in the color ID which is from pams do uh sorry from search pam. ID and size ID from search pam. size ID
great now let's go ahead and create our actions to get the sizes and colors and the individual category so let's go ahead and first do the sizes so I'm going to go ahead in my Actions I'm going to copy the categories and paste them and rename them get- sizes like this uh rename the component get sizes sorry the function and instead of SL categories it's going to be slash sizes like that and change this type to size there we go and then you can copy and paste that and rename that to get- Colors there we
go and rename the function to get colors and the type to color like that oh my apologies so the type to Color and this to slash colors like that so same as sizes but here we match the colors and let's go ahead and let's create uh the want to fetch the individual category so copy the uh get product right here and rename it get- category great and rename this function to get category and it's going to be slash categories the type is going to be category and this can stay the same perfect now we can
go back into our page right here And let's go ahead and let's add the sizes so con sizes is going to be a weight get sizes like that const colors is going to be await await get colors make sure you import that so I forgot to import get sizes so let me just uh do that get sizes from actions get sizes and const category await get category rams. category ID like that and make sure you import get category from actions get category so These are the Imports that I have perfect uh and now we can
go ahead and start developing this right here so class name vg- white and let's add the container here so import that from components UI container like this and ins inside of the container we're going to render our billboard and remember each category has a billboard attached so we're going to pass in the data category billboard like this so let's go Ahead all right so we have an issue here and let me just wait a second to resolve it so the issue is that we are not including uh the billboard in the individual get category so
go back into your dashboard go ahead and find the API folder go inside the categories inside category ID inside route TS like this and find your get function and alongside where add include category sorry billboard true like this and now if I refresh here I Think that should resolve uh the issue there we go so now it says test because the category that I'm in which is glasses if I go into that category right here uses the test billboard perfect so that is working correctly so let me just change that billboard to the explor the
glasses collection so it looks just a little bit better so I'm going to save here and I'm going to refresh and there we go explore the glasses collection perfect let's go Ahead and let's continue developing this so we added the billboard now let's go ahead and write a dip here the class name p x-4 SM px-6 and LG px-8 and PB -24 so we leave some space on the bottom inside let's add a class name LG grid LG grid D co-5 and LG Gap D x-8 like this so I'm going to add a commment add
mobile filters we're going to do that later for now we're going to develop the filters on the desktop so Let's go ahead and write a div here give this a class name of hidden LG block so while you're developing this make sure that you are in desktop view don't collapse this too much otherwise you're not going to be able to to see what you're developing right now inside of this div you're going to go ahead and add a new filter component it doesn't exist yet so we're going to get an error if we save the
file and go ahead and give this a value Key of size ID and name sizes and data is going to be sizes like that if I save of course I'm going to get the error so let's go ahead and develop this component so right here in this folder category ID you're going to go ahead and create a new folder called components so just go inside and create a new folder components like this and inside create a filter. PSX like that and now go ahead and Mark this as use client and just write sfc filter like
that div filter Like that and go back into this page right here and let's go ahead and import this right here so import filter from SL components slash filter like that so the error in our screen goes away great let's continue developing the filter now so I'm going to write the interface interface filter props we're going to have data which can be either size or color and it's going to be an array it's going to have a name which is a string and a value key which is a string as Well let's go ahead and
assign these props so react at FC filter props like that and extract those so data name and value key like that perfect now that we have those let's go ahead and add the search params so con search params in a client component is added using use search params from next whoops use search params using next navigation like that we can go ahead and separate these Imports if you want to and after that we're going to add the router so Con router is equal use router from next SL navigation perfect now let's get the currently selected
value con selected value is going to be search pam.get value key like that great now let's go ahead and let's create our on click function Con on click it's going to accept an ID which is a type of string like that first let's get the current query if it's if if any query is available in the URL so Query sorry conrant is equal to uh Qs so we have to import Qs from query-string like that let's go ahead and write qs. parse search params do to string like that great now const query is going to
be equal to current we're going to add the value key and we're going to pass in the ID so when the user clicks on any of the filters which we're going to render here we're going to look what is in the current URL and we going to add the new filter to that URL great now if current Value key so if the current value key is equal to ID in that case that means that user clicked on the filter that is currently active meaning that the user wants to remove that filter so query value key
is going to be null like this great and now let's create a new URL so cons URL is qs. stringify URL like that URL is going to be window.location.href like this and the new query and I'm going to add the Second argument here skip null true like that perfect and all that's left is router. push URL like that perfect now let's go ahead and let's actually develop the filters uh so class name is going to be mb-8 let's go ahead and create H3 here give this a class name of text- LG and font semi bold
and we are going to render the name inside so you can see how it says sizes right here perfect now we're going to add an HR element and Give this a class name of my- four like that give it a div here the class name of flex flex-wrap and GAP D2 and inside we're going to iterate over the data which is either an array of colors or filters so take the individual filter right here and let's go ahead and immediately return a div let's give it a key of filter. ID and let's give the class
name of flex items Das Center like that and inside of here I'm going to render the button component so you can Import button from add/ components UI button right here and inside I'm going to render filter. name like this so you can see that I have options of medium and large right here for the sizes let's go ahead and give this button a dynamic class name so class name go ahead and use the uh CN library from at lib utils which I've added right here and go ahead and open parenthesis so the default are going
to be rounded DMD text- small text - gr- 800 p-2 BG D White and we're also going to have uh border and Border D gr-300 like this perfect and the second argument inside of here is going to be if selected value is identical to filter. ID so if the current value is selected in that case it's going to be BG Das black and text- white like this perfect so you can see both of these are unselected now but we're going to add an onclick right here so let's go add on click to this button Which
is going to trigger the on click and send the filter. ID there we go so I'm going to refresh now I'm going to click medium and let's see if anything happens looks like Uh something's wrong but let's just try again in case okay uh looks like something wrong I'm going to go ahead and debug so I found our issue uh the issue is in the button component so let's go ahead inside the button component right here and we forgot to use the rest of The props here so after the ref go ahead and just spread
the props inside let's try now when I click medium right here there we go medium is selected and you can see that there is an appended URL size ID is in my URL if I click again it should get removed there we go if I click large a new size URL if I click medium a different size URL perfect that's exactly what we want so now let's go back into our page. DSX when we added this filter let's go ahead and copy and Paste this filter and we're going to call this color ID and we're
going to call this uh colors right here and we're going to pass in the colors so now we should have uh the colors as well so black and this random uh value that I've added called d a great and both of these are a pendant and the size ID and if I remove so my URL is constantly changing perfect uh great what we have to do now is we have to render the products depended on these filters right here so I'm going to go ahead I'm going to find the end of this div uh which
holds uh this filters right here and I'm going to add a new div with the class name of mt-6 LG call- span D4 and LG mt- Z and inside what I'm going to do is run products do uh length is equal to zero in that case I'm going to render no results so go ahead and import that component no results right here and you can move it alongside this components so that would be if I choose a combination There we go so there is no combination of large and black so that's why it's no results
but if I remove one filter you can see this goes away and now what's going to show is our product so go ahead and write a div here give it a class name of grid grid ds-1 SM grid Das col-2 uh MD grid ds-3 and GAP D4 like that and inside what we're going to do is products. map item go ahead and return the product card so just import product card at the Top of your file right here and in here I'm going to go ahead and give this a key of item. ID and I'm
going to give it a data of item like this let's go ahead and there we go we have a random shirt if I remove this filter right here uh well only this shirt is still available but if I click on shoes for example I think we should see the other product there we go and I can go ahead and try and play with this uh sizes right here and there we go I Can remove it so this is only available in medium so you can go ahead and check what you have in your categories in
your products create many products and create many sizes and you're going to have a much better experience uh with this uh great so we finished that and let's go ahead and create the mobile filters now so let's go ahead and I'm going to find where I left my comment right here for mobile filters and I'm going to add the mobile filters components which of Course doesn't exist yet and I'm going to give it uh whoops so name It Mobile filters I'm I'm going to give it sizes sizes and colors colors like that and if I
save I'm going to get uh an error so let's go ahead and let's go inside components and create a new file mobile Das filters. TSX like this and let's go ahead and let's fix this quickly so use client like that mobile filters and create a div mobile filters like that you can go back in the page right here And let's import those mobile filters the same way we did with filters so mobile filters and mobile Dash filters like this and the error should now uh go away great now let's go ahead you can see it's
taking space now but we're going to fix that go back inside the mobile filters and let's go ahead and create the interface so interface mobile filters props we're going to take in the sizes which is an array of the type size and Colors which is an array of the type whoops color like this perfect and now that we have that let's go ahead and assign this prop so react. FC mobile filter props and let's destruct those so sizes and colors like that perfect now let's go go ahead and create a state which is going to
open or close this so open set open from use state from react let's give it the default value of false like this I'm Just going to separate the Imports and I'm going to write a simple function const on open which is just going to trigger set open to true so I don't have to do that every time and const on close is going to trigger it to false there we go now let's go ahead and let's actually create uh the mobile filters so instead of using a div we're going to add a fragment like this
and let's add a button from components UI button right here and we're going to Write filters like this and let's go ahead and add the plus button uh like this from Lucid react let's go ahead and give this a size of 20 like that and let's give this a class name of flex items D Center Gap dx-2 LG hidden like that all right uh and let's see now when I Collapse my screen you can see this is only visible uh on mobile so if you're still seeing this big thing that I was seeing just refresh
your page right so It should only be available on mobile like this so you can collapse your screen to look at mobile now uh great and add this and click to be on open like that perfect now let's go ahead and create the dialogue So Below this button open a dialogue which you can import from headless UI react as I did right here okay and let's go ahead and give this a prop open to be controlled by our open as div class name is going to be relative z-40 LG hidden like this and on Close
is going to be on close like this there we go now inside of this div we're going to go ahead and create our background so with a div right here with the class name fixed ins set- Z BG black B- opacity d25 like this so if I try and click on filters you can see how I got a background activated great let's go ahead and now let's uh position our oh yeah so this is a self closing tag so you can just do it like this great now let's go ahead and add The dialogue position
so what I'm going to do here is I'm going to create a new div with the class name fix inser Z z-40 and flex so this is going to position our overall dialogue and inside let's create the dialog. panel so you already have dialogue imported great and let's go ahead and give this some class name so class name is going to be relative ml- aouto Flex h- full w- full Max dw- Xs Flex-all and we're going to have overflow-y oops overflow-y D AO B- white p-4 pb-6 and Shadow DXL all right so there we go
now I have you can see how I have a nice little uh panel on my right side here here great now let's go ahead inside of this dialogue panel and let's go ahead and add the close button inside so I'm going to go ahead and add a div here give it a class name of flex items Das Center justify Das end npx of four And I'm going to use the icon button component which we created so make sure you import the icon button from right here and let's go ahead and give this an icon X
which you can import from Lucid react so I'm just going to reorder these components a little bit and headless UI is also with there so from Lucid react we have the plus and the X so let's go ahead and let's use uh the X right here let's go ahead and give it a size of 15 like this and let's give this icon Button on click on close so there we go you can see a little button in here and when I click it closes this navigation bar sorry the drawer uh great now let's go ahead
and actually render the filters here so for that we're going to use a div with a class name of p-4 and inside we're going to reuse our filter from do/ Filter so make sure you import that as well so it's the thing we just created and added in the main page so you can actually go ahead and just Copy this uh right here and go here and paste it here there we go and you should have the very same thing available there we go so now you have the colors of medium and large and they
work exactly the same way perfect so you can actually see how useful this model is on very small screens so if I Collapse my screen there we go you can see how I control uh the filters from there perfect uh so we finished the category Screen uh great and what we have to do now is we have to create the popup model so in order to do that first we have to create uh the store for that and for that we're going to need a new package so go ahead in your terminal and I'm going
to run npm install two make sure you have the two stand installed so just wait a couple of seconds and mpm uh mpm run Dev again there we go refresh your page to ensure that it's working and go in the Root of your page and just go ahead and create a new folder called Hooks and inside you're going to go ahead and create use- preview DM model. DS go ahead and import create from suent like that and go ahead and import product from types so I'm going to separate this to great now let's create the
interface preview model store let's add the is open to be Boolean let's add the data to be an optional Product so it's this type right here on uh on open is going to need data which is a type of product and it's going to be a void on close is just going to be a void like that great now write con use preview model to be create which you just imported we're going to use the type of preview model store go ahead and open parenthesis open parenthesis again and go ahead and return an arrow function
which returns an immediate object it assigns the E Open to false the data by default is going to be undefined on open is going to use the data which is a type of product and it's going to use the set function to assign data to uh that data and set the is open to True like that and on close it's going to be an arrow function which uses the set and is uses is open to false like that if you want to you can use a shorthand for data like this there we go so now
we have to export default use Preview model like that perfect now we're going to go ahead and create the actual model so let's go inside of our components inside of UI and create a new file model. PSX mark it as use client and go ahead and create an interface model props it's going to take open which is a Boolean it's going to Tye on close which is a void and children which is react. react node like this great now write const Model to be equal to react at FC model props like that and we're going
to go ahead and just destruct this right here so we're going to take in uh the open on close and children there we go now inside go ahead and return we're going to create a transition for this model so go ahead and add transition from headless UI react like this show is going to be controlled by open like like that appear here and as Fragment which you can import from react so make sure you have fragment and transition right here go ahead and open the dialogue again from headless UI react give it an as prop
to be div class name is going to be relative z-10 and on close is going to be on close great now inside of that open a new div uh it's going to be a self closing div so this div is going to create our background Shadow and so fixed ins set- Z BG Das Black and BG opacity -50 like that so go ahead and create a new div with a class name fixed inset d0 overflow dy- AO like that and inside create ative uh so just go ahead and point to this div with a class
name of Plex mean- h- full items D Center justify Das Center p-4 and text- Center like that inside of this div you're going to go ahead and add a transition child so Transition. child like this and let's go ahead and give it some props so as fragment enter is going to be e- out duration D300 enter from is going to be opacity d0 scale D 95 enter two is going to be opacity d00 scale-1 100 leave is going to be e- in duration -200 leave from is going to be opacity D1 100 and scale of
100 and leave Two is going to be opacity D zero and scale Dash 95 like that and now inside we're going to create a dialog panel so go ahead and write dialog. panel like that let's go ahead and give this dialog panel a class name so this dialog panel is going to have a class name of w- full Max dw-3 Exel overflow D hidden rounded dlg text- left and align Das middle great and inside of this dialogue panel we're Just going to create a couple of more divs and we're going to render our children inside
so go ahead and open a div with a class name of relative Flex w- full items Das Center [Music] overflow hidden BG D white like that it's also going to have a px D4 pb-8 pt-4 Shadow D2 Excel like that that smx-6 SM pt-8 and MD p-6 and LG p-8 so these are a bunch of variations which are going to make the padding look better uh great and now inside create another div right here with class name of absolute right das4 and top-4 and inside we're going to render our icon button so you can go
ahead and import that from do/ icon button or change it to the components UI version And inside I'm going to add the on click to be on close and it's going to have an icon which is going to be X which you can import from Lucid react go ahead and self close that icon here and give it a size of 15 like this there we go so I'm just going to expand this entire screen so you can see uh better like this uh if you don't want to write all of this you can just go
into my GitHub for the front end store and copy the model component uh great and Now just outside of this div right here which holds the icon button we're going to render the children like that there we go so that finishes our Global model and now we're going to actually reuse it uh to show the preview model and don't forget to export default model at the end so export default model like that there we go so now let's go ahead and let's go back inside of our components and in here create a new file preview
Das model. DSX So go ahead and name it preview model like that and let's just mark this as use client as well so use client like that it's not going to have any props but it is going to access the preview model store so con preview model is going to be used preview model which you can import from the hooks and cons product is going to be use preview model State state. data like that perfect and if there is no product so if the model has not loaded any data in that case There is nothing
to show so we not going to show the model at all great instead of div we're going to use model from do UI model or/ components UI model if that's what you prefer great and now let's go ahead and add some props here so open is going to be preview model that is open like that and on close it's going to be preview model. on close like that inside we're going to render our children so go ahead and give this a class name of grid W-o like this uh is going to have grid ds-1 items
Das start Gap D X-6 gap dy-8 on small devices grid is going to be whoops that calls that-2 LG Gap D x-8 there we go so we have that ready now let's go ahead and render the gallery so class name is going to be SM call- sp-4 LG call- sp-5 and inside we're going to render Our Gallery which we already have so you can use either do/ gallery or you can change into SL components like this and it accepts images so use images product. images like this there we go outside of this div create a
new div with a class name sm- span d8 lg- span das7 and inside just render the info not from Lucid but from doino it's the component we created so either SL Components or doino like that and give this a data of product uh great perfect now we have to create our model provider so let's go ahead and close everything here I'm going to go and create a completely new folder here called providers and inside create a new file model- provider. TSX model provider like that and what I'm going to do is I'm just going to
open a fragment and inside I'm going to Render the preview model from at/ components preview model we're going to mark this component as use client like that and let's go ahead and do is mounted trick so is mounted set is mounted from use state which by default is false I'm going to separate this Imports use effect make sure you import that from react and don't forget the empty array right here set is mounted is going to be true and if we are not mounted in that case we're not going to Render the models because they
can cause problems with hydration perfect and now that we have this we have to add that to our Global layout so let's go ahead inside app folder inside layout. TSX and just above the navbar lad model Provider from at/ providers model provider perfect and now we are ready to use the hook that you created to trigger models from various places so let's go ahead and let's find our uh product card so if for me it's inside UI product card right Here so that component is this individual component which renders these buttons uh for cart and
for this button which we're going to use right now uh to enlarge the screen great so go inside of here right uh and go ahead and find the icon button for expand and what you're going to do here is you're going to uh add a custom function on preview like that go ahead and write F on preview to be mouse event handler like that which you can import from react so just make Sure you've imported that I'm going to move it along with navigation to the top uh great it's going to take in the HTML
button element like that so we're going to get the event and then we can use event. stop propagation like that and we're going to pass in preview model which we don't have so let's go ahead above the router and add cons preview model to be use preview model like that from add/ hooks use preview model perfect and then in this Preview model I'm going to add dot on on open data like that so this stop stop propagation is going to over override the fact that this main div has an onclick right so let's go ahead
and try and see if maybe we did something wrong so I'm going to click here and there we go it works for me and I have the gallery right here perfect let's try in this other category so if I click here there we go works as well beautiful if I try from the store I'm pretty sure we're Going to get the exact same results so I can look at this here and at this here and I have my little Gallery here perfect uh what we have to do now is the card functionality great so now
we have to create our card functionality I'm going to go ahead and close everything here and before we continue I'm going to install a package called react hot toast which is something we already have inside the admin but we need it here as Well so npm install react D hot- toast so look at this command make sure you install that and just press enter wait a couple of seconds and then you can go and mpm run Dev uh again refresh here and there we go now we have to create a toast provider so I'm going
to go inside my providers and create a new file to- provider. PSX let's go ahead and call this toast provider like that and it's going to be a client component like this And all it's going to return is the oops toaster from react hot toast like that there we go that's all we need for that and we have to add that to our app layout. DSX So Below model provider add the toast toast Provider from as/ components toast provider great so now we have to create the store for our cart go ahead inside Hooks and
create a new file actually you can just copy this file so go ahead and copy this file and name it Use- card go ahead and rename this from preview model store to uh use cart like this so we have the card store and the use card use card use card perfect now let's go ahead and modify the interface a little bit so I'm going to go ahead and add the items which are going to be a type of product we already have that import right here add item is going to get the individual product and
work with that uh Remove item is going to work with an ID of the product and it's going to work with that and remove all is going to will just be an empty void which is going to obviously remove everything from the cart so let's go ahead and remove everything here uh and basically what I want to do now is I'm going to modify this a little bit so I'm going to completely remove this create and just leave create like this and what I want to do is I want to import two more Packages so
we have them don't worry uh we're we're going to import persist and create Json storage like this from SU SL middleware like that so we're going to create a store which is going to be uh persisted in local storage so go ahead and open create open persist like that and give persist a pointy brackets and a value of card store go ahead and open brackets go ahead and extract the set and get function open an arrow function and return an immediate object so first The items are going to be an empty array like this uh
let me just confirm that I did this correctly just a second yep everything is fine uh great so items are default Mt then we have an item add item which has the data which is a type of product so make sure you have that we do uh great so add item is going to work in a way that we're going to get the current items using con current items uh get. items like that then we're going to have the existing item con Existing item is going to be current items. find item item. id identical to
data. ID like that if there is an existing item in that case so if a user tries to add an item which is already in their card we're going to return a toast from react hot toast so make sure you import that and we're going to tell them that so item already in part great and if that's not the case we're going to call the set function we're going to call the object and write Items which is an array we're going to spread the current items and add the new one in a form of data
like that and toast. success item added to card great uh alongside add item we're also going to have remove item so let's go ahead and use the ID which is a type of string open this function and go ahead and call the set items open an array inside spread the get. items do filter Like that get the individual item and filter by item. ID which is not identical to this ID which we are checking great and toast. success item removed from the card like that and the last function is remove all so go ahead and
just call set items empty array like this great and now we have to add a second parameter to this uh persist uh uh function so let's go ahead so find the last parenthesis here and before that add a comma like this And open an array and inside name card- storage and storage is going to be create Json storage go ahead and open an arrow function and just write local storage like this so you cannot import that local storage is global like that uh there we go so you can pause the screen if the vly red
lines were a problem or you can go to my repository and copy the working one perfect so now we can use this card to add items to it and we get a nice toast message and we Can check the count and we can render them perfect let's go ahead and do that now so let's go inside our Novar actions so in the components Novar actions right here uh go ahead and add the cart so const cart is equal use cart you can import that from as/ Hook use cart and instead of rendering just zero right
here we're going to go ahead and render cart. items. length so now there going to stay zero but we're going to change that soon so let's go back Into our product card so the place where we added uh the preview model right now so this thing now let's go ahead and add the let's go ahead and add the uh add to card functionality so I'm going to go uh back here and I'm going to add I'm going to find this shopping cart and I'm going to uh give this on click a new function called uh
on add to cart and we're going to go ahead and develop that now so const you can actually copy this entire thing so copy the on preview and rename It on ADD to cart like that and instead of using the preview model we're going to go ahead and use the const cart equal use cart and make sure you added the import from ad hook sluse card great and now that we have the card we can just change this in the on add to cart function to call the cart uh and it's going to add item
data and make sure you use this on add to card so my T is lowercase my mistake so on add to card like this there we go so let's see what Happens now I'm going to refresh this and I'm going to click here and there we go item added to card and you can see there's a number one here if I try again it says item is already in card if I try on another one now I have two items in card and even if I refresh my page it's persisted great that's exactly what we
want so now we have to create the cart view so for that we're going to go back inside of our navbar actions right here and let's go ahead and let's add the Router here so const router is equal use router from next SL navigation like that so just make sure you add that uh great and on this button right here I'm going to add an on click which is going to be an arrow function which is going to called the router. push to/ cart like that and if you go ahead and try you're going to
get a 404 because SL card does not exist so that's what we're going to do now we're going to go ahead uh and Create our card page so let's go ahead I'm going to close everything here I'm going into the app folder routes and I'm creating a new folder cart and inside I'm going to create a file page. DSX card page div card page like that and if I refresh right now there we go it says card page let's go ahead let's mark this as use client like that uh and let's do do the good
old mounting tricks so const is mounted set is mounted to be use State False use effect go ahead and you already know what to do so set is mounted it's going to be false here like that and give it a default value if it's not mounted in that case return null perfect and now let's go ahead and develop so give it a class name of B- white like that and let's go and add the container from at/ components UI container so I'm just going to separate these two inputs Perfect and let's go inside and let's
render a div with the class name of p x-4 p y-16 SM px-6 LG px-8 like that inside open an H1 element and write shopping cart like that and let's go ahead uh and let's give this a class name uh let me just refresh this uh I'm trying to figure out why nothing is Showing uh uh let me just see if iand I'm wondering if it's because of uh the mounting huh let's change this to Black see what's going on uh okay let me just spend uh just a little bit debugging why this is happening
all right so for now let's continue developing but I'm not going to use this is mounted looks like there is a problem with it uh in the version that I worked with this was fine but right now seems to be a problem nevertheless Uh let's go ahead uh and let's add the card so const card is going to be used card from hooks used card like this great and now let's go ahead and continue here so change this back to BG white like that now we have the shopping cart here let's give this a class
name of tt-3 XL f-bold and text- black like that beautiful and just below this heading we're going to open a new div and let's go ahead and write class name here mt-12 LG Grid LG grid ds-12 LG items Das start Gap x-12 like this so inside of this uh inside of this grid right here so I just collapse so you can see uh we're going to go ahead and open a new div with the class name of LG call- span D7 and that's going to be um so we're going to iterate our card items here
or we're going to show the result that there is there there are no card items so card. items. length zero in that case I'm going to show a paragra which is going to say no items added to cart great and let's also give that a class name of text- neutral 500 great uh so that's one case other than that we're going to open a u so unordered list and inside I'm going to write card. items. map item like that I'm going to go ahead and add the card item component which does not exist yet but
we're going to create it and I'm going to ahead and give it a key of Item. ID and data of item like this great so let's create the card item component so I'm going to go uh inside the components right here create a new folder components like that and inside I'm going to create a new item called card- item. vsx like that uh let's go ahead and let's import image from next SL image like that let's import toast from react hot toast let's import X from BL react like that and I'm also going to Mark
this entire thing as client so use client like that let's go ahead and import icon button from components UI icon button let's import the currency from components UI currency let's import use card from hooks use card and let's import the product type from types like that great the interface for card item props is going to be data which is a type of product and let's go ahead and write card item here and for now I'm just going to write a div card item like That and let's just assign react. FC cart item props and structure
the data and now we can go back inside our page. DSX and I can use this card item right here so import card item from SL components uh SL card item like that perfect and you can see we have some hydration errors so that's what I was trying to fix with the uh with the uh is mounted but don't worry I'm going to get to that later I just want to finish the UI first uh great so we have this card Item right here let's go ahead and create the UI for it first so uh
instead of div it's going to be a list item and let's give this a class name of flex py- 6 and Border dasb like that and inside I'm going to create a div with a class name uh of relative H-24 w-20 24 like that rounded D MD over fl- hidden uh SM h-48 and SM w- 48 as well great and inside I'm Going to use the image component which I imported from next above uh it's going to have the Field property and it's going to have the source which is data. images the first one. URL
like that there we go so I have two items in my card now and the alt is going to be empty and class name is going to object D cover object D Center like this there we go beautiful and outside of this div go ahead and create a new one with the class name of relative ml D4 Flex Flex D1 Flex D call and justify D between smml D6 like that all right now inside I'm going to open a new div the class name of absolute z-10 write- Z and top- z and that is going
to be the button to remove it so icon button which we already have imported and on click is going to be for now empty and we're going to go ahead and give it an icon of X which we have imported from lucid and size of 15 like this there we go so now you can see how we have uh you can see How it takes full screen on mobile but on desktop it just takes half the screen because this is where we're going to have our summary uh great so we have that icon button now
let's go head and outside of this div create a new div right here with a class name of relative pr-9 SM grid SM grid d-2 SM Gap dx- uh 6 and S smpr d0 like that and inside I'm going to go ahead and create a class name relative sorry Flex justify Dash between like that and I'm going to create a paragraph with the class name of text- LG font semi bold and text- black and inside I'm going to render data. name like that so it says random shirt and navy suit here perfect outside of this
paragraph and outside of this div I'm going to go ahead and open another div with the class name of mt-1 flex and text DSM like that and inside I'm going to Open up paragraph which is going to render data. color. name like that and let's give this a class name of text- gray- 500 like that perfect and I'm going to copy this and use data. size. name for this one and I'm going to add a class name to the second one which is going to be uh ml D4 and Border DL and Border d gr-200
uh pl-4 as well and we already have the text Gray there we go so now we have the Black and medium uh right here perfect and outside of this div our final component is the currency which we already have imported and the value is going to be data. price like this there we go so you can see how it looks on desktop and you can see how it looks on mobile perfect great now let's go ahead and let's create uh our summary component actually before we do that let's enable the ability to remove a product
so go ahead here and add const Card to be use card which we already have imported like this and const on remove go ahead and write card. remove item data. id like that and use this on remove instead of this icon button on click right here perfect so I'm going to go ahead and try now if I click here there we go item remove from the card meaning that I can go ahead and try and add it again so I'm going to go to the store there we go I can add it back again perfect
now let's add the summary Part so let's go back uh inside of our page. DSX for the card right here I'm going to close everything here and go ahead uh and find the end of the unordered list and find the end of this div right here and in here we're going to add the summary which right now doesn't exist so it's just going to throw an error so let's go inside of our components and create a new file summary. DSX great now inside go ahead and Mark this as you client go ahead uh And we
have to install one package called axus so let's go ahead and close this and run mpm install axus so look at this command and make sure you install that wait a couple of seconds and then I'm going to go ahead and mpm run Dev my project again and refresh this so import axus from axus like that import uh use effect from react like that and import use search params from next SL navigation let's go ahead and import the button from components UI button like That and import the currency from add components UI currency import use
card from ad hooks use card and import the toast from react hot toast and you can move that uh here perfect so con summary is not going to have any props so you can just go ahead and start developing the component immediately and remember to export default summary like this and I'm just going to return a div which is going to say summary so I can go back in my page DSX and import That the same way I did with card item so instead of card item it's going to be summary and I'm going to
change the path to summary like this there we go so yes we're still getting these hydration errors I'll I'll address that uh later so if you want you can either develop in Mobile mode or in desktop mode it's it's going to be the same uh now in summary let's go ahead and let's create the interface first so let's go ahead and write the class name Here so it's going to be empty 16 rounded - LG bg-- 50 PX -4 P y-6 sn-6 LG co- sp-5 LG mt- Z lgp b-8 like that okay now that we
have that in side I'm going to add an H2 element which is going to say order summary like this and I'm going to give this a class name of text- LG font D medium uh and text- gray- 900 like that perfect and inside let's open a div right here with A class name uh the class name is going to be empty -6 and space- y-4 like that and inside open a d with the class name uh Flex items D Center justify Das between uh border DT border DT and Border D gray-20 and pt-4 like that
uh great now inside I'm going to go ahead and add a new div and this div is going to have the order total Tex and a class name of Text-base font D medium text- grade- 900 like that great and just after that I'm going to add the currency which I have imported and give it a value of uh well for now we can uh you can just write whatever you want for example 45 and you can see how it formats it dollars right here uh great now outside of both of these divs right here so
just on the last one add the button and say checkout there we go uh all right and Let's go ahead and give this a class name of w- and mt-6 like this there we go now it looks much better now let's go ahead and create the actual calculations for the total price so I'm going to go ahead and get the card so con card is equal to use card like that and let's go ahead and get the items uh yeah so actually we didn't have to use it like this so const item items is equal
to use card get the state and write state. items like that there we go uh and get The remove all options con remove all from use card State state. remove all so I'm extracting it like this because I'm going to use it inside use effects uh and also let's get search params so cons search perams use search params like that perfect now let's go ahead and let's calculate the total price so con total price is equal to items. reduce total and item like this and just return total plus number and item. price like This uh
and default value is going to be zero like that there we go and now we can use the total price instead of this hardcoded 45 right here there we go so now it combined the prices of the navy suit and the random shirt and if I remove the navy suit you can see how it's just the random shirt perfect now let's go ahead and let's add the on checkout button uh on checkout function so const on checkout is going to be as Synchronous and const response is going to be await axus dopost open pointy brackets
and go inead and write process. environment. nextt undoru _ API URL so practic Bally what's in our environment right here so we're going to connect to our dashboard Now using this and go outside SL checkout so this is an AP route that we don't have yet but we're going to have to create uh great and we have to pass in the data the data is going to be product IDs which is going To be uh basically items. map item item. id like that perfect and then go ahead and do window.location response. dat. URL like that
perfect and use this on checkout uh for the on click of this button right here perfect and now I have to create uh the response to this so after this checkout works it's going to redirect us back to here so we have to create a use effect which is going to detect what Happens so let's go ahead and write if search Rams doget success in that case toast. success payment completed like that and we're going to call remove all to remove all products from the store otherwise if search perams has a cancell it whoops in
that case toast. error something went wrong like that go ahead and add search forams Uh and remove all to the dependency array perfect so that finishes uh our cart and if I'm if I'm not mistaken that finishes our uh our entire uh store Page right here so what we have to do now is we have to create uh the actual functionality web hook great let's go ahead and do that now so in order to continue and to actually finish and wrap up our checkout and everything inside here uh what we have to do is create
our stripe udal so Let's go ahead and I'm going to close everything here and I'm going to go inside my lid folder right here and I'm going to go and create a not a new folder but a new file called stripe. DS like this and I have to install a new package so temporarily I'm going to shut down this app and write mpm install stripe so make sure you do npm install stripe and press enter and go ahead and npm run Dev again so this one is going to run on locol 3,000 because this one
Is running on 3001 uh great so let's go ahead and import Stripe from stripe like this and Export const export con stripe is equal to new stripe like this and what we have to pass in now is the stripe API key so let's go ahead and do that so either go to stripe.com or Google it basically you have to find a way to create an account to for stripe uh I'm just going to go ahead and sign In and I'll be in my dashboard so I'll just pause and load that screen there we go so
I'm inside my stripe account and I'm going to create a new account and I'm going to call this something like a tutorial or something let's just wait a second for this to load so it's going to be called e-commerce dadmin dvideo and I'm going to click create an account here great so now we can go ahead uh and Here you have your publishable key and your secret here so go ahead and copy the secret key right here and basically what we have to do is we have to add an environment variable so let's go inside
our environment right here and just pass stripe _ API strore key and pass in this uh secret key right here so I copied it from here secret key great so now that we have the stripe API key we can go back in now stripe. TS uh function right here and inside you're going to write Process. environment. stripe API uncore key and just put the question mark at the end to fix the typescript error and inside I'm going to use the API version of 20022 1115 and typescript is going to be true like that perfect now
that we have the stripe we can go ahead and create our checkout route so I'm going to close everything here I'm going to go in inside the app folder inside API inside store ID and create a new folder called Checkout and then I'm going to go ahead and create a new file called route. TS right here great so go ahead and import Stripe from stripe and go ahead and import next response from next SLS server go ahead and import the stripe library from the util like that and import Prisma DB from as/ Prisma DB so
now I'm going to create a object course headers because I'm going to reuse this basically the post request is not going To work right now uh in my uh front end store because course is going to prevent that because it's on a different origin so this is on locol 3000 and this is on locol 3001 so it's not going to work so I'm going to create the headers access Das control- allow D origin like that is going to be asteris access-control-allow-methods is going to be get Comma post comma put comma delete comma options access-control-allow-headers is
going to be content Das type like that and authorization like this great and for self-control I'm just just going to copy this from my source code there we go so just make sure that it's correct now let's go ahead and Export assing function options like that and return next response. Json first argument is empty and in the second argument we're Going to use this headers course headers so before we do the post request we have to do the options request otherwise the course is still not going to work and now we can go ahead and
create our post request so export asking function post it's going to ahead and take the request which is request and it's going to have the pams which take in the uh pams which is an object which has the store ID which is a type of string like that great so go ahead and open this function Right here first let's check if we have the uh product IDs so con product IDs from await request. Json like that because that is what we are sending in the front end so this checkout as you can see send the
product IDs which are in the cart so that's what we expect right here great uh so what we have to do now is check whether we have those so if there are no product IDs or if product id. length is equal to zero in that case return new next Response product IDs are required and just go ahead and create a status of 400 like that great now go ahead and write const products are equal to await Prisma DB product. find many where ID is in product IDs so we're going to find all of those products
which have this products IDs sent right here great now let's go ahead and create a constant for line items which we're going to send to stripe so const line items is a type of stripe. checkout. Session create Rams doline item and give it an array and the default value of an empty array like this so I'm just going to expand my screen a little bit as you can see great now in here I'm going to write products do for each product I'm going to write line items. push and inside what I'm going to do is
I'm going to add the quantity to be one the price underscore data is going to be currency which is US Dollars like that and productor data Inside is going to be name product. name like that and we're also going to have the unitor amount which is going to have product. price to number because uh it's a decimal times 100 there we go uh perfect so now we have that and now we have to create our order so go ahead and write const order is equal to await Prisma db. order. create data we're going to pass
in the the store ID from perams store ID like that is paid by default is going to be set to false because this is just the checkout session and Order items are going to be create product IDs do map product ID which is a type of string go ahead and return an immediate object and write product connect ID product ID like that uh great and now that we created our order using this method we're going to go ahead and Create a session so cons session is going to be await stripe. checkout. sessions. create like that
we're going to pass in the line items which we have created mode is going to be payment billing address collection is going to be required because we want to receive the address from our customer phone number collection is also going to be enabled and required now successor URL for that we have to create a an Environment variable so go back in the environment right here and go ahead and add front endore store URL and in my case that's going to be locol 3001 so go ahead and copy locol 3001 I'm pretty sure it's the same
for for you so you can just go ahead and paste that here and make sure to remove the back slash so make sure it's like this great and now you're going to use this so process. environment. front endore store URL make Sure you didn't accidentally mistype that so frontend store URL like that and we're going to redirect back to slart with a success one so when we go back here this use effect is going to notice that it was success and it's going to trigger payment completed uh great and we're going to have do the
same thing but we're going to have uh the cancel URL and in this case we're going to do canceled canceled one so then we're going to show the error that something Went wrong uh great and let's also add the metadata order id order. id so we're going to use the metadata after we add our web hook so once the user has paid we're going to load this exact session use this metadata to find this order which was created and we're going to change the status to paid great and return next response. Json url session. url
like that and go ahead and write headers again course Headers this course thing is very important don't try uh and avoid that uh great so we have that now let's go ahead and let's try and see if this is working or if we are having some errors so I'm going to go ahead and I'm going to prepare my uh my network tab right here uh just a second Network okay and let's go ahead and try and click check out to see what happens so it says pending pending pending let's see if it's going to redirect
there we go I'm Redirected and I have a random shirt right here of $39 and that should have created uh an order in my database if this works correctly there's a chance we made a mistake I don't know there we go we have a random shirt order with a price of $39 and a status paid off false beautiful all that's left to do is to create a web hook so right now yeah this won't work this is going to stay unpaid uh you can see how I got the error something went Wrong because we got
it cancelled and this order is going to stay unpaid for now but what we're going to do now is create the web hook which is going to actually uh notice when we pay something so let's go ahead and do that now so what we have to do is we have to connect to a web hook locally because we are not in production right now so go into stripe and write web hooks in this big search bar right here and why is it not searching for Anything just a second let me find where it is uh
all right so I don't know why it's not showing up in my search but all you have to do is click on the developers right here and go into your web hooks so in production we're going to click add an endpoint but now we have to test in a local environment so uh you need to have the stripe CLI so click this number one download the C the CLI and in here you have the instructions for Windows Linux Docker whatever you want I used Homebrew it's the simplest for Mac OS now you have to log
in in your stripe using the terminal so right here I have prepared my terminal make sure that you are inside your admin dashboard so go ahead and navigate inside your admin dashboard right here so it's the same terminal that I have right here but this one is already taken because I'm using it to run the project so that's why I opened the one here and inside of here Uh you're going to ahead and click this and do the stripe login great and now click enter right here and you can see that I'm going to get
a message here uh allow stripe to access your information with this uh code right here let me just confirm yes it's the same code and I'm going to click allow access and there we go and I can now close this window and I'm going to go back here and there we go it says that this step was Completed uh great and what we have to do now is we have to run this second command which is stripe listen-- forward2 let's go ahead and add that as well and we're going to change this to be slash
uh D- forward do Local Host 3,000 web hook like that and now you have your signing secret so go ahead and copy this secret right here and that is what we're going to use to continue in this code right here so I'm going to go ahead and I'm going to create my web hook right here so go inside your API create a new folder web hook and inside create a new file route. DS like that go ahead and import stripe stripe like that go ahead and import headers uh from next SL headers like that go
ahead and import next response from next SL server go ahead and import Stripe from at/ li/ stripe import Prisma DB from atlib Prisma DB And expert asynchronous function post which takes the request which is a type of request go ahead and get the body so con body uh is going to be a wait request. text so not request. Json because this is a web hook and we need special case for that con signature is going to be headers doget stripe Das signature like that as string and now let's set the event to be stripe. event
like that go ahead and open the tri block event is equal to stripe. webhook Hooks whoops. web hooks. construct event like that go ahead and pass body signature and the last one is going to have to be this which we just copied so web Hood signing secret and I want to keep that inside of my environment file so I'm going to go ahead and add uh stripe undor web hook undor secret like this and I'm going to pass it here so I'm going to use that here as the last argument but under process. environment Of
course and you can just go ahead and add a a question exclamation point at the end to fix the typescript error add a catch here error which is the type of any and just return new next response uh open back takes web hook error error. message with a status 400 like that uh great now let's go ahead and let's get the session so con session is equal event. dat. object as stripe. checkout. session like that con address is going to be session if it exists. Customer details. address and now we're going to use uh basically
an address can have many components uh if you've seen let me just click check out here again so okay this is going to create another order but it's fine you can see so the address has a country an address line one address line two postal code in city and all of those are separate fields in an object so we're going to go ahead and create a function which is going to generate that into one single string con Address components like this address question mark. line one address question mark. line 2 address question mark. City address
question mark. State address questionmark dopal code address questionmark do country like that and now we're going to use that con address string is going to be address components do filter get the individual component Check if it's not null and then join what's left with a comma and space perfect now let's go ahead and check the event we want to listen to that event is going to be so if event. type is identical to checkout. session. completed like that in that case we're going to go ahead and write const order is equal await prism db. order.
update where so we're going to find that order which we created in our checkout Right here we created this order but the status is is paid false and we save the order ID into metadata so we're going to have to access that metadata here ID session question mark metadata question mark. order ID like that and go ahead and give this a data of is paid to True like that address is going to be the address address string like that phone is going to be session question mark customer undor details question mark phone 5 pipe empty
string And we're going to include order items true because we're going to need to modify them great now let's go ahead and get our product IDs because we we have to archive all the products which have just been bought so const product IDs are equal to order. order Items Map order item order item. product ID and now await Prisma bb. product. update many Where so we're going to update all of the products ID is in spread the product IDs like that and pass in the data is archive true there we go and very important uh
at the end of this entire uh if Clause at the end of this event go ahead and return new next response no and a status of 200 like that great so that finishes our web hook let's go ahead and let's try this last Thing here so uh let's go ahead and copy this and I'm just going to open a new one I'm going to try and Trigger it from here there we go so this works okay uh I get a 401 let me just see I think that's I think that's fine because we don't have
this event nothing for this event so I think that's fine not 100% sure uh yeah okay let's continue and let's test our thing let's see if our thing is working or not so I have I think a couple of more orders here let's See we have this order let's try and finish this order so I'm going to add a random mail.com right here I'm going to type whatever here uh I'm going to add a test number here my name here whatever we want here and click pay and let's see if that is going to work
or not apparently it works so this is a success and let's see what happened here uh uh uh uh I think I'm seeing more errors here let's see if anything Changed no nothing changed here uh I think our web Hook is not working as intended so I'm going to go ahead and debug that a little bit and I I think I know what's the issue the issue is we are running on Local Host 3000 SL web hook because that's what I told you to do but in fact when we should be doing it on slash
API SL web hook like that and now I think we can even try this thing right here with the payment intent succeeded and I think we we will get a Yeah now we have a 200 yeah sorry it was locost 3000 apiap hook my apologies and now let's hope that this is working now so I'm going to go here and let's let's add something to my card right here so I'm going to add this shirt I'm going to check out and I'm just gonna add whatever uh in here [Music] so uh uh uh okay so
this is all test so you can Write write whatever you want okay let's see looks promising okay let's see here apparently everything's fine and let's refresh here and there we go we have successfully finished the entire flow between the stripe and the orders and the frontend everything beautiful beautiful project uh all we have to do now is we have to finish this overview page so let's go ahead and let's do that now so let's go I'm going to collapse everything here all of this Is working just fine let's go inside of our app dashboard inside
of routes inside this page. DSX right here and I'm going to modify this just a little bit so we're not going to fetch the store instead um we're not going to fetch anything just yet um first let's go ahead and let's just um let's do some styling so class name is going to be flex-all right here let's go ahead and div this div a class name of flex D1 space- y-4 P-8 and pt-6 and inside I'm going to use the heading component from components UI heading like this and I'm going to write a title of
dashboard and a description of overview of your store like that and let's give this a separator from components UI separator like this it's so much nicer to develop with shat CN rather than uh whatever we had to do to make this store right uh Great now uh just below this go go ahead and write class name grid Gap D4 grid d-3 and now we're going to work with some cards so go ahead back to UI shat CN UI and what we have to do is we have to find the card component and we have to
install that so let's go ahead and add npx shat cnii latest ad card so I'm going to go in my terminal right here and I'm going to write npx shat cn- latest at card and press Y and then mpm run Dev again great So now we have the card and we can go ahead and go back here and let's go card from components UI card like that let's give it a card header from components UI card header like like that total revenue let's see oh and refresh your page of course and make sure you're importing
the card from here there we go so total revenue right here uh let's give this class name of text- smm and font D Medium okay uh and let's give it this a dollar sign icon from Lucid react and Lucid react is going to have a class name oh my apologies okay uh let's stop now and what I want you to do is move the dollar sign inside of the card header like this and we're going to use this for card title so import card title and wrap the total revenue inside the card title like that
and give card title a class name of tax- smm and font D medium but this top one is going to have A different class it's going to be Flex Flex D row items Das Center justify Das between uh space- y- Z and pb-2 like that so they're aligned now and go ahead and give this a class name of h-4 W-4 text- muted D4 foreground like that all right so we have the card header now let's go ahead and do the card content inside so import that from card as well make sure you don't accidentally import
it from Prisma and here I'm going to do a Div uh with class name of text D2 Excel and font Das bold and uh let's go ahead and just run form form which you import from at/ liu. format and just write a random number inside there we go so it says our total revenue uh right here uh great now let's go ahead and I'm just going to copy this entire card and I'm going to paste it make sure you copied it correctly like this okay and in this Second field right here I'm going to call
this uh sales like this and my sales is going to have have a different icon is going to have credit card icon so copy that from Lucid react as well I'm just going to move this to the top like this okay so we have the sales and it's not going to be formatted instead it's going to say something like plus 25 something like this uh great and I'm going to copy the card again one Last time and this one is going to be uh products in stock like that with a capital in there we go
so products in stock and it's not going to use the credit card it's going to use the package icon from Lucid react there that looks better and we can just write the actual count like I don't know 12 like that perfect so let's now create functions which are going to actually fill these values so first we need the Total revenue so cons total revenue and just an empty function go ahead and copy this this one is going to be uh sales count and this one is going to be stock count so first let's go ahead
and do the total revenue using a weight uh get total revenue and we're going to pass in params that store ID like that so now we have to create this go ahead and create a completely new folder called actions and inside create a new file get- Total-revenue dots like that and in here what we're going to do is we're going to import Prisma like that export con get total revenue it's going to be an synchronous function which takes the store ID which is a type of string and inside we're going to get the paid orders
so con paid orders are going to be await Prisma db. order. find many so we're going to find all orders where the store ID is this store ID right here so we can just pass that like this and the state of paid is true meaning the web hook uh stripe confirmed that it was actually paid for and we're going to include order items include product through like that and now let's go ahead and write cons total revenue is equal to paid orders. reduce total and Order go ahead and open the arrow function here and just
give this a default of Zero and then write const order total is equal to order. order items. reduce order some item open this Arrow function give this a default value of zero as well and write return order sum plus item. product. price. two number number like that and then return total plus order total so basically we iterate over all orders and then over all order items and then uh we combine the prices of all of those great and what you have to do is return total Revenue like that perfect so let's go back to page
and let's go ahead get total revenue from actions get total revenue uh right here and let's see I'm going to use this get total revenue instead of this hardcoded 100 right here and I think I should have just $39 because in my orders yes that's the only thing I have purchased this random shirt which has the paid status so that's the only Revenue that I actually have great now for the sales count uh we're going To do a similar function called get sales count so you can just copy this and paste it and name it
get- sales dount like this uh so export con get sales count and what we're going to do inside is a bit simpler so no need to calculate these things uh we're going to get const sales count to be order. count we're not going to include anything and we're just going to use the store ID and is paid and return the Sales count like this there we go now inside of here we can replace this with a weit get sales count and pam. store ID like that and use this sales count uh inside of this after
the plus and it's going to say only one because that's the only sale that I have and for the products in stock again it's going to be similar we can copy the sales count this time and write uh get Dash uh stock Das count let's name it that get stock count like that and the Way it's going to function it's going to be a synchronous function yes this is going to be stock account and we're going to search for products so product and in the inside the store ID which is not archived like this so
This should now return one I think oh I did not add it anywhere uh let's go back into page right here uh change this to a wait get stock count Rams that store ID and use the stock account uh right here instead of the Hardcoded 12 like that there we go it says one even though I have two products that's because I purchased one of them so archived is true for the random shirt perfect it's it's working exactly as we intended uh great uh and now what I have to do is create the graph functionality
so let's go ahead and let's go all the way down here uh so where these last two divs are and open a new card inside give it a class name of call- span das4 like that a card Header which is going to have a card title inside which is going to say overview like that and a card content here which is going to have a class name of pl-2 and it's going to have the overview component which which we don't have and it's going to accept data which for now can just be an empty array
so let's go ahead uh and let's create that uh overview components so go inside of the components folder and just create a new File overview. DSX like that and we need to install a new package called recharts so I'm going to go ahead and write mpm in install recharts like that so this right here here make sure you have that installed and after it's done I'm going to rerun uh my application so npm install recharge and mpm run Dev and I'm going to refresh right here and I'm going to mark this as use client like
that and let's go ahead And import bar bar chart responsive container xaxis and Y AIS from recharts like that and then interface overview props data let's give it an any type and Export const overview is going to be react. FC overview props like that uh Over like this okay okay and it's going to return sorry it's going to have data and it's going to return responsive container go ahead and give it a width of 100% and height of 350 like that bar chart component with a data of data like that xaxis which is a self
closing tag like this with a data key of name and Stroke of hashtag uh 1 2 3 1 2 3 like this uh font size is going to be 12 uh pick line is going to be false Axis line is going to be pulse you can go ahead and copy this but this time instead of xaxis it's going to be y AIS data key uh is uh doesn't exist here great so this is 12 thick line access key and just write thick formit take the value and return a dollar sign dollar sign dollar sign value
like that so double dollar sign because one of them is a special object and one is The actual dollar uh great and inside of here add a bar with data key total fill is going to be # 3 4 9 8 DB radius is going to be an array 4 comma 4 comma 0 comma 0 and it's a self closing tag like this and now go back in page and import that overview component so import overview from components overview like that and save this and there we go okay so now we have an empty uh
component right here let me Just check if what I uh did was correct all right so I think it's working it's not explaining anything because obviously we have not passed it any data so now what we have to do is we have to create a function that is going to organize our data for the graph Revenue so let's go ahead and do that uh I'm going to go ahead and I'm going to copy get sales count for example and rename this to get- graph D Revenue like that and let's call that get graph Revenue and
let's go ahead and first let's find the paid orders So const Paid orders are going to be prism db. order uh. find many like this where store ID is paid is true and we are going to include order items and we are going to include product through like that uh now let's go ahead before we return anything let's go ahead and write con monthly revenue is going to be uh a type of an object which takes Uh the key which is a number and another number like that for now it's going to be empty now
we're going to go and iterate over all of our paid orders and we are going to uh add them to this monthly Revenue so for const order of paid orders const month is equal to order. created at. getet month let revenue for order is zero for con item of order. order items revenue for order plus equals item Do product. price. to number so we're going to add that price and then monthly revenue for that month is going to be monthly monthly revenue for that month if it's not if it's not available then by default it's
zero plus revenue for this order in this for Loop great and now let's go ahead and create the graph data so I'm going to write con graph data to be equal to uh well we have to create An interface let's go here and write interface W data name String and total number like that so that's going to be graph data right here and it's going to be an array of those so that's the actual type and open an empty array here and go ahead and write name Jan total zero and go ahead and copy this
12 times and we're going to add this for each month so next is February then we have the March we have The April we have the may we have the June July uh what's next August September October November and December right 1 2 3 4 5 6 7 8 9 10 11 12 I think that's correct okay uh and now for const month in monthly Revenue graph data par in month. total is going to be equal to monthly Revenue Pars in month like that and return the Graph data let's go ahead and and let's test
if this works so I'm going to go back uh inside of my page. DSX I'm going to H con grab Revenue await get graph revenue for Rams the store ID and let's pass in the graph Revenue to the data right here and let's see if that is going to trigger anything and there we go in the June uh you can see how the bar goes close to the $40 because that's what we made uh great so You officially finish the entire project there is nothing left to do yes we have this hydration order I'll try
and search how to do that but that's pretty pretty much it uh I don't know how much time we have left on YouTube there's a limit for 12 hours so there's definitely some stuff that I missed uh but you can always go into my Discord or uh the GitHub repository and from there you can uh ask whatever you want for example uh you can See that there's no skeleton there's no loading States uh we simply don't have time for that uh after I finish this part of the video I'm going to check how much time
is left so maybe I'm contradicting myself maybe we do have time but there is a limit and I think I'm very very close to it and I want to upload everything in one part uh great let's go ahead and uh see what's next but before I leave uh I just want to create a theme provider so I forgot The dark mode Let's go ahead and do that uh so I'm going to close everything here going into shaten going into dark mode right here and first thing we have to do is create a theme provider so
go into the app go into providers theme- provider. DSX and you can just copy this entire thing and paste it here so obviously we need next Dash themes let's go ahead and install that so I'm going to close this and npm install next- themes make sure you Install this so let's just go ahead and wait for this to install there we go and npm run Dev again perfect uh so now we have that and we have to add this to our Lo root layout so save this go inside app inside layout and just add this
uh and wrap the entire uh like this theme providers from theme provider and wrap everything all of our models everything just wrap them and let's go ahead and give it some uh attribute is going to be class default Theme is going to be system and we also need enable system prop right here and I think this already might turn this into dark mode for me because I use dark mode by default uh let's just wait for this to load I I think no okay not uh let's see if I did something wrong or if I'm
if I'm able to trigger it in any way so what if I choose dark by default and then refresh there we go yeah so you can See how dark mode works now now I don't know why it's not working for my system because my system is definitely dark okay now it's working uh and let's add the toggle right here so if you want to you can use this one or you can you can basically do whatever you want yeah I'm going to just copy this entire thing so I'm going to copy this I'm going to
go inside of my components and I'm going to call this them- toggle. DSX and I will paste this entire thing we already have The we already have the drop downs and I'm going to go into inside my nav bar right here and alongside the user button I'm going to add theme toggle uh yeah why is it not here oh let's rename It theme toggle and now I think it it will be found beam toggle there we go from do slash components theme toggle I will refresh here and there we go now I can click here
for light mode system dark mode light perfect Great all right so now I'm going to wrap this up by fixing this hydration errors that we are having uh oh okay this is a different thing fixing this hydration errors that we're having in the client uh and let's actually go into summary right here just to wrap all of the things up so we're going to disable the checkout button if item uh sorry if cart what are we ordering about just a second uh items okay so if items. length is equal to zero in that case we're
Going to disable this button right and okay and let me just go inside of the button and let's use this disabled prop to and actually assign it so disabled disabled like that there we go now it's disabled uh okay so that's fixed now uh I'm going to try the mountain thing again so is mounted set is mounted use state fulse uh use effect set is mounted false whoops true if is mounted return Null uh uh uh okay let's try moving this up here uh oh I'm I'm sorry I'm getting tired it's because of the exclamation
point that was pretty I'm pretty sure that was the that was the same thing as the first time I'm sorry uh okay so yeah it doesn't matter where you move the use effect sorry uh okay and now let's go ahead and let's commit all of this and let's go ahead and deploy it uh on Versal so the first thing we have to do is we have to create a new repository for the admin so admin is the first thing we have to deploy go ahead and name this uh e-commerce admin video for example it's going
to be private for me and I'm just going to create the repository uh I'm going to go and shut down the app for now and I'm going to commit everything so get add get commit final like that and let's use this one use or use or push an existing Repository from the command line so this second option here and that should push that right here so if I refresh that's going to be ready great now we have to the same thing for the store so let's go ahead here I'm going to go in my GitHub
again I'm going to go ahead and create a new repository it's going to be named e-commerce Das um store- video like this it's going to be private I'm going to go in my terminal and commit all of the changes so get Add all right and click create repository right here now go ahead and copy this line right here the second one and paste it right here and that should uh enable this repository great now I remembered we have to go back into the admin so go back into your admin and go inside uh package.json right
here and go inside of here and add post install script Prisma generate like this great if you want you can also go ahead and run npm run lint So mpm run link let's see if we have any errors here uh no Sint warnings great get add get commit pix post install Prisma make sure you push this change for uh Prisma okay and I'm going to do the same thing here mpm run link uh there is no Prisma in the front end part so no need to change that great and now that we have that let's
go ahead inversal doc and I'm going to go ahead and click add new project and I'm going to import So first you have to do the admin so let's go ahead and choose the admin right here and let's go ahead and choose the environment variables so I'm going to go in my environment file right here I'm going to copy everything uh yeah that's all we can do we can copy everything and just paste it inside there we go and go ahead and click deploy I'm going to pause the video and I'm going to go back
uh if if it has an error I'm going to show you the error And we're going to fix them together if not uh you're just going to see how it looks when it's finished all right so there we go it works for me right here and now let me just click here to see okay I have the new URL e-commerce admin video versal doapp and you can see how I have to log in so let me go back to my dashboard right here and what I need from here is the URL so I can either
copy it from here so e-commerce admin video uh like here and now I have to go Back inside and we're going to change the environment right here so I'm going to change this public uh URL uh I'm going to replace the Local Host right here with the just make sure it's a proper URL so I past it with with a double slash make sure you remove that like this so this is you don't have to commit this because environment file is is in get ignore but I'm just preparing for this so go into versal decom
inside uh here and add a new project here but This time it's going to be for the store so go ahead and import the store so make sure you've uh deployed the admin first now we have the store and the environment variables for that are going to be this one so you can go ahead and copy and paste them here so it uses that uh deployed admin and go ahead and just click deploy right here I'm going to pause again and show you if there are any errors or if that is successful as well and
then we're not Done we have to change some variables for stripe uh and we have to change the front end variable right here so right now it's pointing for Local Host it's not going to work right so we have to get this URL the deploy store so I'm going to pause the video and show you how to do that all right looks like this is successful as well so let me just click here and yeah so it's loading uh from my admin dashboard which is also deployed Perfect and now what I have to do is
I have to copy this URL for the store and I have to go in my settings right here in my environment variables right here and I have to change the frontend store URL from Local Host to the new store like like this and I'm going to click save for that and now I have to go back into stripe.com right here in my dashboard and I have to add the proper signing key so right now we're using the Local Host signing key I have to change That so I'm going to developers right here and go into
web Hooks and you can see we have local listeners but we don't have any hosted endpoints so click plus to add an endpoint here and the endpoint URL in this case has to be this deployed the dashboard so let me just find it so this one e-commerce admin video slash API SL web hook right so that is our Endo uh and we have to select some events so go ahead and select the event for checkout and let's see in the web Hook we are listening to an event called checkout. session. completed so click that one
and click add events and click add endpoint and now click reveal on this signing secret and copy it and go back inside uh where you changed the frontend URL where is that oh it's at the top now okay and change the stripe web hook secret so in addit here and change that to the new one and click save and now you have to redeploy so go into deployments choose the last one Which is successful and click redeploy make sure you don't check this and so leave this as it is and empty and click redeploy and
I'm going to wait again and I'm going to go ahead and test the app to see if it's working great so both of my applications are deployed right now let's go ahead and let's play around so I want to change this billboard explor the a special collection to something else I'm going to change this to I don't know Everything 20% off and save the changes and let's see if that is working as intended it does in production beautiful let's check the light mode it works and what I'm interested in is the stripe so let's go
ahead I'm going to zoom in uh zoom out here a little bit it's waiting for events I think the uh Endo is correct let's add this to the cart I'm going to go inside and I'm going to click check out here let's see looks like this is Working I'm going to refresh here there we go we have an order which is not paid I'm going to add a dummy uh email I'm going to add a random phone number my name random addresses and click pay and let's see if that's going to trigger any event if
we set up this correctly so I'm going to refresh this and there we go looks like it's working I will refresh this manually to see uh there we go checkout session completed You can see that we are successfully in production with stripe the dashboard is working everything is working sales too Revenue has increased and no products in stock my entire store is now empty because all of my products are archived amazing the app works amazingly thank you so much for following this tutorial if you want to go full production you do have to CH uh
turn out of test mode but for that you have to activate your account so you have to register your Business or whatever the stripe requires thank you so much for watching this tutorial remember to leave a like share and subscribe and see you in the next one I just remember there's one more thing we have to do so we can add to card using this but we cannot add to card using this this button does nothing and same thing in the preview model it does nothing so let's just go ahead and enable that so I'm
going to remove that from the store right here and I'm going To click here we'll have to go inside routes product product page. CSX and you we are using this info component both in the preview model and in page so just go find and find this info model which should be in your components folder and in here let's let's do this together so const cart is we use cart from hooks use cart like that and what we're going to do is we're going to add const on add to cart like this and let's just call
card. add item data like that and let's use This button in this on click there we go let's see now if I click here there we go item has been added to cart uh I'm going to remove it from cart now and let's see if it works from the preview model it does there we go perfect