[Music] hello everyone welcome to this lecture in the build large language models from scratch series first let me take you through what all we have learned so far in this lecture series through this diagram so in this lecture series we are going to build a large language model completely from scratch and we are going to do that in three stages in the stage one we will uh lay the foundations for building an llm in the stage two we will pre-train the llm and in stage three we are going to fine tune the llm we are
still at stage one and until now we have covered two aspects of stage one we have looked at the data preparation and sampling which included tokenization vector embeddings and positional embeddings and very recently we have looked at the attention mechanism in a lot of detail DET in particular those of you who have followed the attention mechanism we had a very detailed uh four to five lectures which started from simplified self attention self attention causal attention and multi-head attention if you have not been through these lectures I highly encourage you to go through them because attention
really serves as the fundamental building block to understand everything which follows if you have watched all the previous lectures and if you have run the code which I have been providing it's amazing and I would like to congratulate you that you have reached this part understanding attention is one of the most difficult aspects of understanding large language models and if you have reached up till here the rest of this will be easier for you so let's get started in these subsequent lecture videos which are to follow we are going to learn about this part number
three which is the large language model architecture as I always do I'm going to break this into multiple videos I will not cover everything in one video um we will cover every single video in a lot of detail and completely from scratch today right now it's the first video in the large language model architecture module so let's get started I think this will be a very interesting module for all of you especially to those of you who have followed until now we have learned about the attention mechanism we learned about input embeddings we learned about
position embeddings but all of you must be thinking how does all of this really come together to give me something like a GPT where does the training happen where does back propagation happen where are the neural networks here if you remember at the start I told you that large language models are just deep neural networks where are neural networks and what exactly is the Transformer we learned about the attention mechanism and uh you must have heard about this that um attention mechanism is at the heart of Transformers but what really is Transformers when do we
do the training and where do we generate the next word as the output all of that will become pretty clear to you as we slowly start unraveling this box of the llm architecture I really had a lot of fun learning about this and uh let's get started as I told you llm architecture I'm planning to cover in four to five videos and today is the first video so after learning about the attention mechanism in the previous lectures let us learn about the llm architecture now I want to give you initially a view of what the
llm architecture really looks like this is the birds ey View and we are going to cover every single aspect of this in detail but right now I want to show you what all you have learned and how does that fit in the context of what's to come next this always helps in the learning process imagine if you are getting walking through a forest right and if you want to get to the other side it's always good to know to track your path to have some kind of feedback like okay this is what you have covered
right right now and this is what's next to come so that you can relate what you're learning next with the learnings from the past and that helps you reach the end of the forest in our case learning about how the previous knowledge fits into what we are are going to learn about next will really help you learn about llms in a much better manner so initially we started with tokenizing then we looked at Vector embedding and positional embedding the final embedding lay vectors which we had for every token were then converted into context vectors through
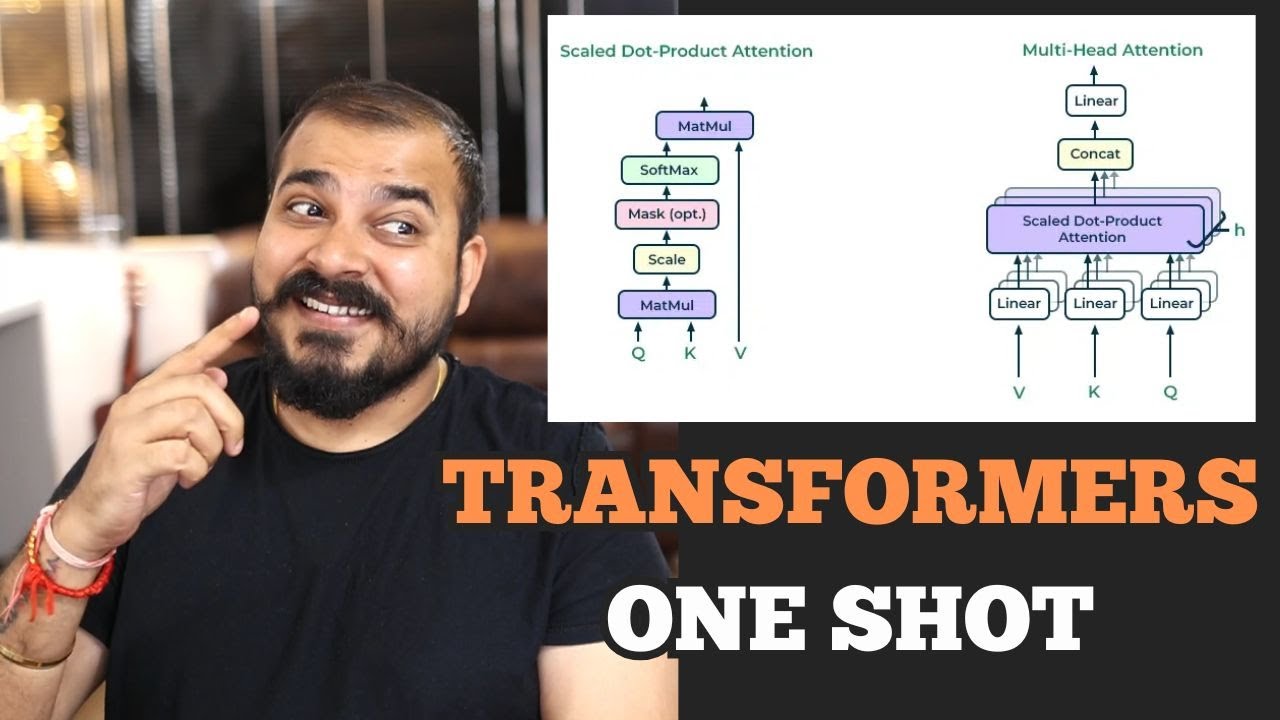
M MK multi-head attention so the main aim of attention or rather the multi-ad attention was to take the input embedding vectors and convert them into context vectors context vectors are a much richer form of representation than embedding vectors because they not only contain semantic meaning of the token but they also contain information about how the token relates to all the other tokens in the sentence now uh mask multi-head attention forms a very important part of something which is called as the Transformer block Transformer block is the most important part of the large language model architecture
and it's a block which actually consists of many different aspects which are linked together so let us zoom into this Transformer block a bit unravel it open this block and see what it contains if you zoom into the Transformer block you'll see that it contains a number of things and mask multi-head attention forms a part of this so whatever you have learned in the multihead attention comes over here so imagine you have a sentence such as every effort moves you and you want to predict the next word right the first step is to convert each
of these into input embeddings or vector embedding so these are these and let's say we also add a positional embedding right these embedding vectors are then passed onto the Transformer block the first part of the Transformer block is a layer normal normalization the second is M multihead attention which converts the input embedding tokens into context vectors these are then passed into a Dropout layer you can notice this plus signs so these arrows which run from here to this plus sign they are called as shortcut connections the output of the shortcut connection goes to another layer
normalization then we have a feed forward neural network here then another Dropout layer is connected and there's one more shortcut uh connection here and if you zoom into the feed forward neural network further you will see that it has something which is called as the JLo activation if you look at all these terminologies and you you think what does it mean what is layer normalization what is Dropout what is the JLo activation why do we have a feed forward neural network here and why are all these things stacked together like this that's all what we
are going to cover in this video and the four to five videos which are going to follow forward but remember this entire architecture has a large number of trainable parameters and trainable weights when the llm is pre-trained these weights and these parameters are optimized and ultimately we get the output the outputs are such that they have the same form and dimensions as the inputs and the outputs are then processed further which gives the final text so once we get the output from the Transformer block it goes to these output layers and then the which decodes
the output from the Transformer block and we get the next word so every effort moves you was the input if you remember and the next word is forward I just wanted to give you this bird eye view of what exactly is going on and what we are building what you have learned so far and how it fits into what we are planning to learn next in these set of lectures which we which are going to follow we are going to zoom into this Transformer block and we are going to understand every single thing which has
been mentioned here we will learn about first of all we'll learn about how to stack these different layers together which will be in today's lecture then we will dive into each individual layer and learn about them we'll have a separate lecture on layer normaliz ation a separate lecture on the shortcut connections a separate lecture on feed forward neural network with J activation we'll stack all of these together and then finally we'll have a separate lecture on how this output from the Transformer is decoded to produce the next World okay so I hope you have understood
why we learned about the mask multihead attention because if we had not learned about this see this forms such a critical part of this Transformer block right to learn about this one small block is it took us five lectures spanning over 7 hours but that's the importance of the attention mechanism if this block is removed uh if this Mass multi-head block is removed it's like the large language models would lose all their power and then we are back to the age of recurrent neural networks and long short-term memory networks okay so let's see what we
have learned so far we have learned about input tokenization we have learned about embedding token plus positional and we have learned about mask multi head attention Okay so uh let me first give you a brief overview of the Mask multihead attention in which you have if in case you have forgotten so we have the input embedding vectors which are stacked together like this we have a bunch of keys queries and the value matrices which are multiplied with the inputs to give the queries the keys and the values the queries are multiplied with the keys transposed
to give us attention scores which are then converted into attention weights attention weights are then multiplied with the values Matrix to give us the context vector and since we have multiple attention heads the context vectors are stacked together to give us a combined context Vector this is what is happening in the multi-ad attention block now uh this whole process of what all we have learned so far can be visualized like this also if you have the input text which is every effort moves you it's first tokenized and GPT uses a bite pair tokenizer which we
learned about before every single token is converted into a token ID every single token ID is converted into a vector embedding which is a vectorized representation these Vector embeddings are passed into the GPT model which consist of the Transformer block which I showed you before then there is an output that output is further decoded and that gives us the output text for gpt2 the token embeddings which were used had a embedding Vector size of 768 Dimensions which means each token ID was converted into a vector of 768 Dimension and the output is generated such that
the dimensions are matched so the output is a 768 dimensional Vector for each 768 dimensional input token embedding and then we do some postprocessing with the output so that we generate the next word which is forward so every effort moves you forward great so what we are yet to learn is the Transformer block and we'll start learning about this in today in today's lecture we'll dive slowly deeper and deeper into every single layer of this block in subsequent lectures so for this set of four to five lectures we will not use a toy problem we
will not use a toy model we are directly going to use gpt2 so we will use the same architecture which was used to build the gpt2 model so if you look at this paper this was the paper which introduced gpt2 and if you look at the models which they had they had uh they had a small model model and they had a large model which has 1542 million parameters if you look at the small model it had 117 million parameters this was revised later to be 124 million parameters which is what we are going to
use for these set of lectures and for the rest of these video series as well so we are going to construct an llm with 124 million parameters which has 12 layers what are these layers which means we'll have 12 Transformer blocks and uh D model which is the vector embedding size is 76 these are the parameters which we are going to use in today's lecture and also in the rest of the lectures um so why are we using gpt2 and not gpt3 or GPT 4 one reason is that gpt2 is smaller so it's better to
run it locally on our local machine uh and second reason is that open AI has made only gpt2 weights public opena has really not made the weights of gpt3 and gp4 public yet uh so that's the thing with open source right open a is closed Source right now whereas meta's Lama models are open source so all weights have been released so that's why we are sticking with gpt2 because its weights have been made public we'll we'll load these weights later in one of the subsequent videos so here is the configuration which we are going to
use and uh to all those who are watching the video you can pause here and try to understand whether you understand every single terminology here we have covered all of these in the previous lecture so I'm I'm going to pause here and ask you to also pause on your end and try to think about these terminologies I'll anyway explain each of these terminologies but I want you to just give it a shot and try to understand okay so so let's go step by step the first is the vocabulary size this means that uh every we
start with a vocabulary so um the gpt2 uses a bite pair encoder right so it's a subword tokenizer so the vocabulary is how many subwords are basically there uh this will be used for tokenization so if the vocabulary is a word level tokenization so if the sentence is every step moves you forward then the vocabulary will have every step moves you forward so that way the tokenization will happen but if you use a bite pair encoder with gpt2 uses it's a subword tokenizer so the vocabulary size is 50257 and it may contain of characters it
may contain subwords it may contain full words also but this is the vocabulary size which we deal with when we consider uh gpt2 this will be very useful for tokenization so when we do tokenization what happens is we have a vocabulary and there are tokens in the vocabulary and there's a token ID with respect to every single token and whenever whenever a new text is given to us using that vocabulary that text is converted into tokens and then those tokens are converted into to token IDs if some text does not belong to the vocabulary that's
called as the out of vocabulary problem the bite pair encoder does not face this issue because it's a subw tokenizer we have covered about vocabulary size in our lecture on embedding so if you are unclear about this please refer to that the second is the context length the context length basically refers to how many maximum words are used to predict the next word so if there is context length is 1024 which was actually used in gpt2 we are going to look at one24 words and we are going to predict the next word maximum there will
be no case when we are looking at 2,000 words let's say and predicting the next word when I say word I'm actually meaning token here which is not exactly correct because gpt2 uses the bite pair encoder toker to tokenizer which is subword tokenization scheme but for the sake of this lecture if I use word and token interchangeably it's because it's good for intuition the second thing is the embedding Dimension now every token in this vocabulary which we have will be projected into a vector space such as this so for example the tokens are your journey
starts with one step here is a three-dimensional Vector representation of every single token right um and the embedding should be such that the meaning is captured so for example if journey and starts are more similar in meaning they would be closer together in this embedding space so this is a three-dimensional embedding embedding space in gpt2 we are using a 768 dimensional embedding space it's very difficult to show this over here but you can imagine a 768 dimensional embedding space in which the words are projected now if you are thinking how do we learn about these
projections how do we know which Vector Journey corresponds to now that's also trained in gpt2 when we look at the Transformer block you'll see that the embedding itself is not fixed we are going to train the embedding layer so that uh every word is embedded correctly so that semantic meaning is captured the next thing is the number of heads and these are the number of attention heads which are equal to 12 so if you look at this diagram over here I told you that multiple queries keys and values Matrix matrices are created right so the
more the number of attention heads the more the number of these matrices are created so if we have 12 attention heads it means there will be 12 such queries keys and value matrices so here the number of heads is 12 number of layers is the number of Transformer blocks remember this is different than the number of attention heads number of layers is how many such layers are we going to have so this is one one Transformer block layer and it includes multi-ad attention so within this one layer there will be 12 attention heads but in
terms of these Transformer blocks itself there can be 12 blocks so it's not necessary that the number of layers and number of heads are similar here we are using 12 Transformer blocks U which will which will see later how they are stacked up together okay so number of layers is 12 then drop rate is basically the dropout rate and uh query key value bias is or Q KV bias is the bias term when we initialize the query key and the value matrix by default this is always set to false okay so the number of Transformer
blocks one more thing which I want to mention here is is that we are looking at the gpt2 small model which use 12 transform which uses 12 Transformer blocks right but as we saw over here they had four models of gpt2 so if you go from left to right here you'll see small the medium has 24 transformer blocks the large has 36 Transformer blocks and the largest which is extra large that has 48 Transformer blocks and you'll see that the dimensionality also increases from left to right we are using 768 Dimension gp22 small but if
you go from left to right you'll see that 10241 1280 and finally the gpt2 extra large has a dimensionality of 1600 okay so I hope you have understood this this configuration and what we are now going to do is that now I'm going to take you to code and I'm going to build a GPT placeholder architecture what does this mean this basically means that whatever I showed you over here right this thing this thing whatever I showed you I know that you have not yet understood the layer normalization the shortcut connection even the Transformer block
what it exactly has has what the speed forward neural network is what the JLo activation is right now what I want to do is I just want to create a skeleton for our code where these different blocks will come in together we'll code them later in subsequent parts and we'll have a separate lecture for each of them but right now we'll build a GPT placeholder architecture which will also called as the dummy GPT model this will actually give a bird's eyee view of how everything fits together so here I have shown a bird's eye and
this is a bird's eye view so the reason this Birds Eye is again very important is that you'll see what we are planning to do in the subsequent lectures and that's why the skeleton is very important especially for a complicated topic like the llm architecture where multiple things have to fit in together first let's zoom out and see what all has to fit in together and then in subsequent lectures we'll start coding it out so I'm going to take you to code right now this is the GPT configuration 124 million parameters which we are going
to use so let's jump right into it okay so now what we are going to do is we are going to implement a GPT model from scratch to generate text and I'll show you exactly how the code is executed but at every single step of the code I'll again take you to the Whiteboard so that you can visualize what every parameter means it's very important for you to read a sentence of the code and to visualize how it how how it looks like only then you'll really understand the code so this is the GPT configuration
which we covered on the Whiteboard I hope you have understood the meaning of every single terminology here if not just look up the meaning once more or go through our previous lectures but it's very important that you don't just skim through it without understanding the meaning okay now as I told you we are going to build the GPT architecture so this is a dummy GPT model class we'll use a placeholder for the Transformer block we'll use a placeholder for the layer normalization okay so first let me give you a broad overview of what all do
we have here so we have a Dy GPT model over here and it has the forward pass what this forward or rather I should call it the forward method what this forward method does is that it takes an input and at the end of this forward method we are going to uh print out the output this is what we are aiming to do so if you look at the figure which um Let me show this figure to you here this is the main thing right so what that forward method does is that it takes an
input which basically can just be these words and then the aim of this is to the aim of the forward pass is to give you the next word in this case the next word is forward so that's the output so all of what we want to implement somewhere lies in the middle right um so there are two main blocks which will be very important to us so there is first the Transformer block we we are going to create a class for the Transformer block not in this lecture but in later lectures and we are going
to create a class for the layer normalization let me show you where these come into the picture so if you look at the Transformer block over here the Transformer block consists of all of these things right and layer normalization is a very important part of it layer normalization will also be implemented before the Transformer and after the Transformer but it is also present within the Transformer itself so we'll have a Transformer block we'll in which we'll put all of these things what I'm showing here and we'll have a separate layer normalization block the reason we
are having a separate layer normalization block is that it comes in the Transformer block that's fine but it also comes at other places so it's better to define a separate class of it so this is the class which will Define later not now this is the class will which will Define later not now now let us see what what this forward method is actually doing okay so the forward method first takes in an input and uh let me show you what that input actually looks like um okay so I have just made some visualizations over
here so that you understand what's going on yeah okay so the forward method is going to take an input right and the input let's say is this same thing let me write it over here what's that input the input is every effort moves you let's say this is the input which is which is passed to the forward method let me write over here right and I'm going to write this with a different color so let's say the input is every every effort moves you okay great so this is my input right now the way this
will be fed to the forward method is that uh let me actually show you that so we are going to feed this input to the forward method doing something like this so let's say every effort moves you is the input right we are first going to use the tick token tokenizer which is the bite pair encoder and we are going to convert these tokens into token IDs so remember the workflow which we saw over here every token here see every token is essentially converted into token IDs and then everything later after this point happens within
the GPT model class but till this stage we have to do it outside and then pass the token IDs to the GPT model class so now we have this every effort moves you right this will be converted into a token ID this will be converted into a token ID this will be converted into a token ID and this will be converted into a token ID right the first step is that every token ID will be converted into token embedding uh and so what that means is every token ID so let's say this is ID 1
let's say this is ID 1 this is id2 this is ID3 and this is ID 4 right each of these token IDs will need to be converted into a 768 a 768 Vector 768 Vector embedding essentially that is going to be the input embedding and the way we are going to do that is that we are going to first create a token embedding layer and for that we will use the nn. embedding in pytorch what this layer actually does is that uh it creates this Matrix which is called as the token embedding Matrix it has
rows which is equal to the model vocabulary size and every row basically corresponds to one token ID and every Row the length of every row is essentially 768 so now if you want to uh find the vector embedding for ID number one let's say ID number one is 44 you just look at the 44 throw over here and you get the 768 dimensional Vector if you want to look at the let's say for effort the ID is 64 you look at ID number 64 for effort you get the 768 dimensional Vector similarly U let's say
the ID for U is 85 or or rather 40,000 you go downward and you get you go to the 40,000 row and you get the 768 Vector 768 dimensional input embedding Vector now that's why this token embedding Matrix is also called as the lookup Matrix you just pass in the token IDs and it gives you the vector embeddings remember that all of the parameters here here everywhere in this token embedding Matrix they will be initialized randomly for now and we will train these parameters so when we initialize this token embedding layer it initializes the parameters
from a goian distribution and then they are initialized randomly later when we do back propagation we'll train these for now when when you look at all these embedding matrices just just know that their values are random for now okay so the first step is to convert all of these tokens into um token embeddings which are 768 embedding uh vectors and you'll see that that has been done over here so when you go to the forward method first what you do is you look at the input shape right the input shape is basic basically batch size
which are the number of rows and the sequence length which is essentially uh the length of the number of tokens which we are considering so for example let us look at this this is for example one such batch right so I have in this batch two the batch length the batch size is two so there are two rows in this tensor and the number of columns are the number of tokens which I'm going to use for now let's just look at one batch so I'm I'm feeding reading in four tokens and which are my input
inputs and then I want to get the next word so every effort moves you forward which will be the next to it right so that's why the shape is batch size and sequence length so batch size is in the example which I showed you there are two batches so two rows and sequence length is the number of tokens basically great so the first thing what we are going to do is that we are going to create the token embeddings out of the input um input index which is the inputs which we have given now take
a look at these inputs and just look at the first batch the first batch is a list of token IDs which you which uh have been mentioned over here what we'll do with these token IDs is we will then query or look up the token embedding Matrix and then retrieve those input embedding vectors so for this token ID there will be a 768 dimensional Vector for this token ID there will be a 768 dimensional Vector Etc so you might be thinking where is that embedding Matrix so that has been created in the init Constructor which
is invoked by default so see first we have a token embedding Matrix which has been created uh the number of rows of this Matrix are equal to the vocabulary size exactly what we have written over here the number of rows of this token embedding Matrix is equal to the vocabulary size and the number of columns of this token embedding Matrix is the embedding Dimension why because every token or every token ID has a 768 dimensional Vector associated with it so the number of uh columns which are there is equal to the 768 so for every
token ID essentially there will be 768 columns uh so this is the embedding uh token embedding weight Matrix which has been created using this pytorch embedding class and what we are doing here essentially in the forward method is that we are looking at the input token IDs which have been mentioned in our batch and we are going to look up that token embedding Matrix and we'll get the token embeddings for the inputs so we'll essentially have four four 768 dimensional vectors for the first batch and we'll have four 768 dimensional vectors for the second batch
great The Next Step which we are going to do after getting the token IDs is we have to get the positional embedding right so remember up till now we have uh we have a 768 dimensional Vector for id1 a 768 dimensional Vector for id2 a 768 dimensional VOR VOR for ID 3 and a 768 dimensional Vector for ID number four now what we are essentially going to do is that we are going to add a positional embedding to each of these four vectors okay so for that first we need a positional embedding weight Matrix very
similar to the Token embedding weight Matrix so remember the positional embedding really depends on the context size because uh at for uh we'll take let's say Contex size is 1024 at Max we'll use 1024 tokens to predict the next word right so we just need to know the uh let's say the position is one so let's say the position is one we need a positional embedding Vector for this position if the position is three or two we need a positional embedding Vector for this position similarly if the position is 1024 we need a positional embedding
Vector for this we don't need a positional embedding Vector for one to5 why because we are not we are not looking at uh the context window of 1025 we are only going to look at maximum one24 tokens at once and predict the next word so that's why the number of rows in the positional embedding Matrix is the equal to the context size but if you see the number of columns they are still equal to the embedding size and that is important because we are going to add the positional embedding vectors to the Token embedding uh
to the Token embedding vectors so here there are four token embedding vectors of 768 Dimensions each right to each of these we will have four positional embedding vectors so now uh every effort moves you let's say so it's position number one position number two position number three and position number four right so we will get the positional M Vector corresponding to First Position second position third position and fourth position and we'll add them uh to each of these token embedding vectors the context size is 1024 but for now I'm just showing you a simple version
of four context size but the main point I'm trying to illustrate here is that once we get the token embedding vectors for these four tokens We'll add them with the positional embedding vectors okay so here you can see that first a positional embedding Matrix is also initialized when this init Constructor is called and the number of rows here are equal to the context length which is exactly what I showed you uh over here the number of rows are equal to the context length or the context size and the number of columns are equal to the
embedding Dimension so this is again a nn. embedding which is very similar to the embedding class or exactly the same embedding class which we used for token embedding again these will be initialized randomly for now we'll train them later now what we'll be doing is that based on the positions um in the in the tokens we are going to uh qu or we are going to look up the positional embedding Matrix so torch. arrange sequence length what this will this is going to do is that it will look at the token length so in this
case the token length uh let's say right now the token length is equal to 4 right the token length is equal to four in this batch which I given so it will arrange it as 0 1 2 and three and it will get the positional embedding uh it will get the positional embedding vectors for row number zero row number one row number two and row number three three and then it will then what we are going to do is we are going to add the token embeddings for the four tokens and we are going to
add the positional embeddings for the four tokens so the X the um we have the input initially right the way it's been transformed is like this so the four tokens which we had in every batch uh we'll convert them into 768 dimensional input vectors we'll then add the 768 dimensional positional vectors to each of them and then finally we have a 768 dimensional uh embedding Vector for each of these tokens awesome so now next what we are going to do is the next step is something which is called as drop EMB which is the Dropout
embedding uh so this is just the dropout rate so what it will do is that it will take these uh it will take the embedding vectors for um all the tokens and it will randomly turn off some weight values this generally helps the generalization performance and prev overfitting we'll look at this in detail in one of the next classes after we get these uh embedding vectors let me show you the figure what happens next so once we get these embedding vectors as I showed you over here um uh yeah actually let me show it over
here yeah so once we get these uh token IDs and the token embeddings right uh we'll then pass it to the GPT model which essentially consists of the Transformer block and then the output is generated so after we get the yeah so after we get the input embedding and after we add the positional embedding next what we have to do is we have to pass it through the entire Transformer block and also we later have a layer normalization layer so this is exactly what is done over here after we get these embeddings and we apply
the Dropout layer we then pass it through the Transformer block so in this one step actually several things are happening in this one step what we are doing is that we are implementing multi-head attention we are implementing a Dropout layer we are implementing shortcut connections we are implementing layer Norm we are implementing feed forward neural network with JLo activation then another Dropout layer uh and then remember we have 12 of these Transformer blocks in gpt2 and then finally we have another final Norm which is the um layer normalization layer towards the end and the important
step which I want to highlight in today's lecture is this last step which is the output which we have which are called as logits and there is a reason why they are called as logits so let me explain that to you uh okay okay so when we reach the when we reach the output what we'll be having is that we'll have four tokens and each of those four tokens we have a 76 68 dimensional representation that's the output vectors right but now we want to predict the next word based on the input token based on
the input sentence the input sentence as I mentioned was every effort moves you we have to somehow predict the next word which is forward so after all of the Transformer blocks have been implemented the output is such that for every token uh for every token we'll have a 768 dimensional Vector that's the output now what the main thing is that how will we predict the next word and so the way this is done is that the final output Matrix which we have which we have will have this format where there will be four tokens which
are the number of rows but there will be columns which is equal to vocabulary size which is 50257 and let me tell you why so if you look at token number one uh actually before that when we look at an input batch every effort moves you there are actually Four prediction tasks which are happening here uh you have you first look at one word every and you predict the next word which is effort then you look at the next which is every effort this becomes an input in the next and then you predict the next
word then the next input is every effort moves and then you predict youu only then there is the fourth task which is every effort moves you and then you predict the next word which is forward so when you look at this input batch which has four tokens or a context length of four in this case we are actually doing four prediction tasks so when you look at token number one which is every we need to predict what what's the next token right out of the vocabulary what has the highest probability of coming next so if
you look at the rows there will be the column length will be 50257 and every element here will represent probabilities so you will then take that element which has the highest highest probability so let's say that is the 40,000 that is the 40,000 column over here so then we look at the vocabulary we'll look at the 40,000 token in the vocabulary which and that seems to have the highest prior probability we'll choose only that token which has the highest probability so that's the 40,000 column and then that 40,000 column will be effort now similarly when
you look at token two so the input will be every effort right and then you'll again look at the row and you'll see uh that column number which has the highest probability and let's say this column number is 20,000 so you look at the token corresponding to 20,000 in the vocabulary of 50257 and that should be moves similarly every effort moves you will be the input and we'll again have a token corresponding to you and then every effort moves you will be the input and then we'll have a token corresponding to forward so that's why
the output which we expect will have this format which has these tokens which is the input sequence length and in this case it's equal to four and the vocabulary size will be 50257 and then this will essentially give us an idea of what the next word will be at every single prediction stage since there are four input output prediction tasks in this uh input sentence so that's why if you look at the output head later when we print out the output Dimensions it Dimensions will be the number of tokens and the number of columns will
be equal to vocabulary size so even if you look at the output head Dimension uh remember when we reach up till this point the number of rows are equal to the number of tokens which is four number of columns is the embedding Dimension which is 768 that will be multiplied by this neural network which has 768 rows and 50257 columns so ultimately the result which will come in logits will have four rows and 50257 columns very similar to uh very similar to what we have seen over here four rows and 50257 columns don't worry in
the subsequent lectures we'll have a separate lecture for each of each of these but right now I just wanted to show you this overall thing of what we are going to implement when we reach the end of the next four to five lectures we'll get these logits Matrix so that we'll know what the next word in the prediction is now now see here what we are doing is that we have taken two texts every effort moves you is text number one which is also batch one and the second text is everyday holds up right so
we are creating a batch which has two texts and the first step as I mentioned is to get the token IDs so these are the token IDs these four token IDs for the first batch these are the four token IDs for the second batch what we do then is that we create an instance of the dummy GPT model with the configuration as I mentioned above with the configuration as this right and although we have not defined anything over here and everything is placeholder right now we can still run this code um nothing is initialized here
right so this block currently does nothing and even this layer currently does nothing but we can still execute this code and get the output so what will happen is that these two blocks will not essentially do anything but we can still it's a functional code so we'll still get the Logics so let's see what the result is uh so we'll pass in this batch to the model right now and let's see the output shape so once we pass in this batch try to visualize the steps which are happening right uh and your visualization should follow
this workflow for now think of the workflow so first I have this first look at only one batch so I have four token IDs these are the four token IDs these four token IDs will be converted into 768 dimensional input embedding vectors then I will add positional embedding vectors to each of them the resultant will be passed through um let's see what the result yeah the resultant will be passed through a Dropout layer then I'll have then will go through the Transformer block then the result will go through the another uh normalization layer which is
also called as layer normalization layer and then until this point when I reach this stage the output will have four rows corresponding to the four tokens and 768 columns because the embedding Dimension is 768 that's for one batch now this will go through the output embedding uh output head which is the final neural network and then the result will be number of tokens which is four and 50257 columns because I want to now get logits and see which one which word should come next so here you can see the result for the first batch there
are four rows and then 5 0257 columns this is exactly similar to the output which I was showing you over here the output Logics should have four tokens as the rows and 50257 columns and similarly for the second batch there are four rows and 50257 columns each parameter here should ideally represent the probability of the next token remember when you look at these four tokens there are four input output tasks Happening Here not just one so every is the first input and effort should be the first output every effort is the first is the second
input and moves should be the second output every effort moves should be the third input and U should be the third output every effort moves U should be the final input and the output should be forward so right now these these outputs are random because we have not trained anything but ultimately we'll just add the back propagation algorithm and then all of these probabilities will start to make sense later we'll also apply soft Max Etc to these logic so that they'll be between 0 to one okay so here you can see that the output tensor
has two rows corresponding to the two text samples this first row corresponds to the first text sample the second row corresponds to the second text sample each Tex sample consist of four tokens so first token first row correspond to First token second to the second token Etc and each token is a 50257 dimensional Vector which matches the size of the tokenizers vocabulary so yeah here you can see each token is a 50257 dimensional vector and it encodes the probability of what should come next the embedding has 50257 Dimensions because each of these Dimensions refers to
a unique token in the vocabulary at the end of the series of lectures when we implement the postprocessing code we'll convert these 50257 dimensional vectors back into token IDs which we can decode into what word comes next okay uh so in this lecture we have looked at a top down View at the GPT architecture what are the inputs what are the outputs Etc and uh I hope you have gotten a sense of what all we are going to implement in the subsequent lectures so in the next lectures we'll go through every single block sequentially so
my next lecture is planned for layer normalization then after that we have a lecture on feed forward neural network with J activation then we have a lecture on shortcut connections then we'll have a lecture on uh how all of these come together in the Transformer block and then finally we'll have the entire GPT model implementation and the last lecture will be gener text from output tokens so this logits Matrix which is there right which you obtained over here uh where was that yeah here was the Logics Matrix which was uh which was returned how to
convert this into the next word we'll see that in the last lecture in this series of lectures okay so that that actually brings me to the end of this lecture I want to leave you with this one image this one image so what we have learned right now is this GPT backbone so we have started this series with understanding the GPT backbone but remember this GPT backbone consists of layer normalization jalu activation feed forward Network and shortcut connection and all of these actually come together all of this feed in together um to make what is
called as the Transformer block um that's why it's called Transformer so you might be thinking what exactly is the Transformer and why do we say that that attention is the heart of it the reason people say attention mechanism is the heart of Transformer because if you if you unlock or Unravel the Transformer block you'll see that the mass multi-ad attention is a crucial component of it but there are several other components which you also should be aware of and we'll cover that I hope you have got a bird's eye view which I planned for in
today's lecture um thank you everyone I hope you're having a lot of fun with these whiteboard notes as well as through this coding assignments as well as through this coding part the Transformers lectures which came before were a bit complicated but now it's getting a bit easier so you have been through the hard part of the course so congrats for that and now comes the very interesting part later thanks everyone I'll look forward to seeing you in the next lecture