welcome back to our series on computational thinking in this section we're going to program a motor a servo and a sensor which is kind of a lot to cover in one video so instead we'll be splitting up the content over three parts part one programming a motor part two programming a servo in part three programming a sensor welcome to part one programming a motor what do we need to know before we get started well it's important to have an active configuration file for your robot we also need to access the blocks programming tool through our
web browser an alt mode which is short for operational mode is a program that is executed by the robot controller the first one we're going to write will control a DC motor how do we get started well let's think about how we want our system to behave while running the hot mode the op mode should provide instructions that result in this desired output behavior for this example we want our up mode to turn on the DC motor to a certain power level and display the information about the rotation of the motor for the user great
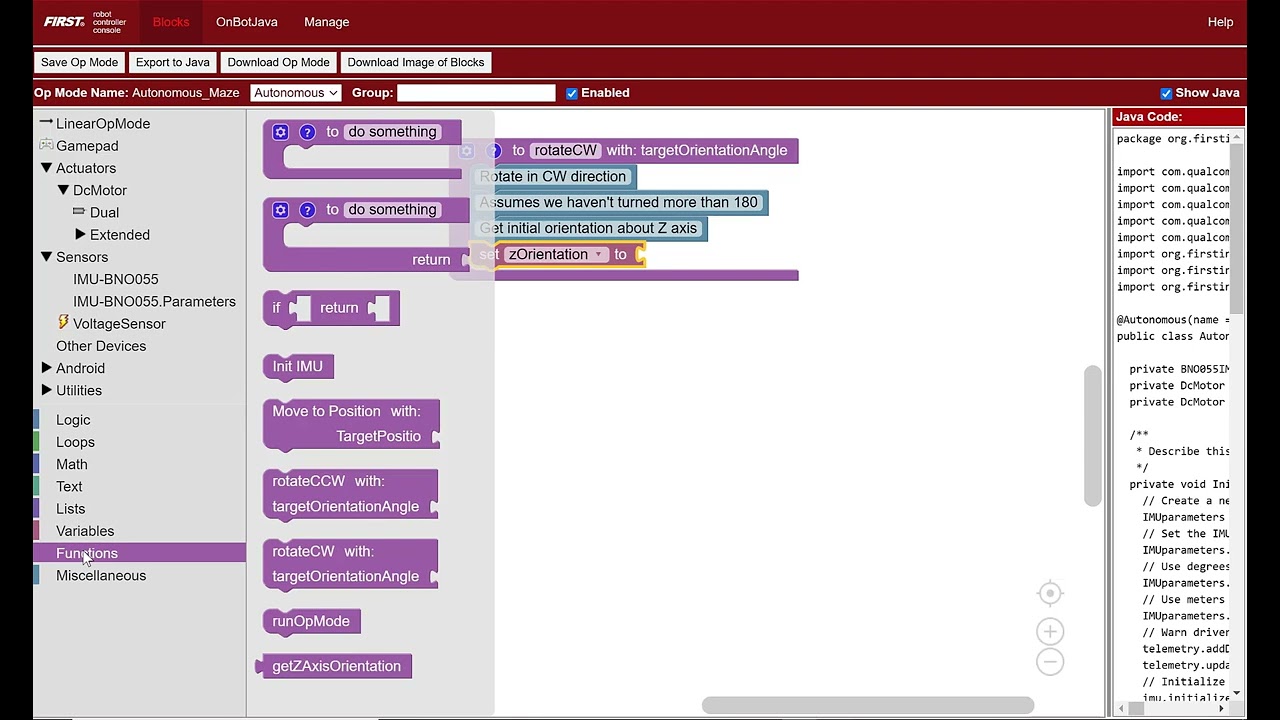
let's get started here's the completed program let's walk through the steps to write the OP mode and make the motor move here you can see where the initialization blocks and the run blocks woke up and also where the loop blocks are commented within the wildly commented within is that like special blocks language well how cool are we first go to blocks in the upper left corner select create an oppo type in simple motor then press ok we'll need to do this for each op mode we create the blocks tool provides you with a framework that
you can use to build your own lot load the purple bracket with the label run op mode is the main body or main function of the up mode the blocks or instructions included in this bracket will be executed sequentially from top to bottom now that the basic structure of the opmod is on screen we want to add programming blocks to the function to make the motor behave the way we would like it to select the actuators category then DC motors to display a list of blocks that can be used to control a motor let's set
the mode for this motor select the set simple motor mode block then in the drop-down select stop and reset encoder place under the put run blocks here comments note that simple motor refers to the name that we assigned the motor in our robots configuration file go back to actuators DC motor and select the set simple motor mode block again place the new block under the existing block and change to run using encoder mode wait what's an encoder an encoder is a device that tracks the rotation of a motors shaft encoders can be used to measure
how far our robot travels for example if your motor is equipped with a four inch diameter wheel that every time the motor shaft makes one complete rotation the robot travels twelve point six inches which is the circumference of the wheel okay we also need to set the power for the motor go to actuators DC motor and select the set power block and place it under our existing blocks change the power level to zero point three you've completed the blocks that will turn on the motor now we can use the while loop to send information back
from the robot to the driver station okay so this is where we'll call the telemetry function so to do this go to the utilities category find telemetry then select the first option with a key and a number it looks like this place the telemetry block under put blue blocks here comment in the well in the key field type the words encoder position then go to actuators DC motor and look for simple motor current position block connect it to the number field in the telemetry block right and make sure you have the blocks in the correct
border then it's time to see the Appa once the OP mode has been saved you can run it from the driver station on the driver station select the arrow on the right then select simple motor press the initialization icon then click to see your motor continuously move press stop to stop this movement while the motor is moving you should see the current position of the motor displayed at the bottom of the drivers stations congratulations you completed your first op mode don't forget to join us next time for part two programming a servo until then goodbye
everyone [Music]