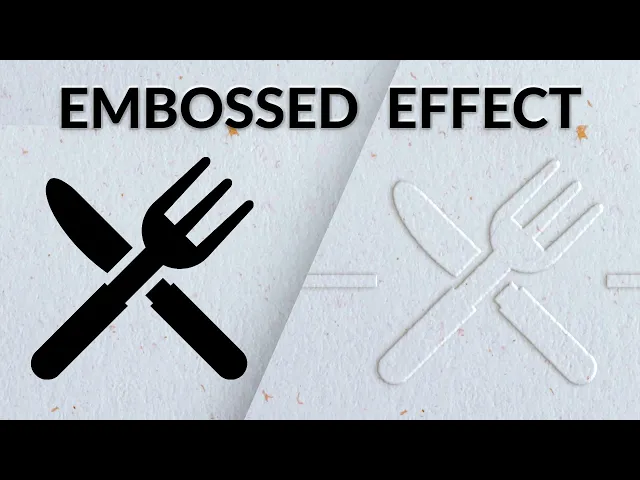
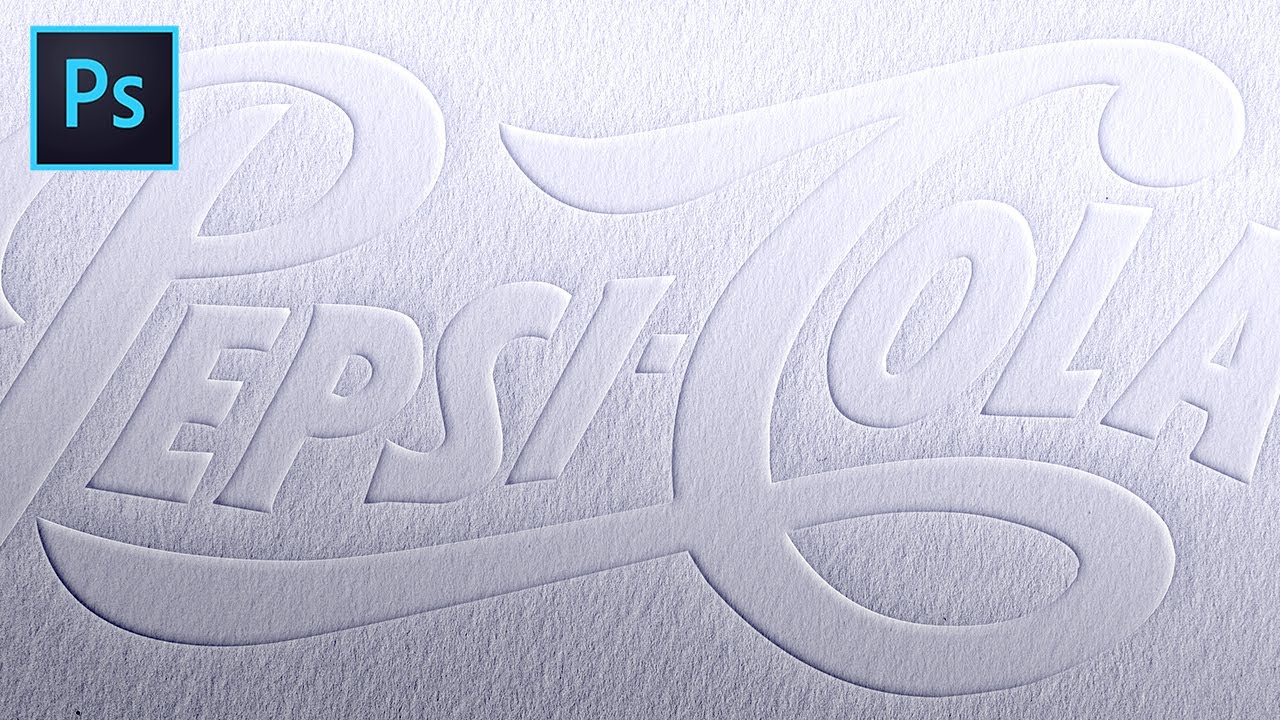
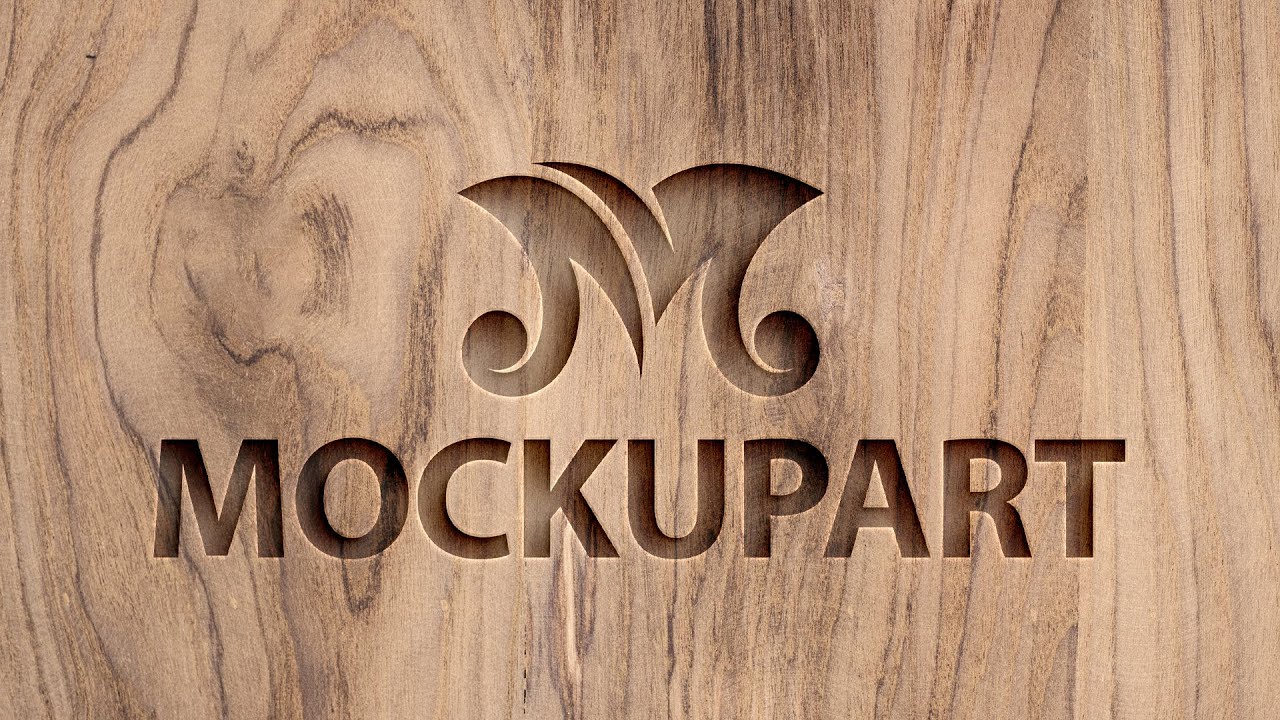
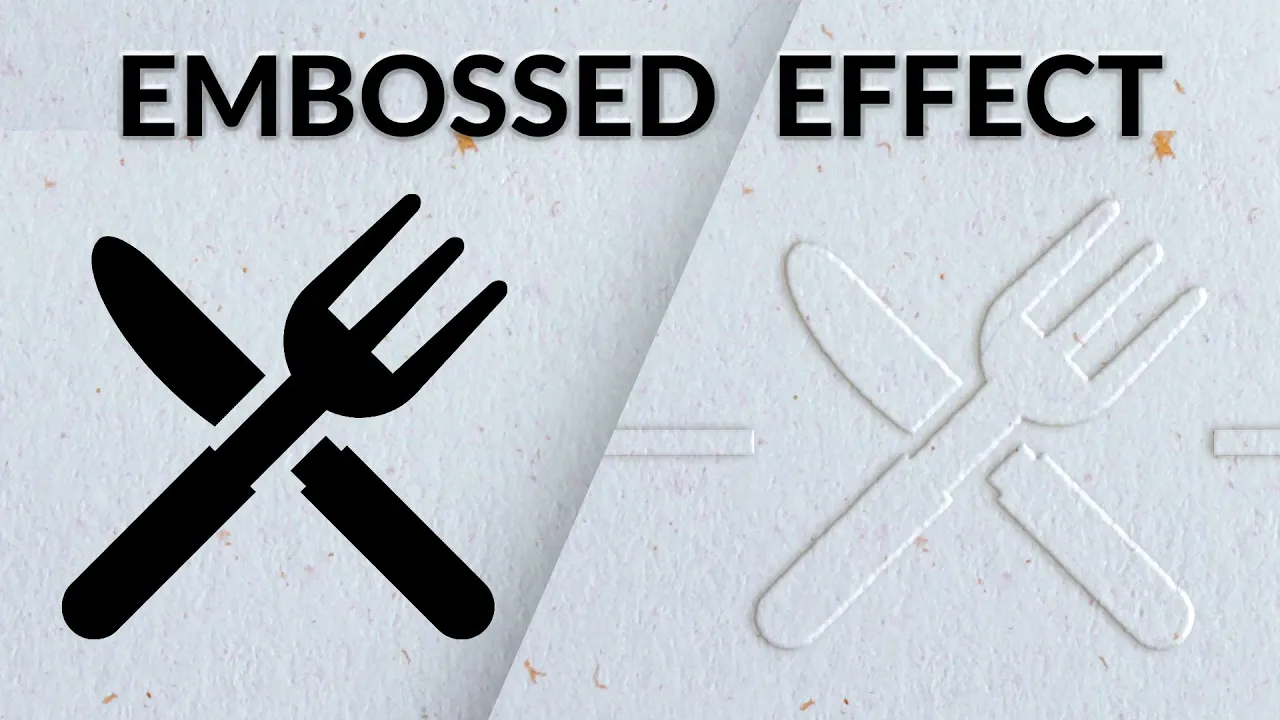
today i'm going to show you how to create an embossed effect in photoshop hey there and welcome to phlearn my name is aaron nace you can find me on phlearn.com where we make learning fun in today's video we're going to show you how to take any graphic and turn it into an embossed effect that literally makes it look like it's pressed in or out of a piece of paper this technique can be done on any type of surface and it's really great for seeing a preview of what an actual emboss might look like on your
final design so here we are in photoshop we've got a piece of paper here let's go ahead and open up our designs we're gonna hit controller command o for open and i've got a fork and a knife that i got from the noun project dot com as well as a menu here so let's hold controller command we're gonna open both of those up and by the way you can download all of these assets on phlearn.com just follow the link in the description right down below you can download both of the images and then we'll link
you to the noun project which is my favorite website for getting any type of icons alrighty first thing we want to do is go ahead and get everything into the same document because we have three different documents here we just need it all to be on this piece of paper so we're going to grab our move tool we're just going to hold the shift key and click and drag from one document to another there we go and you can see it does the transfer automatically and adds a new layer all right there we go we're
done with this one let's go ahead and close it out and the menu let's transfer that and close that out as well so let's hit f4 full screen we're just going to make the menu invisible right now and focus just on our fork and knife now the key to making this effect look realistic is to take into account the texture of the paper as you see right now the outline of our fork and knife is really perfect and that wouldn't be the case if it was actually pressed into a piece of paper you would see
a little bit of the texture of the paper in the actual outline so the first thing we're going to do is give the outline of our object just a little bit of texture it's going to make it look more realistic so let's go ahead and create a new layer here and i'm going to place that layer right under my fork we'll just double click and call this fork there we go so on this new layer we're going to hit m for our marquee tool we're going to make a selection right around this area and we're
going to go to edit and then down to fill and we're just going to go ahead and fill this with white so we're just going to go down to white and hit ok so we have a white background and a pure black element and this can be anything we're using a fork and knife here because i'm kind of trying to create a menu or something like that but this could be any design now the next thing we want to do is go ahead and merge these two layers together this white layer and the layer with
your design on it the reason we're going to do that is because we have to use the filter gallery to wind up like distressing the edge a little bit and that doesn't work if you just have an object on a transparent background so you need to make sure that your object has a white background so the light and dark elements can interact with each other so let's go ahead and hit shift and click on the two of those layers so our fork and layer three and hit control or command e to merge those together so
now we say we just have one layer with the white background and our black logo okay so you can start here if you've already got a white background with black logo that's perfect the next thing we're going to do is turn this into a smart object and the reason we're doing that is because we want to create a filter and i might want to change the settings that filter so if you don't want a filter to be stuck in place you want to make sure you can do a smart object that's going to allow you
to change it at any time so let's go ahead and right click on our fork layer we're going to go down to convert to smart object you'll see it right here there we go convert to smart object and you can see my little icon here the smart object now we're going to go up to our filter and we're going to go down to filter gallery now here in our filter gallery this is a great place to just preview your effect so let's go ahead i'm just going to start off with our spatter effect now you
can see i can increase things like my spray radius and my smoothness we can bring this up and down so you can start to see okay this might look like it is actually pulled out of effect let's just go ahead and hit okay here i know that doesn't look exactly like how we want but here you can get an idea of see how it kind of looks like it would have the texture of a piece of paper rather than it being perfectly smooth now i kind of purposely did this too much to show you that
you can change it at any time that was the reason why we made a smart object so because we made a smart object we see we have the smart filters which i can turn off and on at any time and now we have our filter gallery right here which i can just go ahead and double click to change this so i think this spatter is just a little bit too rough it doesn't look like the piece of paper it looks more like a piece of stone or something so we'll double click right here on filter
gallery and we'll just bring our spray radius down a little bit and our smoothness up there we go and this is basically just like by eye let's hit okay and here we can see that looks a little bit better and i yeah i kind of get the hint that that would be like pulled out of a piece of paper so this looks great now the next thing we have to do is separate the black icon the fork and the knife from the white background because you'll see here it's both on the same layer right so
what we're going to do is go to select and then down to color range we're going to select and we'll just have a little eyedropper here boop click on our eyedropper and then just go ahead and click on the black icon there okay so it's going to turn it white basically this is saying whatever is white is going to be selected so i'm just selecting black as my color range basically let's hit ok and you can see this turns into a selection now it does turn other areas that are dark into a selection up there
too so just keep that in mind now what we're going to do is we're going to just turn that layer off we're going to create a new layer up here and i'm going to hit b for my brush tool and we're going to go ahead and paint black right over top this okay so i'm just going to paint black because the selection is totally independent of layers so i can make a selection with one layer visible and then just paint it on another layer so now we're ready to go everything is looking really really good
so let's go ahead and just see what we've done now we have one layer it has a transparent background and it has my distressed edging just like i want okay i still have this layer here that i can go back to at any time i can even turn the filter gallery off but what we want in the end is just our logo on a transparent background because that's going to help us for our effects so now let's go ahead in time to make that embossed effect let's zoom out a little bit we're going to double
click right here on the layer and this is going to bring up our layer style okay we're just going to bring that to the top and i'm going to bring this right down here and go ahead and zoom in so we can see what we're doing a little bit i'm trying to fit everything on the screen it's a little bit crammed but we're going to be able to see it so the first thing i want to do is right here at the top where it says blending options we're going to take the fill opacity and
we're going to drag that down to zero what that does is it makes the object itself invisible but your layer effects like bevel and emboss for instance are going to be visible so our fill opacity we're going to bring that all the way down to the zero and then i'm going to turn on bevel and emboss and immediately you can start to see our bevel and embossed effect here within our bevel embossed dialog i can change where the light is coming from so we want to match the light of the original image right so we
can see we have a shadow off to the left going like that so we want to make sure our light source is coming from the right hand side so it matches the light of the original image now we can do things like include how much depth we'd like this embossed effect to have we can change how much size we want you want to keep that relatively low to make it look realistic and how much you want to soften it and that's going to help it look realistic too see if it's not soft and it's not
going to look real give it a little bit of softness and there we go we're looking a little bit better all right fantastic this is looking really really nice now the next thing we want to do is make sure that our shadows and highlights match the original image so here where we choose your shadow color okay go ahead and click on this it might be black by default but you can see that this doesn't look realistic okay this black shadow here not gonna look very realistic because as you can see right here we should have
somewhat of a brown shadow there so what we're going to do is go ahead and click on our color here and i'm going to use my eyedropper to just hover right over that brown color and then make sure we're sampling that brown color and hit ok on that all right this is looking really good maybe i'll turn the size up this a little bit and go ahead and soften it up by the way you can change these settings at any time so if you're not like for sure what you want to be visible here you
can change it now our highlight we're going to make that white and you can change the visibility that and the shadows you can change the visibility of the shadows we want to go just a little bit of shadow there okay now this is looking good it's embossed it's pressed out of the piece of paper we want to add just one more shadow off to the left and that's going to be like basically the shadow that would it would cast on a piece of paper so we're going to go right down here in our layer effects
and go ahead and add a drop shadow so our drop shadow again we want to make sure the color is the same color as the shadow in my image so right here so go ahead and click on your color go ahead and use your eyedropper to sample that color perfect and now we can change our settings here with our drop shadow so our distance our opacity i recommend keeping this pretty subtle obviously you can go super far with it if you want to i recommend keeping it up nice and subtle go ahead and bring our
distance down bring your opacity down something like that and then you can change your size here as well there we go that's looking really nice let's go ahead and hit okay and here we can start to see our effect so we've got basically an embossed effect i want to add a little bit of texture to this and give it a little bit of a blur as well because the edge is still a little bit too well defined in my opinion so we're going to go to filter down here to blur and over to gaussian blur
there we go and we're just going to give it a very subtle blur okay so you can see how well the edges are defined now it's a little bit too much so i'm just going to hit the up arrow here on my gaussian blur okay i want it to kind of match the uh there we go match the blur level of the image itself that's looking pretty good about 1.5 now the bevel and emboss i think is looking good but it's a little bit too dark in the shadows so i'm just going to take this
shadow level and bring it down a little bit so you can see it's kind of like a push and pull of effects here i can keep changing these effects to get exactly what we want there we go and that's looking really really nice so the next thing i want to do is add a little bit of texture to this embossed effect let's go ahead and double click on our bevel emboss there we're going to click right where it says texture there we go let's go to our texture tab and then we can choose all kinds
of different textures i'm just going to choose like a grass texture okay let's go ahead and scale this up and down and you can see it right here as well i know we're a little limited let's go ahead and just move that off to the left and put that right there so i can bring my depth up okay and then change my scale and then my goal here is to make it kind of look like this piece of paper okay so you can go either depth can be a positive value or it can be a
negative value there we go so let's go ahead and just bring this down here we go and change our depth i just want this to be very nice and subtle and something that it looks about like the depth of the piece of paper here we go that's looking fantastic so we'll hit okay and here we have a nice bevel and embossed look maybe the texture is a little bit too visible in my opinion now so we can just go back to our beveled emboss no problem we'll just bring that off to the left go ahead
and take my texture and we're just going to bring our depth a little bit lower there we go and then maybe a little bit less soften fantastic that's looking really nice so as you can see here we have a beautiful embossed effect that really looks like it's a part of this piece of paper so let's go ahead and finish this up we have this menu from earlier uh what we're going to do is i'm going to just go ahead and grab my polygonal lasso tool we're just going to select part of this menu here there
we go this is just done for a mock-up okay let's hit ctrl or command j and that's going to duplicate just that selection to a new layer there we are and we're going to hit controller command t for transform let's go ahead and rotate that around a little bit and scale it up there we go hit enter and now i just want to get this uh white part invisible so we're going to change this from normal down to a multiply all right we're going to go to image we're going to go to adjustments and down
to desaturate i don't need any color there you can see it looked a little bit bluish before and now we're going to hit controller command l for our levels and i'm just going to make my white point just a little bit to the left it's going to make my lights a little bit lighter when we're in our multiply blend mode that's basically just going to make them invisible so there we go fantastic and we'll just bring the opacity down on that just a little bit and here we have our menu super fun basically just like
pulled from another menu but again the main effect here is our emboss effect i just kind of wanted to show you what it might look like in uh you know in context now the cool thing about this emboss effect that i have here is that anything that i add to this layer is automatically going to be added to this emboss effect so check this out if i have my marquee tool my rectangular marquee tool let's go ahead and do a line right like this right across the center there okay i'm going to hold alt or
option and that's going to allow me to minus out that selection so let's go ahead and minus out in the boundary of the fork and knife so now we just have to the left and to the right and if i hit shift delete i can fill this with a color on that same layer now keep in mind my fill is at zero percent so it's not actually going to fill it with white here well it will but it will be invisible but we'll just get a bevel and emboss effect right there so if i hit
okay and then hit control command d to deselect look at that now we just have white for instance i could even take my brush tool now and i could just draw on this layer so anything i'm drawing on this layer it's now drawing with a bevel and embossed effect obviously it doesn't look as fancy but i could say like chef choice or something like that if i was actually writing in a way that looked cool but here we have the idea anything that i put on this layer is now a bevel embossed effect other cool
things we can do if i create a new layer and let's just say i have a new logo that i'm working on so i you know just gonna do a circle on this new logo there we go hit shift delete go ahead and fill that with white on a new logo i can turn this layer off and i can copy this layer effects from one layer to another by holding alt or option i'm going to click this fx and click and drag just want to make sure the fx so hold alt or option go to
the fx you can see we have a fx effects there click and drag there click on this layer and bring the field back down to zero and now we have a bevel and embossed circle okay so really easy to copy these layer effects from one to another i can hit ctrl or command t scale this around and you know start to start to put it in places to kind of work on my design now best thing of all you can actually download this entire psd on phlearn.com so you can go through all of these layers
you can get in there and take a look at all these settings and tweak them to yourself so you can really get a good understanding of how all this works together thanks so much for watching i hope you enjoyed today's video if you're ready to learn more photoshop photography and lightroom be sure to check out phlearn pro we've got over 200 tutorials and 500 lightroom presets available for instant download thank you so much i'll learn you later bye everyone