PRIYANKA VERGADIA: One of the biggest challenges in machine learning is building a system to continuously evaluate and update your models to reflect those changes in the environment. Doing this can help ensure your project's success. But how do you do that?
Well, that is what this video is all about. I am Priyanka Vergadia, and in this video I'll walk you through a demo of the end-to-end MLOps workflow using Vertex AI pipelines. In the last episode, I introduced MLOps and the different steps in the ML workflow.
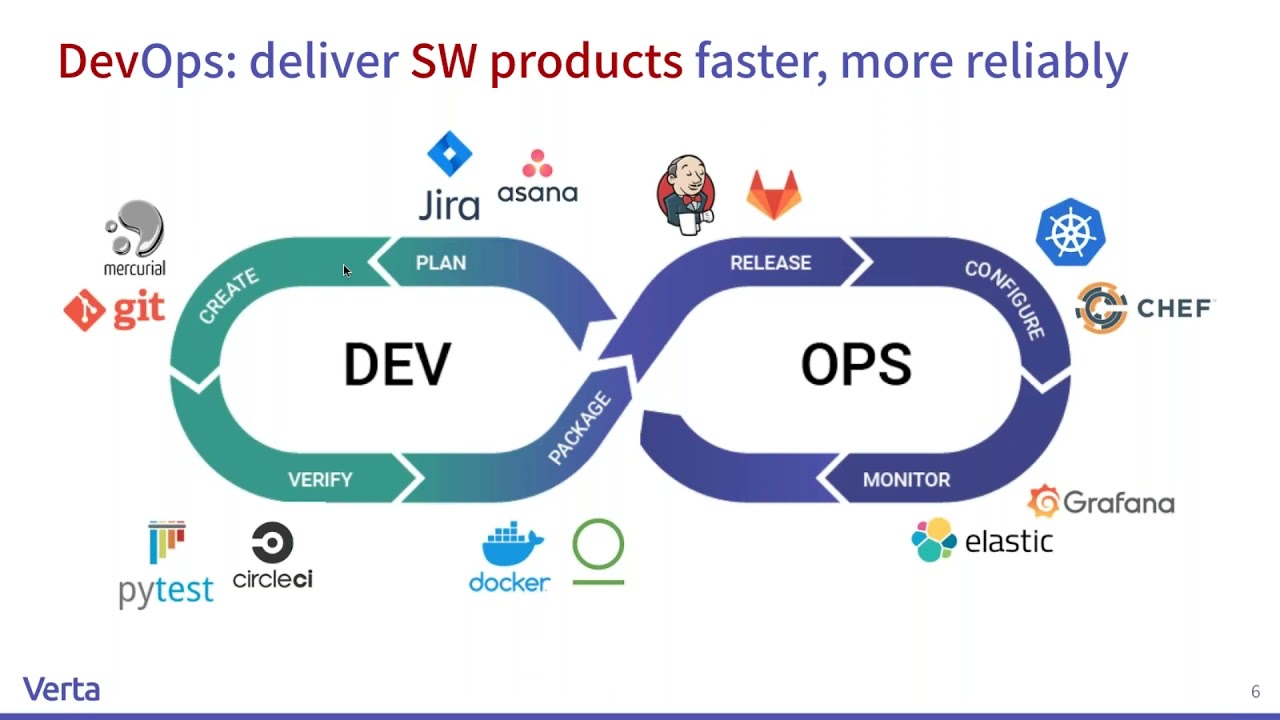
Let's revisit that. [REWIND NOISE] First step is data transformation, feature engineering, and model development. Then comes continuous training of the model and finding ways to automate training and making it repeatable, so your ML system can respond to newly available data and other triggers in your ML models.
Then deploying those models to make predictions. And while the model is in production, continuously monitoring it so that you can make sure that performance is improving. And finally, we have model management or governance capabilities that span across the entire framework.
And we need traceability, verifiability, and auditability of every single step of this workflow, which happens in model management. Now, Vertex Pipelines helps us automate this MLOps workflow. And it does that by orchestrating the workflow in a serverless manner.
It is based on containers. And as we know, containers are portable and scalable, and it supports both KFP and TFX. Each step takes an input and provides an output which acts as an input for the subsequent step.
But before we jump into the demo, let's see the steps that we will take. Now, our pipeline will create a data set in Vertex AI. Then we would use this tabular data set and apply a classification model on it using AutoML, and then get evaluation metrics on that model.
And based on those metrics, we would decide if we want to deploy the model. So there'll be a conditional logic in Vertex pipelines that will help us decide this. And then finally, deploy the model to an endpoint using Vertex predictions.
Now let's see how this works. The first step is to create a new notebook instance with TensorFlow Enterprise 2. 3 without GPUs.
I've already created one here, so I'll just get into this one. I installed the AI platform and the Pipeline components package. Then we need to restart the kernel and check if the packages are correctly installed.
Then I set the project ID and cloud storage bucket that we will be using throughout this pipeline, followed by the relevant library imports, and defining some constants, such as the region and pipeline route, which is the path where the artifacts created by our pipeline will be written. After this initial setup, I first define the custom evaluation component in our pipeline. This component will get the evaluation metrics from the trained AutoML classification model, parse the metrics, and render them in Vertex Pipeline's UI, compare the metrics to a threshold to determine whether the model should be deployed.
And then before we define the components, let's understand its input and output parameters. As input, this pipeline takes some metadata on our cloud project-- the resulting trained model, which we will define later, the model's evaluation metrics, and a threshold, which we will define when we run our pipeline. In the case of this classification model, threshold string will be the area under the ROC curve value for which we should deploy the model.
For example, if we pass in 0. 95, that means we would only want our pipeline to deploy the model if this metric is above 95%. Our evaluation component returns true or false, indicating whether or not to deploy our model.
Now step two in the process is to add our pre-built components of the pipeline. First, I defined the display name of the pipeline, then defined the input parameters of our pipeline. The rest of the pipeline uses a few pre-built components for interacting with Vertex AI services.
TabularDataCreateOp creates a tabular data set in Vertex AI, and gives the data set source either in cloud storage or BigQuery. In this pipeline we're passing the data via BigQuery table URL. AutoMLTableTrainingJobRunOp.
This method kicks off an AutoML training job for a tabular data set. We pass a few configuration parameters to this component, including the model type, which is classification here, some data on the columns and how long we would like to run training for, and pointers to the data set. To pass in the data set to this component, we are providing the output of the previous component.
ModelDeployOp deploys the model to an endpoint in Vertex AI. There are additional configuration options available, but here, we are providing the endpoint machine type, project, and models we would like to deploy. And the model is the output of the training step in our pipeline.
Like I mentioned earlier, in this pipeline, we're making use of conditional logic, a feature of Vertex Pipelines that lets you define a condition, along with different branches based on the result of that condition. In our pipeline definition, we passed our threshold parameter. This is the accuracy threshold we're using to determine whether to deploy our model to an endpoint or not.
To implement this, we make use of the condition class from Kubeflow SDK. Remember that custom model evaluation component I created? That's the one we're passing here.
If this condition is true, the pipeline will continue to execute the deploy component. Otherwise, the pipeline will stop here and won't deploy the model. Now, the next step is to compile and run the end-to-end pipeline.
For this, we use the compile function and pass the package path and the pipeline to it. And then finally, we run the pipeline. It will take a little over an hour to run.
But I have one that I ran earlier, so let me show you that one. Here's our pipeline. If I toggle the Expand Artifact button at the top, we see details of the different artifacts created from our pipeline.
If I click on the dataset artifact, it shows the Vertex AI data sets that were created. I'm curious about the custom metric component that we created. So if you click on this artifact, we see the confusion matrix for this model.
Vertex Pipelines also lets us track lineage of the artifacts created throughout our pipelines. This can help us understand where artifacts were created and how they are being used throughout our ML workflow. If we run this pipeline multiple times, we may want to compare metrics across runs.
I'm doing that here to access run metadata for all runs of this pipeline and load it into a pandas dataframe. You've now learned how to build, run, and get metadata for an end-to-end machine learning pipeline on Vertex Pipelines. What's next?
Well, try it out yourself. The codelab is linked below. And if you run into questions, reach out to me in the comments or @PVergadia on Twitter.
![End-To-End: No Code - AutoML in Vertex AI for ML Operations [notebook 02a]](https://img.youtube.com/vi/ZZadMQTKJXk/maxresdefault.jpg)