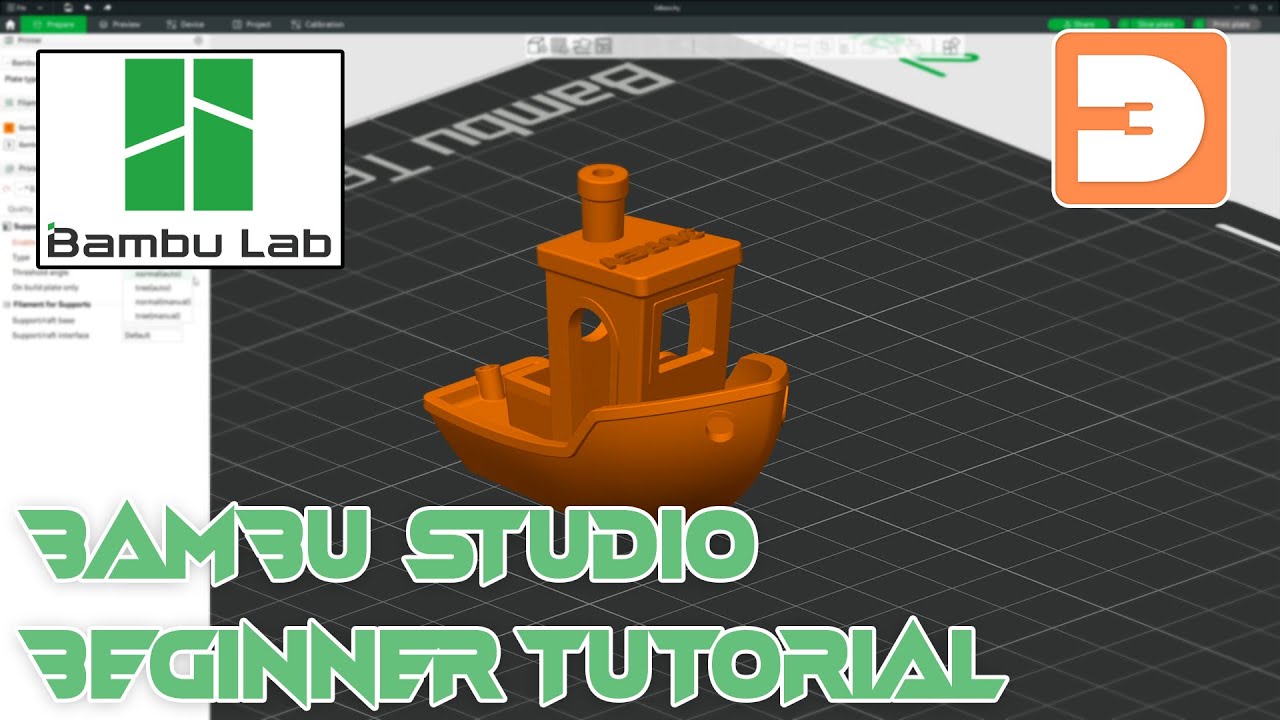
Hey everyone what's going on Welcome Back to the channel Bam Bam print my name is Nick and today I am super excited to be putting together a series of tutorials about bamboo Studio this video is the first of many in a series that will teach you to get the most out of bamboo Studio slicer software ever since the first time I launched the software I felt right at home with its interface which is more than I can say About other slicing softwares that are out there whether you're a newcomer to the 3D printing world or
I've been around the block a few times bamboo studio is here to streamline your printing process and honestly just make this entire industry much easier to get into bamboo Studio stands out for its ease of use and Powerful features for starters it's as simple as loading a model slicing it and hitting print no more fuzzing with an SD card it's just That easy well almost there's even a place for more advanced users as well the customization options that bamboo Studio offers is hands down just amazing unlocking all the advanced features allows for precise control over
every print detail whether you're tweaking infi density to save material or adjusting support structures for the perfect print you can do it all here so today let's lay down the foundation of knowledge that will be your building Blocks for quicker faster better prints I really hope you enjoy watching these videos as I've tried to make them easy to follow yet informative as I can oh and if you haven't already please subscribe to the channel so you don't miss any of the videos in this series before we dive into today's content I want to clarify that
this list will provide a broad overview of our learning objectives each section will be broken down into detailed segments to ensure You get the most out of this beginner's guide additionally I have organized the content into chap in the timeline for easy navigation if needed here's our broad overview of chapters menu and option settings all bamboo Studio modes the controls toolbar features a complete slicing and G-Code education printer filament and process menu and device management now before we get started I wanted to mention the version of bamboo Studio that I'm currently running which Is 1.9.16
that way if you happen to be watching this video in the future and something is different you'll know why the first thing I want to do is go over the interface quickly and just highlight the different sections in the software then later we will discuss each section in more detail first we have the view pane which is the main viewing area where all your models are displayed just above that is the toolbar that controls Everything in your view pane window here you can move scale resize cut and modify your models you can also import and
add models here as well and these are just the basics of what the toolbar can actually do to the left side of the the screen we have our main settings panel this is split up into three sections printer settings filament and process which is where you adjust your printing settings we will go over this in more detail in a bit just above our left Panel we have our mode menu this includes home prepare preview device Multi-Device project and calibration modes and lastly here at the top is our bamboo Studio main menu I would like to
dive into more detail of all the settings here the file menu is your standard software file menu where you can start a new project open a project view your recent projects you can adjust the number of projects shown in this menu and I'll show you how to do that in Just a minute you can save your projects save your projects as import import is where you can import models and bamboo Studio settings next is the export menu the export menu has many options you can export your workspace as an STL file STL files are your
standard 3D print file formats which was created in 1987 and it stands for stereo litography next is exporting as a 3mf file which stands for 3D manufacturing format this is the newer open- source file format that is Slowly taking over the STL format the information is stored in an XML readable format which allows for a lot more information about the file to be held custom supports variable layer height settings are just a name a few to put it simply it's the latest and greatest and I would definitely recommend always saving your files in a 3mf
format next is export your pre-sliced plates export gcode and Export your bamboo Studio config file and then lastly of course is Quit next up is our nameless down arrow menu this has your standard edit menu for your undo redo cut copy paste clone select and deselect I recommend memorizing the keyboard shortcuts just to make your life a little easier next is our view menu which has a standard 3D modeling views top bottom side Etc again try to memorize these if possible so you can quickly switch between views when working with your models now I wanted
to take a moment to talk about the two view Modes perspective and orthogonal the only way I could explain how these views differ is with a perspective view you will get a more distorted view of your models kind of like you're playing an FPS game and with an orthogonal view you'll see your models in a more realistic view with no Distortion the definition of an orthographic view literally means perpendicular view or to show the view of a 3D model object projected on a 2d plane so to Demonstrate this let me show you an example of
this Halo helmet model as you can see from the top view the visor looks like it's sticking outside of the build plate which means I won't be able to print it but if I switch to orthogonal view now you can see that the helmet is inside of the build plate when I first started using bamboo Studio I ran into many instances of this once I Chang my view I never look back I recommend Changing your view to orthogonal view so moving on next is our show labels feature I use this kind of religiously when I
have a bunch of models open you can quickly see which model is which this is especially helpful when I'm printing multiple models and multiple build plates all at once it definitely has its use here you can see when I move multiple models onto one build plate I can quickly see the names of each of the models and you can imagine if you have 50 models open with 36 build plates it gets a little crazy next is our show overhangs feature this will give you the option to turn on and off your highlighted overhangs if you're
not sure what an overhang is it's basically the area of your 3D model that you need supports for bamboo studio will actually create your supports for you your 3D printer while amazing can't just print in midair now not all overhangs will need support and as you get better with Your printing skills you'll learn how to block some areas from supports because your printer will be able to handle them without it once I turn on show overhangs you can see the highlighted areas on my model showing me where I need supports the great thing is that
bamboo Studio does an amazing job at automatically adding them for you we'll go over those features a bit later because there are different types of supports and the settings that you can adjust if needed I Also wanted to mention that bamboo studio will give you warning if you try to print a model that has an overhang with no supports that would usually happen if you have your auto supports turned off all right moving on to our preference menu I will touch on a few things but for the most part the default settings will be good
at the top you'll have your language location and measurement unit options I would recommend leaving the units to metric Unless you specifically need them changed keep only one bamboo Studio instance is definitely an unchecked feature for me I almost always have two or three different 3mf Files full of models open at all times if you check this option then it won't allow you to do this I would only check this option if I was running a low-end PC now Zoom to Mouse position is going to be purely preferen I tried both ways and either of
them worked for me when you have it Checked the view pane will Zoom to the position of wherever the mouse is I would try both and see what fits you best auto plate type I leave check because I mostly use the gold textured Pei plate 95% of the time there are a dozen different build plates out there here are a few of the plates that I have purchased you can find them on Amazon flushing volume options are best left alone for now as it will calculate the amount of filament for each color change If you
have an AMS I would recommend enabling Multi-Device management if you have multiple printers and we will quickly go over the Multi-Device section in a little bit the presets and file associations are better left checked unless you mainly use another slicing software and don't want your 3D files the default to Bamboo Studio I think they are straightforward features to leave alone maximum recent projects are changed to 25 for me I sometimes open a Lot of files and the default 18 wasn't enough for me so I bumped it to 25 you can use whatever number you like
I would recommend leaving no warnings when loading 3mf files with modified g-codes unchecked as this will safeguard you from a potential harmful 3 file that has been modified we of course want to leave auto backup enabled if you have a slower computer you may want to change this to something higher if you like the downloads folder I left alone and I also Enabled dark mode which I'll do right now it's easier on my eyes and I spend a lot of time in front of the computer and dark mode definitely helps you can opt out of
the customer experience program here if you like I left the last two options unchecked as well so that's basically it for the preferences okay let's quickly go through the help menu just to familiarize ourselves the keyboard shortcuts give you a list of all the shortcuts in the software this Is definitely useful I'm a nerd when it comes to shortcuts and saving time I would spend a few minutes to at least quickly go through all the different shortcuts as I found some that were helpful most of these will be more clear once we get through the
gist of the software the setup wizard will take you through the initial steps when you first launch the software this is where you can add another printer to Bamboo Studio The show configuration folder will basically open your bamboo Studio config folder and display it on the screen the show tip of the day feature is very useful I would leave this on as you'll never know what you might learn bamboo Labs takes these tips from their Wiki documentation and that's very detailed I will put a link of the wiki in the description below the last options
are straightforward and I don't think we need to waste any time on them now I Think these three icons are straightforward the dis is going to save your project and the two Arrow buttons are for undo and redo I would recommend using the control Z for undo and the control y for redo if you're on a Windows computer all right let's head over to the mode menu the first button on the left the house is our home button this will display all the recently opened files and some of the featured models on maker world the
maker lab Section is all the different experiment apps that will allow you to create things such as signs vases pixel puzzles and other cool things as suggest you take a look around when you have some time the left-hand menu lets you switch between all these individually recently in this version of 1.9.1 maker world has now been integrated completely into bamboo Studio before this version of bamboo Studio it would open maker World in your browser this feature is very Welcome by me and it makes the entire experience much more cohesive I give bamboo Labs two thumbs
up for this when opening a model you're shown a lot of different information at the top is the name of the model and the Creator just below that are the images of the model and you can scroll through on the menu it also shows how many likes and downloads in the release date of the model as well on the right hand side of the popup you can choose between all the Different print profiles if someone created an upload one for your printer you can filter out by selecting it in the menu here usually any profile
is fine though print profiles are individually created settings that are set by the user and then uploaded to this particular model things such as model placement infill percentage separate build plates can all be changed and uploaded to their own profile I've see models where all these things have Been Chang changed and drastically makes a difference when printing each profile has a print time number of plates used and ratings most of the time the highest rated profile will be your best option but don't rely on it 100% under that is the description of the model and
any information once you're ready to send your model to the printer just select the profile and click the download and open Button a few seconds later you're almost ready to hit print it's just that Easy now going back to our homepage we have the maker lab link which takes you to the maker Lab website within bamboo Labs I won't go into detail about maker lab as that is better suited for a separate video lastly on our list is the user manual there's a ton of great information here and I suggest spending some time here this
will take you to the bamboo lab Wiki link which I mentioned earlier and I'll add the wiki Link in The description below all right moving on to the prepare tab the prepare tab is where you're going to spend most of your time this is where all of your editing of your models things such as moving SC scaling rotating cutting and painting just to name a few oh and of course slicing let's quickly go over the controls of the view pane the middle Mouse button and the right click will pan your view around the left click
will rotate and orbit around the view pane I Would also like to note that whichever build plate you have selected that is where the camera will rotate around I will discuss multiple build plates here in a minute lastly the mouse roller will zoom in and out of your view once you click on a Model you'll see a white boundary box appear and the toolbar above will activate this means you're ready to edit the selected model left clicking on the model now allows you to move it around the build plate let's Discuss the toolbar and what
all these icons do exactly the first icon is where you can import a model straight into your project remember a few minutes ago we could import models using the import button in the file menu as well while this icon does the same thing directly next to the import button is where you can add additional build plates let's talk about build plates for a minute for this I loaded a T-Rex model from maker world into bamboo Studio as You see both the skull and manable are sitting outside of the print plate there is no way we
can send these to the printer like this so we split it up into two separate prints let's add a new plate from the toolbar menu now we can move the manable to its own print plate now let's Center both models on their own plate using the right click menu hover over the model then right click to bring up the menu but before I hit Center I wanted to show you something Bamboo studio will Center the model to whichever plate is highlighted in the darker gray color this is the active plate be sure that you're always
aware Ware of the active plate as many other features will work like this bamboo studio will make adjustments to the current active plate all right and now we select the correct plate and the skull will Center correctly and we can also Center the mandible as well now you can add up to 36 build plates in one Project and remove them individually by hitting the x button in the top right corner next up in our toolbar is the auto Orient feature I sometimes use this feature when I import a bunch of models onto multiple build plates
and don't want to spend the time to manually adjust them on the build plate I'll show you an example of how it works with the T-rex skull so first what I'm going to do is rotate the skull a little bit and let's pretend like we imported The model just like this you can use the auto Orient tool to allow bamboo Studio to automatically adjust the model make sure you have your model selected and hit the auto Orient Button as you can see it flipped the model back onto its flat surface I don't recommend using this
tool all the time but sometimes it can be a timesaver next let's explore the auto Orient feature next to the build plate for this I placed six random T-Rex heads In different orientations we're going to select all of them at once holding down the shift button on the keyboard and dragging a box around them we'll select them all at once then we hit the auto Orient Button as you can see it shifted them back to the original position moving on to our next feature which is the Auto Range button now I have to admit I
don't use this feature a whole lot I mainly print a lot of large models and usually Have one maybe two on my build Plate at a time but I think it's important to go over the features available that way when you're printing multiple small objects on a plate you can quickly get them all organized there are two places where you can arrange objects there is a button right next to each plate that will arrange your models for the particular build plate the other is up in the toolbar menu the toolbar button will allow you to
range objects for your Active plate or for all of the models across the entire open project this could be 100 models across 36 plates so definitely be careful when you using it clicking the toolbar button will bring up a drop- down menu with more options the spacing option will set a spacing distance between models after being arranged just note that if you set the spacing to zero the bamboo studio will Auto Select a spacing that it sees fit you can check auto rotate for Arrangement if you want to allow bamboo Studio to rotate your models
for more time-saving printing I will show you how this can affect your prints in just a minute allow multiple materials on the same plate will keep models that are set to print in different materials on the same plate this will drastically change the time of print I always leave this feature unchecked and print the same materials together now the Align to y-axis is one of those features that at First glance is hard to understand but I was able to get an explanation from bamboo Labs on exactly what it accomplishes here's what they had to say
aligning to the y- AIS can decrease the time it takes to print depending on the model's geometry or the number of models on the build plate it also optimizes the tool path Creation in some instances shortest path to the next object depending on the printer's schematics core XY is opposed to a mle based Printer this type of orientation and path creation can be more effective please note that you need to check the model slice as it does not always mean it will be faster it can be slower in some certain circumstances and that's a response
I received from bamboo Labs I personally do not use this feature I have tested many different projects and it's a hit and miss feature for me if you're not sure what the difference is between a core XY printer and a mle Printer the p and X Series printers from bamboo lab are core XY and the a series printers are mle printers let's go ahead and check auto rotate for arrangement and see what happens bamboo Studio combined all the T-Rex models onto one plate and rotated them to reduce travel time travel time is the distance between
each model when the extruder needs to travel to the next print position let's try an example of three models and see how the travel time Can affect print times I'm going to move all three of these T-Rex heads really close together and then slice the plate the total print time is going to be 4 hours and 59 minutes and the travel time is going to be 46 minutes and 34 seconds or 15.6% of the print time if you check this box here you will see all the paths that the extruder will travel to make this
print I think this is pretty Cool now if we arrange the skulls in three separate Corners you can see that the new print time is going to be 5 hours and 6 minutes and a travel time of 53 minutes and 50 seconds or 17.6% that's a difference of print time of 20 minutes so make sure that you're aware when placing multiple models on a build plate and how it's going to affect the print time lastly let's quickly use the auto arrange feature right next to the build plate and see how it works all You have
to do is highlight your active plate by clicking on it and hit the auto arrange button just note that what it does is take your previously set auto arrange settings and applies them to that active plate next I will skip over the split to object objects split to parts and variable layer Heights buttons but I will cover these in a separate video if you would like to know more about variable layer height I have a complete Tutorial that walks you through everything you need to know about variable layer height and I'll add that video link
in the description below let's quickly go over the move rotate and scale buttons for this I will use a cute little dinosaur toy that my daughter wants me to print when clicking the move button you are shown three different arrows coming from the center of the model the blue arrow is the z-axis the Green Arrow is the y- axis And the red arrow is the xaxis now if you hover over each of these arrows you'll see a number that is the center position of our model for that particular axis on the build plate our dyo
model is showing 17.85% notice that if you type in a value or pull on the blue arrow the model snaps back down to the build plate to exit out of the move function just click anywhere in the view pane or up here in the return arrow Button the rotate button works very similar to the move Button as it has the same three axis X Y and Z but now of course we're going to be working with rotation rather than position you can either rotate your model by typing in a specific angle in the boxes above
or freehand by pulling on either of the arrows on each side of the box now I want to show you how to use the snap feature this is going to make your Model snap to a predefined angle when dragging one of the arrows two sections with white lines will appear if you keep your mouse within close proximity of these it will snap to those lines the Outer Circle increments by 5° and the inner circle of lines by 45° again the model will make sure to snap to the z-axis to make sure that it's making contact
with the build plate next up is our scale button button this is similar to how the move and the Rotate buttons work you can type in specific values and scale your models by a percentage or by a specific millimeter size if you want to scale it without being uniform simply uncheck this box now freehand scaling is similar you just grab one of the boxes and pull on it the blue red and green boxes will scale your model without being uniform I'll pull on the blue box and you can see that it's stretching my Dyno along
the z-axis Once I let go of my mouse it will show you the new scale values in the boxes above if you want to scale your model uniformly then you would use the light blue boxes just click and drag if you want to reset your model back to the original size just hit the orange replay button right here and you're back many of the other buttons in the toolbar are going to be a little Advanced so I will be making separate videos of all these shortly so if you Haven't already please subscribe to my channel
as I have a lot of great videos in the works however I would like to quickly go over the measure tool which is a fairly new feature in bamboo Studio while this tool is a great added feature and will do the job of simple measuring I feel it has a ton of room for improvement for this example I'm going to add two simple cubes to our plate now when measuring a model or multiple models you need to decide ahead Of time if you simply want to measure the distance between two objects you'll need to select
both of them you can do this either by holding down the control button on the keyboard and selecting one and then the other or by holding down the shift key on the keyboard and dragging a box around them then select the measuring tool this will allow you to measure the distance between two edges either on the same Cube or Separately it will also give you the angle between the two edges you can select the two sides of the cube and it'll give you the angle between them of course they're going to be 90° but I
think you get the point now just remember to use these two orange circle arrows to reset your selection or you may get confused as to what you're actually measuring as I mentioned before it's got a ton of room for improvement but hey at least we have something for Now now that I've shown you the slicing feature in bamboo Studio I would like to go more in depth with it as there's a lot to cover even for beginners let's talk about what bamboo studio is actually doing when slicing your model just as you slice the bread
into pieces bamboo Studio Cuts your 3D model Into Thin horizontal layers these layers guide your 3D printer on how to build your object layer by layer bamboo Studio divides a 3D model into horizontal Layers based on the layer height you've set such as a. 2 mm for standard prints each layer represents a cross-section of the model that the printer will create one by one think of it like stacking slices of bread to recreate a whole loaf for each layer bamboo Studio generates pass for the printer's nozzle it starts with the perimeters or the outside walls
of each of the layers which Define the shape then it calculates the infill pattern and density to provide the Internal support you can choose different patterns like grids gyroid or bamboo Labs new INF pattern the crosshatch and adjust the density for strength and material usage it's like deciding how dense the bread should be inside each slice bamboo studio also sets the print speed adjusting it for different parts of the print slower speeds improve the quality while faster speeds can be used in the infill to save time it also sets the nozzle and bed Temperatures based
on the filament type you're using ensuring optimal adhesion and print quality then bamboo Studio plans all non-printing moves called travel to minimize stringing and reduce the print time we just talked about this a minute ago it optimizes this is the path to make the printing process as efficient as possible imagine planning the quickest route to spread peanut butter on a slice of bread without making a mess Extrusion control is Critical bamboo Studio calculates the flow rate of the filament to match the movement speed and path it also manages retraction to prevent oozing and stringing with
the nozzle moves between different parts of the print think of it as controlling the amount of dough coming out of a Piping Bag to ensure even coverage finally bamboo Studio translates all these plans into G-Code as a series of instructions for your 3D printer these instructions guide the Printer's movements Extrusion and temperature settings ensuring the model is built accurately layer by layer let's take this toy dinosaur model here as our example we're going to slice it the slicing button is up here at the top right depending upon the speed of your computer it's going to
run through it slicing code and generate the G-Code once it is complete you'll be moved to the preview tab now in the preview tab you'll be shown this overview window Right here I know it can be overwhelming at first but once I explain everything to you I think you'll be more comfortable first up let's start with the totals you have total filament which will include your model and any brims or supports the totals will be displayed in both length and weight then you have the model filament which only includes the total of your actual model
itself the cost total is only going to give you an accurate number once you set up a Filament profile and set up the amount you pay for each spool of filament your prepare time is going to be the time for your printer to warm up and go through the bed leveling procedure model printing time is how long the actual printing time of your model will take and of course the total is going to be the combined time of both now just above your totals are going to be all the different G-Code movements your printer will
make everything is Completely broken down into 18 different commands all color coded so that it's easy for you to follow the yellow represents the inner wall creation orange is the outer wall red is the infill and so on each line type also displays the time percent total of the entire print use filament and a display option that you can use to turn on and off for each command for viewing next let's quickly go over the drop down menu this is is going to change the display Of information in the window there's line type which is
what we're currently on filament speed layer height line width flow layer time fan speed and temperature let's quickly run through each of these the filament window is going to give you a much more detailed breakdown of the filament usage this is especially beneficial when you have an AMS and you're using multiple types of filaments and colors it's going to give you a clear breakdown of your usage the Speed window will show you a visual representation of your model and the speed at which it will print each layer as you can see on our dyo model
the first layer and the brim are going to be laid down on the plate very slowly this will give it better adhesion to the build plate you can also see that the printer will slow down when it starts to print areas that are going to be in overhang this allows the filament to cool in place as it slowly prints these Areas this is to prevent the filament from sagging as it prints these gradual angles line height is going to be hard to see any changes because we slice the entire model in one layer height which
is2 mm this tab is especially useful when you use the feature called variable layer height you can learn more about this feature in a previous video I created that goes over everything you need to know about variable layer Heights I'll put the link in the Description below line width is going to be similar to the line height window you can adjust your line width settings in the quality tab on the left side menu for the most part these options will stay the same for your printing needs the flow menu is going to display the amount
of filament being used at a particular moment in time this is called the volumetric flow rate you can see that the model flow rate will range from a30 to a 21.73 layer time will break down the model into colorful pie slices representing the length of time to print that layer the smaller the print area the quicker it will be to print and the more pink that the layer will be the fan speed window will show you a change in the fan speed while printing the model our fan is set to 100% during the entire duration
of the print so it's displaying a solid green for us during the first layer the fan is turned off to Give it better adhesion to the build plate temperatures going to display the extruder temperature across the entire model if your extruder changes temperature at any time during the print you will see it in this window for the most part you're going to see a solid color model just like this all right and that wraps up all the different slicing windows I hope that these simple quick explanations give you enough information to make it more comfortable
with bamboo Studio next up i' wouldd like to move on to these horizontal and vertical green bars the green bar to the right is going to display the layers of your print I call it the layer Widget the number on the top is going to be how many layers tall your print will be the number just below it is going to be your height and millimeters now this layer widget is a great way to run through the entire print you can move the circle with a plus up and down to display a particular Print layer
this is good for times if you have a failed print happening at a specific layer this will allow you to drill down to that point and investigate you can also hover your mouse over the entire bar and click and the circle will jump to that position at the bottom of the layer widget is another Circle that you can actually move up to highlight a specific area of your print if needed now the next feature I'm going to show You is a little Advanced but I think it's good to bring up if you move your layer
down just a little bit and right click it's going to bring up a menu add a pause add custom G-Code and jump to layer the add a pause is one of the coolest features this will pause your 3D print at the beginning of the layer you may be asking why would you want to pause your print with this pause feature you can use it to accomplish many different things here are two examples That I've recently use the pause feature 4 you can pause your print to change your filament color this is the most obvious this
is if you don't own an AMS and would like to make a color change to your model now this is not going to work very well if you're printing something with a 100 different color changes in it it's just not feasible and you'll be sitting at your printer for hours on end but for something more basic like a two-c color sign where your bass is one Color and your letters are going to be a different color this works perfectly another way to use a pause feature is when you would like to add something such as
a magnet or a metal rod for support strength to your print I go over this in my added magnet to your 3D print video it's a very detailed tutorial that teaches you all the steps the added custom G-Code feature is a very Advanced feature this is where you have the ability to add custom Commands to your print at a specific layer so you may be wondering what you can actually accomplish with custom G-Code well here's a quick example let's say you wanted to print multiple models but you can only fit one model on your build
plate well you can set the printer to push the model off the build plate when it's complete and then start on the next print now it's a lot more involved than the way I explained it but I think you get the idea the jump to layer Button is supposed to move the layer widget to the proper layer but in this version of bamboo Studio it's very buggy I normally just use the circle handles anyways this horizontal widget bar is where you can view all the G-Code created from slicing your model the number on the right
hand side is the number of G-Code commands for that particular layer now the way this works is you move the layer widget to a specific layer then you use the G-Code Widget to scroll through all of the G-Code you will be able to see the order of how the entire layer will be printed this can seem pretty overwhelming but the good news is you will probably never need to worry about any of this messing with the G-Code is a very Advanced feature now this little icon down on the bottom right corner works like a filter
it basically isolates everything except for the current layer so that you can see each Layer individually if you want it's a cool little feature all right I think that covers most of the basics for the preview tab all right let's go ahead and discuss the left-hand settings menu now it's broken down into three sections printer filament and process first I want to show you an interface feature if you click on this area next to printer or filament it will collapse these sections giving you more viewing Area for the process section below the printer section is
where you're able to add 3D printers that you own the little gear icon will bring up a menu with dozens of preset printer systems let's pretend for a second that I changed out my nozzle size on my second p1s to A2 mm well all I would need to do is scroll down and select the 2 mm option and hit confirm now you will see the preset for my p1s with A2 2 mm nozzle has been Added to the list now in the drop- down menu you can remove any printer presets that you have added or
create a 3D printer from scratch select your printer model add in your printer settings and hit okay the next screen you would select a printer model preset to use as a template for your new printer but this is for a more advanced user so we're going to save this for another Tutorial the little icon next of the drop down will allow you to make changes to your printer presets most of the features here are going to be locked I would only recommend using this menu if you're in advanced user for this video we're going to
skip this section next if you click the text plate type it will bring up the bamboo Wikipedia compatibility page this has a lot of great information that you should refer to if you ever run into a print issue The drop- down menu will allow you to change to one of the different build plate types there's a cool plate engineering plate smooth pei and textured Pei plates 95% of the time I use the textured Pei plate I rarely have any issues with print sticking to this plate so I really don't use anything else some of the
other plates can give you a cool texture or transfer holographic designs to your prints so if that interests you I would suggest Taking a look at some of the plates available on Amazon next up is the filament section let's start with the gear icon for this section as well this is where you can add and remove filament profiles from your list let's go ahead and add some polymaker PG and Pla I want to show you something now since we added a new p1s with A2 mm nozzle profile we no longer have our previously saved filament
profiles as you can see when I change Back to my4 mm profile all of my presets are now showing this is because each printer that you have set up has its own set of presets and calibrated filaments this box right here represents the filament number and the color assigned to the filament you can change this by clicking on the box and selecting a color now this right here is the name of the filament that you have selected clicking the drop- down menu will show you all The different system presets that you have added to the
software and any user presets that you have added and calibrated yourself if you would like to create your own custom user filament you can do that by selecting this edit button here you'll be presented with a bunch of features that you can edit and change the filament tab is where you can make any temperature changes the cool tab is where you can change the fan speeds and Cooling options the settings overrides are an advanced feature I haven't had to use any of these as of yet now turning on the advanced toggle will enable more features
that are hiding once you've made some changes and are satisfied with your settings hit the dis icon here you'll be presented with this popup first give your filament a new name now the user preset option will save your filament and make it available for all your future projects the option Preset inside project will only add the filament for this particular project and you won't have access to to it in any other project hit okay and close the window now you can see your new filament is added to the menu this is how you would add
any new filament brands that you have started using you first start with a generic pla or petg preset for example then change the settings that the filament manufacturer suggests usually there's a sticker printed on the Side of the spool or maybe even a business card size guide that was included or you can usually find the information directly from the manufacturer's website as well once you have all the custom values for your filament added then you can give it a name I use the brand name and then the filament type like polymaker PG or sunlo pla
now you have a filament that is specific to that brand I would like to point out that the polymaker petg is not The correct name I should be giving this filament name of pla as you can see here the type of filament is set to PLA and yes it does matter PLA and petg both have different sets of requirements let's change the name to the correct type and move move on next up are these plus and minus buttons that will allow you to add additional filament spools by default it's going to add whichever filament you
have selected as additional spools so For instance if you're using a different filament type and color for spool number two then you would simply change it here now if you're using an AMS this button right here will pull all the filaments that you have set up with your AMS and display them here I don't currently have an AMS but plan to buy one soon hit the sync and it will display all of your filaments all right let's move on to the process Menu the first thing that we're going to discuss is the global and objects
toggle button when the global is highlighted in green that means that any changes you make in this tab below will apply to the entire project when switching to the objects button that means you'll be working with the settings for individual models in the project now this Advanced toggle button will turn on and off a lot more features since this is a beginner's gu we're Going to save that for my Advanced video that will be released shortly just know that these features are not essential to get started 3D printing next is going to be the view
all objects menu this is going to list out every model that is loaded into your project it will give you a bird's eye view of the settings that are set for each model so that you can quickly see if a setting is not set correctly for a specific Model next the compare presets lets you load two presets into the menu below and compare their settings think of this like a compare feature When shopping for similar products online and you want to compare the features of each of the models I'm going to switch back to my
point4 nozzle printer for a second the drop down right here is going to be the menu of all of our process presets as you can see I have a ton of different save presets for different Specific types of prints I have presets that I have saved for my Droid prints some for my dinosaur skull prints and even some of them with variations of print quality below my saved user preset are the system presets think of these like a template building block to get you started you then make custom adjustment to these presets to create your
own once you get more familiar and comfortable with printing you want to explore the Different process settings in the Advan mode you will find that certain settings work better than others and can yield a higher quality print you can even Save hours of print time and filament as well but for now I suggest sticking with the system presets also remember that if you ever have a print that starts to fail on your printer always try going back to a system preset and see if that fixes it I remember when I first started creating my own
user presets eventually my Settings got so far off course from the system presets that my print started to fail and even printed horribly to fix this I would revert back my settings to the system preset and it would fix my issue let's talk about the system presets for a moment now if you take a look at the system presets for this particular printer with a04 nozzle you will see that we get a range of 28 mm to 8 mm this is going to be the range and layer height for this4 mm Nozle now if we
switch back to the 2 mm nozzle preset you're going to see that we have a range of4 to a 06 mm so keep in mind that certain nozzles have a range of layer height that they can print in the smaller the layer height the higher the quality of print you will get this will also increase the print time though if you want more detail and a higher quality print for something like a miniature then maybe a 2 mm nozzle will work better for you but For someone who likes to print large vases droids or even
full-size dinosaur skulls then a larger nozzle such as A8 mm nozzle will work better it will allow for faster prints without needing to worry so much about tiny details let's go ahead and move on to the tabs below we have quality strength support and others before we move further I want to show you that each of these titles are Going to highlight whenever you hover over them most options throughout the process section are going to link back to the bamboo Labs Wiki so if you ever get stuck you can always remember to try getting more
information from the wik link also i' would like to point out that once you make any changes to these settings they're going to change to an orange color that means that the value has changed from the preset that you have set right here in the drop Down this makes it very easy to see any difference in the settings now you can revert back to the original setting by hitting the orange circle Arrow icon all right first up is the layer height section the layer height is a thick thickness of each layer of your print the
smaller the number the better the quality but longer print time remember that you can only use the range that your nozle will allow the print quality will always be less noticeable On flat walls but when it comes to angles and slopes then it will be much more noticeable again if you're most worried about print quality then I suggest checking out my variable layer height tutorial after this video the first layer height is always going to be equal to or larger than the layer height setting this is to ensure better build plate adhesion one of the
biggest issues with 3D printing is bed adhesion I'm constantly seeing people Ask for help with bed adhesion in Facebook groups the larger first layer will help compensate for the imperfections of your build plate or unleveled bed I own another printer brand and the number one issue I spent time with was you guessed it bed leveling next is the seam position as your printer lays down the layer of filament it will meet back to the original position where it started to Complete the loop once that layer is done it will need to shift up or in
this connection is where it will create a seam in your print this option will give you the ability to change where it creates that seam the nearest option is going to create a seam nearest to the position where it left off from the previous layer this will create a scattered seam all over the print as you can see here the default aligned option will allow The seam and try to keep them closest together it will also place the seams in corners of the prints such as it does here along the T teeth and in the
arm area this is to prevent them from being seen the next option is going to be back now back is referring to the back of the build plate not your model so if we slice it now you can see that the seam is going down along the back side of the dyo we go back to the prepare window and Rotate it and hit slice again now you can see that it's going down the side of the dyo this is a great option if you have a preference on where you would like the seam to go
just point your model towards the back of the bill plate and it will place the seam there the last seam option is the random option now the thought behind this option is that the slicer will place a seam randomly all over the model you would think that these small Imperfections would get hidden when they're scattered all over your model while this can work sometimes it can also make your model look messy alternatively there's one more option available back in the prepare window there's a feature in the toolbar called seam painting first select your model then
open the seam painting tool this will allow you to place a seam directly on your model wherever you see fit but first let's change our seam position From random to aligned when opening the seam tool you'll see a drop down menu the first two buttons are going to be how you will paint your seams the circle will allow you to place a flat circle onto your model to paint with similar to using a brush tool while the sphere option will paint the seam in a three-dimensional area next you can adjust your seam painting size to
have more control and be more precise with your painting let's Go ahead and paint a seam down the back side of the dino tail to see how this works next I'm going to slice the model and now you can see the seam is now being placed on the back side of the tail the corners and folds in your models are always going to be the best place to hide your seams the aligned option tends to do a great job of this most of the time all right I think this covers the basics for Seam painting
now under the advanced section we can change the only one wall on top surfaces option the option only one wall on top surfaces feature focuses on reducing the number of perimeter walls on the topmost layers of your print typically when printing the walls on the outer perimeters of a model bamboo Studio generates multiple walls to ensure the strength and quality however with this feature the slicer will only print one perimeter wall on The very top surfaces to demonstrate this let's switch over to a cube primitive with the top surfaces option selected I'm going to slice
our Cube model now as you can see bamboo Studio printed a top layer over the entire top surface of the model the top layer is leading out to the entire edge of the cube now if I switch our option to not applied and reslice our Cube you will see that now our top layer here in red Only extends out to the yellow wall Loops rather than the edge of the cube moving on to the next tab which is strength the first option we have here are wall Loops the wall Loops are also known as perimeters
or shells and refer to the outermost layers that form the walls of a 3D printed model when you print a 3D model it starts by outlining the shape of each layer creating loops around the perimeter before filling the inside so why are wall Loops important This is going to give you strength and durability your surface quality and your 3D model Dimension accuracy this setting is going to be a preference for small prints like this Cube two wall Loops will be completely sufficient but when it comes to something like a full-size dinosaur skull I always use
a minimum of four walls your decision on this will come with experience but just remember if you need your print to be more durable bump Up your wall Loops the top and bottom shells are going to be the surfaces for the top and bottom of your models now the surface pattern is currently set to the default monotronic line pattern different patterns work better for different models of materials it's up to you to test and see which gives you the best results for purely aesthetic Parts focus on patterns that provide the best visual finish and For
functional Parts use patterns that offer more strength just remember some patterns might take longer to print and use more material I gathered the benefits of each patter pattern and here they are the monotronic line provides a smooth and consistent finish by altering the direction of printed lines between layers best for aesthetic Parts where surface finish is crucial the monotronic ensures an ultra smooth surface with lines printed in the Same direction across multiple layers best for parts requiring a premium finish concentric creates aesthetically appealing curved patterns that follow the shape of the part best for circular
or organic shapes and decorative parts rectal linear offers balanced strength with a straightforward grid pattern best for general purpose prints aligned rectal linear enhances surface consistency and structural Integrity by aligning lines between Layers best for functional Parts requiring additional top layer strength the Hilbert curve achieves a highly detailed uniform surface with A continuous space fielded curve best for decorative items with a focus on Surface detail archimedian cords provides an aesthetically pleasing spiral pattern with a balanced strength best for parts with a central Focus point and decorative elements octogram spiral forms a visual Striking star-like shape
with a good Force distribution best for decorative Parts needing a strong central structure all right let's move on to the top shell layers options your top shell layers are going to affect the amount of top walls your model will print increasing the number can give you a higher quality top layer print an example of this was when I was printing a star destroyer model it had very intricate details that were being lost I Finally figured out when my model was trans positioning from infill pattern to a top layer it would increase the quality if I
gave the printer more top layers to print with once I bumped up my top shell amount it instantly made the quality of these details higher now the top shell thickness is one of these features that's going to always overwrite the top shell layers this feature is set in millimeters rather than layer amounts if you need to have Your top and bottom layers at a specific thickness then you would want to use the shell thickness option all right moving on to the internal solid infill pattern pattern bamboo Studio employs the internal solid infill pattern to ensure
the highest levels of strength durability and reliability in 3D printed Parts this pattern is essential for applications where structural Integrity is critical helping to create parts that can handle Significant stress and mechanical demands effectively the only way to understand what the internal solid infill pattern is is by showing you layer by layer on our dyo model if I show you a display of one layer at a time you will see that the internal solid infill pattern shows up throughout the model in purple as per bamboo Studio this pattern is to ensure the Integrity of each
print but online you will find some who wish there as an option to Remove it for now I stick with the options that bamboo Studio gives us and go with that next up is sparse infill we have two options the density percentage and the pattern let me quickly explain what sparse infill is the sparse infill is a 3D printing technique that partially fills the interior of a printed object with a structured pattern instead of making it completely solid bamboo Studio uses many different patterns leaving Space between the printed lines spse infill significantly reduces material usage
and print time making the process more cost effective and efficient while it doesn't provide the same level of strength as solid infill sparse infill still offers adequate support and structural Integrity for many applications when deciding on which density to use for your prints many times it's going to come down to preference you can ask 10 different People what they would use for a specific print and you would probably get 10 different answers for more structural prints I choose 40% and for objects that are more aesthetic I use between 10 and 25% when printing simple toys
or models such as Ardo a 10% infill is sufficient enough now there's a lot of controversy around which infill pattern is the best I truly can't answer that for you but I can tell you that I've tried most of them choosing the Best infill pattern for your 3D print depends on specific needs of your project consider strength print time and material usage and the intended use for the final part for maximum strength and durability pattern like the honeycomb and gyroid are ideal they offer excellent strength to weight ratios and balance strength in all directions if
you need a balance strength with efficiency rectilinear and grid patterns provide decent strength While reducing the print time and material usage triangles and cubic patterns also offer a good balance between strength and speed making them suitable for functional parts that don't require maximum strength for parts where surface finish and flexibility are priorities concentric and zigzag patterns are excellent choices providing smooth finishes and adaptability to complex shapes unique patterns like 3D honeycomb And octogram spiral offer specialized benefits such as Superior strength making them ideal for lightweight and decorative items remember to keep these simply as a
guide there is no wrong pattern to choose that will completely bomb your project just keep these in the back of your mind the next time you slice your model all right let's move on to the sport tab now the first thing you will need to do is enable your supports and That's going to activate all the features you will also notice that I imported our 3D Beni model onto its own build plate we will be using that in just a bit let's go ahead and hit Slice on our dyo model now that we have supports
enabled and see what happens this is going to generate normal supports because that's the type that we have selected here as you can see in the window up here the supports are going to Take about 7.4% of the print time let's go ahead and change our supports to tree Auto and slice our model again and see what happens the tree supports are much cleaner and will take 7% of the print time before we move forward let's talk about these supports for a moment normal supports also known as linear or grid supports are straight up and
down structures used to support overhanging Parts these supports are typically created in a grid Or lattice pattern directly beneath the overhangs and connect to the overhanging parts to the print bed they are simple to print and remove making them ideal for models with basic shapes and moderate overhangs due to their simplicity and reliability normal supports are great for beginners and are easy to handle in post-processing on the other hand tree supports are more advanced and are designed to minimize contact with the printed object Resembling the branches of a tree these supports start from a trunk
at the print bed and Branch out to support the overhangs this design uses less material and can be easier to remove reducing the risk of damaging the print tree supports are particularly useful for complex models with multiple overhangs and intricate details they offer material efficiency and and reduced print time making them ideal for detailed models where traditional supports might be Cumbersome and harder to manage I hope my explanation gives you a better understanding of the difference between the two this should make it easier to decide which supports will work better for your model if you're
not sure the best thing to do is test them both out on the slicer just like I did sometimes the obvious choice will present itself over time it will become second nature to you using the threshold angle you can fine-tune your support settings to only Generate supports for angles below a specific degree it's currently set to 30 but if we change it to let's say 45 and slice again now you can see that a lot more of our dyo model will have supports printed for it 30° should be sufficient in most cases but if you
find a model fails in a specific area because of its overhang then you can change this value the on build plate only option will tell bamboo Studio to only generate supports on the Build plate for this example let's move over to the BCI model first I'm going to revert our threshold angle back down to the default 30 value by hitting the orange circle and then slice our Beni model remember to select the build plate first then hit the slice Button as you can see there are supports being generated inside of the captain area which are
not being generated on the build plate rather they are being Generated on the model to support the model now if I turn on the on build plate only feature and reslice our model you can see the supports being generated from inside of our model are no longer there all right let's go ahead and talk about the manual supports this will allow you you to manually paint areas on your model where you prefer to have supports similar to how the seam painting feature Works move over to the prepare tab again and make Sure you have your
model selected next let's click on the support painting button in the toolbar in the drop- down menu you will see the familiar Circle and sphere options you will also get fill and GAP fill options now as well let's quickly go over some of these features if you select a circle tool and left click on your model you can paint a purple area on your model this is telling bamboo Studio that you would Like to have supports generated in this area now if you right click on your model and paint it will show up in a
pink color this is telling bamboo Studio where you do not want to have supports added these are referred to as support blockers this left and right click feature works the same for the fill tool as well so if we select the fill tool button and hover over the model you will notice areas begin to highlight these are the highlighted Areas where the fill tool will color in either supports or support blockers depending on if you left click or right click this makes it easy to quickly fill in an area without having to manually paint an
entire surface Let's test it out by clicking the circular window on the bow of the boat you will now notice that the top half of the window is now highlighted in purple the blocker works exactly the same if I right click the area it now Turns it to Pink and supports will no longer be generated here we can also fine-tune these fill areas let's turn on this on overhangs only option now you can see that the highlighted areas are a lot more precise than before you can also adjust these slider options as well and fine-tune
your settings even further let's first uncheck the on overhangs only option the Smart Fill angle option will Allow you to adjust the overhang angle that you would like to highlight you can lower the angle and all your highlighted areas will only be for that particular angle and below this makes for much more precise overhang angles and will give you more control as you can see if I adjust this very low to something like four then now our bow window overhang has been broken up into many different areas that can be filled in individually but If
I adjust a Smart Fill angle to something like 85 now you can see that the bow window overhang no longer will highlight or allow me to fill in supports so you can see that this can really make it easy to pinpoint those overhangs and make your support painting much easier the Highlight overhang areas works just like our show overhangs feature it's going to automatically Adjust the Highlight on the model on the fly allowing you to quickly see which angles may be an issue on your model let's move on to the filament and support section if
you have an AMS this option will allow you to use specific support materials when printing your models for the most part you will never have an issue using the same material as your model to print supports but if you would like to experiment with support specific materials you would then select The filament here in these drop- down menus before moving on let's revert all of our custom settings back by hitting the orange circle button now you will get this warning down here at the bottom support enforcers are used by support is no longer enabled this
is referring to the support painting that we added earlier so to fix this let's head back over to the support painting feature and hit the erase all painting button moving on to the others tab there Are four different sections let's go ahead and start with the bed adhesion section first the first two features in here are the skirt and brim settings the skirt feature is an older feature typee that basically accomplishes two things if I change skirt Loops to three you will see that it will draw a border around your model this would help ensure
that the extruder has a proper filament Extrusion before printing your model and you would Also see where the print would be placed on the build plate but with modern printers this is no longer necessary my old creality printers would print a skirt every time it usually needed that extra bit of printing before the extruder was printing a decent line with the bamboo printers this is not needed I've seen others use a skirt height feature to build a protective barrier wall around their Model this would be necessary for printers without an enclosure this prevents variations in
air change and are mostly only needed for filaments that are touchy like ABS I think for most modern printers this is a dying feature I have personally never needed to use a skirt feature with my bamboo let's go ahead and reset our skirt options back to zero and move on to the brim feature a brim is a helpful technique to Improve the stability of your print imagine a brim on a hat it extends out and around the edges similarly in bamboo Studio A brim is a thin layer of extra material that extends out from the
base of your model let's go ahead and select the outer brim only option and leave the brim width set to five then hit slice you can see that it generates a brim that would be printed around the outer edge of your model the brim feature will achieve two things increase Bed adhesion and prevent your model from warping the brim sticks of the print bed helping the base of your print stay in place while reducing the chances of it coming loose during printing by holding down the edges the brim helps prevent warping which is when parts
of your print start lifting and curl up you will see models start to peel up around the corners usually when they're large flat prints here are some of the reasons why prints will warp and peel up temperature Differences material shrinkage inadequate bed adhesion and cool drafts once you gain more experience and knowledge with your prints you will learn when a brim is needed and when it's not when I first started out 3D printing I used a brim for almost everything the brim feature can also give you peace of mind if you're like me and like
to start a very long print before heading to bed the brim can be the difference of a successful long Print or a failed print in the middle of the night I prefer the Peace of Mind of having the extra bed adhesion I've had only three failed prints on my p1s because of bed adhesion it's because my p1s does an amazing job at Bed leveling and printing consistent every time if we take a look at the brim types you will see a default Auto feature this will automatically generate an outer and inner brim width calculation based
on the model this typically will be Sufficient for most of your models when starting out now you may have noticed that with the auto brim feature turned on after I hit slice a brim wasn't added to the Beni model now why is that well the auto feature is designed by bamboo lab in this mode bamboo Studio automatically analyzes each part of each individual object and generates a brim with a proper width for it it takes the following into consideration when generating the brim the shape and Orientation of the parts filament type and print speed let
me show you a quick demonstration here are three objects on our build plate all with different heights if I generated an auto brim for these you'll see that bamboo Studio generates all different brim sizes if you'd like more information about this you can check out the bamboo Wiki moving on to the Prime Tower section and flush options these features are linked to the color painting tool in Bamboo Studio I have a completely separate video plan for this so we're going to skip these two sections for now the special mode section has some very interesting features
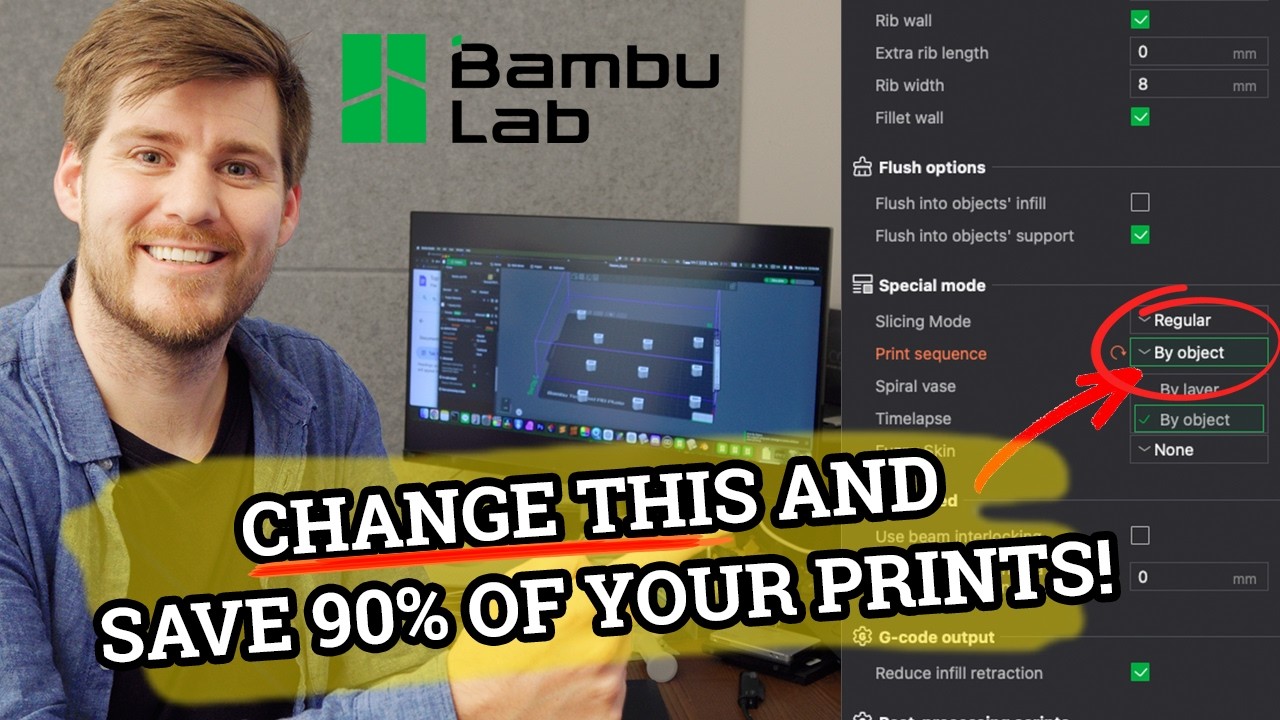
so let's quickly go over them so we can move on to the final section of this tutorial the print sequence is going to allow you to print two objects on your build plate separately to demonstrate that let me move the Beni over to the dino build plate now if we change by layer to by Object you're going to see this wrestling ring looking boundary around your build plate both objects are going to have a border around them what's going to happen is bamboo studio is going to print one object complete then move on to the
second object rather than printing both objects simultaneously layer by layer what we need to do is give the printer enough room so that it won't collide with the other object once is printed as You can see right now I'm getting an air saying the 3D Beni is too close to the other objects and may cause a collision now one of the advantag to printing this way would be if you had two different colors for each model let's say for instance you wanted to print the Beni using the blue PG filament we currently have set up
then you wanted to print the dyno using the green generic pla if you were to do this using the by layer option the AMS would have to swap filament colors every time it changeed models to print with the buy object option the printer could print the entire Dyno in green first then change the filament and print the Beni next I get that this is a little on the advanced side but I think you understand the advantages of by layer and by object the spiral vase feature will be covered in a separate video basically what it
does is hollow out your object and make Adjustments to it this feature is of course used for printing vases now if you own a printer like the p1s from bamboo Labs you have the option to record all of your prints traditional will take a snapshot after each layer is complete this means that the tool head will be in a different location after each snapshot the smooth option will move the tool head to the excess shoe and then take a snapshot this will cause excess filament to purge from the Extruder so the Prime Tower will be
needed this will increase your print Time by a lot and to be honest unless you have a specific reason to use this time lapse I suggest leaving it on traditional fuzzy skin is one of those options you will probably never use basically what it does is create a texture on your print that randomly shakes a print head while printing I've never had a use for it but I've seen it being used to try and hide printer layer Lines by adding a texture to the print walls the only way to fully cover this featur is by
showing each option one by one so the fuzzy skin feature is also on the list for a future video before we move on from the prepare tab let's talk about the three green buttons up here on the right first up we have the upload button this is going to open up your browser to the upload screen that you can upload your model to maker world the slic plate button will allow You to slice either just the current active plate or all the plates in your project I have mentioned earlier that I like to print large
models so I almost always have multiple build plates open in my project this will allow me to get them all sliced at once once you slice your plate then you'll have multiple options on what to do next with this button here the print plate button will bring up a pop-up window with an overview of the model and Some of the options to select your printer and if you would like to include bed leveling and time-lapse recording with your print hit send and it will upload to Bamboo cloud and send it to the printer to download
and begin printing the send option will send your slice model to your printer's SD card and store it for access at a later time it's basically like telling your printer that you're done with this model but not ready to print it but hold on to this File for me to access later the X export plate slice file and Export all slice file will allow you to save your project with all plates or just a single plate on your computer this feature would be used if you had a printer that needed a print from an SD
card you would export it to the SD card and then move that SD card over to the printer and print directly from the SD card the send to Multi-Device button is new to this version of bamboo Studio which added Multi-Device printing I've covered this new feature in a separate video already but we can quickly go over the popup menu once you hit send to Multi-Device you see a screen that looks like this it gives you a thumbnail of the model time to print and filament usage you can choose to print either using the external spool
on your printer or an AMS next you can select which printers you'll be using by selecting them here the options below will allow You to enable and disable printing options the send options are there to safeguard your power system and prevent overloading instead of hitting print and sending your model to 10 different printers all at once and possibly overloading your power Breakers you can choose to only send to a specific number of printers at once and allow a waiting period between each batch so let's say you have 10 printers but only want to start printing
three at once you would Change send to three printers at once and give it 5 minutes between each batch once you're comfortable with your settings you would hit s and you would be forwarded to the Multi-Device tab for now let's go back and change our printer to the correct nozzle of4 mm which is what we actually have now this popup window is going to display basically asking if I want to keep my current settings or if I want to use a syst system preset Settings I'm going to revert everything back by selecting the discard modified
value button then I'll reslice the plate and hit print plate this is going to give me a popup window then forward me to the device tab after I hit send this downloads my slice model to Bamboo cloud and uploads it to the printer if you look at your printer screen you will see the download Happen in the device tab you have this left hand menu if you have multiple printers you can switch between them here and even add additional printers with this button as well the status window will show you a live feed of your
printer's camera simply hit the play button here and the feed will start streaming directly to your screen below that it will give you a status of what the printer is currently doing downloading heat bed preheating Bed leveling cleaning nozzle tip printing Etc the percentage complete of the print the layer it's currently on and how much time is left you can also pause and cancel the current print right here on the right hand side you have the control window the first two icons here are the extruder and the bed temperature you can adjust the temperature manually
by clicking here and typing in a value the printer will then begin to heat up and set the temperature you'll see the Icon change color to Orange indicating its heating to cancel this just type in zero and hit enter on the keyboard next up is the ambient temperature inside your printer's enclosure currently only the XS series models have an ambient temperature temperature sensor the RPM icon will allow you to adjust a printer speed during the middle of a print you have four options silent standard Sport and ludicrous each adjusting the speed by a specific percentage
75 100 125 and 150 and if you're wondering no I haven't yet used the Ludicrous Speed however there has been occasions when I wanted a print to finish just a bit sooner so I could start a new one so I turned on the sport mode towards the end of the print next is the internal enclosure light control just below that are the three fan controls the tool head fan on the extruder the auxiliary fan that is located on the leftand side of the enclosure and the Chamber fan located on The rear of the printer to
the right you see the big circle control panel you can use it to move the print head along the X and Y AIS the outer portion of the Ring moves it by 10 mm and the inner ring moves it by 1 mm the greenhous icon in the middle will home the print head to 0000 center of the bed for calibration next to this is where you can control the bed up and down either by 10 mm or 1 mm these next two buttons up and down Control the extruder just below this you can unload your
filament and make a filament change all right let's move back over to the left side menu the micro SD card option will display all the time-lapses and models that are currently saved onto the SD card you can see the models that you previously printed by clicking here you can also manage the models by deleting and reprinting using these buttons here You can batch delete items by hitting the select button at the top right corner and then selecting multiple items and hitting the delete button here the same goes for the time-lapse menu you can use the
select button up here to select multiple items and either delete them or download them all at once the update button will allow you to update the printer's firmware if available you can also view the updated release notes by clicking this link Here all right I think that concludes most of the basics for bamboo Studio real quickly let's run through the process of importing and printing a 3D model first we import our model by either downloading or importing it from maker world we position it on our bed next we make sure that we have the correct
printer and build plates selected choose which filament we are using from the filament Dro down Here next select either our user preset or a system preset and determine which quality or layer height to use make sure that all your process settings are what you want slice your model and hit print plate congratulations you're off to a great start printing hundreds of things that your significant other is going to ask you why did you print that I know I've gotten that before no in all seriousness this is one of the coolest hobbies to be a part
of the industry is Constantly improving and growing and I'm sure you'll have tons of fun if you stuck with me through this entire video I would like to deeply thank you for taking the time to improve your 3D printing skills with me I truly enjoy making these video tutorials as simple and as real world as I can and will continue to do so in the future if you haven't already subscribed to the channel I would greatly appreciate your support and would be honored to have you As a viewer I promise to keep adding more content
on a consistent basis again my name is Nick have a great day and happy printing