all right so once we've gotten everything clean we've used the proper solvents we've got all the passageways open we're going to go ahead and put it back together of course we always recommend that you're going to use genuine gracol parts you know I always recommend you get the right stuff and you only have to rebuild it as really necessary versus using substandard or rings and parts we want to use plenty of fusion lube on the o-rings that comes on a little toothpaste tube making sure all the o-rings are free of Nicks that the sealing surfaces
are clean where that o-ring that's going to sit we don't want to cut the old one and put it back in this is the main air piston yeah when the air is on this side it'll go forward and then it'll be shutting off the gun when the air passage is on this side it's going to go back and it's actually going to line up the mix chamber with the chemical parts and then we'll be spraying we'll talk about that a little bit more when we do the final kind of setup of the gun so we
just want to make sure that that piston moves freely notice it's got flats here so it's keyed to keep that from spinning so just line that up and push it in so then we're going to examine our own rings in our spool make sure they're clean so again this is one one take a little care make sure that we get it lined up so that we don't Nick those orange and when we use the screwdriver or a tool make sure that we get it all the way in but we want to make sure we don't
cut that o-ring you can see where that trigger in has come through so the trigger has a spring on it this air inlet does not have a ole ring seal but if you look closely there's a machine taper we want to make sure that taper doesn't have any debris or tape or anything like that that will allow the air to leak to have a grease that's starting so we're gonna smoke that up we don't have to go overly tight again this is not a fluid pressure seal this is all air seal of the o-ring here
make sure that it's clean I'd like to get grease on all the threads that way if it does cross over you'll be able to tear it apart without too much trouble anything that has a wrench flat we can go ahead and put a wrench on there if it's just knurled we don't want this overly tight we don't need to put pliers on there I usually like to just take a little bit of a rag so the grease doesn't restrict me they just get it tight hand tight you know what a flat of course we'll go
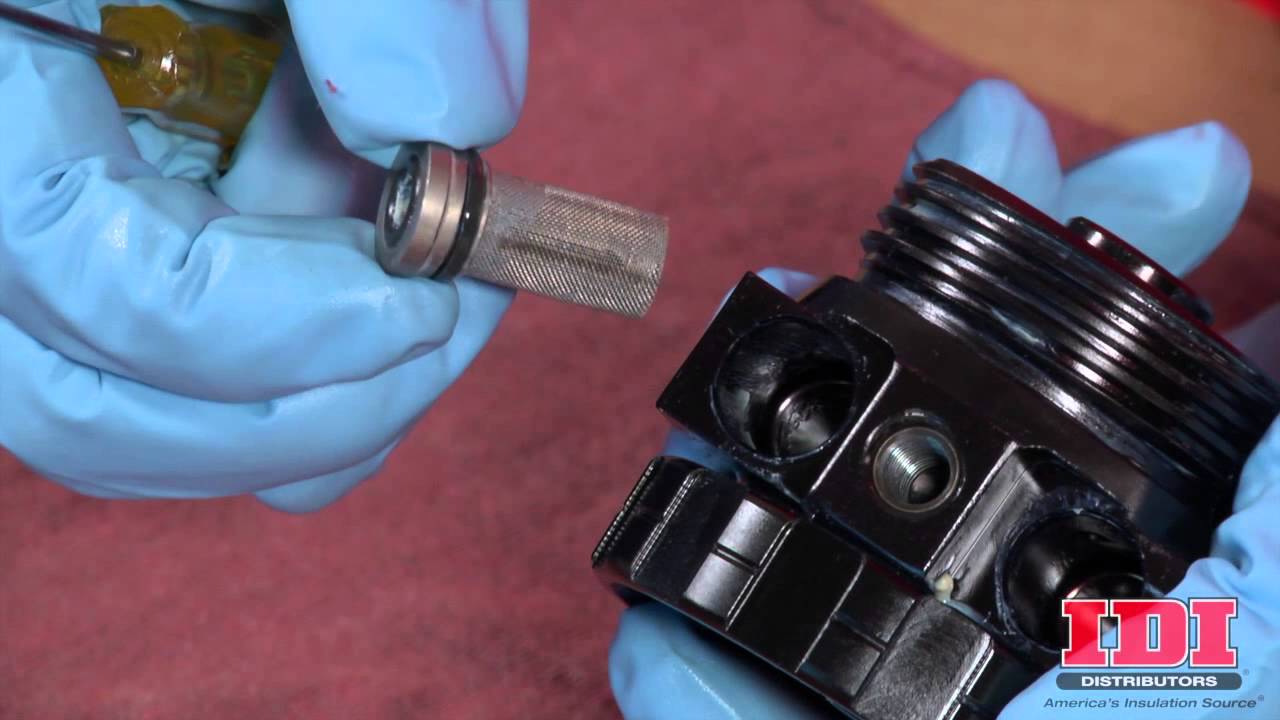
wrench tighten we want to make sure that the safety is all the way engaged in the Pistons forward so when we go to put the fluid section on this won't be too far back and we won't have to struggle with that so we can go ahead and replace our plug we can put a little stainless steel pipe sealant tape you know it doesn't have to be overly tight it's just an air seal then make sure that screen is good and clean and we're gonna replace that lost muffler of course this has a wrench flat so
we want to go more than hand tight so that's the air section of this gun we can actually before we assemble the fluid section we can trigger the gun and make sure everything is working we say the air pressure can go as high as 120 anything more than 80 psi is really more than enough so first with the that's the air purge air that would be captured by this o-ring so we know that that passageway I was talking about is free and clear so I'm getting plenty of airflow there okay so that's the air section
then we're gonna move on and get the fluid section back together again okay so we're gonna put the fluid section back together again be mindful that we have an a side and then a dot or a B side we don't want to mix and match the parts their machine exactly the same but there's always a little bit of residual chemical on there and we don't want to reactants the gun so it's a good idea to keep the a and in the B parts separate so I want to start with putting that retaining ring back on
again if you look here you can see this sharp move here is for the retaining ring and this more radius groove is for the o-ring when we put this back on we got to make sure that we don't end up in this groove we have to go a little farther and walk it on and we want to kind of be careful with that because I don't want to be nicking up this edge here we're gonna get an air leak when her chairs been becoming where we don't want it to go so we'll start with the
retaining ring it's important that we looked at the threads not only on the retaining ring here but here and here if the anodized coating is gone you'll notice these are an aggressive Acme thread and it actually that the distance of the thread depth is what engages that side seal so we have the side sealed cartridge with that spring I already showed you this is a mechanical seal if I don't get the right compression this o-ring will be exposed and you can actually extrude it out the gun when it's under pressure so it's really important that
you make sure that you don't wire wheel this or you don't mess up with the thread dimensioning because that's what provides the mechanical force along with this spring to make that side seal so if you're blowing off soaring a lot make sure that this bar is clean and then get all chewed up make sure that your threads they call them an ACME thread notice they're square not sharp and that everything's clean there and burr free let's go ahead and put that retaining ring back on this is where we have to kind of lock the spring
get it started I'm gonna use our small screwdriver lock that spring on okay so I'm only in that first groove remember it's the o-ring groove on the outside so the key is to get that leading edge all the way into the groove lock it in place and so that's on the back groove not on the front groove where this orange OHS and making sure these o-rings are clean if not replace them I'm actually going to grease that in here versus here so I can make sure that I get the seal where that's going to go
otherwise it'll get too much grease on there or the proper amount so we also have the front o ring this one sits in an ID groove again that's the one that seals against the smoothbore of the air cap and this one will be on the smoothbore of the handle so before I put that on there we're going to want to put our pieces back together the a1 is still together matching the aside I want to just get that started if I get it too far in when I go to put the mix chamber into the
gun we don't want to be knocking the the side seal off the the cartridge and it will lose it into the drum head or the bench or under the floor so just get it started so go ahead and put the o-ring back on the B side sealed cartridge 300 rings total the two bigger ones go on to the cartridge assembly make sure it's not in the groove that we put for the screwdriver leverage there's the side seal again make sure there's no scratches on the surface that's shiny here if I can catch it with my
thumbnail we want to make sure that that gets replaced the mechanical spring seal we're just gonna put a little grease on there one right up we always want to make sure if I push on that side she'll see how it springs back especially on a cartridge with the isocyanate and the way it can react to the different solvents want to make sure everything's good and clean if that spring isn't free to float it won't seal well against the sides hill and we'll cross the gun over right away so this is they not and we want
to get that started but we don't want it so far in that we're gonna knock that side seal off you can notice this one's in a little fire you can actually see it extruding or protruding into the where the mix chamber okay so at this point we can put our mixture on again when we put this what I call a witness cut they've machined a little groove there that's the identify the a side in the mix chamber they are laser touch but after time the laser etching gets harder to see we don't want to be
mixed in the a part or the B port it would probably work but you're going to be mixing even though I have some residual here make sure that what you see here there's a little bit of kind of wear marks but there's nothing I would be able to catch with my thumb that would prevent that seal from happening so the a on the gun my witness cut then I get that in there make sure they both kind of have that spring back and we're just going to put a good amount of grease on these Acme
threads so if it does get some chemical leakage in there it'll be easy to easily leave to take that apart so again there's Merle here I don't need to get a wrench on there keep the gun clean we have this PTFE white or in here that's kind of a wiper to keep this part clean to keep chemical from coming in it's not really an air seal we want to make sure that's good and clean okay so we have the inlet screen and check valve assembly this o-ring actually seals against the mix manifold when it's bolted
on to the gun this o-ring seals on to the gun ed boar okay so this is a check ball assembly it's a one-way check the fluid chemical can go that way it tries to prevent the chemical from going back when the ball seats that's actually spring-loaded and then we have the spring retainer when we're putting this spring retainer back in we want to make sure that we don't screw it in too far because we don't want to restrict that ball travel so I like to just get it where it's just flush maybe one full thread
in then it's not going to restrict that ball travel our Inlet screen we have three different measures a tee is kind of a standard depending on your process you might want to coarser mesh screen then what the eighty provides this is the B make sure the bore is clean it just sits in there until it's flat the one marked a dose of the a it's flat and the last thing to put together is our clean off air needle valve press that into place for a starting point I'm just going to keep that closed because I
want to listen for some air leaks but then we'll adjust that when we go to put that together so remember we want to put a little grease here where that eternal ring seals make sure that the air cap is pushed all the way back and that the piston is all the way forward so when we go to put it together they'll be clearance you can remember this is keyed so once we get to thread starter we just want to line up the grease zerk and the air purge will be to the top you can feel
when it engages the handle again neural threads so I don't need pliers on there I don't need a wrench I'll grab a rag make it a good hand tight we're just going to recover the research ok so that's pretty much the symbol of the gun a couple of things we want to check when we get it back together here I want to put the hose manifold on or my service block that comes in the gun kit just to retain these check valves or otherwise want to put air that will come out of there so we'll
just use the hose manifold again making sure that there's no burrs for the o-rings making sure that threaded insert is clean and chemical free if this is our spare gun we'd want to make sure that we put that night cap on there and we keep everything clean notice the spring clip the purpose of that is it won't allow this ring and the ratchet pawl kind of a setup to come undone while you're working the gun so there'll be no danger of the fluid section separating from the air section it should better look at that once
I get this on there so it's kind of a spring tight if this were to start loosening up you heard that click now it even though it's loose it won't come completely off the gun so you always want to make sure that that spring clip is in place that is the purpose okay so when we put the area to our gun we want to listen for air leaks we'll talk about adjusting the clean off air properly so notice that the safety is on when the air came on it moved the piston forward if you're spraying
and you were to lose your air supply compressor stopped this is a way to shut off the flow of the chemical is just to push the stop and it did the same thing as the air would notice that it came forward then we're stopping the chemical flow so then we can go back to the truck to find out what happened to our air supply so that's kind of the just give a push on the gun and that'll shut off the fluid flow gun and I want to make sure it's quiet so I have to clean
off air there's no purge because it would be flowing chemical right now that gun is pretty quiet so then I can adjust my clean off air and we say usually a half turn or so you can barely hear the air it's just coming across this tip and it's going to kind of keep that fat from coagulated so this gun is pretty much ready to go when we go to spray I just like to put some fusion lube on the surfaces here that way if it gets caught in the foam and a lie pop pretty clean
so but when we store it we want to kind of keep it and clean so it doesn't get sawdust and dirt and and whatever so this guns ready to go we can either put it back on to our hose manifold on the machine or we can put it in our our spare gun box [Music]