A wide-angle lens is used to take photos when you don't have much space. False. A telephoto lens is used to zoom in on a subject. No, no, no. A large aperture allows you to shoot in dark places. Still wrong, no. Well, we need to talk. Today, I'm going to explain that the settings of your camera are primarily creative rather than technical. We’ll see together how to adjust your camera and what choices to make to respect the artistic direction of your image. We’ll look at why Alien 4 was shot with a wide-angle, why La Haine is
a masterclass in focal length choices, and how the Joker conveys emotions through depth of field. So if you want to be an Art Director rather than just a photographer, what follows should interest you. When you’re starting out, you can feel a bit lost with all the settings. It's true that there are quite a few parameters to consider. There’s focal length, aperture, shutter speed, and ISO. Plus, they all affect light, depth of field, or completely different things. That’s a lot, and we never really know where to start. Should we start by adjusting our shutter speed or
the aperture? Should we start by setting the ISO? Often, when we start photography, we have so many parameters to consider that we’re not quite sure how to proceed or where to begin. On top of that, the internet is full of videos or articles that spread nonsense about all the parameters with perfect settings for your camera or your photo gear. Well, it’s a whole bunch of nonsense that doesn’t really help much. So, I thought I’d make a video to explain how to set up your camera based on the image you want to create. We’ll see that
not all parameters are necessarily technical. Even though they will indeed have an impact on shooting conditions, we’ll see that the vast majority of parameters will condition the artistic direction of your image and those are the ones we need to prioritize. What I’m going to do here is go through all the possible parameters, trying to prioritize them based on their impact on the artistic direction of your image. and try to see which are the most important, which are secondary, and which are purely technical to know in what order to address them. So don’t worry if you’re
confused; all you have to do is watch this video, follow the list I’m going to give you, and everything will go well. First point, there’s no ultimate setting that works for all situations. The first thing to define is the artistic direction of your photo. You need to know what emotion you want to convey before asking how you’re going to set your camera or photo device. So the first question to ask yourself is: What do you want the viewer to feel? Do you want a dreamlike scene? Do you want an explanatory scene? Do you want something
that feels Japanese or rather something reminiscent of what we saw during the Renaissance? It’s up to you. Depending on your parameter choices, the viewer's experience will definitely be different. For example, in the two stills I’m showing you from the film La Haine, you can clearly see that the emotions conveyed are not the same at all. On one side, I have an ultra-explanatory scene where I understand everything. On the other, I have a more introspective scene where I’m really focused on my character. And this is despite the subject being exactly the same. The only thing that
changes here are the settings. What I’m getting at is that the first thing to consider before even thinking about settings is what you want your image to communicate. Once you’ve answered that question, we can tackle the first parameter, which for me is the most important, and that is focal length. Focal length is really the first question to ask. Unlike other settings, this one is not found on the camera body but on the lens. That means when you buy a lens, there’s always a specific focal length or a range of focal lengths. That’s why choosing the
lens is super important, and in my opinion, it’s even more important than choosing the camera body because the focal length will primarily define the tone of your image. By the way, a little aside, if you’re new to the field and need to choose a brand, like Sony, Canon, Nikon, or others, don’t choose based on the available camera bodies, but rather based on the lens lineup. Because, I repeat, what is most important in your gear are the lenses, not the camera bodies. So what is focal length? First, it’s measured in millimeters. Usually, it’s always written on
the lenses. For example, I have a 50 mm, so it’s noted there. Here, I have a 70-200 mm, So this lens has a focal range between 70 and 200, which means I can adjust the focal length from 70 to 200. Whereas on this one, which is called a prime lens, I only have access to 50 mm. It’s not a natural way of thinking. 50 mm, 70, 200 mm—what does that mean? To simplify, the human eye sees approximately at 50 mm. 50 mm is the focal length of the human eye, which means if you use a
50 mm lens, you won’t have any zooming effects. It’s roughly what the human eye sees, so there’s not much risk. Below that, from 35 to 50 mm, we have what’s called a normal focal length. It’s a safe focal length, so it looks roughly like what the human eye sees. Below 35 mm, from 0 to 35 mm, we’re dealing with what’s called a wide-angle lens, which means we expand our field of view, we gain space compared to what the human eye sees. Conversely, above 50 mm, from 50 mm to infinity, we talk about a telephoto lens.
We “zoom” in on the image. In photography and video, we don’t usually say we’re “zooming”; we’ll rather refer to a telephoto focal length, where we define a focal value. For example, I shoot at 135, 200, or 250 mm. But to help you understand, a telephoto lens is somewhat like zooming into our image. So why is this focal length defined in millimeters? In truth, it could have been discussed in degrees, for example, which might have been easier to understand. For this, I’ll give you a little physics aside. Here’s a diagram on the screen, and what you
can see is that this focal distance, corresponds to the distance between the focal point and the optical center of your lens. That’s why long focal lenses are larger than wide-angle lenses. It’s purely physical; it’s because this distance is greater. Well, if you don’t understand any of this, that’s fine; it’s not super useful to know. I mention it mostly for general knowledge. The primary use of focal length, of course, is to zoom in or out in an image. That means most people will tell you we use long focal lengths to achieve wide angles. and to see
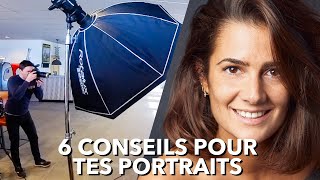
an entire scene when we don’t have enough space or distance. Conversely, if we want to shoot something from far away, we’ll use a telephoto lens, because it allows us to zoom in on something that is distant. So, that’s true, but it’s also a very reductive way of using focal length. Okay, focal length allows you to zoom in and out, but honestly, that’s not the main point. The most important thing about focal length is that it will distort your perspectives. Now, before we talk about the background, let’s talk about the models. You can see in this
example that I photographed the same model at different focal lengths. So how did I do this? Simply put, I made sure that the model's face stayed in the same position in my photo and I moved closer or further away to keep the size of her face consistent. You can see that at 50 mm, we have a normal-looking face. Below 50 mm, the face appears flattened. Conversely, above 50 mm, the face will appear more robust. What you need to remember is that when you shoot below 50 mm, you’ll have faces that look a bit more childlike.
You’ll be able to make your subjects appear slightly less mature and younger. Conversely, if you shoot above 50 mm, you’ll make your subject appear more substantial, giving them a bit more maturity, which will slightly age them. If I take this example of Dix that I shot about six months ago, you can see that at 35 mm, she looks like a child, whereas at 105 mm, she looks like a woman. And that changes everything. It changes everything because it’s very important for you to ask yourself at what focal length you will shoot your subject. Because depending
on the focal length, you won’t convey the same feelings. Personally, when I have a portrait to do, the first thing I do is test my model's face at several focal lengths. In general, I pull out the 50 mm and the 105 mm, I test with both, and I see what it gives. Some models respond very well to 50 mm but poorly to 100 mm, and vice versa. So that’s something I always do at the beginning of my shoots. And I must admit I have a preference for focal lengths starting at 100 mm, simply because it
will make my subject appear more substantial and also give a bit more charisma to the people I photograph. But that’s just my personal opinion. After that, you’re free to use whatever you want. Another point that will be affected by your choice of focal length is the distortion of perspectives. In this example, I created exactly the same effect. This means I took a subject and contextualized it in a setting and ensured that my subject was always in the same position in the photo. You can see that below 50 mm, it’s very well contextualized. We clearly understand
where I am; we can see the trash can next to it, and we can even see that there’s a staircase on the left. All this is because the wide angle allows us to capture more of the setting. Conversely, if I shoot with a telephoto lens, I will compress my perspectives. It’s as if the background comes closer to my subject, as if it enlarges and moves closer. The direct effect is that we detach our subject from the background. Since there are fewer elements in the background, it gives the impression of having a wall in front and
our subject will be very well separated from that. For me, the main point of choosing a focal length is precisely this distortion of perspectives or the distortion of the subject which allows you either to contextualize a subject in a setting, or on the contrary, to detach a subject, isolating it from the scene so that we only see them. Now that we know the impact of focal length on our image, we can discuss these four consequences that follow. 1. We can hide or show things. 2. We can contextualize or, conversely, isolate a subject. 3. We can
convey the feeling of our subject in relation to their environment. 4. We can add proximity or, conversely, distance between the viewer and the subject. So let’s start with the first point, using a focal length to hide or show things. I don’t know if you’ve noticed, but not-so-fine blockbusters tend to excessively use wide angles while independent films are more likely to be shot with telephoto lenses. Because a wide angle means a short focal length, which means “we see a lot of things on screen.” And “seeing a lot of things on screen” means “we have to accessorize
all that space we see.” If you want to shoot in a square and you use a wide angle, you will need to completely privatize the entire area, have extras all over the place, and light up the whole area. Conversely, if you're shooting at 200 or 400 mm in that space, you’ll only see 5 square meters of it. So you don’t need to privatize everything, you don’t need to light everything. You’ll only need four extras to make it look like there’s a crowd. So, the compression of perspectives serves this purpose as well: to hide things we
don’t want to show. Whereas the wide angle is used in blockbusters to show off. That is to say, the money shots are often in wide angle, just to say, "Hey, look, we’ve gone all out; there’s so much going on." So that’s also a constraint related to the use of focal length. It’s a purely financial constraint; with a short focal length, you will need resources. Whereas with a long focal length, you can manage without too much hassle. And it’s no coincidence that all independent films are shot with long focal lengths. It’s simply because they lack the
means to privatize large locations for a long time. So, okay, focal length allows us to hide or show elements of our scene, but more importantly, it also allows us to contextualize our subject in its environment. And the first film that comes to mind when we talk about contextualization is Blade Runner 2049. Blade Runner 2049 is filled with introductory shots. These are shots filmed in wide angle that contextualize the action by showing a scene in its entirety. The film is packed with them, and you can see some examples on-screen. Another film that brilliantly uses short focal
lengths is Mad Max: Fury Road. Well, practically the entire film was shot with short focal lengths, to counterbalance a frenetic pace. Given that the editor was on amphetamines, George Miller decided to use long focal lengths to help the viewer better understand the scenes. Each shot introduces a character, a setting, and an action. It’s truly a delight to watch. Conversely, we have the telephoto lens. So the telephoto lens, as I was saying, will compress perspectives. And because of this compression, we will hide things in the image. We will have much more off-screen space, making it much
more mysterious or a bit more intimate. The direct consequence of this is that our character will not really be part of the background. They will feel somewhat detached from the setting. An excellent example of the use of a telephoto lens is the film Dune. In Dune, the characters are on a planet with massive ships. Dune is a saga that takes place on a cosmic scale. To convey this, what do we have? We have the telephoto lens used to show that the ships are enormous and that the people are tiny next to them. That’s why in
Dune, you will see extensive use of the telephoto lens to constantly place the protagonists in context. Another film that effectively shows the massiveness of things through a telephoto lens is Star Wars: Rogue One. Now, yes, okay, the Star Wars films from Disney—we can all agree they’re a pile of garbage, but there’s one film that stands out, and that’s Rogue One. Rogue One is the first film to convey just how massive the Death Star is, how imposing it is, and how dangerous it is. I don’t know about you, but when I watched the original Star Wars,
the Death Star was presented as something that could cause immense damage, like the ultimate weapon, but all I remember is it being just a small dot on the screen that gets blown up twice. I admit I never felt afraid of the Death Star until I saw Rogue One. And how does Rogue One show us just how massive the Death Star is? By filming it with a telephoto lens, plain and simple. The third point induced by the use of a focal length is the feeling of our subject in relation to their environment. And for me, the
masterclass in this area is the film La Haine. To make it brief, we follow young people from the suburbs, who spend the first half of the film in the suburbs and the second half in Paris, within the city limits. The director did something very clever: he shot the entire first part of the film in wide angle. Simply because these young people are at home. They’re at home, so they don’t feel oppressed or constrained at all. They are there, relaxed, and thus they see everything. They have a sort of omniscient view of their surroundings. And that’s
why everything is shot in short focal lengths. Simply to bring that omniscient view to the image. Then, midway through the film, there’s a switch that occurs, and the rest of the film will be shot mostly with a telephoto lens. Why? Simply because what we want to show is that these young people are not at all in their world. They lose their bearings in Paris, and they especially lose their omniscient point of view of the surroundings. And that’s why we use a telephoto lens, simply to show that they are uncomfortable. And we are too, because we
are focused only on them, not what surrounds them. And as a result, it’s more difficult, more complicated. And this change is very well represented visually, since when the protagonists arrive in Paris, there's a vertigo effect that shows the change in focal length on screen. And that’s super intelligent. So for me, La Haine is truly a masterpiece in the use of focal length, depending on the emotion we want to convey. Finally, the last point about focal length is the distance between the subject and the viewer. A short focal length implies being close to your subject, while
a long focal length implies being far from the subject. If I go back to my examples from the beginning, you can see that in this portrait, I was really very close, because when I shot at 9 mm, I was literally just a few centimeters from my model's face, which is quite uncomfortable, by the way; don’t do that—try not to be that close to your models. Conversely, at 600 mm, I was several dozen meters away from the model. This distance from the subject is something our brain understands. When you shoot something with a short focal length,
our brain understands that we are physically close to the action, whereas when you shoot with a long focal length, our brain understands that we are distant from the action and that we have a somewhat external perspective on what is happening in front of us. Well, I’ll return to Dune, because in Dune, there’s not just the telephoto lens. There are also a few shots filmed with a short focal length, especially when Atreides is losing control and having all his visions. In those scenes, we are close to him. It’s filmed at 35 mm, and we get up
close. Why? Because we want to emphasize that he is the main subject. We don’t necessarily need to contextualize, but rather, we really want to capture his emotions and we want the viewer to be physically close to the subject. Another very good example of this is Alien 4. Alien 4 has been criticized by many, but one thing you can’t take away from it is that it is incredibly well made. Alien 4 was shot almost entirely with a wide angle. And why is that? Simply to add a sense of oppression. Throughout the film, the camera is really,
literally, 20 cm from the faces of the protagonists. I’m thinking specifically of the final scene in Alien 4. Again, I’m going to spoil Alien 4, so come on, guys; I don’t know how long this film has been out, but I think you’ve seen it. At the end of Alien 4, there’s a sort of hostage situation. There’s a villain who wants to kill a good character, and there are two good characters with guns who don’t know what to do. At the same time, there’s a guy who has an alien inside him that’s about to burst out.
So there’s a lot going on, and especially a lot of emotions. To convey the frantic nature and all the emotions that pass through these characters, and especially to show the oppression in this scene, we use a short focal length, close to the faces, and we are with them. I remember when I first saw this scene, I felt everything hit me hard. It was incredibly intense, simply because the chosen focal length was super effective. Another example from Alien 4 is the basketball scene. In this scene, you have Ripley starting to fight with the protagonists. And again,
what happens here? We get into a frantic rhythm; things are happening, and we need to quickly understand the emotions of the characters, so we switch to a wide angle, and the whole scene is filmed in wide angle, with a somewhat frantic editing style. Then, as the pressure eases, we detach Ripley from the background, and we switch to a telephoto lens, moving to normal shot/reverse shot compositions with a telephoto lens. All this to show that at the beginning, we were in the action, hence the wide angle, hence being close to my subject, whereas at the end,
as the pressure drops, we detach from the action, thus we switch to the telephoto lens. And all of this, even if it’s not stated, our brain understands based on the focal length used. Alright, last example to convince you, let’s go back to 2049 with the final scene, the one where the main protagonist dies, and this death is completely impersonal. We realize that in the end, the main character is nothing exceptional. He is not the child we were looking for throughout the film; he is just a simple replicant that can be disposed of. And so this
death is impersonal; this death is futile. And to show this, we will shoot this death with a telephoto lens, simply to demonstrate the viewer's detachment from the main character. So again, the choice of focal length speaks volumes about the narrative. What you need to remember is that a focal distance also implies a distance between the viewer and the subject. With a telephoto lens, you will get a bit of a voyeuristic effect, as if you’re watching something through binoculars. And when it comes to photography, it’s exactly the same. I’ll show you examples of workers I photographed
about two months ago. Some photos were taken with a telephoto lens to create a detachment from the action, while at other times, I shot them quite close at 35 or even 24 mm, to imply proximity and a bit of that “America, fuck yeah” vibe in my photos. Of course, what I’m saying applies to creative photography, like advertising photos or that sort of thing. It’s true that in documentary work, it can be a bit different. In documentary, we endure the environment we are in. It’s clear that when constructing an image in a studio, it’s not the
same as being on a battlefield. I completely understand that someone in the middle of a war isn’t going to say, “Oh wait, let me use a short focal length to capture the emotion of this soldier who is being shot at.” For me, there’s no debate there. But in any case, when you’re constructing a photo, it’s important to realize that you are the master of your environment and that the focal length is not something you should endure. It’s really a creative choice. To summarize, there are two things to consider. First, do you want to contextualize your
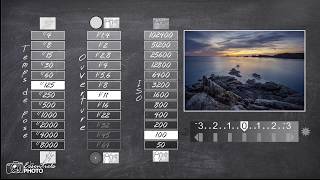
subject or not? And second, do you want to be close to your subject or not? Once you’ve answered that question, we can move on to the second parameter, which is aperture. Aperture is primarily a creative setting, not a technical one. Many people will tell you that aperture is used to let more or less light into your camera. and to compensate for more or less illuminated areas. But again, this is a somewhat reductive way of viewing aperture. Before explaining how it is a creative parameter, I’ll quickly explain how it works. Aperture is a diaphragm located in
your lens that opens or closes to let more or less light in. We talk about a large aperture when the diaphragm is wide open and a small aperture when it is very narrow, letting in very little light. As in photography, we love to complicate things, a large aperture is expressed by a small number and a small aperture is expressed by a large number. This value is measured in f-stops, and roughly speaking, at 0.95, 1.2, or 1.4, your diaphragm is huge; you have a large aperture, it is really open. Whereas for a small aperture, you’ll be
looking at f10, f11, f22, f30 and there, you will have a very small opening. To simplify, you should remember that when you have a small number, you get a lot of light. When you have a very large number, you get very little light. This value is found on the lenses. It is determined by the lens. Which shows that the lens is really the most important thing in photography. For example, I have a 50 mm, 1.2. 1.2 means I have a maximum aperture of 1.2. I can go from 1.2 up to f22. Here, I have a
70-200, 2.8. It’s also called a 70-200, 2.8 constant. Why? Because my minimum aperture value is 2.8 whether I’m at 70 or 200 mm. That won’t change. Conversely, if I take this 35-150 f2-2.8. This is a lens that goes from 35 to 150 and will have a minimum aperture of 2 at 35 mm and 2.8 at 150 mm. This one has a variable aperture. I don’t know if what I’m telling you is useful, but I think it’s important to explain to you how to read all these numbers that appear on lenses. We’ve seen that a diaphragm
allows more or less light to enter. That’s not what’s important at all. What’s important is to understand that an aperture will affect the depth of field. What is depth of field? It’s the area of sharpness in your image. The larger your aperture, the smaller your focus area will be. Again, everything is reversed in photography, which is super annoying. You need to remember that the more light that comes in, the smaller the area that will be in focus. Conversely, the smaller your aperture, meaning less light comes through, the larger your area of sharpness will be. For
example, if I take a portrait of a model at f1.2, if I focus on the iris of the eye, the eye will be sharp, but the eyelashes will start to blur, the tip of the nose will be out of focus, and everything else will fade. However, if I take exactly the same photo at f11, then the whole face will be sharp. Now, if I take a background, if I shoot it at f11, everything will be sharp. Conversely, if I take it at f2.8, only my subject will be sharp, and everything else will blur. Here, we
start to see the importance of aperture. The importance of aperture is to either detach our subject from the background or to contextualize our subject within the image. The larger the aperture, the more elements we can hide. Conversely, the higher it is, the more we will reveal to the viewer. A film that uses depth of field very well is "Bringing out the dead" If you haven't seen "Bringing out the dead" go watch it; it's incredible. I won’t spoil it too much in this video. Nicolas Cage is one of the greatest actors in the world. At least,
he’s my favorite by far. And in "Bringing out the dead" he delivers an amazing performance. But that’s not what interests us, as I wanted to talk about aperture. In "Bringing out the dead" we have scenes where we need to contextualize our character. So, what do we have? We have shots where absolutely everything is in focus. If you take this one, for example, we clearly understand that we are in an apartment. We clearly see who the protagonists are, and everything is sharp. Our eyes have no specific place to settle. They can wander freely around the image.
The same goes for this shot, where we have both our protagonists, but also the entrance of the hospital, which is perfectly sharp. This way, again, there are not too many dreamy zones. These are shots that are, in any case, quite explanatory. However, if I take the shots where Nicolas Cage is in great distress, then, on the contrary, we will have a very shallow depth of field. Here, for example, you can see that the eye is sharp and everything else blurs out. I won’t even mention the background; you can’t even tell what it is. The same
goes for this shot, which shows us only a small detail. That’s the only thing that matters, and everything else fades into an artistic blur. This shot comes from the most beautiful scene in the film, the moment when Nicolas Cage completely loses it. It's a moment when we really need to be introspective with him. Here, what do we have? A very large aperture to focus solely on his eyes, or rather on his face and not the background. Another example that uses aperture very well is Dune. You will have contextualization shots where everything is sharp. so we
can situate ourselves. Conversely, there are shots where we will really focus on a character and where we will have a large aperture so that everything else blurs out. Notably this shot of Atreides where we are really focused on his eye. Or these shots of soldiers where the others completely fade into blur as well. Or even in this last shot where the soldier on the left is important and so the others fade into blur. Again, this guides our eye. I’ll return to Mad Max because this film uses a small aperture extensively. In fact, in Mad Max,
you will have a very large depth of field. Mad Max is a film where we always need to contextualize things because a lot is happening on screen. If you look at its shots, you see that everything is sharp. Here we have Max, the car, the landscape; everything is sharp. In this shot, it’s even more obvious because we have a very sharp foreground but also a sharp background so we can understand what is happening and how the action affects our character's feelings. So with Mad Max, you will have a great contextualization of your scene through the
use of aperture. This technique of using a large aperture to highlight just a small object is widely used, as seen in this shot from The Rock or this shot from Batman. This same process is used to highlight only one element in our image. And the Joker does this very well. In fact, the Joker is clearly a masterclass in the use of depth of field since we have both large and small apertures. In these shots, you can see that everything is sharp because we need to contextualize our atmosphere. And then, as soon as we start to
approach a person's point of view, we switch to a large aperture, and only they are sharp in our image. The same goes for all these shots where our main character is the most important. And there, we will have a very large aperture, thus a very shallow depth of field. And I’ll conclude with these two examples of shots where we have a unity of place and a unity of character, but which are still filmed with two different apertures. In the first, we have a character in their environment, and it’s relatively joyful, relatively because we’re still in
the Joker film. And in the other, we clearly have a scene of distress, and here we are only focused on our main character. So in photography, aperture will also be useful. This aperture will allow you to hide ugly things if there are any. I often do this when I have to shoot in laboratories or in places that aren’t necessarily ultra clean and that we couldn’t really arrange as we wanted. This process allows me to mask certain things. It also allows me to focus on a specific point. For example, you see manipulations being done, and we
needed to emphasize those manipulations. So, I use a large aperture to mask what I don’t like or to create ultra-expressive portraits where we really focus on the model's gaze. Now that we know at what aperture we will shoot, we can move on to the third parameter: shutter speed. What is shutter speed? It’s the exposure time of your sensor to light. Shutter speed is a duration. If my physics teacher could hear me... Anyway, your sensor is physically protected from light by a shutter. And when you press the shutter button, this shutter opens to let light in.
And you, as a photographer or videographer, control the opening speed of this shutter, known as shutter speed. This speed can be very fast, from 1/4000 of a second to 1/32000 of a second for high-end cameras, but it can also be very slow, like half a second or even several seconds. I will differentiate between photography and video here because they are radically different in managing speed. And I’ll start with photography. In photography, shutter speed is a semi-creative parameter. Shutter speed can be viewed as a way to compensate for aperture and let in more or less light
into your lens, knowing that with a large aperture, we will have a higher speed, and conversely, with a small aperture, we will have a slower speed. All this is to balance out the fact that the aperture allows more or less light into our lens. However, be careful; you should know that a slow shutter speed can lead to motion blur. It’s normal; if you take a camera and shake it, if your speed is too slow, you will see those shakes in the image, and that’s what we call motion blur. To avoid motion blur, we have the
"double the number" rule. This rule consists of taking your focal length and multiplying it by 2. So if you're at 50 mm, your shutter speed should not go below 1/100 of a second. At 200 mm, it would be 1/400 of a second, and at 600 mm, it would be 1/1200 of a second. With this rule, you realize that the longer your focal length, the more speed you will need to avoid motion blur. By the way, this was true for DSLRs, but much less so for mirrorless cameras, since mirrorless cameras have IBIS, which works exceptionally well.
So shutter speed is primarily a parameter used to balance aperture, meaning that if you shoot at f1.2, so if you have a lot of light coming into your lens, and you’re in full sunlight, for example, in the south of France in August, you will likely need to shoot at very high speeds, like 1/8000, 1/16000, or even 1/32000 for cameras that can handle it. Conversely, if you are taking photos at a concert in a very dim environment at 35 mm, you might go down to 1/70 of a second to try to let in as much light
as possible. So that’s the theory. The theory states that speed is solely for balancing exposure. But speed can also be used to intentionally add motion blur. In some cases, it can be interesting to add motion blur to convey a sense of movement. Take this photo of a waterfall, for example. Yes, I’m sorry, waterfall photos can be a bit kitsch, but they are still a great way to illustrate what I want to explain. So on the left, you have a photo of a waterfall taken with a fast shutter speed, and you see that all the movement
is frozen. On the right, however, we have a photo taken with a long exposure, and all the movement is captured. We will have something much softer, and we’ll understand the movement of the water. In the first photo, it feels like time has stopped, as if we’ve hit pause, while on the right, we are aware that time is flowing. This long exposure technique is also widely used in sports. For example, when I shoot motorcycles, I often use the technique known as panning. This technique involves taking a photo with a slow shutter speed and following the subject,
so that the subject is sharp, but all the moving areas become blurred. That’s why you see the background blurred, creating motion blur, but you can also see it on the motorcycle wheels. You can see that the motorcycle wheels are not perfectly sharp; there’s a slight motion blur, and that’s what gives movement to my photo. Conversely, I’ll show you this other photo, which was taken with a fast shutter speed, and there, you see that everything is frozen, and even though technically the photo is successful, I find it lacking because there’s no emotion coming from it. And
this long exposure technique can also be used in other areas, like portraiture. In these examples, I used light painting to create that trail of colors on the model. The principle is simple: I freeze my image with an initial flash, and then I move my camera at a slow speed, to create blur induced by continuous light. Indeed, in 99% of cases, your shutter speed will be a technical parameter, used solely to balance an aperture, whether positively or negatively. But in some cases, this shutter speed can also be useful for adding a creative effect, which is why
I consider this parameter to be semi-creative. So, if you don’t have a creative intention around blur, speed remains a technical parameter that compensates for aperture. And if you find yourself with speeds that are either too slow or too fast, and whatever you do, you’re stuck, we will then move on to the last parameter, which is ISO. But before that, I need to talk to you about speed in video. So, in video, speed is supposed to be simpler. It’s not even supposed to be a parameter we touch, since normally, we have the rule of doubling the
frame rate, which states that you take your frames per second and multiply it by 2 for the shutter speed. So if you shoot at 25 frames per second, your shutter speed should be 1/50 of a second. If you shoot at 100 frames per second, it should be 1/200, and if you shoot at 50 frames per second, it should be 1/100 of a second. So far, so simple. Why do we say this? Simply because this shutter speed allows for a slight motion blur, but not too much, but still a slight motion blur, which makes your image
softer. Basically, this is what we call the cinematic effect. The cinematic effect is contrasted with images produced by camcorders from the 90s and 2000s, which were terrible and shot at very high speeds to counterbalance the fact that there was a lot of light. As a result, they produced very sharp images, which were really awful, while in cinema, we pay attention to having some motion blur in our image, simply to make it a bit creamier on screen. By the way, if you pause action scenes in films you watch, you will often see that the image is
blurry, simply because the shutter speed is slow, and therefore, naturally, we will have motion blur. So normally, in video, we don’t worry about speed, since we respect the doubling rule, except that it would be too simple; speed can also be a creative parameter, even in video. If I take a faster shutter speed, it will allow me to have sharper images, and then, it will become a little more jarring to the eye. A good example of this is "Saving Private Ryan." All the scenes follow the double rule, except for certain scenes, including the landing scene. In
this scene, Spielberg wanted to disturb the viewer and show how horrific this part of history is, which is why he increased his shutter speed to make the entire scene as sharp as possible, and that our eyes are aware of it. That’s why this scene, when you watch it in the cinema, is supposed to grab you by the gut. Conversely, if you want to have more dreamy scenes and give a bit more space to movements, you can choose to lower your shutter speed. That’s what I did for certain scenes in my latest short film, where to
show the madness of the main character, I decided to lower my shutter speed to 1/25. This allows me to have motion blur that adds a dreamlike quality to my image. So if in video you don’t have a creative intention around motion blur, speed remains a technical parameter that should adhere to the doubling rule. And like in photography, if you find yourself with an image that is too dark or too bright, you will need to play with the ISO. With ISO, we are in a purely technical parameter. There is very little creativity associated with ISO, even
though I’m sure that in 20 years, this won’t be the case. In 20 years, it will be a completely creative parameter. But for now, it’s purely technical. So what is ISO? ISO is the sensitivity value of your sensor. We’ve seen that the lens allows us to capture light, and the sensor is simply a photosensitive cell that transforms light into bits and thus into digital elements. It’s exactly the same as film. In the days of film photography, we used film that was photosensitive paper reacting to light. Depending on the amount of light perceived, it would burn
more or less, and that’s what allowed us to capture an image on paper. With a sensor, it’s exactly the same. We have a photosensitive sensor that collects light data to transform it into bits. It’s exactly the same. For film, we had different sensitivity values. We could buy film at different ASA levels, simply to have film that we would use either indoors or outdoors, depending on the brightness. And on a sensor, it’s exactly the same. You can adjust the sensitivity of your sensor based on the ambient light. So if you take a low sensitivity like 64,
100, or 200, your sensor will be relatively insensitive. This means that you can let in a lot of light without overexposing your image. Conversely, if you are at high sensitivities like 1000, 2000, 4000, or more, your sensor will be very sensitive to light. And if you are in bright sunlight, your image will be completely white. However, be aware that there is a downside to using ISO. The more you increase the ISO, the more noise you will have in your image. And this noise isn’t necessarily attractive. It’s something we try to avoid. Well, it’s not attractive
for now, but I’m sure that in 20 years, it will be considered ultra-cool and everyone will want digital noise in their images. Just like film grain was considered hideous back when film was popular, now it’s seen as vintage and cool. I’m sure that when we transition to new technology with even cleaner images, digital noise will be the trendy thing. But for now, we find it ugly, so we try to minimize it. That’s why we need to be careful not to crank up the ISO too much. "Cranking up the ISO" means not raising it too high.
In photography, it’s not such a big deal. ISO isn’t really a debate anymore. It’s become very simple to remove digital noise with recent software like Capture One or Lightroom. Personally, I know that with my Z9 or Z8, I can shoot at 4000 ISO without any problem. In video, however, it’s more difficult, and removing noise can require a lot of resources from your computer. So we’re going to try to be more careful with ISO. Now, a quick note: every camera has its native ISOs. For example, on the Z8, my native ISOs for video are 800 and
4000, meaning I’ll have the same amount of noise at 800 as at 4000. So it’s better for me to shoot at 4000 ISO rather than 3600, for example. And generally, I only shoot at my native ISOs. So I only shoot at 800 or 4000 in video. In photography, I don’t worry about it; it’s super easy to correct. So basically, what you need to remember is that ISO is the quintessential technical parameter. In this case, it’s not creative at all, and it will only serve to balance a lack or excess of light in your image. Its
sole function is to ensure that your image is well-exposed. If I were to summarize everything I just said: we have four parameters at our disposal. The first is focal length. The second is aperture. The third is shutter speed. And the last is ISO. Among these parameters, the first two are creative, the third is semi-creative, and the last is purely technical. Creative parameters should not be constrained by your shooting location. You choose them, not the constraints around you. The semi-creative parameter will serve to balance the first two, unless you have a true creative intention regarding motion
blur. And the last parameter will be there to balance the previous three. First, we will choose the focal length to determine how we contextualize our image. Do I want to show an element alone, or do I want to show the whole scene? Do I want to contextualize my subject, or do I want to isolate it instead? Answering these questions will help you decide whether to use a short or long focal length. The second point is aperture. Again, you will need to ask yourself how you will contextualize your subject. Do you want to show the entirety
of the scene, or just a small part of it? Based on that, you will know what your depth of field will be and thus what your aperture should be. Next comes shutter speed. If you have no creative intention regarding motion blur, don’t overthink it; adjust your shutter speed based on your aperture and the light you need. And if you have a creative intention, adjust your shutter speed based on the blur or sharpness you want. Finally, if after adjusting these three parameters, you find yourself short on light or have too much, you can play with the
ISO to better expose your image. There you go; it’s not any more complicated than that. All you have to do is follow this checklist closely. and in this way, your images will reflect your artistic direction. If I were to conclude this video, it would be on that note. Above all, you must think carefully about your image and the emotion it should convey. That really is the foundation. All the parameters we’ve discussed are there solely to serve the artistic direction of your photo. Before thinking technically, think about the artistic direction. What do I want to make
people feel? What should my image show? What should it not show? What should viewers understand when looking at my image? The second thing is that the settings should not be a creative hindrance. Far from it. At no point should you feel constrained by your settings; rather, you should impose them on your image. If you don’t have enough light, you add more. If you have too wide an aperture and too much light, you use ND filters. Find technical solutions to your settings, but under no circumstances should your settings be purely technical. And finally, when you’re starting
out, don’t hesitate to follow the checklist I provided. If you do that, everything will go smoothly. I hope this tutorial has been useful to you. I hope that if you’re new to photography, it helps you get a handle on settings and approach this practice with a bit more confidence. I also hope that if you are more experienced photographers or videographers, you’ve learned something as well. I’m quite happy to have made this video because it’s been on my mind for years. I’ve been working on the script for at least two years, adding new examples along the
way. So, I’m a bit frustrated because I would have loved to show you other examples like "Evangelion" or "HEAT," which is a film I love for its use of long focal lengths. But, well, I had to calm down and restrict myself because otherwise this video wouldn’t have lasted 50 minutes but at least an hour and a half. I still hope you understand the point I wanted to make and that you grasped that settings should primarily be creative and not technical. And if you’re interested in this kind of video, feel free to let me know in
the comments. Don’t hesitate to tell me if tutorials about photography and video practices would be relevant on this channel. It’s true that I tend to make a lot of vlogs or equipment tests, Equipment is great, but knowing how to use it is even better. So if you’re interested in this kind of video, please let me know. It will motivate me to make more. And in the meantime, I’ll leave you because I have plenty of other things to do.