What's up guys Welcome to our tutorial for the month of April and this one we're going to be talking about how to draw characters from literally any perspective my initial idea was to do a study session you know of trying to draw fun perspectives for characters but then halfway through I realized with the techniques that we're going to talk about today you could draw any character from any perspective and I'm not Exaggerating so what inspired me to really want to work on this topic is that I've realized that most of my work involves uh a
shot of a character where they're kind of like flat you know what I mean it's like the way you're looking at me right now it's like a flat focal plane there's no Distortion there's no weird perspectives going from top down or bottom up and whenever I see drawings that involve these very intricate perspectives for characters I find Myself so much more intrigued by the visual composition I also find myself more impressed by just the way they're drawn and I thought to myself why isn't this something that I do more of you know so this is
something that I've been wanting to learn for a bit and I want to take you guys on this journey with me to try to learn to draw characters in strange unusual very Dynamic perspectives I would definitely consider this topic to be an advanced topic it's Going to require a little bit of knowledge of perspective General anatomy and proportions and such but I'm going to try to go through it as simply as possible so that even if you are a beginner you can still get very valuable information out of this video to add to your repertoire
of skills just before we dive into our characters I want to give you guys a bit of a Refresh on perspective perspective tends to be a very underrated topic nobody likes to Talk about it because because it reminds us of math but it is very important so we've got three types of perspective one point 2 point and three point the names are very self-explanatory one point means that there is a singular vanishing point and all parallel lines will flow into that vanishing point two point perspective just as the name says has two Vanishing points so
all of these parallel edges will flow into the corresponding Vanishing points Three-point perspective is the most dynamic option of the three you can really get some very distorted wide angle looks with three-point perspective it will involve three Vanishing points so all these parallel edges flow into each individual vanishing point so if we have a cube that looks something like this it would have one vanishing point because only these edges are being pulled towards that singular point now if we take this same Cube and we just Rotate it 45° now we're going to get a Cube
that's being viewed in a two-point perspective because these edges are now going towards the same vanishing point and these edges are also going towards the same vanishing point now if we want to make this even more Dynamic we take out these edges and we make them shrink down towards a singular vanishing point so now you've got all of these parallel edges running towards each individual Vanishing point that's about the simplest explan ation I can give you can apply the same concept to cylinders as well and this is going to really come in handy for drawing
limbs for example if you have a foreshortened limb you're going to see a cylinder that's kind of really distorted in perspective like that right whereas if you're looking at the limb from a straight on angle you might see a cylinder that's a lot less distorted okay so just keep that in mind Very very useful and just to wrap up this Theory portion so that we can get into the demonstrations I've got three key points that I want you to pay attention to when you're doing these studies with me number one perspective you got to understand
the perspective that you're looking at let's say for example I extend my arm out to you like this now my hand is very large my forearm looks very large and it shrinks gradually as you get towards my torso The same thing happens if I were to extend my arm out backwards see it gets smaller so that's part of the perspective that you want to pay attention to another part of the perspective when it comes to drawing people is understanding the angle from which you're viewing them so for example look at me right now my shoulders
are about Square to you but if you were to let's say view me from this Angle now see my shoulders there's a huge slant Right there right same thing happens if you were to view me from this angle see the slant of my shoulders there's a different perspective and as we get to the end of this video and do some demos on faces you're going to see that the same thing applies to faces so if you look at me right now I'm looking at you square and this eyeline is flat right that's the perspective that
we're seeing now if I were to tilt my head like this my eyeline is slanted that's a different Perspective if I were to do this now my eyelines running in a different direction as well that's Point number one you'll see a lot of this as we get into the demos okay perspective got to keep that in mind Point number two is Distortion now Distortion and perspective are very closely tied together but Distortion mostly comes from distance to the viewer so you saw what happened just now look at the size of my head versus the size
of my hand Okay there's no Distortion here this is the size of my face versus the size of my hand now if I were to extend my hand out closer to you look at the size of my hand versus the size of my head that's what we call Distortion so as I get closer to the camera things start to get larger same thing's going to happen if I lean into the camera my head is going to look larger like that and the same concept occurs vice versa so if I were to lean back now my
head looks smaller So that's what we call Distortion that's something else that you want to pay attention to and my example here that I've given is that with two equal length cylinders if you were to view them from this Angle now this cylinder is going to appear a lot longer and this one's going to appear a lot shorter and at the same time this surface is going to appear much larger and that one's going to appear much smaller this is all due to point number one which is perspective Right things are Vanishing towards a singular
vanishing point all right so that's Point number two now let's go on to number three which is coverage this is as simple as it sounds it's basically just paying attention to what part of the body covers which other part of the body Let's do an example here if you're looking at me Square on my f face my head is not covering any part of my body but if I were to have a bit of a lean say I bow down to you now look at my Chin right half of my face is covering this part
of my body so the shoulder line starts here instead of here now that's very important because that informs us of the pose of the character say I were to do something like this now my shoulder is up and it's covering part of my jaw that coverage is important because it shows us that this shoulder is raised because in a normal pose you wouldn't see of that coverage and as we get into facial features the same thing Is also going to apply so if I were to say for example look up like this now my nose
is going to cover my nose Ridge you're not going to see that Ridge anymore because all you're going to see is the bottom side of my nose so those are the three things that we're going to be on the lookout for today as we go through our demonstrations now I want to begin these examples by doing some full body studies just so you can get a nice clear look at how perspective Distortion And coverage affects the view of your character so I'm going to go through them one by one I'm going to spend a little
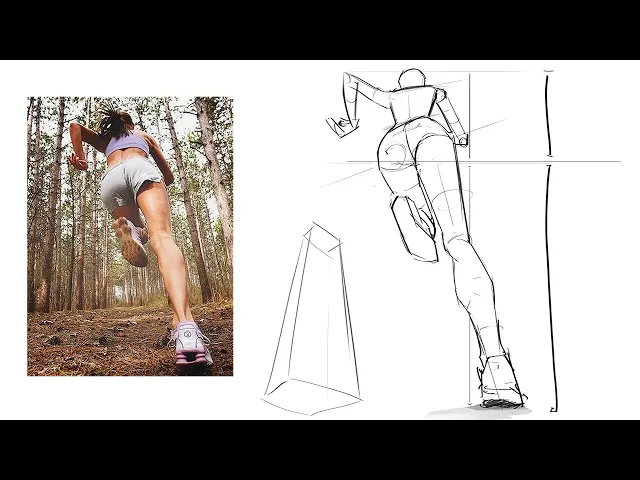
bit more time on the first example just so we can really nail down this concept so this is drawn from that reference now what do we notice here well that reference doesn't have any crazy Dynamic perspective it's mostly flat it's kind of like just a straight on camera setup so we've determined that it's a square on perspective which means There's going to be less Distortion you're going to be seeing all of the proportions of the body okay there are some key proportions to keep in mind here I'm going to give you guys a quick note
of them this might change from person to person person but usually if you just take a character's head you should be able to fit eight of them in the length of their body again people can be taller people can be shorter so that does change but just a general rule Another really great measurement to keep in mind when there is no Distortion is that about halfway down the body you're going to get the hips you're going to get the hip joints again this is going to vary from person to person but use this as your
general guide okay so this is without any Distortion the body divides into a nice half but now I want to go through these two examples with you because these things will change so in this reference we have a camera that Is angled upwards we're looking up at this character and now all of a sudden we can see the bottom triangle of the jaw and if we measure the length of the head you're going to notice that there's 1 2 3 4 5 6 7 8 9 10 and maybe 11 so in comparison to the length
of the body the head has now shrunk and down that is Distortion due to perspective let's take a look at this reference down here now if we just calculate the length of the head in comparison to the body you've Got 1 2 3 4 about five in a bit whereas on the normal body you're getting a full eight heads now this all occurs because of perspective this one is being viewed top down so the head is closer to the viewer the head is closer to the camera it's going to look bigger now let's draw a
box okay let's draw a box in her place if we were to draw a box to indicate the perspective here it would be tapering downwards like so you're going to get a vanishing point below all of these lines Are going to be converging down whereas that same box will be converging upwards for this piece right here now with some of that Distortion in mind let's begin our demo with the bottom up perspective so whenever I'm drawing these characters um doesn't matter what perspective they're in I always try to use the head as an anchor Point
okay so this is the first thing that I put down and I mark down this triangle for the bottom side of the jaw that indicates to me the Perspective that we're viewing the head from now the next thing I'm going to do is draw the eyeline across so when you have a character who is looking upwards you'll see that the eyeline curves over like so the eyeline curves over like so a character who's looking Square forward the eyeline is relatively straight a character who's looking downwards the eyeline curves down the eyeline curves down okay this
just something to keep in mind as you're drawing these characters And as you watch this video please feel free to follow along with me by using the references that I've provided you it'll help you absorb the information a lot better by actively following along okay so here's the head very simplified shape we're going to keep it simple like that now the next thing that I always do is find the angle of the shoulders and the angle of the hips as well as the angle of the spine okay so these things are going to inform me
of the general Pose of the character let's get that angle of the spine the hips are relatively Square so they're going to be kind of flat like so so now let's draw a neck down like so let's connect the shoulders right there and let's draw in a simple shape for the upper torso and a reverse version of that shape for the lower torso here containing the hips and let's draw two simple hip joints inside of a bowl and that gives us the bottom of the pelvis all right I'm going to Mark down the belly button
because I think it's helpful to uh anchor the direction of the Torso so I'm going to mark that down right there and usually for female characters I think it's good to mark down where the chest Peaks so here in this case I feel like it Peaks somewhere around there so I'm going to mark that down with a simple curve again we're breaking down these shapes into nice simple shapes and just under that Peak you're going to get a rounded curve Like so so something like that okay it's very geometric but you don't have to do
as much detail as I am in these geometric shapes now as we get to the bottom half of this perspective this is what tends to trip a lot of people up so look at the measurements that we've got here now we've got the top of the head we've got the pelvis and usually in an undistorted perspective you're going to get the same equal length but we are drawing a distorted perspective which Means since our camera is closer to the bottom half of the body and further away from the top of the body the bottom half
is going to appear larger it's going to appear longer and that is Distortion so now I can confidently bring this line all the way down here see this one's a lot shorter in comparison to the length of this one and now that will give me the point where the feet will sit so now coming down here let's add in a cylinder shape for the thigh usually I just do a Tapering cylinder shape when I'm drawing limbs just like that very simple you can add in the muscles and the clothing later but I always like to
start off with the big shapes and then work down from there so let's get that thigh in there now the kneecap is usually about halfway between the pelvis and the ankle so just be aware of that measurement drawing this nice tapering shape for the calf like so just marking down the kneecap and then we get down to the Ankle and there is the foot now you can connect some of these lines and iron out some of your shapes a little bit just like so and now let's move on to the other leg it's going to
go backwards and you can also look for the relationship between these kneecaps this is something I do a lot when I'm drawing characters this kneecap is a little bit higher and then this calf this back calf is going to come down like so the angle here is a little bit higher because the foot is Actually raised so let's get that in there let me just make this a little bit larger to exaggerate that Distortion the closeness to the camera just like so all right and there we go now you see we've got a very nice
distorted looking perspective of a camera that's looking up at a character right and I'm going to just accentuate that a little bit here by making the foot even larger because again it's closer to the camera so what really sells this perspective versus Verus this piece on the left is that we've distorted the head it's smaller we've distorted the upper torso it's smaller we've made the legs longer something else you're going to notice a lot is the peak of the chest right here it's really shifted its position now before this area would be quite visible and
the bottom side less so visible but if you're viewing from the bottom up the bottom side becomes a lot more visible and the top side shrinks it's like if You were to take a flat plane like this and tilt it up like that now you see less of it compared to before that same thing is happening to these planes on the chest right here now for me I usually like to go from the head down to the toes and then I would start adding the arms because um I feel like the arms are a little
bit less consequential in most poses so here are some simple cylinder shapes for the arms make sure that the elbows are in the right places And there we have the hands all right so here's our first example of bottom up okay now let's do an example of top down top down is going to be the same concept but we're going to get a little bit more coverage which is the third point that I told you guys to look out for so feel free to follow along with me here now we're going to start off again
with the Anchor Point of the head the head here I'm actually making it a lot larger now as you can see uh the reason for that is Because it's closer to the viewer it's closer to the camera there's going to be distortion on this head it's going to appear larger than it actually is if you were to view the character from straight on so here is the head and notice how curved curved this eyeline at the front right curve it down and then back up now this is where you're going to start noticing coverage so
if you were to draw your neck like this and your shoulders down like that now you've got a Character who's kind of going like this right looking down that's not what we want that's not accurate to our pose right this is where you really got to pay attention to how much coverage there is and how this shape kind of digs in to that shape of the Torso right so the shoulders come up like so and you can see they're almost intersecting with that ey line that's the coverage we want to pay attention to you see
the moment you get that shoulder line up there in The right position you're immediately selling this perspective of looking at the character from top to bottom now we're going to do the same thing as before we're going to find the angle between these two shoulders as we always do just like so and now we're going to come down here and start adding in the basic shape for the Torso now remember that when you're viewing a character from top down things are going to look bigger and they're going to converge on A singular vanishing point so
they're going to get smaller as they get further away from you I'm going to try to follow the same shapes as before okay so get the peak of the chest now because we're viewing top down you're also going to see a lot less of the bottom side of the chest next up let's find the angle of the hips and this looks like it's going in the other direction presumably because she is walking so let's get that shape here for the bottom half of the Torso now there's going to be the bottom of the pelvis drawing
a nice round bull shape for the pelvis with some joints here for the legs just like that and now now plot the belly button down just so you know the center of the body like so and there you go now you've got the Torso so now I want you to take a look at the top of the head we're going to move it down right we're going to pay attention to the length here if you measure that distance here on the Reference you're going to see that this length is quite long and then as you
get down here to the point of the toes this length is a lot shorter but if you were to pay attention to also the back leg you can see this length is even shorter so that's what we're looking for now that's the Distortion we're looking for you might be used to drawing your characters with normal proportions but capturing these Dynamic perspectives requires you to really start breaking These rules and uh I think that's what makes it so much fun so I'm going to bring this line down just a little bit shorter than the one above
okay so we're going to do something like that and now at about above the halfway point we can get the kneecap just like so and now you can kind of clean some of this up flesh out your Anatomy a little bit more and um the other leg is even further back so once we've established this thigh here let's just bring the other thigh Backwards like so if you connect the kneecaps here you can see there's a pretty steep angle here between the two so that other kneecap is going to be probably somewhere back there and
you're going to see that sometimes I draw these curves on the front side of the limbs and this is just to remind myself of the uh cylindrical shape of these elements now once we have these kneecaps okay let's just bring the calf down as as well just like so let's get some of These rings on there and then at the very front you're going to get the ankle and the foot now going backwards to the back leg this calf is going to be a lot more foreshortened you're going to see a lot less of it
and you're also going to see a lot less of the other foot right so now you see by paying attention to these distorted elements paying attention to the coverage of these different elements we've been able to do a pretty Convincing ing job at drawing a top down angle right this top half is longer this bottom half is smaller it's shorter and now you know you can just add in the arms we're not paying too much attention to the arms right now because they're not super consequential to the pose so let's just draw the arms down
like so let's get another one right there okay and now you've got a top down angle for the same character here's a little piece of advice okay if You're having a lot of trouble visualizing these different perspectives I recommend using a box I know it's crazy Sam's talking about using boxes but hear me out if you just can't get a grasp on how these lines are Vanishing downwards why not place a box at the feet of this character okay and try to use that vanishing point to draw these lines up just go from that point
and draw these lines upwards and try to contain this Character within the shape of this BX box right and once you've established this box you can see the perspective a lot better you know this is why a lot of artists do use boxes to draw humans not because the box is a good shape for the base of the human body it really never is you shouldn't use a box for organic shapes on the body but the Box comes in very handy when you need it for perspective remember it's like simplifying things it's hard to Visualize
how perspective is acting on all of these different elements facing different angles but if you simplify this whole thing figure into the shape of a box if you just put them into a box this perspective becomes so much more easy to understand so if you're having trouble with that try to draw a box over the character see if you can pinpoint that perspective that this character is in so if you're following along with me right now I've got another example here For you this is your homework you can pause this video in just a second
and try that method out for yourself remember couple things to look out for the perspective that's affecting these characters right this is a bottom up this is a top down Vanishing Point's going to be down here this one the vanishing point is going to be up above remember the Distortion okay so things that are further away the upper torso here it's going to be shorter things That are closer to you this is going to be longer okay so remember that when you're practicing and then for this piece down here you're going to get more Distortion
larger upper torso shorter legs always establish the angles between the shoulders the angles between the hips the angles between the knees and always be on the lookout for points of coverage for example the chin here is is blocking the back view of that shoulder so you can pause this video right now And try that out for yourself it's definitely not an easy exercise it's going to be pretty challenging so take your time with it now one thing I forgot to mention is that on our female body you can see that we've really established this peak
of the chest now that same Peak on the male body is just going to be right here right below the peex okay that's going to be the peak so you're going to get a shape that looks something like that it's essentially Just a smaller version of the female chest and it's always good to establish the center line which is the belly button okay so there you go you guys can use this example that I've drawn here as a base this is going to be a much less disorted version than what you're going to see here
and here okay so give these two references a shot and then we can move on to our next demonstrations all right now we're back I hope you actually did the exercise and didn't just Continue watching this video I would be very disappointed if you did but you see these concepts of perspective Distortion and coverage don't always end up being mild examples like this one and this one sometimes you're going to get a lot more Distortion a lot more coverage a much steeper angle of view and I want to have you guys covered for all of
these different scenarios as well okay so let's do a more challenging Angle now just as I would approach any other pose I start off with the head which is the Anchor Point for this entire piece so this is going to be the back of the head now one thing that I'm noticing already is that the shoulders are covering a lot of the head so you're getting coverage here in that direction and the angle of the shoulders is not a very steep angle here so let's just draw that in not a very steep angle which then
is going to come down into the shape of the Torso and there's that line for the back Of the spine now right away I'm also noticing that there is coverage here with the hips right you're not seeing the full extent the full length of the upper torso instead the glute is actually covering some of that so that's yet another piece of coverage that we have to pay attention to now that's going to give us the shape of the hip and it's going to appear much larger than the upper torso because of that very strong Distortion
so let's get the Shape of this hip in here like so it's a reverse of the upper torso shape and we're going to get the angle of the hips okay and that's going to give us the joints in the legs so that pretty much gives us the shape of the upper torso I know it looks very weird right now this is not what you would typically expect a torso to look like but it's weird because we're seeing it from a weird perspective now speaking of a weird perspective it's it's going to give you Weird Distortion
as well so this is the length of the upper torso now if we were to compare this length to the length of this lower torso you can see there's a huge difference I would say the lower torso would extend probably all the way down here and we'll have to shrink our drawing down just a little bit to accommodate that now starting from this glute we're going to get the cylinder shape of the thigh and notice the angle that it's coming down at so it's a very Dynamic pose the legs kind of kicking out in this
direction so let's get that cylinder in in there and I would say the kneecap is a little bit above the uh halfway point since the foot and the calf are so close to the camera they're going to appear a lot larger we're going to get a lot more Distortion it's just like if I were to raise my hand up and put it really close to the camera now once we've established that knee joint let's bring this cylinder shape right Down like so let's get some of these curved lines in here just to indicate the three-dimensionality
of that shape now let's move on down towards the kneecap and towards the calf what's surprising here is that the calf is going to look almost the same width as the thigh which normally in an undistorted perspective that would not be the case but here it definitely does appear a lot larger simply because it is closer to the Camera now let's get this foot down here get some of that Anatomy on there right get some of the calf muscles just like so that's going to be the bottom side of the sole so there you go
let's get rid of some of these construction lines let's add in some of these anatomical features of the muscles here just like that right that looks great now we can kind of clean up our anatomy a little bit clean up these shapes up top just clean up some of these lines like so Let's bring that down okay now the next thing we're going to do is work on the other leg so this other leg it's going to be kicking forward right so this kneecap is going to be above this kneecap and you're going to see
less Distortion in this leg but much more in the calf so a little bit of distortion there I think that's fine I'm just going to bring this out a bit right there's the muscle there's the other side now that's going to be the kneecap and then We're going to notice the position of the foot the position of the foot is right about there where this knee is going to be okay so let's get the back of that heel let's get this shape of the bottom of the shoe just like so and just above this foot
you're going to get a very very foreshortened version of that calf it's almost not visible so just like that you've got the other shoe I feel like I might have made it too long no problem let's just liquefy that bring That up like so and let's just clean up the anatomy here a little bit right clean up some of these lines just like so now you've got the Torso you've got the legs and you've got a very very Dynamic looking pose in a crazy perspective going to add a little bit of shading here just to
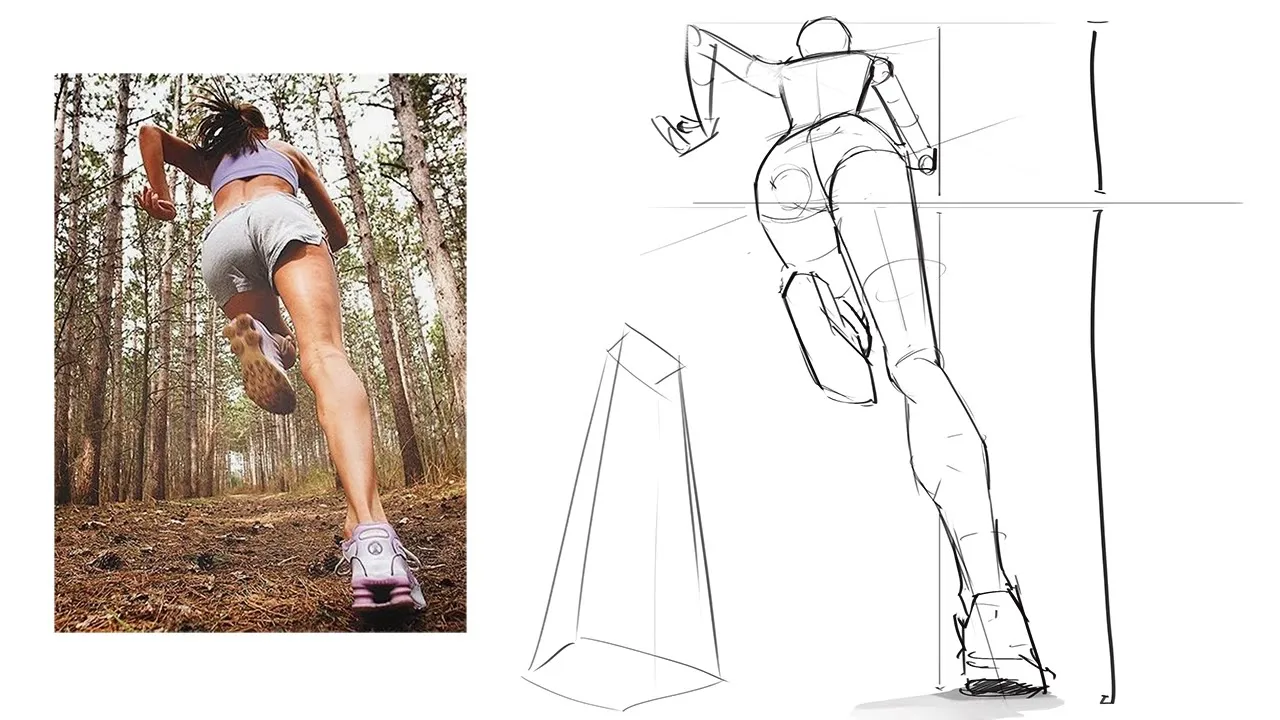
ground the pose a bit now the next thing I want to do is move on to the arms so the arms are very simple get that shoulder joint get that cylinder pay attention to to where it's Foreshortened and where it's not foreshortened this arm is going to be swinging in front and this arm swinging backwards and there's the hand in in a very strange position but there you go now you've got a crazy Dynamic running pose right again paying attention to all of those elements we've got a bottom up kind of perspective right if you
were viewing a box it would look very much distorted something like that and we've also got some crazy changes to the Proportions of the body so the bottom half is so much longer than the top half and your also getting a lot of coverage from both the hips and the top of the shoulders now here's a top down pose that's even more exaggerated why don't we give this a shot now you can see right off the bat the head is huge right and this is all due to the perspective and the Distortion right you can
immediately tell that this reference is being viewed from a top down angle and Everything is Vanishing towards a vanishing point that's at the bottom okay so just keep that in mind as you're drawing this character going to shrink this head down just a tiny bit it and we're going to get the angle of the shoulders so once again pay attention to that coverage because you're viewing the character from the top down part of the shoulders is going to be blocked by this bottom half of the jaw okay so just like so the shoulders are Angled
like that so you see this entire part of the jaw kind of cuts in to the shape of that upper torso right remember to pay attention to that coverage now next thing we're going to do is we're just going to try to find the general angle of this pose we're going to try to bring this torso down like so this is going to be the upper torso and that's going to connect to the lower torso which there's going to be a little bit of coverage here of the hips right You're not seeing the entirety of
the hips so here's the upper torso here's the lower torso now if the upper torso is being viewed from a top down angle you're going to see a lot less of the lower torso so pay attention to that coverage right and let's get the hips like so just behind the shape of that upper torso so now pay attention to the angle of the hips draw a line up like so it's pretty close to what you might find for the shoulders but it is a little bit Less steep so let's just apply the hip joints right
there going to add in the shape for the belly button just to indicate the center of the Torso and let's add in the peak for the chest that's going to give us a shape that kind of juts out like so there you go there you've got the shape of the chest and if you've been following along with me so far we've got a shape for the upper torso right quite simple as long as you remember to factor in all of These different elements covering each other so now let's pay attention to the length of the
Torso okay so here's the top the head bring that line down there's the end of the upper torso bring that line down even further there's the end of the bottom of the body so there's a huge amount of distortion here in terms of the length of the body so let's take that knowledge here let's bring this line down there's going to be the bottom of the hips right there that's Going to be the end of the bottom half of the body so let's expand this out a bit and let's begin with the leg that's in
front so let's draw in this leg like so remembering that this will be the very bottom of the body okay so there's going to be the kneecap the legs kind of coming forward we're going to draw some curved lines of the front to indicate that three-dimensional shape now I'm going to clean up the silhouette a little bit clean up the anatomy just a Little bit just like so and now we're going to get the other leg just behind it so this kneecap is a little bit higher up and this leg is going to be be
a little bit straighter so you see a little bit less of it just like that okay so now we have the two thighs and then just below this front thigh you're going to get barely a visible portion of the calf and right below that right highly foreshortened we're going to get the foot now the foot is going to be a Lot smaller than if it were to be viewed from a normal undistorted angle because again this is very far from you very far from the camera so there's that foot now let's draw in the other
calf just like so and is the other foot now I feel like we can probably bring this head up even more make this even bigger just to add to that sense of distortion right let now let's bring the shoulders out and start adding the silhouette for the arms there's going to be a lot of distortion Here as well right look that's where the elbow is that's where the shoulder is so you're barely seeing any of the side of the cylinder there's going to be the elbow and then right down here there's going to be the
forearm there goes the hands the thumb the fingers that's one arm and the other arm is barely visible so let's just draw in the hand here and there you go now you've got a pretty convincing look at a top down perspective let me just clean up some of These lines here you know once you've been able to establish a solid base like this you'll be able to start adding more stuff on top like costumes you know musculature for example now one thing when you're drawing these poses when you're doing these exercises don't be too discouraged
if you find them looking weird they're supposed to look kind of weird these perspectives are definitely far from the usual thing that we see so your brain's going to be like I Shouldn't be doing this I shouldn't be extending the leg out like this I shouldn't be extending out the upper torso like this but just go against that instinct for a little bit and just try to go about it a little bit more logically right paying attention to the lengths of the body the Distortion the coverage and all that now I just want to show
you guys a way that you could use this knowledge in your own work so say for example we have a character like This okay who's leaning downwards looking at you now there's not too much Distortion other than the foreshortening of the upper torso and there's a little bit of coverage for the shoulders and there's the upper torso plus the lower torso which is the hips but once you start to really understand this okay once you start to really get a grasp of these uh perspectives and how they work you can really play around with it
let's say for example I want to make this even More exaggerated I want to make it look like the camera is going right up against this character well now I can just expand the size of that upper torso come up here expand the size of the head like that let's expand the shoulders like so and now let's take maybe the bottom let's expand that out a little bit too not that much I mean I guess we could but let's just pull that back a little bit expand that out expand that make it a little bit
larger and maybe we Can shrink the hips which are a little bit further away from us and now it looks as though we've put this character into a fisheye perspective right you've got that crazy Distortion at the top you've got more Distortion at the bottom and things in the center seem super far away from you so you look like you've taken this shot on a super wide angle lens so that's a kind of cool experimentation you can do once you start to understand these perspectives And I feel like a lot of the artists that I
look up to when I see a piece that looks like this that's exactly what they're doing they're just pushing and pulling these proportions creating that Distortion and making a pose that would have otherwise been kind of flat look much more Dynamic closer to the camera that does it for the body section now let's talk Talk About Faces I'm sure you guys want to put faces on these characters that you're drawing in these Wild Dynamic poses and perspectives so let's talk about some things to look out for there when you're drawing faces okay what do we
need to pay attention to well the same three concepts actually apply again this is going to require you to know a little bit of the basic dimensions of the faces so here is a face that's in a 3/4 view but it's relatively Square in terms of perspective you're not getting any Distortion here of the upper or lower Portions of the face you can see the ey line you can see the brow the forehead the nose and the chin all match up relatively closely to 3 equal thir which is great that's the measurement that we want
and that is the undistorted measurement okay and another really good measurement that I like to pay attention to when I'm drawing characters that are you know in strange perspectives like this or like this is the measurement of that eyeline so here the eyeline is flat Right flat there's no Distortion in this eyeline so it's almost perfectly halfway between the the top and the bottom of the head granted this guy has a longer chin but you get what I mean now what happens when we view a head from the bottom up like we did in some
of our previous body examples well see this happens the two key things I always look for to determine that perspective are number one the eyeline this curve of the eyeline if that eyeline is curving this Way in a bit of a frown the head is looking up if the eyeline is curving downwards in a smile the head is looking down very simple okay and there are no exceptions to that rule because the eyeline always wraps around your face in a semicircle now in this perspective we're going to notice Distortion usually what you're going to see
with heads is that the eyeline is just about halfway across the middle of the head okay so that you're going to get half up here Half down here but when you're viewing the head from bottom up see how the eyeline moves up like that okay now you're getting a lot less of the upper half and a lot more of the lower half just like how it was in the body drawings it's the exact same concept but it's transferred onto different shapes so it really isn't that complex once you understand these basic perspective fundamentals the second
key thing I look for when I try to determine the angle of The head is this shape right here see this triangle shape at the bottom of the jaw if you can see that triangle at all you're seeing the head from a bottom up angle if you can't see that triangle then you're probably looking at the the face from a normal perspective in this case we do see that angle so that means the face is facing upwards now let's take a look at a face that's facing down look at this eyeline so what's happening here
is the exact opposite of this right In this example the bottom half of the face below the eyeline is longer in this example the top half of the head from the eyeline all the way up to the top of the head this is going to be longer so the nose and the mouth from the eyeline down are going to be really compressed and in some cases you might get the nose covering part of the lips that's where you find coverage now want you guys to follow along with me here and observe this series of references
and see how The perspective is directly affecting the way the facial features look so let's begin with a straight on perspective the eyeline here drawn across the inner corners of the eyes is just about halfway between the top and the bottom of the head okay so there's no Distortion there that's normal now as we move the camera upwards notice what happens here so now the top of the head is here and where do we find the ey line well it's all the way down here and you Can see just below that now there is the
chin okay so now all of a sudden this proportion has completely changed now everything from the eyeline and below is almost only 1/3 of the length of the entire head when we move over to this side as you can see when the camera pans down you're starting to see more and more of this triangle shape under the jaw okay always pay attention to the visibility of this shape as you go all the way down you can see this triangle Becomes very very visible you also notice that the jawline goes from a vshape in the normal
angle to a slightly reversed vshape in the bottom up angle so if I'm drawing ahead that is facing me I'm going to remember that the ey line is about halfway there's going to be no Distortion the ears are also going to be relatively aligned with the top of that eyeline so here we're going to get the eyes remember that the space in between the eyes is going to be about The length of one single eye okay so here you're going to get the eyes now you can get the hairline in there get that brow line
in there divided into 3/3 and you can get the positioning of the nose the positioning of the eyebrows the positioning of the mouth just above the halfway point here between the nose and the chin this is how you draw a normal face now if you want to draw this face in a angle that's facing upwards now you got to pay attention to this triangle Just below the jaw like so okay so we're going to just shade this in so you guys can see it better there's that triangle now from this triangle we're going to get
the same shape for the face and then we're going to get an ey line that's cutting much closer to the top of the head so from this ey line we going to draw our eyes right we're just going to follow the curve of that eyeline there's going to be our eyes soon as you get these eyes Things become a lot easier Now one thing that I think can help you a lot in terms of visualization for how these perspectives change is if you draw a triangle between the pupils and the tip of the nose it's
going to look like that now if you were to take the head and you tilt it up this triangle is going to look a lot flatter okay so the tip of the nose and the pupils they start getting closer and closer to a singular line okay you're going to see that on the examples here in the Reference let's take this one for example no Distortion there is that shape for the triangle now if you were to draw the same triangle on this face look at the difference here it's almost completely flat so that's just perspective
if you take a triangle like that and you face sit towards you you're going to see less of that surface just like that I find that's a very helpful way to visualize it so if you draw that same triangle here you want to put the Tip of the nose really close right there right and now from that tip you can draw in the bottom the nostrils just like that from here you can place the mouth up towards the top now the mouth is going to appear a lot higher because the chin is the closest thing
to the camera so it's going to appear larger there's the mouth we're going to just shade it very lightly to show the difference between the top and the bottom lip and above the eyes you're going to get the Brow line and just above that you're going to get the forehead right and once you fill out the shape of the head the ears you're going to notice they're going to be all the way down here right because the ears are kind of like an anchor point when you move your head up the ears don't really move
but in relation to all your facial features they now appear lower whereas if you move your head down the ear also doesn't move but in relation to your facial Features they are here higher so the year is another very important element that you want to get right when you're drawing these perspectives for your faces okay so now bring it down we've got the neck and you know once you're happy with this you can add in some colors for the hair flesh out that sketch a little bit and now you've got a character looking up okay
now let's give these examples a shot here okay so the bottom one here is going to be um Slightly slanted let's get that triangular shape for the bottom of the jaw like so bring the shape of the face down and to just shade in the bottom of this jaw very gently and bring the cranium back a little bit more now on the side you're going to see that the ears are quite low on this angle right so the ear is going to be right about there that really gives us a nice Anchor Point now the
ey Line's going to be really close to the top just like so we Can get the eyes on here paying attention to that distance between the two eyes we're going to get the irises and again we'll pay attention to the triangle so the tip of the nose and the pupils now what you're going to notice is that we're viewing this face from such a steep angle that this triangle has actually reversed we're seeing the underside of that triangle now so what that tells us is that from uh this angle the nose is going to poke
Out a little bit so the tip of the nose will be all the way up here and going back to the point of coverage well the tip of this nose is actually going to cover a lot of that nose Bridge you won't be able to see much of that bridge and when you guys are drawing this you're probably going to be like this is the weirdest thing that I've ever drawn this doesn't feel right and that's how it's supposed to feel okay it's not supposed to feel right it's basically Going against all of your intuitions
on what a face should look like now just above that add in the eyebrows kind of following the same angle as the eyeline and just below the nose we're going to add the mouth now when you're viewing the face from below the mouth always seems to be in a frown that's because it wraps around the front curve of the face and this plane has a nice curvature to it and the mouth goes a little bit off of that front side so there's the Corners let's add in in some shading for the upper lip and a
bit of shading on the lower lip okay now let's bring the chin up a little bit more going to chip out the jawline here and just add in the taper for the neck just like that and now you've got a head looking up right very very strange looking angle and it's hard to make this angle look good but um boy is it fun to draw so let's get the hairline here let's get the forehead here and now you can start adding in Some details like the hair right just flushing it out a little bit add
in the hair right there let's shade the bottom of the nose shade the bottom of the brow Ridge let's get some more shading on the bottom of the jaw just like so and there you go there is bottom up again very challenging angle very weird looking angle it's probably one of the most difficult things to draw when it comes to drawing faces now let's try at a 3/4 angle but still bottom up so now let's Get that Center Line there now pay attention to the angle of that eyeline right it's coming up like so and
still very close to the forehead so that eyeline is going to wrap around this shape just like that going to get that same shape for the jawline a nice triangle going back to the neck just like so now let's shade in this triangle give it some depth next thing I'm going to do is I'm going to come down here and add in the shape of The neck like that okay now I'm going to bring this jawline upwards add in the shape of that ear now from this ey line I can add in the shape of
the eye as well as the shape of the other eye now you won't see as much of the other eye because there's a little bit of coverage from the nose so remember that trick that I taught you guys okay find the pupil and then find the tip of The nose so in this drawing it's going to look like again a reverse triangle like that right so if we connect the dots here and bring the nose up here that should be the right way to draw this face again very very counterintuitive very strange but if you
just follow these observations it should get you good results shade the bottom side of that nose bring that bridge up a little bit you don't see much of it because of that Coverage bring the eyebrows up like that that now you see we're starting to get a good read on this perspective let's bring the cheek out a little bit just following the shape of the face like so now let's add in the mouth just like that and some shading for the upper lip some shading for the lower lip just like that right so as you
guys can see just pay attention to a few very key things and you can very effectively capture one of these strange perspectives so from Here you know you can start adding in some of the hair uh again very very weird looking looks like a bit of a thumb I'm going to add just a little bit of shading here for the jaw for the neck give it a bit of depth get some shading just under the brow Ridge like so and there you go there's another strange perspective now you can feel free to add these faces
to the uh previous body drawings that we've done and here I'll just round this video off With some final examples of a head looking down now kind of the same concept right we start with the cranium we find that Center Line bring the face down get the jawline like so and now let's get the ey line just going to be closer to the bottom right so you're going to see more of the top of the head less of the bottom of the head this is a 3/4 view so you're getting a slightly more challenging perspective
now the ear Is going to look a little bit higher so that's where it's going to be that's the Anchor Point for the year and we're going to come come down and we're going to just draw in the neck right here very simple right now from this point you're going to notice that depending on the person sometimes their brow is going to cover part of the eyes because you're viewing from a top down angle this doesn't really happen with the Asian people because we don't have as deep of A brow Ridge but here you can
definitely see that it is occurring so the brow is going to intersect with the eye it's going to cover part of the eye that's a little bit of coverage there for you right so part of that eye is going to be covered now on this side part of this eye will also be covered let's get that brow right there now the bottom of the nose is going to appear a lot lower than it would on a Normal Square looking face reason being again because it's closer to us things closer to us in perspective appear larger
so this nose is going to appear a little bit longer than you would normally expect to see it and you also don't see the nostrils because you're looking top down so there's a nose right and just below that I'm going to get the mouth There is almost a little bit of coverage here but not quite so there's the mouth right there there's the shape For the bottom lip shape of the top lip let's get that chin right there get the shape of that cheekbone and there you go now you've got a nice top down angle
right always pay attention to the angle of the eyeline always pay attention to this curve to the angle that it's going in and when you first look at any reference always try to observe the top half versus the bottom half how much of each do you see so this one's a bit more of an extreme example But we can still use that same concept so let's take that round shape for the top of the head now bring this down let's get the shape of that jaw so the eyeline is going to be at this kind
of an angle and quite low on the face it's going to come down like so wrap around just like that there's the front of our eyeline and now we can bring the center line all the way down to the tip of the chin just like that and you can see this head already starts to appear like it's In perspective now let's focus a little bit on the jawline here and add in the placement for the year all right that's another Anchor Point for us so there's going to be the neck there's going to be the
back now there's going to be a little bit of coverage with the shoulder and uh this point indicates you know just kind of the positioning of the body it shows you the pose that's an important piece of coverage to pay attention to so right Off the bat we've got a really good read on on the uh perspectives here let's draw in the hairline here let's try to find the eyes so the eyes are looking downwards which means they're going to be curved downwards the eyes is going to look like this curving down these eyes are
going to look like this curving down now you're also going to see there is a tiny bit of coverage with the brow Ridge so the Brows start right about there and the other set of brows start Right about there so the brow line and the ey line almost seem to merge in this perspective now as you exit from that brow line you're going to see that the ridge of your nose comes down like so and there's the point there's the tip of your nose the triangle there's going to be a little bit of coverage between
the nose and the mouth just like that okay so there's going to be the lips now I'm going to just shrink the chin down a little bit because I've probably made it Too large so there you go now let's add some shading for the lips there let's add some shading under the eyes I'm going to work on the shape of the head a little bit here just bring the ear back in a little bit more as well and there you go there's another top down perspective for the face so I definitely recommend taking your time
with these they're all quite challenging okay be patient with yourself this is for sure a more advanced tutorial so don't try to Rush it but with that being said hopefully some of the things that I talked about in this video can help you out when it comes to drawing your characters in unique and dynamic perspectives I'm going to give you guys a package of reference that I found on Pinterest for you guys to practice and if you want to draw a pose but you just can't find it remember that you can always use yourself as
a reference right just take out your phone you can set it On 0.5 and do some crazy angles with yourself and you can see the same effect as we've shown in this video anyways with that being said I just want to say thank you so much for being here for being part of this community I couldn't do any of what I do without you so for that I appreciate you a lot I hope this video has been helpful to you and with that being said I'll see you guys on the next tutorial video