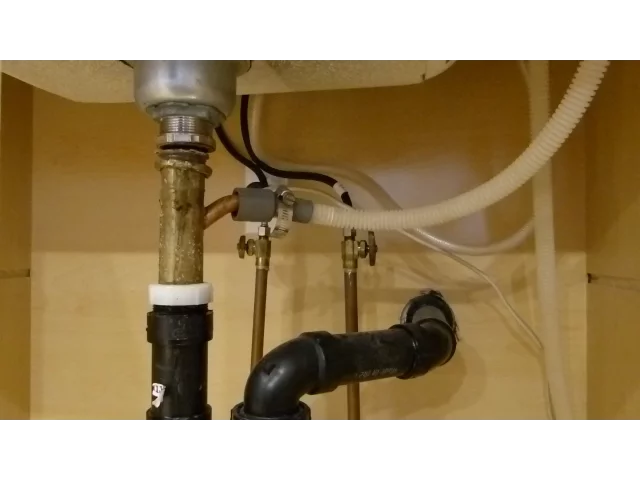
today I'm looking at the drain on my kitchen sink and you can see here what's happened is this slip knot here has failed which has allowed the pipe to separate and now anything that goes through the drain of course will just leak all down here in the cabinet so what I'm going to do is take this off of here and go to the hardware store and get a new one so the first thing that I'll do is remove this bottom slip nut here and of course that's on there pretty well even though that's PVC pipe
so I'm going to grab a pair of pliers here you okay you can see there I finally got that separated this was a little stiffer than I thought just because of all the corrosion on this part and this part feels very very soft when it started to spin I could just feel it kind of crinkle and crack in there so that's that whole thing is ready to fail the next thing I'll do is remove this clamp that holds the dishwasher drain tube on and that's just a matter of loosening this hose clamp this should come
off of here okay a little bit of water there so okay so I'll just let that drain in there and now I should be able to pull this thing out of here and you can kind of see if I'm in the shot here or not but this thing is pretty well shot so I'll take a ride off to the hardware store and see if I can get a replacement for this thing now before I forehead off to the hardware store go see if I can remove the rest of this slick nut yeah okay you can
see that just kind of broke apart and came okay so I ended up having to go all the way to Lowe's to get this branch tailpipe I guess is the proper name for it I stopped at my local hardware store and they didn't have anything in stock so I had to drive the extra 20 minutes or so to get to the nearest Lowe's and I was able to pick this up and just an interesting tidbit this thing was not made in China as you would expect from something from Lowe's it looks like it was actually
made in Newington Connecticut which is not too far from here so that was kind of a pleasant surprise so anyway before I put that in place I'm going to clean off some of the old junk here from the threads and inside the drain pipes while I've got it all apart you can see here I've put some teflon tape on the threads and I ended up using this this stuff here which was the cheapest stuff that Lowe has had and I should have sprang for the little bit better stuff it would have been a little thicker
and easier to work with this stuff just was real hard to kind of get on here flat and get on the threads but I think it'll be okay for for the purposes of this drain but if I were going to do this again I would get the better tape the next thing that I'm going to do the next thing I'm going to do is cut down the length of the new piece a little bit so that it matches the old one a little closer I think it would be okay if I just used it as
it is but it is a little bit long you can kind of see it extends down here a little bit and that could I don't know that might promote clogging I'm not sure so it's not gonna hurt I'll just cut a couple inches off of there with a hacksaw and then knot and then put it in place okay I've got the pipe cut down to link there my hacksaw and now I'm going to slip on this this other slip nut here that I bought this just this lift nut and a paper gasket or poly washer
I guess is what official name is okay so now put the Slipknot on you can see here I've actually removed some of the label here just to prevent any sealing issues so I'm going to slip the slip nut itself on and I'm going to put this poly washer on the pipe with the taper facing down or towards the other pipe and I'll slip slip this up here a little bit and you can see that's partly why I removed the label just to make sure that that slip-up and seal good so now with that kind of
up and out of the way I'll drop it onto the existing pipe trap now kind of set that down there and now what I'll do is I'll attach it to the sink first the sink in first okay now at this point while this is getting kind of tighter I want to make sure that I keep this tube oriented more or less towards the dishwasher drain the way that was originally should be good and tight now that's height bring this side of the slip nut down and lock it down to the trap here and you can
see that will push that nylon washer into the joint and help seal that up okay I guess I could tighten a little more okay that all seems pretty tight next thing that I'll do is reattach the dishwasher connection but because this one's a little bit different than the old one and uses kind of a fatter tube than this one did I'm going to loosen up this hose clamp and I'm going to slip it over the fat end of this coupler instead of the small end so let's sit over there I'm going to slip that on
to the drain tube but that nice and seated I'll back this up a little so it's more Center I'll tighten that down here okay now that it looks like everything is assembled when I turn the water back on first make sure the faucets off now I can turn the water on okay so now I'll turn on the water and should they'll hear the water running here and water is going down the drain like it should and I don't feel any wetness or see any leaks here and everything looks good as far as this part goes
now as a test I've put some water in the dishwasher and I'll just activate the dishwasher drain and take a look at that and make sure nothing leaks there okay so I'm not sure if it's visible in the camera but I can see the water running through this pipe and I can hear it running through the rest of the drain and I don't see or feel any wetness or leaks or anything like that here that will wrap up the replacement of this dishwasher drain tailpipe hopefully this video was helpful feel free to leave a comment
or subscribe if you feel like doing so and as always thanks for watching