So far this year, I've made $1.56 million day trading, and I've documented every single trade live on my second channel. And today, I'm breaking down a simple and effective entry model, which is what I like to call the institutional precision model. Well, that sounded a lot better in my head. Anyways, if you stay to the end, I'm going to share with you some unfiltered advice for unprofitable traders, like some brutally honest advice to wake your ass up. With that said, let's dive into it. Brett, go. Let's go. So, the first step is you want to
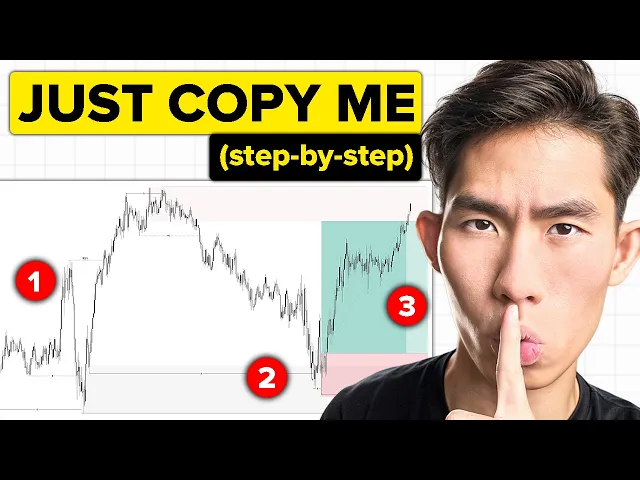
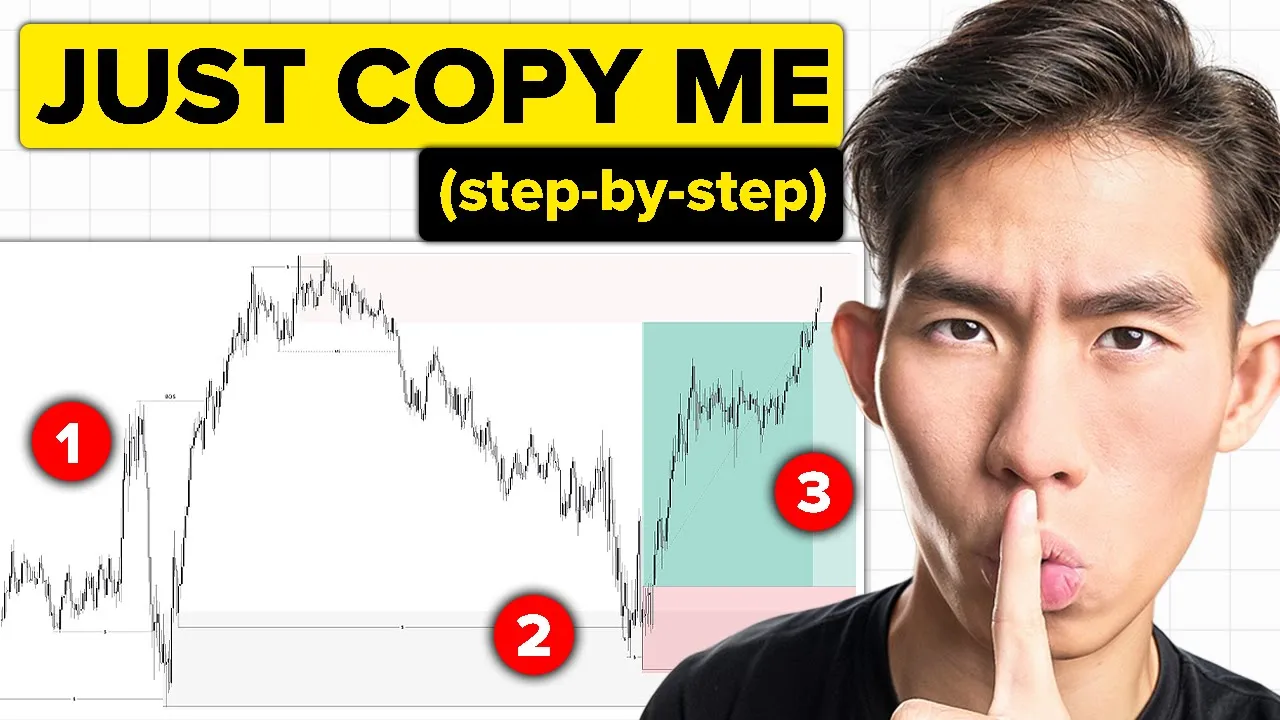
find an institutional zone. And how I define an institutional zone is pretty much a point of interest, a price point which institutions entered for a large amount of buy or sell orders. So, that is the definition of an institutional zone. And how you identify an institutional zone is by finding a protected low or a protected high with liquidity sweep. And here's exactly what I mean. So what we can see right here was that price went up, pull back, goes up, pulls back, goes up, come down here, swept this previous swing low right here before continue
going up right here. So at this point of time, we see clear as day that is a liquidity sweep over here, which automatically means that institutions cause price to actually collapse, trigger out all the stop losses that was, you know, hanging out below this low right here. grabbed some liquidity before it actually pushed price all the way up here. You can see there's a very sharp V-shaped reaction as well. And if you just observe the size of the candlesticks that was formed right after the liquidity sweep, you will see that there's a lot of bullish
momentum in the market. So this right here is clear as day a demand zone that swept liquidity which means that it is a institutional demand zone, right? So you can just use a box two and mark up like the pivot candle, right? the candlestick right here that swept liquidity that swept this low right here and just draw a big cute little box just like this and that becomes your institutional zone. Right? So there you have it. Your first step is done and over here what happened previously was that price has also created like a higher
low right here. So there is also some available liquidity below this low right here which have already been swept. So that becomes our institutional demand zone and that tells us that this is where smart money have actually entered into the market. So if I'm smart money today and price returns back to my point of interest, guess what? I'm going to be scaling into my long position. I'm going to be scaling into my first initial position right here because they're not going to be buying here. They're not going to be buying here. It's way too high.
they are much better off just waiting for price to come back to their original price point which they entered initially and load up on more buy orders. Right? So that's pretty much the logic of institutional zones. Basically it allow us to smart smart money footprints so that we can actually you know write the institutional flow of money. Now another key characteristic of a institutional zone is that it has to lead to a breakoff structure right. So over here what happened was that price created like a swing higher comes down later on demand overpowers supply causes
price to head up tremendously and break structure by taking out this swing high right here. So this demand zone led to like a bullish break of structure just like this and it was also formed after a protected low right after a swing low that swept liquidity itself. So that's pretty much my protected low right there, which means that it's protected. So by definition, it means that price is very likely going to respect this demand zone, respect this low right here, and just continue going up just like this. So once again, this increase the probability of
this zone actually holding itself. So price will not just like start collapsing and take out this low and just start going down and just collapse to So if this is the protected low then this is pretty much the swing high right. So we got swing low that broke structure and swing high is pretty much the highest point that led to price starts pulling back. So now we have identified the swing range that we are trading within. And the next step is easy is to just wait. Okay, which means you do nothing until price actually mitigate
touches this institutional zone itself. And this is the hard part because so many of you watching this are going to get itchy fingers and let your monkey brain take control of you and start entering for buy sell by sell like around here when price is like in the middle of nowhere and then you wonder why you keep on getting stopped out. You wonder why you're unprofitable. So if you are completely new, you don't have much experience, you're much more better off just waiting for the high profit setups to appear, which means waiting for price to
mitigate the institutional zone that we have marked up right here. Okay, so at this point of time, price is in the middle of nowhere. I don't care what price does, price can do whatever it wants over here. Obviously, if you want to trade the pullback, the best time to do so is to enter or sell somewhere around here and trade it all the way down to this institutional zone. Right? So once again, this is for like the more advanced traders. If you want to trade counter trend, you can look for shorts over here, over here,
over here, and trade it all the way down to this um institutional zone. That's not what this strategy is about. That's not what this entry model is about. This entry model, it's a high property model, which is what we call the institutional precision model, which means we want to trade in the direction of the institution flow of money. and institutions they are just going to be patiently waiting for price to come back to the point of interest. Right? So at this point of time we are doing nothing. Price is consolidating around here. Cool. And then
eventually it comes down and mitigate our institutional demand zone. Right? So first criteria check right. First step done, second step done. And the third step is you want to enter after price sweeps the initial mitigation of the institutional zone. The key word here is initial. All right. What I basically means by that is that when price comes down to this institution demand zone, it's going to get a reaction. It's going to get a initial reaction just like this. Price is going to bounce off it because the minute price actually come into here, there's going to
be buy orders sitting at this price point here and it's going to start pushing up just like this. But we don't really want to enter on the initial mitigation because the initial mitigation is usually an inducement which means it's a trap laid out by the institutions the smart money the big banks so that they can actually bid retail traders to enter early and then later on price comes down swip all the stop losses right here before it actually start reversing right before the real move actually happens. So we don't want to become the liquidity we
want to make sure that we are spotting the liquidity. So in this particular case, the minute price comes down, you can see right here on the 5m minute time frame, it came down, mitigated this zone right here, no entry, no bueno. All right, this is just good old liquidity. You can see later on price came down there and swept the liquidity below this low. And right now we are potentially pushing up just like this. We got price mitigating the institutional zone. We also got price sweeping the initial mitigation of the institutional zone. So this is
where you can potentially look for an entry itself. And one more thing right this is more of like a bonus tip is if you look at the left hand side you can also try to spot any additional liquidity. So on the left hand side right here what we have was that price went up there pulls back right and then goes up even further. So this is pretty much like a internal low. So that is also going to be liquidity sitting below those lows right there. So ideally we want to see those get swept as well.
So in this particular case it it did swept those lows as well. Right? So it swept the liquidity that is formed in the continuation phase and now it also swept the liquidity that is formed during the pullback phase itself. So at this point of time I want you guys to continue to observe what price does. Price started reacting from this point of interest. calm down, sweep more liquidity, and this is where we know that the real move is potentially going to happen because right now has officially swept like the initial 15-minute mitigation. Previously, it just
swept like the 5m minute mitigation, right? And then once again, this is the inducement, right? This initial move to the upside, this is to entice retail traders to enter early right here. So if you are sculping potentially what you could have entered is somewhere around here and you can target like at this high right here, right? So very quick uh move to the upside, right? So you can actually capitalize on this short-term move to the upside. But if you're day trading, you're much more better off waiting for price to once again sweep the initial mitigation
on at least the 15-inut time frame. Right? This the initial mitigation wait for that to get swept and then you make your entry from here. Right? All right. So at this moment of time, initial mitigation has been swept. All the available liquidity has been swept as well. Price is most likely going to respect like this protected low, this demand zone that we have marked up over here. Which means that I'm going to look for longs right here. Okay. So very very simple. Once again, understand the objective of price. Understand the context of price. Don't trade
your belief about the market. Trade the market for what it is. Trade the objective reality of the market. And you can only trade the objective reality of the market by first understanding what's the objective of price. So right now we have identified that this is just a pullback for price to come back to the demand zone to create like a higher low in this overall swing structure right here. So right now if I want to trade the objective reality of price, I want to make sure that I'm riding this next continuation to the upside, right?
This next lick to the upside. So that is pretty much where I can place my entry over here. I entered right after the initial right after price swep the initial mitigation itself. Right? Once again I didn't enter on the initial mitigation. No I entered after price sweeps the initial mitigation. I entered after price with all the available liquidity. Once again just to keep it super duper simple this pretty much reduce the chances of you getting stopped out of you being the liquidity. If you can just be a little bit more patient to just wait for
price to actually mitigate your institutional zone, to wait for the liquidity to get swept, it will reduce the likelihood of you getting stopped out, which means it will reduce your losses and this automatically increase your profits. As simple as that. To me, I define professional profitable trading not as, you know, winning more trades, but just losing less trades, making fewer stupid decisions. All of a traders problem stems from hence inability to do nothing when the market is quiet. So if you can just have the balls to just stomach the boredom that is where you are
going to be 10 times more profitable. So at this point of time we have entered for our trade. The next question becomes how do we manage this trade itself? Where do we place our stop loss? Where do we place our take profit? Well you want to place a stop loss at a price point that invalidate this trade ideal. That's my definition of like a proper stop-loss placement. It has to be placed at a price point that allow me to protect my downside if this trade idea does not work out in the way that I want
it to work out. It has to be placed at a price point which makes sense, right? Which means you don't want to put it at like a random place. You don't want to put it too tight or too far away. You have to find the right spot. So to me, I'm asking myself, what is the price point which will invalidate this trade idea? What is the price point that will prove to me that my hypothesis is wrong? So in this particular case, we got price creating like a protected low right here. Which means that this
level right here, it has to hold in order for price to remain bullish. In order for price to create like a higher low and then go up. So if you want to be conservative, what you can do is that you can place your stop loss below the protected low itself because there's a very high chance that price is going to respect this low right here and then goes up if the entire swing structure is to remain bullish, right? the bullish structure is to remain intact. Now, if you want to be a little bit more aggressive,
which is how I personally roll because I kind of understand the market very very well and understand liquidity well, I would place it below this candlestick right here that swept all the liquidity because this is me assuming that this right here is going to become the new protected low, right? Because right now he has swept all the available liquidity that we have on the left hand side right here. Which means that price is most likely going to respect this protected low right here and just continue going up because this is the second time institutions actually
entered for long positions actually scale into the position itself which also means that they are not going to allow price to just continue going down right here break out the protected low to stop themsel out. There's a very low chance that that's going to happen. So once again, trading is not a game of certainty. It is a game of probabilities. Play the odds, manage your risk and you will succeed. Fight the odds, be lex with your risk and you will fail. Right? So at this point of time, I'm just looking at this and just thinking
about how I can put the odds in my side. So that is why I actually entered right here and place my stop loss at this price itself. So that's pretty much where I will place my stop loss. Right? Bear in mind I'm much more aggressive. I'm much more um experienced in this market so I can do this. And as for your takerit, the takerit by definition is the price you want to get out at if your trade idea plays out. If price actually go up in your way. If that's the case, you want to make
sure that you place it at a price point which allows you to maximize your upside, but at the same time at a price point which is not too far away, right? where price will like just reach somewhere in the middle of your take profit and start reversing against you because you place it way too far away. Right? So it's all about finding the sweet spot. So in this particular case once you have understood the objective of price you will know that the only obvious place to place your take profit is going to be at the
next supply zone at the next institutional zone to be precise. Because right now what we have saw is that this pullback is potentially going to be over soon. Right? Price is going to come up there. Demand is going to overpower supply and as a result, price is going to continue hitting up just like this. But with that said, that is our assumption on what price is going to do. There is no certainty that price is going to do that because remember it's a probabilities game. It's a numbers game. So this also means that I want
to ask myself where is the price point that price will certainly gravitate towards and that's where I want to get out if the trade either do play out. And if that's the case, I'm going to look at my left hand side and I'm going to try to find my institutional zone. The zone where institutions, you know, entered for sell or buy orders like a bulk amount of buy or sell orders. So if I look at the left hand side right here, what do I have? We got price goes up, pulls back, goes up, start crashing
down. So this is the origin point of like this entire pullback right here. is the starting point, the starting line when there is a large amount of sell orders started flooding the market and cause price to pull back just like this. If that's the case, this must be a supply zone. And if you look at the left hand side right here, what do we have? We also got price sweeping the available liquidity above this swing high here as well. So, does this fulfill our criteria of a institutional zone? Yes, it does. is a supply zone
with a protected high that swept liquidity and it led to price breaking structure when price came down here and took out the last internal high low right here giving us the market shift which signal to us that the pullback is going to start to happen. So this entire thing right here becomes my institutional supply zone right? So like I said, you can either draw the supply and demand zone at the candlestick that set liquidity, right? So just like what I've done right here or you can mark the entire consolidation just like this. Okay? So marking
the entire consolidation is more conservative. Marking the refined candlestick is more aggressive. Right? So for this particular case itself, I'm just going to mark the entire consolidation just like this. And I'll place my takeprofit right there. So you can see in this particular case this come out to be just nice around like a one is to three risk-to-reward right so very very sweet risk to reward right here that is my minimum minimum one is to three which means I'm risking $10 to make $30 I'm risking $100 to make $300 right so I'm pretty much getting
back in return three times of what I'm risking itself so I deem that as a fairly intelligent risk-to-reward decision so in this particular case once that's done. I'm just going to let the trade play out. Okay, so price goes up, goes up slowly goes up, slowly but surely emits a little bit of resistance right here because if you look at the left hand side, there is some form of supply right here and then later on price went up there and smashed our TP. As simple as that. Now, once again, the hard part is when price
is in the middle of nowhere. This is the point where a lot of people are going to be tempted to actually close the position early to take some money off the table. But if you do that, you are giving in to fear. You're not trading the market for what it is. Once again, you are trading your belief about the market, not the objective reality of your market. So, you're trading your perception of the market rather than the objective truth of the market. So in this particular case, it's so easy to just like, you know, neglect
your plan and just take profits early. But the people, the traders who have the courage to just, you know, trust the analysis, trust the research and preparation and just let the trade run, these are the guys that gets rewarded for their patience, right? Like that's pretty much it. That's pretty much the holy grail right there. I literally just walked you through the entire top to the bottom strategy when it comes to how to spot institutional footprints and also how to manage your risk like a professional because amateurs focus on entries but professionals obsess over exits.
Let me repeat myself. Amateurs obsess over entries. Professionals obsess over exits. That is why to me personally I don't think the hard part is in the entry because any Tom Dick and a Harry can get like a sniper entry if they are lucky whatever but the hard part is determining where is the right price point to actually get out if the trade turns out to be profitable so that you can actually maximize your upside and if the trade turns out to be unprofitable so that you can actually minimize your downside. So this is the framework
that I personally use. Now before I walk you through the next example, I think it's so important for you to understand when not to trade because it's easy to know when to trade once you have identified your mechanical framework. You have identified your entry criteria, your mapping process, and you just use like the three-step framework that I just showed you. But it's difficult to just sit on your hands and just do nothing when the market is quiet. And I think that's what separates professional traders from amateur traders. Amateur traders try to trade every single hour,
every single currency panel, every single asset class, every single day, every single hour. While professionals, they only trade when they have identified their A+ setups. And I have this beautiful quote which I always tell my students. The edge isn't in spotting A+ setups. It's in ignoring everything else. It's in ignoring the setup which looks like an A+ but is actually like a C setup. So, it's important for you to understand the environment in which you want to deploy this entry model because this entry model is super duper aggressive. Which also means that if you are
using it at the wrong place at the wrong time, you're going to get stopped out and you're going to fail. You're going to lose money. You're going to blow accounts and you're going to go back to frying burgers on magnotus. You're going to blow your paycheck. All right? And I don't want that to happen to you because I've been in your exact position hundreds of times, right? I've blown seven accounts, failed multiple funding challenges, lost over $10,000 in my first year of trading. So, I know exactly how it feels to be a freaking loser, okay?
Quite frankly, and that's why every single piece of content I put out here is to prevent you from becoming the loser that I was, right? Preventing you from losing your paycheck, losing whatever little amount of money that you have left after you actually uh put food on the table. Okay? So this is pretty much the scenarios in which you want to use this entry model. The first scenario is a high property scenario. Now once again trading is a game of probabilities. It's not a game of certainty. Which is why as much as possible we only
want to deploy this aggressive entry model on high property scenarios because if you deploy it in low property scenarios you can find the exact entry model you can have all the liquidity system in the world but it's not going to work out because the environment the context is wrong. So hypotheticy scenario is pretty much when you are trading with the trend. So in the example they just showed you, price goes up, pulls back, create like a particular low creating like a demand zone right here and then just enter for a buy trading the next move
to the upside. This will work if the overall swing structure is a bullish right on the higher time frame price is creating higher highs and higher lows then obviously you want to be just continue buying at the higher lows. But if this happens when price is consolidating or when price is in a downtrend, there's a very low chance that this is going to work. So once again, you can see the exact same example, but the environment is different. Then what can happen is that instead of price doing this, price is going to collapse and you're
going to get stopped out all because you fail to understand the context of the market. And the context of the market is once again the objective reality of the market. So the next scenario is high probability point of interest. You must understand that not all institutional zones are created equal. There's times where price is going to respect the zone and it bounces off just like this. And there are also times where price is just going to blast right through it. And it all comes down to how strong that zone is. So there's a few criteria
which pretty much strengthen or weaken a particular institutional zone. The first is if it's unmititigated, right? If a demand zone is fresh and unmititigated just like this, price is most likely going to respect it and just goes up because of the fact that you know this is still a fresh zone that is going to be a bunch of buy order sitting within this point of interest itself. However, if this zone has already been mitigated, the next time price actually come down here, there's a lower chance that it's going to respect this zone, right? So, price
can actually just blast right through it and just continue crashing down. And the next is protected, right? Protected, we have literally just cover it is basically like a zone or like a swing low or swing high that swep liquidity. So as long as we got some form of liquidity just like this, this entire zone is protected and price is going to respect it because this is a valid institutional zone. And the next thing is whether it's part of like a supply and demand chain. Supply demand chain is basically price goes up, pulls back, goes up
creating like a demand zone just like this. Later on price come down, respect this previous demand zone and cross price to continue going up creating another demand zone and then later on price comes down mitigate this previous demand zone and just continue going up just like this. So you can see it's pretty much a chain in which price is respecting the previous point of interest over and over again and we can expect this entire momentum to sustain itself which means right here we can draw this is the near demand zone and we are expecting price
to respect that and just continue going up as long as the bullish trend direction the bullish structure remains intact. So those are pretty much the criteria of what defines as a high property point of interest. Obviously, there's a lot of different criterias which I don't really want to go through right now because it'll make this entire video like freaking three hours long if I actually go into all the nuances in which what makes a point of interest high probably. But at a high level, you can see these are like the most important ones. And then
the next scenario is tight ranges where you can see protected structure and liquidity without zooming out. So this is a little bit difficult for me to showcase without a chart. But basically what I mean is that if you are able to see this protected higher right here and see the pullback on the same chart itself without zooming out to the higher time frame or without like doing this on trading view like you know like just zooming out physically uh on trading view itself. This means that we are in a tight range. Let me just give
you like a quick example. So in this particular case itself you can see this is the demand zone that swap liquidity right. So it's like a protected uh demand right here is like a protected low. And in this particular case, I can see the liquidity, I can see the protected structure all on the same chart itself. But if I have to actually, you know, zoom out like this to see the protected low on the left hand side, which means it's quite far away from where price is currently at right now. It's a few hours or
like a few days away. This pretty much means that it's in a wide range, right? And it's not in a tight range. So in a tight range just like this where we can see the liquidity, we can see the structure properly. This is where we want to actually deploy the this entry model itself because it's assuming that price is going to be using the most recent liquidity rather than some liquidity that freaking existed like ages ago, decades ago. Okay, not decades, but like you you get my point. Okay, cool. With that said, let's dive into
the next example and we're going to look at it on a Bitcoin chart. Now I want to really drive from the fact that this entry model works on all asset classes. It works on crypto, futures, options, stocks, um, forex, commodities, whatever tiny little niche you like to gamble in. It works. And I'm going to show you that it works by applying it to a Bitcoin chart, which is to me the most volatile asset in the entire different asset classes out there. Right? So it's a force to be reckoned with. So if this entry model can
work for this asset class, it can work for all the other asset class. Okay. So in this particular case, first step always go and identify my institutional zone. Right? So over here we can see price goes up, pulls back, goes up, swep this higher and it starts crashing down like crazy. And you can see there's also a lot of imbalance on the left hand side right here. You can see there's so much selling pressure. Look at this big bearish candlesticks right here, the BBC, right? This means that there is clear as day institution selling pressure
right here. And this is the origin point. This is the protected high because once again it swept liquidity over here and it led to price breaking structure when price actually came down here and taking out this previous swing low right here. Living us a cute little market shift, right? Cute little market shift right here. So if that's the case, we can identify this as our institutional zone that SW liquidity, right? This is the supply zone that swap liquidity. And once again, you can either mark up the entire consolidation just like this or you can mark
up just the liquidity candle just like this, right? The candlestick that you have liquidity. Okay, so now what do you do? What's step two? Step two is fold your arms or wear a straight jacket so that you do nothing until price eventually reaches that damn institutional zone. Okay, you fold your arms. All right, just just do nothing. Just just chill like just just become just go and meditate or touch some grass. So at this moment of time, I'm not doing anything. I'm cool. My hands are getting itchy, but I'm stopping my hands, right? You know,
I'm like just pushing my hands down. No, Brad, you can't you can't trade right now. No, you just got to wait. Another trick that really helps me out is just set alerts, right? Like what you can do is come on to Trading View, press this button right here, set an alert at a price point that you want to get notified uh once price eventually touches that price point and you do nothing until that alert goes off and you get the notification from your boyfriend trading view on your phone, right? Like just do nothing until that
thing comes then go and check out the charts. Anyways, at this point of time, do nothing, right? Breathe, chill, chill. Touch some grass. Boom. Eventually price mitigate that supply zone right here. Mitigate that intutional zone. Okay. So once again, second step is waits until price mitigate your institutional zone. Third step is once again you don't enter on the initial mitigation. You enter after the initial mitigation itself. You enter after price sweeps the initial mitigation. So let's go back in time a little bit. The minute price actually mitigate your institutional zone just like this. What do
you do? This this this is what you do. Okay, this is what you do. At this point of time, it's so easy to get FOMO. It's so easy to think like, oh my god, price is going to go down right now, man. I got to enter for a sale right here. Yeah, you can go and do that if you want to be the liquidity. If you want to offer your hard earned money to me, the guy who's patient enough to wait for the true liquidity strip, by all means, go ahead. I already have enough money.
I don't need your money. But if you want to offer me more, I'm more than happy to take it. Because trading is after all, it's like a zero sum game. You lose, I win. I win, you lose. So at this point of time itself, price mitigated the zone. Do nothing, right? We wait for price to sweep that initial mitigation. Nope. Nope. Boom. There we have it. Right now price has potentially sweeping the initial mitigation. If you look at the five minute time frame it has become more apparent. Right? You can see price mitigate that zone.
Chill. This is where all the retail traders the dumbest noobs is going to enter for a sell right here. But you the professional trader you wait until price swept that initial mitigation. So you got your liquidity s right here. And now you can look for your entry. Enter for a sell right here. Place your stop loss. Once again, if you're conservative, place it above the high that swap liquidity, above the protected high. And if you're aggressive, place it above the candlestick that swept liquidity, that swep the initial mitigation, and you just target the next opposing
institutional zone. Okay, so at this point of time, where is the next institutional zone? Right? By the way, I forgot to mention, but you need to target the next opposing institutional zone. Oh man, it's so freaking hard to pronounce. institutional zone. Man, I I [laughter] man, should I just call it Isy? Isaac. Isaac. Isaac. Isaac. Isaac's actually like a pretty good name for like this entire longass word. Okay, cool. You know what? For the remaining of this video, I'm just going to call it Isaac. Right. My boy Isaac. Institutional zone shorten abbreviated into a nickname
for Isaac. All right. For people who don't understand the context. So, at this point of time, where is Isaac? West's body right so over here I can see price goes up pulls back right here and then come down swap liquidity below this low and then starts pushing up comes down goes up pulls back so liquidity below this low and then start pushing up so at this point of time this is the next opposing the next opposing zone that swep liquidity so if I'm actually entering for a sell right here what I can do is to
place my take profit at this zone over here and let's see whether that actually plays out later on price comes down slowly but surely smash our TP just like this comes down and smash the hell out of Isaac that's it that's it baby that's it as simple as that but what I want you guys to observe is what happens next all right so let's just continue to look at what price does next price starts consolidating around here starts crashing down even further and where the price gravitated towards Well, the next demand zone, right? The next
opposing demand zone. Okay. And then down price starts going up. Boom. What do we have right here? What do we have here? All right. So, let's just get rid of drawing over here. And previously, we have saw price actually swept the initial mitigation on the five minute time frame. But remember price is fractaled, which means that whatever happens on the higher time frame must first happen on the lower time frame. And whatever patterns that you see on the lower time frame will also happen on other time frames on the higher time frame as well. So
in this particular case, this was the initial move. Now if I just stay on the 15minut time frame itself and I don't go down to the five minute time frame to spot my initial mitigation, then this is actually the initial mitigation on the 50-minut time frame itself. That is the 15-minute mitigation. Which means that if you adjusting on the 15-minut time frame itself, you will constitute this as the initial mitigation, which means you will not enter for a sell right here when price does this. And you want to see that high get swept before you
actually look for your real move, before you can actually trade the next leg to the downside. So in this particular case, price has came all the way down up here, swept the initial mitigation of this 15-minut supply zone, right? And what we also have is price just coming deeper into the zone itself, right? Like really just going deeper and potentially mitigating, you know, like the refined supply zone that we have marked up right there. And now watch what price does next. Okay, so let's say over here we entered for a sell after we got that
initial mitigation sweep. Place your stop loss once again above the candlestick that liquidated this high here or place it above this supply zone, this protected high right here. Either way, whatever it is, do what you want. And then place a take profit at the opposing demand zone, the opposing institutional zone, right? So in this particular case, since we're entering for a sell at a supply zone, our take profit is going to be at the next demand zone that have some form of liquidity sweep. So if that's the case, just looking at this alone, where is
the most obvious price point that we can see that's intentional movement? Well, if you look at the left, what we have price goes up, pulls back, good old juicy available liquidity being built up right here. Later on, price comes down, swept all that liquidity before started pushing all the way up here. So if that's the case, this entire thing right here is our beautiful liquidity sweep, which also means that this is our next demand zone, our next institutional zone, the next opposing institutional zone where price is going to gravitate towards next. And it's further backed
up by the fact that there is so much liquidity. There is so much bullish momentum that was being created after price actually set the liquidity. You can see this sharp V-shaped reaction right here. So much buying pressure, right? So that's pretty much like the natural point in which price is going to gravitate towards. And let's just wait and see what price does next. Price started slowly but surely tranling down and smash our TP. There's nothing more satisfaction than that. Seeing your research, your analysis, your preparation played out perfectly. This is what it means to trade
with precision like an institution. That is why we call it the institutional precision entry model. So before we end here today, like I say, I don't want your money. I want you to become a better trader. So, I really want to share with you brutally honest, unfiltered advice that I wish my younger self knew, right? Like, this is what I personally would tell to 18 year old bread when he started day trading. The first piece of advice is if you cannot explain your trade idea in three sentences to a 10 yearear-old, then you don't have
one. Simplicity is the highest form of intellect. And I mean exactly what I said right here. If you cannot explain your trading strategy, your trade ideal, your investment ideal in three sentences in at like a fifth grade level, then you really don't have one. Right? A lot of trading gurus, they like to make complicated. But in reality, it's because they don't understand it enough. So that is how I can pretty much just simplify all of these complicated trading concepts into like usually just three sentences, just three steps. It's because of the fact that I've been
doing this for so goddamn long and I have such a deep understanding in whatever that I teach. And also because of the fact that I practice what I preach every damn day. Next is don't take advice from people who sell advice for a living unless they are punished for being wrong. Gurus without skin in the game over complicate to keep you confused and buying. Real educators, real professionals simplify because they actually have a deep understanding about the craft. What I'm talking about is the guru who rented the Lamborghini for the day. The guy who show
you his crypto portfolio uh and thinks that he is a mentor because he got lucky during the Bitcoin bull run. The only fans trick which is flexing about you know how much money you have made from crypto when in reality it's really all comes down to like pure luck. These people they have no skin in the game. You know they have they just been trading for three months and now they think they can they can freaking sell a course, right? So do not take advice from people who actually sell advice for a living unless they
are punished for being wrong. Because you must understand that at the basic level of human psychology, all humans want to do things for self-interest. Like the reason why they sell you advice is because of the fact that they got something to sell you and they want your money, right? So the only people that actually become rich through this sort of like content or through this sort of like um marketing is them. It's not going to be you. So you're much better off listening to people who actually have like a profitable track record and can actually
simplify things in like a fifth grade level because that really shows that they really understand what they are talking about. And next, this is a controversial belief, but I believe that a trading strategy is like an Everybody has one. The hard part isn't making a strategy. Anybody, any trader under the sun have a trading strategy. The hard part is sticking to it when it stops working temporarily and having the patience to follow it long enough to prove it does. The hard part is sticking to the strategy after a massive losing streak, after a massive draw
down where every ounce of your being is convincing you, telling you, persuading you to just neglect your trade plan. In that particular case, if you can continue following a strategy, then you have a proven strategy. Then you actually have an edge. And also having the patience to follow it long enough to prove it does. Just because you want one trade, just because you want three trades, five trades, 50 trades, doesn't mean that your strategy works. There's two things, data and time. You need to gather a lot, a lot, an insurmountable of data. I'm talking about
100 trades. I'm talking about 500 trades. I'm talking about thousand trades before you can actually prove that it works. And you also need a lot of time. You need your strategy to stand the test of time because it's one thing for the strategy to work for one day or one month or one year, but it's another thing for you to work for the next five years, the next 10 years. And last but not least, consistency beats intelligence in trading. Stop trying to outsmart the market because that will never happen. You will never ever win the
market. The market is always right. Instead, start focusing on executing your edge consistently. To me, my goal is to make money. No doubts. I want to make money, but that's not my job. And you don't confuse your job with your goal. My goal is to make money, but my job is to execute the best trade in accordance with my trading plan. And if you go in with that mentality, you can never ever lose because now you're not attaching your self worth to your P&L, but rather you're attaching your selfworth to your ability to execute. your
ability to follow your trading plan religiously, your ability to stay disciplined, to stay calm under adverse situations. So remember, stop trying to outsmart the market and start focusing on just executing your plan consistently. And ironically, when you do that, you can eventually outsmart the market. So that's pretty much all the unfiltered advice that I have for you. I will just end off this video with like this quote that I have written when I was on like a trading retreat. The world belong to the optimist who can do boring repetitive work for an extended period of
time without needing any external validation or immediate results. Anyone can grind when they are motivated or praised or they're inspired. But very few can grind when nobody's watching. And the people who can work harder, 10 times harder when nobody's watching are the ones that usually win because you are rewarded in public for the work done in private. Nowadays you see me, you know, making six figures every single month from day trading. But what you failed to see is the thousands of hours that I spent trading, journaling, recording, reviewing, refining my trading plan, reiterating my the
trading plan, the moments of doubt, where I feel like quitting, the sleepless nights where I obsess over what I've done wrong, and the times where I felt like giving up. Those are what you don't see. You only see the highlight reals. But just always remember, if you can be your biggest fan, even when nobody else is rooting for you, nobody is clapping for you, you will eventually win. You will eventually win if you just maniacally focus on the accomplishment of one goal, one thing, and just ignore everything else and just stay on that path and
just continue to walk that path regardless of whatever the world throws at you, you'll eventually win. And as always, remember, you're just one thread away.