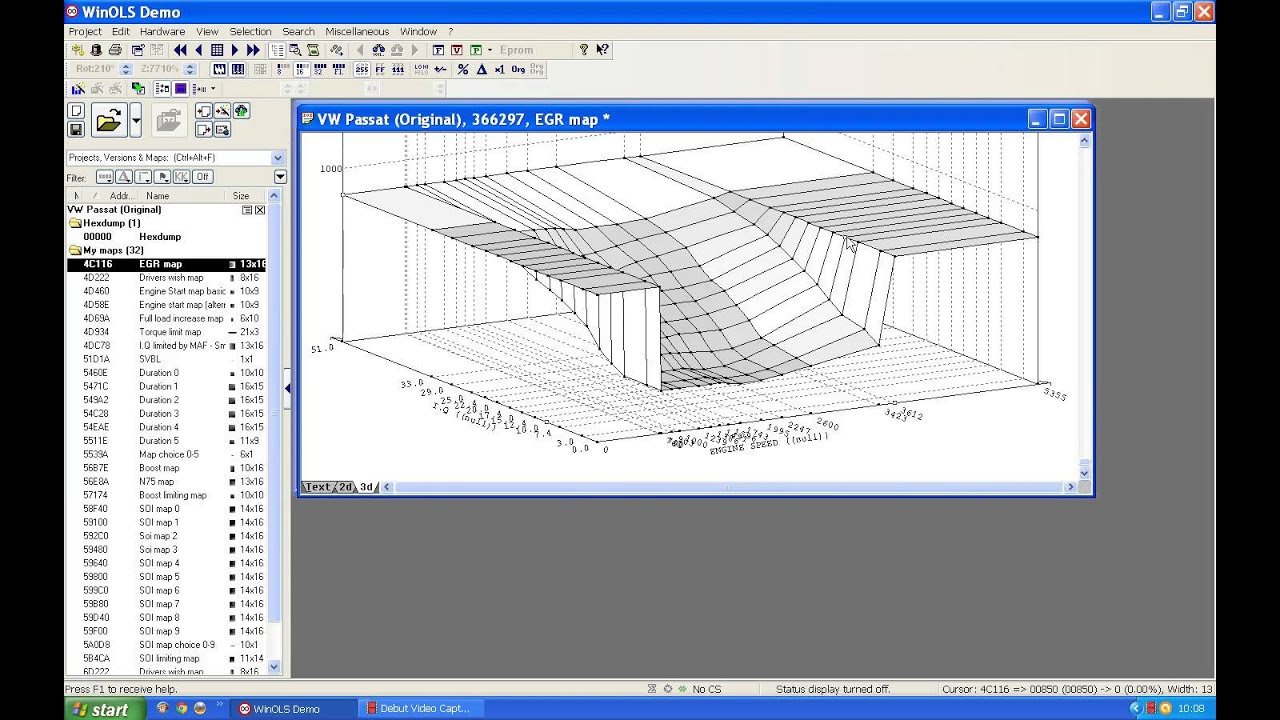
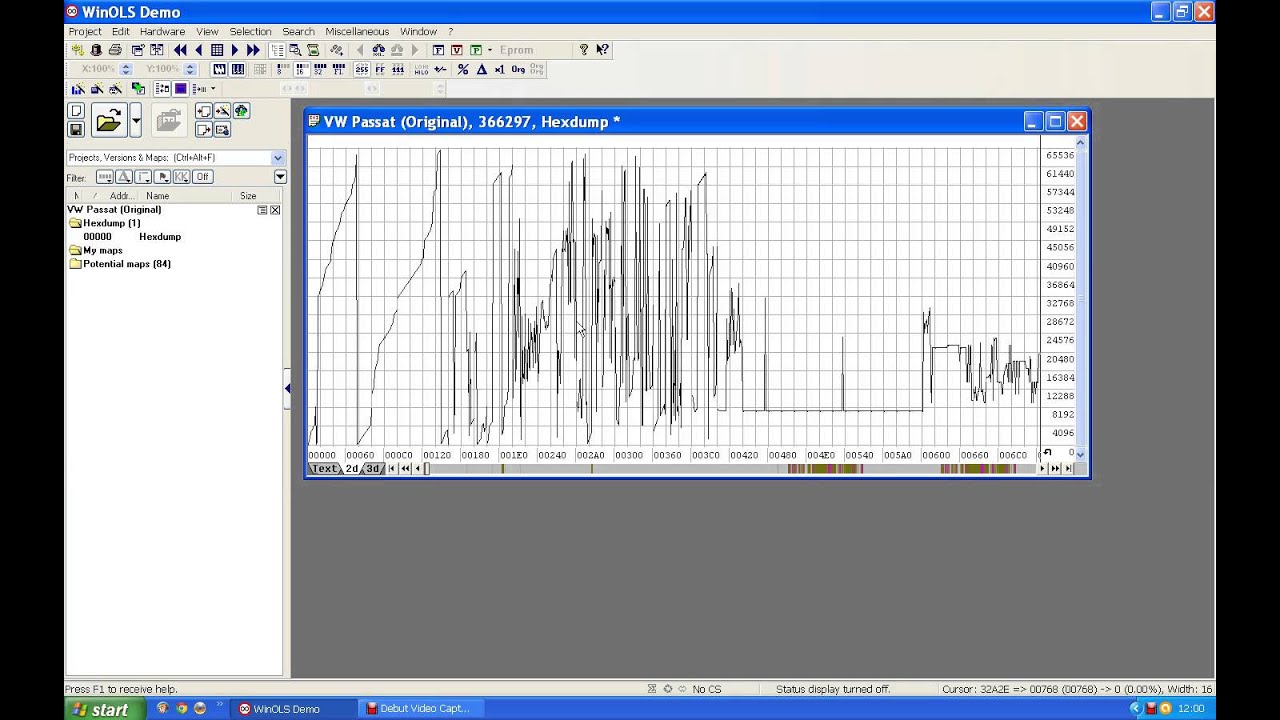
okay this is the first in a series of videos which are basically a beginner's guide to chip tuning or remapping I'm going to use the edc15 file that I've been using from the pat TDI pd130 I've been using this all along in all of the vide so far so if you've watched any of them you will be familiar with it at the moment on the screen you can see the driver's wish Map There's the file with the driver's wish map and there's the driver's wish map now before I get too involved in this let's just
point out the obvious the whole point of remapping or changing the tune of the engine for 99% of people is to produce more power what they are looking for is more performance occasionally people are looking for more economy but generally speaking people go down this road because they're looking for more performance now in order to achieve more performance there is virtually nothing you can do other than the obvious which is put more fuel in the engine so no matter what people say at the end of the day generally speaking if you tune an engine to
give you more performance you will use more fuel because the energy for the more performance has has to come from somewhere and it doesn't come from fresh air it comes from the fuel now having said that occasionally people notice that having tuned an engine slightly for more performance their economy is no worse in fact some people sometimes find it's even slightly better now this is often misleading because it is very often the result of how you drive the changed car in other words you may well find that with a slight performance increase due to a
remap that you're not actually pressing the pedal down so hard to get the performance that you used to have on the old map and you might find yourself throttling back on occasions just because you're happy with what you've got and the end result of that is that occasionally people will know noticed that they've even got exactly the same fuel consumption as they had before even though the map is giving a little bit extra performance or it may have even improved the fuel consumption of fraction but very often that's not a result of the remap as
such it's a result of the way they are choosing to drive given the remap obviously if you've remapped and what you intend to do now is to use every ounce of performance performance that you've managed to ring out of the map then your fuel consumption is going to be considerably higher so I just want to make that point right in the beginning that if we want more performance we're going to have to use more fuel it's as simple as that now as a start to this it's probably easier to jump from one map to another
and show what's going on if I don't use wins what I'm going to do is I'm going to jump to exactly the same Maps but displayed in Microsoft Excel now this is an old version of Microsoft Excel and that's deliberate because I've been using this since it came out in 2003 and I'm perfectly comfortable with using it and I've carried on using it so that's why you're looking at an old version I've got newer versions and I basically I just don't like them so that's why I'm still using this one okay now here we go
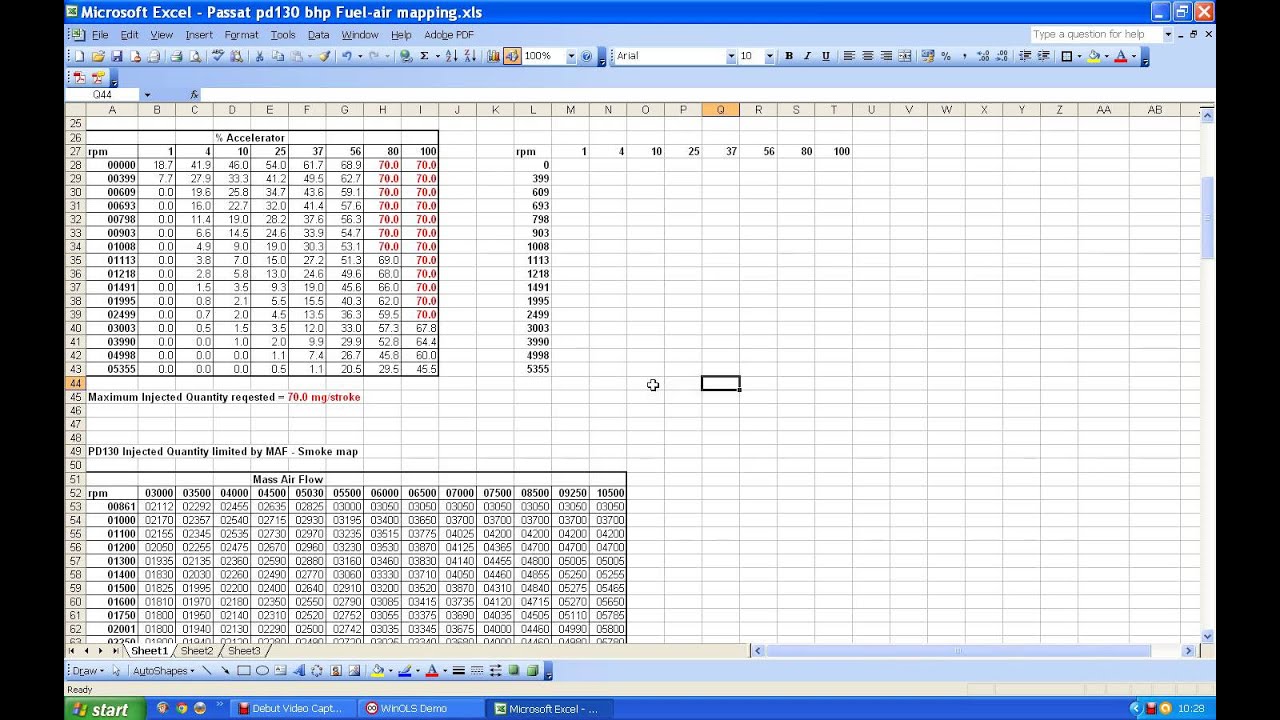
then what we've got here is the same map with were just looking at in winow here's the driver's wish there's the driver's wish as it would have come straight out of the file in winow the only difference is that I've put the axis data here where it belongs in terms of our view of it because when I first copied it across it the axis data was up here in a block and so what I've done is I've moved it to the appropriate spot so that it looks a bit more like a map and then here
I've done exactly the same thing but I've added the factors so that we can see it as it is in a map so that's the file display that's the map view and I've done this on purpose because I want to be able to look at the fueling on the driver's wish nice and clearly and then I've done the same there's the file for the smoke Map There's it shown as a map there's a comment on the actual fueling I'll ignore this one for the moment and come back to it and I've done the same again
here there's the talk map as it appears in the file there's the talk map as it appears in a map and again there's the maximum fueling and again here boost map file boost map as you would see it as a map I'll ignore that one again and here we are single value boost limiter if you've looked at the other videos you'll know that that's 2620 for this file and here's the Boost limiting map and I'm just again showing the maximum haven't worried here about whether it's a file view or a map view because they're basically
the same because the only difference would have been a KN in front of each of these if we were looking at the file because the file would have had five digits for each of these whereas these have only got four but basically the numbers are the same don't need to worry about factors or offsets okay right I'll go back to the beginning because I want to make a simple Point here and then I will stop the video and move on into what I suppose you could call part two um I'm trying to keep all of
these videos at are manageable length so that you don't drop dead from sheer boredom watching them okay here we go look here we've got the drivers wish map for LPD 130 and if we look at it we can see that we've got a request here from the driver's pedal from the accelerator pedal of 70 MGR per stroke of fuel now for that engine that's probably plenty of fuel to get quite a big increase in power from the engine should we inject 70 now do we I mean that's the obvious thing isn't it I mean if
we were injecting 70 would we get an increase and if we're not injecting 70 what are we injecting now in terms of making a remap we might want to play with these figures but we might not want to change them to make them any bigger we might simply want to move them around a little bit but anyway I'm not going to worry about that at the moment I'm going to come back to that later date I just want to give people an overview at the moment of what we're talking about so there's our 70 milligrams
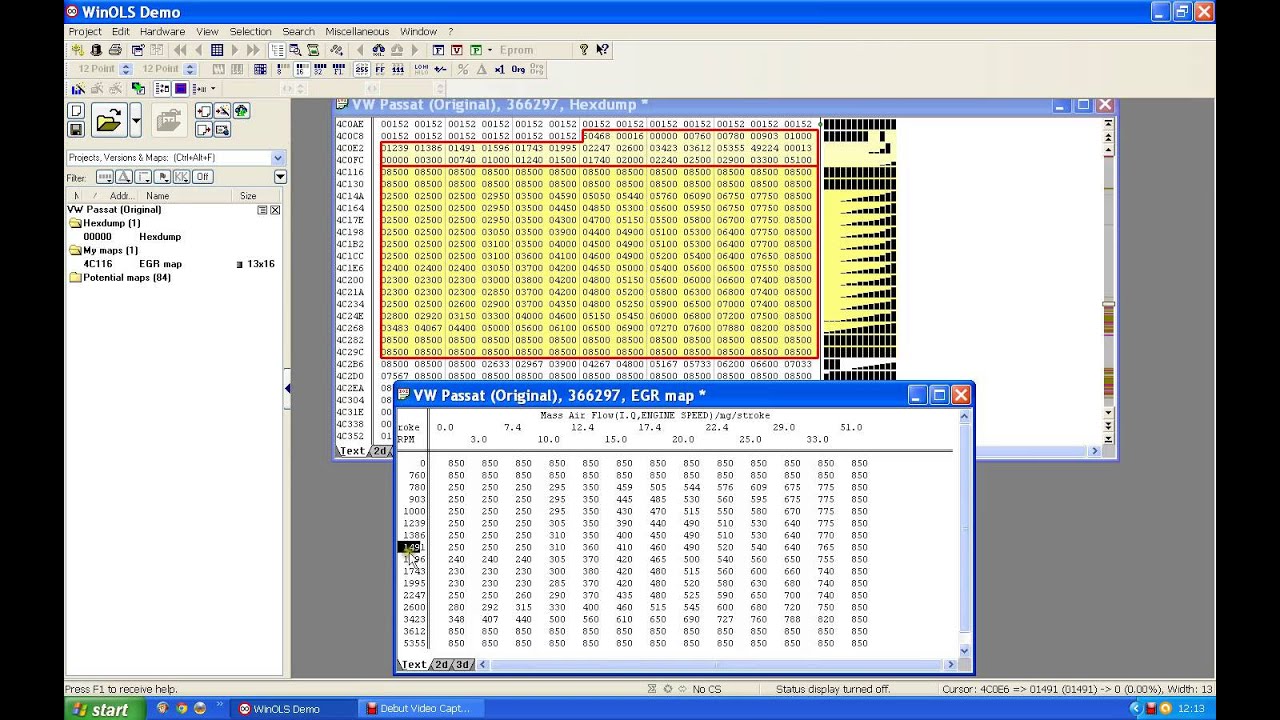
right now let's go and look and see what the smoke map is doing if we look at the smoke map our maximum which again I've highlighted in red is 58 mg so I might have been requesting 70 mg to inject but I'm not getting it the best I can manage is 58 and it's quite possible that much of the time depending on how I'm driving I won't even get 58 because obviously it depends where on the map I will be at any given time when I'm trying to accelerate through the gears but I'm being told
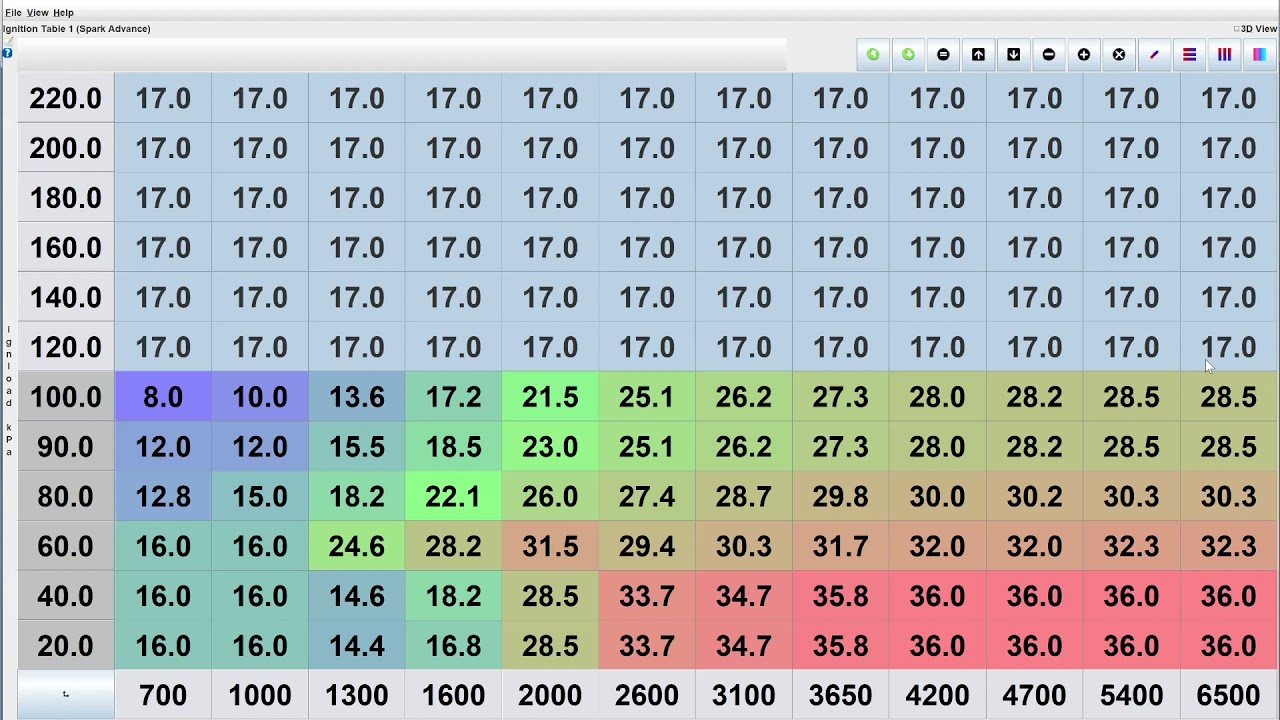
here that the maximum I'm going to get anyway is 58 now again ignoring this map here if I jump forward to the talk map I see something even stranger which is that as far as the Tor map is concerned between about 1,00 revs per minute and roughly 2,500 revs per minute the maximum injection quantity is going to be 52 mg per stroke so that 52 Mig per stroke is going to be fed into the duration Maps the duration maps are going to calculate a duration for the injection injectors to be open and that's what I'm
going to get maximum 52 so if we work our way backwards to the beginning again there we are we're requesting 70 the smoke map is saying no I'm going to limit that to 58 and the torque map is further going going to limit it back to 52 now just before I stop this session let's just run through and look at why we can ask for 70 here but when we get to here the smoke map is saying no no you can't have 70 because the available air and this is the air column remember the available
air for this fuel does not allow 470 so this amount of air is good for let's say 58 60 mg per stroke it is not good for 70 so therefore this map does not allow for it so you're being limited to 58 simply because this map doesn't allow enough air for 70 now I'll come back to that because that's the whole point of this yellow chart now when we get to the talk map the talk map May well be getting a message or or looking at the ECU figures and saying yes 58 is a Poss
possibility but the talk map is now saying now now 58 is not a possibility I'm going to limit to 52 so at the peak power point which is somewhere between 1900 and 2500 so this is our real peak point on one of these turbo diesels which just goes to show that all this acceleration up here or trying for more acceleration up here is not a big difference on a diesel we this is where all the power is we're being limited to 52 and in fact if we look what happens is we get a slow increase
in limitation in other words the am or an increase in non-imitation as it were so as we go up here these numbers are increasing so we are allowing more and more fuel to be injected and then it's gradually tailing away again and making less and less fuel available and why are we doing that well the designers have decided that if they allow this figure to continue or if they allow this figure to go higher you are going to damage the engine damage the gearbox break the clutch that sort of thing so in other words this
is all about longevity of the engine because if they sell you a car and the engine breaks straight away they're not going to be very popular so this is all about longevity of the engine right now that means that we can expect in our files to be able to go through them and say well okay what's the maximum at the moment for the driver's wish what's the maximum that the smoke map will allow what's the maximum that the Tor map will allow and we will usually find that the driver's wish is the highest allowable the
smoke map is the second highest allowable and the Tor map is the third in the row and that's usually the point at which there is some kind of stop to stop you damaging the engine uh is especially at different air pressures although they don't all have an air pressure range like this as you will have seen if you've looked at some of the other videos right now at this point you know then that if you want to do some kind of tuning or remapping whatever you want to call this you will be considering changing the
driver's wish or you may not because depending on what the driver's wish map has already got on it you might not need changing if you have change the driver's wish map you will then want to look at the next limitation which is the smoke map so you will probably want to change the smoke map and if you want to change the smoke map and give yourself a bit more performance available there you are almost certainly going to want to change the talk map to allow a little bit more power here so if you don't change
at least two of those these last two you obviously won't get the performance increase you think you're going to get because they are the two that are really limiting what's happening in this particular ECU now there are other maps that I've put on here but I'll come back to those in a moment because I will take each of those in turn and explain why they need to be looked at in the way they are looked at so I'll stop there


![Our TOP Haltech Tips and Tricks | Elite ESP Tuning Software [GOLD WEBINAR LESSON]](https://img.youtube.com/vi/0T__f0WWN4Y/maxresdefault.jpg)