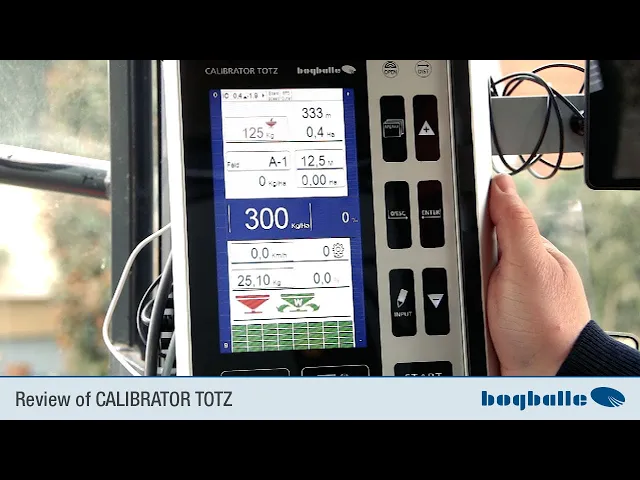
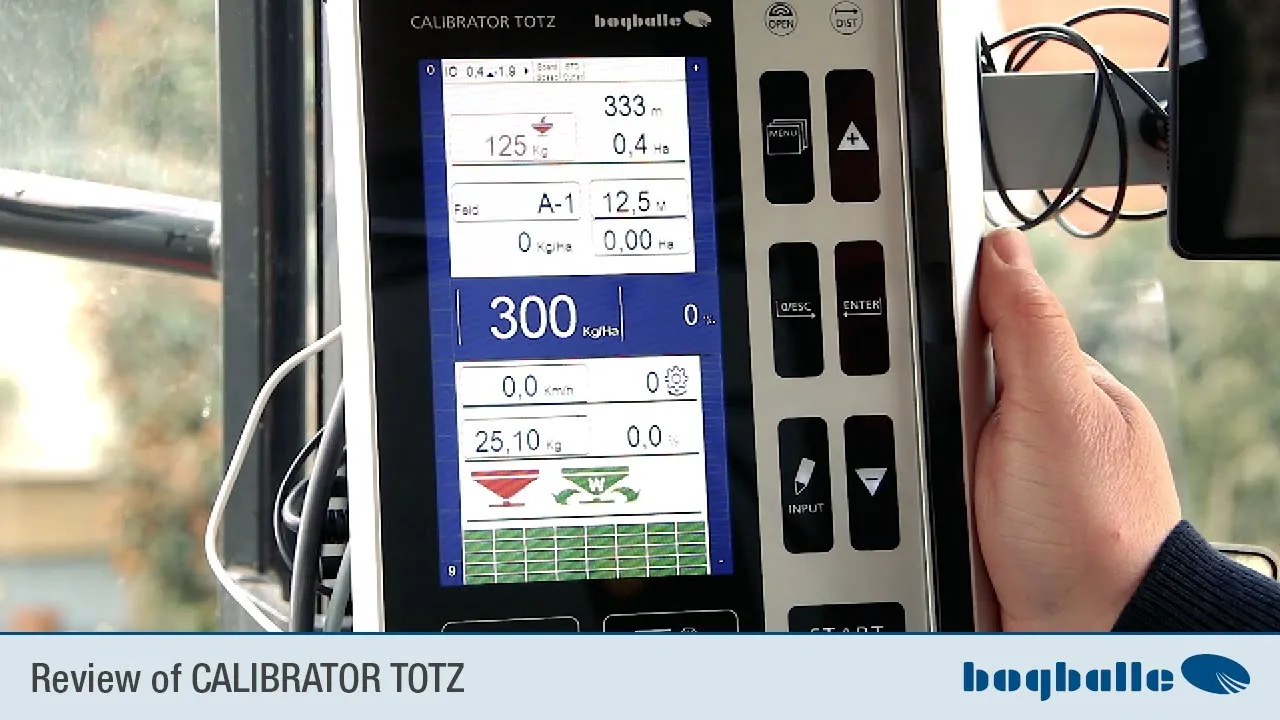
display which you also use when working with the Fertiliser spreader with the calibrator Totz despite seeing can we have here the big display we have Here you can use the function keys while you work We will probably use it sometime here a menu button we have an input here key plus minus zero escape and an enter button down here is the start stop button with which you start the actual controls or stop it doesn't matter where you put the button on it press the button that is a button that has Both functions alternately switch on
and off You can see what's going on in the menu is pressed, let's look at it first information on the display we have here The display we have up here where it says 0.2 and minus 2.0 with the small drop forward or up and to the right that's the inclination like that spreader is set now we have We looked at us earlier like the spreader in the Tilt is adjusted you can do that at the back make and then if they normal mechanical Top link, put the top link in the position They have a hydraulic
upper control arm you can if the spreader or bad one with the steering wheel on a flat surface Adjustment via the hydraulic toplinker from the tractor seat that's what it's for Tilt angle specified here is the first number the inclination in the direction of travel with the second number The arrow to the right is right left tilt like Of course, the spreader should always be set The toplinker strive to be the same length normal procedure as always is next to it sensor speed ie the control is now or that The on-board computer is now set
so that the speed above the normal impulse sensor is entered and behind it is standard outlet that is the can slide position so the outlet disc that is under the steering wheel which we previously changed to max have there is another reminder that which is now also set as standard and the diffuser disc or the outlet disc for The rear window is also standard position from that is correct we have Now here's one that's currently in the red and stuff like that an arrow into a fertiliser spreader weighing 125 kilograms will always be the current
remaining amount in the tank The container fill level is displayed to the right of this 0.4 hectares or 333 meters which is 0.4 hectares the area I have with this tank capacity The set amount can still be sprinkled 333 meters is the length of the tramlines that I have This tank contents can still be scattered underneath We have separated something here, it stands A-1 We have a small area of documentation We are integrated into the on-board computer have four a--b-c-d folders there with 100 each Actually there are 99 areas and a sum of which you
can use how to do it I'll show you now, we'll have it again As a reminder, the set working width currently set to twelve meters 50 We have storage on these surfaces here Scattered average amount of electricity in kilos per hectare on the already on these areas memory scattered amount of at the moment Of course 0.0 hectares because we haven't spread it yet Below here is the amount of average in kilograms per hectare that is the set basic amount But you can always talk about these plus and minus Schalke circuit can still vary Do you
have a percentage that simply indicates by how much percent is it now compared to that set reason default i.e. kilos per hectare default set if you on plus If you press it, you will immediately see the whole thing green up means you have an increase in the set amount of spreading by five percent, that means something now not the basic amount that is set was from 300 kilos but take out 315 kilos you can easily adjust it using the null escape button or also via the minus button if we press - the whole thing will
red simply as a reminder of her that it is in currently less than what was actually set Amount of spreading realized on the field how to take it imagination back out via impression to zero escape we have the kilometers per under here hour i.e. how driving speed was measured is currently displayed as shown above via a speed sensor, i.e. via a built-in one sensor on the cardan shaft or on the front wheel The pins have the speed displayed here will now of course be zero because of the cell spreader says PTO is not turned on
have a huge factor here or actually Abort roben value that applies to the spread chart from the litter table it read what I would always recommend and here behind This percentage simply indicates to what extent This value changes as we work We don't just use weighing technology to be precise to know the tank contents shown above but we use the cradle technicians above all to the huge ability of the fertiliser the outlet to measure the behavior of the fertiliser in the field the measured transfer due to the changed or a possible altered giant ability That
means constantly adjusting the fertiliser if the fully automatic low dosage is switched on, this value will increase on average That means we have to change about every 25 kilograms Very often the weight in the tank is actually online and whenever 25 kilos have been spread, the huge ability of fertiliser in this last 25 Kilogram interval recalculated and automatically adapted here to what the transfer also Constantly being corrected is very important shows the percentage of how this value changes while working so you just get a feeling get for it like homogeneous or inhomogeneous is my fertiliser,
what does the litter actually do? below we have different functionalities symbols three pieces of these on the left side This now red spreader simply means whether the tax or run you can read whether the spreader straight spreads or not spreads now of course The spreader spreads isn't true we were created That means at fun driving speed 0 kilograms We couldn't spread it without further ado Spreader detects at zero kilometers per hour It is not allowed to vary the driving speed because he is standing in the middle The symbol is important and should always be green
and this cannot be recognized on it This means that the fertiliser is fully automatic Dosage is activated, which means success now constantly a comparison between the spread quantity and the controlled area ie the giants ability of this behavior of the fertiliser constantly monitored and the dose transferred adapted to this here on the far right we have the at the moment no symbol here would then if It's completely switched to grand straws normal border symbol can be seen what we also We'll switch gears right away then here But I want the function keys a little bit
later we explain leaving once the basic setting through from the spreader and you do it via this one up here menu button that means we're going to go there now When we press the menu button a opens menu logically hence the name menu button we The attitude here at the top is that we are coming go into the settings and we can see here You can set the language here, that's it currently in German here when we go in if you can still do it in English Just put them here in lengths with stretches that
is the list of languages that are installed and then you just go to the German language and everything is written in German we have then I'll go back to the menu button The setting we then have is the LCD backlight This is simply the brightness of the display and you can down here on the screen also accompanies the brightness of the keyboard in the We need to set the basic lighting now can't do that looks quite good here You can also set the date and time is already done in the company that needs we don't
look at each other now we have here as Number four the percent step setting that It is very important that you set it up always default you see that opens here the menu where you can see the percentage presentation the amount of litter is preset That's actually always five percent here is displayed here using the plus and minus buttons Can I change the setting? Everyone has to Decide for yourself what is best for you attitude is I would do that for myself first Set it to ten percent so you can see how does that work
in terms of attitude but that is freely selectable up to 25 percent if you confirm with enter that a press the plus button exactly ten percent more or less quantity you can now in The amount was ten percent higher than that Basic set amount ten percent high or downregulate 0 escape take it out again then We have it here in the menu in the settings The kilogram step setting doesn't count for load cell spreader but you could here when you are at the wheel loaded with big packs Without weighing technology, sprinkle this on 600 kilos
every key press at a possible with filling 600 kilos corresponds to we have the meta step Attitude is something you also have to do should adjust and we have a wedge function that I will explain later in the menu and Here you set the meta step setting just how many meters less amount spread should be once you click on the wedge function My recommendation is to press minus or plus always take an eighth of the working width Because that's exactly what happens when you drive with GPS Eighth of a section in section control corresponds to
automated section control at twelve meters that becomes exactly 1.5 meters and you would also set it here so that with four main functions or main section the right side and four main sections on the So an eighth of the left side is always working Set the working width there and that's what makes it work Most sense then that is exactly compliant with the section control shown below So how many sections are switched on or are turned off then we have Here in the menu in the settings Bild Schirmbeck leaders had already explained We need that
brightness from the display now don't make surf com active here respectively You can set this to not active here, which means simply that you have a smaller area documentation has thereby become the writing Displayed a little larger, we'll leave it for now once active then we have the intended one here setting at the foreground setting can we set that the spreader at one automated section control via GPS regardless of whether tablet or with other external systems such as example matrix from Teejet or others systems that we do not have the basic setting use that we
have programmed but everyone can if he thinks it is right, the amount Open the spreader sooner or later when setting start or close completely if there is a hiring freeze It's easy to do, you just go to the number So here we are now at the setting from the start and if we now press plus but I I pressed plus twice and now we have two meter that means the spreader starts now two meters later than the default setting is mine In my opinion, I would always do it at zero let's have thousands of spreading
test made where we measured exactly due to overlapping images so overlapping images of spray curves where the optimal point for adjustment and to exhibit is I would only really Set it differently if you have very specific things maybe sprinkle or if they who have experienced that they are alive was a little denser in the pre-profits area or a little less close to the front area I want to go here with 0 escape as always out again because that's what I want right now Don't imagine that there is only one possibility which I would like to
show you then they have Here in the menu button in the settings the differential control if you sometime Application maps can be used with our tablet story that we will introduce later if it is available or with it other terminals that are external to it Then you can always check if there are differences Set whether you want a symmetrical distribution and would like to adjust the quantity or whether you want to sprinkle other amounts on the right on the left I ask you to always keep in mind that which of course also leads to streaks
can because she is her right one more appropriate as left I'll be careful with and that Maybe just try it in one field first but if so, just post it here in which you press dynamic control That's how it's set now, I'll set it up but back to standard control again This means you sprinkle the same amount on the right left when you drive off application maps because that actually makes more sense here to do it like this down here at the differential control because the zones have different amounts Yes, not everyone drive along the
tramline but As a rule, the structures are somehow enter in the field that's why we do it here the symmetrical application and leave that too as standard setting just stand then have we here in the mine function the settings which you set up here, go through all of them and go to the spreader type here is just too Check what kind of spreader type is used We have now set up an M35W and he asks me automatically like the can pushers or the outlet disc is adjusted at the rear Here you can then do the
grid again adjust this at the back before you have selected it Sprinkle very large amounts max or max plus or current of small amounts min or at the micro grenades granules at the micro the facility How do we leave this as standard now because of that? spreader is set that way then we have Here in the menu functions the outlet position which is nothing other than what we already have I've only seen them once, but they don't have to be there You can also take a detour via the spreader type You can directly select which
outlet slider position here preselected back in front of selected have to do this here in the electronics understand, we're leaving here again We now have the speed input here and is Of course important because if you don't have GPS You have to drive somewhere on the tractor Danger, measuring speed, this can be done once via a signal socket which normally In the tractor with the newer ones, everywhere Inside is a standardized 7-pin signal socket that is where the impulses come from we offer As an accessory, an adapter cable is available for this if you have
installed that so that's what's behind here you can see it back here now in the However, an impulse is installed at the moment sensors that means if you click on the speed here Entrance go the possibilities like that speed can be measured you can have on each type of speedometer 2 storage spaces you have here in the impulse sensor pulse sensor b you could have two there Save different tires or two Save different trains when you are in care tugs have you have radar here and radar you have signal socket here a and b if
you want the speed directly from Remove the teaching signal socket in the tractor you can come here at any time if all else fails You can enter a fixed speed here input via serial rs232 go if you have a They also have an external GPS system do the section control then it does it naturally always the actual real speed measured via GPS here also to save and to lose weight then we offer a small, simple one GPS antenna on as a speed sensor So you don't have to move a sensor on the tractor has the
advantage especially when changing tractors if you also use old farm tractors for that You don't need an extra transmitter for maintenance work But you can simply use a GPS antenna. Put it on and the speed will be direct taken from this we said we working here with a pulse sensor so show I'll briefly show you how to calibrate That's why we go here on the desk sensor we now have a counter module here, that is You are now driving to a known measuring route have to stretch once is recommended 100 meters is the easiest way
to calculate So put yourself at the beginning of the known ones Press measuring distance for three seconds 0 escape then If it's the same beep then the number is back set to zero and now they drive exactly one known route and this counter module counts the impulses like on this well-known route Coming up more precisely at the end of the route they stay resist taken west simply with the middle front wheel stop again at the marking then the pulse counter has certain pulses counted and they simply share the ones shown the counted pulses through the
traveled meters That's why it makes sense to do it at 100 meters If you have a long enough distance and you can It's very easy to add a decimal point by two places to slip to the left we already have that here That was 157 pulses per 100 meters Here we have the plus minus button Value stated with 1.57 pulses per meter if Once done, confirm the whole thing enter the same way you make them calibrated if you do that via the signal socket press again in one fluid pass The menu button now takes you
to the beginning These known measuring distances then work out the speed input whenever you go here on the speed input and the signal socket have selected, the pulse counter starts at zero So it makes most sense to count on position at the beginning of the route then go You enter this menu exactly 100 meters and can then use the plus minus keyboard Enter the pulses when you receive the signals Socket work is usually done like this That would be around 13,14,000 pulses at 100 meters This corresponds to 130 - 140 pulses per meter Simply set
plus or minus here and then with I just do that we walk away so that exactly the standards would be implemented 130 pulses per meter is what I set now once on and they look up the longer you go The more the plus button stays on it, the further it travels the numbers to the left are moving now We're already here at the tens number of this one moves and that's a bit of a matter of practice that you get exactly the right number sometimes faster, sometimes slower, how that counts now we immediately set it
to 130 pulses per meter that we just measured 130,93 was calibrated according to ours with it the speed measurement is complete if you check the speed directly via GPS You don't have to provide any information but that will happen when you find the right one Type of speed measurement selected have automatically in driving speed implemented and here as driving speed displayed when we then press the menu button again Going in is our next point here Calibration of the actuator actuator will be at us the electric servomotors called that is the main metering actuator that is
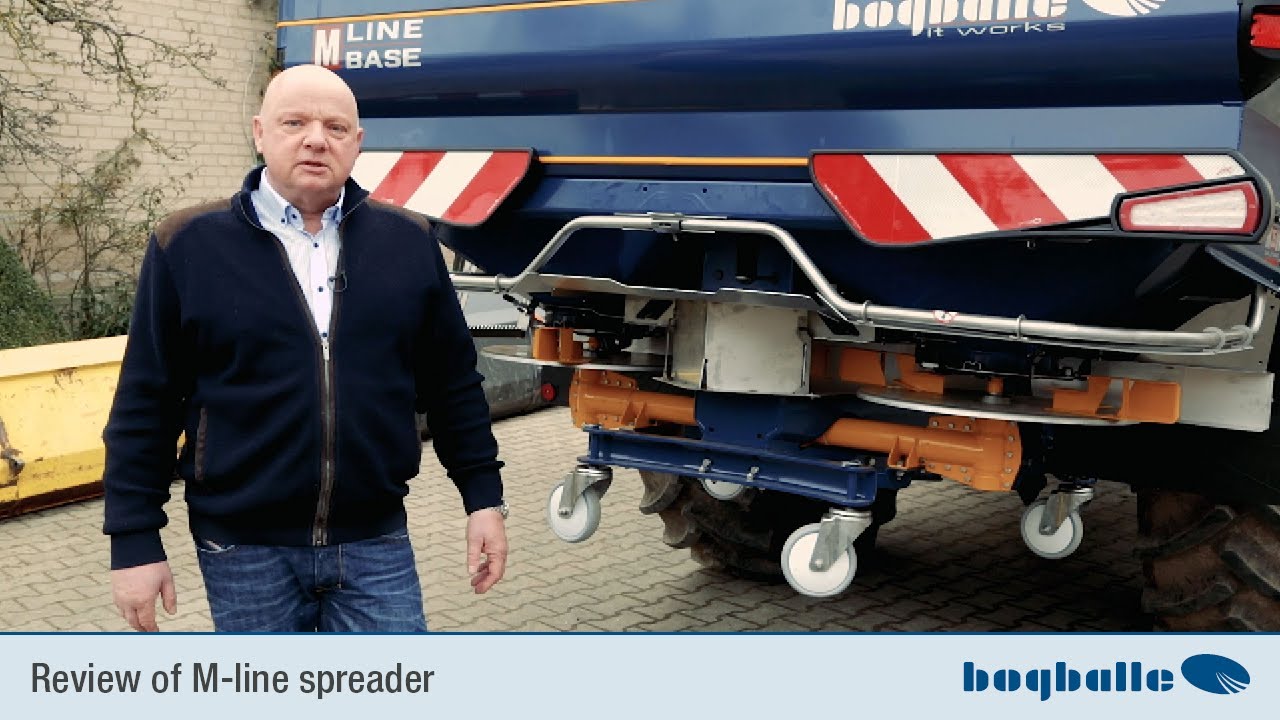
the motor who opens and closes the lever to get the right one The amount to be dosed in the field is done in the factory Of course, this has always been done with new spreader been realized we always show that gladly because it makes perfect sense for once in the year when you take the spreader out of winter storage To do this again, the scales have to be used stopper that we saw earlier, exactly at position nine it is exactly at position nine be fixed if you now clock in the menu enter like you just
did press just enter here now you can Looking backwards at the wheel is now moving metered slider goes against position 9 The scale stopper detects that the current strength goes up because it is against the mechanical resistance tries to fight and goes back again This means that the scale has been read in and you see that here the spreader already you know where this can lever is, that's what it needs Of course, to get the right amount on the field dose and precisely calibrated for this process This scale stopper must be at the back of
the can He is standing in position nine Now says okay, that was successful we confirm that with enter that was the calibration of actuator now we have here in the menu function as the next point the calibration the weighing cell that is very important They will have to do it from time to time because every electronic scale changes a bit due to temperature or other things external influences you know that when you have one Press a budget question or postal vote or a bathroom scale and you switch it on scale on always flashes and starts
then at zero we can't do that at switch on start at zero because of course we don't know if they have any younger ones in the tank or not that's why this has to be zero point Calibration must be done by hand from time to time or done manually that means we now have an accurate weight calibration Work done but we do the calibration in the factory without all the tank attachments because we Don't know what size the spreader will be That's why it's used by you He now also weighs 125 kilograms here It's not
true that there is now fertiliser in the tank all the tank attachments and accessories a spread was installed corresponds to one weight of 125 kilograms that is natural If we want to spread fertiliser now, it's wrong If spread like that now, the only result would be that The weight display is always around 125 kilograms Too much and none of the effects on the accuracy or summed quantities Because everything is always based on weight differences works and these weight differences stay true to me even if everything is around 125 kilograms shifted is what we want Now
set the weight to zero because he spreader is now empty with accessories attached To do this you go into the menu function and we go then here in the calibration of the weighing cell purely we have three options here what we we can have a complete once Calibration has already been done at the factory We have a zero setting here and we have a factory setting at full Calibration starts when the spreader is empty You have complete calibration here and the tax says you feel at least 500 kilos we have confirmed in the first step
that the beam is now one would one Fill in known weight and then him Tell us how many kilos that was would be a complete calibration the lead not through now because we know the spreader is calibrated super accurately but we go Cancel out of here with 0 escape and we leave again to get a zero point setting So we're going to go back to calibration weighing cell you can see here that the second point I can also go down with the cursor here but so far and in the zero point setting go in and
we have the spreader empty Zero point setting was successful if we Now accept this value so just enter press then we have the weight back to zero put back and you can see that the spreader if it is empty it also shows 0 again all else fails and they fill with fertiliser 1600 liter spreader as an example and that shows Five tons that can't be that much Didn't fit in at all then you can change the weight Always reset to factory settings This means you simply go into the menu here function you say calibration weighing
cell You go into the factory settings and confirm with enter and continue and we now accept this step and Now it shows the exact weight again but of course 125 kilograms again for them Here in this case there are built-in tank attachments means you have to reset again now Very simple menu whether you now calibrate the weighing cell Click on the cell directly or with the cursor there go to it and confirm with enter that is No matter that has the same function we go Now here again to the zero point setting see that confirm
that with enter and press Enter again to set this zero point accept and you see he shows here again If the tank is empty then we have zero in the menus Function a tank sensor for those who don't like that cells spreader that it is so slightly grayish here written hatched that just means that you can't use it now because over the You will always see weighing technology accurately How much money container contents are still there? have whatever history is important here The inclination calibration of each control has been installed a tilt sensor actually has
a tilt and vibration sensors to detect vibrations of the to filter out spreaders because of course they are influence the weight measurements and about the inclination at the same time as the weight Each cell can only measure the vertical load on the like the cell need to save This inclination of the stream has to be done at an angle We correct this by adjusting the inclination Of course, you have to measure the inclination at the same time be correct if you have a special calibration They would want to do special calibrations Go in and align
the spreader horizontally beforehand It's best to use a water cart for a short time It's easiest on flat ground He now shows us what he thinks and how many he has an inclination if we press enter now If we didn't do something, he would be here now show 0 again we don't need to do that the first time you use it because we know that we did that in the factory and that one very accurate tilt calibration has been so now we go with 0 escape simple out again they have another point in the menu
history a test mode if we If you go in we can see everything here We can just test it as one Example of testing the dosing actuator you see Here if we go in to the tractor A2 scale Scaling that means two pins that can be seen here are down here is the scaling from zero to nine on it again dosed or the whole thing again system also has the setting from 0 to 9 and if you now set the upper one, for example on two that means I have now specified that the dosier slider
opens by two then you can see it very nicely here it now shows in the lower scale what it is The on-board computer thinks how it has set it up that agrees and if that's still behind The dosage scale also says knowledge on two She says that everything is right, that everything is completely normal If it runs we can go back above zero escape that you can just give an example like that the whole thing moves and keeps looking at us in the menu functions here this data transfer if Please do a software update, you
have it here Below in the picture with this dust group secured or protected by a USB port Then you download the software from us on the homepage which is available free of charge at any time for the calibrater Totz despite down and then can Insert the USB stick with this software here If you then go to data transfer you would Select the point update despite from the USB stick that's the first item on the program if you then Pressing enter showed him what was on the USB stick but of course he's showing me one now
Error message because we don't have a USB stick here inserted into the usb stick Removed from the USB port and plugged the stick back in or restart with enter or escape with 0 cancel we'll cancel this now you would The arrow can select and then installed The software itself is also exactly in place the operating instructions like everything else We also have the menu function in there explained we said here that we have another one input function have when we go to the import function we now have the active field number one on which we
can edit Enter a new field here and it will open the button that we have the A-B-C-D folder here So these are four folder, for example as barley wheat or fruit can take that they have the different fields on it or what a lot of people do besides just that first fertilisation on all fields on the folder A second B third C fertilisation correspondingly tough and the fourth fertiliser later on the folder D that can They do what they want, they don't have to use this is an option you can use to what extent this
fits into your operational process You have to decide for yourself when you start a new field If you want to do this using folder A, just go here new field I now want to be on field number two work and say enter now you have them here Area data that is on field number two They have 300 kilos of fertiliser up here per hectare you have the calibration value here except stray table pretend you can have the working width you could still enter one planned area you don't have to go over it here the surface
structures make you can do that I'll show you the whole thing again The easier way is to delete the input Now we haven't adjusted anything and we're working Now press 0 escape again and we'll work Now you can do the quantities on area A1 also give at any time via a direct Access via the touch display that means all You can pay numbers that have a border here select directly via the touch display now on field one if I want to change that I'll just go here I say man I want to edit on folder
or somewhere else He wants a new field and an existing one edit field now we'll just take that existing field A 1 I pressed wrong I we have to go back so we go here and we are here on the existing field one if I press enter and it shows me the scatter data all on and if I now with the cursor on I can easily get the scatter amount here via the Plus and minus buttons change the amount of scatter amount I'm now 320 kilos, I imagine that here on 320 ein or of course
I can do that too Just enter 320 kilograms with enter here confirm then the amount of scatter amount is set I can tell you the scatter value and the downforce value Distracted table in front of give I just go on it and say I want the lime amon now Scattering kalkar poppies that I have, for example 23.1 which I chose is important up here 23.1 confirm with enter then it is set if I asked the whole thing here again now security depends on whether I'm on the standard or max Position I work but standard so
give I just let the authorities know and I can Now just click on save entry down here go and the whole thing is saved I have The output value changed to 23.1 the amount of scatter amount lied to 320 if I didn't have these areas Of course I have the functions I want Possibility of both the flows kilos per hectare as well also the downforce value via direct access That means you want to set it via the touch display I change the amount of scatter amount without changing the areas documentation to somehow change or in
the I just go to work on area documentation on the amount of scatter amount, put the button on it once and I now want to spread 350 kilos so I give it to you Simply the 350 1 consists of the whole thing enter and the 350 kilos are taken over, exactly that same thing at the calibration quantity story he asks me about it I want to be sure that calibration quantity is worth it again for the standard setting at the rear the spout slide or rather take it from the back then I confirm that here
by pressing a button on it and now just enter my 23.2 just that I simply specified a different number is important Here someone had to stand at 23.2 and I confirm then enter the whole thing so you can do this Simply specify values via direct access So there is no reference to the values on the touch display A detour via the info input keyboard is necessary and of course that makes the whole input a lot much easier than it could otherwise be, well me I explained the info button we now have Here again in the
display I will explain briefly again what you can enter directly on the display Once the functions have been filled here, that is Before I fill up the spreader, I can just do it press the kilogram here and I want now fill one and he shows me what he has filled so far filled to the same level as before filling is the current content now and the difference Of course that's what I felt and this is done by pressing enter when I do that Of course, confirm the transfer amount Of course we can't add them up
now because we can't import fertiliser now but it's quite simple here you have to do this Don't press the button every time you use it fill the spreader but rather that it is automated programmed, that is, at that moment where They weigh more than 200 kilograms then the on-board computer jumps into the steering wheel On-board computer automatically enters this filling menu If you're full you don't have to pay spreader now Simply confirm with enter and fill it's done, he'll show you everything again briefly that you should please think about it Lock the ladder properly and
push it in and the same if you have ladders at the back larger controls that we fold them up that that not in the current in it stray electricity in it hangs it If you've done it, say okay, then it's done So you can fill the menu here at any time but you don't have to open it if the He will recognize the spreader notice automatically as filling and the menu jumps by itself that they only have to suppress if you ever repaired something on the steering wheel and Maybe there were two or three people
in there Of course you have the opportunity, I'll show you that Fill it in here again at any time if he jumped into the menu on his own null escape to cancel then of course the one filled quantities or the people have not stood on it as filling registered but jumps back normally back the fields we have already said we You can also change the working width here at any time the hectares through direct access here Simply choose the working width here record the previously set working width I'll just switch to 15 meters now 15
please make sure that the correct 0 is here are now we have 15 meters specified confirm that with enter he took over this here hectar then just showed how many now has spread and when we put it back on If we want to set zero, we can now simply set three Press escape for seconds 0 and that's it We delete zero field information again confirm that with enter then it would work again I think the number of hectares should start at zero that it has now become clear and I'm leaving just go back to the
normal display We now have the function keys down here these are our section when I'm in the section control area work and we have here now our function keys that we take a close look at They must have 2 wedge buttons up here and there The difference simply arises from whether one like now here in this scattering section control standard mode works means that you just an intelligent quantity adjustment to the remaining area then they are Both buttons are switched exactly identically means if I can't fall into it now If I press one of the
two buttons it doesn't matter which he shows me the set spread width and we set it up so that earlier I an eight every key press is accurate an eighth of the spread I can now do that Simply reduce the amount in the same ratio The actual spread width also changes in the germ or with the last normal fans before the border punishable as long as there is zero, I can just do that take it out again turns on the full working width I have finished the section control dynamics system installed then they are Both
wedge buttons are assigned differently I then press the left button if it is part of the left The right cold button starts when there is no one start on the right ie if I open it here There is a window in which there is an eighth beam is also displayed and by every key press can I then create a section on this right button from the right start to switch off with this Left button then start from the left to switch off So I'll switch accordingly down here one main section one section at a time
after the other one I have this under here Here is a tray under the fertiliser spreader Synonymous with an abortion robe when I'm here Go to it and the turn off menu appears I have the option of fully automatic here I can take the dosage again here Calibration quantity worth which I also directly talked about I can set the display manually downforce robe make I can the litter tables Enter a value or an S indicator value where None of this is necessary with weighing technology Everyone is simply aware of the calibration value and I always
leave it on fully automatic that down here so if I in normal I I want to continue using it when I'm in normal mode display bin should this green sign this Stray spreaders with the neither inside are always active his so that I know that he is constantly comparing between the amount spread and the spread area and always corrects this calibration value that means this value will constantly change Behind it you will see the percentage you can set this function key here I have my function key for the border here scattering is therefore an unwound
one to the right angled scatter picture at the back when I'm here The ceding opens on it, it's not nonsense the turning menu is not but as a limit menu I have the options here to spread normally I can spread from the alley to the border means if the first border road with the half the normal distance from the world border is removed or if the is installed I can also use this as an accessory from the border Sprinkle, that's an optional extra, then it works At the back of the wheel a small one shone
straight down and the right window remains closed means that I then only put the fertiliser from the border into the Feld reinsch faithful for example on the water or Many vegetable companies do this simply for that reason this option because if I like here in this case only that has the limit is half of normal workflow so that passengers keep their distance This is half the distance at the border road Given the limit, I then just go to it limit confirm the whole thing with enter and you can Now we can hear the direction of
rotation in the back of the engine of the gearbox and now shows me now Here too, this function symbol borders spread that he is on the borderline radiation if I want to put it back I'll go I simply click on the limit function here again Then say spread normally here and can do that sometimes confirm this again briefly Here is simply an indication that the PTO shaft must be stationary for as long as the PTO shaft is running would say stop here or also I switch on the pin speed to be displayed Nothing happens wrong,
it's whether a window open and there is the error message Please turn off the PTO shaft first How to take off the drive shaft before using the trend function We want to activate it, so it's normal to spread confirms that normal current with enter and you hear behind and here you can see that the engine is moves the motor is finished moving and we are back in normal spreading mode that this functional symbol is now complete gone, yes, that was pretty much the whole thing Control we have two more buttons up here and Although that
is the open function when I use this When you press functions, the control opens completely setup 9 he now tells me this function the slider will open you want to continue yes, the dossiers about will now be fully opened and I can clean the spreader or take everything out Let it run for emptying the remaining quantities we looked at the mechanicals behind the wheel if not press older again or I just Of course, the spreader will drive off automatically also closed again we have a distance here Function when you scatter without GPS is completely normal
standard then you can use these distance functions Use this to find the optimal switching point define that means when they scatter they make Close the spreader if you forget to check the cross to drive briefly onto the designated lane before they drive around that means catch them It is best to turn the spreader on About the start stop function when you get out driving then it's usually about half that Working width plus 6-7 meters as a fist number can they say that after a working width behind the cross forgotten the spreader completely open will have
to be fully open, that is, if they Here the distance functions counted down here always from the time of printing the function or button the meter goes further Back light, they're driving now, so I'm still going Let's drive out of here now from the front area Passenger out you can press any dance and after half a working width plus 6-7 meter just press the city function They can actually feel quite well get in where the spreader is optimal It should be opened in relation to the front area Passenger this is just a tool you need
not not use the important thing is that the spreader forget about a working width behind the cross is fully open, which is always optimal Opening process should be at about seven meters After half the working width, this works well We have explained the on-board computer completely That was of course much more detailed than you would expect actually needs a company if you are in now are operating and want to drive as normal then we will now give it again completely Just before you check here again, it's really cool the inclination setting up here at the
as you the first value is the important one you have Here is a help function, press it again away if so up here on calibra gate despite crutches, the help function appears, which is easy to use The submenus can provide some explanation We don't want to delve into that any further now You can easily do it yourself, so if you have a tendency Check whether the setting is in the spreader table corresponds corresponds to a horizontal floor then Also check the working width and the amount of electricity check and adjust and the scatter value or
the downforce value from the scatter table Set when you start with borderline dreams what Of course it makes sense to just look at it The desired function goes to the grants Select and confirm with enter and you can get started after 25 kilograms of tight change comes Here someone else fended it off, of course can be much more precise than the default if When you have finished the small controls, press again to confirm normal spreading with enter and start spreading normally again the moment you move closer instead If it brings up the source of error,
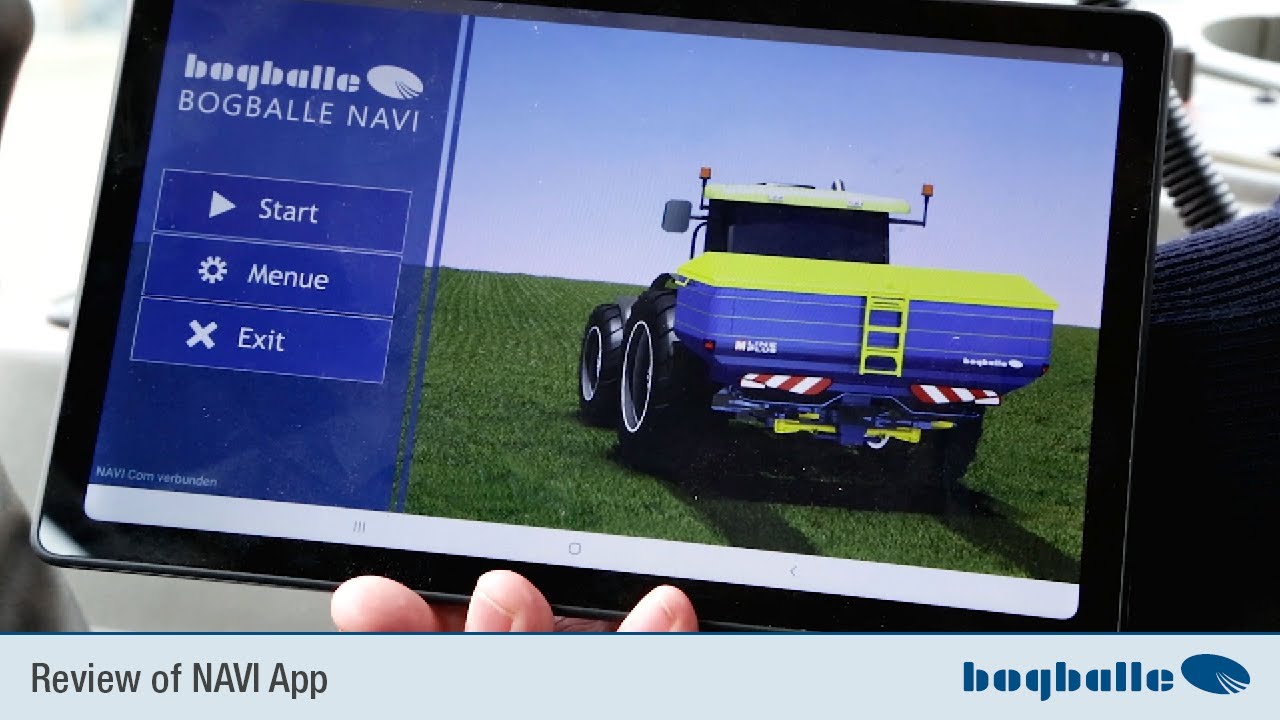
the speed turns red displayed driving speed and displayed in red but you can see the green spreader here and the two cases that the spreader now is in straw mode and if we were to drive off He would open it apparently normally and Also spread fertilizer, yes, that was on a large scale whole of the on-board computer from the declaration who We've gone through all the points and have the On-board computer is actually completely explain look at us when we use the app and drive what we need and that on the tablet Above all, this
navi com module is you I see the navi com module comes once a cable out which you can take with you to the Disconnect the power plug from the on-board computer There are two cables that can be connected to the school plus and minus are clamped here A USB port to provide power to the tablet to provide them with which they then work here The navigation app comes internally, which is part of it Included in delivery of the navigon modules This is where the antenna comes in and that's it serial interface cable what from below
is plugged into the on-board computer like you are see this when these things are connected This navi com module is easy Clamped into the holder at the back That's all you have to do both free serial ports can for an N-sensor recordings or connecting one N sensors or other electronic systems which you can also combine with this if we then have that connected we can let's deal with the actual app the tablet and this is explained below