hi I'm Shannon and in this episode of tools 101 we're going to cut through all the basics of this very popular power tool the miter saw to ensure you operate your saw safely and properly it's important to understand all of the basic features and settings we'll also answer some basic questions you may have such as what kind of cuts can I make with my miter saw or what size blade will I need for my project welcome to Ryobi tools 101 now before we get started be sure to subscribe and click that notification Bell so you're
the first to see videos on new product announcements DIY tips project ideas and so much more let's begin with a simple question what is a miter saw used for quick accurate Cuts in wood by positioning a mounted blade to cut through your workpiece material sizes range from seven and a quarter up to 12 inches which is in reference to the blade size itself each size will determine the different width and depth you can cut your miter saw will give you the ability to complete different types of cuts and while these may seem similar it's important
to understand the differences as they relate to your project needs let's begin with a cross cut and this is the cut made with the blade running across the grain while going through the width of your material next is a miter cut these are Cuts made with the blade entering and cutting through the top or face of your material at any angle other than 90 degrees next is a bevel cut which is a cut made with the blade entering through the thickness or inside the wood at any angle other than 90 degrees you'll find bevel Cuts
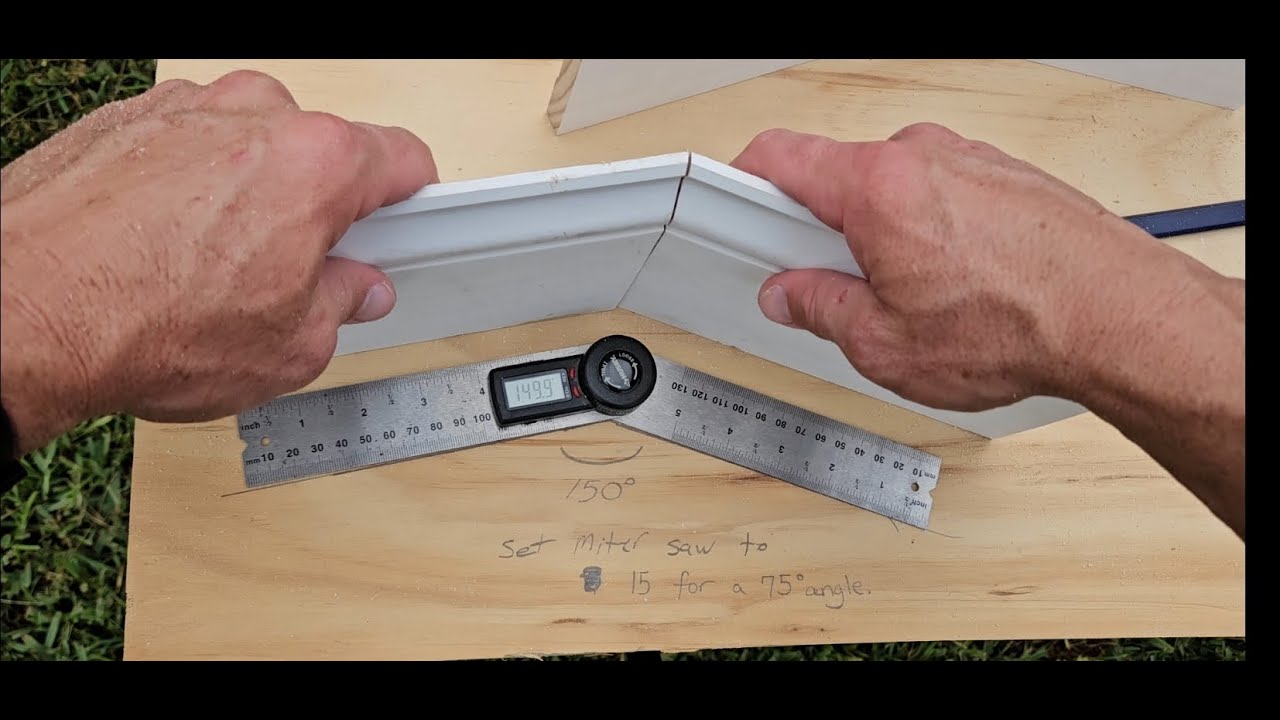
useful in a project for instance where you need to attempt to seamlessly meet two pieces of let's say crown molding in a room where one piece wasn't long enough to reach the other side of the room here you would just cut a 45 degree bevel angle on each of your two work pieces opposite facing and they will slide overlap right perfectly into one another's bevel Cuts this is the same concept used for french cleats next is your compound cut and this is a cut made using both the miter and bevel angle together you would use
this type of cut on crown molding for instance where your two pieces that meet in the corner of the room need that clean joint together last is your slide cut a slide cut is designed to cut on the push stroke some common applications or places you'd use your miter saw would be when you need to make cuts that are precise and clean such as in joints framing boards window or door trim crown molding baseboards or even in projects like decking [Applause] now let's walk through all the features and settings in your miter saw breaking it
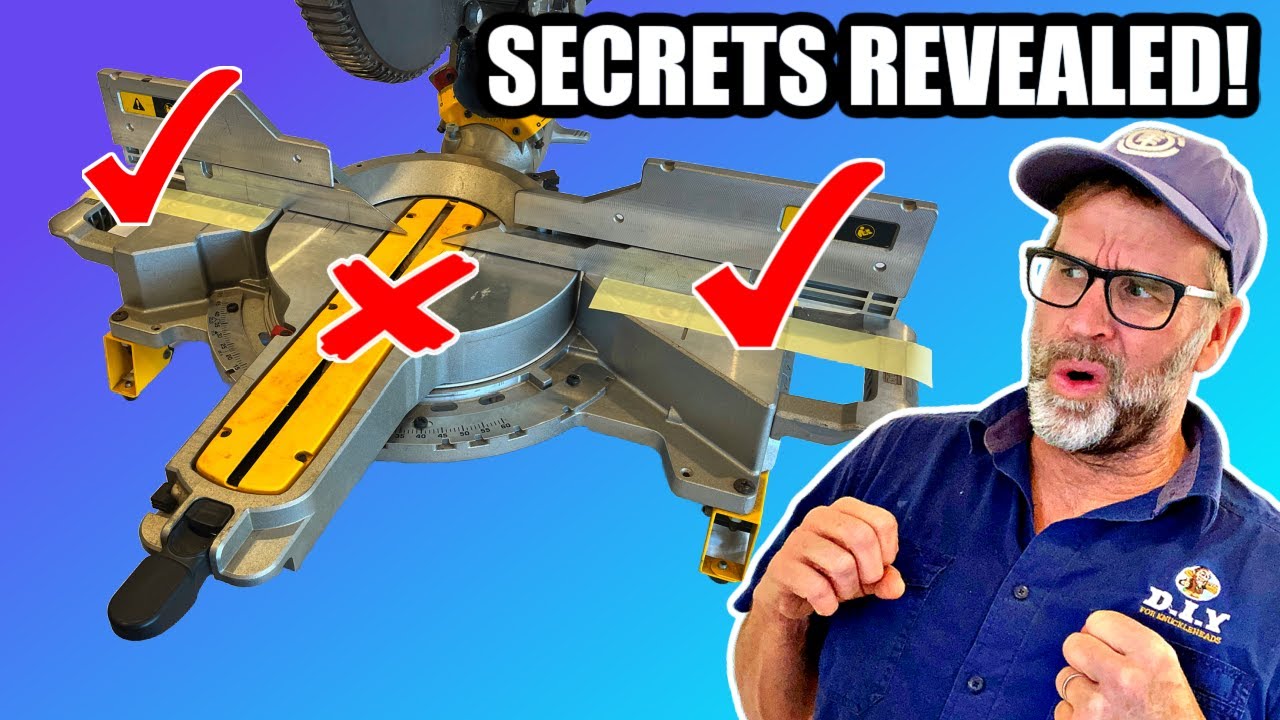
up into three parts beginning with your stationary features then adjustable and finally the attachable pieces that come included in your box first you have your miter fence this is used to hold your work piece securely against when making all your cuts the miter scale measures the miter angle with index points provided at most common angles such as 0 degrees 15 degrees 22.5 degrees 31.6 degrees and 45 degrees the bevel scale measures the bevel angles at those same points [Music] the support foot supports the front of the miter saw these slide bars are used for cutting
various work piece widths as they allow the saw arm to Glide forward and backward at the length of the slide bars this is what will make it possible to cut wider work pieces because it increases the Saw's reach capacity the slide lock knob locks and unlocks the sliding feature of this tool this feature can be locked in certain locations to help cut crown molding and baseboard the self-retracting lower blade guard provides protection from both sides of the blade and will retract over the upper blade guard as the saw is engaged and lowered onto the workpiece
now taking a look at adjustable features we start with the switch trigger which prevents the saw from engaging or turning on until you depress the trigger lockout lever while simultaneously squeezing the switch trigger this led switch which can be found on our HP brushless unit is used to activate the LED lighting system which will project a shadow of the blade to indicate precisely where the blade teeth will make contact onto the workpiece this will show you the curve of the blade on the material you are cutting and this certainly is needed in precise Cuts where
you need to take the guesswork out of wondering where exactly the blade is going to cut the miter lock handle securely locks the saw at the desired miter angles the detect release lever is used to adjust the miter angle until stopping on the detents on the miter scale while the d10 override allows the miter table to move freely to any desired angle without stopping on the detents this provides an option to accurately cut any uncommon angles that you may encounter for instance when cutting crown molding for a home whose walls are not perfectly straight or
level the spin the lock button locks the spindle and keeps the blade from rotating during blade changes the lock pin is used to lock the miter saw in a lowered position when not in use the depth control knob limits how far the entire head of the saw can drop down when going to make a cut typically used for cutting a date out or non-through cuts and lastly the partial sliding fence may be necessary to adjust to ensure proper clearance prior to making your cuts finally let's go through the included attachments starting with the work clamp
this is used to secure your work piece onto the miter table behind that you will have your blade wrench which is used to remove or secure the blade the carry handle up top is used for transporting your miter saw and you're going to love how easy this makes things if you are moving around to different locations or work areas the two table extensions allow for additional support when cutting your workpiece and lastly the dust bag is attached in the back to collect the dust and debris from your workpiece [Music] now let's take a closer look
at the blades which can range from seven and a quarter inches to 12 inches in size when it comes to the material many blades are carbide tip which allow them to last longer another term you'll hear when dealing with blades is kerf which is the material removed when the blade makes a through cut or is used to define the slot that's created in your material when you make a non-through cut it's actually super helpful for you to understand what kerf means with regards to making accurate measurements and cuts the blade itself has a specific width
and at any point if that blade cuts through your material it's removing that same width amount from your work piece or making a curve most blades are about an eighth of an inch so it's not a huge measurement but it can matter when the cut needs to be exact for instance if you have a piece of wood that's 10 inches long and you know you need to cut exactly two five inch Cuts you won't be able to do that because your blade is going to remove that small amount from the overall length of that 10
inch board during that first five inch cut therefore one of those cuts will be for instance four and seven eighths of an inch because again we lost approximately an eighth of an inch lastly you'll want to look at the number of teeth on the blade you're using a blade with a higher tooth number will give you a finer finish with less tear out but it will cut slower than a blade with a smaller number of teeth this will directly affect which blade you'll use for certain projects a high tooth count blade is ideal for finish
work such as trim or crown molding while a low tooth count blade is best for framing for example [Music] now that you understand your miter saw let's take a look at putting it into action before you get started always remember to remove your battery before making any adjustments to your saw and be sure to wear safety glasses and hearing protection when you first open your miter saw you'll notice it takes a bit of assembling on your part before you can get into actually operating it be sure to follow the instructions in your operator's manual to
safely and properly assemble your saw the first thing you'll want to do is secure your saw to your work surface at approximately hip height using clamps or bolts through mounting holes or secure to a miter saw stand or bench never cut on the ground or floor in a crouched position or on an unsecured stop once you've got your stop properly secured let's talk about installing the blade which typically comes installed out of box but it's still useful information for when you replace your blade sure to only use blades designed for your saw and unplug or
remove the battery before installing or replacing first raise the saw arm and using the Phillips screwdriver end of the blade wrench loosen but do not remove the blade bolt cover screw rotate the lower blade guard and blade bolt cover up and back to expose the bladeful depress the spindle lock button and rotate the blade bolt until the spindle locks using the hex end of the blade wrench loosen and remove the blade bolt by turning clockwise next remove the outer blade washer but do not remove the inner blade washer fit the saw blade inside the lower
blade guard and onto the spindle the blade teeth are to point downward at the front of the saw now replace the outer blade washer the Double D Flats on the blade washers are to align with the flats on the spindle to press the spindle lock button and replace the blade bolt then tighten the blade bolt securely by turning counterclockwise next replace the blade bolt cover by tightening and securely screwing before lowering the blade guard and lastly raise and lower the saw arm to ensure the lower blade guard functions correctly once your blade is secured it's
time to measure and Mark your material it's best practice to measure and Mark your scores by using a speed square or a straight edge to draw a straight line that runs the entire width of your knee cut when it comes to securing your material make sure it's properly supported especially when cutting long pieces of lumber or molding support the opposite end of the stock with a roller stand or with a work surface level with the saw table then clamp the work piece on one side of the blade the work piece must remain free on the
other side of the blade to prevent binding now let's review our four basic Cuts with any of these you will first insert your battery let's begin with a cross cut Slide the saw to its most rearward position and tighten the slide lock knob securely when making non-sliding Cuts first insert your battery pull the handle down to allow the shadow to indicate where the blade will meet the work piece and make any necessary adjustments press the LED switch if you have that feature with the handle raised use a firm grip to press the lockout lever and
squeeze the trigger to start the saw always remember to let the blade reach full speed before slowly bringing your handle Down release the switch trigger and allow the saw blade to stop rotating before raising the blade out of the work piece next let's make a miter cut loosen the miter lock knob and squeeze the detent release lever rotate the control arm until the point aligns with the desired angle on the miter scale then tighten the miter lock knob follow the same steps as previously mentioned to make your cut again on the face or Surface of
your work piece this is a bevel cut to make a bevel cut loosen the bevel lock knob and adjust your saw to the desired angle next securely tighten the bevel lock knob and follow the previous steps to make your cut as a reminder your cut should run through the inside of your work piece next is a compound cut and a compound cut is a cut made at both a miter angle and a bevel angle for a compound cut follow the previous steps to adjust your minor angle and bevel angle and make your cut finally we
have a slide cut grasp the work piece firmly with one hand and secure it against the fence using the work clamp C-clamp or another suitable clamp to secure the work piece before starting the saw grasp the saw handle firmly then pull the saw forward until the blade Arbor center of the blade is over the front of the work piece or until the saw is fully extended allow the blade to reach full speed and next lower the blade into the front edge of the work piece and push the saw handle away from you and towards the
bevel scale at the back of the saw never make a cut by pulling towards you then just as done with any cut release the trigger and allow the blade to fully stop rotating before raising your blade from the material and that's all there is to it with time and practice you'll begin to realize all of the great ways to incorporate your miter saw into your everyday DIY projects around the home [Music] thanks for joining us on this episode of tools 101 if you enjoyed this video be sure to like And subscribe and comment below because
we absolutely love hearing about all of your projects don't forget to check out our other tools 101 videos and all the other amazing content we have for you on this channel see you next time [Music]


![BRUSHLESS One+ HP 10-inch RYOBI Miter Saw Review [PBLMS01]](https://img.youtube.com/vi/o2kU2GOlu-I/maxresdefault.jpg)