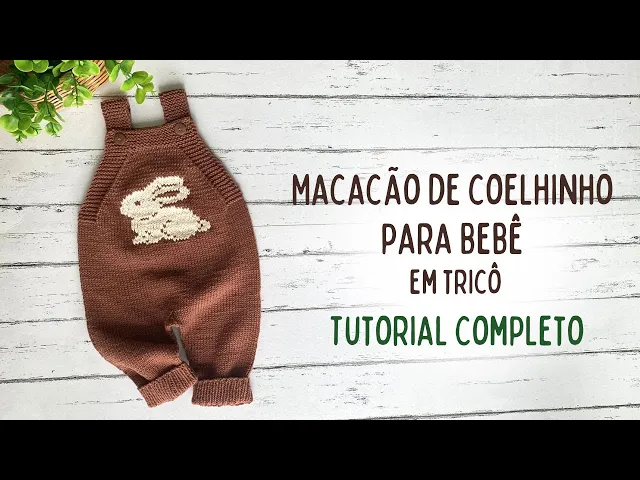
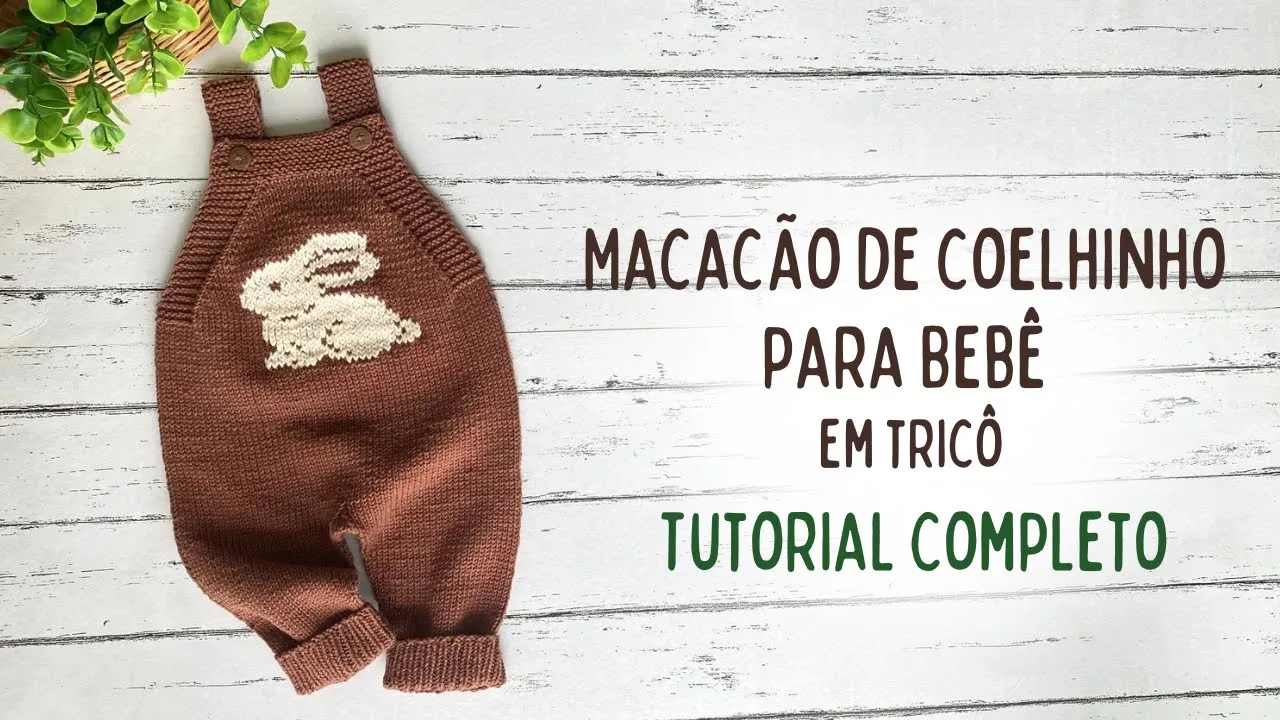
Hi guys, how are you? In this video lesson, I'm going to teach you how to knit this super cute jumpsuit and I'll also teach you how to do this bunny alligator embroidery. I knit it for a baby aged 0 to 3 months.
If you want to knit it in other sizes, I'm providing the written recipe that has all the information for you to knit it in sizes from zero to 12 months. The link is here in the video description. I knitted this piece with cotton yarn and I knitted it circularly so it has no sewing and the information about the materials I used to make this piece is also here in the video description and if you want a set along with this jumpsuit, here on the channel there is a step-by-step guide for this little bunny shoe that will look beautiful together with the jumpsuit and if you liked this piece, leave your like, subscribe here on the channel and activate the bell button so you don't miss the next videos and follow me on Instagram and I always share tips and news about knitting The link is here in the video description after all this Let's knit to start this work I put 46 stitches on my needle this number of stitches is for size RN if you want to knit in other sizes I suggest taking a look at the written recipe I'm leaving the link here in the video description I'll put the stitches for the I'll divide 23 stitches for one side and 23 stitches for the other for knitting Using the magic loop method 2 4 6 8 10 12 14 16 18 20 22 23 double I put both sides on the needle, be careful not to get them twisted, ok, the two edges are on the same side then I do the following to close the circle I put one more stitch for the other side on the other side of the needle I put one more tight stitch and I make a knot then on this needle here I put One more stitch I leave the stitches here on the needle and the other needle I pull I do it this way, ok if you Do it any other way, you can do it however you think is best, then I'll take it and see that here is the last stitch that I cast on.
So this penultimate stitch here, which was the first stitch that I cast on on the needle, I throw over the stitch that I just cast on like this and here I closed it, it was a little loose and here I closed the circle and now I just knit in a circle like I am with a needle with a 1. 20 m handle. So for me, it's very comfortable to knit.
in m magic loop that's why I always recommend it on my Instagram so you can buy needles the longer the handle the more comfortable it is, ok PR knit and here I'm going to start by knitting a stocking stitch a knit stitch and repeat a stockinette stitch a knit stitch I knit in this way until I reach the end of the row I finished knitting the 13 rows in bar stitch one by one and from now on I'm going to knit five rows in I finished knitting the five rows in stocking stitch, 1 2 3 4 and 5 on the sixth row I 'm going to make an increase, I'm going to take it as my stitch is facing this way, I'm going to take my needle from the back and make a loop as if I were going to make a stitch, then I'm going to take it from the front to make a stitch and I can now drop it from the needle and here I made an increase, press it so there won't be a hole, so the first stitch I already made an increase Continue knitting in stockinette stitch until there are two stitches left at the end of the row, there are two stitches left to finish the row and I'm going to do it again This increase , as my stitch is turned this way, I'm going to take my needle from the back, pull a loop, I'm not going to drop the stitch from the needle. It's as if I were going to knit the stitch in stocking then from the front, I'm going to insert my needle, pull another loop, as if I was going to knit the stockinette stitch, then I drop it from the needle, I'm going to undo it here, if your stitch looks like this, you're going to pick it up from the front first, because it's a difference from How the stitch is, you see this here you take it from the front this one you take it from the back then from the front I will do it as if I were going to do a stocking stitch and then from the back I will pull another loop making an increase in this way, leave it tight so as not to leave a hole and the last stitch I do in stocking stitch so this is the increase that you will knit for a few rows in the next row I will knit five more rows in stocking stitch without do no increase on the sixth row again I will do another stitch again in this way the first increase picking up the first stitch at the beginning of the row and the second with two stitches remaining to finish the row an increase and a stitch in stocking ok then it will be five rows in stocking one row of increase plus five rows in stocking stitch on Friday an increase plus five rows in stocking stitch on Friday an increase so V continue knitting in this way until I reach the indicated length of my piece I finished knitting the leg and this is the result, more closely then As I said, PR, you then knitted five rows, I made an increase, then five more rows, 1 2 3 4 5, on Friday, an increase, will you be able to see here ? I knitted the same way I did this one, okay, I continued knitting, making the increases in total there were 1 2 3 4 5 6 and 7 seven increases and they went from stocking stitch to the end there were 44 rows in stocking stitch and here below there were 13 rows in bar stitch one by one then 13 more 44 rows in stocking stitch okay And now I'm going to do the half in between PR do the half in between here I did 10 chains for those who don't know how to do it crochet chains I'll teach you If you know how, you take a crochet hook and make those who don't know and don't have a crochet hook first you make a Little Knot o Little Initial Take this Little Knot And put on The thread that is connected to the ball then this one is the Initial Knot you will take this loop and you will keep pulling the thread that is connected to the ball, pull it and do this until you have 10 done 1 2 3 4 5 6 7 8 9 and 10 here cut the thread this is to pull it ready here are the 10 chains make two they will be one on one side and the other on the other so to make the middle between here I have my little leg I turn the work where the thread that is on the needle this one from the back I pull and this one I pull to here which is where the thread is understand here you put it on the needle take the chain see there are no these little corners here at the back Oh these ones I don't know if you could see these Here, I'm going to pick up eight stitches here, 1 2 3 4 5 6 7 and 8, if it's too hard for you to pull it, it's because the chain is too tight, so you make a looser chain and here I lifted 2 4 6 8, I'm going to put a stitch marker here to identify the middle, put a stitch marker here at the beginning of the eight stitches and another marker here at the end of the eight stitches.
I'm going to take my other leg, the legs have to stay with this part of the increases one looking at the other practically, right so here I'm going to take my other little leg and I'm going to continue knitting until I get here at the end of the row I knit the other leg it's all in stocking stitch I'm going to put a stitch marker on this little thread that I cut I'm going to leave here inside then we 're going to sew the middle between here I'm going to also again eight stitches here is one 2 3 4 5 6 7 and eight eight stitches raised and here I'm going to join the circle I'm going to put another stitch marker and to join the circle just continue knitting the other leg in stocking stitch, so the beginning of the row I'm going to count by these yellow markers, okay, I put white here and yellow here, I'm going to knit a round in stocking stitch without making any increases and no decreases . The leg will always be knitted in stocking stitch, ok And here in the TRS part also in stocking stitch, arriving here I continued knitting the other leg until I reached this front part and from now on what I do on the front I'm going to do it on the back of the piece here are the decreases only in the center here in the middle so here I passed my stitch marker I'm going to make a decrease tilted to the left then I pass the first stitch without knitting to the needle the next stitch I'm going to do a stocking stitch I take that stitch that I didn't knit in stocking stitch and throw it over the stitch I just knitted making a simple late I'm going to knit four stitches 1 2 3 and 4 and now I'm going to do a decrease tilted to the right I'm going to take these two stitches I will turn and I will take my needle insert from left to right and knit two stitches together in the middle then this point this decrease is tilted to the left and this other is tilted to the right and here I continue knitting in stocking stitch arriving here at the back I will do this same decrease again, everything I do here on the front I will do here at the back a decrease tilted to the left four stitches in stockinette and a decrease tilted to the right I will continue knitting here and come back to continue the work with you, after having done the last decrease, I knitted a whole row in stocking stitch, okay, first it was a row and a half, a decrease and a row and a half back here, the same thing, ok, a row in stocking stitch, a decrease, a row and a half. Remembering that the decrease is both at the beginning and at the end of the stitch markers, so now that I've finished knitting the row, I'm going to do a decrease again, a decrease inclined to the left, I pass the stitch without knitting to the needle, the next stitch, a stocking stitch, I take the stitch that I didn't knit.
and I play over the stocking stitch I'm going to knit two stitches in stocking and here again a decrease I'm going to come here with the two stitches and I'm going to knit two stitches together like this I'm going to do this decrease both here in this front part and in the back part in the middle part and then I'm going to knit another row in stockinette stitch I'm going to continue knitting then I'll come back to continue the work I finished making the decreases in the middle and in total there were 1 2 3 and finally the last decrease that left only two stitches left I I knitted a decrease inclined to the right, so here it is 1 2 3 1 2 and 3 then I did a row in knit and finally decreased inclined to the right and then I continued knitting in stitches until I reached 16 cm measured from the beginning of the middle 16 cm and from now on I will do the sides here in knitting cord stitch as I am knitting in circular the knitting cord stitch is knitted this way I will knit eight stitches here in knit stitch 1 2 3 4 5 6 7 and 8 then I will continue knitting in stocking stitch until I reach the end of the front row with eight stitches remaining I will knit them in knit stitch eight knit stitches I turn the work to the back I will knit eight knit stitches which is on the edge I knit in stocking stitch and at the end eight knit stitches at the end of the row ok so I will continue knitting this way Remembering that here the middle part is in stocking stitch, just the edges, which are eight stitches in knitting stitch, I finished knitting the row and as I said PR to you previously, eight stitches at the beginning in the front, eight stitches in knitting stitch at the end in the middle in stocking stitch and here at the back the same thing eight stitches at the beginning in knitting stitch and eight stitches at the end in knitting stitch and in the middle in stocking stitch then in this next row to do the knitting stitch in stocking stitch I will knit I'm not going to do the whole row in stocking stitch here at the beginning So it's going to be one row in knit stitch one row in stocking stitch one row in stocking stitch and one row in stocking stitch to get the knitting stitch stitch so in this next row I'm going to do it all in stocking stitch I finished knitting by doing the knitting stitch stitch here on the sides both on the front and the back so I did it like this first I did a row of knitting stitch then a row in knitting a row in knitting a row in knitting And I ended up doing a row in knitting so Here there were three rows in knitting stitch but we count as knitting cord stitch 1 2 and 3 ok and from now on I'm going to knit the front part and I'm going to knit it in flat knitting I'm going to do the front part and then I do the back part both are done in the same way Ok so for the front part I'm going to knit the eight stitches in stocking stitch 1 2 3 4 5 6 7 and 8 eight stitches in stockinette and here I I'm going to make a decrease inclined to the left then I'm going to pass the first stitch without knitting to the needle the next stitch I do a stocking stitch I take the stitch that I didn't knit and throw it over the stocking stitch I'm going to continue knitting in stocking stitch until there are 10 stitches left here on the front there are 10 stitches left to finish the front row I'm going to do a decrease leaning to the right so these two stitches here I'm going to turn I'm going to take them from left to right and knit two stitches together in stocking stitch and knit eight stitches in stocking stitch here I turn I'm going to leave my work on the back part reserved, okay, if you want, you can transfer it to another needle and here the first stitch as it is in a knitting stitch I'm going to transfer the first stitch to the needle in a knitting stitch I turn my work as I 'm knitting now in flat knitting I'm going to knit eight stitches in stocking stitch to form the knitting cord stitch 1 2 3 4 5 6 7 and 8 eight stitches knitting cords eight stitches in stocking stitch and here in the center I will continue knitting in knit stitch, arriving here at the eight stitches in knitting stitch stitch, I will knit these eight stitches in stocking stitch, I have reached the end of the row I will knit the eight stitches in stocking stitch 1 2 3 4 5 6 7 and 8 I turn my work here as it is a knitting stitch, I will pass it to the needle with the yarn forward without knitting and I will knit seven stitches in stocking stitch 1 2 3 4 5 6 and 7 leaving the eight stitches in knitting cord stitch, here I will again make a decrease inclined to the left And I will continue knitting in stocking stitch until there are 10 stitches left at the end of the row where again I will make a decrease tilted to the right and then eight stitches in stocking stitch to form the moss stitch. knitting I finished making the decreases and in total I made 16 decreases on both sides and stitches on the needle I have 2 4 6 8 10 12 14 16 18 20 22 24 26 28 29 29 stitches on the needle and from now on I will knit three rows of stitches knitting cords first stitch I move to the needle without knitting and I will knit the entire row in stocking stitch instead of doing the knitting stitch here in this central part I knitted the three rows in knitting cords 1 2 and 3 stitch knitting cords we count by the cords it's 1 2 and 3 and now I'm going to make a buttonhole I'm going to knit five stitches knitting cords 1 2 3 4 and five I'm going to make a loop two stitches together in stockinette and I'm going to continue knitting in stocking stitch until there are seven left stitches at the end of the row there are seven stitches left to finish the row I'm going to knit two stitches together in knit one loop and knit stitches 1 2 3 4 and 5 now I'm going to continue knitting for three more rows in knitting cords in total here there will be six knitting cords here there are already three I'm going to do three more to make it six then I'm going to finish off the stitches I finished making the straps I knitted a total of 26 rows in stitch cords. knitting so we count the cords with these ripples here, so here were the six rows, right in knitting cords then 1 2 3 4 5 6 7 8 9 10 11 12 13 14 15 16 17 18 19 20 21 22 23 24 25 and 26 26 rows I finished the stitches and then I placed the buttons on both one loop and the other on the other I tied the thread down here and continued knitting in the same way I did this one and now I'm going to sew the middle between I'm going to release these stitches here, here just pull where the end of the knot is, there's the Initial knot and it's like this, this one is the Initial Knot, you pull it through the Final Knot because then that's enough.
pull the pebbles, I'll take them out here, just pull them and put them on the needle, look, lift this little part here too because it will be good for sewing, so there won't be a hole 2 4 6 7 8 eight stitches and here on the back, this one is the Initial Knot, which you can't undo, so it has to be this other side here, look , just pull it and put it on the needle. If it's wrong, it's OK, you have to have this little strap here at the back, both on one side and on the other, the thread that I asked you to leave Extra, I've already put it here on the Tapestry needle, as the thread is on the other side, I'm going to start on this side, so the first stitch I always drop from the needle, the first stitch and the second I leave it, so I'm going to insert my needle from the back with the tip going away from me, I drop the needle and insert my needle, taking it from the back, Oh, like this Tip of the Needle coming towards me I pull the next stitch from the needle the needle coming towards me and I insert it going away from me first needle going away from me I drop the needle and from the back Oh as if it were from left to right coming towards me second needle coming towards me and going away from me first needle going away from me and coming towards me second needle I insert the needle coming towards me and going away from me first needle going towards me and from the back always from the back Oh coming coming and going back and forth, I realize that it's kind of the opposite, right, coming and going, coming and going, coming and going, going and coming , coming and going, coming, and going, and coming, and in the last one, coming, how is it here, it's a little tight, this stitch here is loose, oh, it's in between, and here I'm going to make a little knot on the inside, a little knot here on the inside, I'm going to make a little knot to do the embroidery, I've already printed the diagram here and the diagram here contains 28 28 stitches, which is from the snout to the tail 28 stitches and from the foot to the last ear is 29 rows so 28 stitches 29 rows here I put the numbers, don't lose it, ok And here I did my centering so I'm going to start from the bottom to the top taking from the Central Point here I already placed it I also counted from the Central Point 14 stitches so This is where the tail will be this row will be Where the tail will be so here you count the beginning is here so it's on row 8 a 12 so there are five stitches that I'm going to embroider So starting from oit then here 1 2 3 4 5 6 7 8 so start here on this row and on this row here horizontally so here I go with my needle from the bottom to the top in the middle of the stitch, that is to say below the stitch 1 2 3 4 5 6 7 in the puo and to take the place of the stocking stitch Oh here is the stitch, you can see that it goes around here in the top stitch So I'm going to insert my needle like this I adjust it a little and I'm going to insert my needle into the same little hole that I inserted the first needle in and here I've already set up the stockinette stitch, I'm going to the next stitch, here below, in the point above, I'm going to insert my needle like this, I'm going to adjust it, okay, guys, and I'm going to insert my needle down here to jump to the next stitch, you just keep doing it like this, jumping into the next little hole here, there are already two stitches, there are five in the next one up here , in the same place I inserted the previous one, you introduce it and jump to the next one, there are already four, there are five there. I put five stitches down, then here, here is the blank part, the part that remains is the brown, so I'm going to skip 1 2 3 4 5 so I don't have to keep skipping, go PR here to finish the row, I'm going to go up to the next row, then I come back to this one, so the next row is a blank stitch because it didn't start like that, here is a blank stitch, so I'm going to go back to the previous one, which is on row 11, and do 1 2 3 4 5 6 six stitches on the row 11 so to go back I introduce o here in the middle of the bottom stitch o here is the stitch that will be embroidered on the top top and here I introduce it downwards , this way I introduce it here in the middle of the next stitch Here is the stitch that will be embroidered on the top one I introduce my needle I insert my needle again downwards where I did it last time, it ends up like this here in the middle in the next one above and here below so here are six stitches I will embroider the six stitches and come back to continue I did the six stitches above here then going back to the diagram one tip I give you is to cross out what you have already done, understand why then you don't If you get lost, I don't know if you could see me crossing out the next one, closer, this row here, look 1 2 3 4 5 6 7 8 So it starts, we finish here, put it on the top one and go back here from right to left on row six, in the middle of the last stitch This will be the stitch that will be embroidered on the top one, I'll introduce it here below, I'll take advantage of it, I'll introduce it on the other side to move on to the top, I'll introduce it below, I'll take advantage of it, I'll put it in the middle of the next one there are eight stitches I embroidered 1 2 3 4 5 6 s and here I finished eight 1 2 3 4 5 6 7 8 eight embroidered stitches come back here in the diagram cross out what you did the eight stitches then here I can either lower or raise it I'm going to take the opportunity to finish this here so I'm going to download ISO here and knit three stitches in the row below plus three stitches that are below that I just made o skip one in the next one let me remove it here o below what I did I'm going to go over these two dots that I put on the top and put it down and here a little dot skipped, you see So there are three stitches in this row, three stitches risk I'm going to the next one that's closest, this one here 1 2 3 4 5 6 7 8 9 10 11 I'm going to embroider 11 stitches in the row above, so I introduce it here in the middle of the last stitch I just made and this will be the stitch I'm going to knit, so I put my needle in the row above, I'll put it in the next stitch 1 2 3 4, I'll have to adjust it a little 5 6 6 7 8 9 10 11 and 11 Wow, let me go back and I'll do the 11 stitches so here, let me see, I'll go and cross out these 11 stitches so I don't get confused and I'll go to the bottom row, coming back, oh, I stopped here, I'll knit on the bottom row 1 2 3 and 4 this one, I'll introduce it here, skip one stitch on the bottom row, I go around here above the top stitch, it could be from the light thread down, one two, three and four, I come here, I skip one stitch and I'll do this one here, which is four more, 1 2, 3 and 4, let me cross it here on the same row.
Oh, skip this stitch here, I'll go to the next one here, one three and four, I've already done the four, then here, to finish this little round here, I'll skip down here, I'll skip one stitch after the last one I made and I'll embroider four stitches . here I skip one stitch, this stitch here and go to the next one and do four stitches one 2 TR and that's it, here I finished this part here and this whole part that I crossed out Ok, I'm going to continue doing it now that you've learned how to skip the stitches I 'm going to continue doing the embroidery and always skipping where the stitch is, this little white square, you skip a stitch if there are two little white squares, you skip two stitches, you're doing it and you're crossing it out like here my thread ended, oh, I come down here and I do a Nozinho, okay? I take another thread and start all over again, I finished the bunny drawing, this is the result of the drawing and this is the result of the jumpsuit.