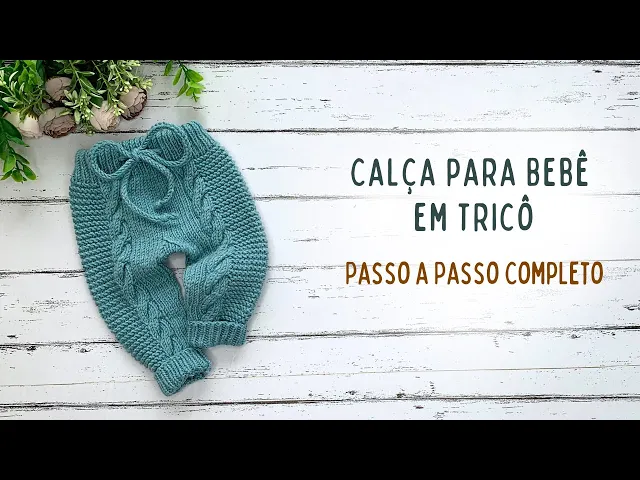
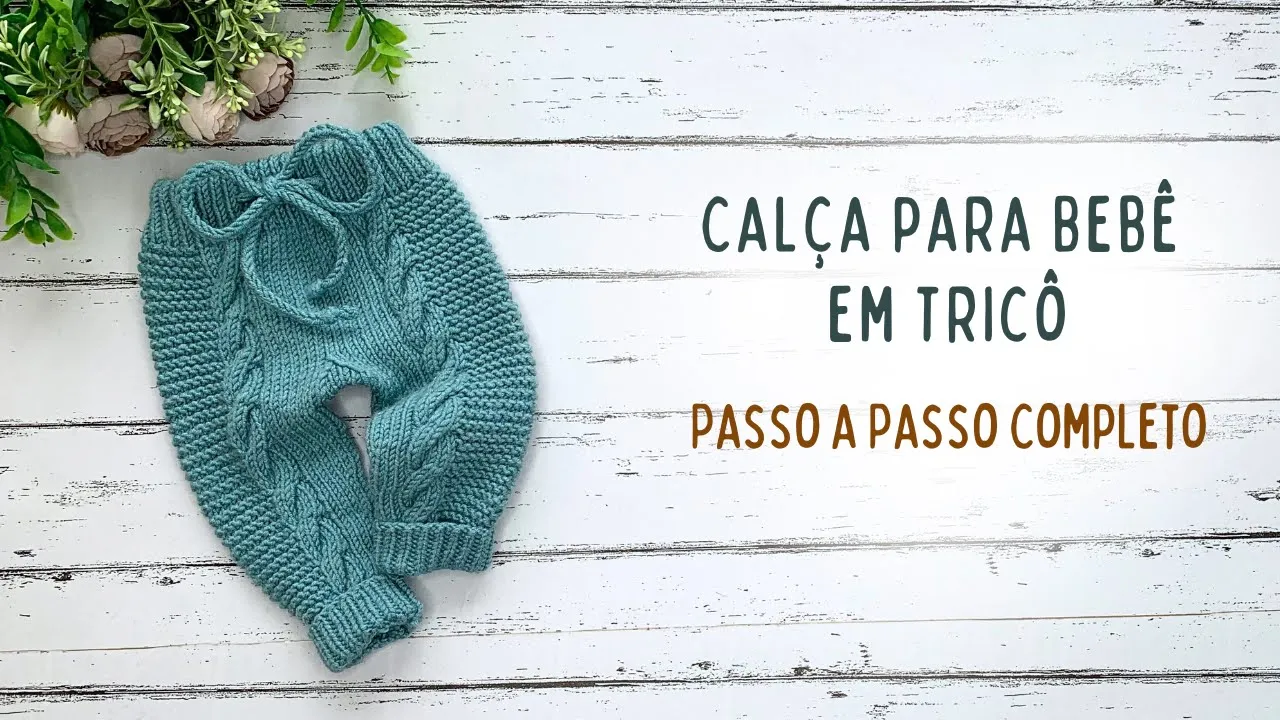
Hi everyone, how are you? In today's video lesson, I'm going to teach you how to make these beautiful baby pants. I knitted them for a baby from zero to 3 months old.
Don't worry, the written recipe has all the information for you to knit in sizes from zero to 12 months. The recipe link is here in the video description. Oh, and all the materials I used to make this piece are here in the video description, too.
To make it easier for you. I knitted this piece in the round, so it doesn't have side seams. I know you're going to ask me if it's possible to knit it with a straight needle, and yes, it is.
What you're going to do is the following. For example, if I cast on 20 stitches on my needle, that's the example. You're going to divide it by two because you're only going to knit the front part and then you're going to knit the back part.
So you're going to cast on 10 stitches on the needle and you're only going to knit the front part. Then, finish the front part and knit the back part. Then, the increases that are made here in the middle of the leg of this leg are made in the beginning of the row because we knit from right to left and this one is done at the end of the row because we knit right to left right so this one here is at the end of the row and this one here is at the beginning of the row the increases in the back are the same thing just repeat the increases made at the end and here at the beginning of the row ok the increases are done this part here of the inset you can knit just like I teach the cast on and the seam then when you finish knitting the front part and the back part then do the seam here on the side here in the leg part I teach how to do the inset seam like this here there is an invisible seam and the waistband part you also do the seam and fold here and do the seam here where I also teach here in the video is the seam to make the waistband like this but if you want you can cast off the stitches here it is shown here the cast off ok and put the little string there you will have to put the string it is shown here it is between the stitches hem one by one and if you liked this piece leave your like here in the video comment below what you thought of the piece and if you're going to make it too and follow me on Instagram @tbabytricô where I'm always posting knitting tips, news and the next recipes that I'll bring here to the channel and now let's go to the step by step to start this work I put 34 stitches on my needle this number of stitches is for size RN in case you want to knit in another size the link to the written recipe is here in the description of the video where it contains all the information for you to knit in sizes from zero to 12 months so on needle number tru I cast on 34 stitches if you don't have needle number three you can knit with needle number 3.
5 ok so here I'm going to put the stitches for the cable that I'm going to knit it in the round so I'm going to divide this number of stitches so 34/2 gives 17 so 2 4 6 8 10 12 14 16 and 17 then here I fold the cable and put these stitches back to the needle of both needles here I make sure that the edge doesn't It's twisted like this and now to close the circle I'm going to cast on one more stitch on the other needle. Look, on this needle, the end of the yarn. I'm going to cast on one more stitch on the other needle and here I'm going to tie a knot to knit this piece.
You need a needle that has a cable of 80 cm or more. Mine has a cable of 1. 20 m, so it's very comfortable to knit and circle.
So here where I cast on one more stitch, I leave it on the needle and on the other side I pull it to knit using the magic loop method. Look, you see, there's a lot of cable left on one side and a lot of cable on the other side. So, smaller needles like 60 cm 40 can't knit like this.
Okay. So here where there's one more stitch, I'm going to take this penultimate stitch and I'm going to throw it over the stitch I just cast on, just to close the circle. So now I'm going to have 17 stitches on one side and 17 stitches on the other side.
Okay, so the extra stitch is just to close the circle. And here I'm going to start knitting in rib stitch one by one. knit one stocking one knit one stocking one knit and I'll repeat Oh after you've finished a row you put finished knitting put for the the cable turns and the other side that needs to be knitted you put it on the needle then you pull it so that the cable remains on one side the cable remains on the other side and here you continue knitting the last stitch was in stockinette stitch so here I start knitting in knit stitch I finished knitting in rib stitch one by one I knitted for 10 rows ok so here 1 2 3 4 5 6 7 8 9 and 10 10 rows in rib stitch one by one and now with needle number 4 I will knit two stitches in stockinette this number of stitches remembering that it is for size RN ok take a look at the written pattern because these stitch numbers in the detail already change for each size so here two stitches in stockinette I will make one stitch in knit six stitches in stockinette 1 2 3 4 5 and 6 then now I will knit eight stitches in knit cord stitch as we are knitting in the circular the knit cord stitch you will make a row in stockinette stitch and in the next row you make it in knit stitch ok because if you knit all the rows in stocking stitch it will form the knit stitch, you understand or if you knit all the rows in stocking stitch it has to be one row in stocking stitch and another in knit stitch so just these eight stitches here in the front in knit stitch, okay these ones here you repeat two stitches in stocking stitch, one knit stitch and the six knit stitches here you repeat always knit, always knit and always knit but the knit stitches have to be one row in stocking stitch and another in knit stitch so I'm going to start doing in stocking stitch okay so eight stitches in stocking stitch on the front 2 3 4 I know you're going to ask me why I pick up from the front and also pick up from the back because of the position of the stitch, because the stitch is turned like this I have to pick up from the front if I pick up from the back it will already be twisted, it will form here, oh here, oh here a little X below you see here so that's why I have to pick up according to the position of the stitch, oh you see that now it's open so here the stitch is kind of straight and here I have to pick up from the back because if it's like this then pick up from the back from the front but if it is like this then you have to pick it up from the back because if you pick it up from the front it will also be twisted, you see that it forms a little X here below, it will be twisted so that is not what we want now there are some stitches that require the twisted stockinette stitch now it is open you see here so that is why sometimes I pick it up from the front from the back because of the position of the stitch so you can knit the way you usually do it because the way I knit ends up changing the position of the stitch so do the normal stockinette stitch that you usually do so here eight stitches in stockinette on the front part of the knit cord stitch and again eight stitches on the back part in stockinette stitch to form the knit cord stitch ok so 1 2 2 3 4 5 6 7 and 8 eight stitches in knit cord then six stitches in stockinette 1 2 3 4 5 and six one stitch in knit and two stitches in stockinette I turn there on the second row just so you understand better I will continue knitting in this way until you reach four rows then two stitches in stocking stitch this is the sequence 2 stocking stitches one knit 6 stocking stitches 1 2 3 4 5 and 6 and now 16 stitches in knit cord stitch which is eight stitches here in the front and eight stitches behind as in the previous row I did in stocking stitch so in this one to form the cord stitch I knit in knit stitch okay look at the 16 stitches in stocking stitch then in the next one I knit and then I knit I keep alternating to form the knit cord stitch you see so I'm going to continue here and then I'll come back to teach you how to do the braid crossing in the fifth row I'm going to knit a total of four rows I continued knitting until I reached the fifth row I knitted for four rows look 1 2 3 and 4 so it was 2 stocking stitches one knit 6 stocking stitches eight knit cords and repeat the same thing on the back everything I do on the front is the same as on the back look eight knit cords six stocking stitches one knit and two knit okay and now I'm going to do the braid crossing in the fifth row so here I'm going to start knit two stitches in stockings one stitch in knit I'm going to take an auxiliary needle I'm going to pass three stitches and I'm going to leave it reserved at the back of the work I put the yarn in front of the auxiliary needle look like this and I'm going to knit three stitches one two and three I take what's on the auxiliary needle I put it on the needle on the left I put the yarn behind because I'm going to knit these three stitches in stockinette stitch so one two and three I'm going to give you a tip take the stitch marker and in this row place it here look at the knit stitch done because this was the crossing row now we're going to knit for a few more rows to make the next crossing then it will be easier for you to identify where the crossing was to do the counting so here I put it in the knit stitch because it's easier to do the counting by the knit stitch so here I'm going to continue knitting the knit cord stitch as the last row was in knit stitch so I'm going to knit them eight knit stitches here on the front and eight knit stitches on the back eight knit cord stitches on the back then I got to the six knit stitches again I'm going to make the braid I'm going to pass three stitches to the auxiliary needle I leave it reserved behind the work this yarn passes here on the front of the auxiliary needle I'm going to knit the next three stitches in stocking stitch I'm going to take what's on the auxiliary needle and put it on the left needle and I'm going to knit these three stitches in stocking stitch one stitch in knit and two stitches in stocking stitch then I'm going to continue knitting according to the pattern where there is stocking stitch I do stocking stitch where there is knit stitch I do knit stitch remembering that the knit cord stitch is a row in stocking stitch another row in knit okay so the next row I'm going to knit the cord stitches in knit stitch so it will be like this look you see one stocking stitch one knit one knit one knit one knit and one knit so I'm going to continue knitting until I get to the eighth row where I'm going to make the increase then I'm going to teach you how to make the increases I'm on the fifth so I'm going to knit six and then on the eighth I'm going to go back to continue I'm on the eighth row look for the stocking stitch here on the side 1 2 3 4 5 6 and 7 then I'm going to start the eighth row so I'm going to make a stocking stitch I'm going to take this little yarn that's in the middle of the two stitches and put it on the front like this okay take the little yarn that's in the middle of the two stitches put it like this on the needle left and here on the front I'm going to knit a stitch in stockings so here I made my first increase I'm going to knit a stitch in stockings then a stitch in knit ah this increase is what we call a right-angled increase ok so I'm going to continue knitting according to the pattern until I reach the end of the row with only one stitch left there's one stitch left to finish the row I 'm going to take this little thread that's in the middle of the two stitches and instead of placing it like this I'm going to place it on the back like this oh you understand at the beginning we place it like this and at the end we place it like this and on the back I'm going to make a stitch in stockings this is a left-angled increase ok and lastly a stitch in stockings then I'm going to continue knitting according to the pattern stocking here three stitches in stockings one knit six knit and eight stitches in knit cord the same thing here on the front there's 3 knit one knit 6 knit and eight stitches in knit cords so I'm going to continue knitting and then I'll go back to continue the work I'm not going to make any increases ok the increases will be made every eight rows I'm going to knit a few more and I'll show you how it looks and how to count I continued knitting according to the pattern until I reached the eighth row of the braid, okay?
It 's not the increase. The increases are made every eight rows and the braid is also made every eight rows, but it's different. The crossing row is not in the same row that you do both, okay?
So here I told you to put the stitch marker because then it will count. In the next one, it's 1, 2, 3, 4, 5, 6 and 7. There in the eighth you will make the crossing of the braid.
Here in the increase you only did four rows, oh, two tr and four, okay? So don't make any increases yet. So here I'm going to knit three stitches in stocking stitch, one stitch in knit stitch and again I'm going to make the crossing of the braid.
I'm going to pass three stitches to the auxiliary needle and I'm going to set them aside behind the work. put the yarn on the front and I'm going to knit the next stitches in stocking stitch three stitches in stocking stitch I take what is on the auxiliary needle I put it on the left needle and I'm going to knit these three stitches in stocking stitch ready here I made the braid crossing I can take this stitch marker out and put it on this row where I made the crossing so it's easier to count the next crossing so here I'm going to make my eight stitches in knit cord stitch and I'm going to repeat the same thing I did now I'm going to repeat on the back there are eight stitches in knit cords I'm going to make the braid crossing one knit and 3 knit stitches so I'm going to continue knitting like this and when I get to the 16th sixth row I'm going to do the increase again then I'll show you how to count the increase here ok I continued knitting according to the pattern and here I got to the eighth row to make the increase here the increase was made so the next 1 2 3 4 5 6 and 7 and now in the eighth I'm going to make the increase ok so here I'm going to knit a knit stitch I'm going to take the little yarn that's in the middle of the 12 stitches I'm going to put it in the needle like this from the front and from the front I will make a stocking stitch then an increase slanting to the right I will knit according to the pattern until I reach the end of the row with one stitch remaining where I will make another increase an increase slanting to the left I have reached the end of the row with one stitch remaining to finish I will take the yarn that is in the middle of the two stitches and I will put it on the needle like this from the back and from the back I will make a stocking stitch then I will make one more stocking stitch to finish the row if you want you can be placing the stitch marker here if you have difficulty counting the rows of the increases it is the same as the braid there are only three rows of the braid so the crossing is done every eight rows of the braid and the increases will be done every eight rows so I will continue knitting like this until I reach 18 cm measured from the stitches cast on here below I finished knitting the leg and there were five increases of the 3rd cc after I knitted the fifth increase I continued knitting until I reach 18 cm from the stitches cast on so for each size This number of increases is different, so after making five increases for size RN, for the other sizes, you can take a look at the written pattern. After making the last increase, you can continue knitting until you reach the indicated length for each size.
Then you can measure it using the stockinette stitch, because the stitch is a knitting cord. It makes the rows smaller. It can be up to half a little row here, bigger and smaller here.
But then we do the blocking, and it's perfect. Then stretch it a little, and it's perfect with the blocking. So here, using the stockinette stitch, you can knit until you reach 18 cm.
This is the second leg. I did the same first one, and I cut the yarn, leaving about 15 cm to sew. After the inset, you can pass the first leg to any treble you have at home, any size, and knit with number four.
The second leg, this one, is set aside, and you can do the same as the first and the second. They are knitted in the same way, so when you turn it over, it's very perfect. You can see some increases to make it like this, so I'm going to start.
to make a crochet to make the crochet I will need two chains with 10 chains so here I will take my extra yarn any yarn you have at home whoever knows how to crochet with a crochet hook can do it whoever doesn't know and doesn't have it then I will teach you now how to make this chain with 10 chains so here I will make an initial knot o initial knot then here I take this little hole and take the little yarn that is connected to the ball and pull it to make the initial knot then take this little hole insert it into the yarn that is connected to the ball and pull it then made a little chain there again look 2 3 4 5 6 7 8 9 and 10 there are 10 chains there here cut and pull ready here there is a chain with 10 chains then you make two ok that is to make the crochet ready there now in this little leg that is connected to the ball in the back where the yarn is connected I'm going to put this one on the needle I can pull it which is the front part I turn it over look what is connected to the ball of yarn ok I'm going to take my chain with 10 chains and I'm going to pick up eight stitches so here here is the front part of the chain on the back where there are these little sections here look you see here on the back there are some sections there are these sections here then I'm going to insert my needle and I'm going to pick up eight stitches like this just one section is on the back two 3 4 5 6 7 and 8 ready I picked up eight stitches here I'm going to place a stitch marker I'm going to place a stitch marker here at the beginning of the eight stitches I entered there 2 4 6 8 and another stitch marker ok I'm going to take the first leg here on the front part because the leg has to be like this there look this yarn that was cut is on the back so you start here on the front part but you're going to knit with the yarn that is connected to the ball of yarn so to avoid confusion take this yarn and put it here inside like this here with the yarn that is connected to the ball after making the eight cast on the eight stitches then continue knitting the stocking stitch without making any increases ok we will not make any increases but continue knitting if you need to cross the braid then you do it ok here in my case it is not necessary so I will continue knitting until I get here to the back part knit this entire leg then when I get to the back part I will pick up this number of stitches I also finished the leg and now in the back part I will also pick up eight stitches so I will take a stitch marker I will place it here to identify only the intervito stitches also look at the back part look at these little stitches here so here is a 2 3 4 5 6 7 and 8 ready I picked up eight stitches look at 2 4 6 8 then I will place the other stitch marker then now I need to close the circle ok so I will continue knitting the next leg from now on if you want to knit with that 40 cm needle you can because then it already fits all the stitches there if you don't want to, continue knitting using the magic loop method like I'm doing here. So now I'm going to continue knitting the entire round according to the pattern here on the front part. You're going to knit in stocking stitch both here and here.
So when I get here again, I 'm going to knit the entire round. I'll get here. I'll continue knitting the leg here in stocking stitch according to the pattern.
Here in stocking stitch, according to the pattern. Then when I get here, at this white marker on the front part. I'll come back to teach you how to decrease the in between.
It'll be really pretty. So here I'm knitting in stocking stitch. It's both on the front part and on the back part.
And the leg, you continue knitting according to the pattern. Knit here. There's the knit stitch.
The cable. If you need to cross, do it. And on the edge, knit in knit cord stitch.
So I'm going to continue knitting and I'll be back to continue the work. Ready. I finished knitting the round.
Then I got here to the front part. Look at this part here where the stitches were cast on. I knitted in stocking stitch both on the front part and on the back part.
Okay, I knitted in stocking stitch. Then I got to the beginning of the work, which is where we started. I started to cast on these stitches, so here is the beginning, so I pass my stitch marker and now I'm going to make a decrease slanting to the left, so I'm going to pass the first stitch whenever I return to the needle, the next stitch I make a stocking stitch, I pick up the stitch that I didn't knit and throw it over the stocking stitch, then I'm going to knit four stitches 1 2 3 and 4 and I'm going to make a decrease slanting to the right, I'm going to turn these stitches here so that it looks like this and taking the front part I'm going to knit two stitches together, okay, then it's slanting to the right, everything I do here I'm going to do on the back part too, okay, so here I pass the stitch marker, I continue knitting according to the pattern, if I need to cross the braid, do it, okay, and I'm going to repeat this decrease here on the back part too, because it's the same both here on the front part and on the back part, I'm going to make this same decrease, so I knit When I get here to the markers, I make a decrease.
I knit four stitches in stocking stitch and I do the same decrease again that I taught you. Now, then I continue knitting until I get to the front again. Okay, I got to the front again and I made the decrease both in the front and here in the back.
So, the back is the same as the front. Just repeat. You see the decrease.
And the part here on the sides, keep knitting according to the pattern. You're doing the edge knitting cord stitch or the braid that makes the crossing every eight rows. And here in the center in stocking stitch.
Ready. So, I got here again in the middle and in this row I'm not going to make any decreases. I'm going to knit these six stitches in stocking stitch.
Six stitches in stocking stitch. And I'm going to repeat it again here in the back. Okay, I make six stitches here in stocking stitch.
In this row, I don't make any decreases because it will be like this: a row without the decrease that was the first one. Then with a decrease now without it. In the next one, it will be with a decrease.
Then without it. So, I'm going to continue knitting here without making any decreases. And then I'll come back here again to the front to show you again how to make the decrease.
I finished the round without making the decrease, so this next one will be with a decrease, so here I'm going to pass a stitch to the needle without knitting the next stitch I make a knit stitch I pick up the stitch that I didn't knit and throw it over the knit stitch making a decrease slanting to the left I'm going to knit two stitches then another decrease a decrease slanting to the right I turned my two stitches here and on the front side I take them and insert them on the needle from left to right knit two stitches together in knit and then it will look like this then I'm going to make this same decrease on the other side ok and then I'm going to knit another round without making a decrease because as I told you before it will be a row without the decrease one with without with then without ok and then I'll go back to continue the work remembering to repeat the same thing I did here on the front side do here on the back ok it's the same after I made the decrease I knitted for one more row without the decrease and now I only have four stitches here in between so I'm going to make a decrease slanting to the left and a decrease slanting to the right there are only two stitches left so I'm going to knit a row without the decrease remembering to repeat this decrease here on the back too, there it is, then I will make a row without decrease and then the last row I will make a decrease tilted to the left so that there is only one stitch here, okay then I will do that and I will come back to continue after I have done the inset, so here it was like this, look at the first row we knitted it in stocking stitch without decrease, then there was the decrease, then without decrease with decrease, then without with 100 and with the decrease when there were only two stitches left, I knitted two stitches together in stocking stitch, there is only one stitch left, here it was for the body part of the pants, so it was like this the inset, then you repeat everything you do here on the front, do it on the back too, there it is, then I continued knitting according to the pattern which is stocking stitch here in the center, there is the braid, the knit stitch here on the edge and the knit cord stitch until I reach 27 cm, here I have already done my blocking, just take the steam iron, the steam only from the iron, okay, don't touch the iron to the piece, not just the steam, then you pass it like this with the steam and it stretches it out so because the legs will be like this, you understand, then you just straighten it here towards the center and it will be very straight, just the steam from the iron, then here I knitted until I reached 27 cm measured from the stitches cast on the ankle, look at 27 cm, then now I'm going to make the waistband of the pants, I'm going to take my number three needle, if you made this little part of the ankle with the number 3. 5 needle, then you knit here with 3. 5, but if you made it with the number three, then you knit here with the number three, okay, it can be three or 3.
5, I'm going to knit for 24 rows in rib stitch, one by one, so here I'm going to start with a purl stitch, one knit stitch, one knit stitch, one knit stitch, one knit stitch, one knit stitch, and I repeat this sequence until I reach the end of the row I finished knitting in rib stitch one by one I knitted for 24 rows and then I did the cast off stitches here I cut my yarn I pulled it to make a knot leaving a quantity of 70 cm of yarn to make the seam here like this but before making the seam I'm going to make the cord I'm going to take my yarn and take the number four needle and I'm going to cast on two stitches I cast on two stitches I'm going to knit these two stitches in stocking stitch then I'll pass these two stitches again to the left needle and I'll knit two stitches in stocking stitch I pass again to the left needle and knit these two stitches then I keep on repeating passing them to the left needle and knitting them in stocking stitch I pass to the left needle and knit the stitches in stocking stitch then I'll continue knitting like this until I reach the indicated length of the cord here there's a little thread I'm going to stop knitting the cord I knitted until I reached 75 cm here below I tied a little knot then when I finish just knit two stitches together cut the yarn and hide the little thread here in the middle and here I made two knots at the end, look, the cord is like this, now I'm going to take my pants, I'm going to pass this thread to the tapestry needle, then here I'm going to close it and I'm going to insert it in this first stitch, look, in this first stitch from back to front and here from front to back, then it's like this, you see, it's kind of closed, look, and here I'll tie a knot, ready, now I'm going to sew, before I sew, I'm going to put my cord because it's easier, so here in these middle stitches, let me see, look, here's the middle, yesterday, these stocking stitches, I'm going to put it between the sixth and seventh rows here below, look, 1, 2, 3, 4, 5, 6, then here between six and seven I'm going to insert the cord, as I tied a knot, it's more difficult, tighter, ready on one side and on the other, here, 2, 4 and 6, ready, then it's like this, look , there, now I'm going to fold this part here, it has to be like this, folded inwards, and here on the side, I'm going to start sewing, the sewing is very simple to do, make sure the cord is inside, okay, when we fold it like this, then here let me see look at this row here so I'm going to insert my needle yesterday look here where there is this little knit stitch so I'm going to take a little leg from the cast off stitch and a little leg here from the knit stitch like this there again look a little leg from the cast off and a little leg from the next stitch a little leg from the cast off and a little leg from the next stitch down here which is the knit stitch look it's very simple the seam from here I'm going to continue until I get to the end there it's going to look like this the seam here on the front part you can't see I finished doing the seam so it looks like this look here I made a little knot and a little loop here I've already passed the stitches from one side then I 'm going to teach you how to pass it to a needle look here are the stitches of the chain there where there is when the thread is up it's because it's the place to take this other side look it's down there's this initial knot there's no way to take it out it has to be this one here look you see that the thread is up this one here it stays down because here it's folded but it's on this side here, look, you see here, this little stitch here, you already put it on the needle here, pass it through, then you're going to pull it, keep pulling and putting the stitches on the needle.