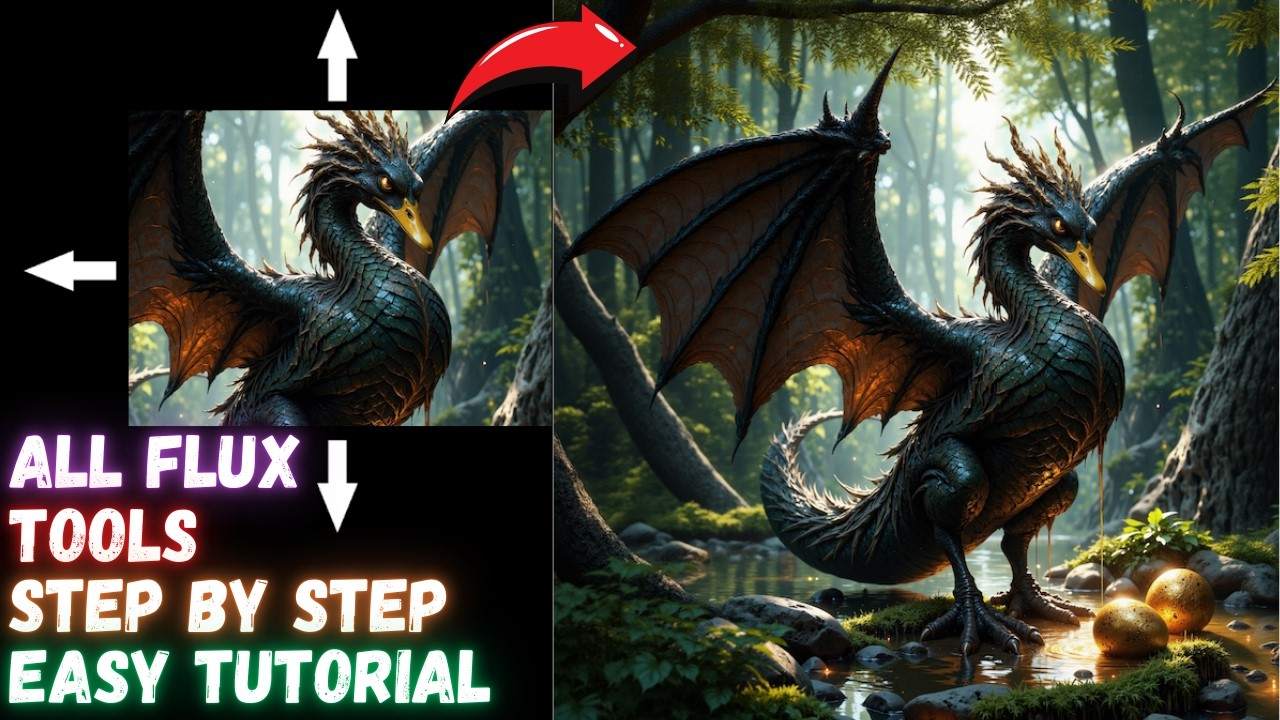
welcome to episode 23 of our comfy UI tutorial Series today I will show you how to install and use flux tools I am on the Black Forest Labs page they created the flux model and have now released flux tools it includes a model called flux fill which lets you inpaint easily by selecting portions of an image and generating something new in that area and there's also the flux depth model which is similar to control net and it can recognize a depth map allowing you to generate something new based on that map flux canny uses a
canny image to guide the generation and flux Redux can create variations similar to the image you provide they also have something similar to the IP adapter but from what I saw only the API is available for that option from this page you can find links to all the models the hugging Smiley icon means the model is on the hugging face page so if I click on one I can find more information and download that model on the comfy UI blog you can also find information about each model including what each model does how to use
it and how to get started for example you need to update comfy UI to access the latest nodes so you can run these new models it also shows you which models go in which folder they provide some examples as well so if you visit this link you can find various examples for different models scroll down until you find the flux model and here you will find instructions on how to install it uh we covered that already in episodes 8 and 10 so make sure to check those if you haven't run flux before for you'll also
see the flux fill model with a link to the model and instructions on where to place it Additionally the images contain the workflow so I can drag this image into comfy UI and it will load that workflow allowing me to start testing I will show you in this video and also provide links to everything so you can get started quickly I recommend watching the entire video first and then starting the installation to make sure you install only what you need as some models can be quite large are you ready go to the manager and click
on update all to update comfy UI and all the nodes or it won't work wait for it to finish you can see what is being installed in the command window once the installation is complete the restart button will appear click on it and then click okay now let's get the flux fill model on the hugging face page you need to agree to the terms before you can download it so make sure you log in and click agree once you've agreed you can access and download the model keep in mind that this model is huge just
like the original flux model so make sure you have plenty of space on your hard drive click the download button then go to the comfy UI folder navigate to the models folder and then the unet folder this model contains only the unet part so the vae and clip models are not included meaning you'll need to load those separately as you can see I've already saved the model in this folder now for text encoders we need the clip L and T5 floating 16 models you might already have them go to the models folder then the clip
folder and check if you have them as you can see I have the clip L and T five models if you don't have them start downloading them and place them in the clip folder by the way if you want to see the workflows open in tabs like you have documents open in Photoshop you can go to settings and search for workflows for the setting called open workflow position you can choose top bar now go to the workflow tab then open it it and I'll add all these workflows to Discord so you can download them for
free yeah let's open the flux fill in paint workflow this is very similar to the flux workflows we've used so far with a few exceptions we use a load diffusion model node not a checkpoint remember it only has the unit part which is why we added the model to the unet folder we then load the flux fill model next for the Dual clip loader we have the clip L and T5 models that you downloaded in the clip folder this won't work with the Guff T5 clip models between the model and the K sampler we have
the differential diffusion node which enhances the denoising process by applying a differential mask function this refines noise reduction and improves the diffusion models output during each step then we have the inpaint model conditioning which prepares the necessary inputs for inpainting by combining the positive and negative prompts latent vae input pixel information and The Mask it ensures the diffusion model focuses on the masked area while preserving context from the unmasked regions enabling accurate and seamless edits now let me show you how it works in the load image node you can load an image then rightclick and
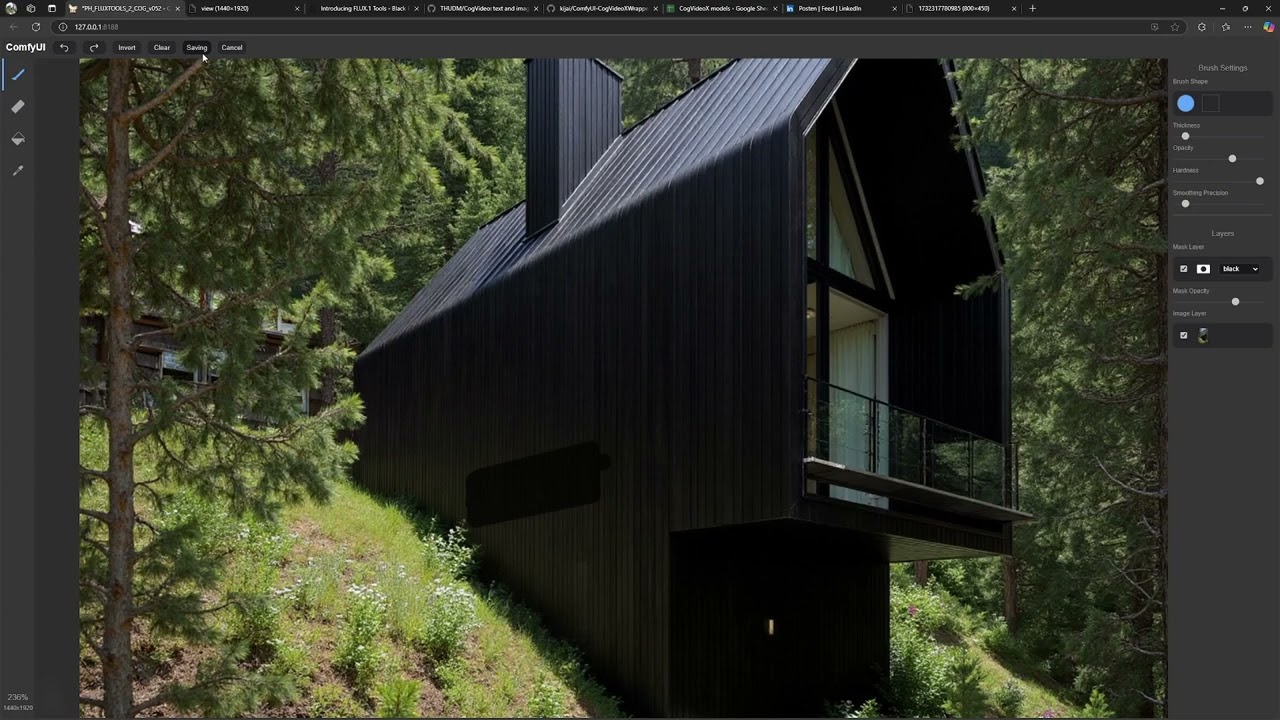
select open in mask editor I already have a mask here so I will clear it using this button after that I can adjust the mask thickness and paint the area I want to change I showed a different inpainting method in episode 17 that works with sdxl models and talked more about the mask editor but this method works great with flux so I definitely recommend using this one uh I usually paint the area larger so it has space for a soft transition around the edges then I click save to node now the mask is saved with
the image and it's prepared we can now add a prompt describing what I want to see in this case a cute cartoon bunny wearing a black superhero mask when I run the workflow it will load all the models so if you don't have enough video RAM it might not work the prompt image and mask are sent together to the K sampler and then the image is decoded resulting in our final image look how well it fits the mask on the bunny if you don't like it you can go back to the mask editor and adjust
the mask change the prompt or try a different seed if you like it and want to keep it but make more changes you can right click on the image and select copy image then select the load image node mode and use crl +v to paste it now this becomes the starting point image I am opening this image in The Mask editor and this time let's say I want to select this bottle I click save to node and now I describe what I want to see in that area for example let's add a cartoon toy rocket
on the table flux generates exactly that for me and blends it perfectly so I'm quite happy with this model sometimes the object you want to change might have a shadow so in some cases you can open the mask editor again and add to the mask to include the shadow as well I saved the new mask to the node and when I run it I get a new rocket with its shadow if you don't like it you can run the workflow again to get a different toy rocket if I like the result I can copy the
image again and paste it into the load image node then make more edits maybe I want to add a magic black hat on the bunny's head so I do the masking change the prompt and run the workflow here's the result it looks great now let's use this image again but this time we'll try out painting I'm including the out painting workflow on Discord 2 but it's easy to switch from inpainting to out painting we just search for the out painting node and we have the pad image for out painting node let's make some room for
the new node now we connect our image to the new node and the node's image output goes to inpaint model conditioning this time the mask isn't the one from the mask editor but the one from the pad image for out painting node that's it now it's converted into an out painting workflow here we can select which direction to extend the image and how many pixels the Feathering controls how much to blur the mask around the edges helping it blend better let's expand the image to the left by 400 pixels and for the prompt I tell
it what I want to see there in this case a 3D cartoon restaurant interior when I run it I get an image with the new area seamlessly blended with the original image how cool is that I will try now instead of expanding to the left to expand the top and bottom to see how it handles that it worked well except for the bottom part of the bunny I can run it again to get a different seed but the bottom part is still not quite accurate I'll try adjusting the prompt to include the bunny and see
if that helps now the proportions seem a little better the key is to experiment with promp s and describe more accurately what you want to see so you can guide the AI in the right direction I'm sure I'll use this more in future episodes but let's move on to the next model on the hugging face page we need to agree to the terms to access this model as well the good part is that this is a small model so we can use it with the existing models we already have and it will just guide the
existing flux model in the right direction click on down download then go to the comfy UI folder models and look for the style models folder this is the first time I'm using a style model so we'll download it to this folder as you can see I've already downloaded the model we also need the clip Vision patch model which is not very large either click download go to the models folder then look for the clip Vision folder and save the model there if you had your workflow and comfy UI open you can use the refresh button
if you don't see the models in the list make sure the model has been downloaded completely now I'll open the workflow named flux Redux one image for this workflow I am using flux Dev Q8 just like in other episodes along with the Q8 T5 clip model then between the flux guidance and K ampler we have the apply style model node we did something similar when we created the control net workflow where we had the apply control net node this node requires a style model and a clip Vision model which we downloaded earlier we load the
clip Vision model with this node then it goes to the clip vision and code node and then to the apply style model it also uses the image we uploaded after that we have the flux Redux model which allows us to create a variation of the existing image let's run the workflow to see what it does it generated a new Cube similar to the existing image so it's not like control net where the composition stays the same instead it's more like an accurate interpretation of the image that can be generated again similar to a style transfer
like the IP adapter which only allows you to upload an image and get a random version of that the way I see it is that you upload an image and get a variation of that image without needing to write a prompt and you can use any aspect ratio unlike image to image which requires a similar image ratio as you can see I can write Red Box in the prompt but that will not make the Box red I'll just get another variation of the image um I saw on their site that they mentioned the style transfer
controls only available via the API where you can use the prompt so I'm not sure yet but we'll see in the coming weeks let me try with a different image I'll choose this red flower and I get this variation of the flower I can change the ratio of the latent image so I can choose a portrait ratio and I'll get a variation of the image in that ratio without distortions like you might get with image to image so we used an image and got a variation but we can actually combine two images let me show
you how I did that I saved this workflow as flux Redux 2 images so let me explain what's going on here we have the first image just like in the other workflow with the clip Vision that is encoded and it goes to the apply style model then I added a second image which goes to the second clip Vision node instead of adding another load clip Vision node I'm using the existing node since it's the same model all that goes to the second apply style model node this one is positioned between the first apply style node
and the K sampler so it's connected and you can add more nodes if you want so I have this landscape image that I want to combine with a dog image when I run the workflow I get a random combination of the two images let me move them around so you can see it better now what happens if change the image and add a desert landscape instead well I get another random combination of those images you don't have control over where they are placed and it's random but you can get some interesting results what happens if
I combine a portrait of a woman with the photo of the dog you get a little bit of both images so it's nice to explore different ideas that you probably wouldn't get if you only used prompts alone let me see what happens if I combine it with this wizard portrait I mentioned earlier that I saw on their site that restyling is available via the API so I'm not sure when we'll have local access to that if we ever do or maybe I didn't interpret the text correctly If someone knows feel free to let me know
here's the result it's actually not bad so it can be useful sometimes I just hope they make it so I can actually prompt how I want things to be like if I want a man with a dog it won't work right now or maybe I'm doing something wrong so this feature was just released so maybe I missed something feel free to correct me let's try one more workflow with three images for this one I have three apply style model nodes chained together and of course three different images the more images you have the more likely
you are to get something more abstract or strange I feel like a mad scientist doing experiments ha so the image isn't great but it has elements from each image in the result if I try a different seed I get something else the results are even more interesting when you combine different types of images like graphics with real photos let's see what happens if I combine a man a woman and a landscape okay I got this new strange person that looks like me and says what have you done let's take it to another level of Madness
and add another person into the mix and we got this not sure if you can even prompt to get something like this without using these combinations maybe with a condition average node or something so you get the idea of what it can do now it's time to move to the next model on this page we have the flux Cy model model we agree to the terms again and then if we go to files and versions We have this model which is again quite large if it's too big for you there's also a smaller Laura version
available which I'll show in a few minutes download the model then go to the comfy UI folder models and look for the diffusion models folder this is where you can place the canny model we do the same for the depth model agree to the terms for that one as well it's the same size so I hope you have enough space and a good internet connection place it in the same diffusion models folder now let's open a workflow to see what it can do let's start with the depth model it's somewhat similar to the workflow with
control net we load the depth model using the load diffusion model note you can try different weight dtype settings to see if they make it faster then just like in the flux fill workflow we have the clip L and T5 clip models The Prompt and then we load the image that we use as a guide this depth model only recognizes depth map images so to generate a depth map I'm using the pre-processor node where I've loaded the depth anything pre-processor if you get an error on this make sure you've activated long path in Windows when
I run the workflow you can see that the image goes through the pre-processor and I get a depth map that depth map is then sent to instruct pix two pix conditioning the flux depth model is connected directly to the K sampler this one uses a high flux guidance so set it to 30 if you want to avoid artifacts everything then goes together to the K sampler where the magic happens also the size of the image that goes to the latent space is the size we set here for height so if I open this image you
can see it has 10 24 in height if you're using a very wide ratio image here and the resolution is set to 1024 you might end up with a 2,000 pixel wide image that goes to the K sampler which would be larger than the 2 megapixel size that flux supports in that case change the resolution to something smaller like 512 or 768 pixels and this is the final result the skin texture is a little strong so you might want to try different settings for steps Samplers and schedulers to get better results let's change the color
of the outfit to Black and maybe add some red eyes the result is this one it's a little bit overcooked but I can try decreasing the flux guidance however I have a feeling that might make it worse we usually use the 3.5 value but in this case it's not working so I'll keep it at 30 try different values and maybe you can find better settings and share them with me let me try a different image maybe that wizard had done some dark magic to influence the result for this woman I want just a portrait of
a woman with purple hair in the winter the result is quite interesting the snow on the face doesn't fit but let's say it's just magic it's a new model so we don't know much about it yet but it's a promising one let's move to the last Model flux cany I'll load this flux canany workflow the entire workflow is almost the same except that we need to select the flux cany model I've loaded a different image and for the pre-processor I need to select canny if you don't want to use this node comfy UI has its
own canny node for the pre-processor for the prompt I added that I want a cute cartoon 3D gnome the image was processed and we got a canny image that the flux canany model can understand just like in the other workflows everything is combined and we get this cute little cartoon gnome ready and colored for me the quality is quite nice I like it let me try a different image that's not a sketch like this 3D render of a robot I'll change the prompt to robot we got our cany map and this is the final result
so it's really useful and the workflow is quite simple for those who want to try a smaller model you can try the Laura version we have the flux canny Laura model here agree to the terms and as you can see it's 20 times smaller in size download the model go to the models folder and look for the Loris folder you can place it here or in my case I have a folder named flux for better organization I placed it in the flux folder click save let's do the same for the other Laura model the depth
Laura click agree and download it into the same Laura's folder I will load this workflow called flux canny Laura for this one I'm using the flux Dev Q8 model just like we did in other episodes with aura and I really like the power Laura loader check episode 17 to learn more about Laura I've loaded the flux canany Laura here and for the strength I've set it to 0.75 I like using Laura because it gives me control over how strongly the model influences the result in the full Dev canany model I haven't found a way to
control the strength yet then I have the prompt and for guidance you need a smaller value like 10 we have the sketch which is using the cany pre-processor and everything goes to the instruct pick to pick conditioning node Let's test it the result is quite nice it looks like a sticker so if you have good sketches this is quite useful let's try it with the wizard again using this canny Laura and keeping the same prompt for The Gnome I got this gnome image so all these models that were released can really help control your Generations
let's open the flux depth Laura workflow again it looks the same I just changed and added a different Laura here in the power Laura loader node for the pre-processor I selected depth anything pre-processor the result is this since I have control over intensity here the skin texture isn't as strong as in the full model if I reduce the strength even more it won't keep the same composition but it's somewhat similar the angle of the face is not the same but at least we can get some variety to get the workflows it's free just use this
link to join the pixaroma server this link is always updated click on it then go to the site and accept the invite we just reached 5,000 members so thank you to everyone who joined and helped grow the community in the pixaroma workflow Channel you can find all the workflows for all the episodes so you can download and test them for beginners we also have a frequently asked questions section for comfy UI where I posted some common errors and how to fix them of course you can chat about comfy UI in the comfy UI Channel if
you encounter errors please also post screenshots of your workflow and the command window along with what you tried to do when you got the error also if you have time you can check out my other two YouTube channels you can find the links here on alt flux I post Ambience videos and relaxing music which I usually play on a loop on my TV for the AI twplay Channel I post AI experiments with different tools along with tutorials like how to use clling Ai and others that's all for today thank you all for helping this YouTube
channel grow a special thanks to the Legends and VIPs as well as everyone who's active on Discord growing our community if you found something useful please leave a like and a comment thank you so much have a great day and I'll see you on Discord


![Shoot EPIC MOVIES with this FREE AI Tool! [ComfyUI Tutorial + Free Workflow]](https://img.youtube.com/vi/gHI6PjTkBF4/maxresdefault.jpg)